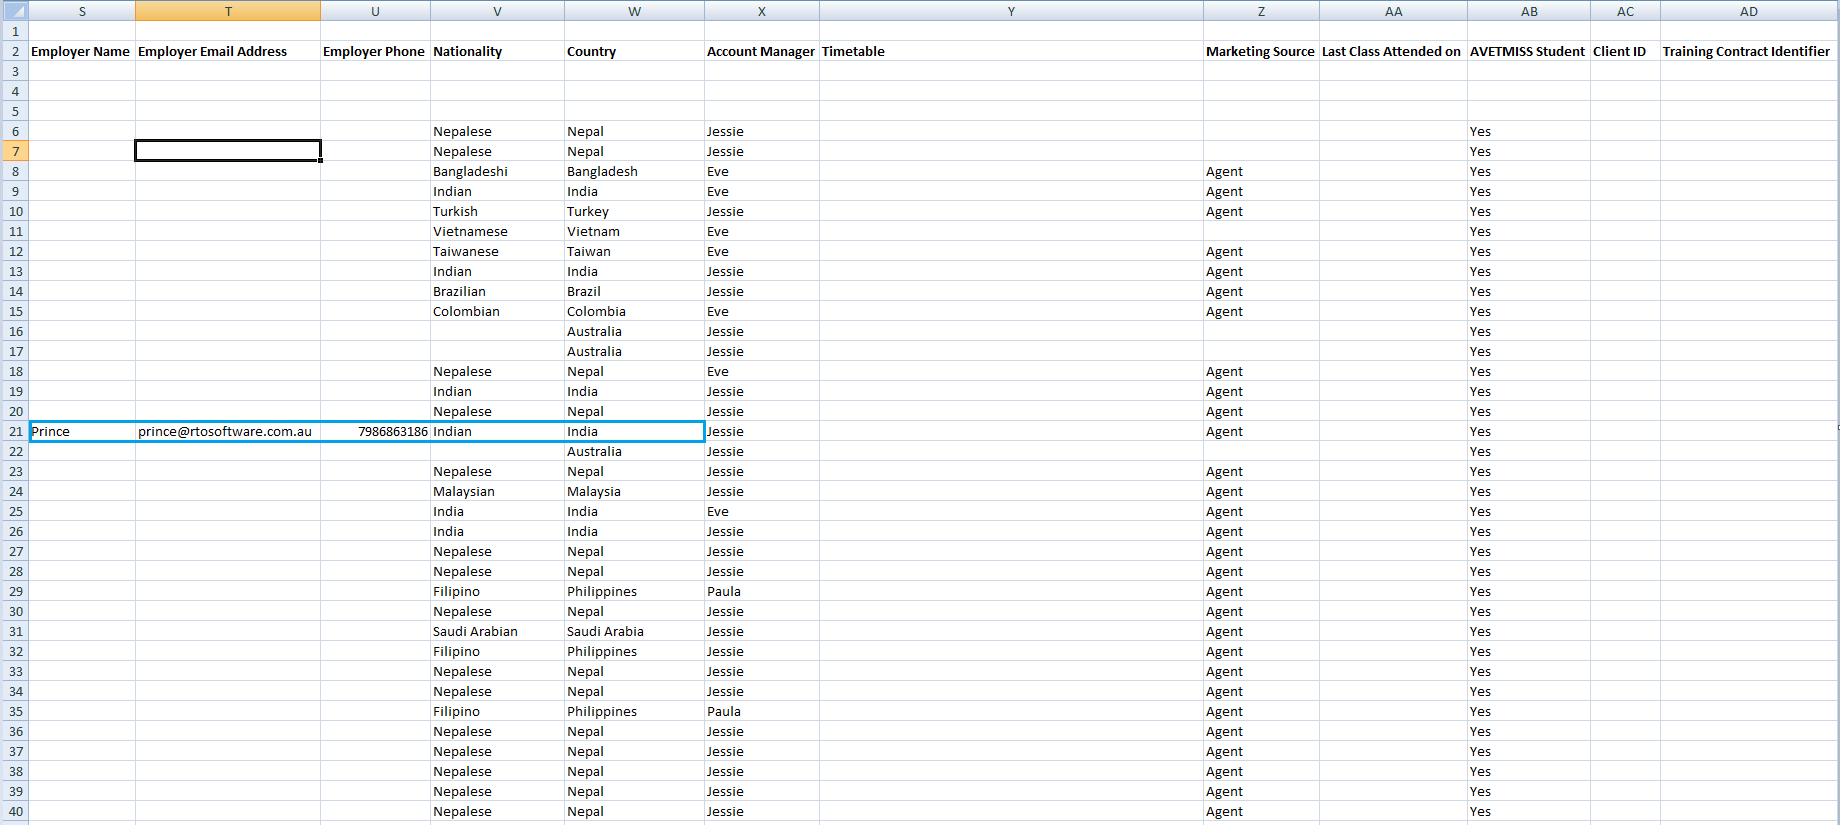
We have introduced a new change for the Employer Column in the Current Student Report. Earlier, the system used to fetch employer details from Student Level but now the system will fetch the employer details from the enrolment level.
We have introduced a new change for the Employer Column in the Current Student Report. Earlier, the system used to fetch employer details from Student Level but now the system will fetch the employer details from the enrolment level.
SMS clients are an integral part of the GSM (Global System for Mobile Communications) network technology. SMS uses standardised communications protocols to allow fixed lines to exchange short text messages. SMS messages can be used to transport almost any kind of data (within the character limit). One of the defining characteristics of SMS messages is the maximum length of 160 characters.
In TEAMS also, we have a limit of just 160 characters for an SMS. A user cannot send out a message which has more than 160 characters. However, we now have changed this. The character limit for a single message still remains 160 characters, but now a user will be able to type in more characters than 160 while sending SMS/s.
One message can contain just 160 characters, so the more characters, you start to type in, the more SMS count will be used. For instance, if for your RTO, the free SMS count per month is 100, and now you are going to send out a message to 2 students that have 170 characters. Your 4 SMS count will be used to send out that message to 2 students. So you will be left with a 96 SMS count for that month.
You can also buy the SMS packages that we have if you have consumed all of the free SMS quota. Kindly contact support to know more about our SMS packages.
Note: This hasn’t been introduced for SMS template screen where you can create templates for the messages. This will be done in the next few updates.
We have introduced a new change in the design of Current/upcoming enrolments and historical enrolments tiles on the student dashboard and also the system is displaying the enrolment’s start date in ascending order in both tiles.
Now you can see full Program name visible for the enrolments in both the tiles as shown below:

Applicant Dashboard > Applicant Profile Tile > Visa Information Icon

This screen will allow you to add/edit the visa details of an applicant at the application dashboard > Visa Information Screen
IMPORTANT – Once the application is converted to a student, you won’t be able to add/edit any details at the applicant level. However, you can make the changes from the Student level.
 on the Applicant Dashboard, it will take you to the edit visa details screen where you can select the
  button to add the visa details of an applicant.
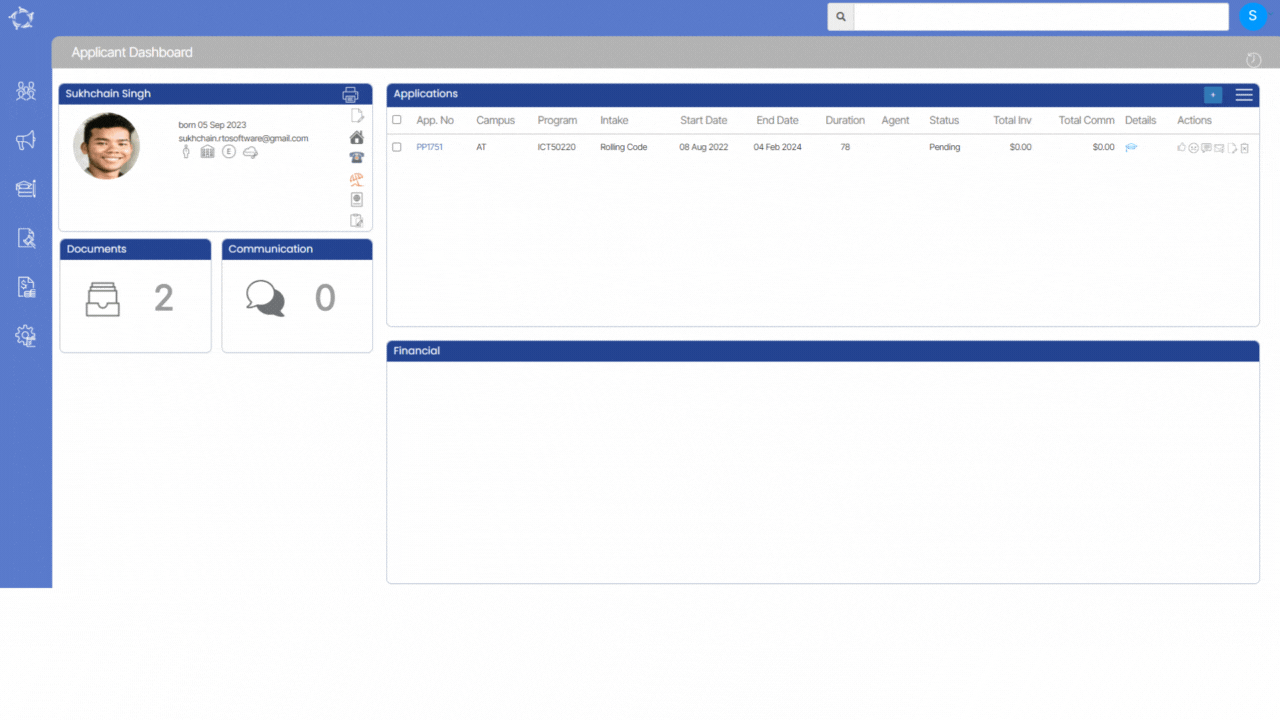
This tile will show you all the pending and converted applications along with the basic details of the applications.
Note: You will only see icons if the application is pending otherwise you don’t need to see icons.
| Icons | Explanation |
|---|---|
| This icon allows you to add a new application for the student from the student dashboard screen and once you click on this icon, the system will take you to the new application screen | |
 | This icon shows you a tooltip called Approve and once you click on this icon, the system will show you a pop message on the screen as (are you sure you want to approve this application?) Select Ok to continue or Cancel to leave as it is |
 | This icon shows a tooltip called Decline and once you click on this icon, the system will show you a pop message on the screen as (are you sure you want to approve this application?) Select Ok to continue or Cancel to leave as it is |
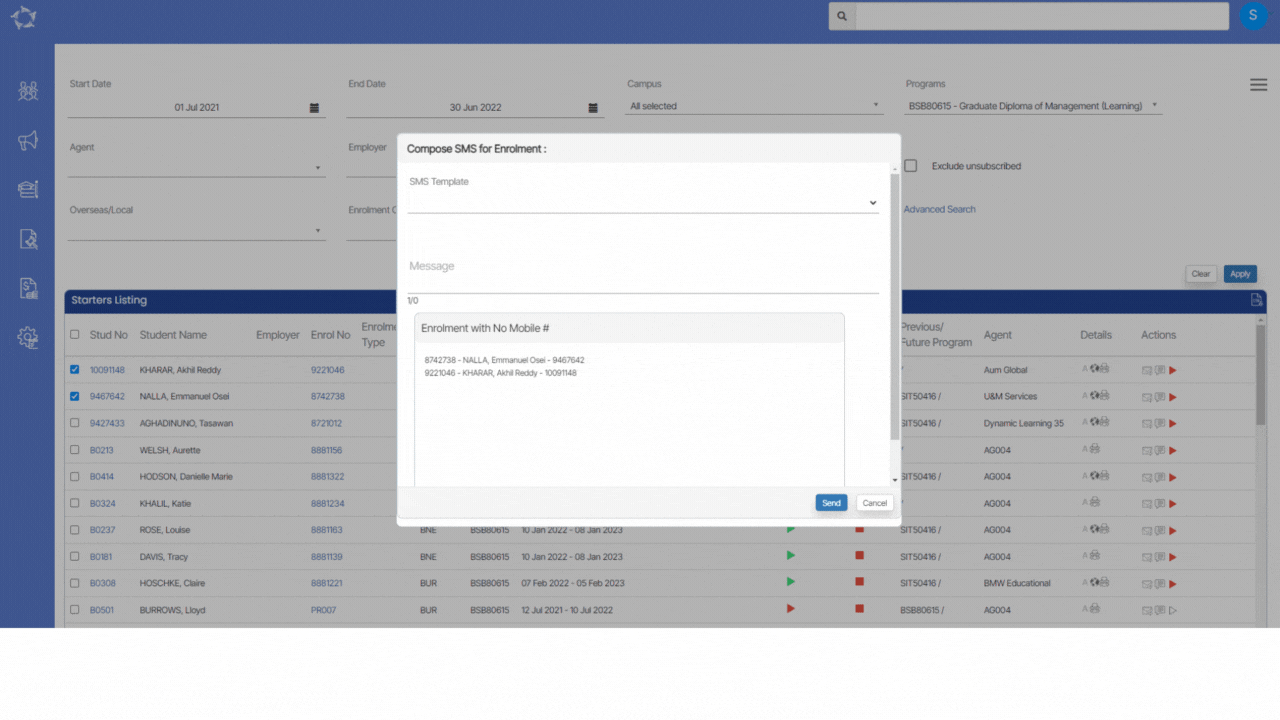
 | When you select this icon, the system will open a dialogue box called (compose SMS for application) from there you can send an SMS to the application |
 | When you select this icon, the system will take you to the compose email for the application from there you can send an email to the application |
This tile will give you an overview of the basic information of the student. You can upload the student profile picture here and edit the details of the student.
You will see some basic information about the student displayed in this tile. It will show the gender and the age of the student in the first line. In the second line, it is displaying the date of birth of the student. It will display the mobile number and primary email address of the student further.
For uploading or changing the student profile picture, you need to bring your cursor near the thumbnail  of the picture and the system will show two icons as shown below.
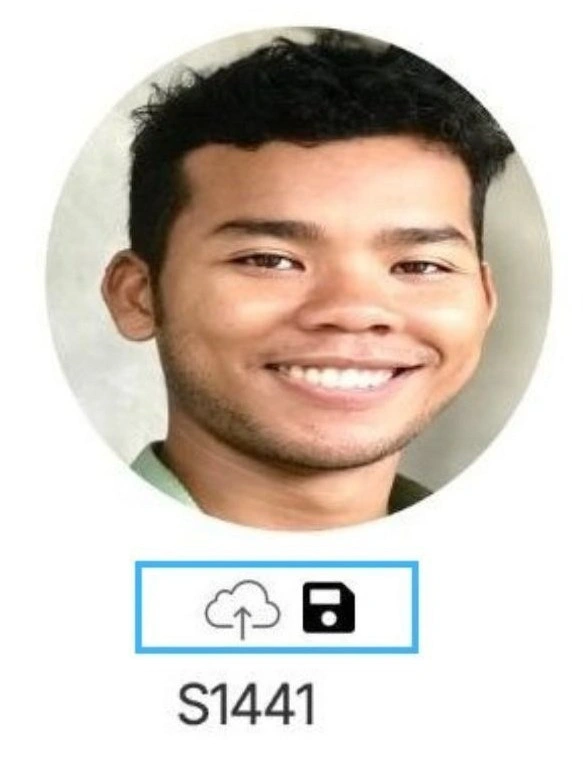
 | To upload the student profile picture by clicking the picture using the system upload, click on this icon. |
 | To save the student profile picture after uploading the picture from your computer, click on this icon. |
Printing letters in bulk from listing screens is a helpful feature that allows you to quickly generate and distribute various letters to students, such as warning letters, course progress letters, course completion letters, poor academic progress warning letters, and other types of letters. The process involves logging into the relevant dashboard, selecting the appropriate listing screen, filtering the data to include only the desired students, selecting those students, generating the letters, reviewing and editing them as necessary, and then printing them in bulk or downloading them as PDF files. This method saves time and is an efficient way to communicate important information to a large group of students.
You can individually generate the letters from the dashboards that we have such as:
Applicant Dashboard
Student Dashboard
Enrolment Dashboard
Agents
IMPORTANT – Before you print the letter, please make sure you have set up your custom templates in TEAMS, so they can appear in the dropdown list. Otherwise, you won’t see any dropdown options.
You can select the links to know more about (how to customise a report template in TEAMS and how to upload a Custom report template in TEAMS)
Note – Once you select the generate button, the system will direct you towards the Report Dashboard where you can see your report in queue or underprocessing. Give it a refresh to check if the report’s done, and then you can download the word and PDF versions.”
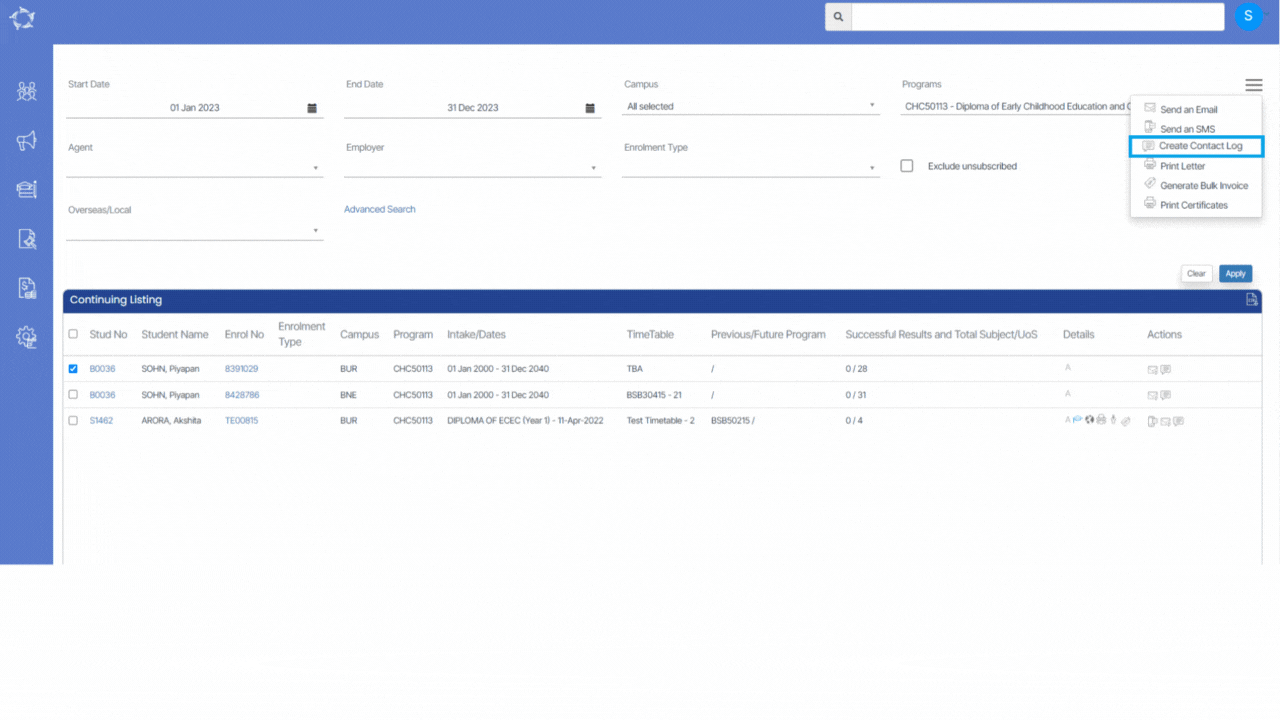
Contact logs are like notes for an RTO. TEAMS allows you to create contact logs for students, employers, and agents. You will see this option on all the listing screens and in the communication tile. You either can create a contact log in Bulk by using the listing screens or you can make it individually for a student or agent by using the communication tile on different dashboards that we have such applicant/student dashboard, application/enrolment dashboard, agent dashboard, etc. No matter what screen you choose to create the contact log/s, the steps to use this functionality are the same everywhere. This post will explain how you can use the “Create Contact Log” option.
TEAMS gives you the option to send out email/s to students, employers and agents. You will see this option on all the listing screens and in the communication tile. You can either send the emails in Bulk by using the listing screens or you can send individual emails by using the communication tile on different dashboards. No matter what screen you choose to send out the email/s, the steps to use that screen are the same everywhere.
Main Dashboard > Compliance
The Compliance section in the main menu offers a range of icons that provide access to various screens and reports related to monitoring data in compliance with government requirements. These icons enable you to generate NAT files for AVETMISS submission and perform other necessary compliance-related tasks.
By selecting the appropriate icon, you can quickly navigate to the desired screen or report and efficiently manage your compliance obligations. Whether it’s tracking student progress, monitoring attendance, or ensuring compliance with regulatory requirements, the Compliance section provides a one-stop-shop for managing all compliance-related activities.


