Attendance Listing Screen

Enrolment Dashboard > Classes and Attendance Tile > Attendance Icon

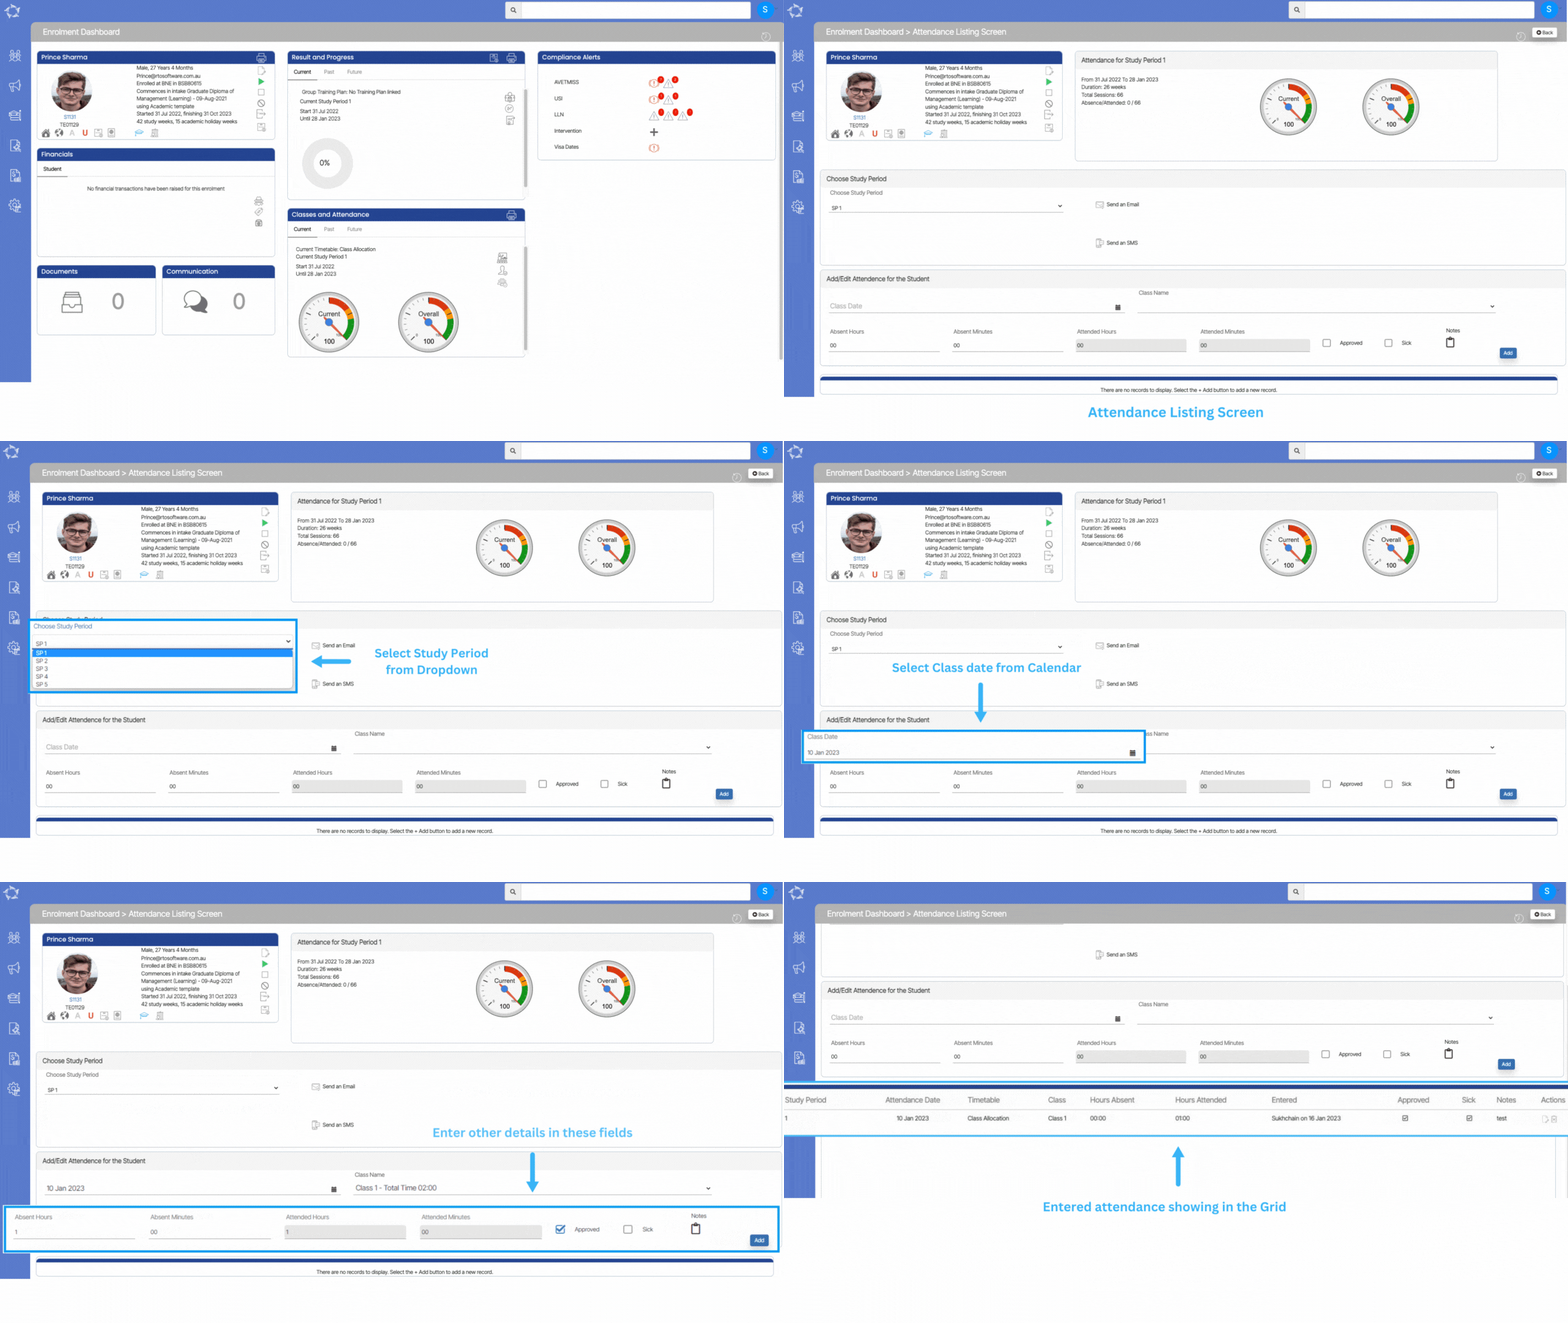
This screen will allow you to mark the attendance for enrolment. You can also send an email and SMS to the student’s enrolment and also view the list of marked attendance.

The screen will show you different tiles as explained below:
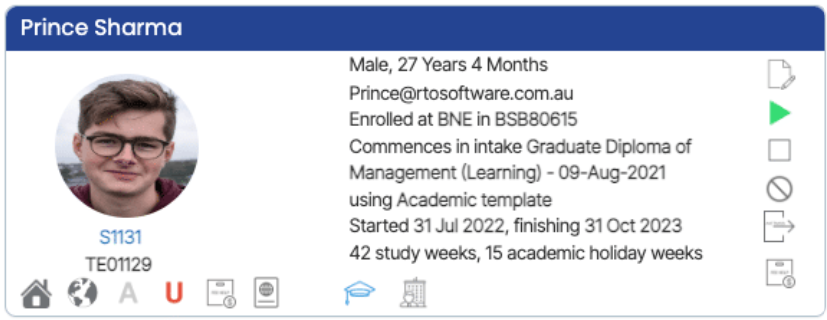
This tile will show you the basic details of the enrolment and all the icons in this tile are read-only. Please note – This screen will not allow you to make any changes in the profile tile

This tile will show you the current study period of enrolment with start and end dates, duration in weeks, total sessions, and marked attendance. It will also show you the current and overall attendance percentage.

This tile will show you a drop-down where by default the current study period will be selected and if you mark the attendance for the past classes then you can choose the study period as per your requirements. Also, you can send an email and SMS to the student from this tile. You need to select the study period to mark the attendance for the student.

This tile will allow you to mark the attendance for enrolment with the selected class date and class name as shown below.
FieldsExplanations
Class DateSelect the class date from the calendar icon
Class NameWhen you select the class date then the system will show you all the Classes that are linked to the enrolment within that date range.
Absent HoursThese are the absent hours that are attended by the student.
Absent MinutesThese are the absent minutes that are attended by the student.
Attended HoursWhen the absent hours or absent is selected, the system will calculate the total attended hours and will show it as a read-only field.
Attended MinutesWhen the absent hours or absent is selected, the system will calculate the total attended minutes and will show it as a read-only field.
ApprovedIf the student’s sick leave is approved then select the approved tick box.
SickThis tick box is selected, when the student has applied for sick leave.
NotesYou can also add notes.

Program – Documents

Program Entry Burger Menu > Documents

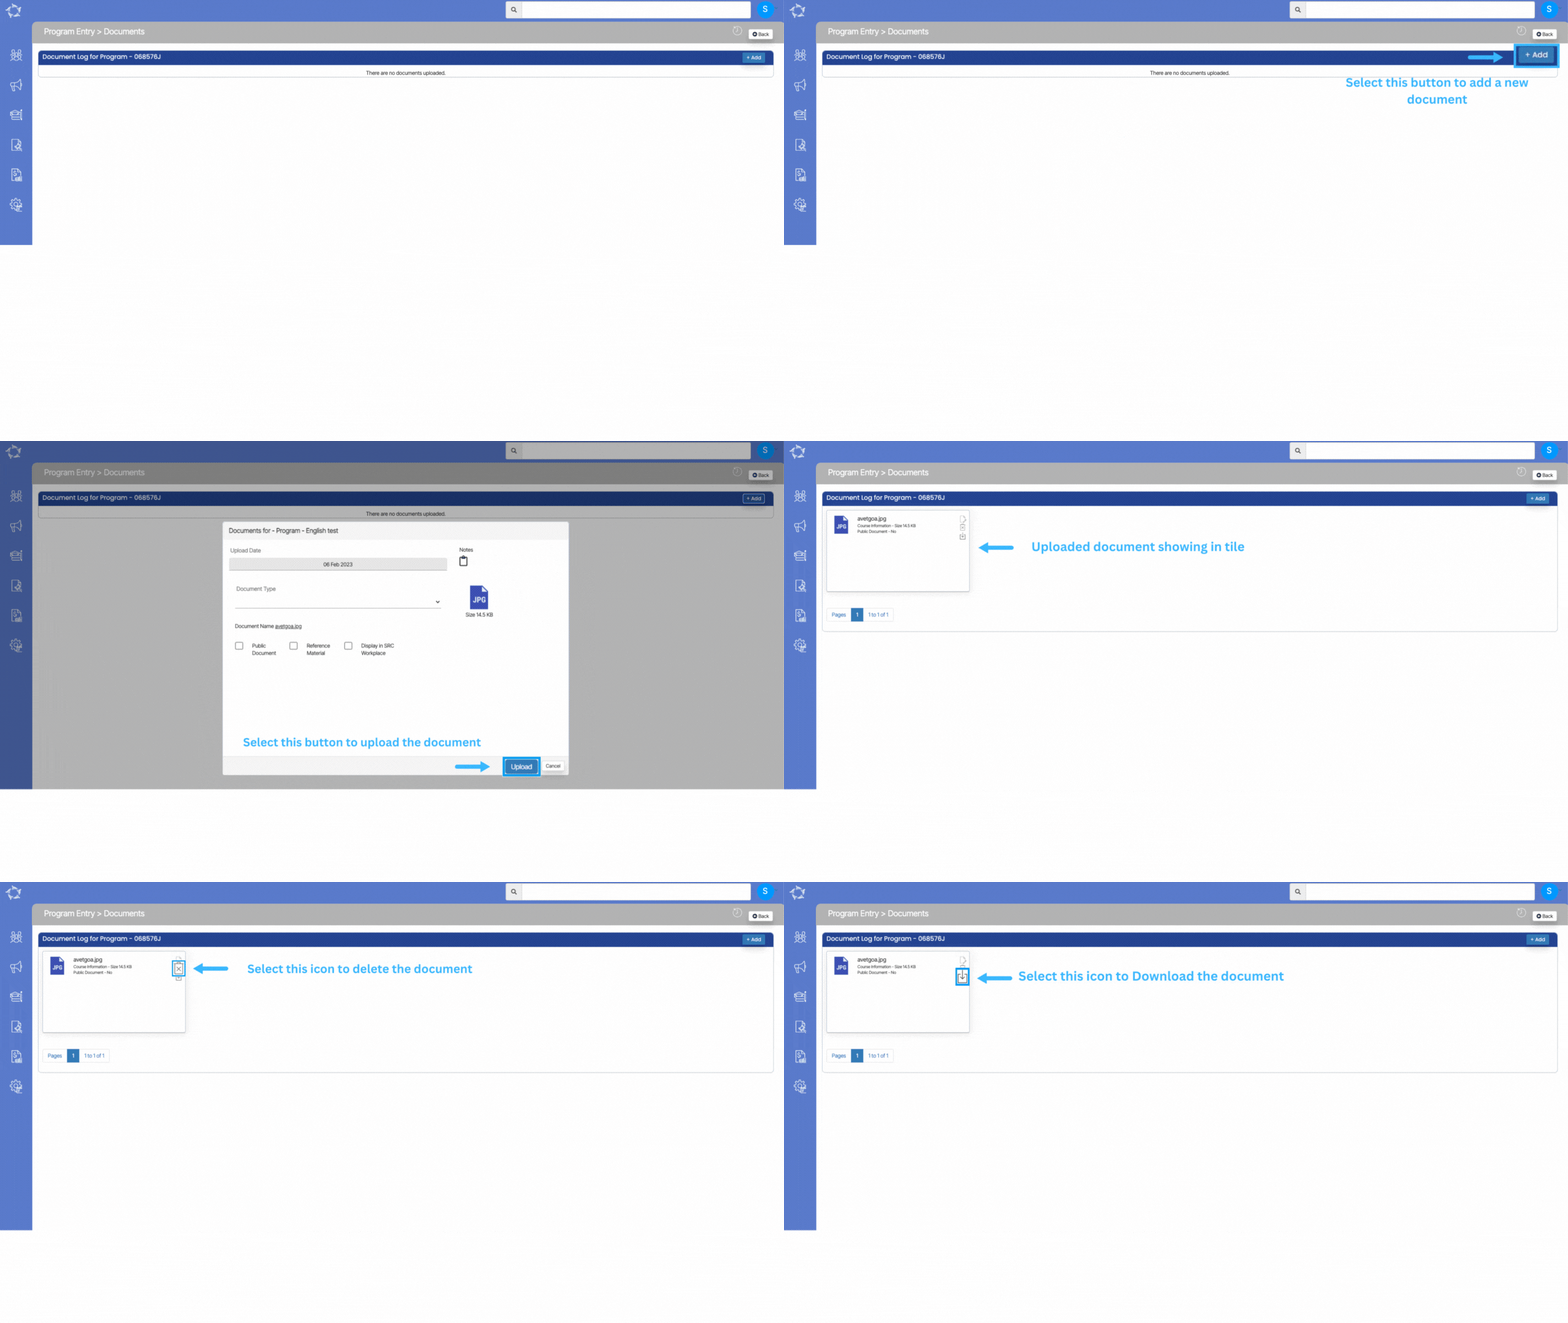
When you select the Documents option, you will be taken to the Program Entry > Documents screen. If you have already uploaded documents for the program, it will show you in the grid.

You can also +Add documents by selecting the Add button in the right hand corner of the screen.

Explanation of the fields below:

FieldsExplantations
Upload DateThis will show the date, the day you upload the document
NotesYou can write notes for your own reference by selecting the notes icon.
Document TypeThis is a user code in TEAMS and based on the user, you ca
Document NameIt will show the name of the document which you have selected.
Public DocumentSelect this box if you want to make the document public on the student portal.
Reference MaterialSelect this box if the document is for reference. Also, add the reference title.
Display in SRC WorkplaceTick this box if you want to display the document in SRC Workplace.

Program – Intakes

Program > Program Entry Burger Menu > Intakes

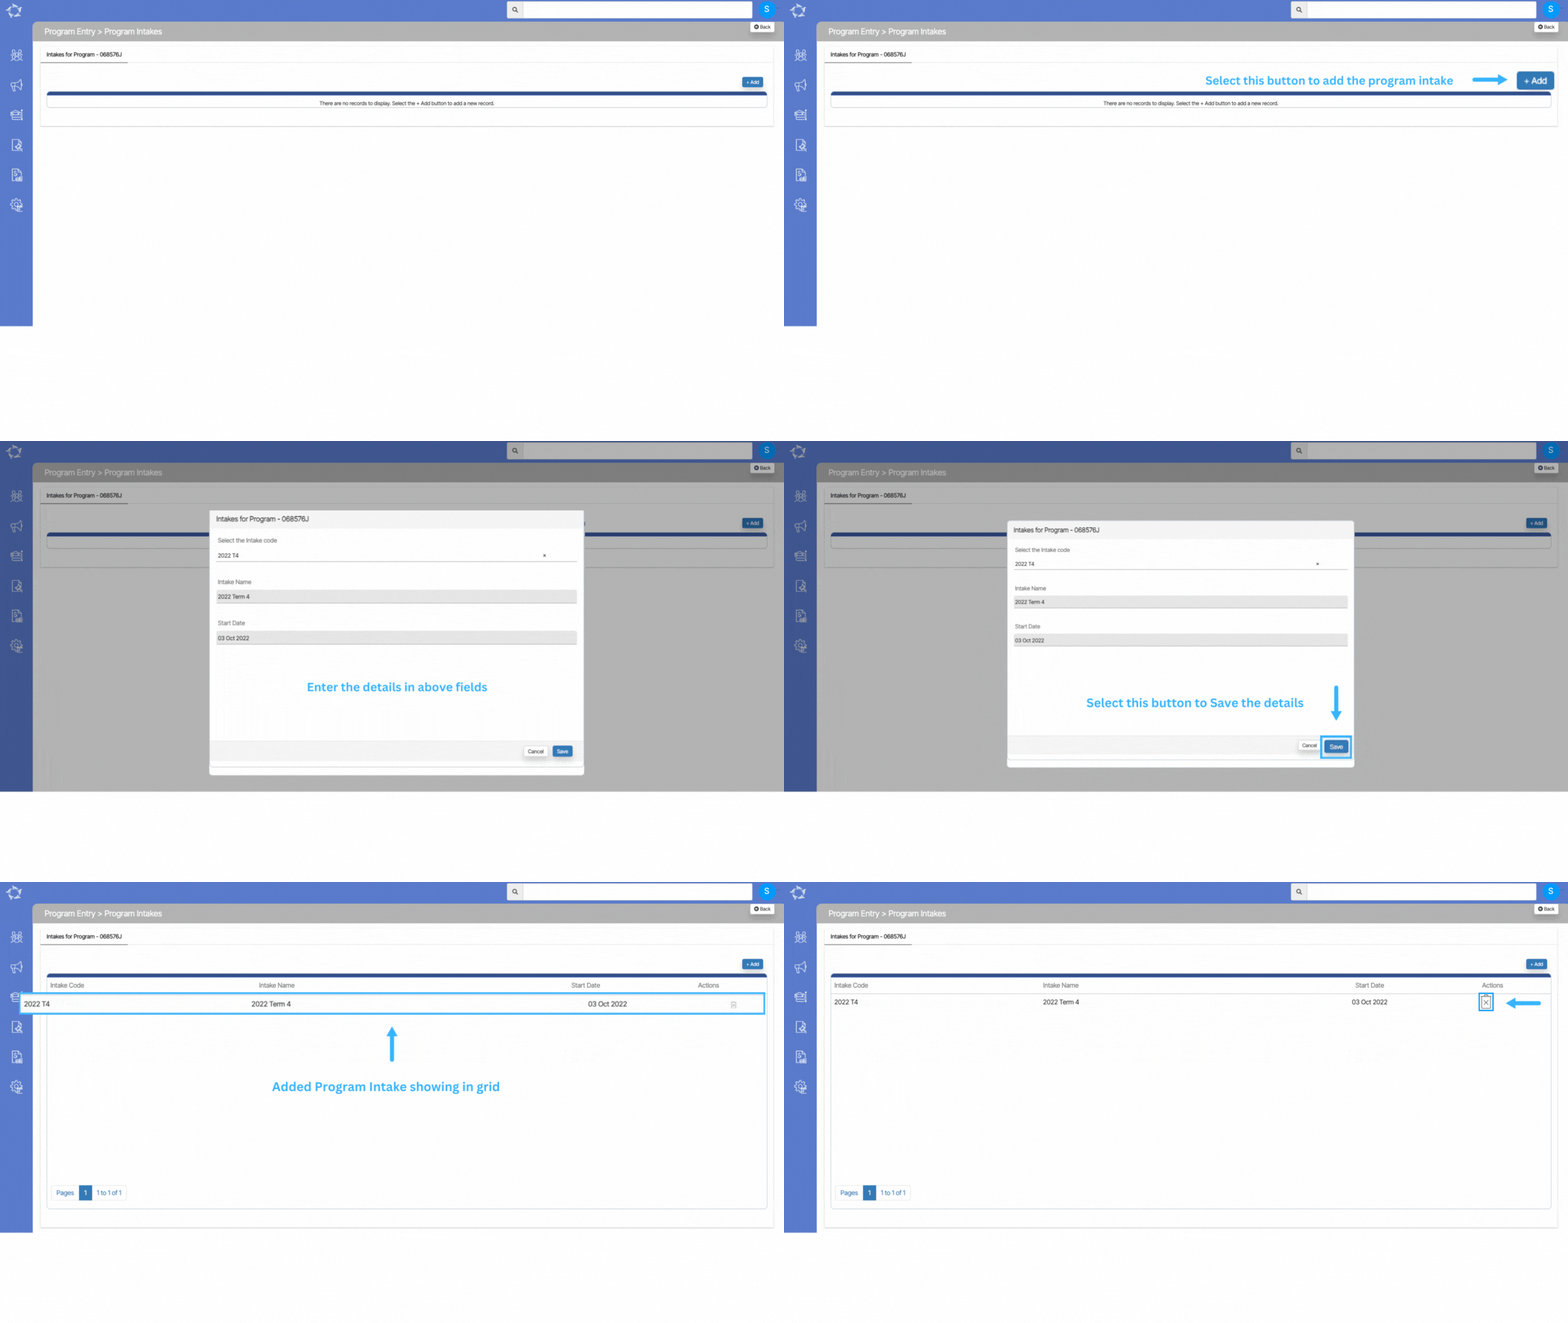
This screen will show you all the intakes that are linked to the program. You can add intake by selecting the +Add button. When you select the “+Add” button, a popup window will appear on the screen where you need to select the Intake code (Intake name and Start date will automatically appear) and then save.

Explanations of the field below:

  • Select the Intake code – It is a magic search field, where you can type the intake code and then you can select the intake from the suggestions.
  • Intake Name – It is a read-only field, which will be auto-populated when you select the intake code.
  • Start Date – It is a read-only field, which will be auto-populated when you select the intake code.

Program – Burger Menu

Programs > Edit Programs > Program Entry > Burger Menu

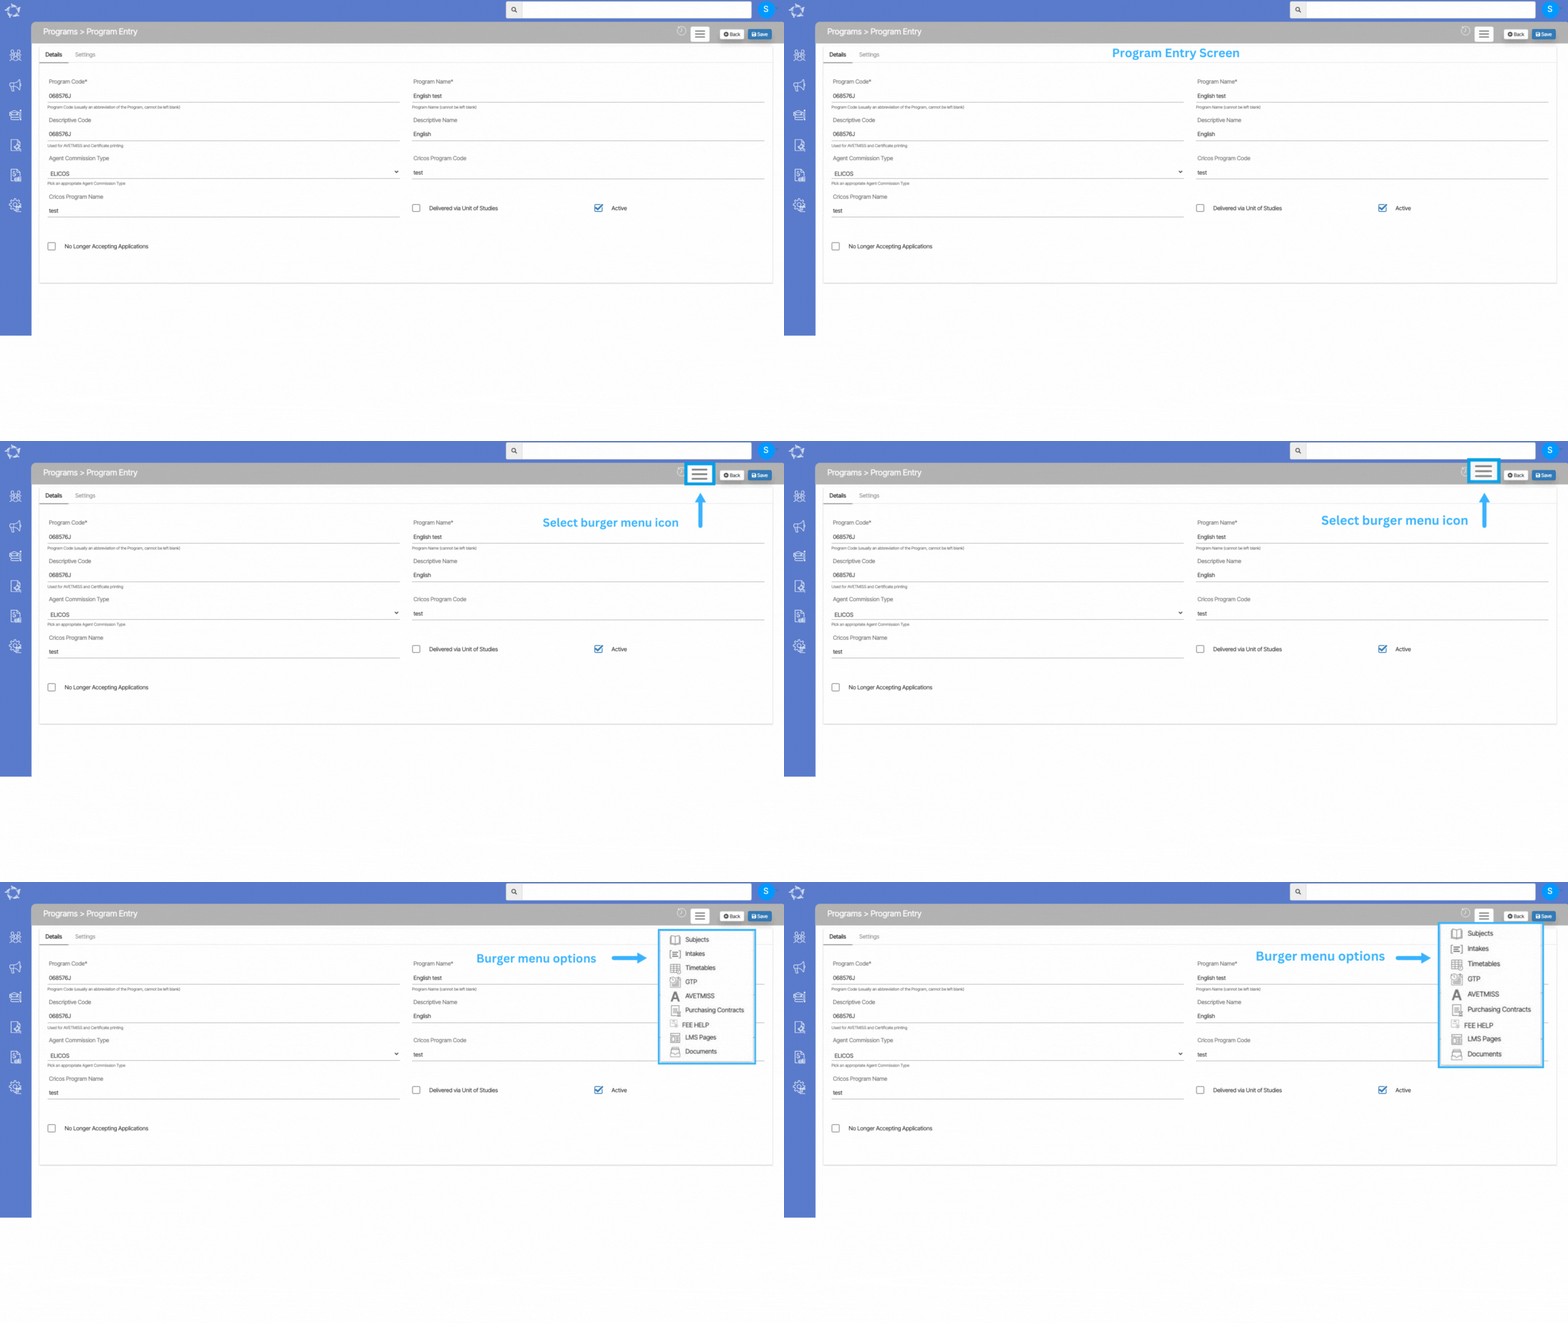
the presence of a burger menu icon in the right-hand corner of the screen while editing a program may vary depending on the specific program or functionality you are referring to. The burger menu icon is typically represented by three horizontal lines stacked on top of each other.

When you select the burger menu, you can see different options under the burger menu as shown below:

  • Program Burger Menu > GTP
  • Program Burger Menu > LMS Pages


Programs

Main Dashboard > Academics menu > Programs

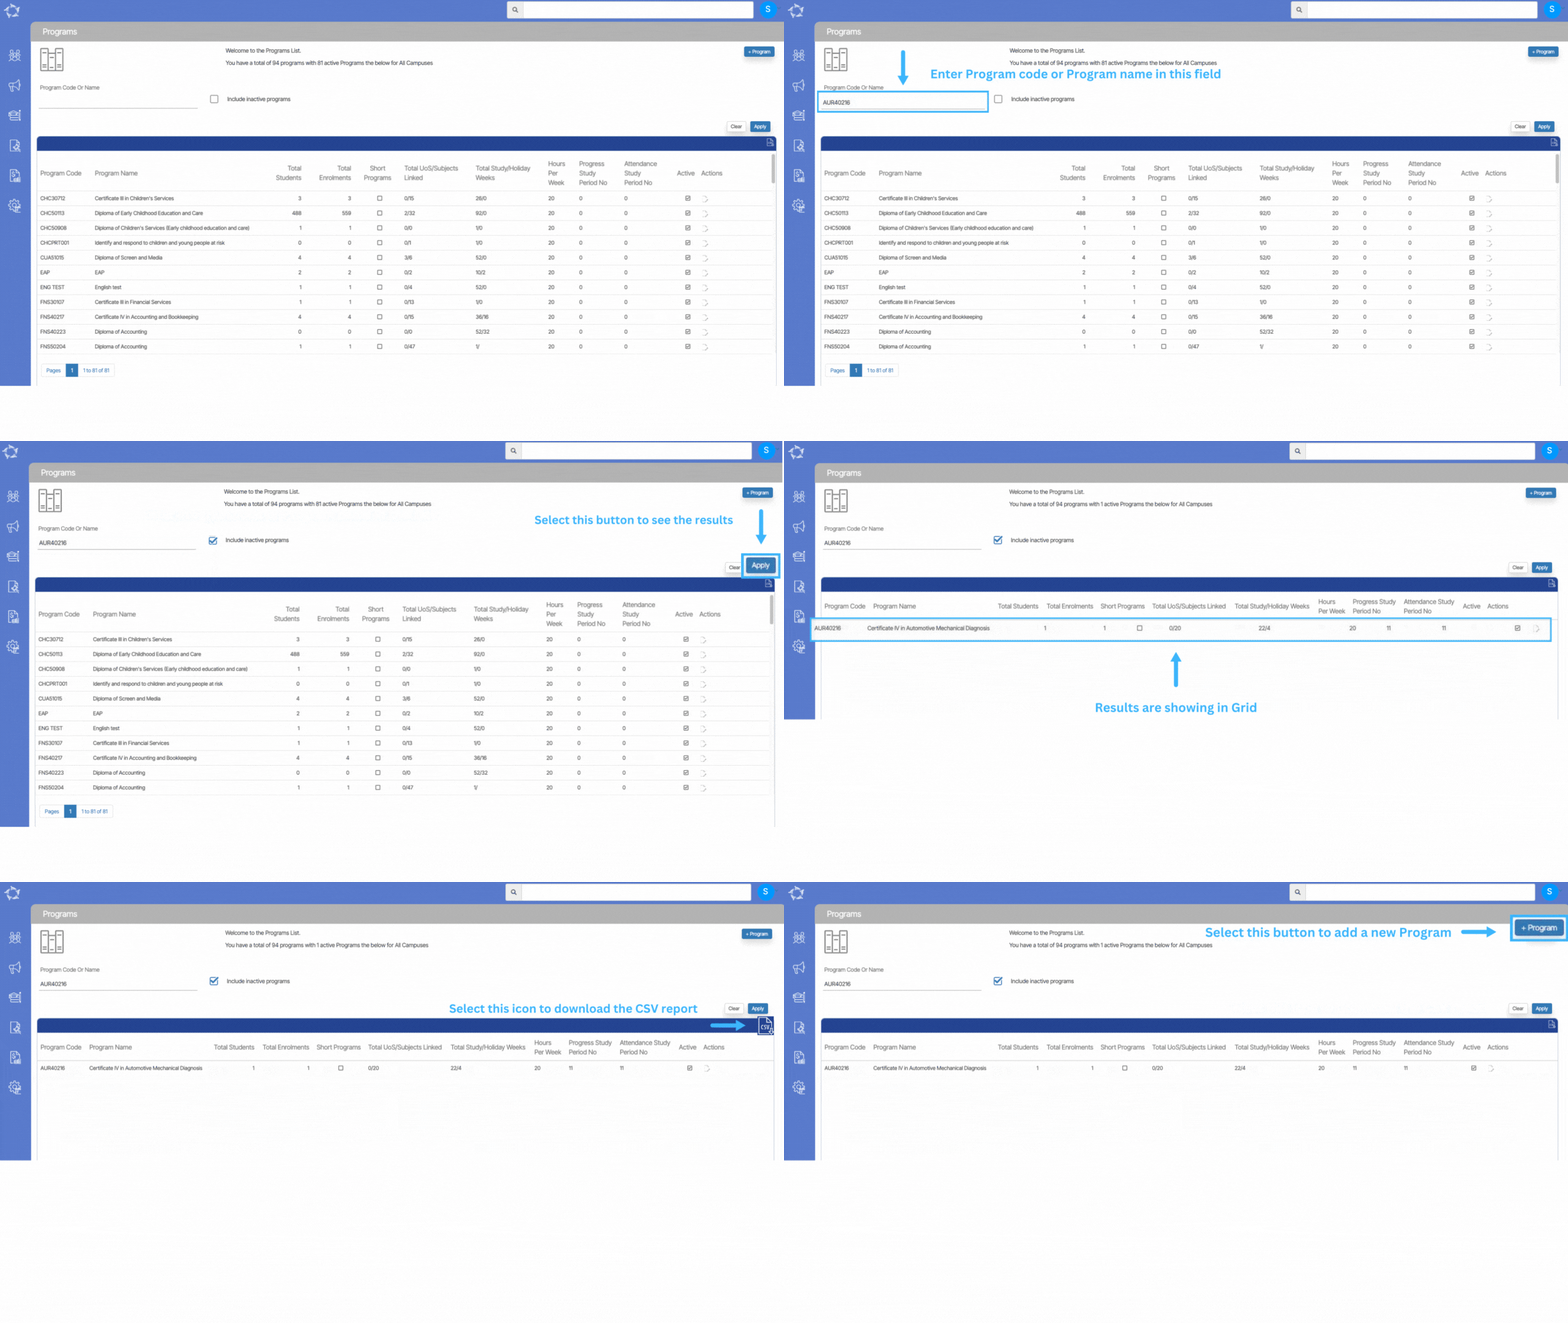
The Program welcome screen will show you a list of active programs for all the campuses in the grid that is already in your database. You can search for Programs by the Program Name and Code in the search field and you will also see an inactive tick box which will allow you to see inactive programs. Or you can select the +Program button to add a new program in the system.

You can also download the CSV file from the CSV icon in the right hand corner of the grid.

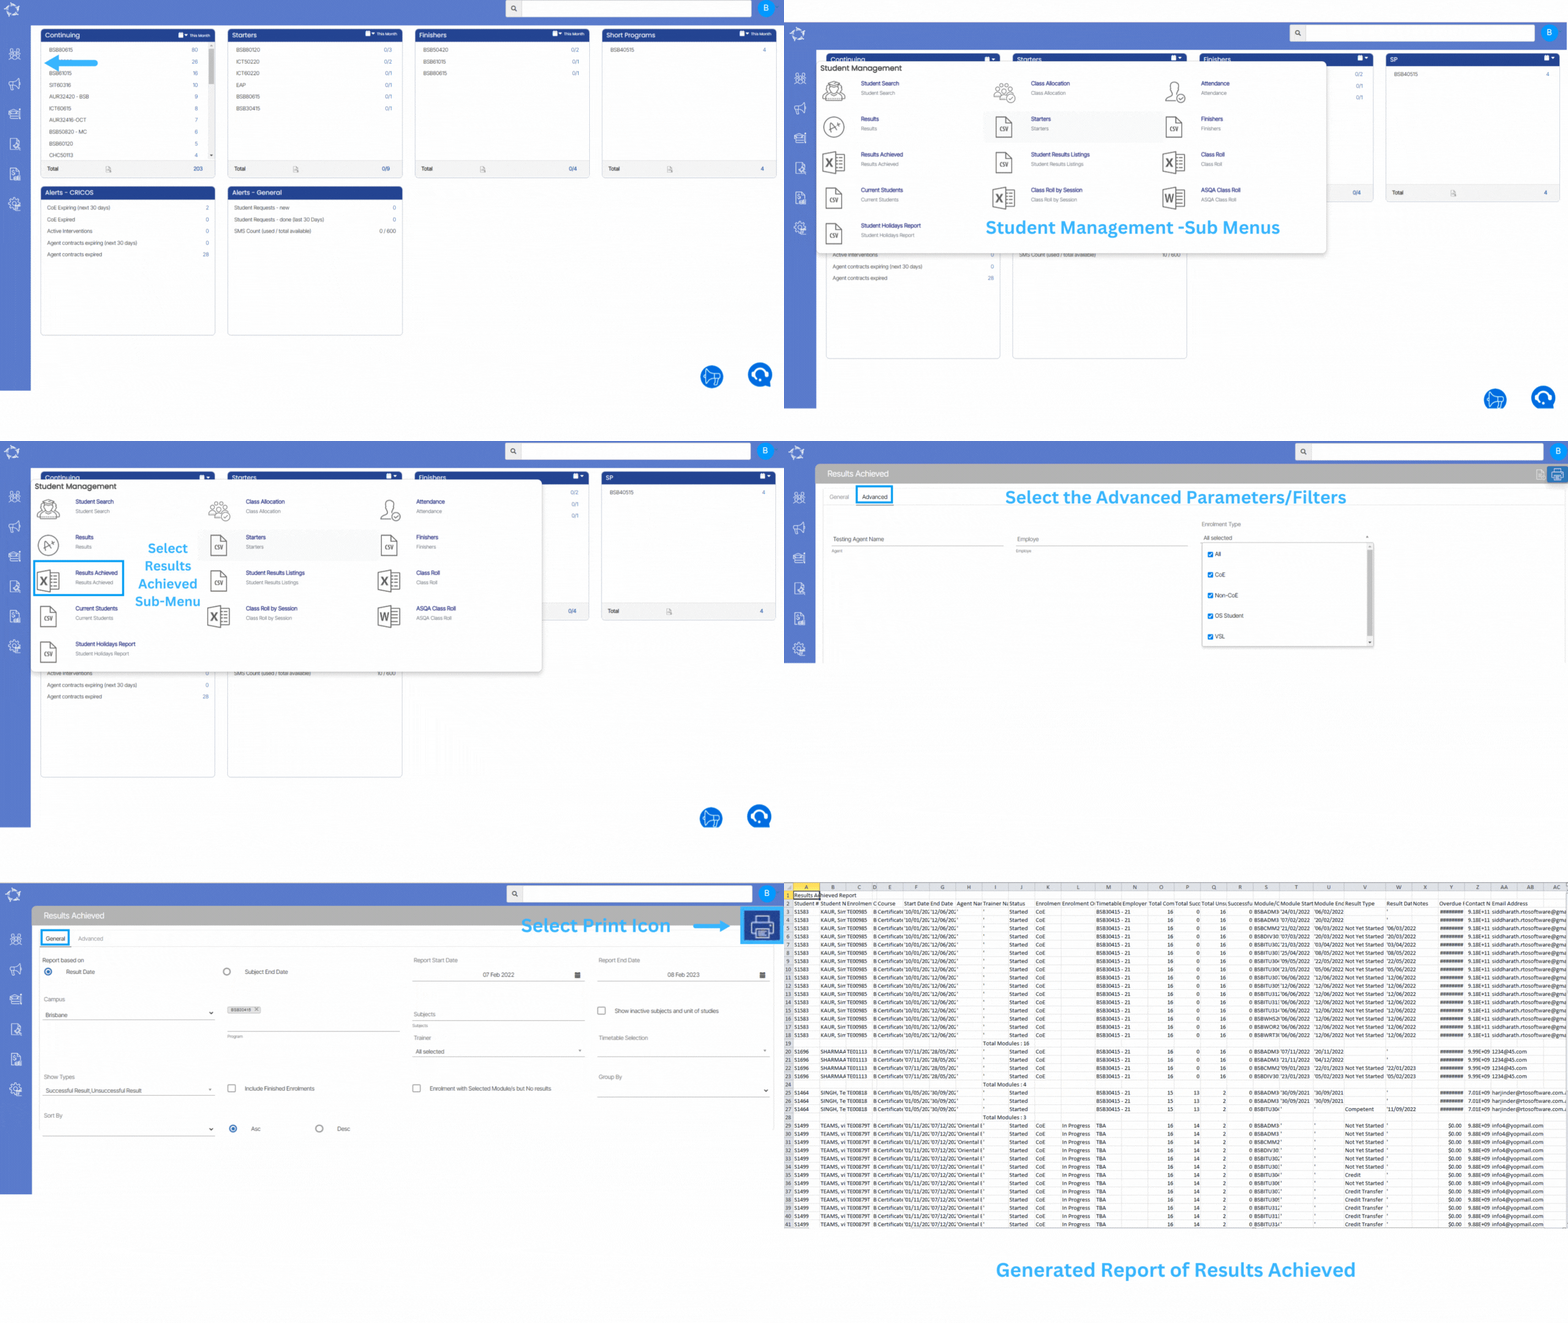
Results Achieved Report Data Columns

The below table will show you the explanation of the data columns that will get printed in the report.

ColumnsExplanations
Student#Student Numbers
Student NameStudent Names
CampusCampus Name
Enrolment CourseProgram Name
Start DateStart date of the enrolment
End DateEnd date of the enrolment
Agent NameAgent Name linked to an enrolment
Trainer NameTrainer Name linked to an enrolment
StatusIt will show you enrolment status as Started, Not yet Started etc
Enrolment TypeEnrolment type whether it is CoE, Non CoE
Enrolment OutcomeEnrolment outcome selected on the Edit enrolment details screen
Timetable NameTimetable name linked to an enrolment
Employer NameEmployer name linked to an enrolment
Total competency CountTotal subjects/competencies count linked to an enrolment
Total Successful resultsTotal number of successful results
Total Unsuccessful ResultsTotal number of unsuccessful results
Successful resultsTotal number of successful results
Module Competency CodeTotal Module/Subjects Code
Module Start DateSubjects/Module Start date
Module End DateSubjects/Module End date
Result TypeResult type such Competent, NYS, CT etc
Result DateResult date of the subjects
NotesResults notes
Overdue FeesEnrolment overdue fees
Contact NumberStudents’ contact number
E-Mail AddressStudent’s email address

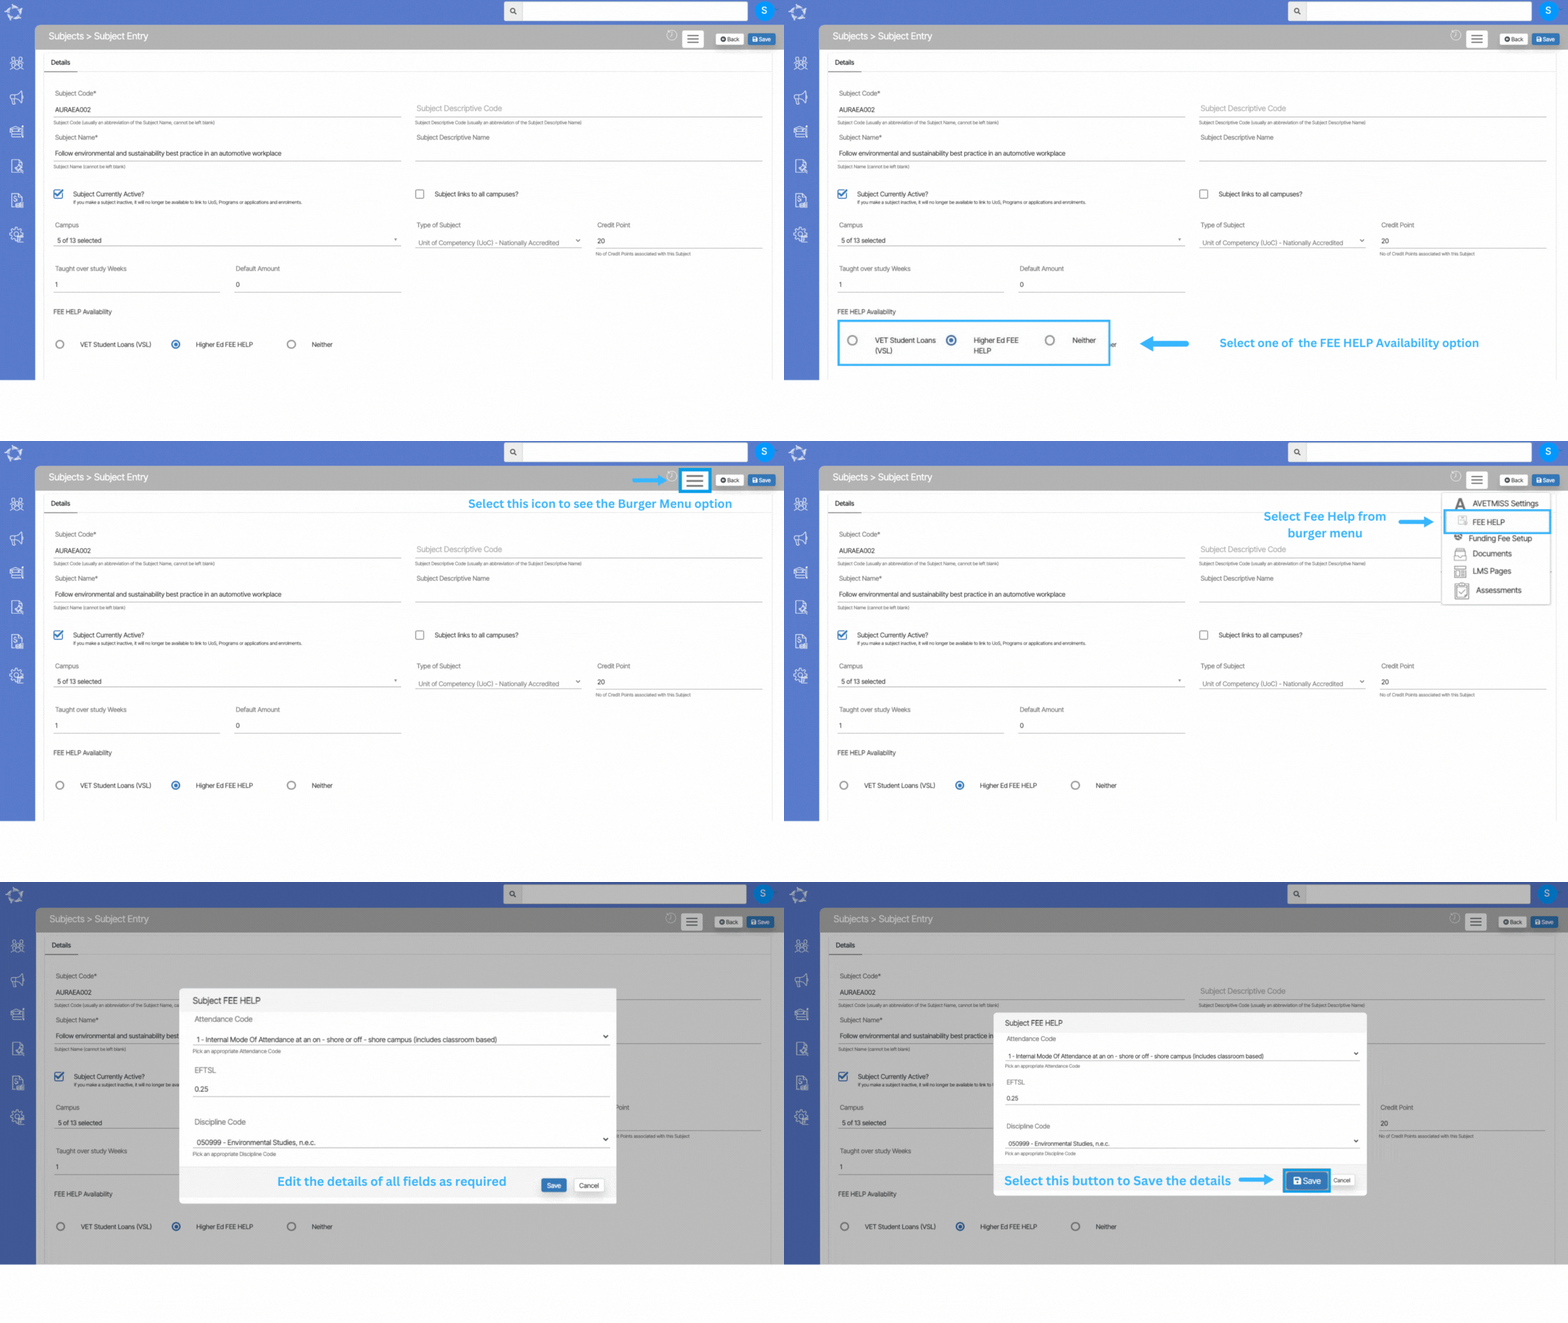
Subject – Fee Help

Subjects > Subjects Entry Burger Menu > Fee Help

In the Subjects Details tab, there will be a field for FEE HELP Availability and there are radio buttons for:

  • VET Student loan (VSL)
  • Higher Ed FEE HELP
  • Neither

IMPORTANT: A subject can only be one of the FEE HELP options it cannot be both. By default, the option of neither will be selected, select the option that you want and then SAVE the change.

When you select the FEE-HELP option from the burger menu, the Subject FEE-HELP popup screen will open, where you can add FEE-HELP details for a subject.

Explanation of the fields below:

FieldsExplanation
Attendance CodeSelect the Attendance Code from the dropdown.
EFTSLEnter the EFTSL in this field.
Discipline CodeSelect the Discipline Code from the dropdown.

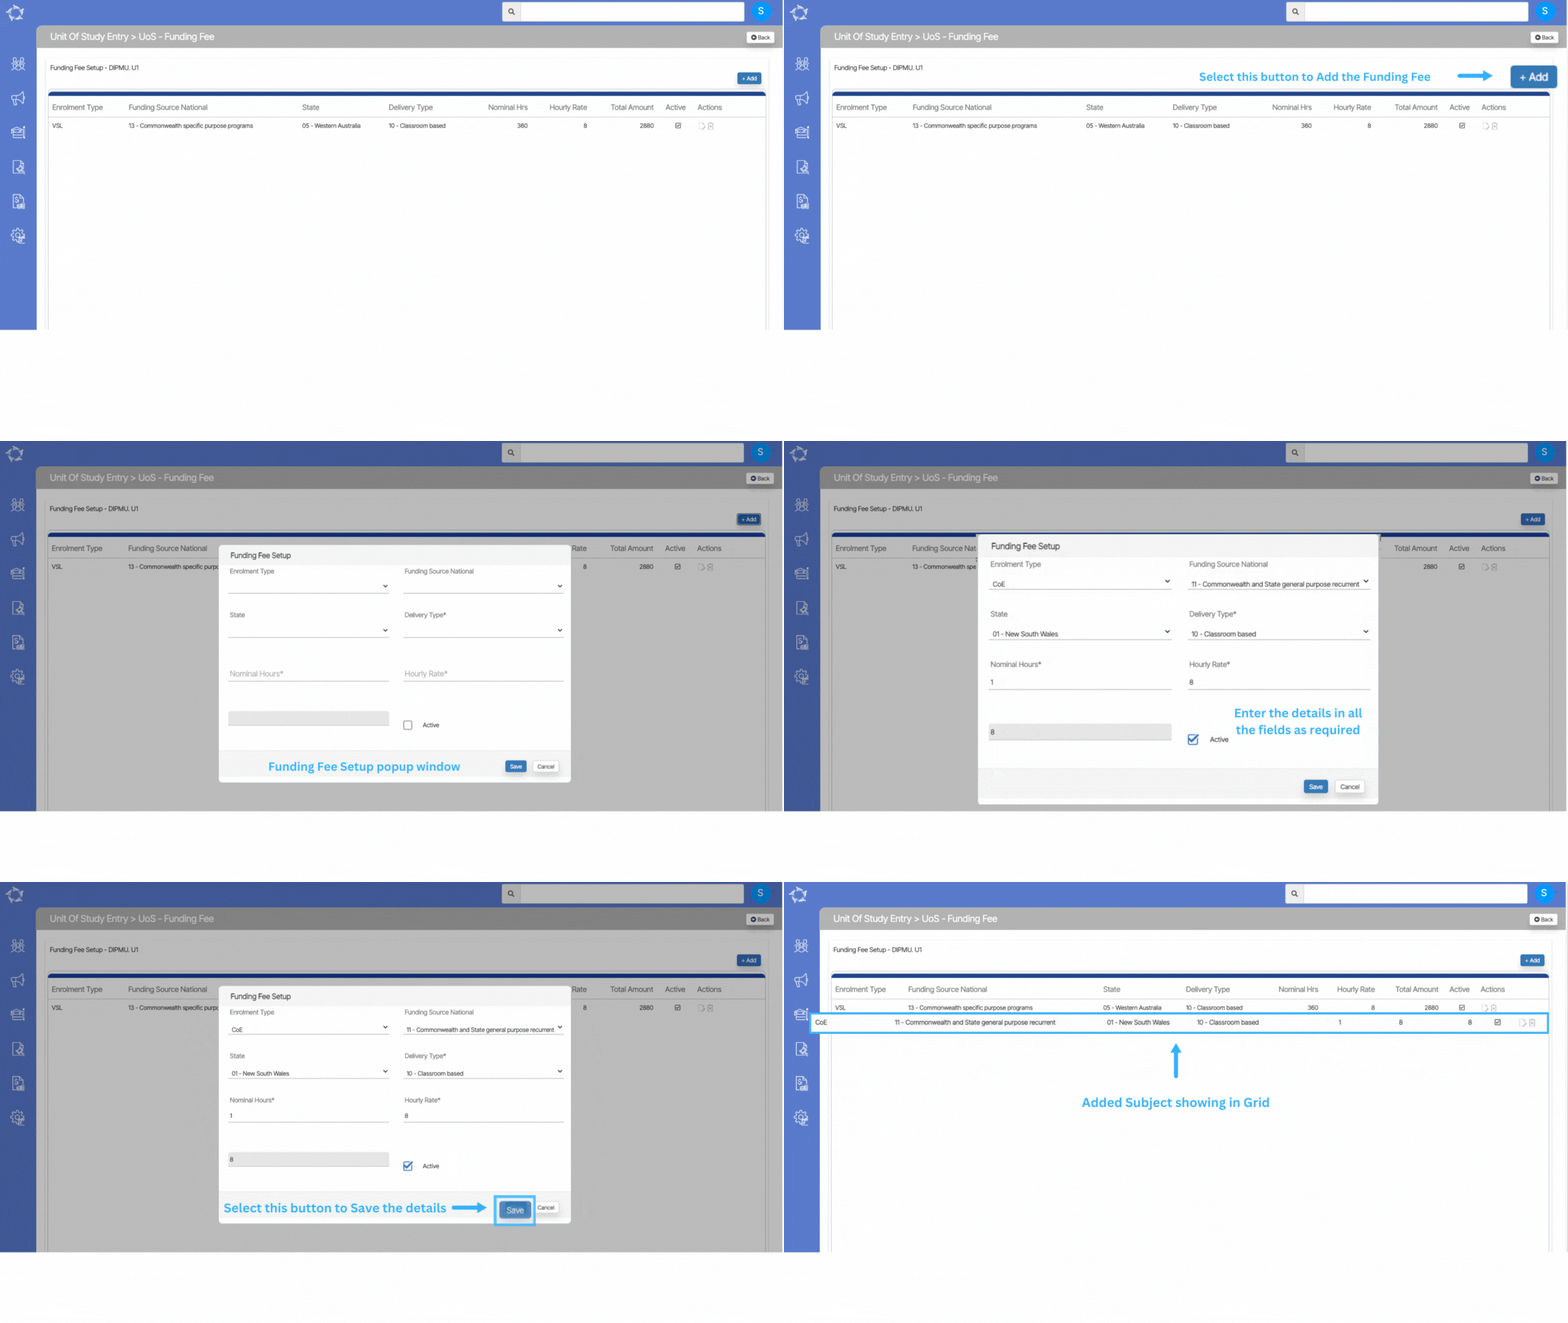
Unit of Study – Funding Fee

Main Dashboard > Academics > Unit of Studies > Unit of Studies Burger Menu > Funding Fee

When you select the Funding Fee option, a UoS Funding Fee screen will open, where you can add Funding Fee Setup details by selecting the +Add button.

When you select the +Add button, a funding fee setup popup window will open as shown below:

Explanation of the fields below:

FieldsExplanation
Enrolment TypeFrom the dropdown menu, you can select the type of enrolment.
Funding Source NationalFrom the dropdown menu, you can select the funding source national type.
StateHere you can select the state from the dropdown.
Delivery TypeHere you can select the delivery type of the subject from the dropdown.
Nominal HoursHere you can add the nominal hours.
Hourly RateHere you can add the hourly rate of the fee, the total amount of the subject will be populated as it is a multiply of nominal hours with an hourly rate.
ActiveTick this box to make the funding fee setup active.