Print Letter

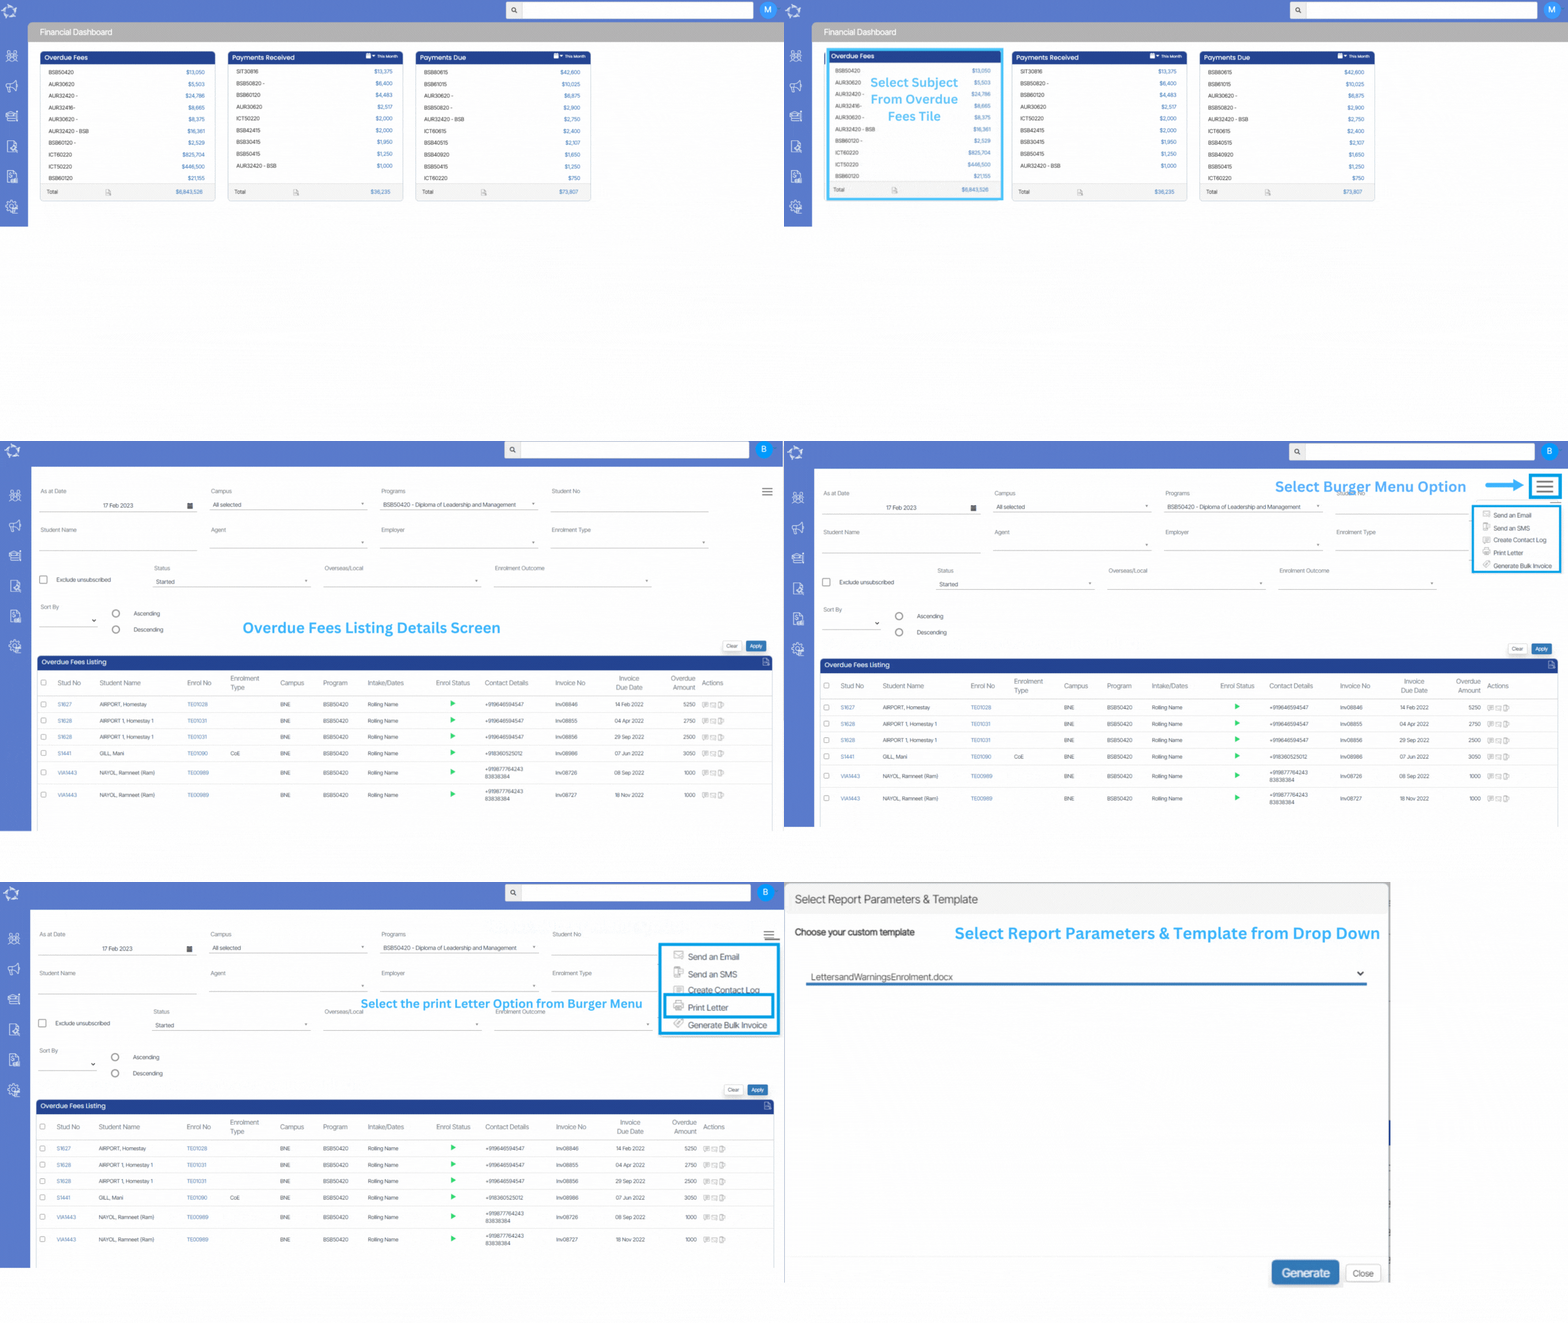
Printing letters in bulk from listing screens is a helpful feature that allows you to quickly generate and distribute various letters to students, such as warning letters, course progress letters, course completion letters, poor academic progress warning letters, and other types of letters. The process involves logging into the relevant dashboard, selecting the appropriate listing screen, filtering the data to include only the desired students, selecting those students, generating the letters, reviewing and editing them as necessary, and then printing them in bulk or downloading them as PDF files. This method saves time and is an efficient way to communicate important information to a large group of students.

You can individually generate the letters from the dashboards that we have such as:

Applicant Dashboard
Student Dashboard
Enrolment Dashboard
Agents

IMPORTANT – Before you print the letter, please make sure you have set up your custom templates in TEAMS, so they can appear in the dropdown list. Otherwise, you won’t see any dropdown options.
You can select the links to know more about (how to customise a report template in TEAMS and how to upload a Custom report template in TEAMS)

To print letters in bulk, you can follow these steps:

  • Select the checkboxes against the student number. (You can select more than one student)
  • Select the Burger Menu on the right hand side corner of the screen.
  • In the burger menu, select the Print letter option which will open a pop window on the screen.
  • Select the template from the dropdown that you have customised for print letters and hit the generate button.

Note – Once you select the generate button, the system will direct you towards the Report Dashboard where you can see your report in queue or underprocessing. Give it a refresh to check if the report’s done, and then you can download the word and PDF versions.”

Contact Log

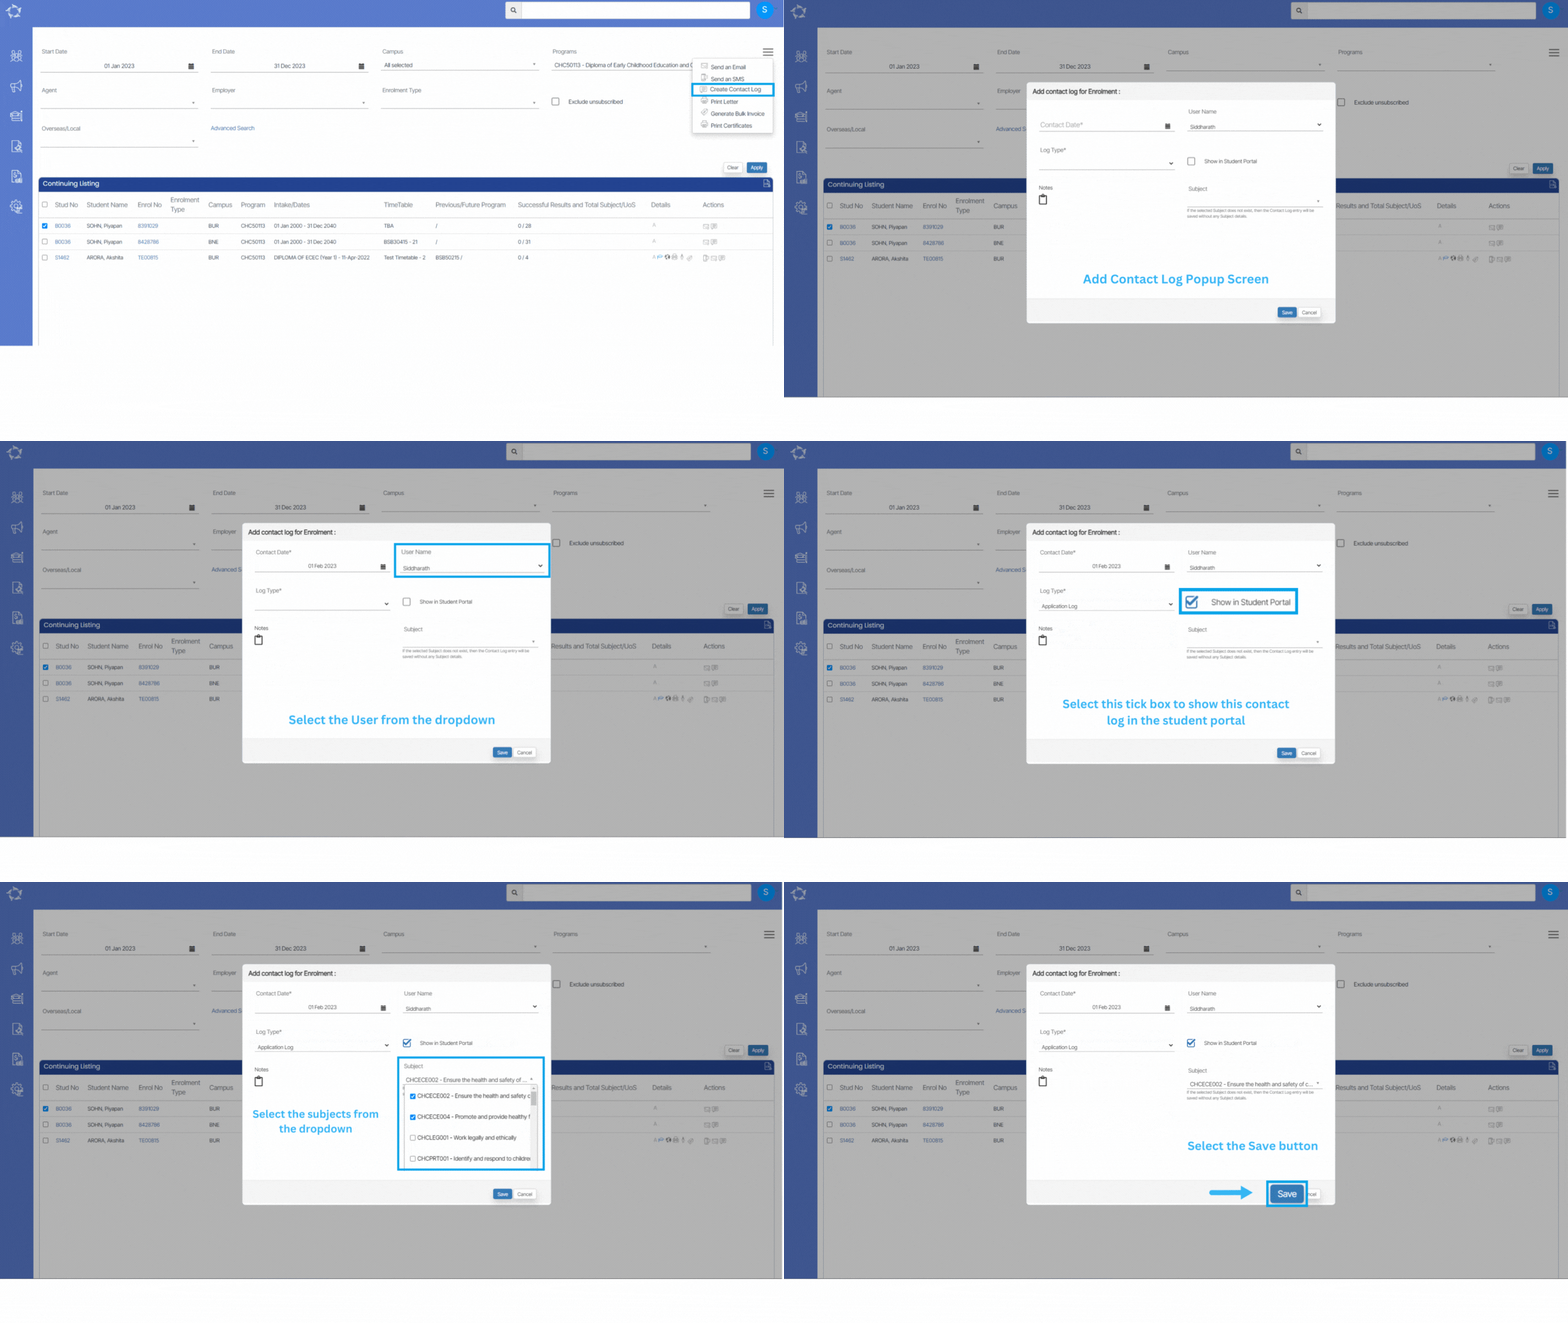
Contact logs are like notes for an RTO. TEAMS allows you to create contact logs for students, employers, and agents. You will see this option on all the listing screens and in the communication tile. You either can create a contact log in Bulk by using the listing screens or you can make it individually for a student or agent by using the communication tile on different dashboards that we have such applicant/student dashboard, application/enrolment dashboard, agent dashboard, etc. No matter what screen you choose to create the contact log/s, the steps to use this functionality are the same everywhere. This post will explain how you can use the “Create Contact Log” option.

  • Select the “Create Contact Log” option.
  • This will open a popup window.
  • Update the contact date. This is the date when you are entering the contact log and this is a mandatory field that cannot be left blank.
  • The user Name field is automatically loaded by the system. This is the user’s login name who is currently entering the contact log.
  • Select your Log type. This is to identify what kind of notes you are going to create. This is a user code and you can create the User Code as a log type as required, such as Late Fees, Financial support due to COVID, etc.
  • If you wish to show the contact log that you are going to create in the student portal, then select the tick box:
  • Type in your notes in detail for the contact log by selecting the “Notes” icon. It will open a popup message box for you to type in your notes manually.
  • Select the Notes icon again to close the popup message box.
  • If you are entering the notes for a specific subject, then select that subject from the “Subject” dropdown.
  • Select the Save button to save the contact log.

Send an Email

history of changes

TEAMS gives you the option to send out email/s to students, employers and agents. You will see this option on all the listing screens and in the communication tile. You can either send the emails in Bulk by using the listing screens or you can send individual emails by using the communication tile on different dashboards. No matter what screen you choose to send out the email/s, the steps to use that screen are the same everywhere.

How to send emails

  • Select the “Send an Email” option from the Burger Menu
  • The system will redirect you to the “Compose Email” screen. Use a comma between email addresses to CC the mail to them.
  • Select an email template if you’ve added any in your TEAMS. If you do not have an email template, you can leave this field blank.
  • If you have selected the email template, the subject field will be updated manually. However, if not, you can update the subject manually.
  • The sender address is automatically entered by the system (it is always the user’s email address). If you have linked a specific sender address with an Email Template, that email address will be listed in the dropdown menu, along with any email address you have linked as default at the organisation level. If there are no email addresses updated at the Email Template or Organisation Level, then you will only see the user’s email address in the Sender field, no other email addresses will be visible.
    Note – When you are using the Application or Enrolment Dashboard to send out emails and the agent is linked with the application/enrolment, you will see some more tick-boxes. If you select “Send email to the agent only”, then the system will send out the email to the linked agent only and if you tick “CC to Agent”, then it will be sent to the student and agent. And if you aren’t ticking any of the above tick-boxes, then the email will be sent to students only.
  • To attach a document from your computer or Network, select the Attach button

IMPORTANT: Do not change the fields that are in curly braces. Those are called merge fields to populate the data by TEAMS and if you remove anything from them, the system won’t print the data when you send out the email to the student or the agent.

Note – If you are sending emails individually from the student’s communication tile then the system will allow you to attach the documents generated from the student level only.

  • Select the “Send” button to send out the email and your email will be sent.


Agent Pending Invoice > Merge Fields

Agent Details

Contact Information

Address Information

Other Agent Information

Other Merge Fields

{Agent ID}

{Agent Phone Number}

{Agent Local Address Line 1}

{Agent Type}

{Current Date}

{Agent Code}

{Agent Fax Number}

{Agent Local Address Line 2}

{Agent Overseas Status}

{Current User Name}

{Agent Name}

{Agent Mobile Number}

{Agent Local Address Line 3}

{Agent Contact Renewal Date}

{Agent Payment Ref No}

{Agent Legal Name}

{Agent Email Address}

{Agent Local Suburb}

{Agent Account Manager}

{Agent ABN}

{Agent Local State}

{Agent ACN}

{Agent Local Post Code}

{Agent Local Country}

{Agent Mailing Address Line 1}

{Agent Mailing Address Line 2}

{Agent Mailing Address Line 3}

{Agent Mailing Suburb}

{Agent Mailing State}

{Agent Mailing Post Code}

{Agent Mailing Country}

Important Links

Agent Pending Invoice

Dashboard > Marketing > Agent Dashboard > Pending Payment icon

Overview

This report is used to generate the outstanding/ pending commission invoices for the agent, where you have used the Agent Pending Payments process.

If you wish to send the invoice from TEAMS for their pending payments; this is approved pending commission invoices to be paid, you can use this report to generate the invoice/s.

How to generate the report?

This is a word report and can be generated either from the Pending Payment Welcome screen

or from the final confirmation step of Pending Payments as shown below.

To know more about the Pending Payment process, click here Pending Payments.

Merge Fields in the report

This report template can be copied and you can then create as many customised templates that the system can generate for you. To know more about the tables used in the template, you can download the master template from the Report Templates Screen.

What’s New: Practical and Theory Classes

To make it easy for our every client to track practical and theory classes, we now have introduced new radio buttons for you to set a class type as practical, theory or both.

The popup window that you use to create a class has now new fields as highlighted below:

You can select these radio button set your class type and accordingly, the data will be printed in the ASQA class roll report.

If you have any queries, please do not hesitate to contact us on 1300 85 05 85 or email us via support@rtosoftware.com.au

Starters Report Data Columns

Below is the list of data columns which will get printed in the report.

ColumnsExplanation
Student NoStudent Number generated by TEAMS
Enrolment NoEnrolment Number generated by TEAMS
Application NoApplication Number generated by TEAMS
Student NameStudent (First name)(Middle name)(Last name)
GenderStudent’s gender selected at the Applicant/Student levels
DOBStudent’s date of birth selected at the Applicant/Student levels
CampusThis will show the number of enrolments linked with the campuses
CRICOS CodeCRICOS code of the Program updated on the Program Entry screen
Program NameThe system will print the name of the program saved on the Program entry screen
Enrolment TypeThe system will print the enrolment type updated on the Edit enrolment details screen
Start DateStart Date of the enrolments
End DateEnd Date of the enrolments
Duration WeeksThis is the total weeks of the enrolment which includes total study weeks, and total academic holiday weeks.
For example, if the enrolment has study weeks = 40 and academic holiday weeks = 12 then the total duration will be 40+12=52 weeks
StartedThis is the status of the enrolment, if it is started then it will show Yes
Agent NameThis system will show the agent name which is selected at the application or enrolment level
CountryCountry of the student
Account ManagerIt will show the Account Manager selected at the Application or Enrolment level
TimetableThe system will show the timetable allocated to the enrolment
Currently OwingThis is the overdue amount till the present date
Total OwingIt is the difference of total invoiced and total receipted 
Visa TypeIt will show the Visa type selected at the Student and Enrolment level
CoE NoThis will show you the COE number updated at the Enrolment Dashboard > Enrolment profile tile
NationalityNationality of the Student updated at the Applicant or Student levels
ClassesThe system will show the classes linked to enrolments
Future ProgramFuture enrolment of the student 
Previous ProgramHistorical enrolment of the student
Enrolment OutcomeOutcome of enrolment selected on the Enrolment Dashboard > Edit enrolment details screen
Employer NameEmployer selected at the enrolment level
StageIt will show the commencement status from the Training Plan and Results screen > Qualification Information tile.
NotesProgram Notes
Total OverdueIt is the difference of total amount of pending invoices and total receipted till date
Tuition FeeThis is the total invoiced amount of Tuition fee
Other FeeTotal amount of all other fees invoiced excluding tuition fee
Marketing SourceMarketing source selected at the application level
Level Of StudentIt will populate the user code you selected at the student level on the student entry screen.
VSNThis is the VSN number selected at the student entry screen
VSN EligibleStudent level at student entry screen.
AVETMISS StateAVETMISS state is the State Training Authority selected at the Enrolment level > enrolment AVETMISS settings screen
Group Training PlanSelected at the enrolment level > Training Plan and Results screen > Training Plan and Academic Template tile
Overseas StudentIf the student is selected as overseas on the student entry screen then it will show Yes
Special NeedsThis is a tick box at the student level on the student entry screen.
Special Needs NotesIt will populate the Notes updated for the Special needs on the Student Entry screen
EmailStudent’s email address updated on the Edit Student Details screen
MobileStudent’s mobile number updated on the Edit Student Details screen
PhoneStudent’s phone number updated on the Edit Student Details screen
International PhoneStudent’s international phone number updated on the Student Dashboard > Overseas screen
Passport NoStudent’s Passport Number updated on the Student Dashboard > Overseas screen
USIStudent’s USI number updated on the Student Dashboard > USI screen
Student Payment No
AVETMISSIt will show Yes, if the AVETMISS tick box is selected at the student level on edit student details screen.
No of Successful ResultsThis is the total count of successful subjects
No of Unsuccessful/Not Yet Achieved ResultsThis is the total count of unsuccessful subjects
Total Subjects EnrolledThis is the total number of the subjects linked to enrolment
Program CodeThis is a Program code saved on the Program Entry Screen
USI VerifiedThis is the status of USI, if it is verified will populate as Yes and if is not verified will populates as No
Student First NameStudent’s First name updated at the Applicant/Student levels
Student Last NameStudent’s Last name updated at the Applicant/Student levels
Student Email Address 2Student’s Secondary email address updated at the Applicant/Student levels
Student Email Address 3Student’s Additional email address updated at the Applicant/Student levels
Student TypeThis is the student type (New Student and Returning Student) selected at the Enrolment level
Orientation RequiredIt will show the Orientation date updated at the enrolment level
Upsell or ExtensionThis will show Yes if the tick box is selected or No if the tick box is not selected
Internal Package TypeThis is a user code in TEAMS and you can let us know your Internal Package type and we will get it updated on your TEAMS site
External Package TypeThis is a user code in TEAMS and you can let us know your External Package type and we will get it updated on your TEAMS site
External Start DateThis relates to the external package type. Once you have selected the external package, the system will ask for the external start date.

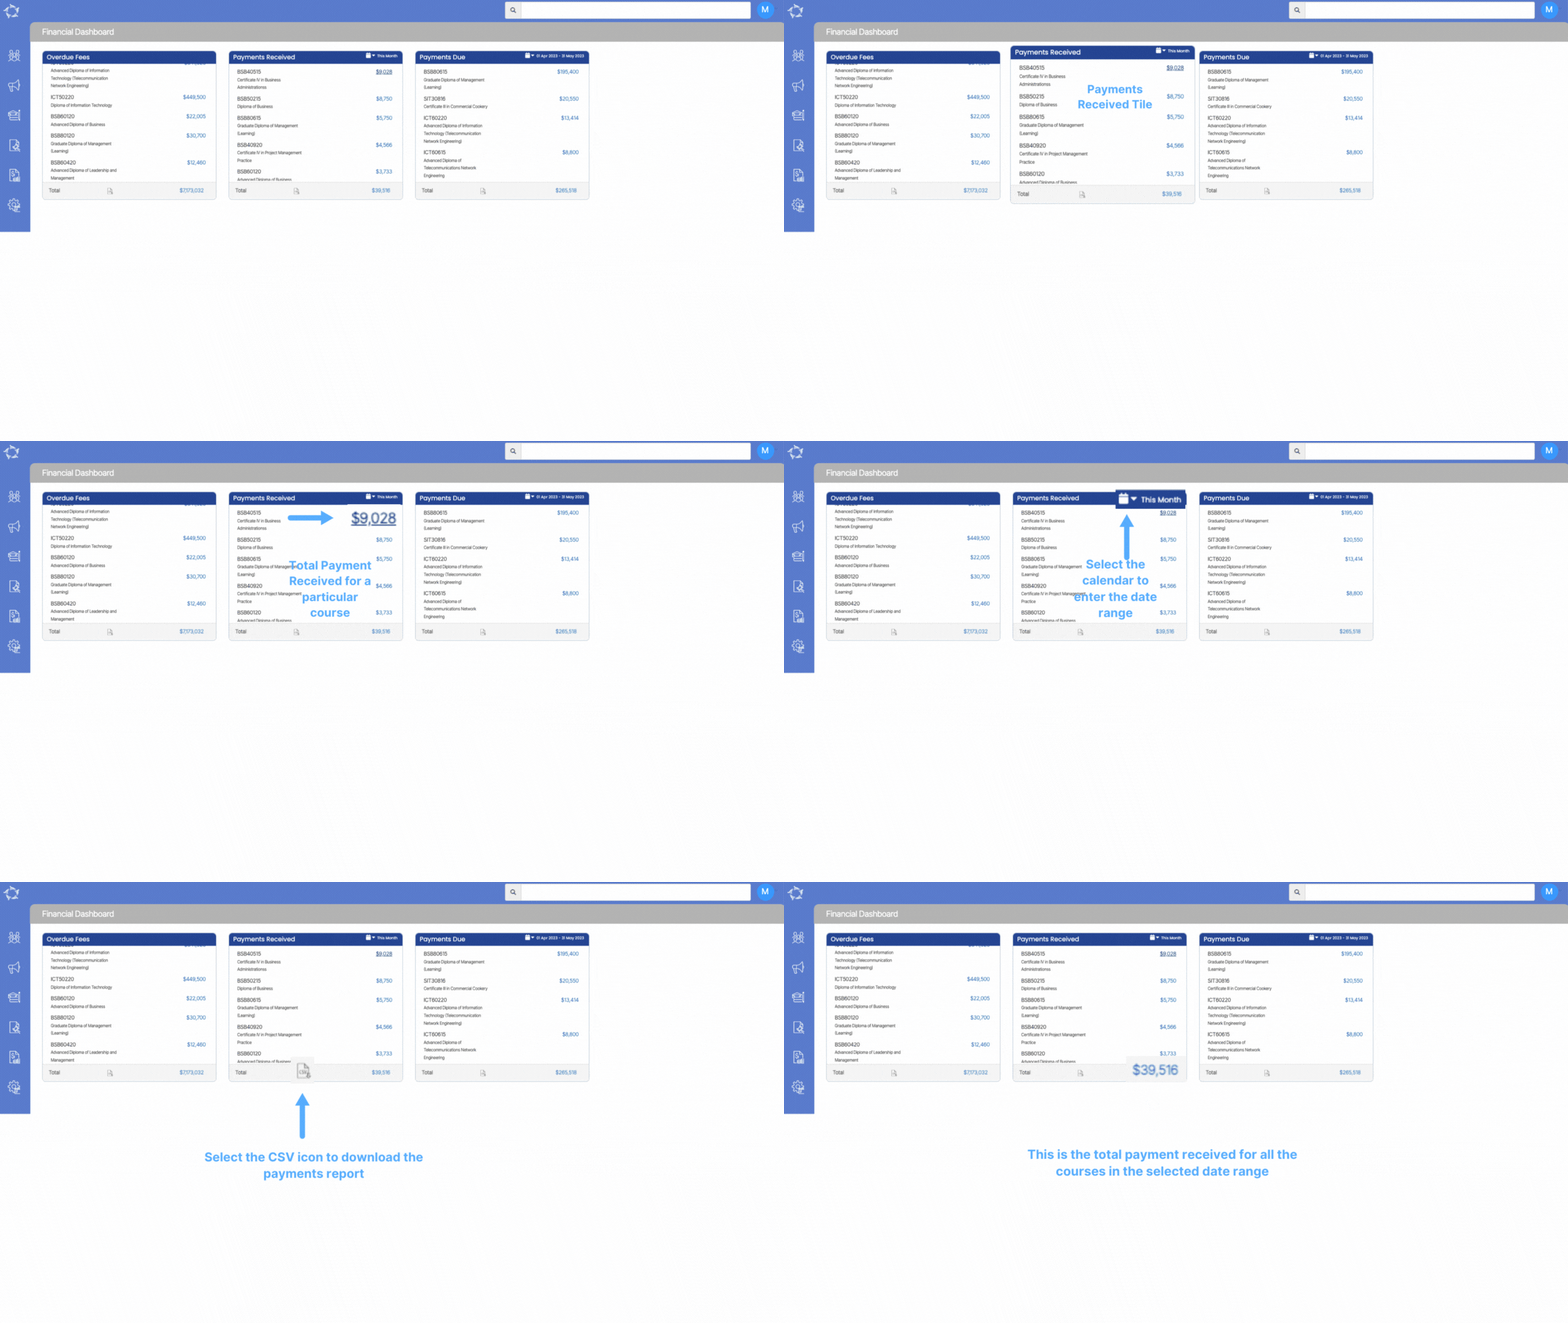
Payments Received Tile

Overview

The provided tile offers the ability to track and monitor the fees received for individual programs within a specified date range. By utilising this feature, users can easily identify the amount of fee collected for each program during the selected timeframe. Furthermore, the tile conveniently displays a comprehensive summary of the total payments received for all programs combined, conveniently located at the bottom of the tile.

How the system will select enrolments?

The system uses today’s date as an ‘as at’ date to find any enrolment that has a receipt with a receipt date less than today’s date but falls into the month and year selected in the calendar options.

Each program code listed has a number on the right hand side of it, which is the total sum of payment received for all the enrolments for the selected date range. The number is a hyperlink that opens the Payment Received Listing screen, where you will be able to send bulk Emails or SMS to the students or enter contact logs against the enrolments.

To save your time, we are showing the total of all payments received for all programs at the end of this tile.

 Click here to learn about the calendar option

Payments Due Listing

Payments Due Tile > Payment Due Listing Screen

history of changes

IMPORTANT – We believe that staying informed about the latest developments in our software is vital for optimising your experience and maximising the benefits of using our system. To view the latest updates and modifications on the Payment Dues Listing Screen, we kindly request you to navigate to the History icon history of changes showing above. By selecting this icon, you will gain access to a detailed log of all the recent changes made to the software.

When accessing the link for a specific program code in the Payments Due Tile, the system will display a screen known as the Payment Due Listing screen. This screen provides information on the Payments Due amounts for invoices associated with student enrolments.

It is divided into two main sections:

  • Filters – The filter section allows you to customise your search for data within the grid by applying specific filters based on their requirements. This enables you to narrow down the displayed information to their desired criteria.
  • Grid – The grid will display the list of all students with overdue Invoice Amounts. In the grid, Stud No, Student Name which will display student specific information and Enrol No, Enrolment Type, Campus, Program, Intake/dates, and Enrol Status will show enrolment specific details. All of these columns are self explanatory. The Invoice No will display the overdue Invoice number, the Invoice Due Date will display the date when the Invoice was due and the Invoice Amount will display the overdue amount for the listed Invoice No and the Contact details column will show you the students phone number.

IMPORTANT – By default, the current screen displays essential information based on the selected calendar option and the program for which the payments are due. The parameter section shows the start date, end date, and the program associated with the selected calendar option. To access the Payments Due listing screen and view the specific program’s payment details, you need to select the Payments Due tile. Upon doing so, you will be presented with a comprehensive listing of the payments that are currently due for that particular program. This screen aims to provide you with clear visibility and convenient access to relevant payment information based on your selected preferences.

Note – There is a Page Limit dropdown after the filter’s sections which will allow you to specify the number of students you want to view on a single page.

To know more about the Icons, select here

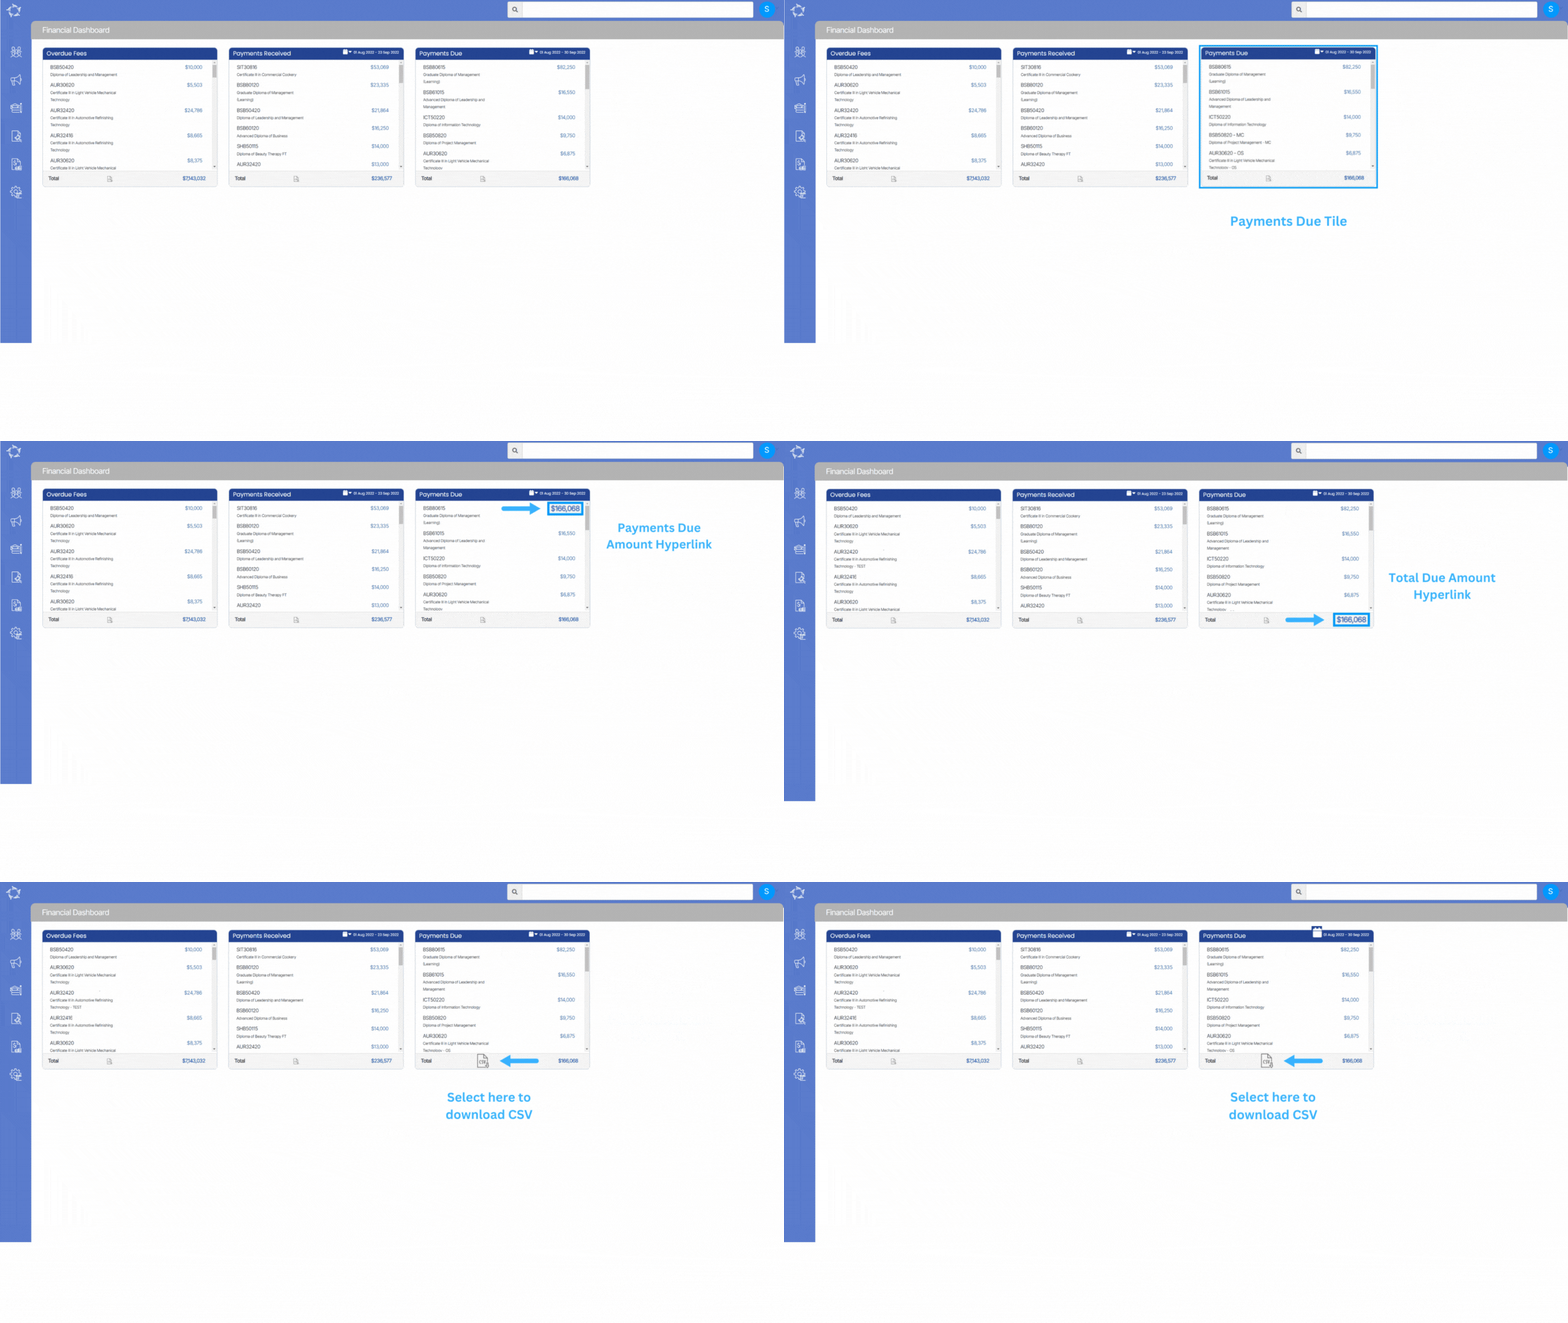
Payments Due Tile

Finance Menu > Financial Dashboard > Payment Due Tile

history of changes

IMPORTANT – We believe that staying informed about the latest developments in our software is vital for optimising your experience and maximising the benefits of using our system. To view the latest updates and modifications on the Payment Due Tile and Payment Dues Listing Screen, we kindly request you to navigate to the History icon history of changesshowing above. By selecting this icon, you will gain access to a detailed log of all the recent changes made to the software.

Overview

The Payment due signifies the deadline by which a required payment must be submitted to meet a financial commitment. This provides a comprehensive view of the fees associated with each individual program, all within a specified date range. At the base of this overview, the cumulative payment due for all programs is presented.

Notably, the program amounts are interactive hyperlinks. Upon selecting any of these program links, the system will seamlessly navigate to the Payment Due Listing screen. This screen will then display a grid containing a list of enrolments, each accompanied by their respective outstanding payment amounts. This convenient functionality ensures efficient management of payment obligations and associated details.

Understand the amount being displayed for each program

You will see the total due amount for each program

1) The count includes all the enrolments which are linked to that program.
2) It includes only started enrolments.
3) It doesn’t include cancelled enrolments or invoices.
4) It only includes the amount which is upcoming not the past overdue.
5) It looks for invoice’s due dates which lie within the selected date range.

You have to use the calendar option to select the specific date range. Click here to learn about the calendar option