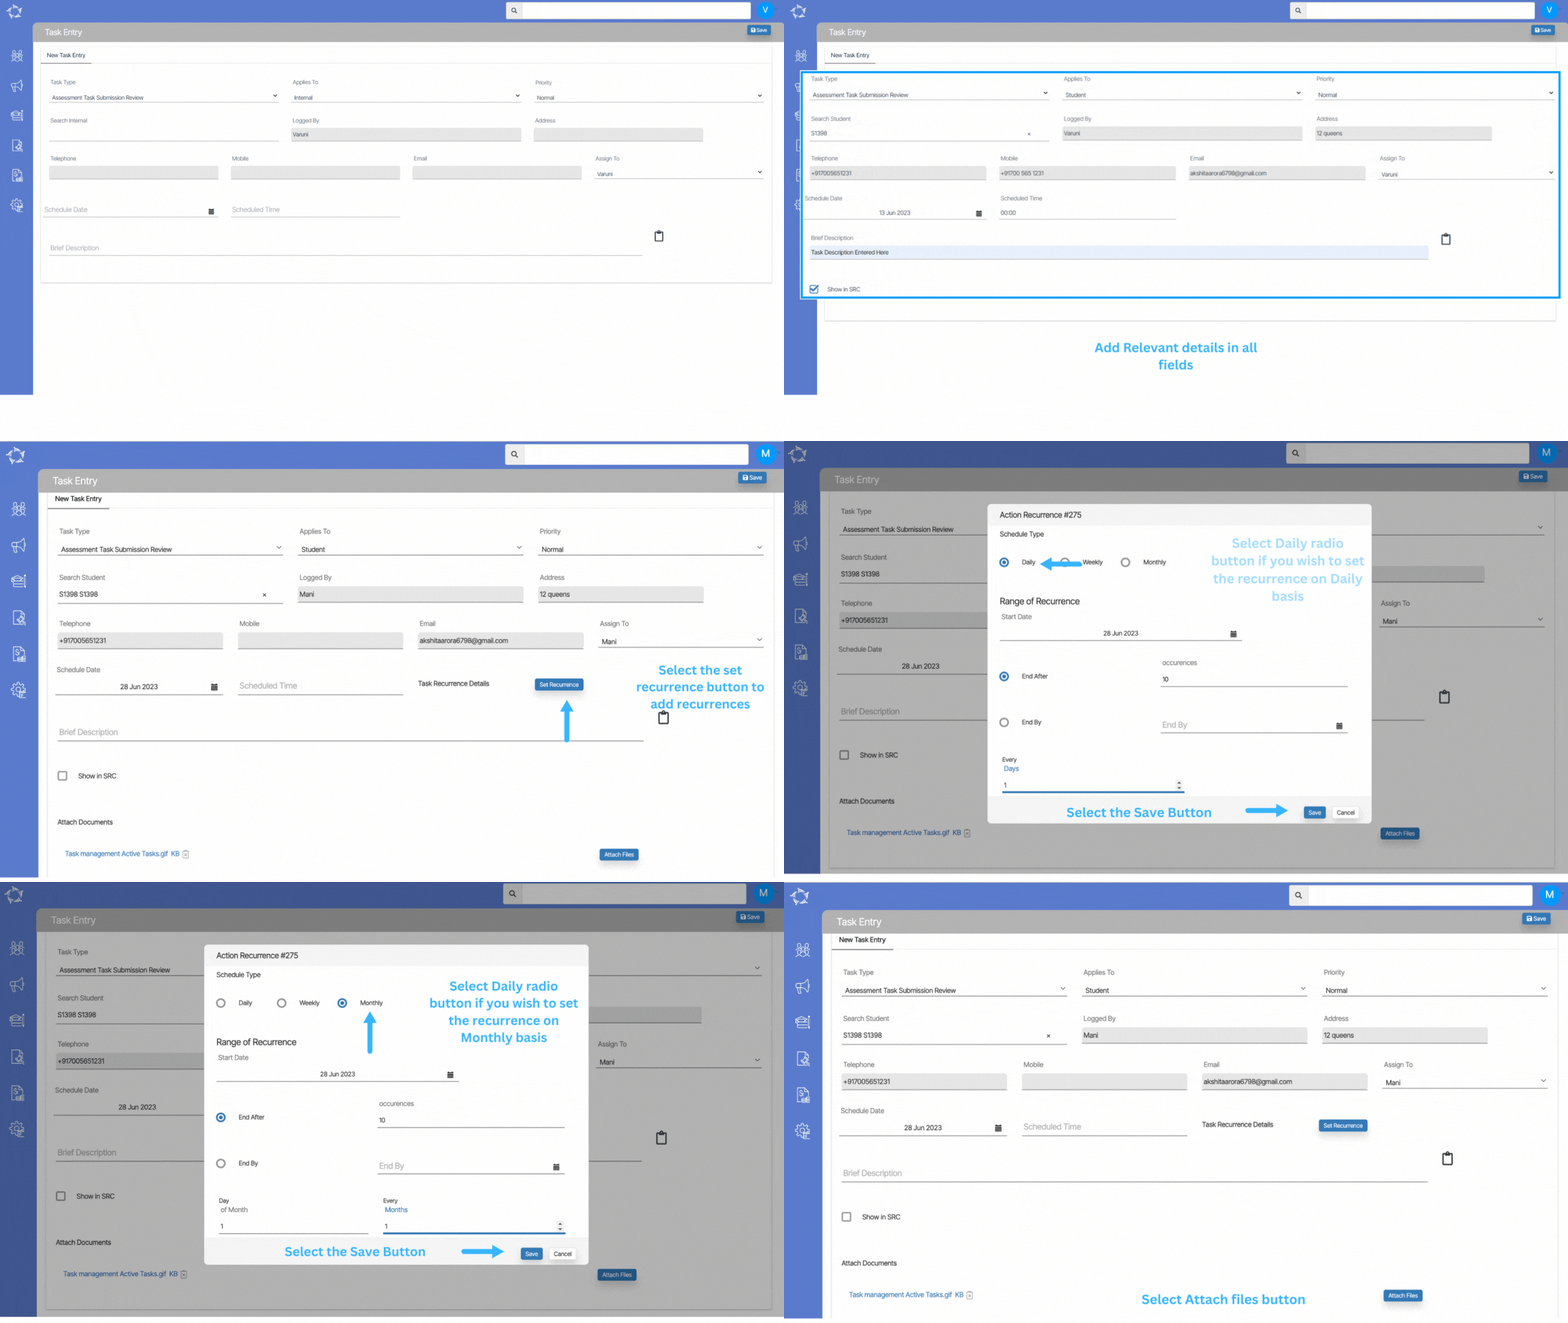
Webform – New Training Location dropdown and reCAPTCHA

Recently, we have made significant improvements to the WebForm, resulting in faster access and a smoother user experience. Now, the screen opens within seconds, ensuring quick and efficient interaction with the form. Along with the performance optimisation, we have introduced a new dropdown menu for Training Location within the Course Selection Section.

This addition enhances the webform’s functionality by allowing you to select the preferred Training Location conveniently. Additionally, to enhance security and prevent spam submissions, we have incorporated a recaptcha at the bottom of the screen. This helps verify that the WebForm is being filled out by a human user rather than an automated bot. With these updates, we aim to provide a more efficient and secure web form experience for you.
Create Survey Step 1

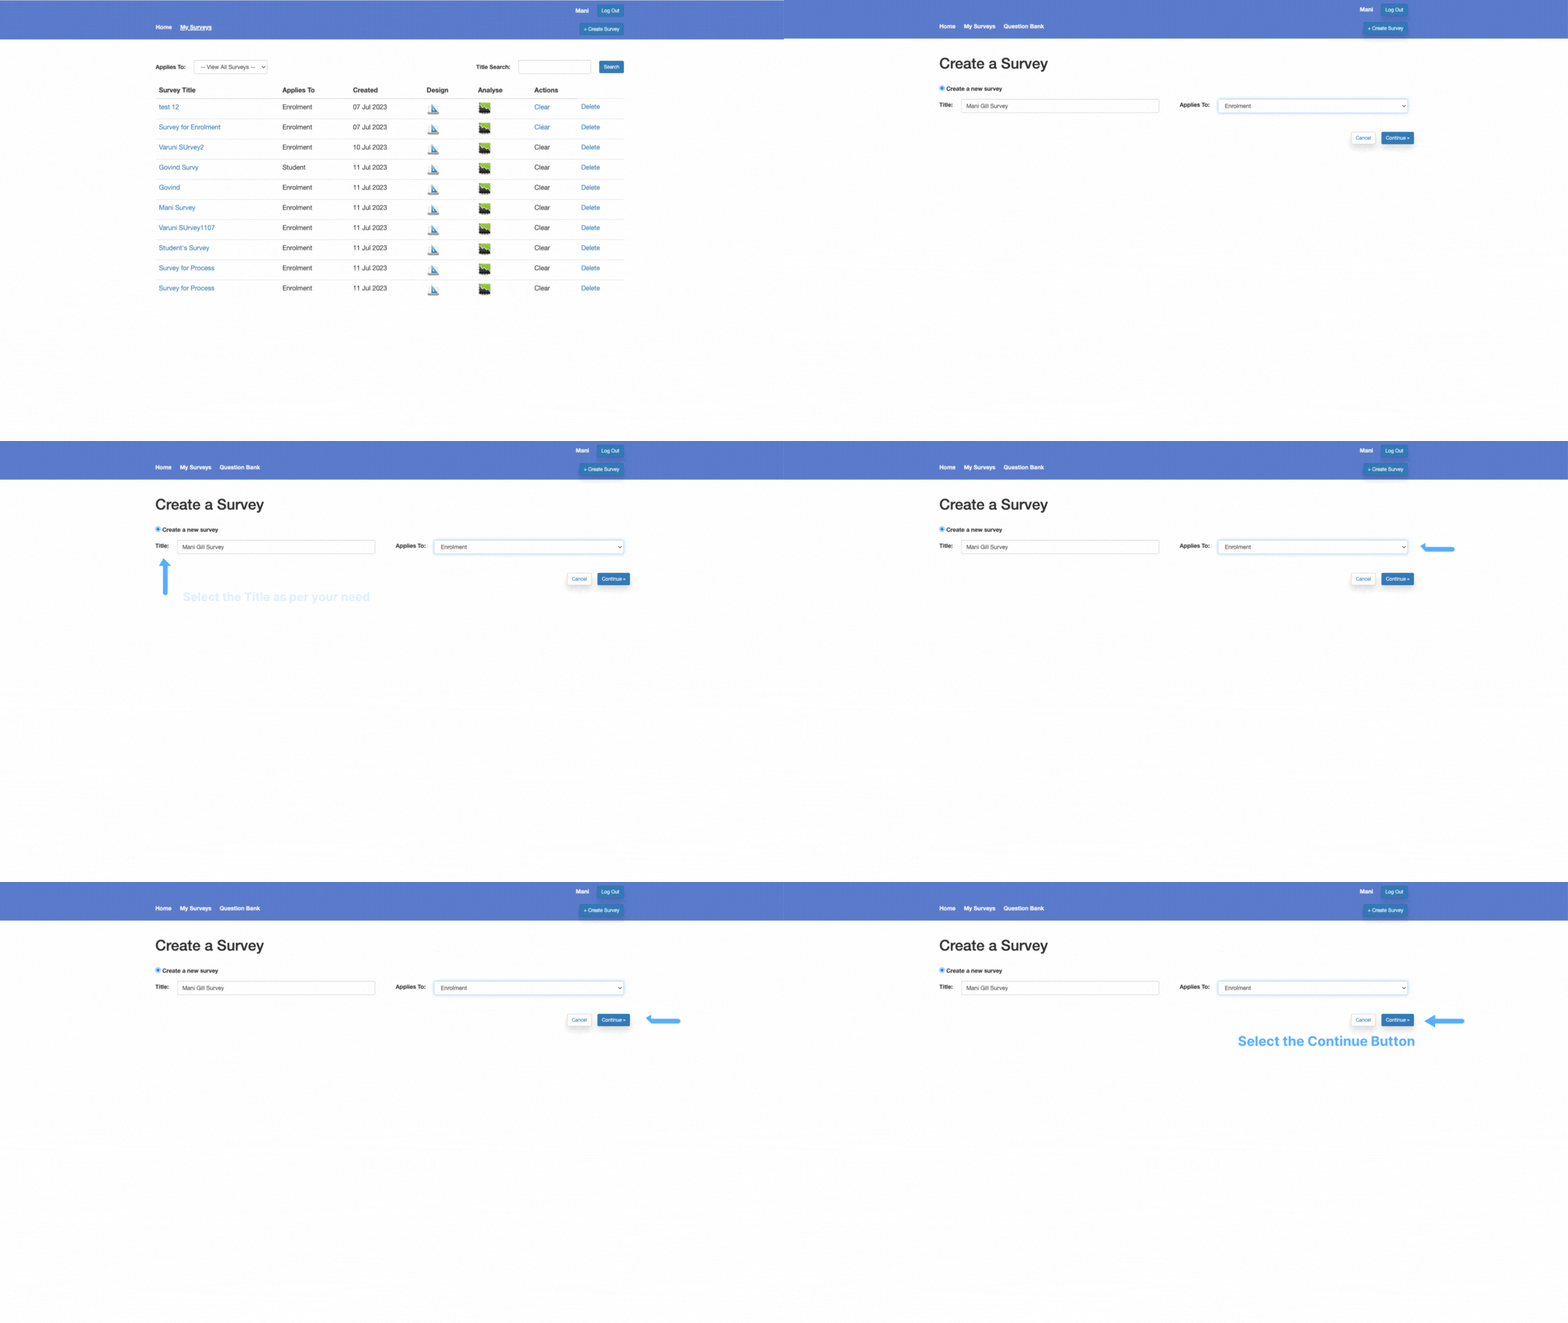
When you select the + Create Button from the Survey Panel screen, the system will takes you to the create survey step screen. This screen will allow you to create a new survey in the system. You will be presented with the create a new survey radio button following the Title and Applies to fields.

  • Title – This can be anything as per your requirements.
  • Applies to – This is a user code in TEAMS, and based on the User Code created, the dropdown will show you the options accordingly.

In the header of the screen, the Home label will takes you back to the TEAMS Main Dashboard, My Surveys label will open the Survey Panel screen for you and the question Bank will take you to the Question Bank Screen.

Once you select the Continue button, the system will take you to the Survey Designer screen.

Intervention Status report – Campus Dropdown Changes

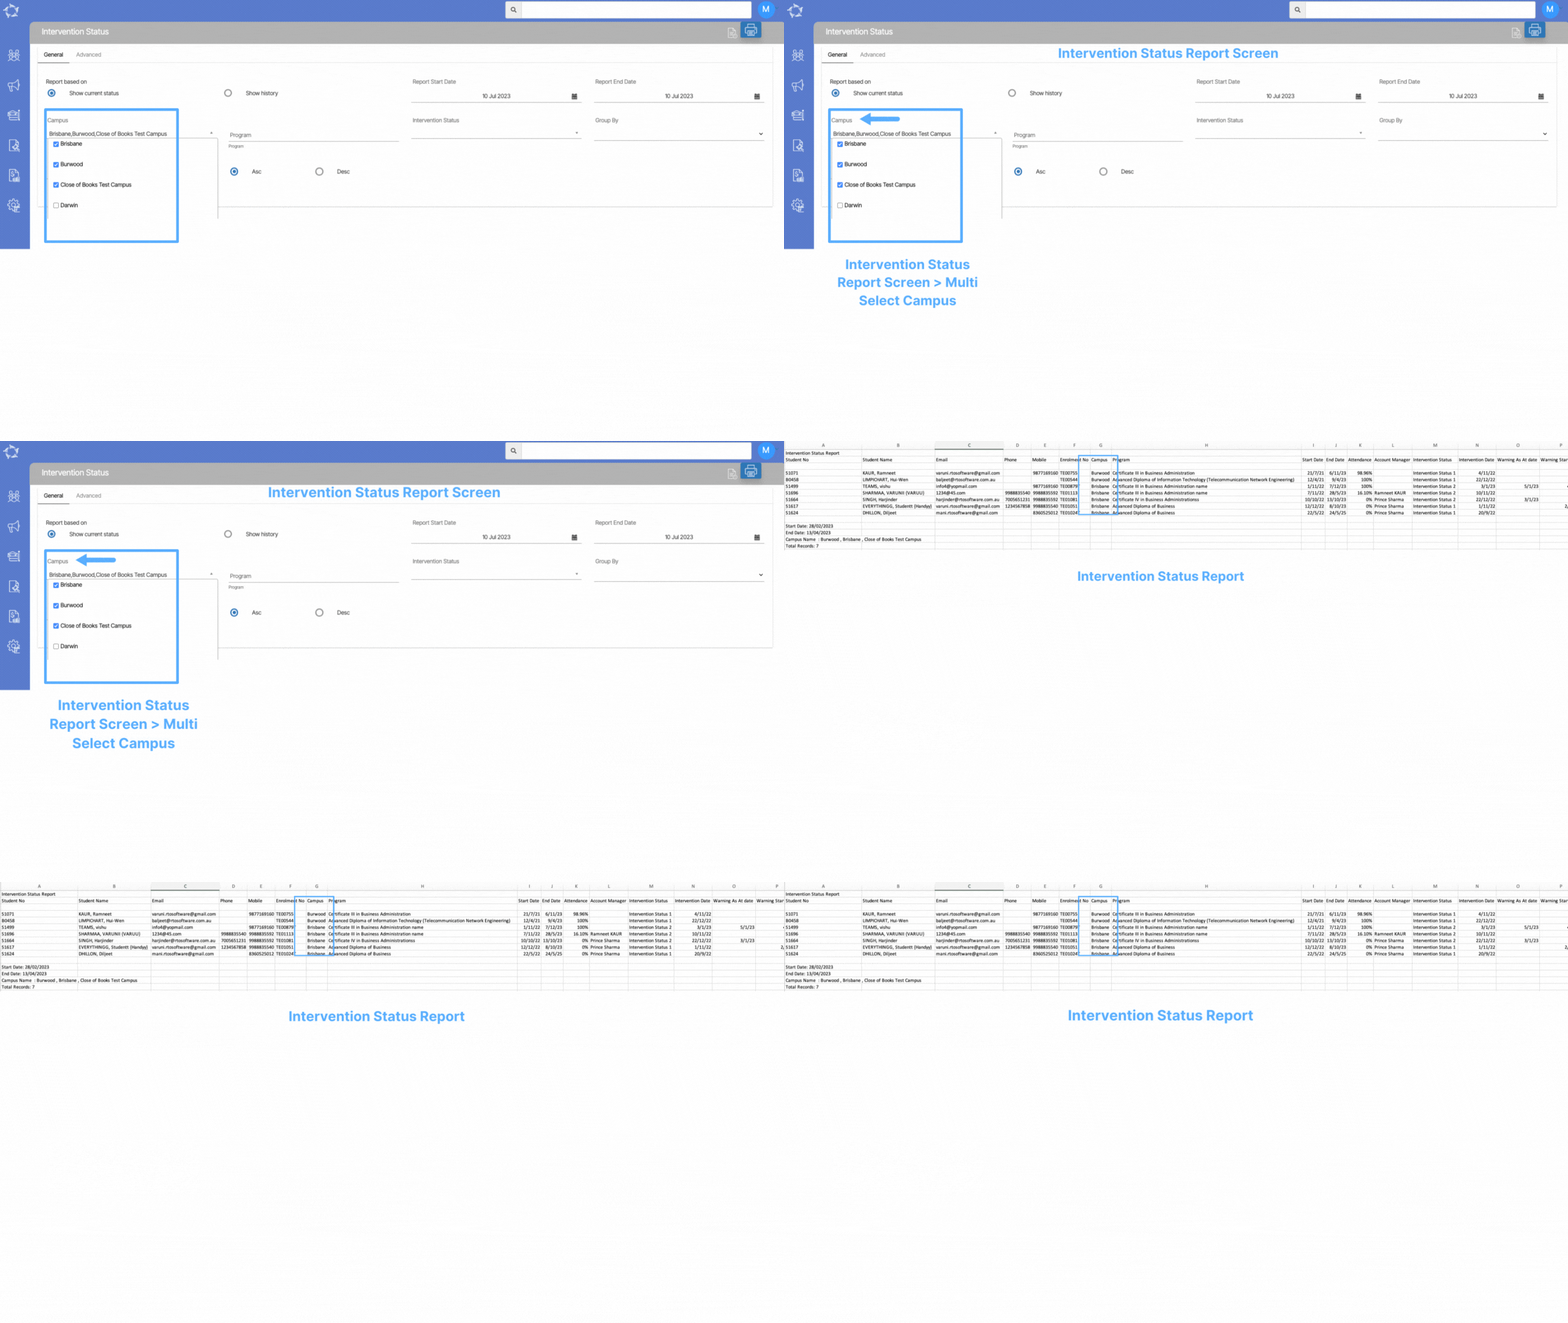
Previously, when generating the Intervention Status Report, the system allowed you to select only one campus at a time from the campus dropdown menu. However, we have now made important changes to this feature. The campus dropdown menu has been transformed into a multi-select option, giving you the flexibility to select multiple campuses when generating this report. This improvement provides increased convenience and efficiency, as you can now generate report for multiple campuses in a single operation.

With the new multi-select capability, you can easily include data from different campuses in the Intervention Status Report, enabling a more comprehensive and holistic view of student progress and intervention efforts across various locations.

We believe that this enhancement will greatly benefit you, offering greater flexibility and enabling more efficient reporting processes.

Listing Screens – Intake/Dates Column Changes

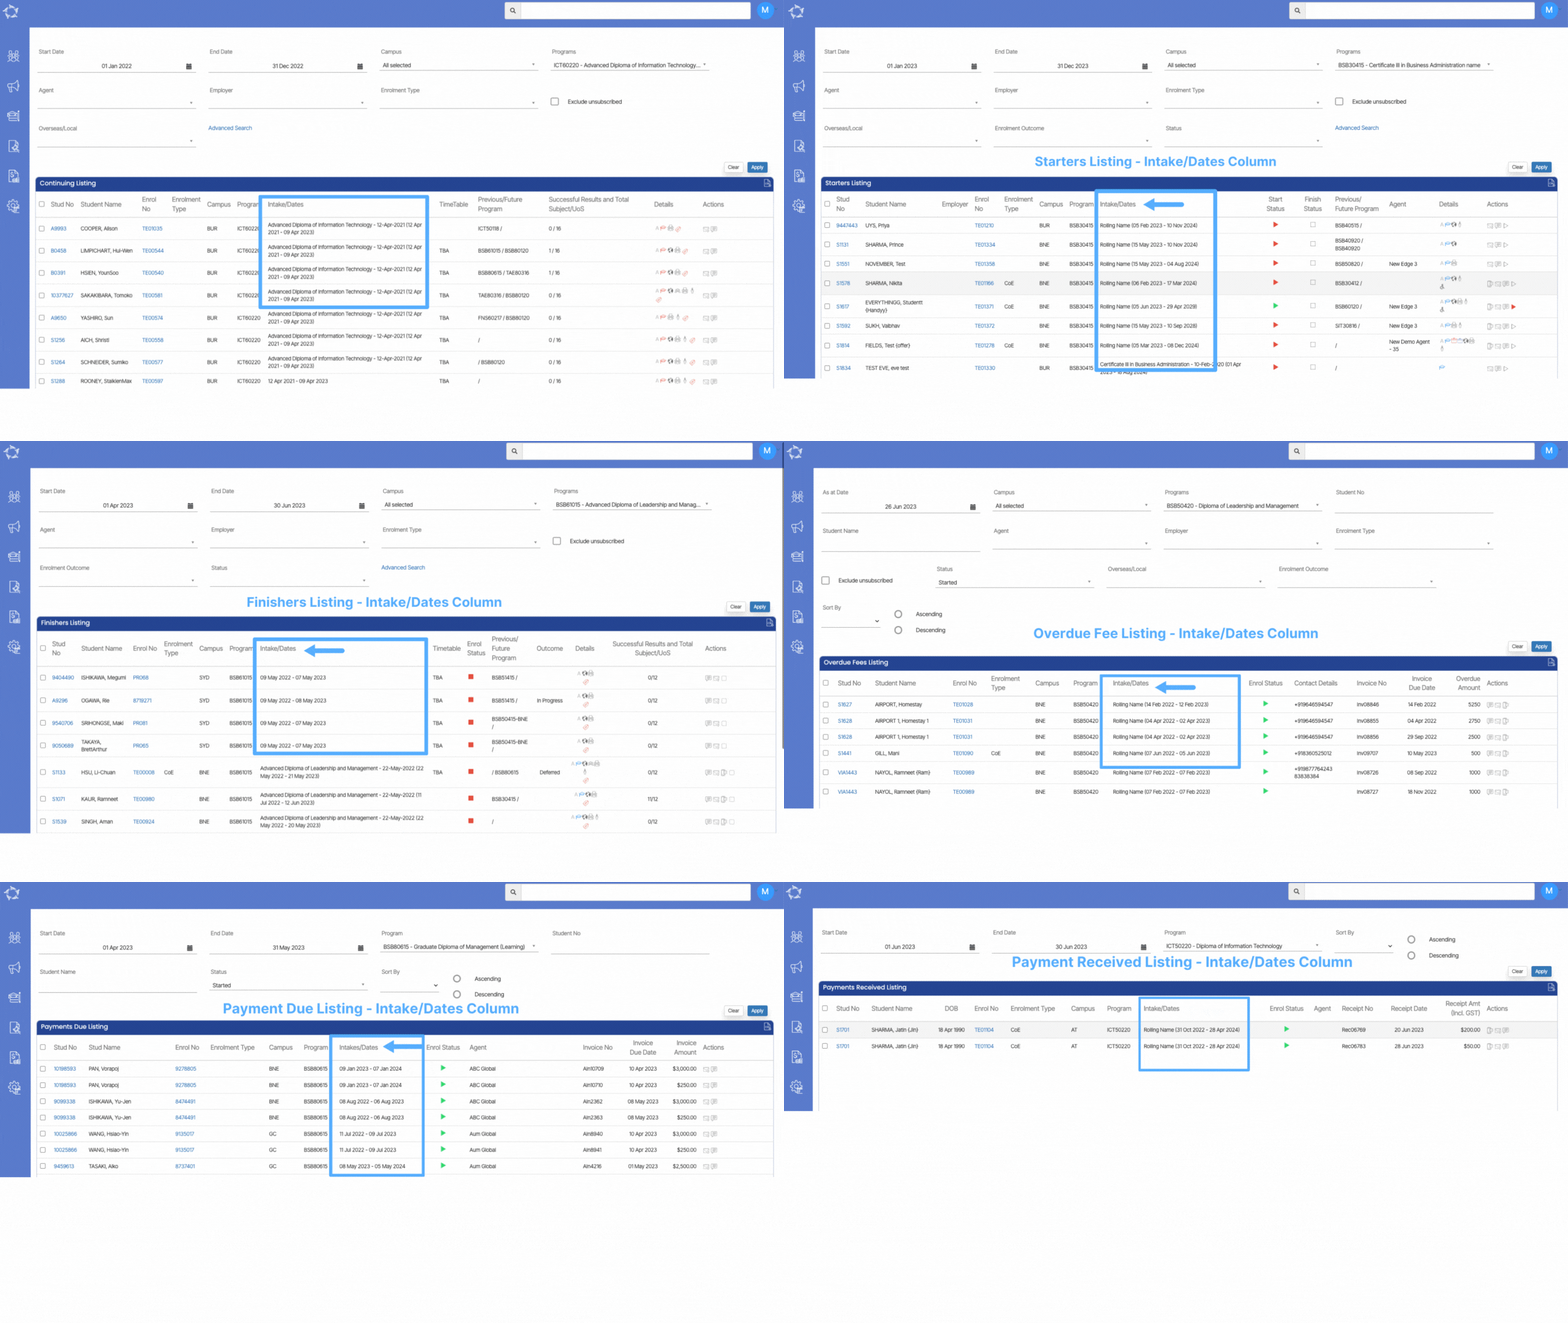
We are excited to announce that we have implemented updates to the Intake/Dates Column across all listing screens, including Continuing, Starters, Finishers, and Financial Dashboard > Overdue Fee Listing, Payment Due Listing and Payment Received Listing. Previously, the system would display enrolment dates only if there was no linkage to an intake.

With the recent changes, the Intake/Dates Column now provides more comprehensive information. If the enrolment is linked with an intake, the column will display both the intake name and the enrolment dates. On the other hand, if there is no intake linkage, you will only see the enrolment dates without the intake name. This enhancement allows for a clearer representation of enrolment details, providing you with a better understanding of the associated intake and enrolment dates.

Application Dashboard – Account Manager

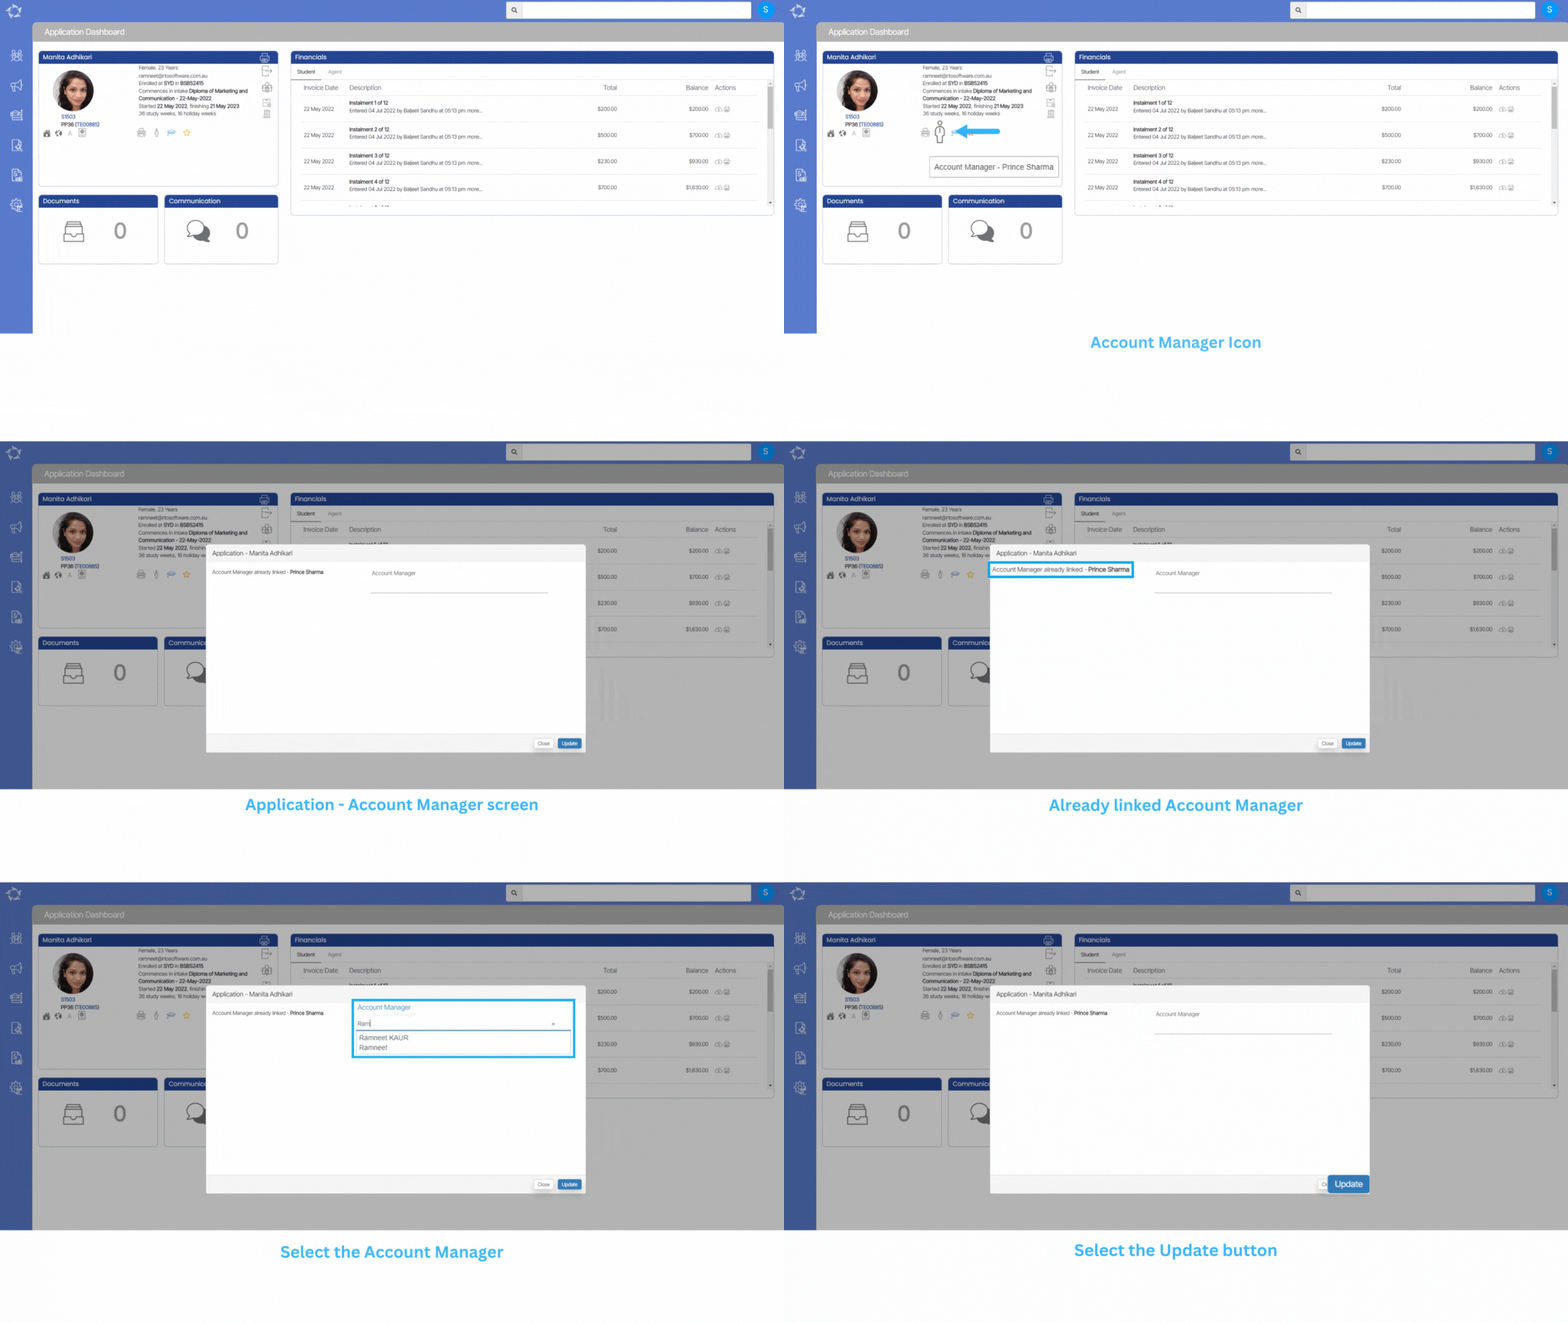
Application Dashboard > Application Profile Tile > Account Manager Icon

This icon will display the name of the account manager. If you want to change the account manager then you can change it by clicking on the icon itself. This will open a popup window where you can enter the first two letters of the account manager and it will display all the account managers starting with those letters. Select the appropriate account manager and select the update button.

Task Management – Task Entry Screen

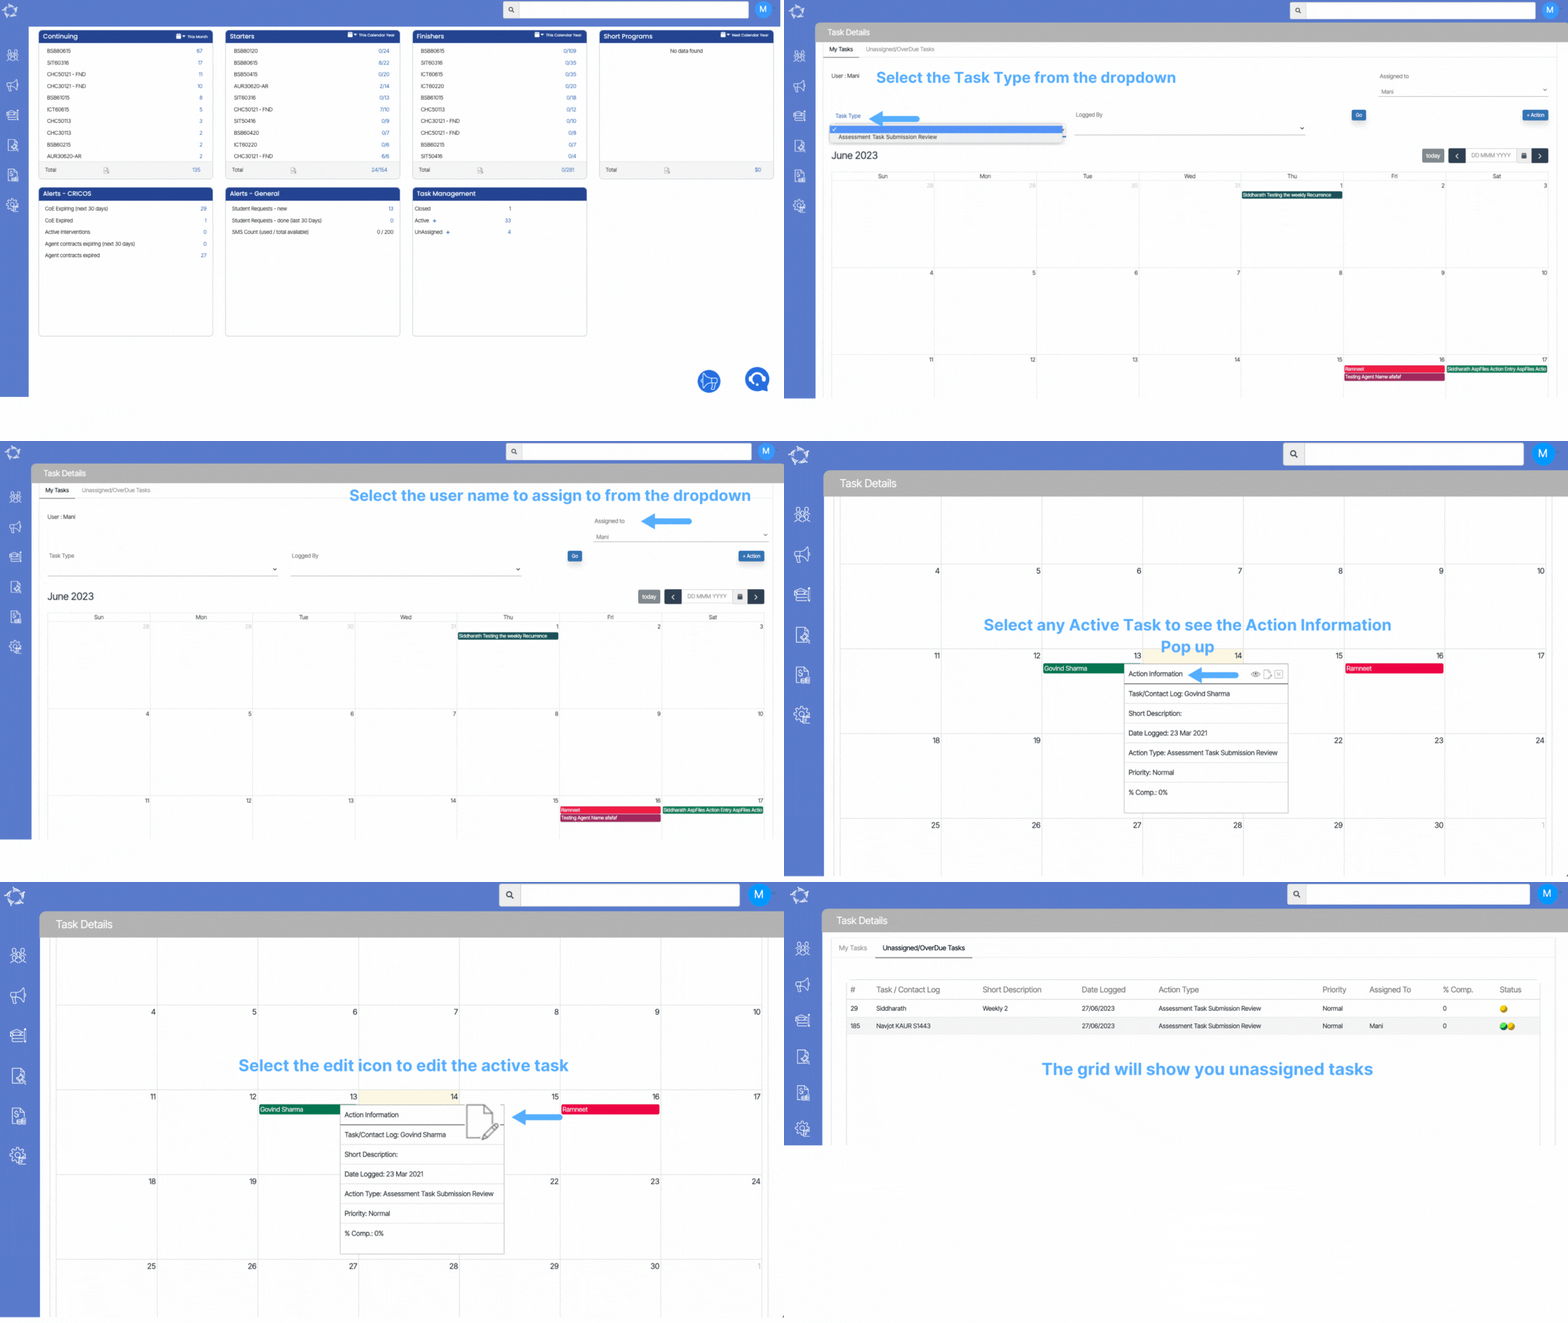
The Task Entry screen is a feature that enables you to add new tasks or edit the existing tasks for any object within the system. It serves as a convenient interface where you can input relevant information and details about the task you wish to create. Along with basic task attributes such as Task Type, Description, and Schedule date and time, the task entry screen provides additional functionalities.

One of the key features of the Task Entry screen is the ability to set task recurrence. You can specify if a task should repeat on a regular basis, such as daily, weekly, monthly, or annually. This recurring option helps in managing repetitive tasks more efficiently, reducing the need for manual task creation each time.

Note – The Recurrences button will only appear on the screen when you have selected the required new tasks details and saved the screen. When you select the Task Recurrence button, it will open a pop window on your screen. To know more about the pop window, please select Set Recurrences.

Furthermore, the screen allows you to attach documents to the newly created tasks. This feature facilitates the association of relevant files with the task. You can upload documents from your local devices or select existing files from the system’s storage. By attaching documents, you can provide additional context, references, or resources that are essential for completing the task.

Below is the table that will explain the fields and their usage.

FieldsExplanation
Task TypeTask Type is User Code in TEAMS and you can Select the required Task Type from dropdown.
Applies ToThis will show you different objects such as internal, agent, Student, Enrolment etc. Depending upon your requirements you can select the object from the dropdown.
PrioritySelect the priority of the task from dropdown. This will indicate whether the task’s priority is Normal, Low or High.
Search When you select any object from the Applies To field then the search field will appear accordingly.
Logged ByThis field will show you the User Name who is logging the task and will be read only field.
AddressIf the User’s address is updated for their user in TEAMS on the User Entry Screen then it will populates here.
TelephoneIf the User’s telephone is updated for their user in TEAMS on the User Entry Screen then it will populates here.
MobileIf the User’s mobile is updated for their user in TEAMS on the User Entry Screen then it will populate here.
EmailIf the User’s email is updated for their user in TEAMS on the User Entry Screen then it will populates here.
Assign ToThis dropdown will show you the list of all the user’s in TEAMS and you can select and assign the task.
Schedule DateEach task will have a schedule date assigned to it, indicating when it should start.
Schedule TimeEach task will have a schedule time assigned to it, indicating when it should start.
Brief DescriptionIf you wish to add any description for the then you can update in this field.
NotesIf you wish to add any notes for this taskfor the then you can update it by selecting the Notes Icon
Attach DocumentsAttach files button will allow you to attach documents to the task.

Task Management – Active Tasks – Task Details screen

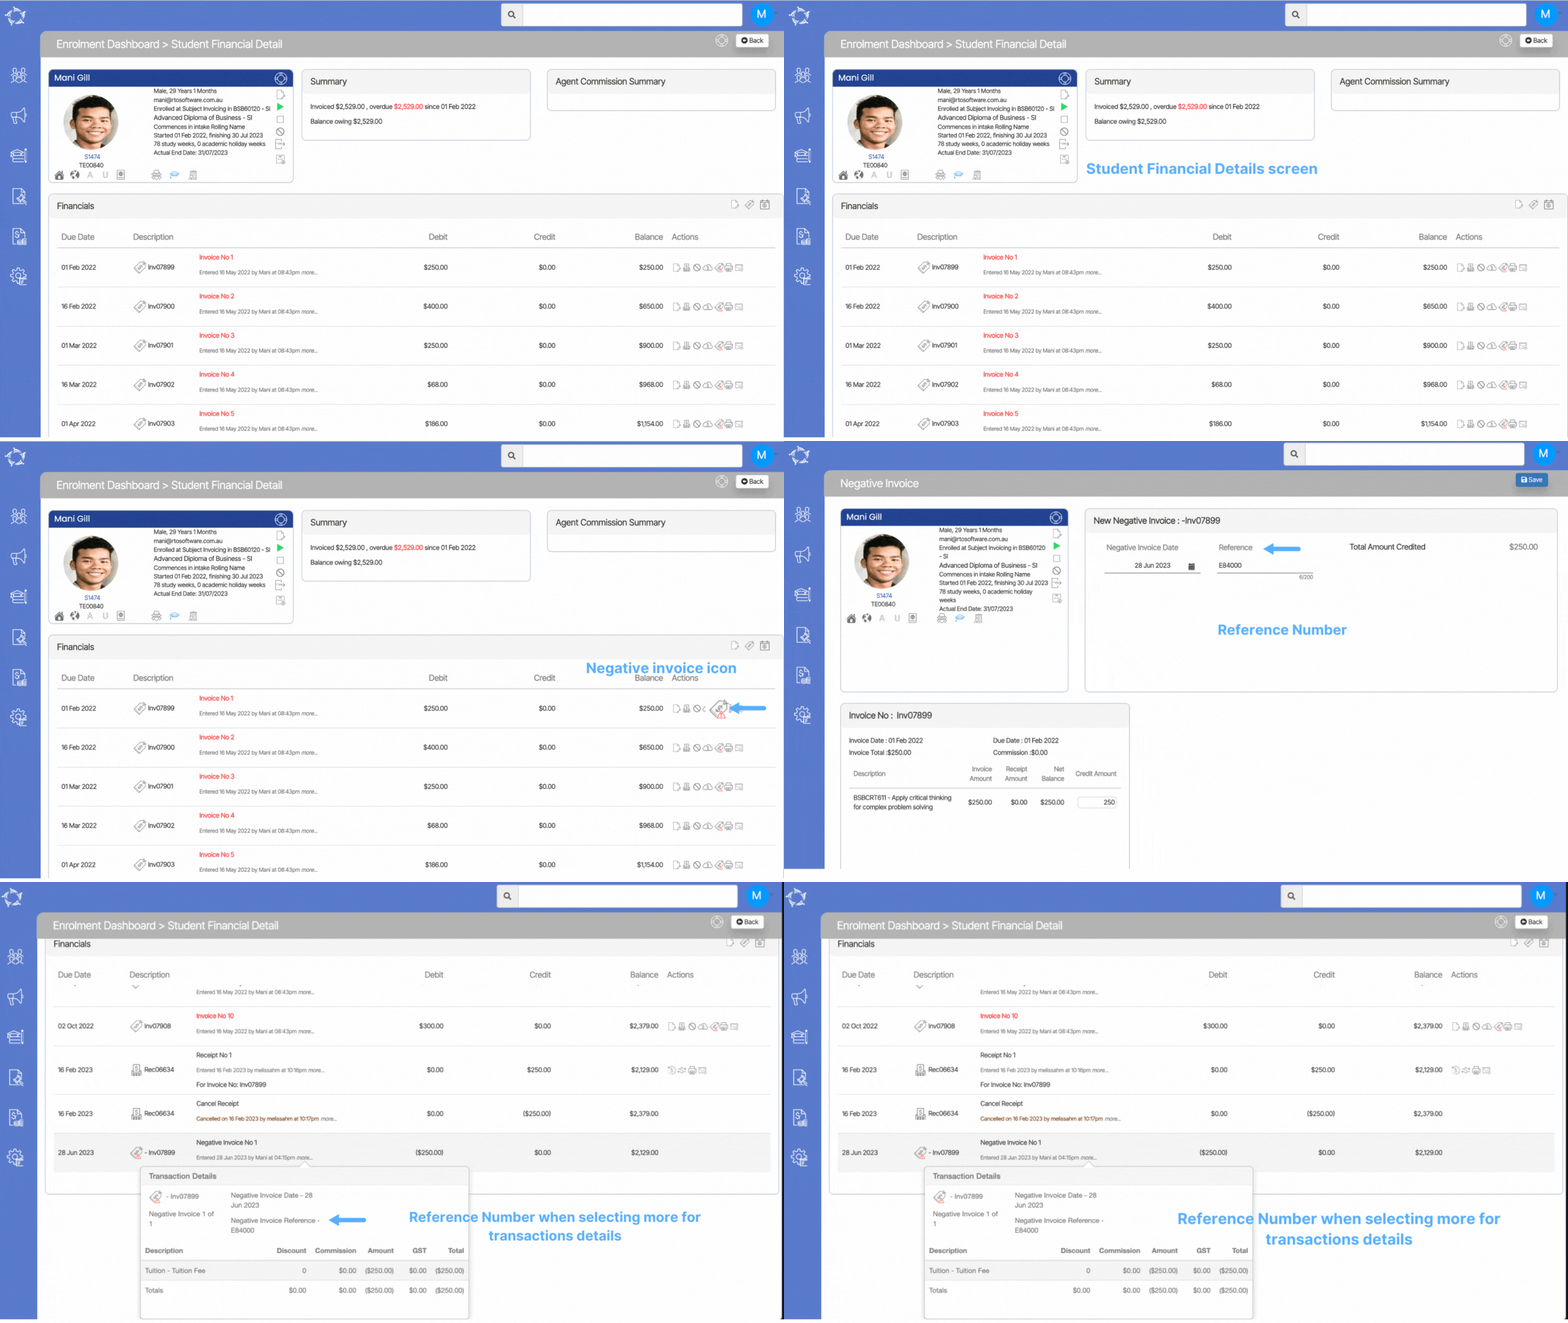
By selecting the Active Tasks hyperlink number, users are directed to the Task Details screen, which provides a comprehensive overview of all active tasks in the calendar, as well as unassigned tasks. The screen is divided into two tabs: My Tasks and Unassigned/overdue Tasks, offering efficient task management.

Under the My Tasks tab, users can easily handle their tasks using various filters such as Task Type and logged or assigned names from the dropdown menu. This allows for quick searching of active tasks. Additionally, users can preview task details, make necessary edits, or delete tasks as needed. This functionality empowers users to review and modify their task list seamlessly, promoting an organized approach to task management.

The Unassigned/overdue tasks tab presents a grid displaying all unassigned and overdue tasks. The grid provides relevant information such as task description, logged date, action type, priority, and task status (pending or completed). This tab helps users stay informed about pending tasks and ensures timely completion.

To add a new task to the system, users can simply select the +Action Button located on the right-hand side of the screen, which will redirect them to the Actions Entry screen. This streamlined process allows for the easy creation of new tasks into the system, facilitating efficient task management and ensuring all necessary actions are accounted for.

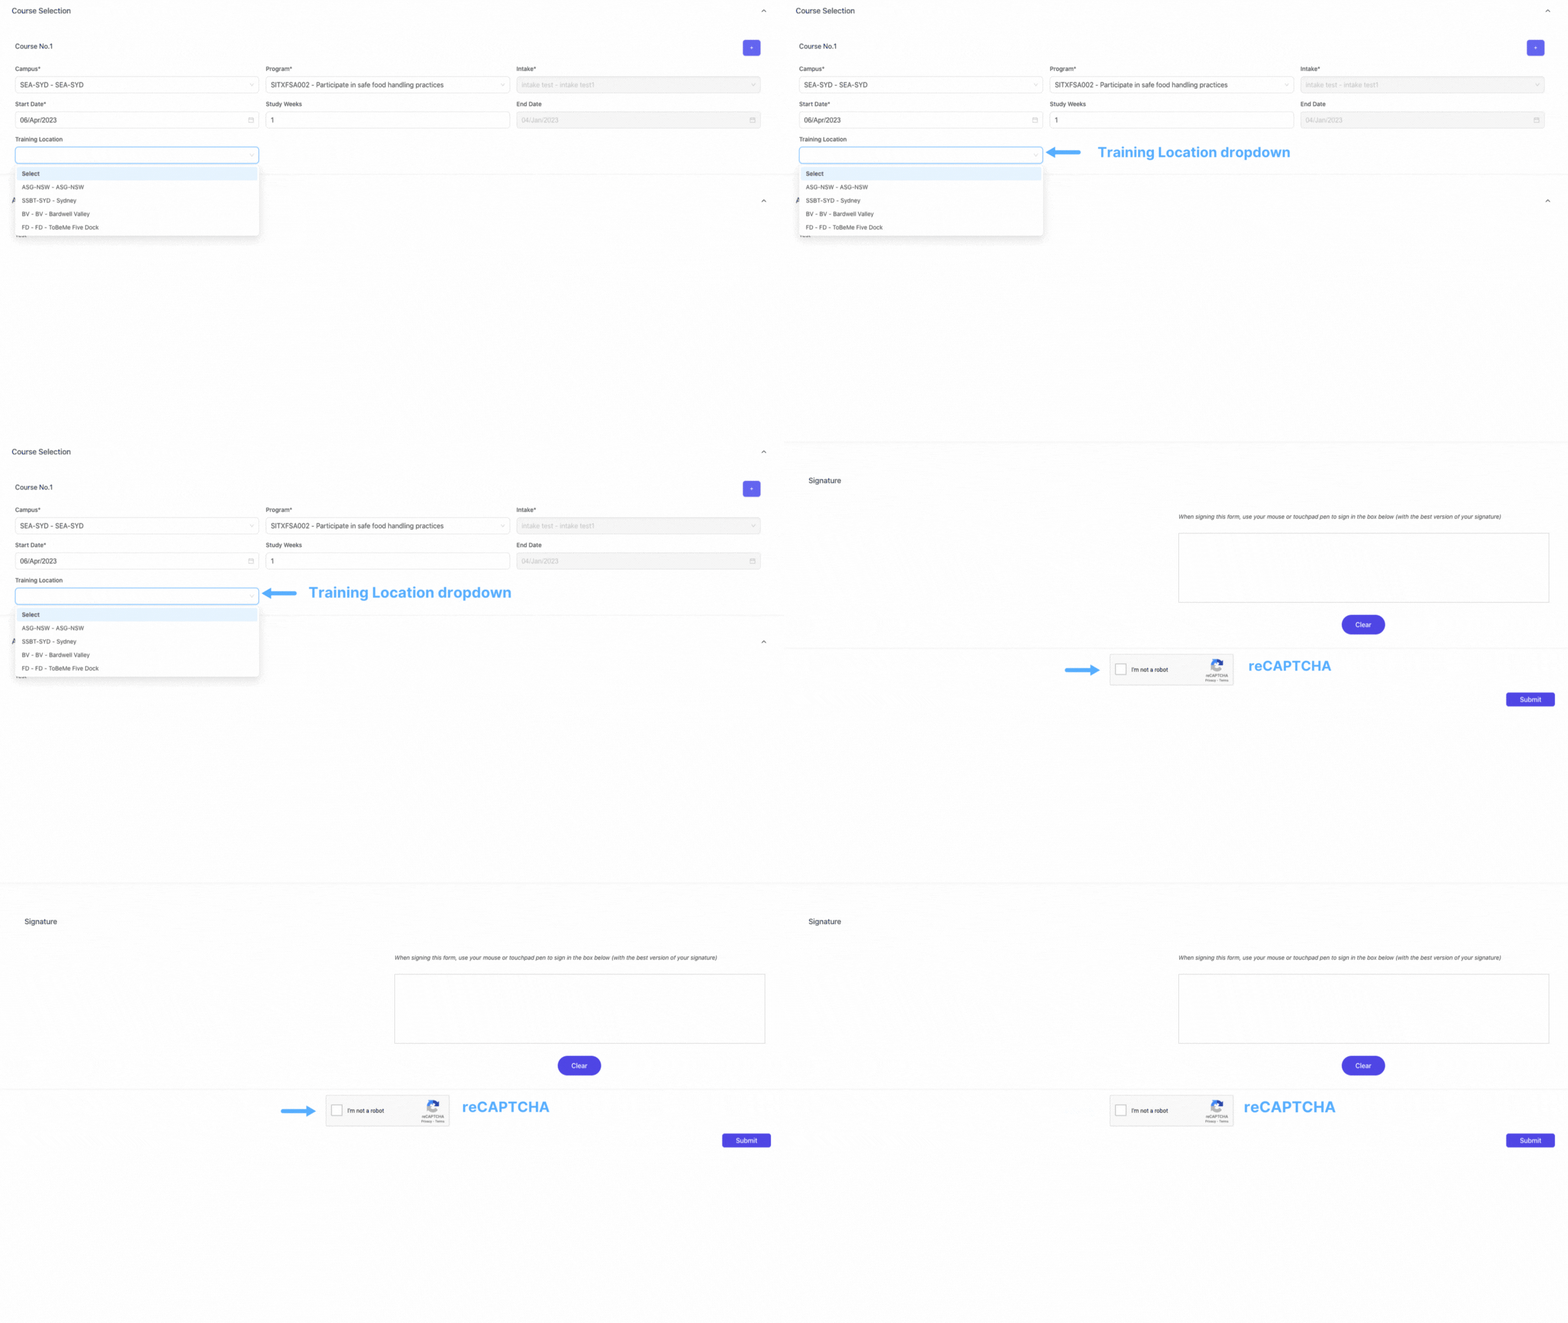
Negative Invoice Reference – New Label

We are pleased to announce the addition of a new label called Negative Invoice Reference on the Student Financial Details screen. This label can be found within the Transactions Details pop-up, under the More option. The purpose of this enhancement is to provide you with a convenient way to associate a reference number with negative invoices.

When creating a negative invoice and specifying a reference number for it, the system will now display this Negative Invoice Reference Number in the Transactional Details section for that particular invoice. This feature enables you to easily track and reference negative invoices, streamlining financial management processes and ensuring clarity and accuracy in accounting practices.

We believe that this enhancement will contribute to better financial management and provide you with an improved and more comprehensive view of your student financial details.

Task Entry > Set Recurrence Button

When you select the Task Recurrence button, a pop-up window will appear on your screen, providing several options for configuring the task recurrence:

Schedule Type:

Within the pop-up window, you will find three radio buttons—Daily, Weekly, and Monthly. By selecting one of these options, the system will schedule the task according to your choice.

If you choose Daily Radio Button, you can specify the task recurrence on the daily basis. The system will show you the below fields as shown in the table.

Fields Explanation
Range of RecurrenceThis field allows you to define the date range for the recurring task. You can set a start date to determine when the recurrence should begin and end.
End AfterIf you select this radio button, you can specify the number of occurrences after which the task will automatically end. For instance, if you set it to 10, the system will repeat the task 9 times because the system will include the task that you have created the recurrences for.
End ByAlternatively, if you choose this radio button, you can select a specific end date for the task recurrence using the calendar icon. The task will continue repeating until the specified end date is reached.
Every daysThis is a mandatory field. If you are choosing, the End After radio button for the specified occurrences then you must select the number of days for this field so that the system will look and create the task accordingly. For example – If you have entered the number 2 then the system will create a recurrence every second day.

Same as if you select the End By radio button and update the end date the system will look and create the task accordingly.

If you choose Weekly Radio Button, you can specify on which day of the week and for how long the task should recur. The system will show you the below fields as shown in the table.

Fields Explanation
Range of RecurrenceThis field allows you to define the date range for the recurring task. You can set a start date to determine when the recurrence should begin and end.
End AfterIf you select this radio button, you can specify the number of occurrences after which the task will automatically end. For instance, if you set it to 10, the system will repeat the task 9 times because the system will include the task that you have created the recurrences for.
End ByAlternatively, if you choose this radio button, you can select a specific end date for the task recurrence using the calendar icon. The task will continue repeating until the specified end date is reached.
Every WeeksThis is a mandatory field. If you are selecting, the End After radio button for the specified occurrences then you must select the number for every week, so that the system will look and create the task accordingly. For example – If you have entered the number 2 then the system will create a recurrence every 2 weeks.

Same as if you select the End By radio button and update the end date the system will look and create the task accordingly.

Please Note – You will also see tick boxes for the days of week (Sunday, Monday, Tuesday, Wednesday, Thursday, Friday and Saturday). When you select the days the system will create the recurrence every 2 weeks on the same days.

If you choose Monthly Radio Button, you can specify on which day of the month and for how long the task should recur. The system will show you the below fields as shown in the table.

Fields Explanation
Range of RecurrenceThis field allows you to define the date range for the recurring task. You can set a start date to determine when the recurrence should begin and end.
End AfterIf you select this radio button, you can specify the number of occurrences after which the task will automatically end. For instance, if you set it to 10, the system will repeat the task 9 times because the system will include the task that you have created the recurrences for.
End ByAlternatively, if you choose this radio button, you can select a specific end date for the task recurrence using the calendar icon. The task will continue repeating until the specified end date is reached.
Day of MonthThis is a mandatory field. If you are selecting, End After radio button for the specified occurrences then you must select the day of the month, so that the system will look and create the task accordingly. For example – If you have entered number as 2 then the system will create the recurrence on every second day of the month.

Same as if you select the End By radio button and update the end date the system will look and create the task accordingly.
Every MonthThis is a mandatory field. If you are selecting, the day of the month then you must mention the number for every month field. For example – If you have entered the number as for the day of the month and selected the number as 2 in every month field then the system will create the recurrence on the second month.

Same as if you select the End By radio button and update the end date the system will look and create the task accordingly.

After, selecting the above desired radio buttons, select the save button.

What’s New 29th June 2023 – Q&A

Here are some recent questions that have been asked, along with their corresponding answers. Our answers aim to offer clear and concise explanations, step-by-step instructions, and valuable insights. Whether you’re looking for guidance on a specific task or seeking to expand your knowledge in various fields, these questions and answers are here to provide you with useful and reliable information.

QuestionsAnswers
Unable to see the icons on the Classes and Attendance tilePlease select the read more link to know the answer.