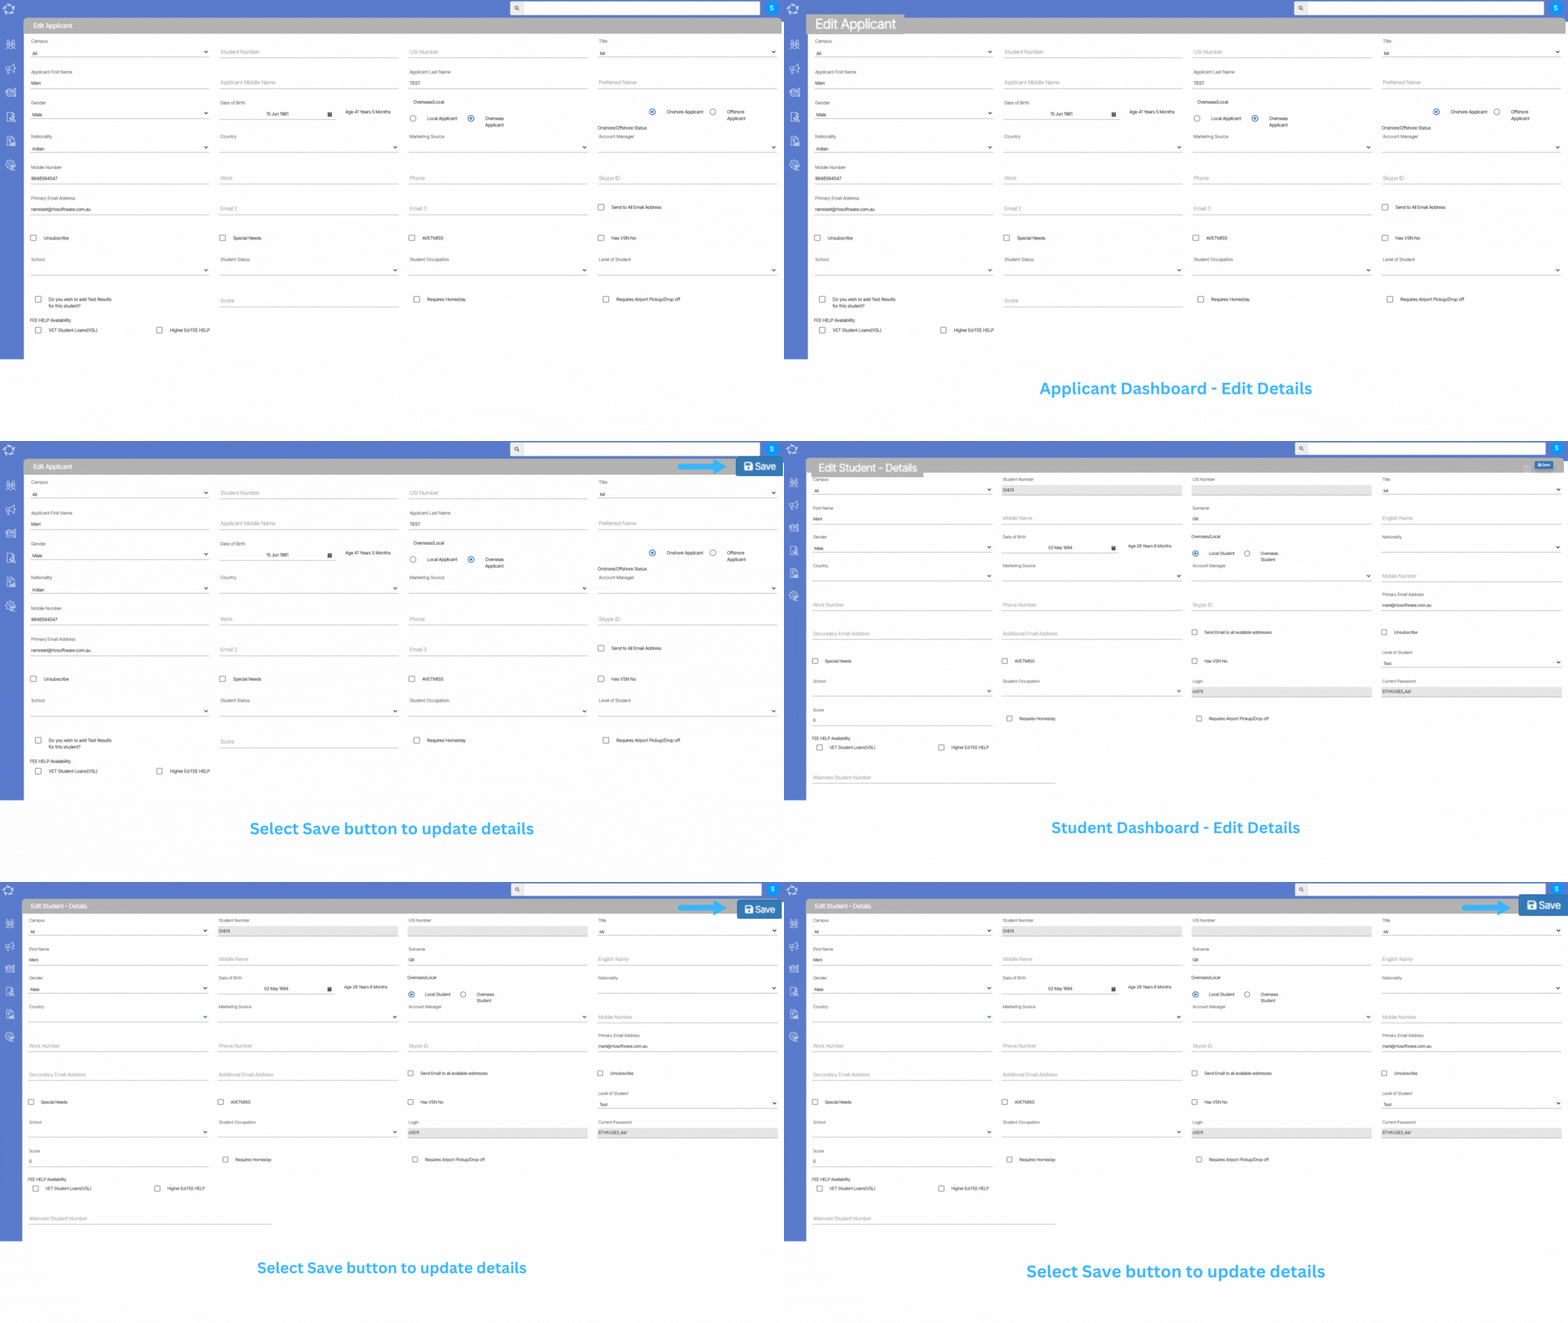
Edit Applicant/Student Details Screen

These screens will allow you to add/edit the information about the Applicant and Student. You can find these screens under:

Applicant Dashboard > Applicant Profile Tile > Edit Applicant Screen

Student Dashboard > Student Profile Tile > Edit Student Screen

Note Once the Applicant is converted to a Student then you won’t be able to add/edit any details at the applicant level. However, you can make changes from the Student Dashboard > edit student screen.
Explanation of the Fields

ColumnExplanation
CampusIt is a dropdown field, where you can select a campus for students. You can also select all as an option if the student has enrolments in different campuses.
Student NumberIt is a system generated field.
USI NumberThis is a Unique Student Identifier number and is a read only field.
TitleIt is a user code field, we can help you to add more titles if needed.
First NameYou can add the first name of the student here.
Middle NameYou can add the Middle name of the student here.
SurnameYou can add the Surname or last name of the student here.
English NameYou can add the English name of the student here.
GenderIt is a dropdown field, where you can select the specific gender of the student.
Date of BirthThis field shows a calendar where you can select the date of birth of the student.
Local StudentYou can select this option if the student is a local resident of the country where he/she is studying.
Overseas StudentThis is for international students. If the student is studying in the same country then select “onshore” but if the student is studying from a different country then please select “offshore
Nationality Nationality of the student.
CountryCountry of the student.
Marketing SourceThis is a user code field, you can select the options from the drop-down. If you need to set up any other options, kindly contact support.
Mobile NumberYou can add the mobile number of the student in this field.
Work NumberAdd the work contact number of the student.
Phone numberPhone number of the student.
Skype IDYou can add the student’s skype ID here.
Primary Email AddressThis email address will be used for all communications with the student.
Secondary Email AddressAdd the secondary email address of the student
Additional Email AddressYou can add another email address here
Send Emails to all available addressesIf this tick box is ticked, the system will send emails to all other email addresses too including the primary email addresses i.e. secondary email addresses and additional email addresses.
UnsubscribeBy ticking this tick box, you can unsubscribe from all the marketing emails. That means the student will not receive any marketing emails.
Special NeedsIf the student has any special requests or needs. You can tick the tick box and then can add special notes in the note box.
Always make sure to hit back at the notes icon after entering the notes to save it.
AVETMISSIf you are going to report this student to the government and the student is studying in any VET course, kindly tick this tick box. This is very important for compliance.
Has VSN NoYou can update the Victorian Student No in this field.
Level of StudentYou can select the level of the student if he/she is studying an ELICOS course.
School
Student OccupationYou can update the occupation of the student here.
LoginIt is a system-generated field where login details of the student portal or moodle will be populated.
Current passwordIt is a system-generated field where the password for the student portal or moodle will be populated.
ScoreHere You can update the English test score of the student.
Would you like to book homestay accommodation?You can select if students want to book accommodation (with or without meals) from the college. 
DurationYou can update the duration of the stay for a student.
Would you like to book our airport pick-up services?If the student wants to book airport pick-up services, you can select this option.
Do you require us to arrange Overseas Student Health Cover for you?If the student wants to arrange Overseas Student Health Cover, you can select this option.
Alternate Student numberStudent numbers given to a student other than system generated student numbers should be added in this field.

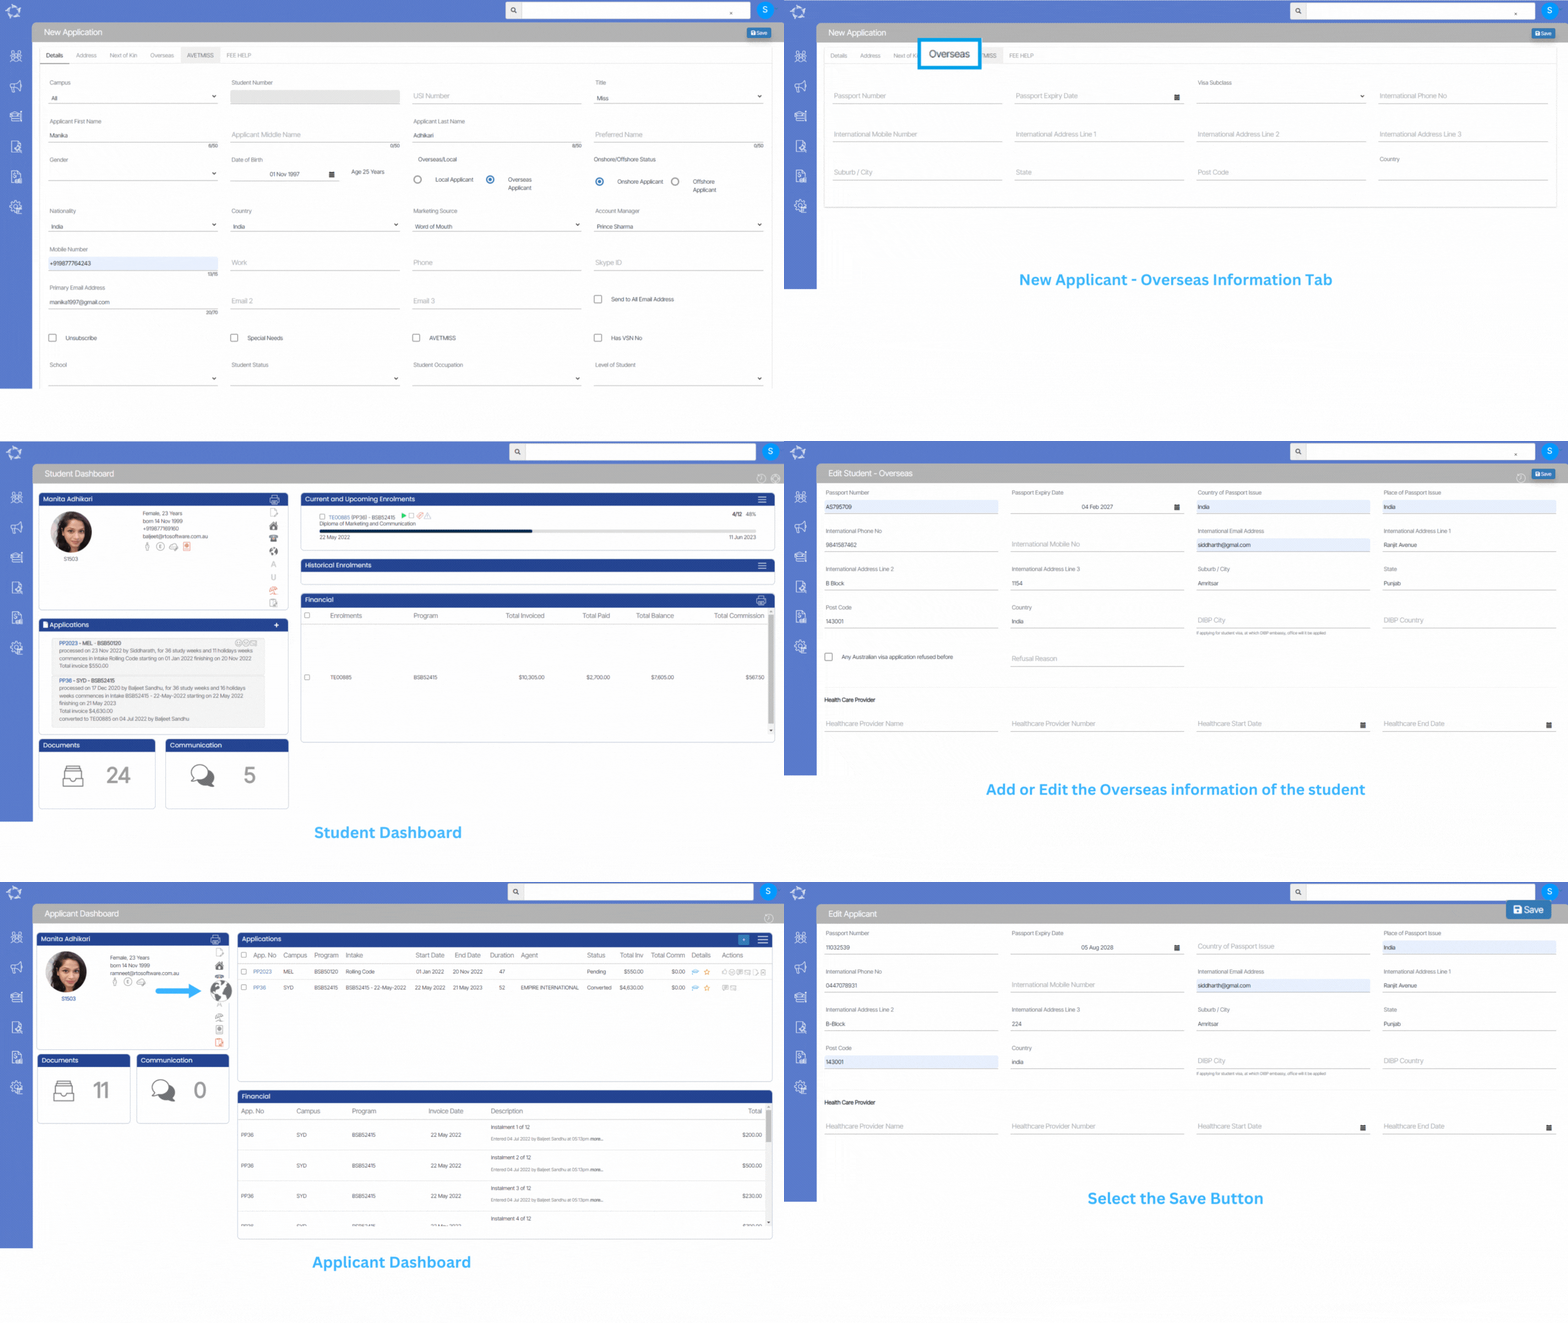
Edit Overseas Information

This screen allows you to Add/Edit the overseas information of the students. You can add the overseas information from the below screens.

New Applicant > Overseas tab

Applicant Dashboard > Overseas icon

Student Dashboard > Overseas Icon

Note – Once the applicant is converted to a student then you won’t be able to add/edit any details at the applicant level. However, you can do the changes from the edit student screen.

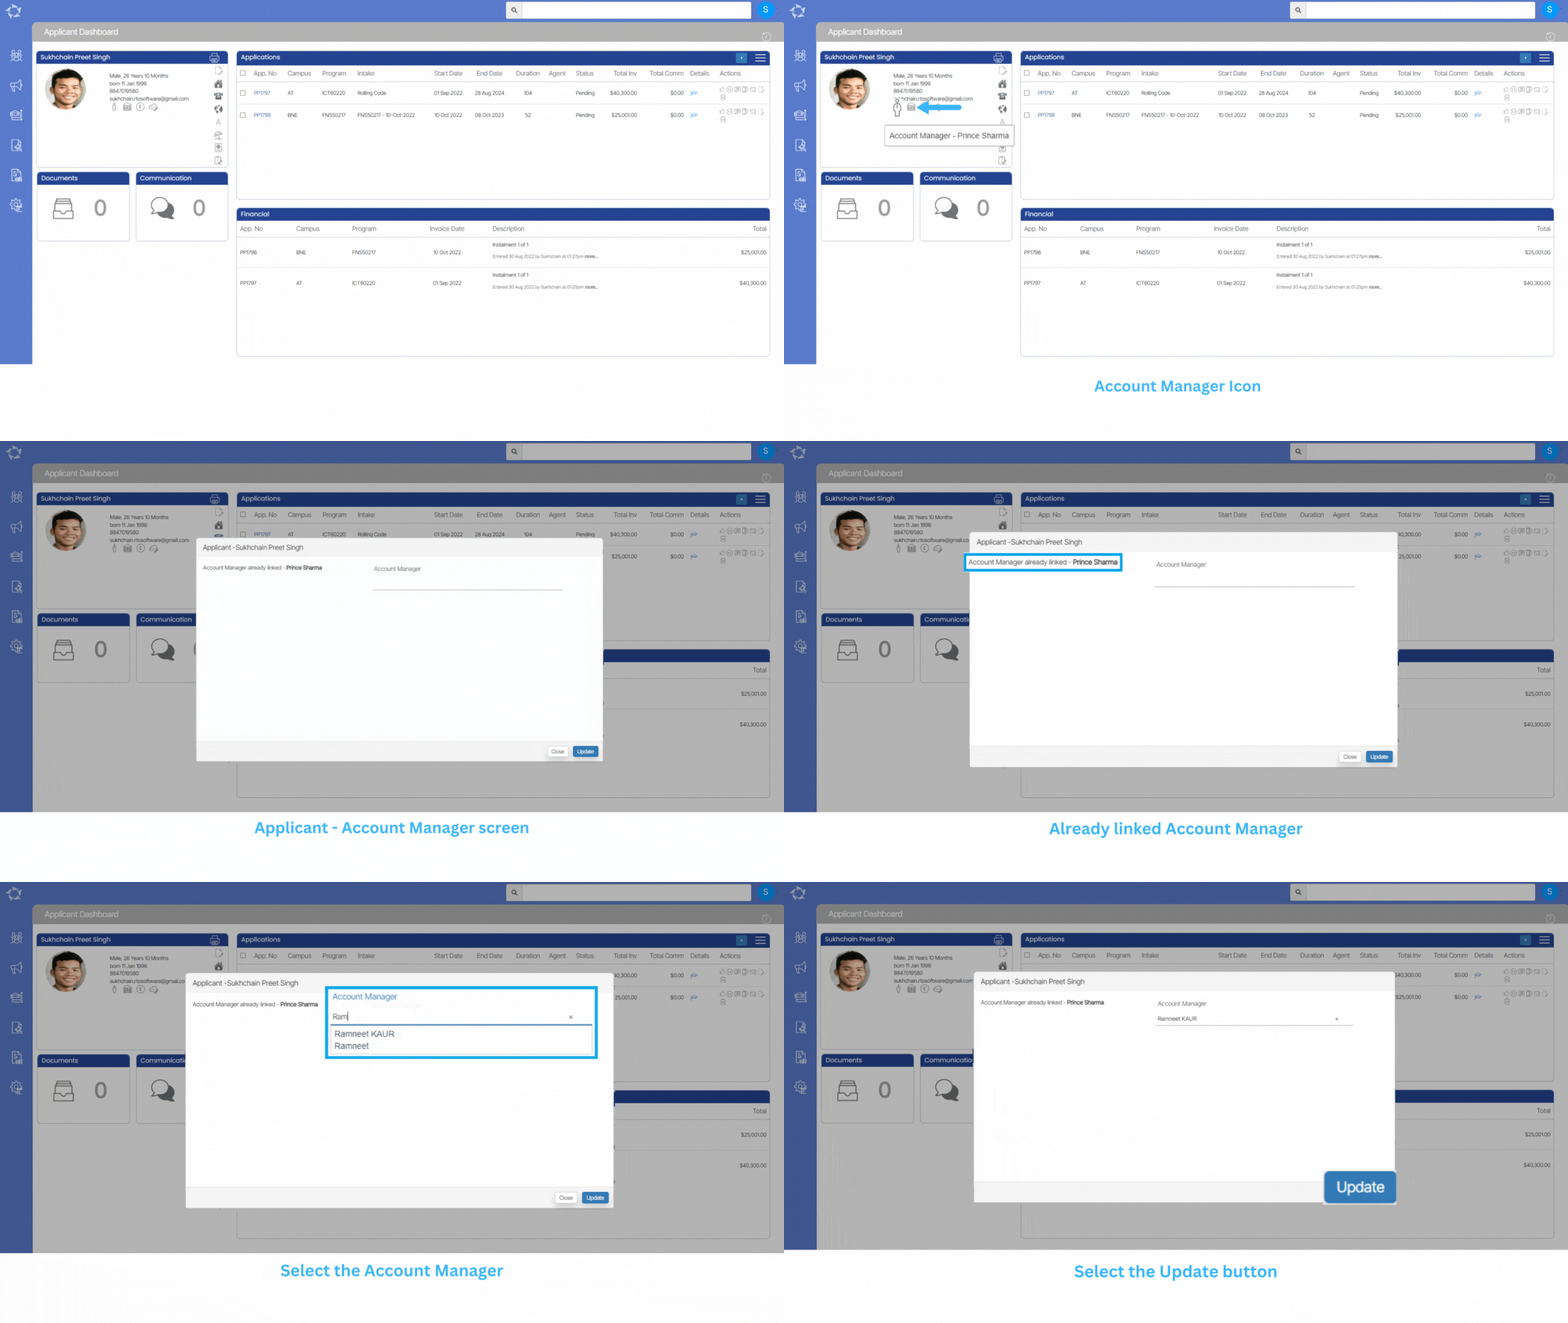
Applicant Dashboard – Account Manager

Applicant Dashboard > Applicant Profile Tile > Account Manager Icon

This icon will display the name of the account manager. If you want to change the account manager then you can change it by clicking on the icon itself. This will open a popup window where you can enter the first two letters of the account manager and it will display all the account managers starting with those letters. Select the appropriate account manager and select the update button.

Note: You cannot edit or change the Account Manager once the applicant is converted to a student. However, you can make changes from the Student Dashboard.

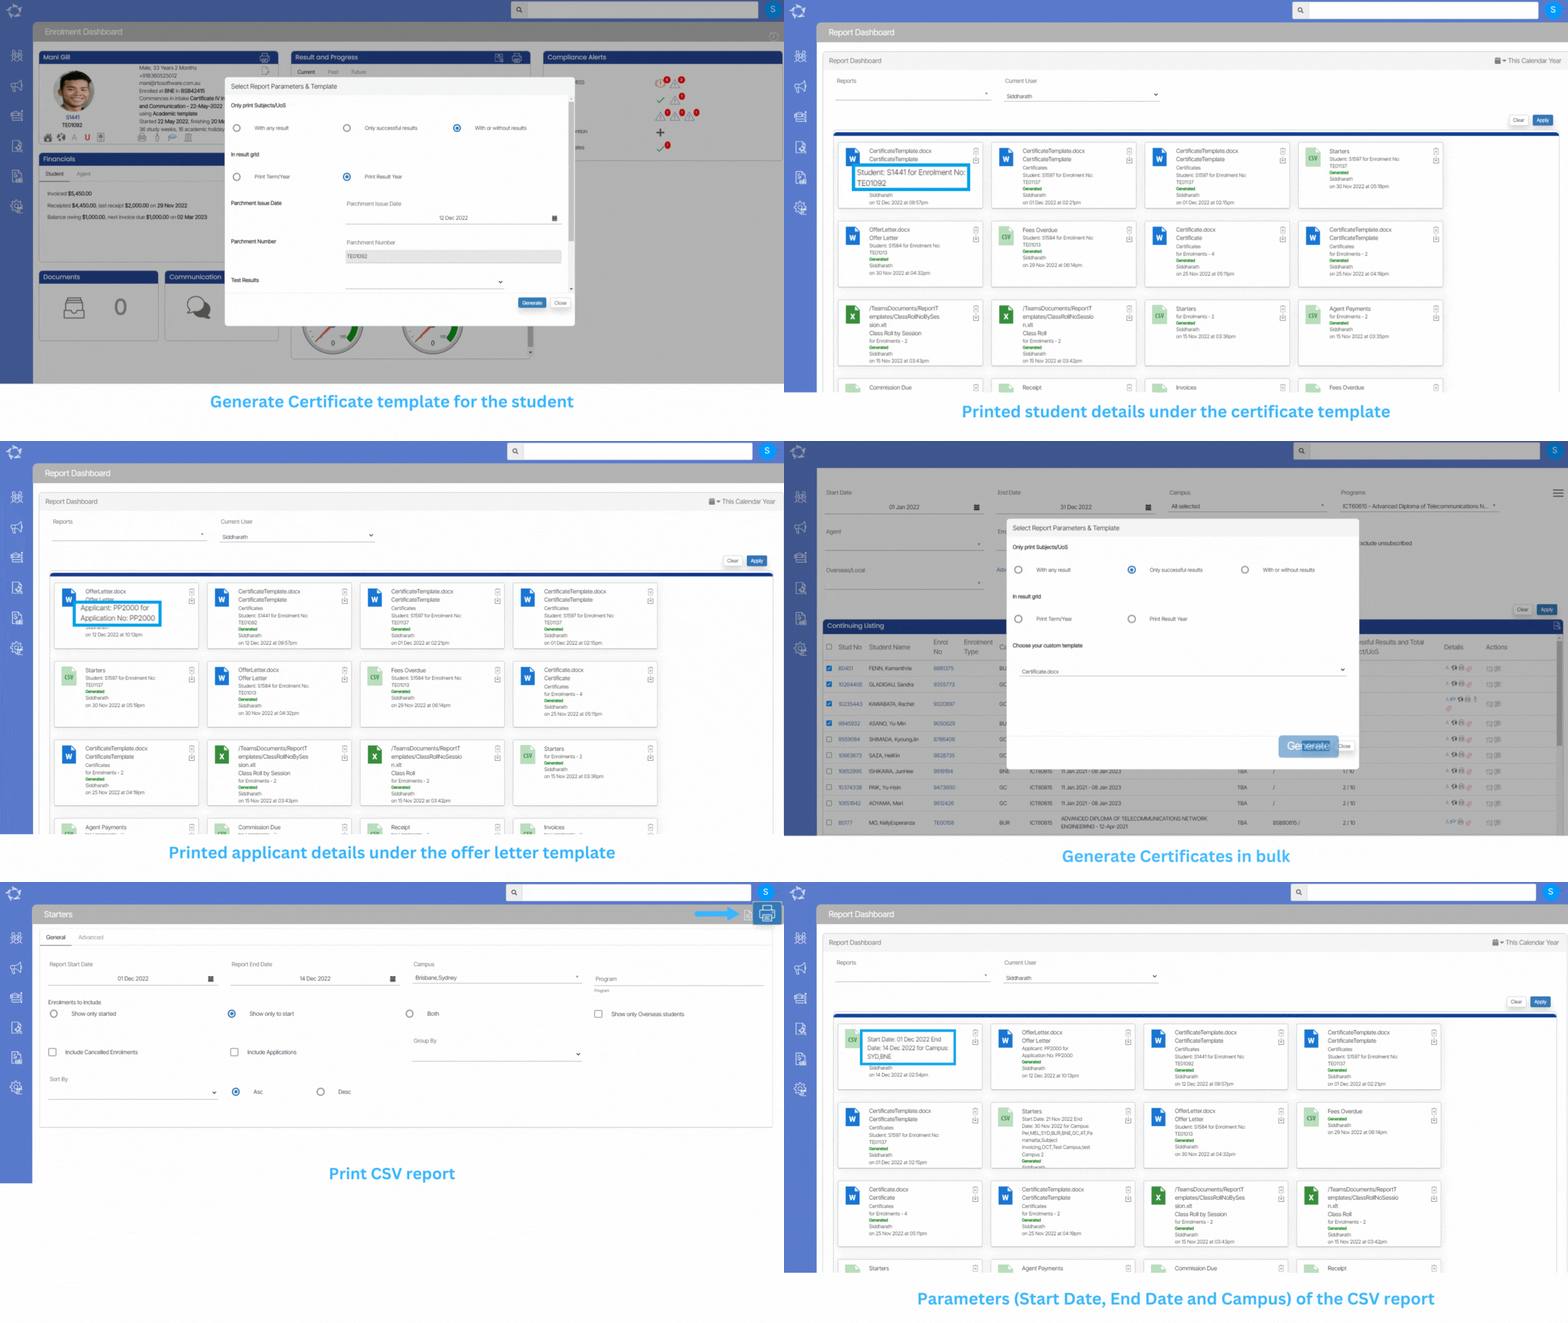
Report Dashboard Word Report Changes

We have made some changes to Report Dashboard in the system. When you generate an offer letter or certificate for a specific student/Applicant, the system will show the student’s information such as Student Number, Enrolment Number and Application Number and if you generate certificates or offers in bulk then you will be able to see the number of applications and enrolments.

Also, for CSV reports such as Starters, Finishers, you will be able to see the parameters (Start Date, End Date and Campus) on the report dashboard.

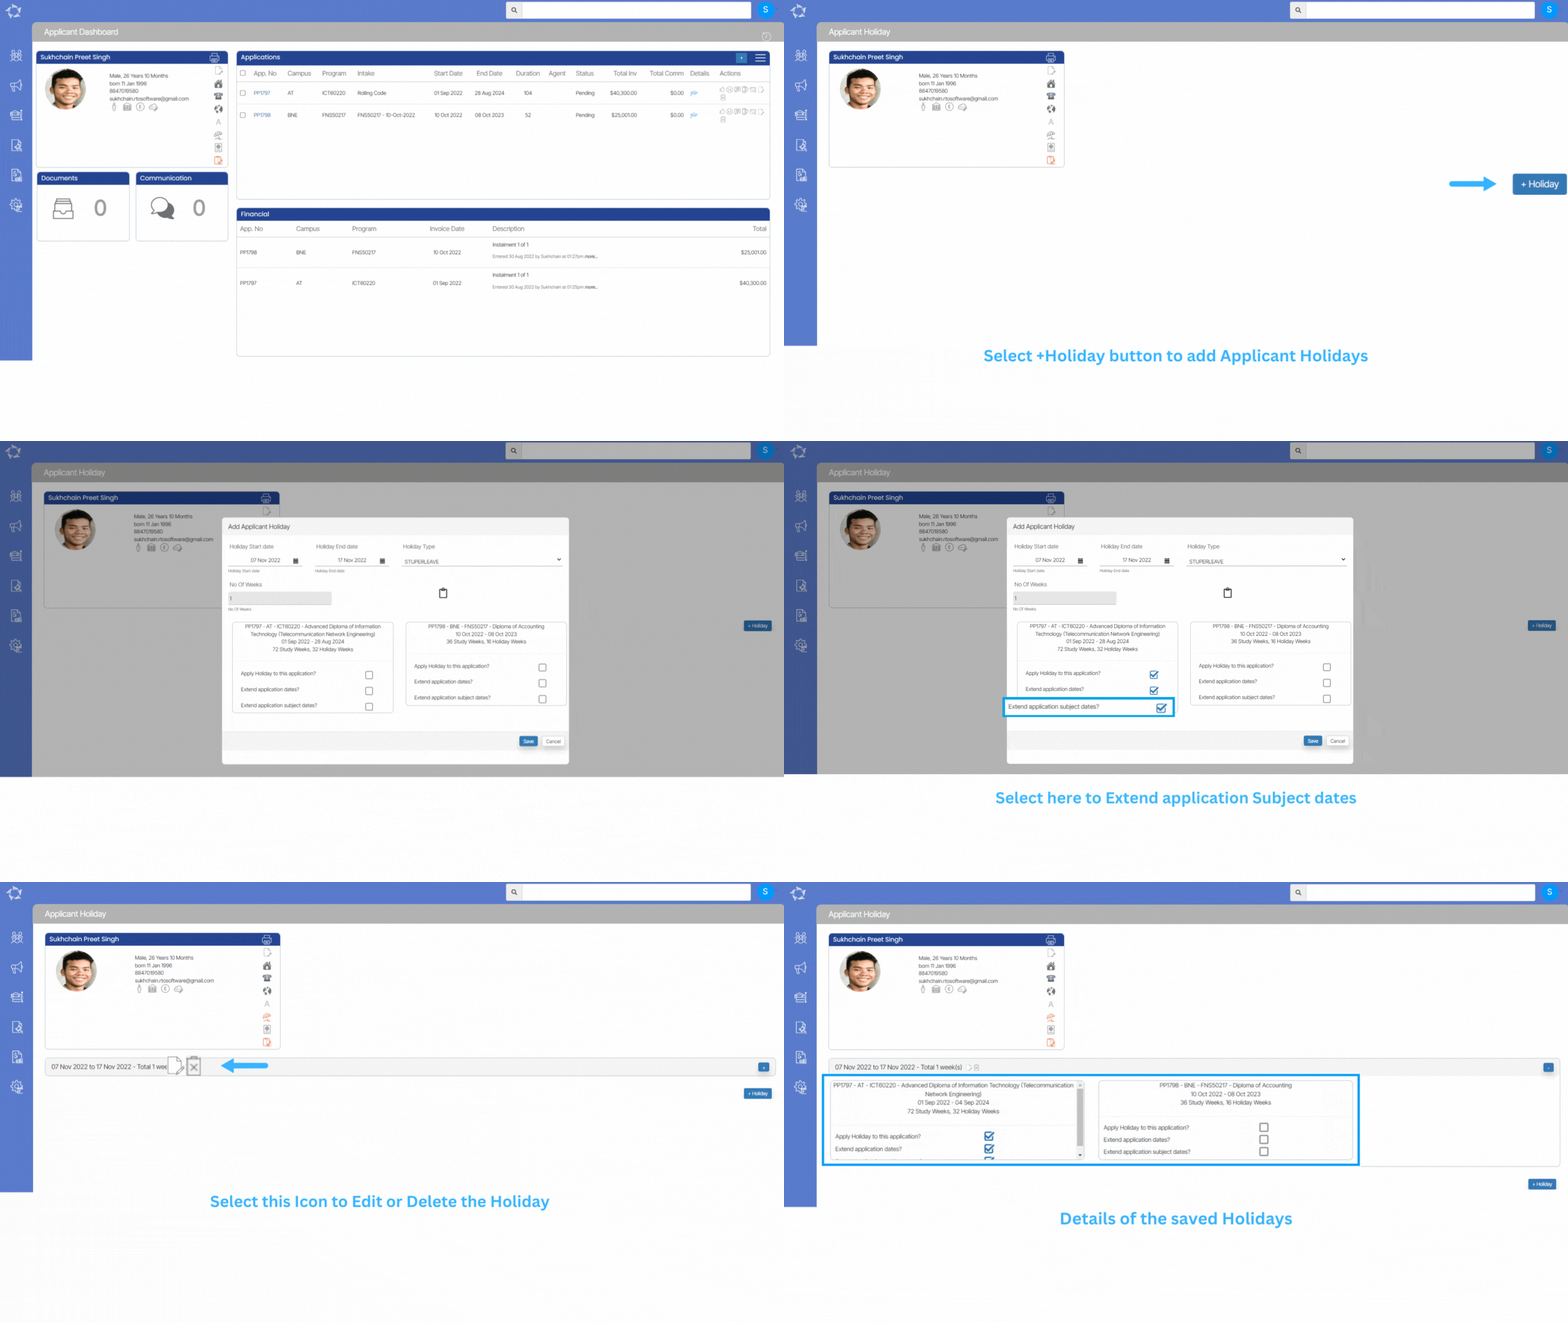
Holidays – Applicant

Applicant Dashboard > Applicant Profile Tile > Holiday Icon

While creating an application, you can apply for holidays at the Applicant level from the Applicant Dashboard > Holiday icon. To do this, you need to follow the below steps:

  • Select the Holiday icon from the Applicant Profile Tile
  • Select the Holiday button on the Applicant Holiday Screen
  • In the popup box, update the holidays with the Start and End dates and Holidays Types

Below is the explanation of the tick boxes in the popup window:

  • Apply holidays to this application- If you select this tick then the added holidays will get linked to the application.
  • Extend Application dates – If you select this tick box, the application end date will get extended as per the selected date range for the holidays. If the application start date is 08/05/2022 and the end date is 06/08/2023 and you have applied the holiday dates for 3 weeks, then the application end date will extend to 27/08/2023 as 3 weeks will get added to the application.
  • Extend application subject dates? – When you select this tick box, the Application’s subject dates will get extended automatically.

When all the above steps are done then you will see the applied holidays on the holiday screen, also if you want to edit or delete the holidays then you can select the edit icon or delete icon.

IMPORTANT – Once the application is converted to a student then you won’t be able to add/edit any details at the applicant level. However, you can make the changes from the Edit student screen.

NOTE – Once the holidays are applied to the Applicant, then the holiday’s icon will change to red color

Also, the Holiday type is a dropdown and if you want any holiday type to be set up on your TEAMS site then you to go to the User codes screen.

With USIs Not Verified

Compliance Dashboard > AVETMISS Students Tile > WIth USIs Not Verified

The AVETMISS Students Tile will show you the count of students as a link With USIs Not Verified. To verify the USIs, you need to follow the below steps:

  • Select This Calendar year from the Calendar icon.
  • Select the hyperlink next to the WIth USIs Not Verified.
  • You will be taken to the Students – USIs Not Verified listing screen.
  • Select the student number hyperlink under the Student No column.
  • You will be taken to the Edit Student – USI screen.
  • Update the Student’s USI number and select the Save button.

Note: When you have verified the USI number on the Compliance Dashboard, you need to refresh the screen to see the updated count of the With USIs Not Verified.

Missing Family Name

Compliance Dashboard > AVETMISS – Students Tile > Missing Family Name

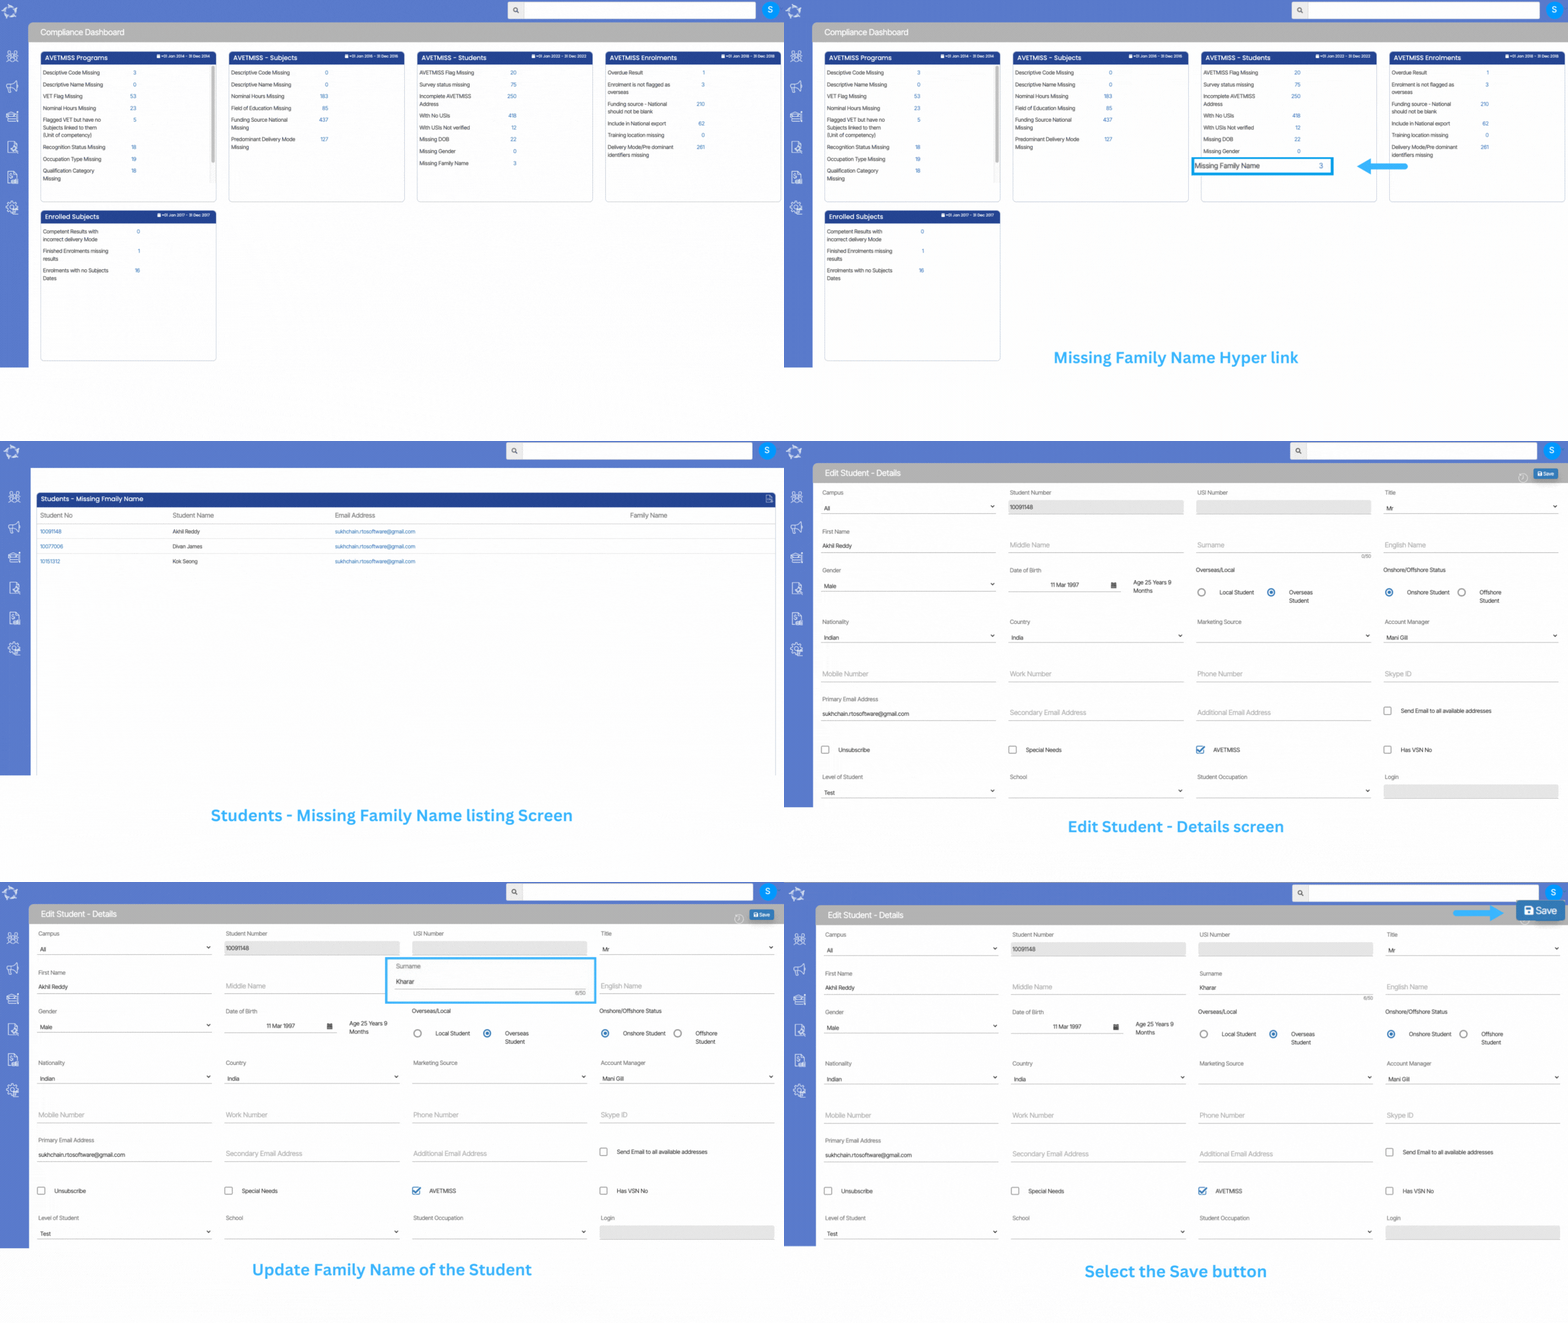
The AVETMISS Student Tile will show you the Missing Family Name of the students in the system. To update the missing Family Name, you need to follow the below steps:

  • Select This Calendar year from the Calendar icon.
  • Select the hyperlink next to the Missing Family Name.
  • You will be taken to the Student-Missing Family Name Listing Screen.
  • Select the student number link to update the Family Name.
  • On the Edit Student Screen, Update the Surname of the student and Save.

Note: When you have updated the DOB of the students then on the Compliance Dashboard, you need to refresh the screen to the count of the Missing DOB students.

NCVER AVETMISS Student Data Submissions – RTO TEAMS Step 1

Campus and Training Locations

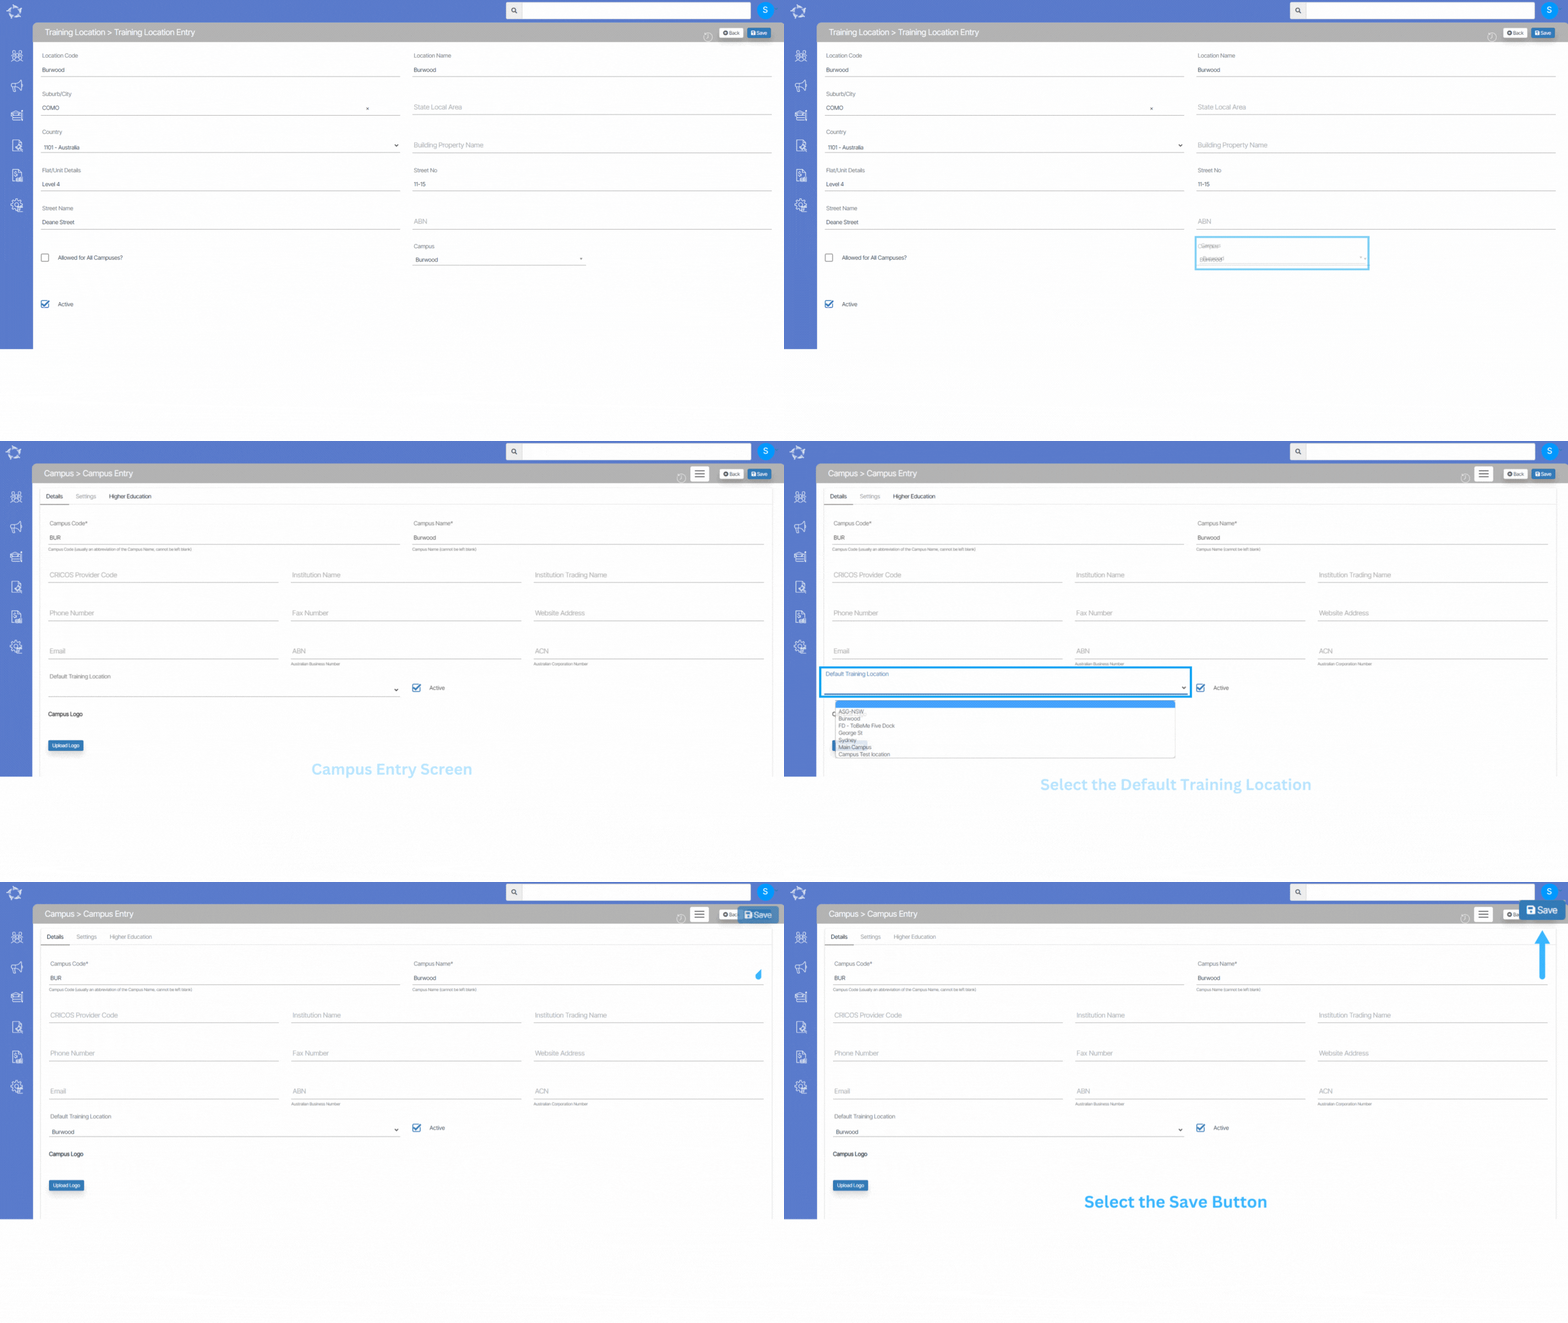
Your campus and training location information is exported into the NAT00010 and NAT0020. In this step you need to review that the information is correct for the calendar year that you are doing your student data submission for.

For example: when you first started using TEAMS you would have had one or many campuses setup and we would have setup and linked to each campus a training location. Where it was identified that you only needed one training location per campus we would have also set that as the default training location so it always updates against each enrolment that you linked to a specific campus. However, if you had to have multiple training locations per campus then it was up to your staff to select the correct training location at the proposal or enrolment. Now in the calendar year that you are submitting data for your circumstances may have changed that you have introduced a new campus and/or new training location and have not considered that this impacts your submissions.

Important: even though this setup and data you are reviewing is related to the NAT00010 and NAT0020 the training location in the NAT00020 also shows in the NAT00120 which is the NAT file with the biggest load of data in it. So, if you do not have a training location linked to an enrolment, for every subject for that enrolment listed in the NAT00120, you will have the same error. This means if an enrolment has 10 subjects listed against it in the NAT00120 without a training location, you will see that error 10 times in your error list. Now repeat this for each enrolment that you haven’t linked the training location to and it can add up to hundreds if not thousands of rows of errors.

Refunds and Transfers – Change

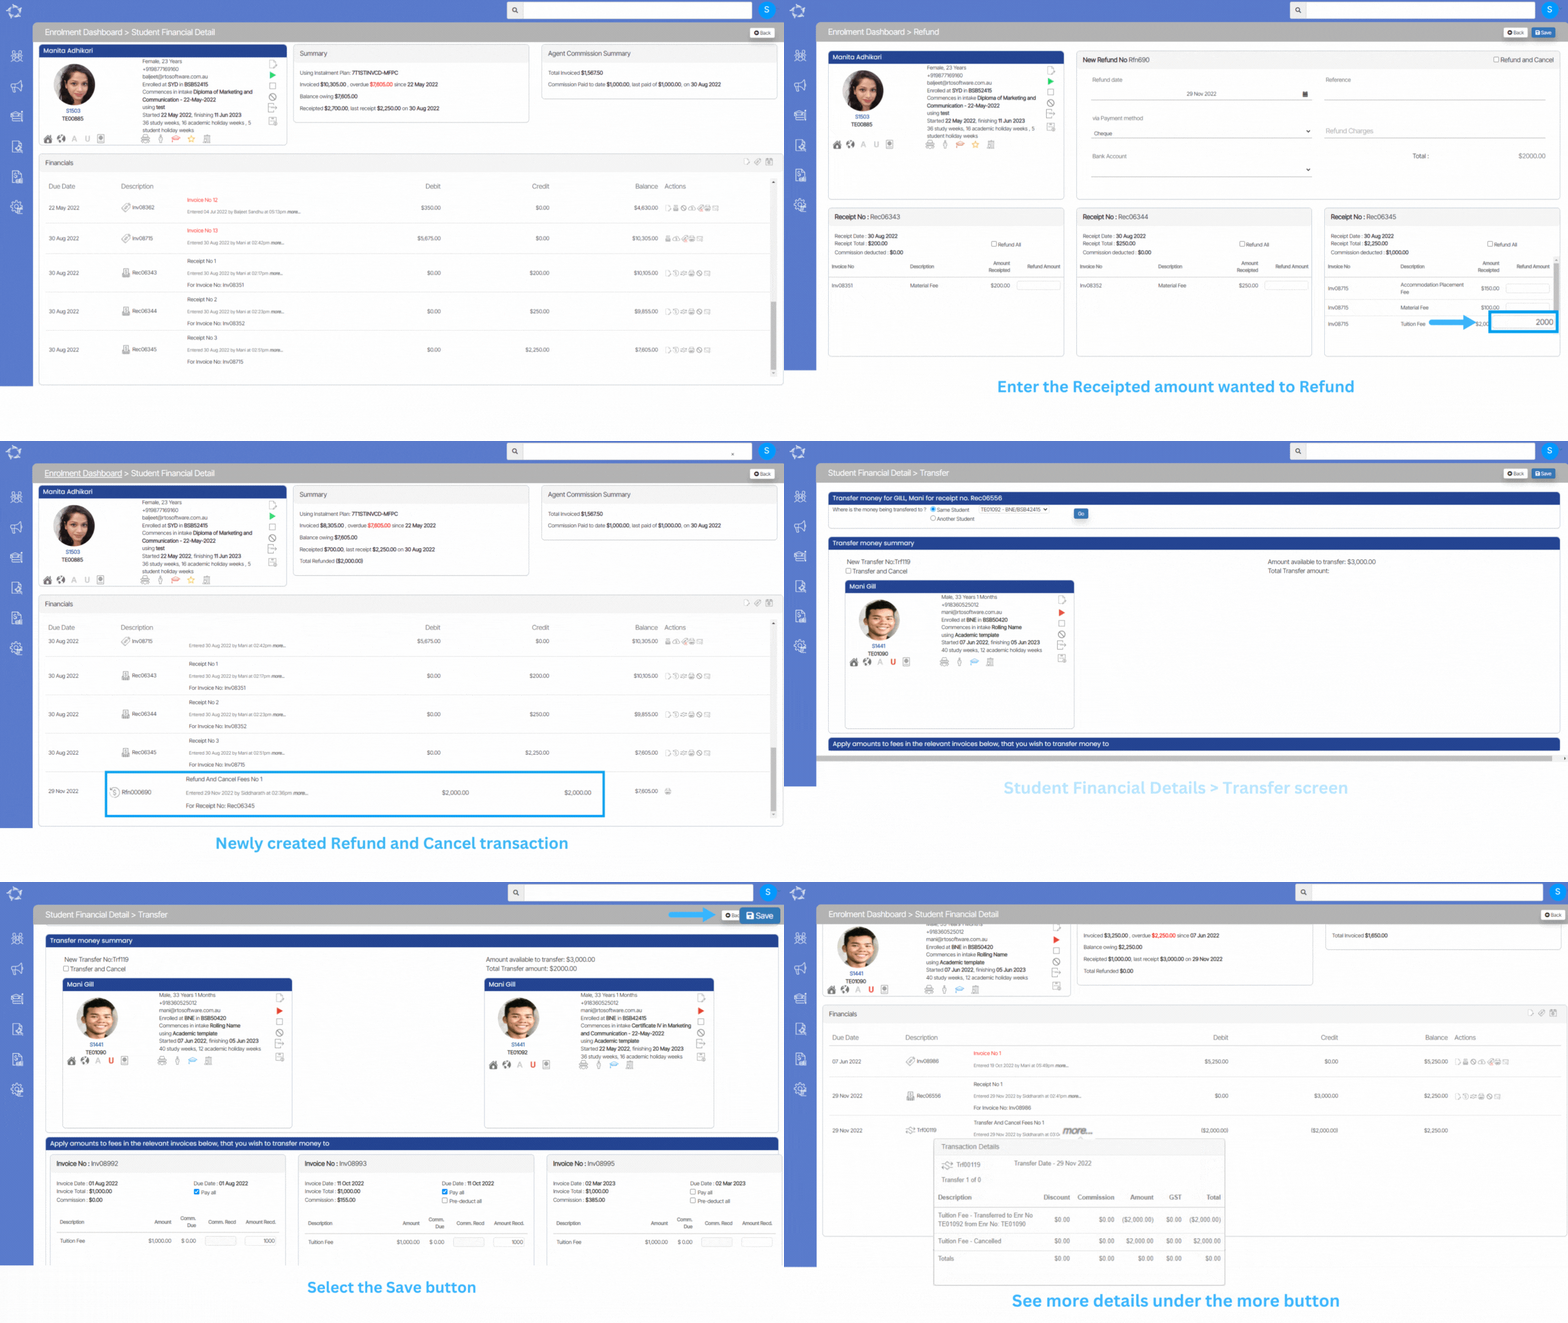
We have added new checkboxes in the Refund and Transfer screens for Refund and Cancel and Transfer and Cancel. Where you select the new tick box, the system will cancel the receipted amount against the relevant invoice. This means it could cancel the entire invoice OR the receipted amount for the fee linked in the invoice.

Refund and Cancel:

This check box has been added under the Refund screen and can be used while refunding the receipted amount. By selecting this tick box, the system will cancel that refunded amount from the total invoice amount. For example, if you have an invoice for $500 and the receipt amount is also $500. When you do a refund on the receipt amount for $500, if you select the tick box for Refund and Cancel, then the system will create the refund entry and also cancel the invoice as well. Whereas, the same invoice for $500 but there is a receipt for only $200 and you want to refund that receipted amount. The system will do the refund entry for $200 and cancel out $200 from the invoice so the invoice amount will then be only $300.

Transfer and Cancel:

This check box has been added under the Transfer screen and can be used while transferring the receipted amount. By selecting this tick box, the system will use the same logic as for Refund and Cancel, for the invoice that the receipted amount is being transferred from.

Missing DOB

Compliance Dashboard > AVETMISS – Students Tile > Missing DOB

The AVETMISS Student Tile will show you the Missing DOB of the students in the system. To update the missing DOB, you need to follow the below steps:

  • Select This Calendar year from the Calendar icon
  • Select the hyperlink next to the Missing DOB.
  • You will be taken to the Student-Missing DOB Listing Screen.
  • Select the student number link to update the DOB.
  • On the Edit Student Screen, Update the Date of Birth of the student and Save.

Note: When you have updated the DOB of the students then on the Compliance Dashboard, you need to refresh the screen to the count of the Missing DOB students.