Main Dashboard – History

Below list will show changes that we have done on the main dashboard. The changes aim to improve the dashboard’s performance and usability, allowing you to navigate and utilise the platform more effectively.

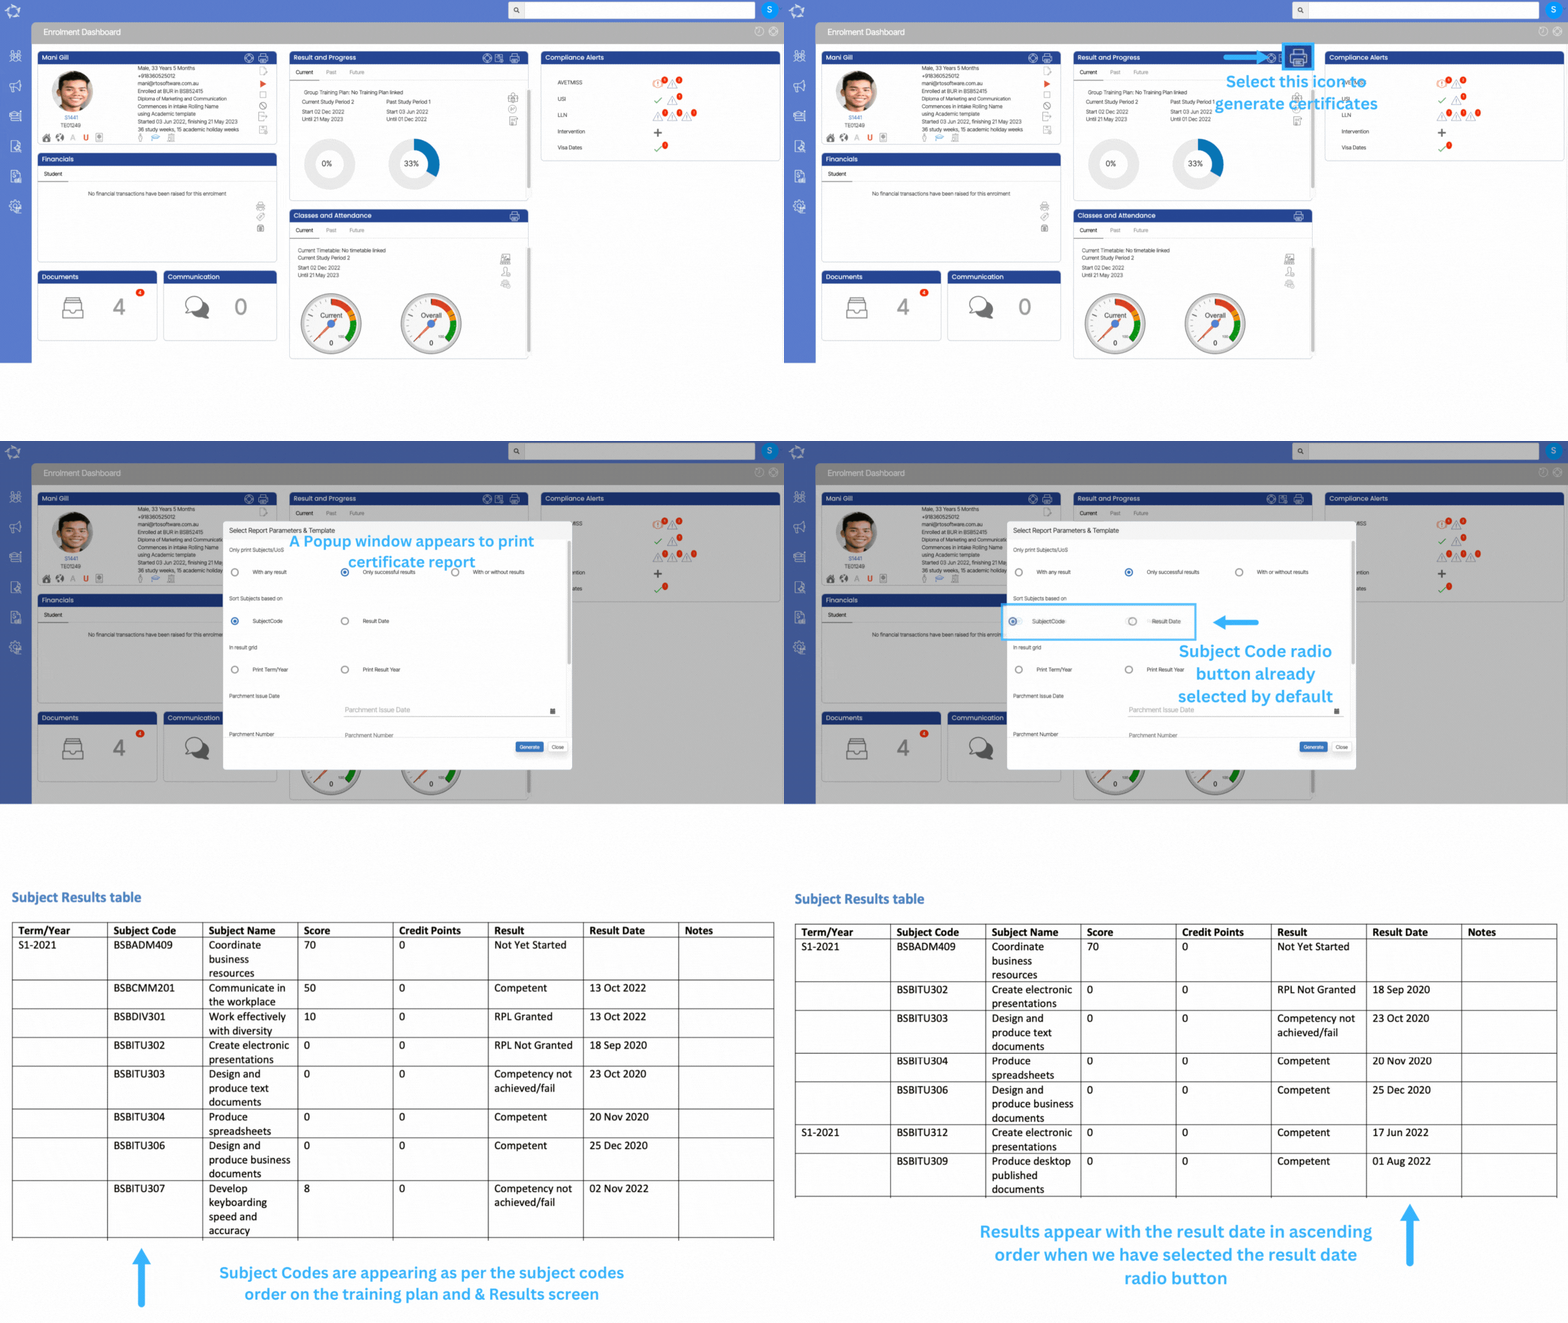
Certificates – Subject Code and Result Date – New System Setting

A new system setting has been implemented for certificates that allow the subjects to be sorted based on two criteria: Subject Code and Result Date.

When the Subject Code radio button is selected, the table within the certificates will display the subjects Code in alphabetical order and if the Result Date radio button is selected instead of the Subject Code radio button in the certificates, then the table within the certificates will display the results dates in ascending order.

Note – Our default settings have been configured to include the Subject Code as the default selection when generating certificates. However, if you prefer to have the Result date radio button selected by default, we offer the option to turn on this setting for you. To do this, please get in touch with our support team, and they will assist you in making the necessary changes to your organisation site.

What’s New – 23rd March 2023

Welcome to the latest update for TEAMS

Some key changes made in this update are:

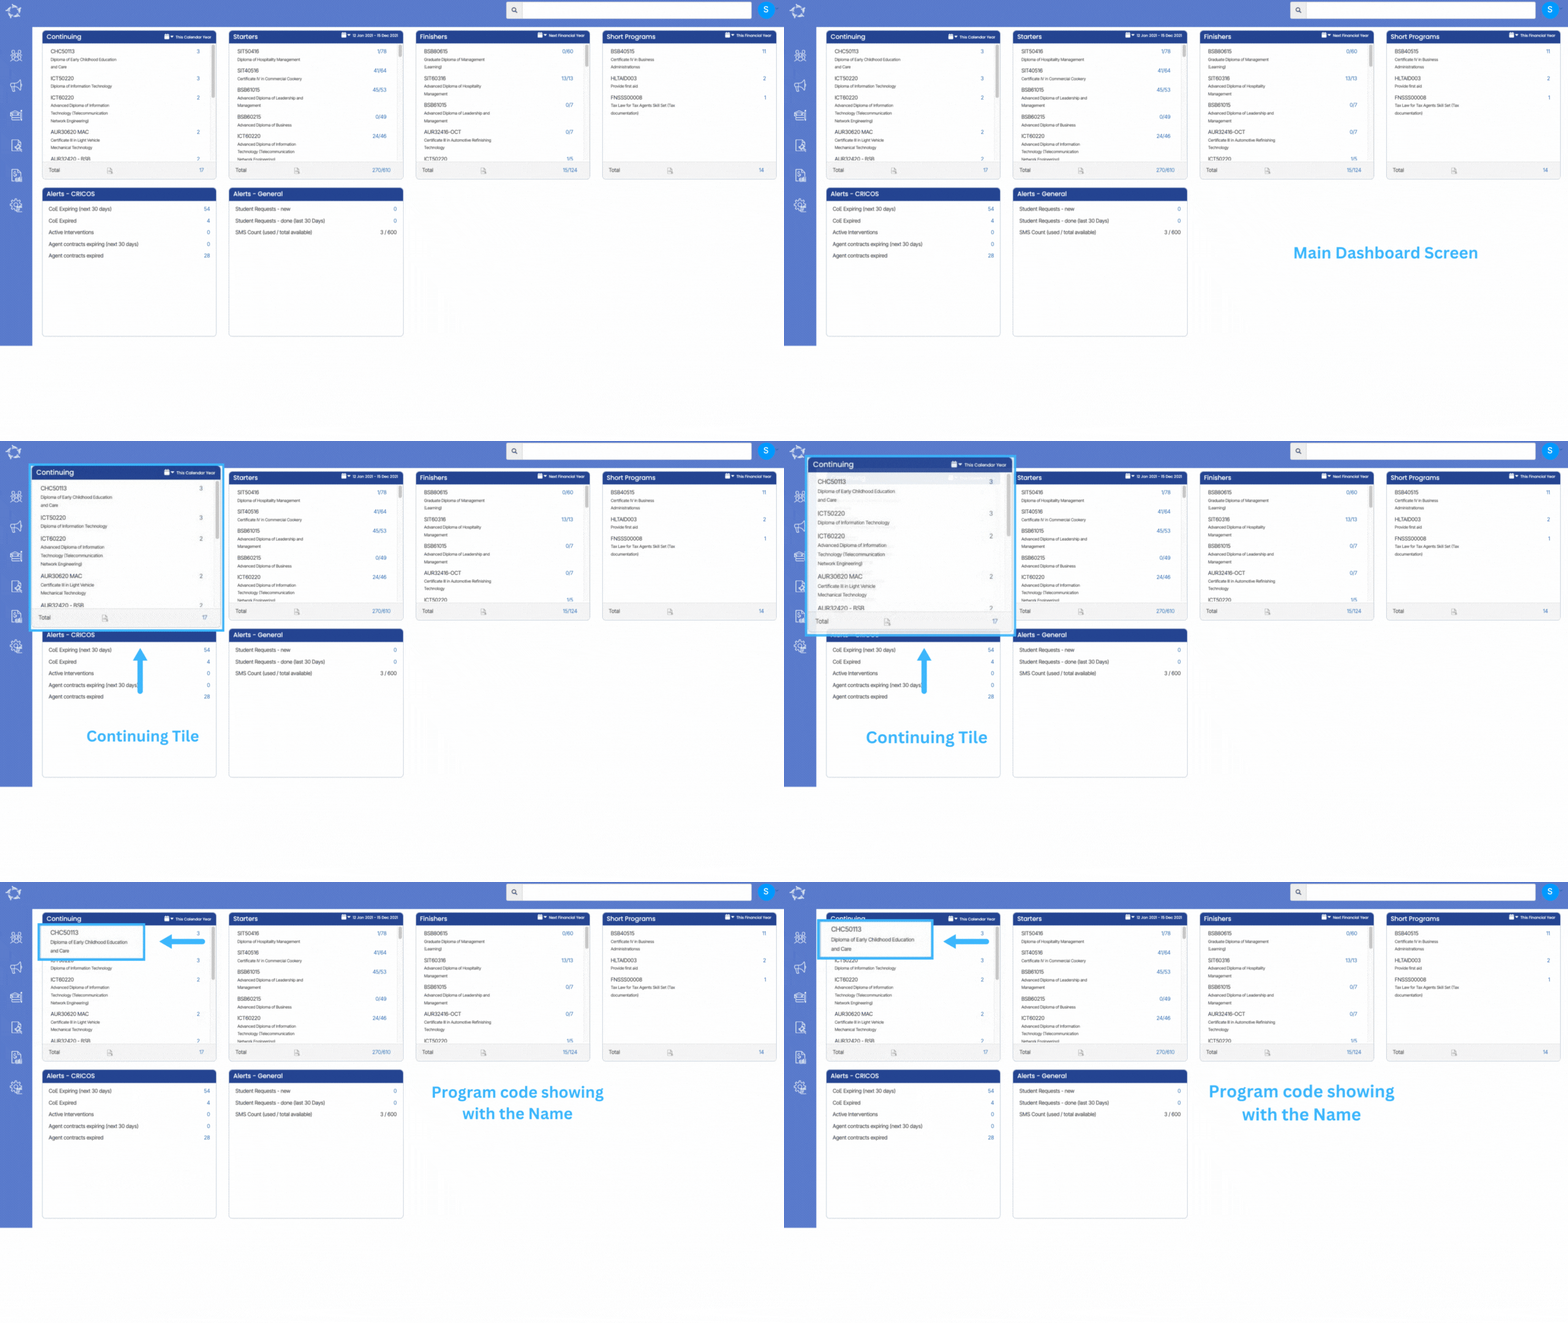
  • The Main Dashboard tiles now display the Program Name and Program Code
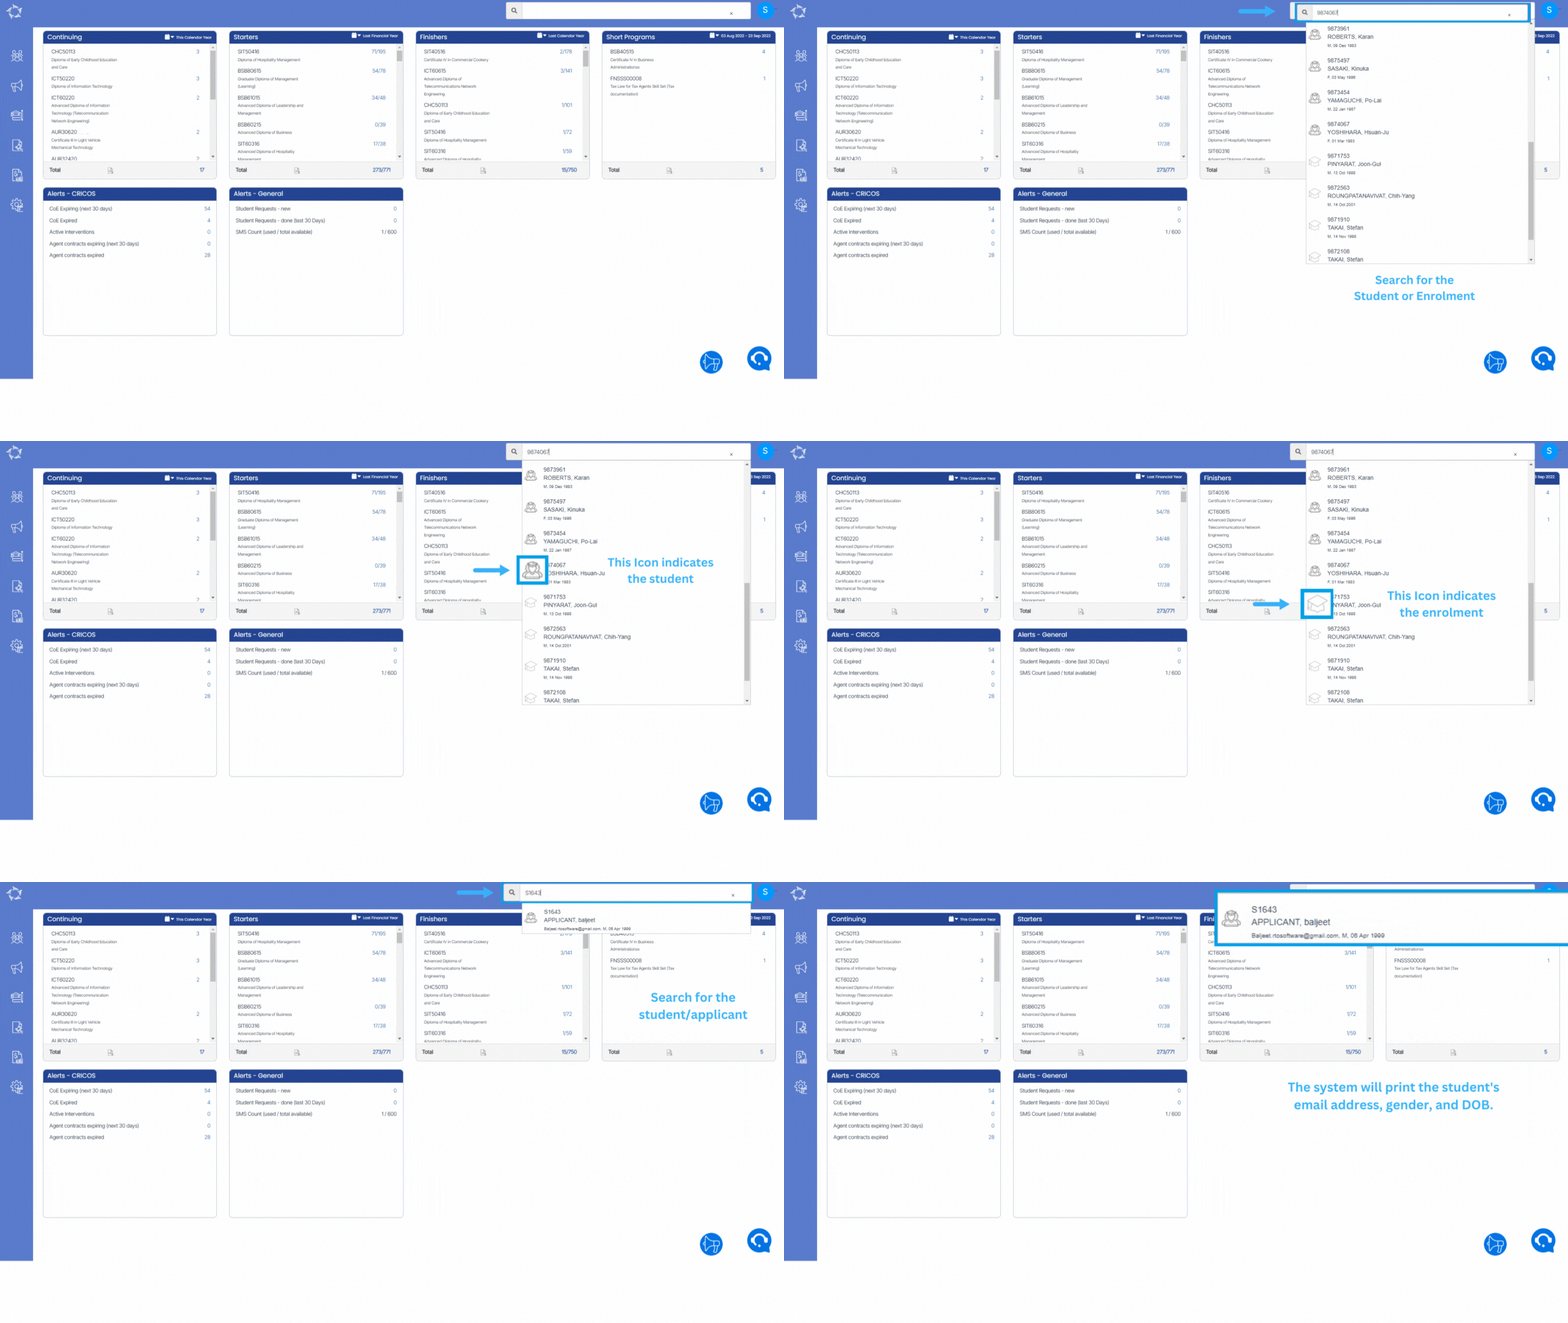
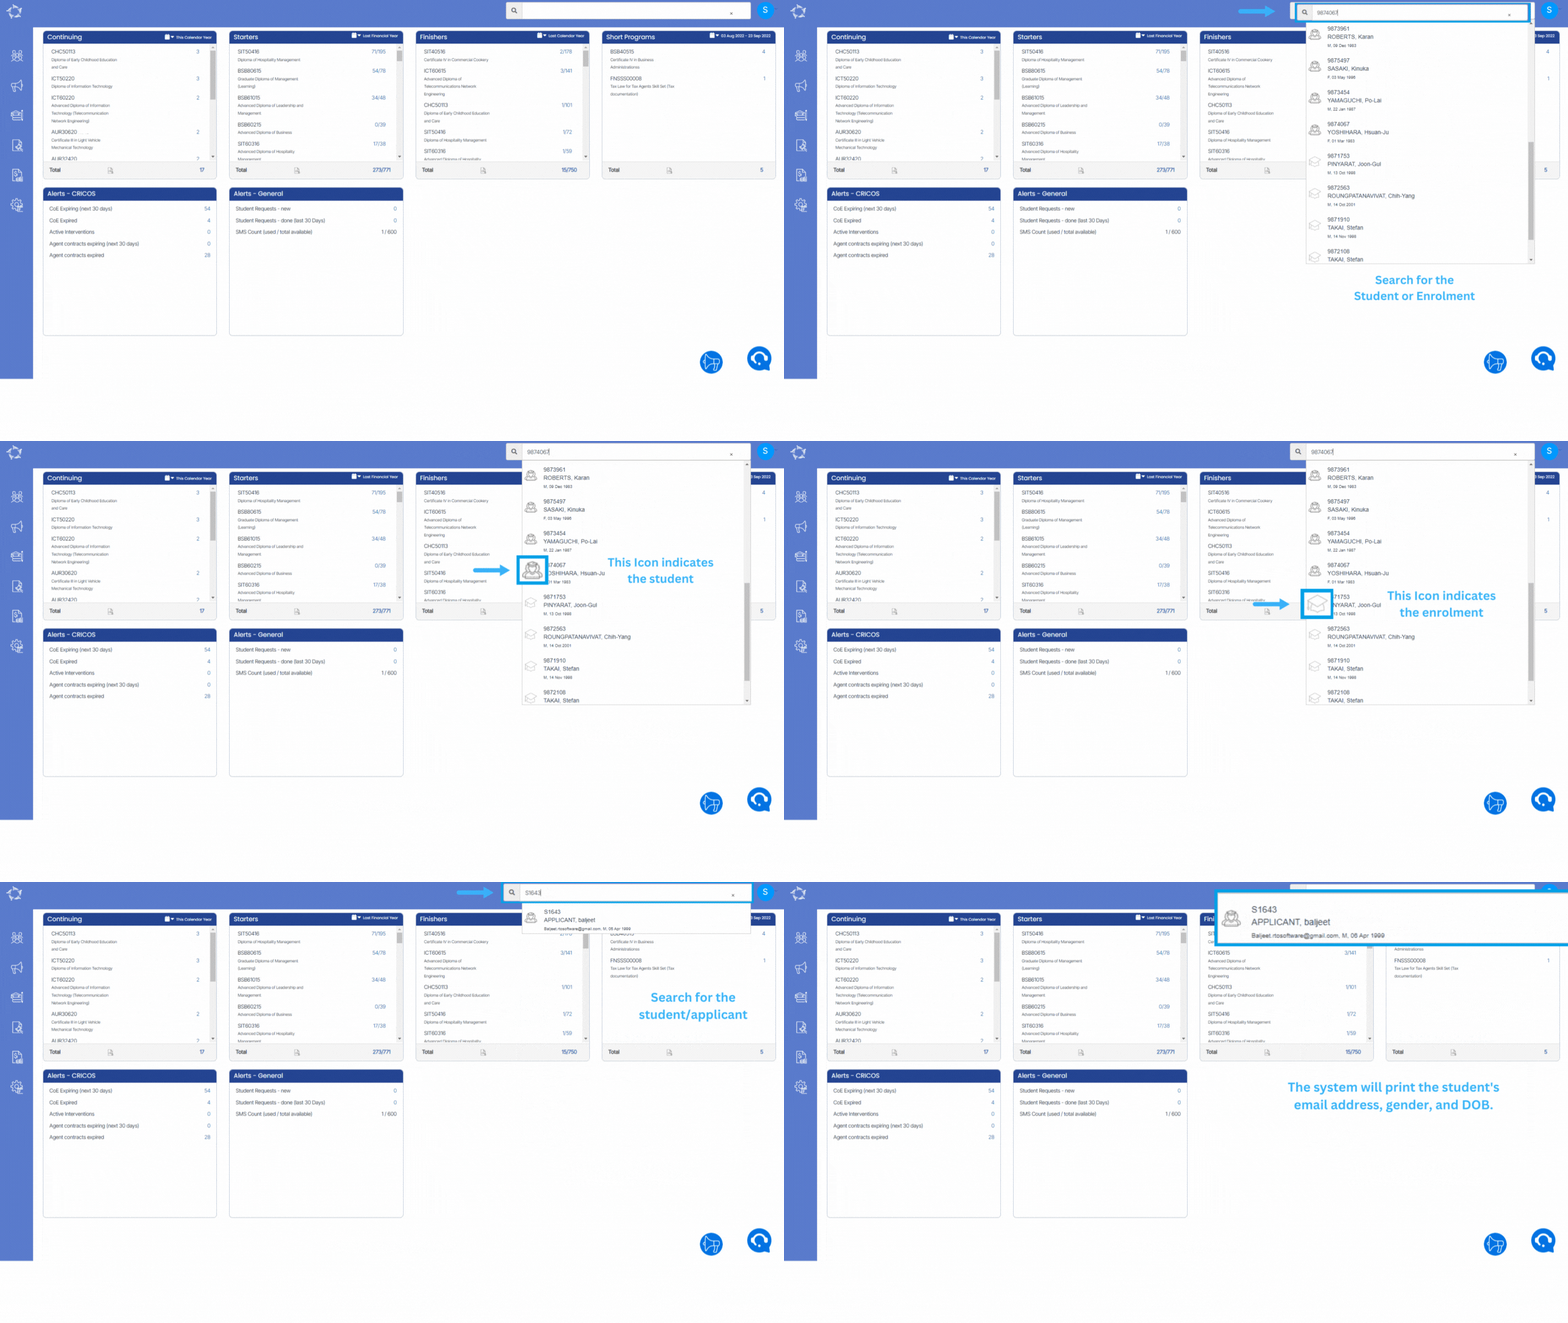
  • New icon to distinguish between enrolments and students in the search bar
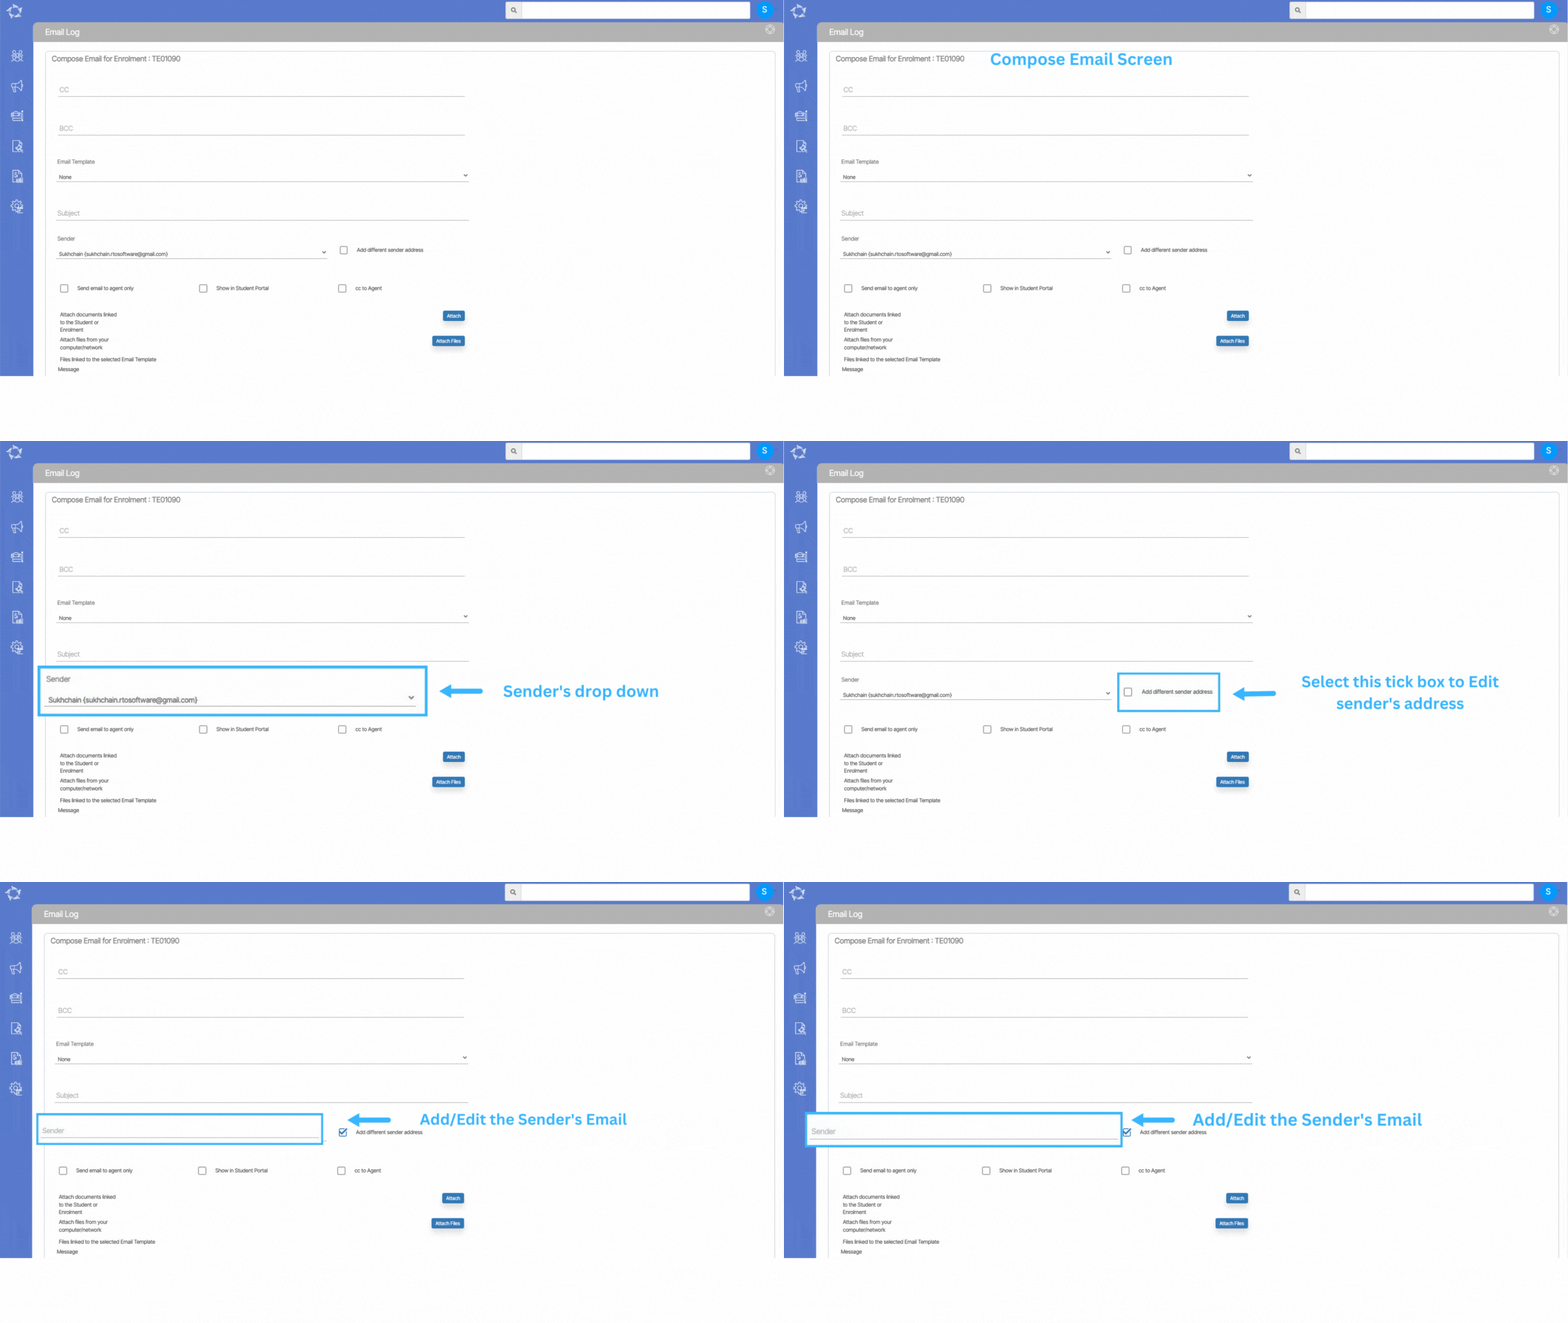
  • The edit sender email option is now available while sending emails
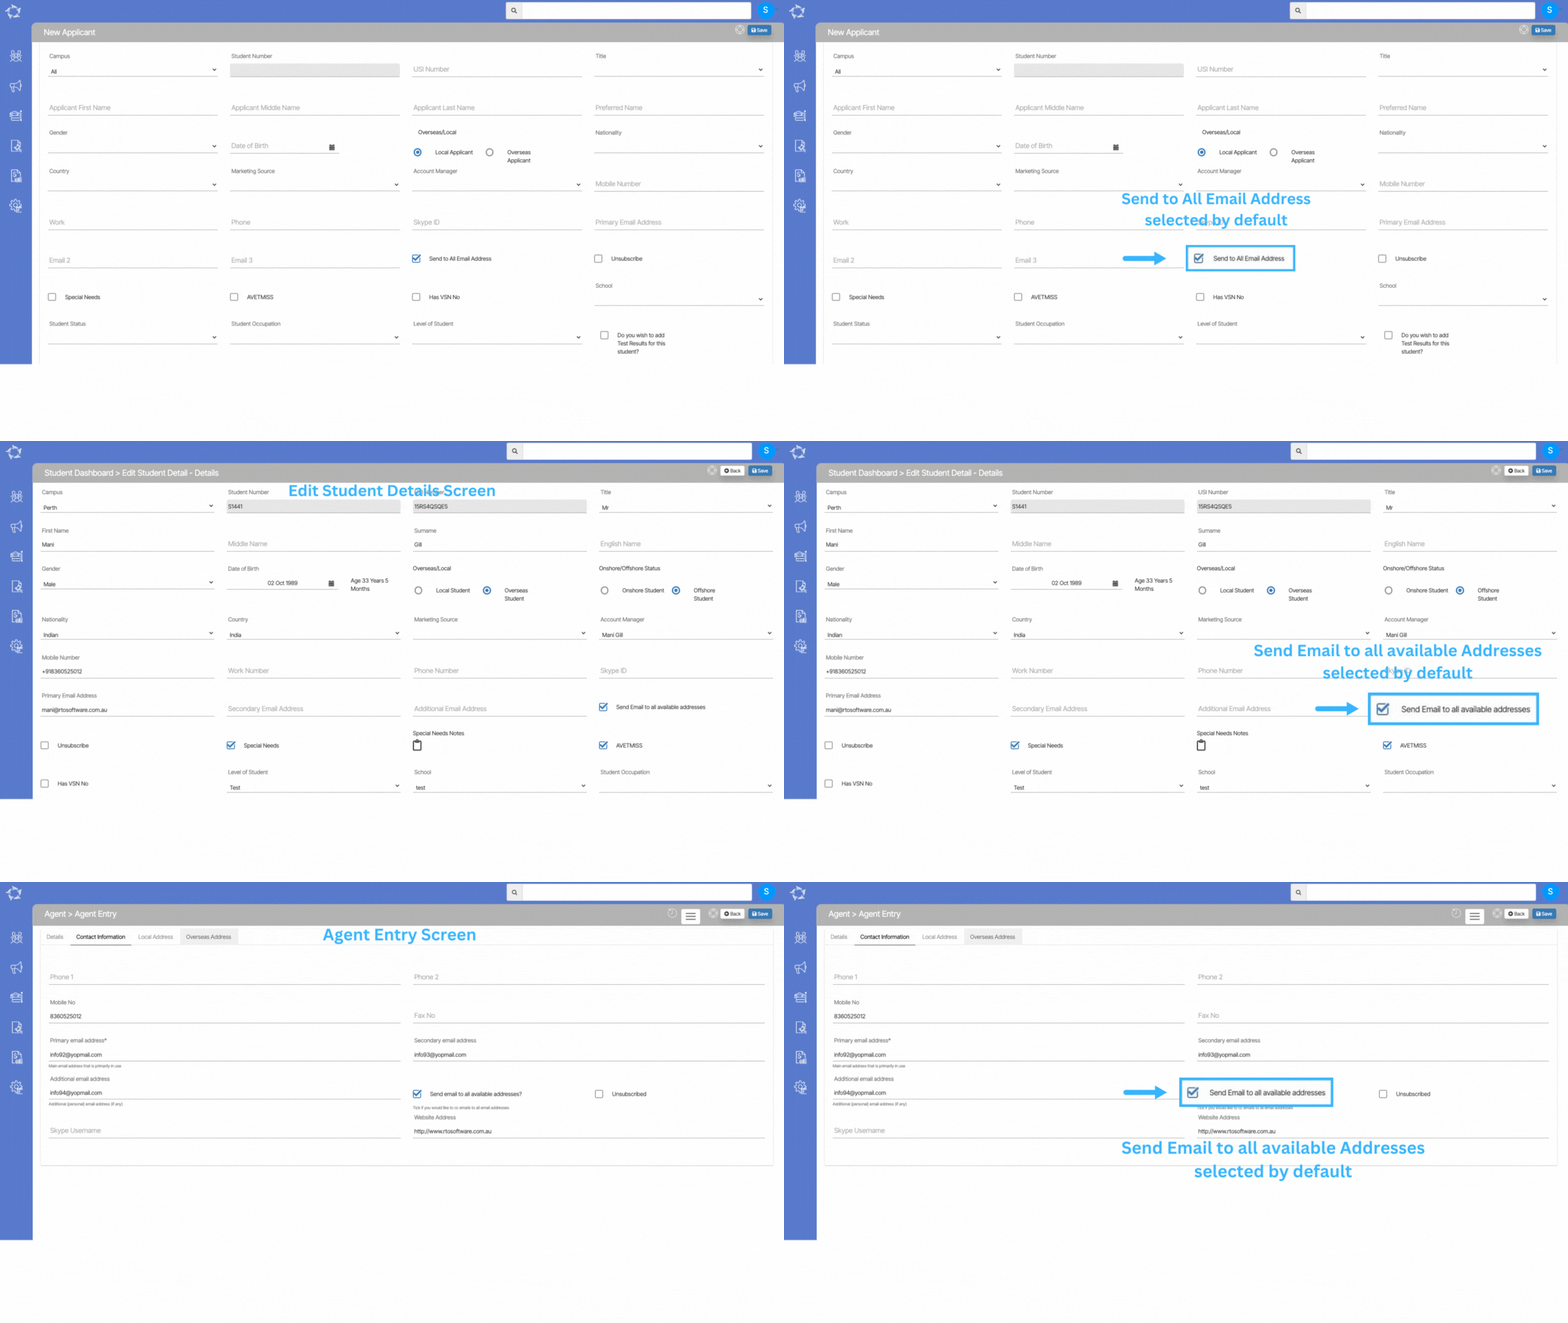
  • System Setting to Set Send email to all as yes by default
  • System Setting to generate certificates with Subject Code and Result Date

For a full list of what has been added in this release, please see below.

Main Dashboard – Tiles Changes

A new system setting has been implemented in our system, which now displays the program name alongside its corresponding program code on various tiles including Continuing Tile, Starters Tile, Finishers Tile, and Short Programs Tile.

Search Bar Changes

Main Dashboard’s Search Bar has undergone recent changes, which include the addition of a new icon to distinguish between enrolments and students in the search results list.

Compose Email – Sender Email Address option Changes

To access this feature, simply select the Add different sender address tick box located next to the sender dropdown when composing an email. 

Set Send email to all as yes by default – New System Setting

This setting applies to the campus level, and when it is enabled, the Send to All Email Address tick box will be selected by default on the New Applicant, Edit Student and Add/Edit Agent screens.

Certificates – Subject Code and Result Date – New System Setting

A new system setting has been implemented for certificates that allow the subjects to be sorted based on two criteria: Subject Code and Result Date.

Our mission is to build software that helps you do things more efficiently. Your input and engagement are vital in helping us improve our service and offerings for your college. We are always open to listening to your feedback.

Any questions, please feel free to reach out to us. We look forward to serving you to the best of our ability.

Please review the changes and if you would like further clarification, please contact our Support team.

A big thank you to so many of you who have been actively participating in helping us bring these new improvements to life.

Next update is due on Thursday, 6th April 2023

Note: Please alert other team members within your college if the changes outlined above affect their role or department.

Thank you for taking the time to read this post.

Main Dashboard – Tiles Changes

A new system setting has been implemented in our system, which allows for the program name to be displayed alongside its corresponding program code on various tiles including Continuing, Starters, Finishers, and Short programs Tiles. With the program code being displayed alongside the program name, users will now have a quick and efficient way to search, navigate, and locate specific programs within the system.

You will also see Program Name in the Enrolment Profile Tile on the Enrolment Dashboard.

Note – If you wish to see program names under the tiles, please contact our support team, so they can assist you in making the necessary changes to your organisation site.

Compose Email – Sender Email Address option Changes

We’ve implemented a new feature in the compose email screen that allows you to edit the sender’s email address. To access this feature, simply select the Add different sender address tick box located next to the sender dropdown when composing an email. This change provides you with greater flexibility when sending emails, allowing you to easily switch between multiple email addresses or use a custom email address for each message you send.

Set Send email to all as yes by default – New System Setting

A new system setting has been implemented in the system, which is called Set Send email to all as yes by default. This setting applies to the campus level, and when it is enabled, the Send to All Email Address tick box will be selected by default on the New Applicant, Edit Student, and Add/Edit Agent screens.

This means that emails will be sent to all email addresses by default, without requiring you to manually select the tick box.

IMPORTANTThis is a system setting and if you wish to turn on this setting, please contact our support team and they will assist you in making the necessary changes to your organisation site.

If your organisation’s Set Send emails to all as yes by default setting is enabled, you will receive a prompt message on the Applicant, Student and Agent levels. However, if the Send to All Email Address option is not enabled for applicants/students or agents, you will need to select the corresponding tick box for Send emails to all and save the changes.

Search Bar Changes

The Main Dashboard Search Bar has undergone recent changes, including the addition of icons against search results to help you distinguish between enrolments and students in the search results list.

In addition to the icons, the Main Dashboard’s Search Bar now also displays the current level of the searched object. This means that when you search for any object using the search bar, it will display its current level; whether it is an enquiry, applicant, student, or enrolment. This feature is designed to help you search for the specific record you are looking for by narrowing down the search results for you.

Also, the student’s email address, gender, and date of birth will now be visible when searching in the search bar.

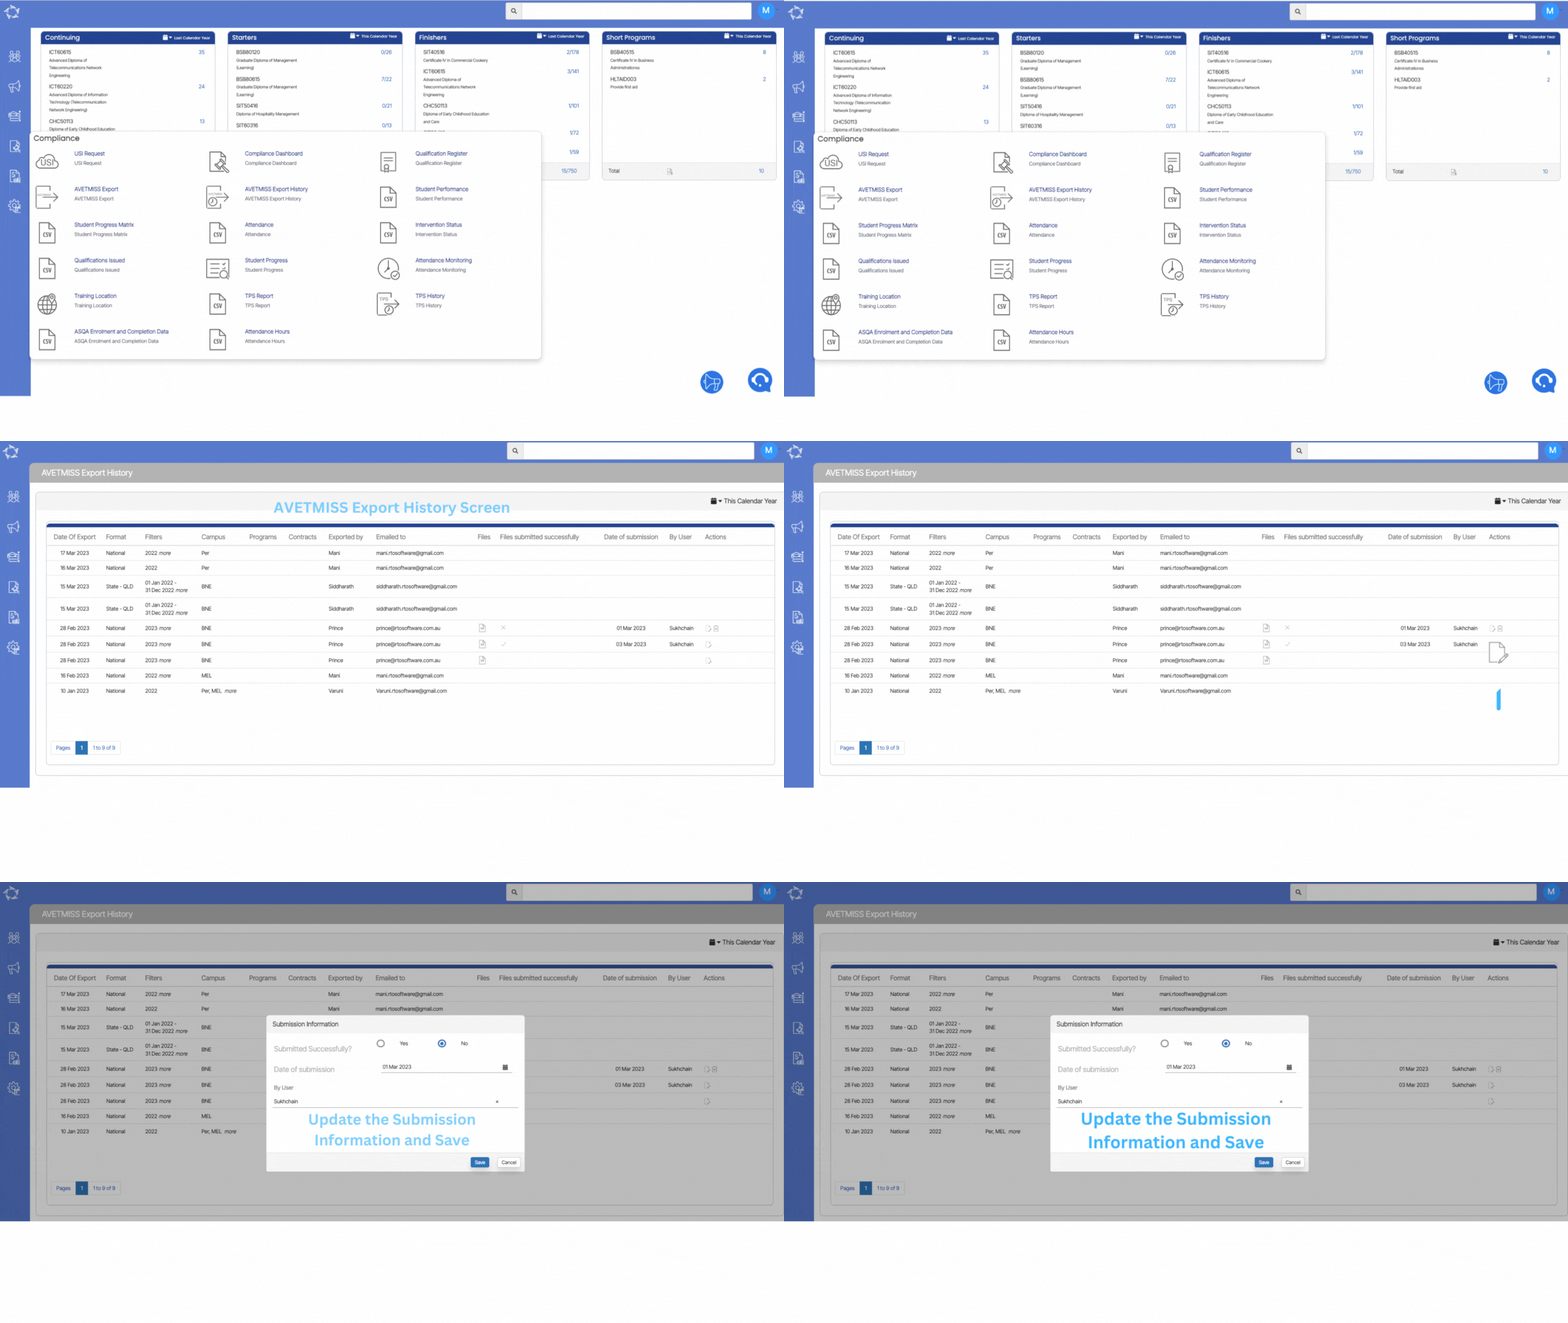
AVETMISS Export History

The AVETMISS Export History screen allows you to view a record of all exports made, including details such as the date of the export, **the format State and National used** and the specific data included. Additionally, you can download the exported files as ZIP files for easy access and storage. In addition to viewing and downloading previous exports, **the screen also allows you to edit their exports as needed.**

To do this, you can select the edit icon under the actions column next to the relevant export. From here, you can add submission information to the export, such as indicating whether or not the data has been successfully submitted, the date of submission, and the user name of the person who submitted it. These details can be important for keeping track of reporting requirements and ensuring compliance with regulatory standards.

AVETMISS Export – National Format

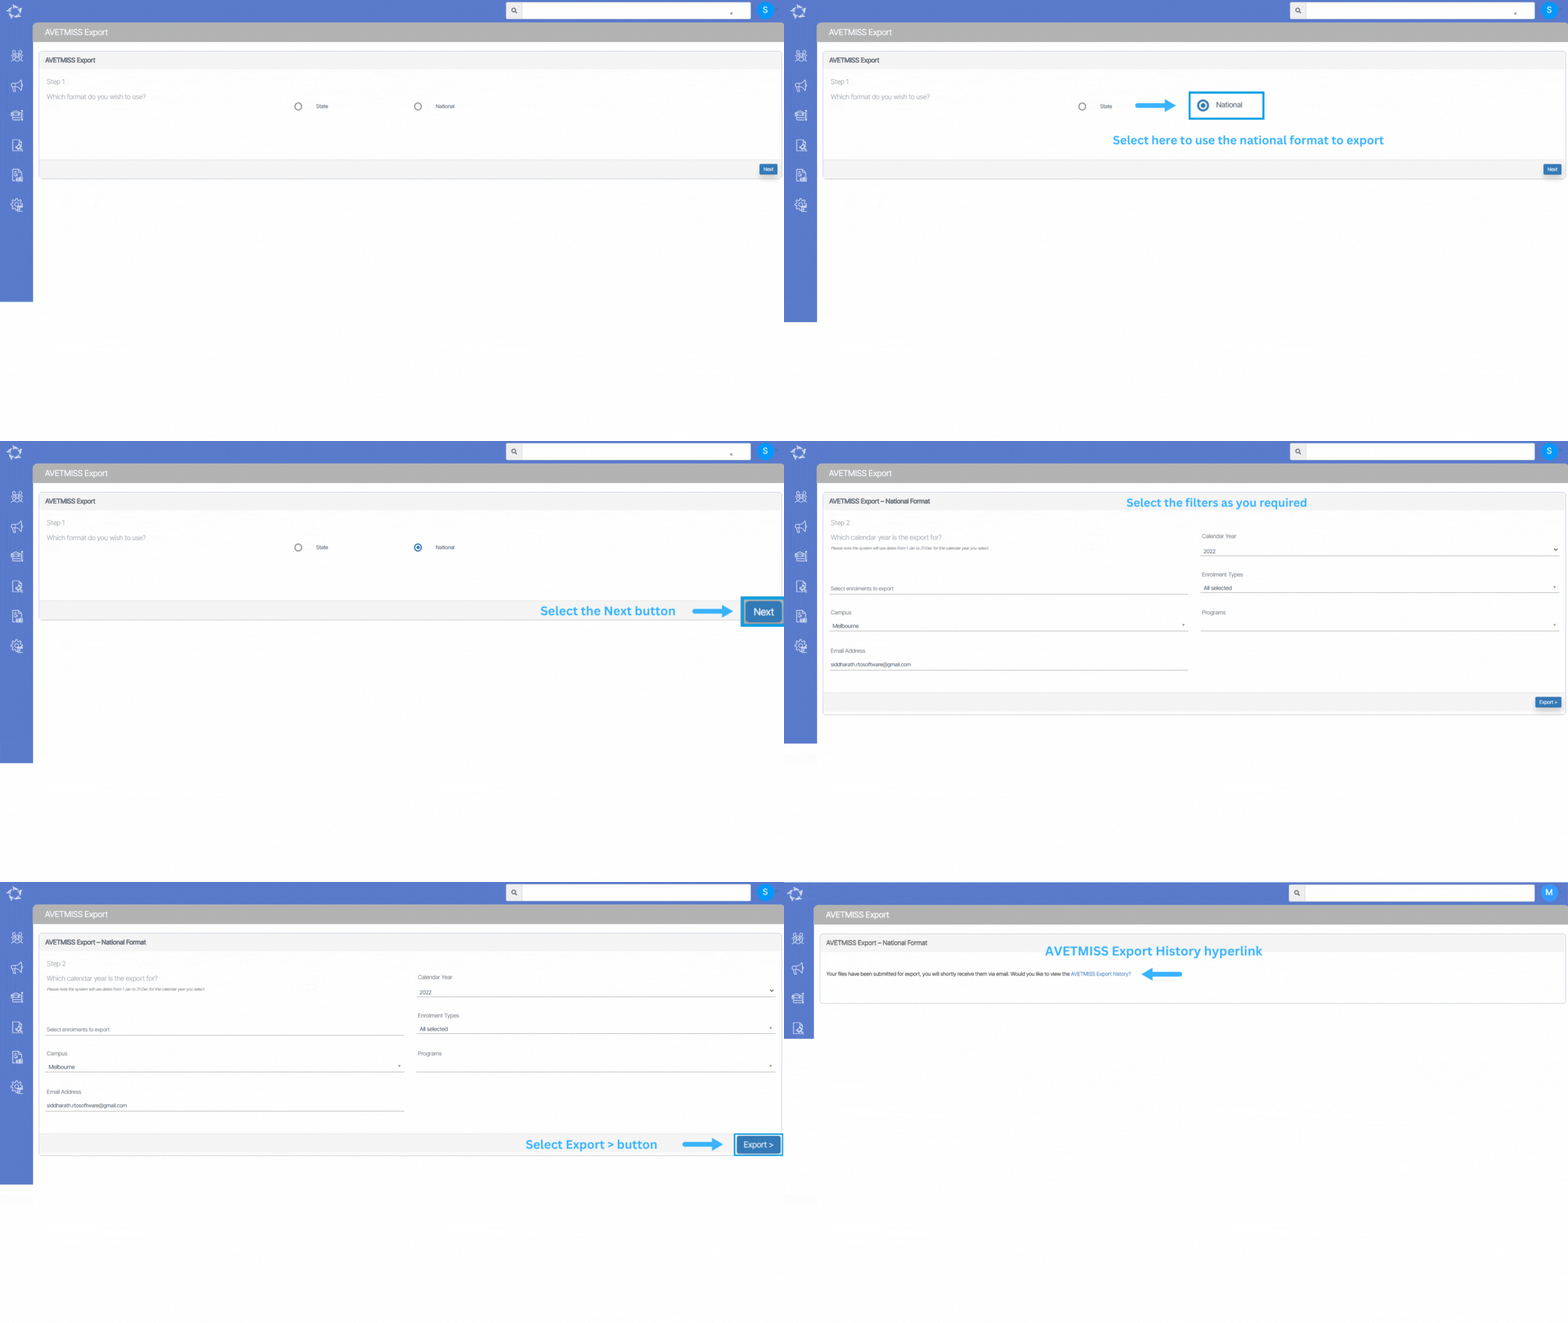
When selecting the export option for National, you will be presented with different filters compared to the State option, as NCVER does not accept State-funded data submissions. You will need to choose the Calendar Year you want to export and submit the student data to NCVER. Additionally, you must select the campuses for which you want to export data. For instance, if you have an ELICOS campus, you should not choose to submit data to NCVER. Once you have chosen your filters, you can select the Export button to proceed with the export process.

Once you select the Export button, the system will refresh the screen and display the AVETMISS Export History hyperlink. However, since AVETMISS exports may take some time, the duration is dependent on the amount of data to be checked and exported. Therefore, you can choose to either access the AVETMISS Export History screen by selecting the provided link or wait for the system to email the zipped up export files to you.

FieldsExplanation
Calendar YearSelect the calendar year from the dropdown to generate the export.
Select enrolments to exportSearch and select enrolments, if you wish to generate the export for specific enrolments.
Enrolment TypeSelect the enrolment type from the dropdown.
CampusYou can select multiple campuses here.
ProgramsSelect Programs here.
Email AddressBy default, the email address will be displayed here.

AVETMISS Export – State Format

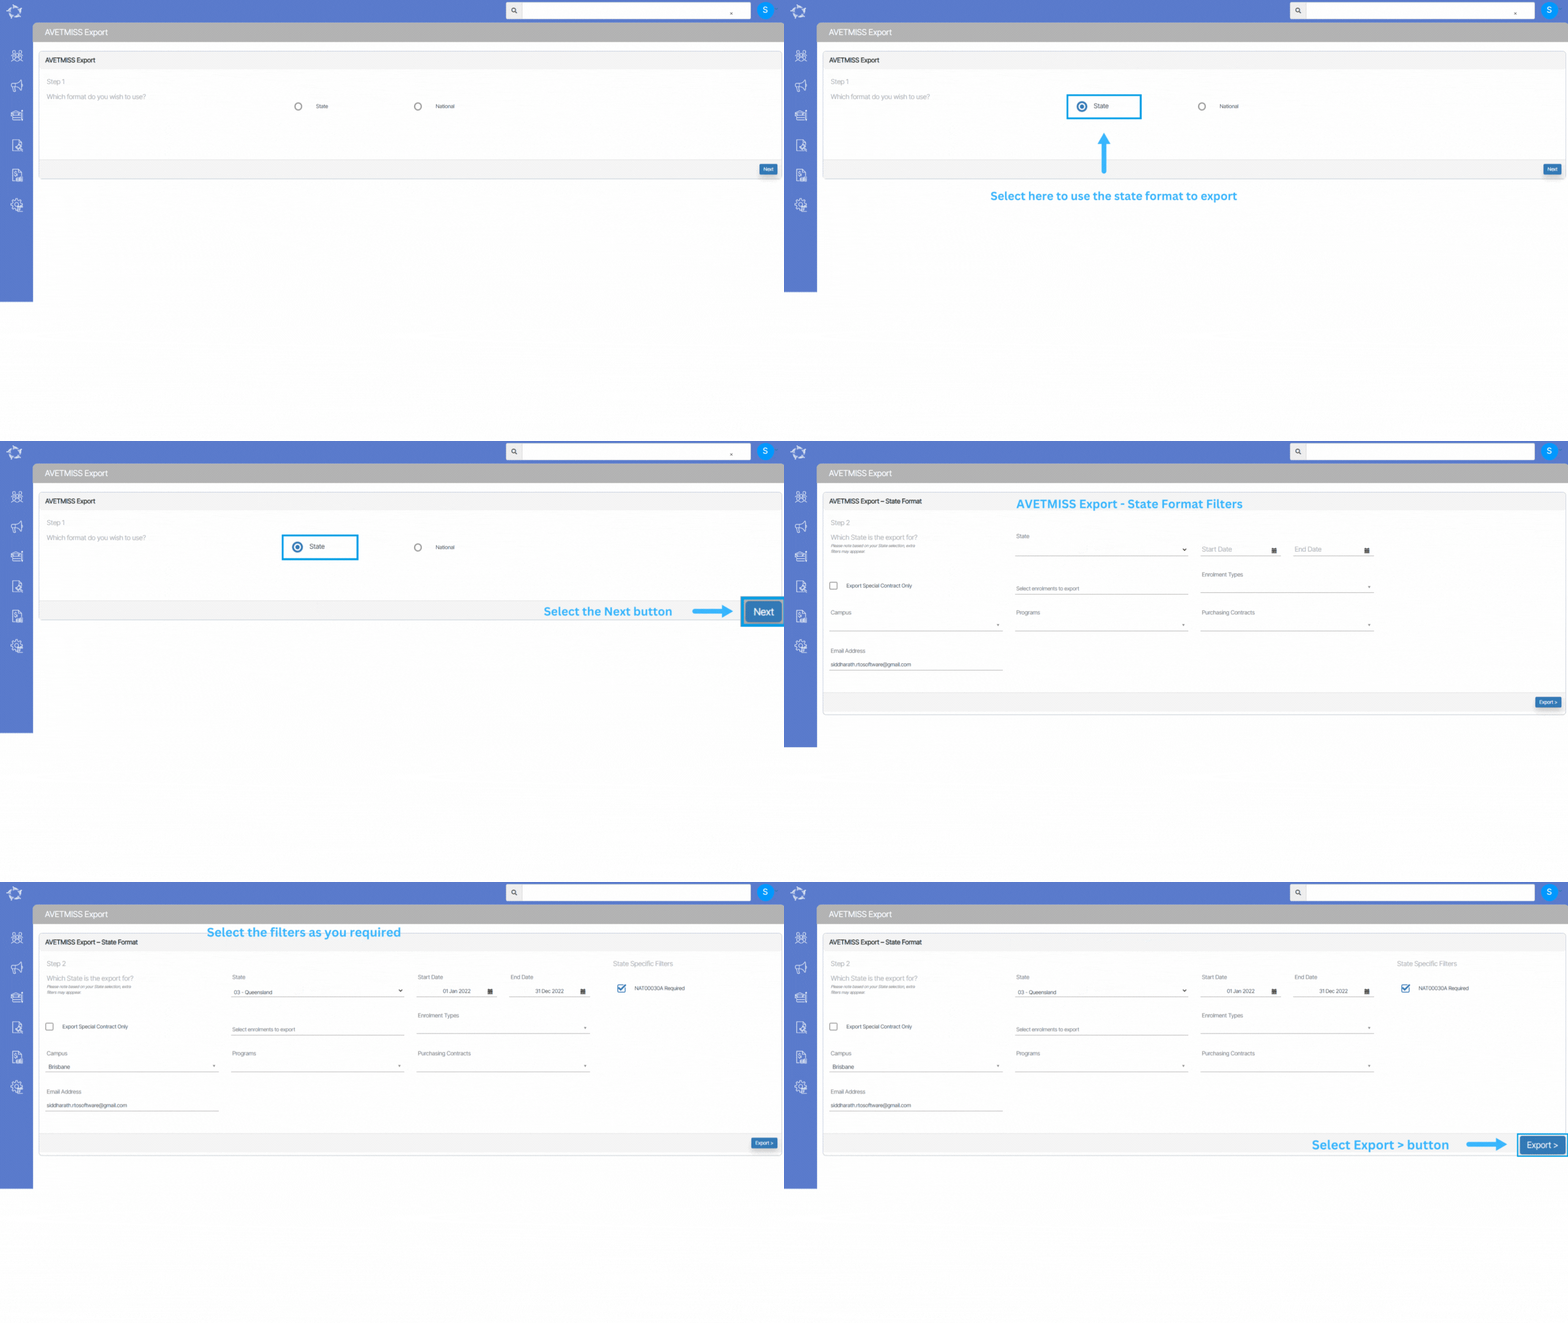
When selecting the option to export at the state level, you will notice that the available filters are different from those for the national option. This is because a state-level export is typically done when your RTO is funded in that particular state, and therefore there are specific fields related to state contracts that need to be included in the export. If you are exporting data at the state level, be sure to use the filters that are relevant to your specific state and its requirements.

IMPORTANT – Even if you are making monthly submissions to a state and receiving payments on a regular basis, your data must be submitted based on the entire calendar year, rather than just a single month’s worth of data. Therefore, it is recommended that the dates you enter for your export cover the full calendar year, such as 01/01/2022 to 31/12/2022. Once you have selected the appropriate filters for your state-level export, simply select the Export button to complete the process.

FieldsExplanation
StateSelect the state from the drop down for Avetmiss Export
Start & End DatesSelect the dates if you are generating the export according to monthly or yearly basis.
Export Special Contract Only
Select enrolments to exportIf you wish to generate the Avetmiss Export for specific enrolments then you can simply search and select the enrolment number in the magic search field.
Enrolment TypesThis is a user code and based on the User Code created in TEAMS, you can select the enrolment type from the drop down.
CampusSelect the appropriate campus from this dropdown and if you are exporting for multiple campuses then you can select them by selecting the tick boxes.
ProgramsYou can select programs here.
Purchasing ContractsYou can select purchasing contracts here.
Email AddressThis field will show you the email address by default.