New Applicant

This screen allows you to add a New Applicant to your RTO with their basic details. This screen has different tabs where the system will allow you to add the details accordingly.

Note: The Overseas tab will only be visible if you select the Overseas/Applicant radio button while adding the applicant’s details and the same as you need to select the AVETMISS tick box to see the AVETMISS tab.
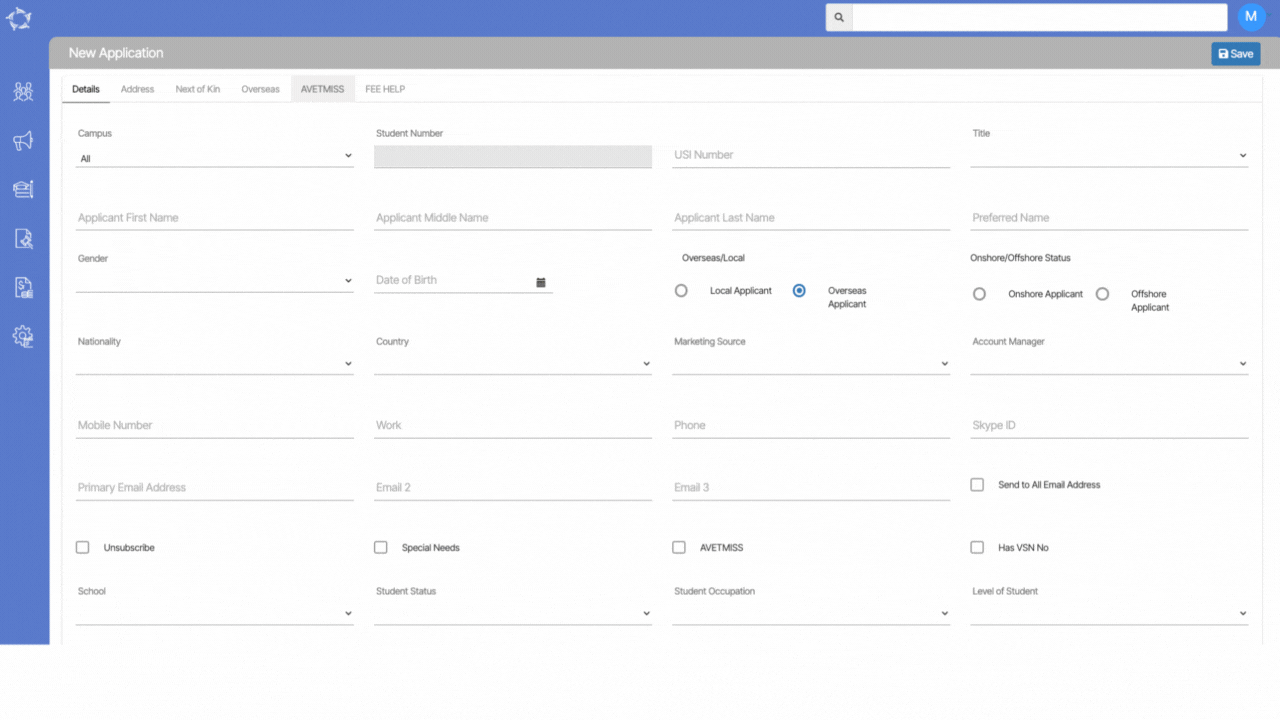
Tabs Description
DetailsThis tab will allow you to add basic information for the applicant. Some fields are very basic and self-explanatory, for other important fields in this tab you can read more here.
Address This tab will allow you to add the applicant’s Australian address information. From Local and Mailing addresses to the specific AVETMISS address format for VET students. It is important to note that for a VET student, you should enter the AVETMISS address first then you can select the copy tick box to copy the address to the local and/or mailing address fields. The system cannot copy from the local/mailing address fields to the AVETMISS address fields. For more information on Addresses click here.
Next of Ki This tab will allow you to add information for the student’s Next of Kin. For more information click here.
Overseas You will only be able to add the information under this tab if the applicant is set as an overseas student. To do this you need to select the radio button for Overseas Applicant that is under the field heading of Local/Overseas. When you do this, you also need to then update the student’s Onshore/Offshore Status by selecting a radio button to identify if the student/applicant is Onshore or Offshore. For more information click here.
AVETMISS You need to select the AVETMISS tick box on the details tab to make the AVETMISS tab visible. When you do this, you will be able to add the AVETMISS details for the Applicant.
FEE HELP You can add Fee HELP information for the applicant in this tab.

Agent – new fields for Agent Portal

We have now added two new fields for Agent login and Agent Admin Password to allow you to setup an agent with a login to the Agent Portal. For the new password field you will also see the new View icon.

Note: When setting up login details for an agent to access your Agent Portal, it is our recommendation that you follow a standard format that your staff must use when creating logins for agents. The recommended format is as follows:

Agent Login: use the agent’s primary email address for this, such as info@edgeoverseas.com – the agent’s primary email address is on the Contact Information tab of the Agent Entry screen.

Agent Admin Password: use the Agent ID that the system automatically generates for an agent. This can be found on the Details tab of the Agent Entry screen. In the example below, the Agent ID is A00172. Then add a mix of numbers and symbols to make it a stronger password. So for this agent below it could be something like A001722022%^&

Both of the pieces of information we have recommended are unique to a specific agent. There can be no mistaking what agent the login is for and no chance that a user will use the same login details for two different agents.

Applications Listing – new filter Use Application dates

We have added a new filter for Use Application Dates which is a tick box. By default the system searches based on the application creation date and displays applications in this screen. With this new filter, when you select it and enter dates in the Start and End date fields, the system will look for any application that has a start date within the date range you have entered.

New Application – Subjects Delivery Dates

This screen will show you the Program details along with the subjects and their delivery dates. The system will show the subject dates according to the option selected for the Populate subject dates using the New Application – Choose Programs screen.

Note – DO NOT close your browser while you are walking through the steps of this process, as you will loose what you have entered. When you select the NEXT button in each step of this process the system does not save what you have done to the database. It allows you to go back in the process to change what you have selected, however, it is not until the final step where you select the FINISH button that the system will fully save everything to the database for you.

Once you select the Drag down button, the system will expand the screen and you will be able to see the subjects linked to the program.

Change – Agent Commission Payment Screen > two new columns

Dashboard > Marketing > Agent Dashboard > Pending Payment Icon

We have added two new columns on the agent commission payment screen that you use to record your post-deducted commissions. The new columns are:

  • Commission to be Paid
  • Balance Commission to be Paid

Explanation:

Comm. to be Paid: This column will show you the commission which is truly due on the paid amount.

Example: If a student’s invoice for tuition fee is $6,600 and total commission is $1,980. And the student just paid $5,000 out of $6,600. In such case, this newly added column will show you the commission due to be paid on $5,000. This way, it will be easy for everyone to see the commission according to how much tuition fee a student paid instead of doing the calculations manually.

Bal. Comm. to be Paid: This column will show you the proportionate balance commission to be paid. Now, if I will continue with the above example where total commission is $1,980 and student paid only $5,000. On $5,000, the commission is $1,500. And let’s say, you have paid $1,000 commission to the agent out of that $1,500. The Bal. Comm. to be Paid column will show the proportionate balance i.e $500. See the below screenshot:

  1. Student Inv Amount – This column will show you the total Tuition Fee for the student’s invoice that the system calculates commission on.

  2. Student Rec Amount – This column will show you the paid Tuition Fee for the specific student invoice.

  3. Ag Inv Amount – This column will show you the total agent commission for the student’s invoice. It will calculate the commission based on the commission rate updated for the agent. Referring to the same example as highlighted in the screenshot where total Tuition Fee is $6,600 and commission rate for the agent is 30%. Hence why the commission is $1,980 ($6,600 * 30/100).

  4. Comm. to be paid – This column will show you the total agent commission to be paid. Referring to the same example as highlighted in the screenshot where student has paid $5,000 out of $6,600 and the commission on this $5,000 would be $1,500. The system will look at the commission rate that was used to calculate the original agent commission, such as 30% in the above example and calculates what the proportionate amount of the commission is due to be paid.

  5. Comm. Paid – This column will show the commission which has already been paid to the agent either by a pre-deducted (student’s receipt) or post-paid using the commission payment screen. If there is no commission paid, then you will see $0.00 in this column.

  6. Bal. Comm. to be Paid – This column will show you the proportionate balance commission to be paid. So using the example above, it is column 4 – column 5. However, if there was no commission paid and the amount in this column will be equals to column 4 which means $1,500.

  7. Balance – The column will show you the total pending commission for the agent’s commission invoice. So using the example above, it is column 3 – column 5.

Important Posts

Agent Pending Payments

New Application – Agent Commission related changes

We have made some changes to allow more flexibility to the Agent commission invoice section of the new application process. Changes we have done include:

  • selecting or unselecting to pay commission on a specific fee that you are raising against the applicant/student’s invoice/s
  • selecting or unselecting whether the system should calculate GST on the agent’s individual commission invoices and
  • raising an agent bonus invoice that will then link to the application

The above options show different steps of the new application process. You can find them as follows:

Selecting or unselecting to pay commission on a specific fee that you are raising against the applicant/student’s invoice/s

In the Agent details screen, there is a tick box for Pay Commission. Whether this is selected or not, when an agent is linked to an application, you will have the option to either select or unselect the Pay Commission tick box against a student’s fee that you are raising for the application. If you select it, then the system will calculate the commission on that fee and if you unselect it will NOT calculate the commission for the agent for that fee.

This option is available in the New Application > Fee Selection step as below:

Selecting or unselecting whether the system should calculate GST on the agent’s individual commission invoices

In the Agent details screen, there is a tick box for Apply GST. Whether this is selected or not, when an agent is linked to an application, you will have the option to either select or unselect the Apply GST tick box against all or individual agent commission invoices that the system will raise for you.

This option is available in the New Application > Invoice Preview steps on the Agent Invoice tab as below:

Raising an agent bonus invoice that will then link to the application

If you wanted to raise an agent Bonus Invoice you would do this from the Agent Dashboard > Profile Tile > Bonus Invoice icon. However, we have introduced this option in the New Application > Invoice Preview steps on the Agent Invoice tab as shown below.

IMPORTANT: there is a difference between raising an agent bonus invoice from the Agent Dashboard to raising it in the new application process. From the Agent Dashboard you DO NOT have to link the bonus invoice to one or many enrolments, however from the new application process, the system will automatically link it to the application program that you link the bonus invoice to.

This option is available in the New Application > Invoice Preview steps on the Agent Invoice tab > +Add Bonus button is shown below.

Once you have added the Bonus, the screen will refresh and you will be able to see the Agent Bonus invoice for the agent.

Note – You can delete and recreate the agent bonus from the same screen.

Agent Dashboard – Bonus Invoice

Agent Dashboard > Profile tile > Bonus Invoice Icon

Agent Bonus is an amount that you wish to raise as an invoice and pay to the agent that is not a part of an agent commission invoice that the system has automatically raised when a student’s invoice was raised for an enrolment.

When you select the Bonus Invoice icon from the Agent Profile section, a popup screen will show, where you can create a bonus invoice for the agent.

Note – Most of the fields in the popup are self-explanatory and you can add the relevant information where needed.

If you want to link the Bonus Invoice to one or many enrolments from this screen, then you need to select the tick box for Link Bonus Invoice with Enrolments.

When you select this tick box, it will show you a search field where you can enter a student’s name and it will show you a list of any enrolments that the agent is linked to where the student name matches. Select an entry and it will be added to the invoice. You will need to search for each individual student’s name and enrolment to add them to the bonus invoice.

New Application – History

Here are some of the latest changes that we have made in the New Application process.

Change – Application Tile Listing – Requires Homestay and Requires Airport Pickup/Drop off

We have added new tick boxes Requires Homestay and Requires Airport Pickup/Drop off on the Application Tile Listing screen.

Once you select these tick boxes and selected the Apply button {Apply Button} it will show you those applications that have the tick boxes for Requires Homestay and/or Requires Airport Pickup/Dropoff selected. From there you can download the list by selecting the CSV icon as shown below:

If you have any queries, please do not hesitate to contact us on 1300 85 05 85 or email us via support@rtosoftware.com.au