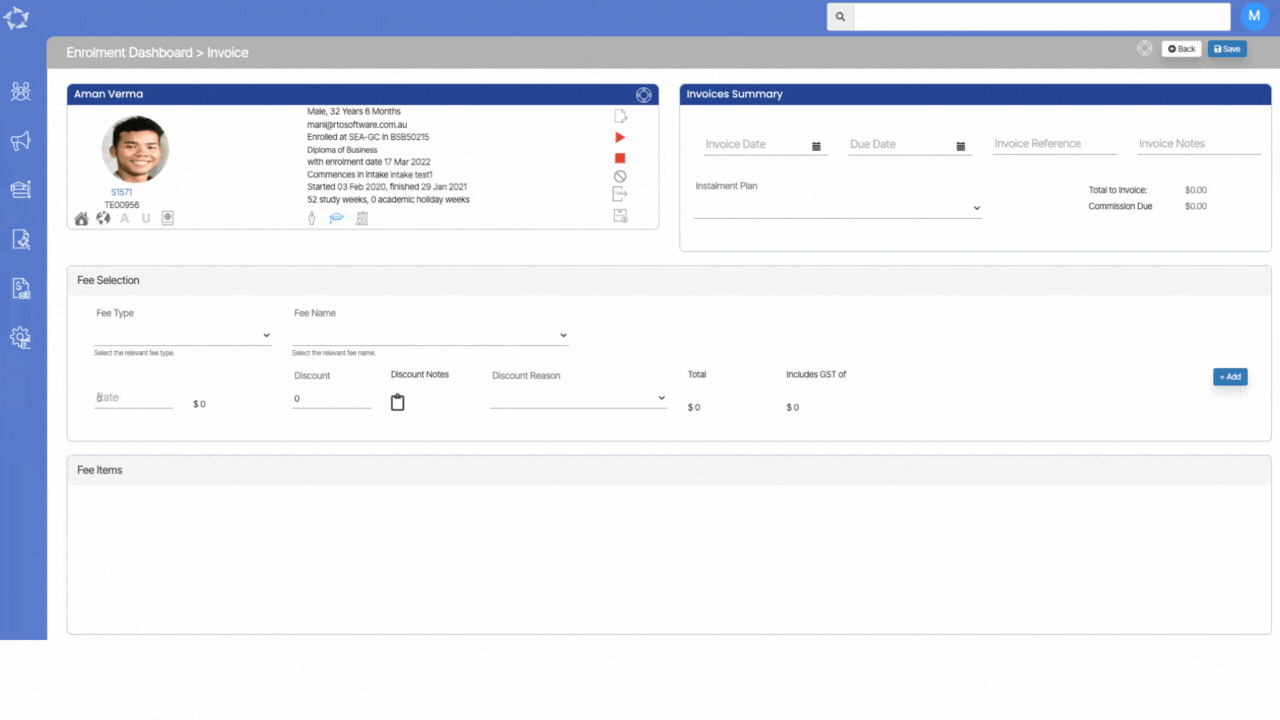
We’ve implemented some improvements to the Fee Selection section when editing invoices or creating new invoices for the Application or Enrolment in the system. Now, when you choose a FeeType, the system will automatically populate the Fee Name by default in the fee name dropdown for that particular fee type.
IMPORTANT – The fee name dropdown will only populate the fee name if there is only one fee created for the fee type. If there are multiple fees created for the fee type, the system will not populate the fee name by default, you will need to manually select the fee from the dropdown.
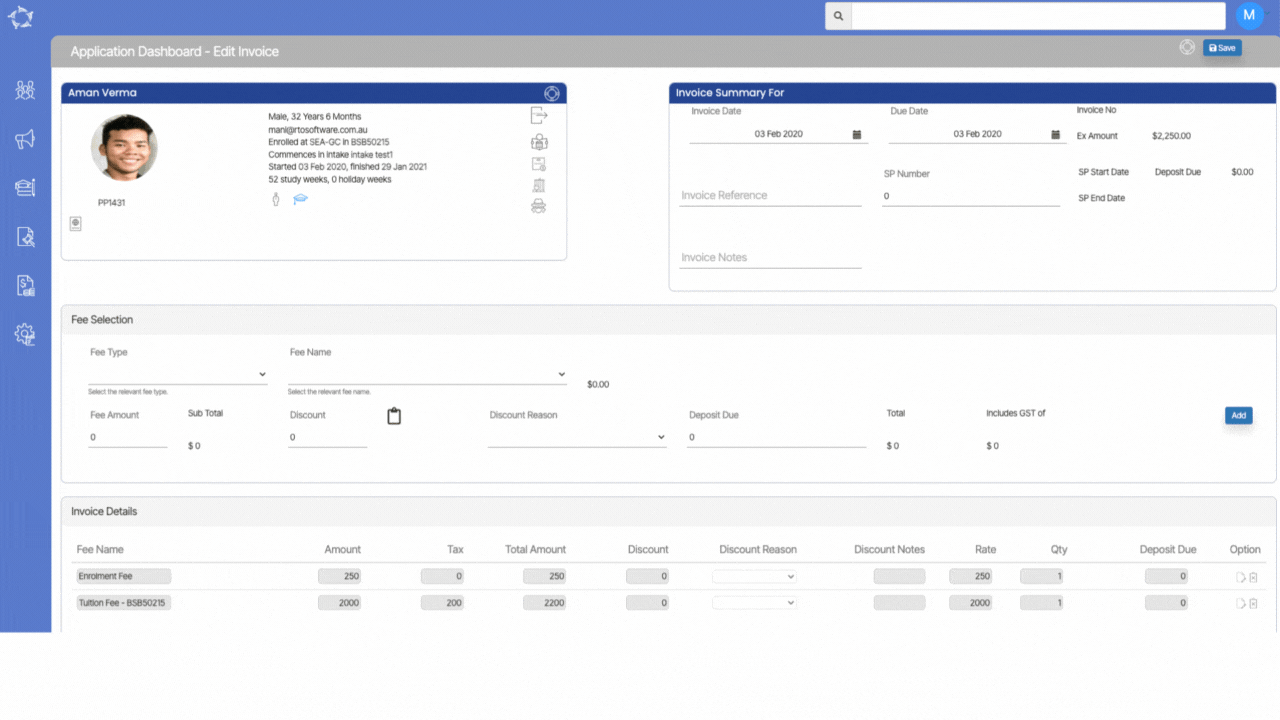
In a recent update, we introduced the Invoice Notes field to enhance your invoicing experience in both the Application Dashboard’s Invoices section and the Enrolment Dashboard’s Invoices section. With our latest update, you can add and edit invoice notes directly when editing an invoice for a specific application or enrolment. This means you can seamlessly manage and update invoice details on the Edit Application Invoice and Edit Invoice screens, providing you with greater control and customisation in your invoicing processes.
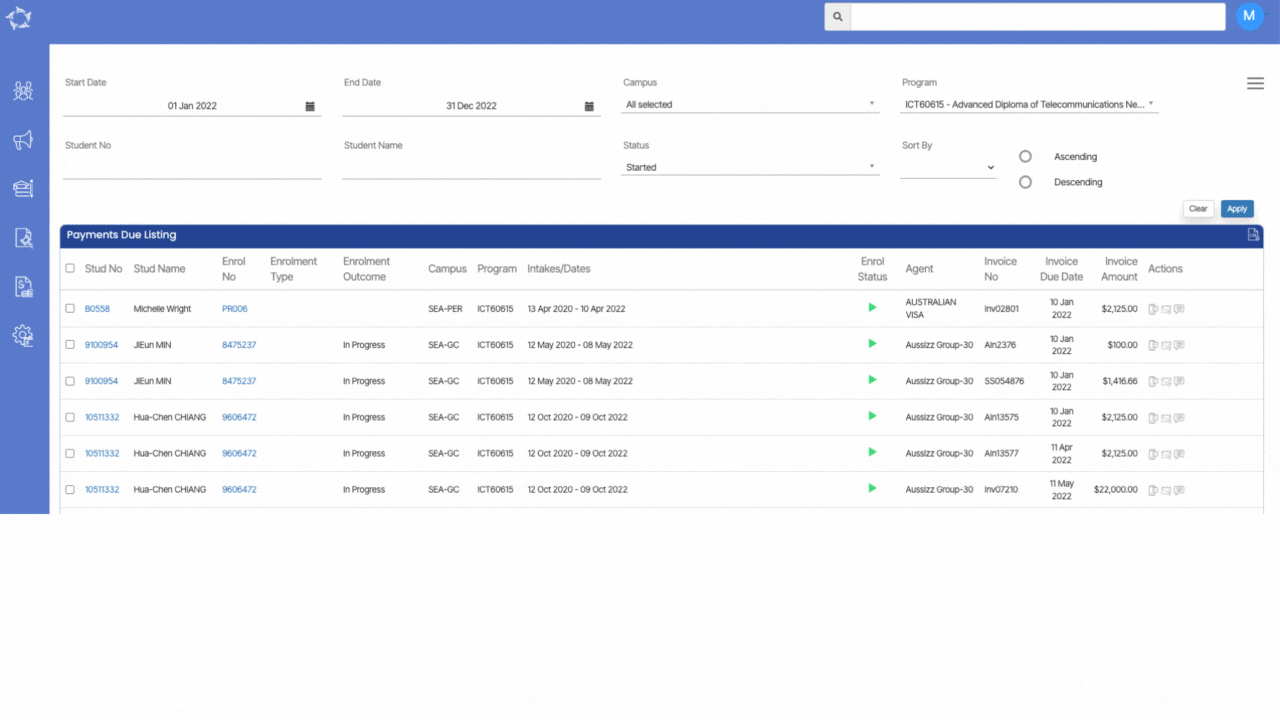
We have introduced a new campus dropdown parameter on both the Payment Due and Payment Received listing screens. This will empower you with the flexibility to select multiple campuses, allowing you to effortlessly retrieve enrolment data for students enrolled in the chosen campuses directly from the grid. We believe this enhancement will greatly improve your experience in managing payments and student enrolments, making your tasks more efficient and convenient.
We are excited to announce some significant enhancements to the Payment Due Listing screen, aimed at providing you with more valuable insights and improving your overall experience. The new changes include the addition of a new column named “Enrolment Outcome.” This column is specifically designed to display the enrolment outcome of the updated enrolments on the Edit Enrolment Details Screen. With this new feature, you can easily track and understand the outcome of each enrolment.,
Furthermore, we have introduced a helpful “Sort By” option for the Agent Name. When you choose to sort by Agent Name from the Filters on the screen, the system will automatically display an Agent Name tooltip when you hover your mouse over the Agent Code in the Agent Column. This tooltip functionality allows you to quickly access additional information about the agent, providing you with comprehensive details right at your fingertips.
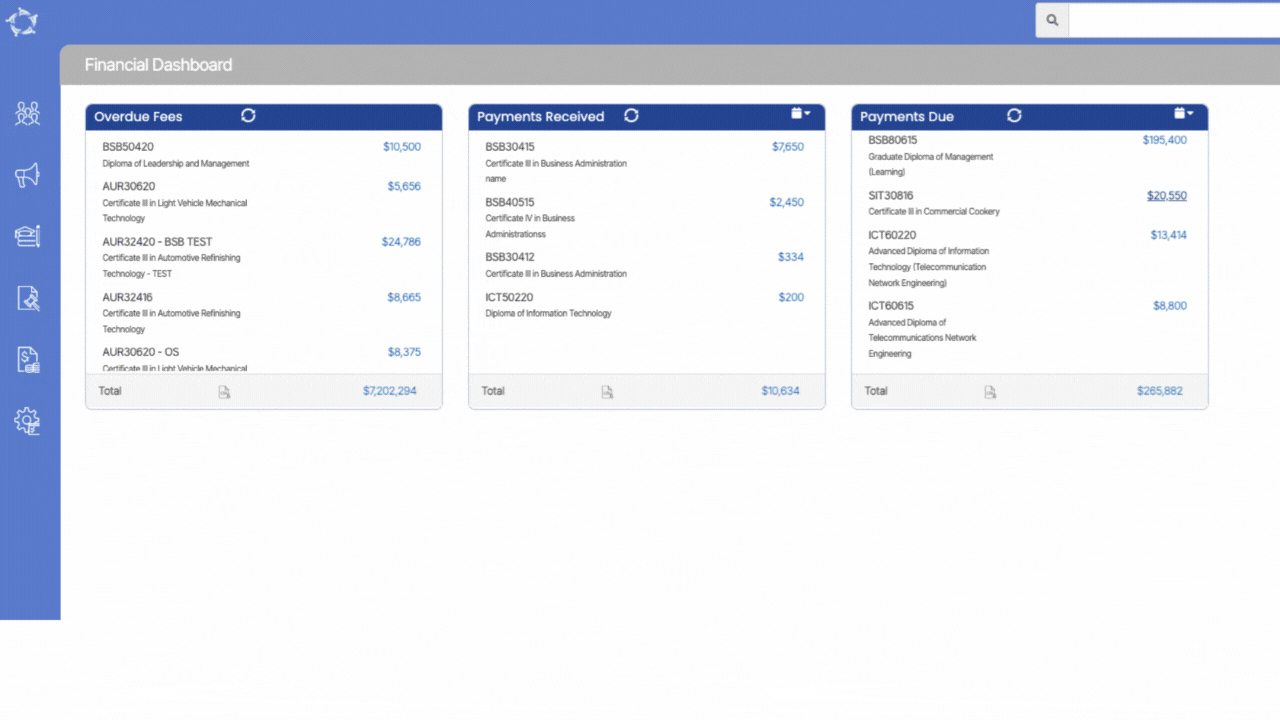
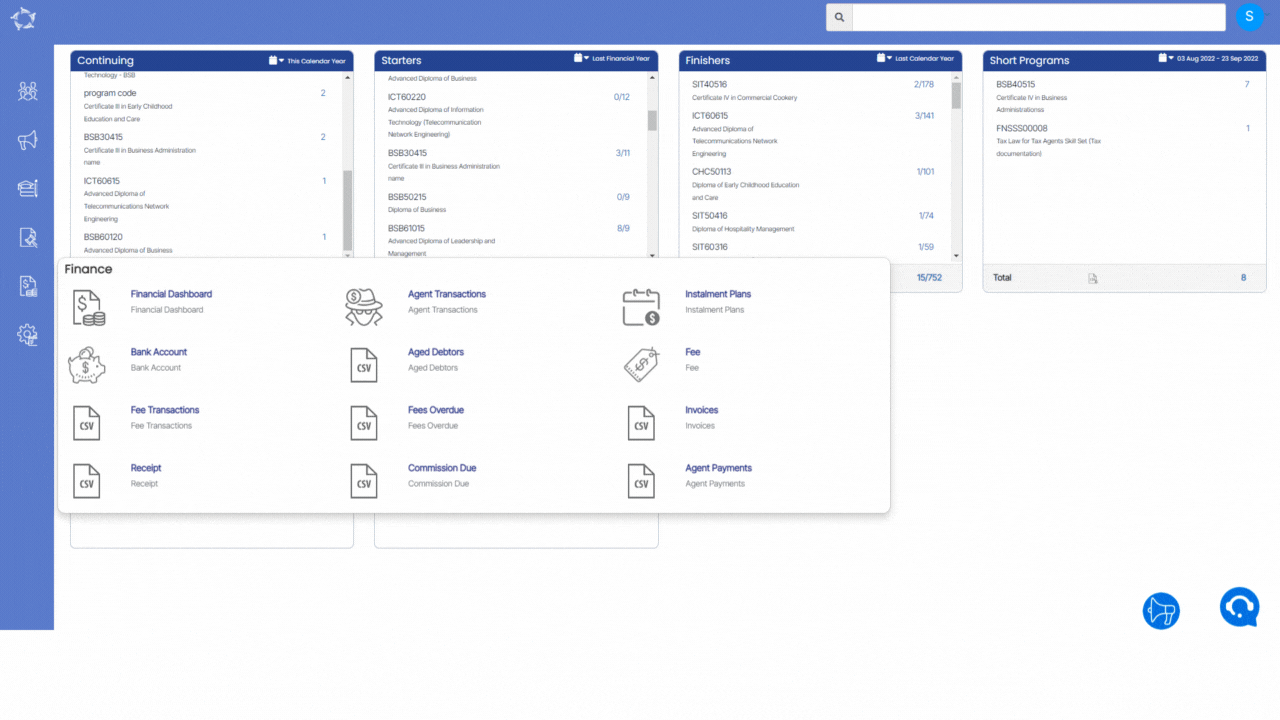
A new feature has been added to the Financial Dashboard that will make managing your finances even easier. You will now notice a new refresh icon accompanying the financial tiles, specifically the Overdue Fees, Payments Received, and Payments Due. With the new refresh icon, you can easily update and retrieve the most recent data related to overdue fees, received payments, and upcoming payments.
NOTE – We have addressed the issue regarding the extended loading time for financial tiles on the Financial Dashboard, which had been causing frustration and delays for our clients. Recognising the importance of quick and reliable access to financial data, we have made significant improvements to enhance usability and overall satisfaction.
Our dedicated development team has optimised the performance of the Financial Dashboard and its corresponding tiles. As a result, when you access the Financial Dashboard now, you will experience a remarkable reduction in loading time for the financial tiles. They will appear within a matter of seconds, allowing you to quickly access the last rendered data without having to wait for the screen to load repeatedly.
Additionally, if you have made any recent updates to fees and payments, you can easily view the latest data by using the new refresh icon. This feature enables you to load the most up to date information without any hassle.
These improvements highlight our commitment to providing a seamless and efficient experience. We understand the significance of accessing financial data promptly, and we are constantly striving to meet and exceed our clients’ expectations.
IMPORTANT – An important addition to our recent updates is the tooltip feature associated with the refresh icon. When you hover your cursor over the refresh icon, a tooltip will be displayed, providing you with the date and time of the last refresh. This tooltip serves as a valuable reminder of when the data was last updated, ensuring that you have access to the most recent information.
By incorporating this tooltip functionality, we aim to enhance the user experience by providing transparency and clarity regarding the freshness of the data. We want to ensure that you have all the tools and information necessary to make informed decisions based on the latest financial insights.
Payment Received Tile > Payment Received Listing Screen
Overview
The Payment Received Listing Screen provides you with valuable information regarding the amounts of money received from students as receipts. This screen serves as a record-keeping system, displaying the received payments and their corresponding receipts. By utilising this screen, you can easily track and verify the payments made by students, ensuring accurate and up-to-date financial records.
This screen is divided into two sections. 1) Parameters 2) List of all students
Filters/Parameters:
To open this screen, you would have selected the fee link for a specific program code or at the bottom of the Payment Received Tile, you would have selected the link for the total number count. Based on what you selected the system will open the screen and populate the information in this section. For example, it will show you the date range that was used in the tile as well as the program/s that were displayed or selected in the tile. You can even sort your list in ascending or descending order.
Select here to learn more about the filters/parameters
Listing Grid
The Payment Received list will show you the list of students according to the selected parameters. We are showing columns Stud No, Student Name which will display the student-specific information and Enrol No, Enrolment Type, Campus, Program, Intake/dates, Enrol Status and Agent will show enrolment-specific details. All of these columns are self-explanatory.
Note – There is a Page Limit dropdown after the filter’s sections which will allow you to specify the number of students you want to view on a single page.
Select here to know about the Icons under the Actions column and Burger Menu
How to select students?
Use tick boxes to select students if you wish to send email/SMS, create a contact log, print letters and generate invoices in bulk. After selecting the students, pick the option from the burger menu and you are one step away to perform your heap of work in one go.
Or if you wish to select all students at once, use the tick box present right beside the Stud No column.
Main Dashboard > Finance Menu > Agent Payment Report
The Agent Payment report is accessible through the Finance menu which provides a concise overview of Agent Payment-related information. This report offers comprehensive details about the Agent Payments, the Commission amount already paid, and the remaining balance yet to be paid. Additionally, it includes relevant information about the student within the report.
The General and Advance Filters tab on the Agent Payment report screen provides a list of filters that can be used to refine the data displayed in the report.
Below is a table that shows the filters and their explanations: Using these filters, you can customise the report to show only the information that is relevant to your needs, making it easier to analyse and take action based on the report data.
General Filters
Explanation
Report Start Date
The system will always look at enrolment start dates only to find enrolments between the date ranges.
Report End Date
The system will always look at enrolment end dates only to find enrolments between the date ranges.
Campus
Select a specific campus or select multiple campuses for your RTO if you are submitting this report for multiple campuses.
Program
This is a magic search field and you can search for multiple Programs by typing the Program Code.
Agent Name
This is a magic search field and you can search for multiple agents by typing the agent Name.
Approved Entries Only
Check this tick box to print the only approved entries of the record.
The system can show you both pre-deducted commission that was done in student receipts as well as post payments done in the commission payment screen
Include Bonus Invoice Payment
Check this tickbox to include bonus invoice payment in the report.
Select the “Print” Icon to generate the report, the system will direct you to the report dashboard screen. You can see the report status over there if it’s generated or not. Once it’s generated, download the report.