New Invoice step 2

The new invoice step 2 is an invoice preview screen where you will be able to see the student invoices and agent invoices preview on the different tabs:

You can enter the Study period number in the SP No. field if you want to, if you will enter the student period No the system will automatically calculate the study period start date and end date.

Student Invoice tab:

Agent Invoice tab:

Once you will verify all the things are fine on the preview screen, you just need to click on the Finish button and the system will create the new invoice and take you to the final step.

Below I have explained the Print and the snd button:

This is the print icon from where you will be able to generate the created invoice, Once you will click on this button the template selection floating window will appear, you can choose the template from the dropdown and select the Generate button to generate the invoice.

By selecting the Send Button you will be able to send the created invoice via email to the student. Once you will select the send button the system will take you to the compose email screen. You can choose your email template and select the send button to send the email.

Note: Whatever template you will select the receipt merge field needs to be added to the template, only then the system will print the invoice in the email.

If you have any queries, please do not hesitate to contact us on 1300 85 05 85 or email us via support@rtosoftware.com.au

Student Dashboard > Financial Tile

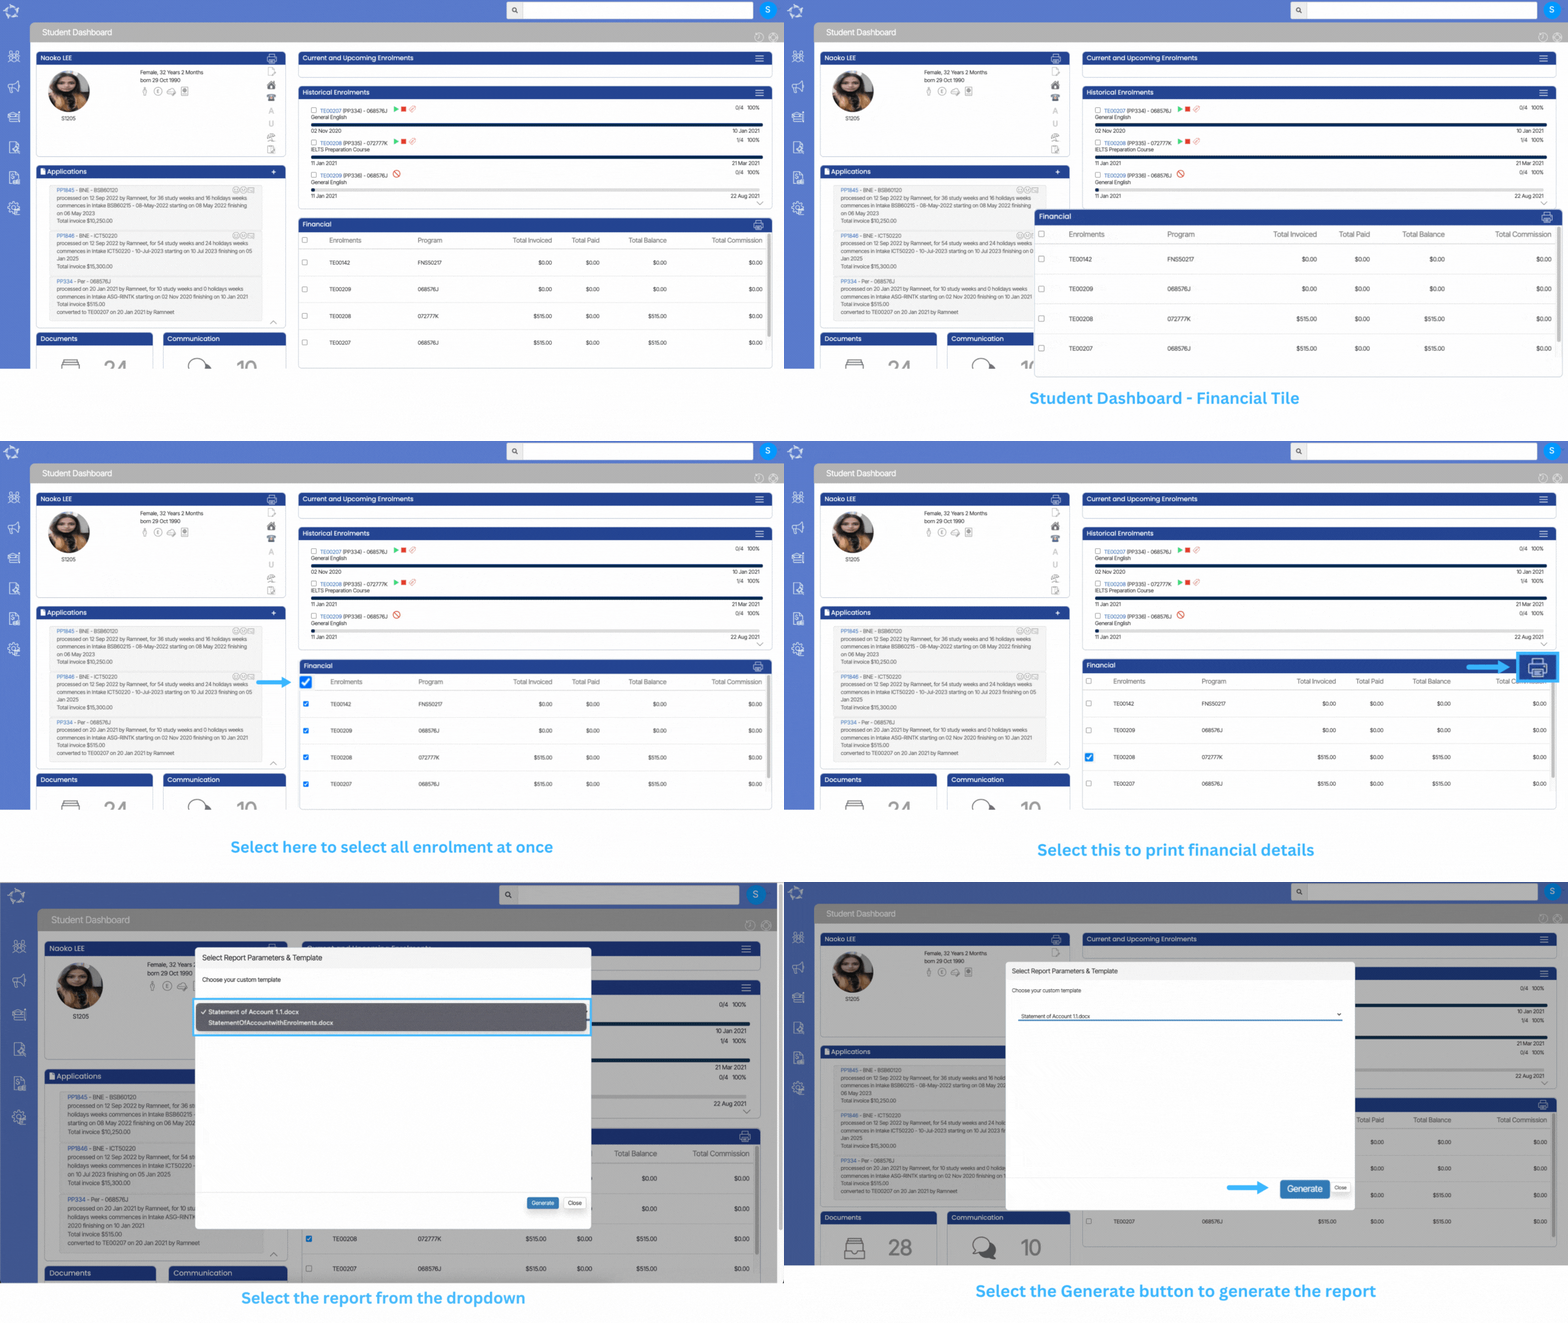
The financial tile will show you the financial details for all the Current/upcoming and historical enrolments. You can see the enrolment number, program code, total invoiced amount, total paid amount, balance amount and total commission.

You can also generate the Student Statement of Account from the Print Icon.

After selecting the generate button the report will be visible on the report dashboard, from where you can download the report whenever you want.

How do I link an Agent to an enrolment?

Main Dashboard > Enrolment Dashboard > Financial Tile

If the agent was not initially linked to the enrollment process, it is now possible to establish this connection directly from the enrollment dashboard. By utilizing the agent linking feature, you gain access to a comprehensive range of information and capabilities related to financial transactions. These functionalities empower you to efficiently handle financial transactions and ensure accuracy in financial records.

To link an agent with an enrollment, please follow the steps below:

  1. Access the Enrollment Dashboard.
  2. Navigate to the Financial tile, located directly below the enrollment student profile tile.
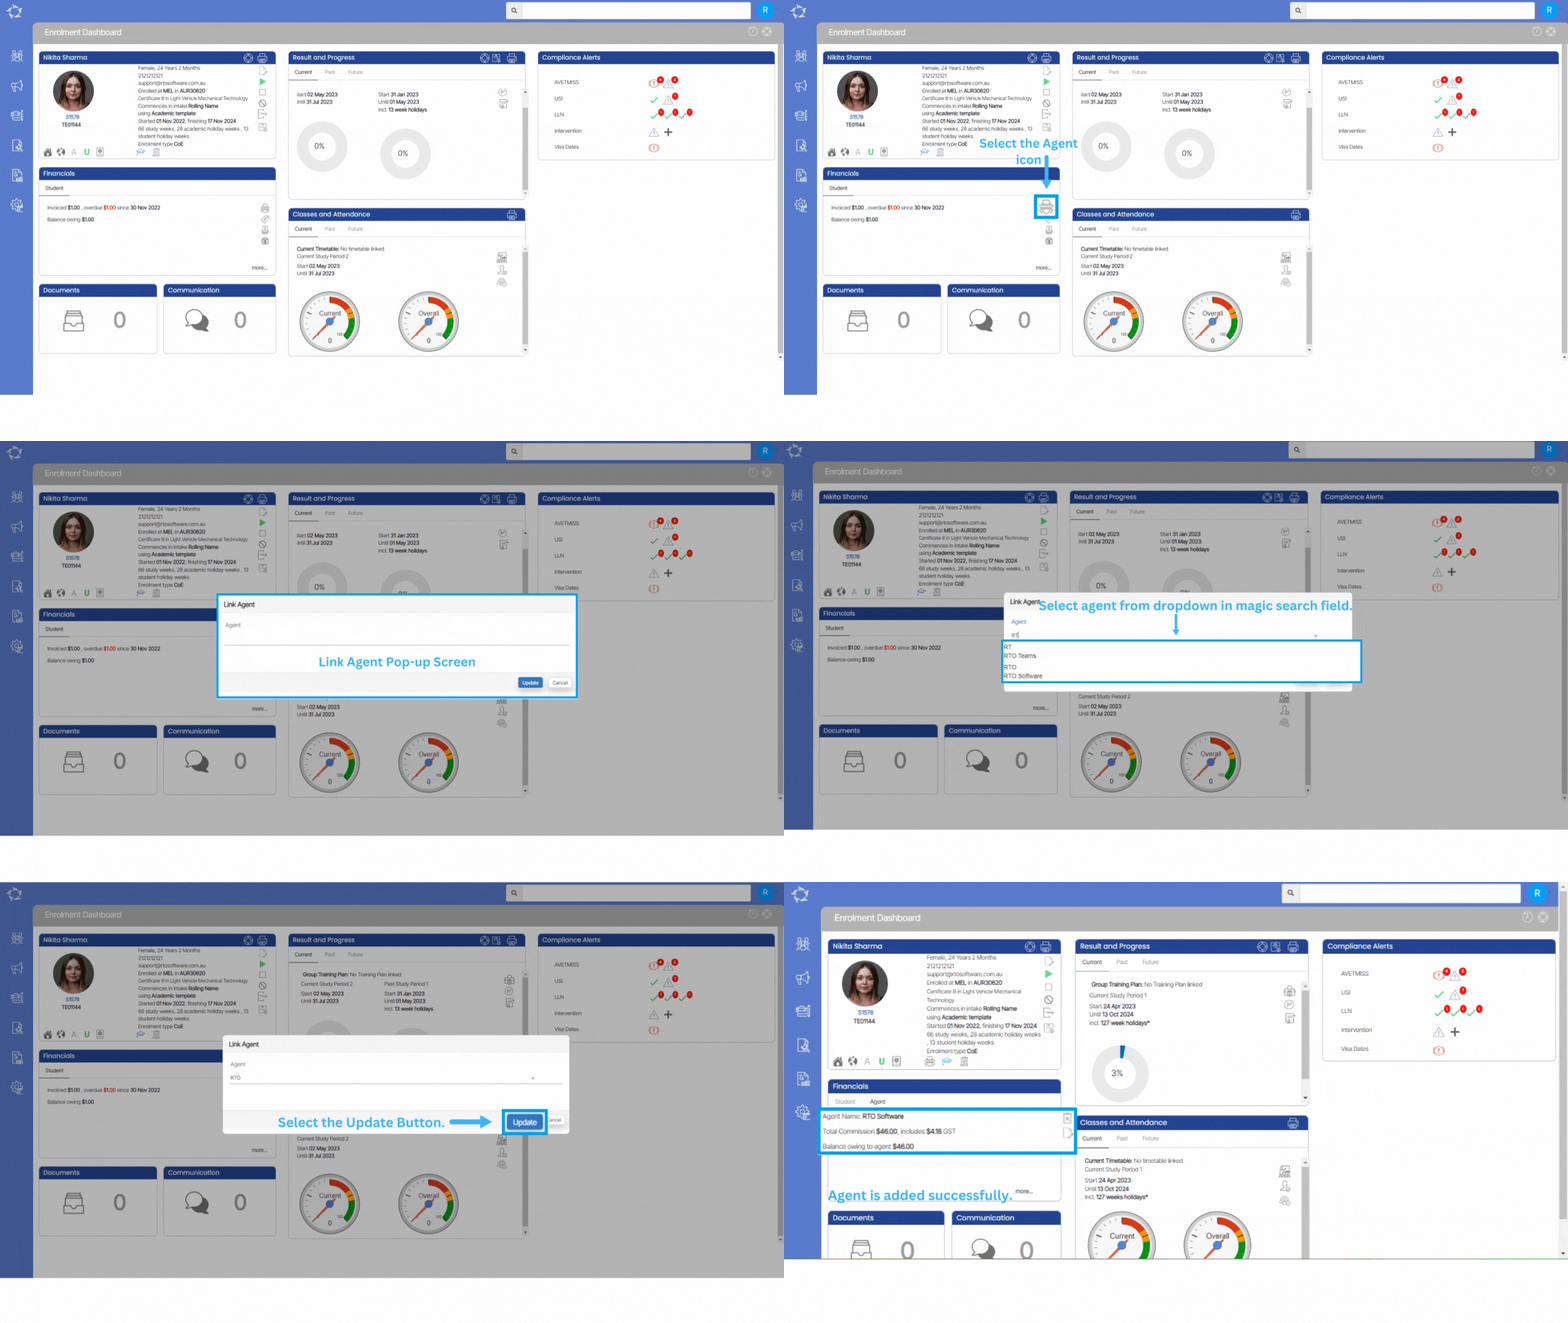
  3. Click on the agent icon within the student financial tile to open a pop-up window for agent linking.
  4. Utilize the magic search field within the pop-up to search for the desired agent. As you type, the search suggestions will display matching agents.
  5. Select the appropriate agent from the suggestions and click the update button. The screen will refresh, and the agent tab will appear in the financial tile.

The agent is linked but the commission is still not calculating for an enrolment

From the Enrolment Dashboard > Financials Tile > Agent tab it shows that there is no financials for the agent linked to the enrolment, this could be because the Agent is not set with Pay Commission.

To raise the agent commission the Pay Commission should be turned on and at least one commission template should be linked to the agent which is explained below.

  • Select the main menu icon for Marketing and then the icon for Agent. This will take you to the Agent Welcome List screen where you can search to find the Agent.
  • Enter the Agents code or name and select the Apply button. The system will search and display the agent and you then just need to select the Edit icon in the Actions column as highlighted below.
  • On the Agent entry screen select the tick box for Pay Commission as shown below:
  • After selecting the Pay Commission tick box, two new fields with drop downs will show for Default Commission Template and Optional Commission Templates.
  • You must select at least one Default Commission Template from the drop down for the system to calculate commission for the agent. You can only select one Default Commission template.
  • If the agent sometimes receives different commission percentages, you can always select other commission templates in the Optional Commission Template drop down. The system will allow you to select more than one from this list.

Now you need to go back to the enrolment dashboard, select the edit icon from the agent tab as shown below:

In the pop up window select the Update button as shown below. By doing this the system will refresh the screen and will have calculated and created, where relevant, the commission invoices for the enrolment.

Why isn’t the agent commission calculating?

There could be a number of reasons why the system is not calculating an agent’s commission invoices for an enrolment. The following posts will help you identify the reason.

Print Letter

Printing letters in bulk from listing screens is a helpful feature that allows you to quickly generate and distribute various letters to students, such as warning letters, course progress letters, course completion letters, poor academic progress warning letters, and other types of letters. The process involves logging into the relevant dashboard, selecting the appropriate listing screen, filtering the data to include only the desired students, selecting those students, generating the letters, reviewing and editing them as necessary, and then printing them in bulk or downloading them as PDF files. This method saves time and is an efficient way to communicate important information to a large group of students.

You can individually generate the letters from the dashboards that we have such as:

Applicant Dashboard
Student Dashboard
Enrolment Dashboard
Agents

IMPORTANT – Before you print the letter, please make sure you have set up your custom templates in TEAMS, so they can appear in the dropdown list. Otherwise, you won’t see any dropdown options.
You can select the links to know more about (how to customise a report template in TEAMS and how to upload a Custom report template in TEAMS)

To print letters in bulk, you can follow these steps:

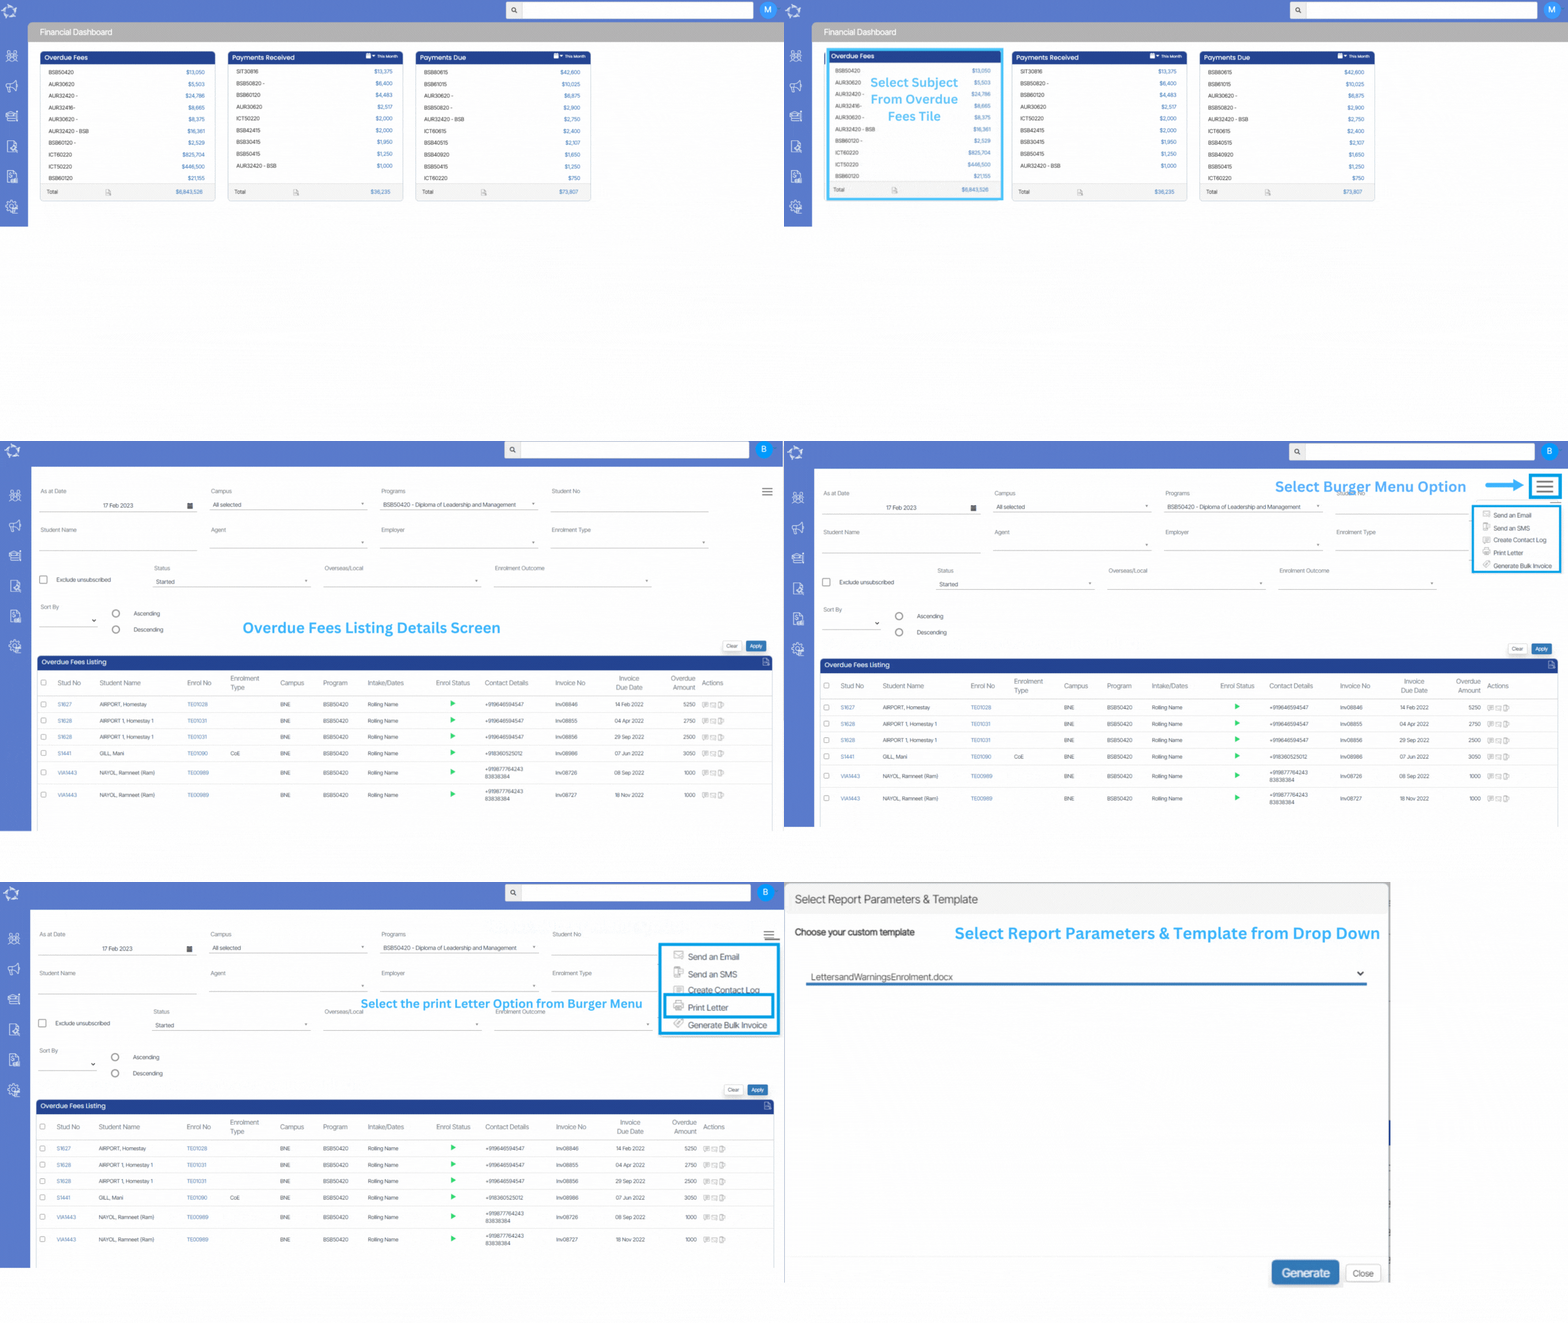
  • Select the checkboxes against the student number. (You can select more than one student)
  • Select the Burger Menu on the right hand side corner of the screen.
  • In the burger menu, select the Print letter option which will open a pop window on the screen.
  • Select the template from the dropdown that you have customised for print letters and hit the generate button.

Note – Once you select the generate button, the system will direct you towards the Report Dashboard where you can see your report in queue or underprocessing. Give it a refresh to check if the report’s done, and then you can download the word and PDF versions.”

Subject Invoicing

Overview

Originally the system was generating only Program based invoices. However, we have introduced new functionality called Subject Invoicing. This will allow you to raise invoices at the subject level in the application process.

Note: To use Subject invoicing you need to set the Invoicing method to use for your site. To do this you must have System Administration permissions to access the settings or speak to your manager about this.

Program Invoices

For program based invoices, we select the fee at the Fee selection step of an application.


And all the generated invoices will be displayed on the Invoice preview screen

Subject Invoices

For subject based invoices, we select the fee at the new application – subject delivery dates screen for all subjects.

And all the generated invoices will be displayed on the Invoice Preview screen.

If you have any queries, please do not hesitate to contact us on 1300 85 05 85 or email us via support@rtosoftware.com.au

How to setup Subject Fees for Programs and Subjects?

Dashboard > Academics > Subjects

  • To set up fees for the Subjects, you need to go to the Subjects > Subjects Entry screen > Details tab. Here you can enter the Subject fee in the Default Amount field.

Dashboard > Program > Burger Menu > Subjects

  • To set up fees for the Subjects at the Program level, then you need to go to the Program Burger Menu and select Subjects from the pop up.
  • Once you have selected the Subjects option, it will take you to the Program Subjects screen and there you need to select the Edit icon under the Actions column for the particular subject, you wish to enter the subject fee.
  • Upon selecting the edit icon, the floating window will open on the screen, where you can add the amount for the subject and select Save.

When to add the fee at the program subject screen?

If for any subject which is common in two or more programs but the fee for each program is different for that subject. Then in such a case, you can add that program-specific fee for the subject at the program subject screen.

Business Rules

The system will fetch the fee amount from the program subject screen. If the fee amount field is blank there then the system will fetch it from the subject entry screen.

Application Process > Subject Invoicing

Dashboard > Marketing > New Application > Subject Delivery Dates

While creating the application when you are on the New Application – Subject Delivery Dates screen, you will see the default amount for each of the subjects under the Amount Column. The system has fetched the amount either from the Program Subject or Subject level where the user has already set up the fee. A user can also edit the amount if he wishes to enter a different amount other than fetched by the system.

Not sure how to set up the subject fee. Kindly, read the post How to set up Subject Fees > Program and Subject levels?

IMPORTANT – The system will always fetch the fee amount from the program level and if it can not find any fee set up at the program subject level then it will fetch it from the subject level.

On the Application – Invoice Preview screen, the system will generate the invoices for the Subjects as shown below:

Note: The invoice date will always be the Subject’s Start date and by default, the invoice due date is also the same. If you wish to change the invoice due date, kindly contact our support team.

After the application is created, the user can check the financials on the Applicant Dashboard.

If you have any queries, please do not hesitate to contact us on 1300 85 05 85 or email us via support@rtosoftware.com.au

Important Links

How to edit Subject Invoices?

Application Level

To edit the subject’s invoices, you need to go to the Application Dashboard > Financials Tile > Actions column > Edit icon as shown below in the screenshot:

  • Once you have selected the edit icon, the system will take you to the Application Dashboard – Edit Invoice screen, where you can edit the subject’s invoice by selecting the edit icon from the Invoice details tile as shown below:
  • By selecting the edit option, you can edit the fees in the Fee Selection tile and then select Add button and Save as highlighted below:

Enrolment Level

  • The user can also edit the subject’s invoice from the edit icon on the Enrolment Dashboard > Student Financial Details screen as shown below:
  • By selecting the edit icon, the system will take you to the Enrolment Dashboard > Edit Invoice screen and there you can edit the invoice and Save it as shown below:

If you have any queries, please do not hesitate to contact us on 1300 85 05 85 or email us via support@rtosoftware.com.au