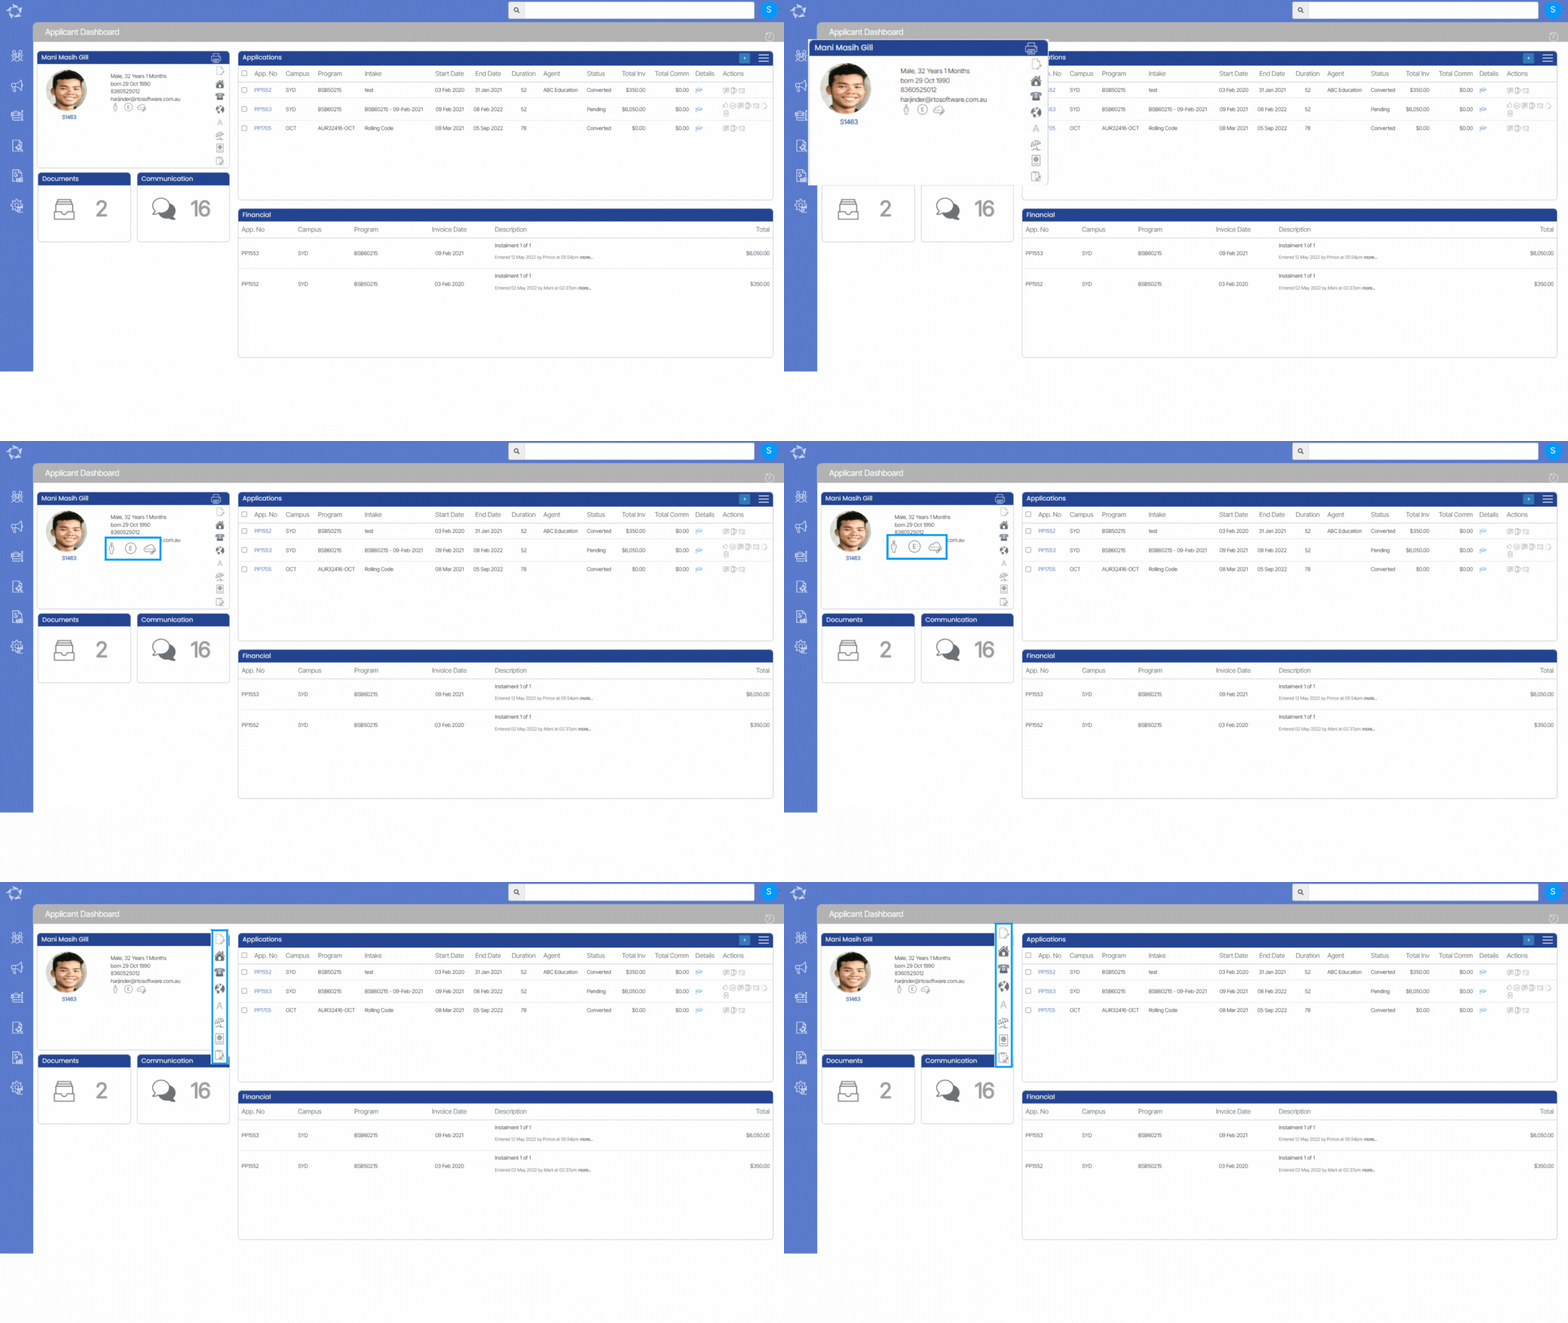
Applicant Profile Tile

The tile will give you an overview of the basic information about an applicant. You can edit details, addresses, overseas information and much more information related to the Applicant.

Note: Once the applicant is converted to a student then you won’t be able to add/edit any details at the applicant level. However, you can make changes from the Student Profile Tile.

You can upload an applicant’s profile picture from here and edit the details as well for an applicant.

Horizontal Icons

Vertical Icons

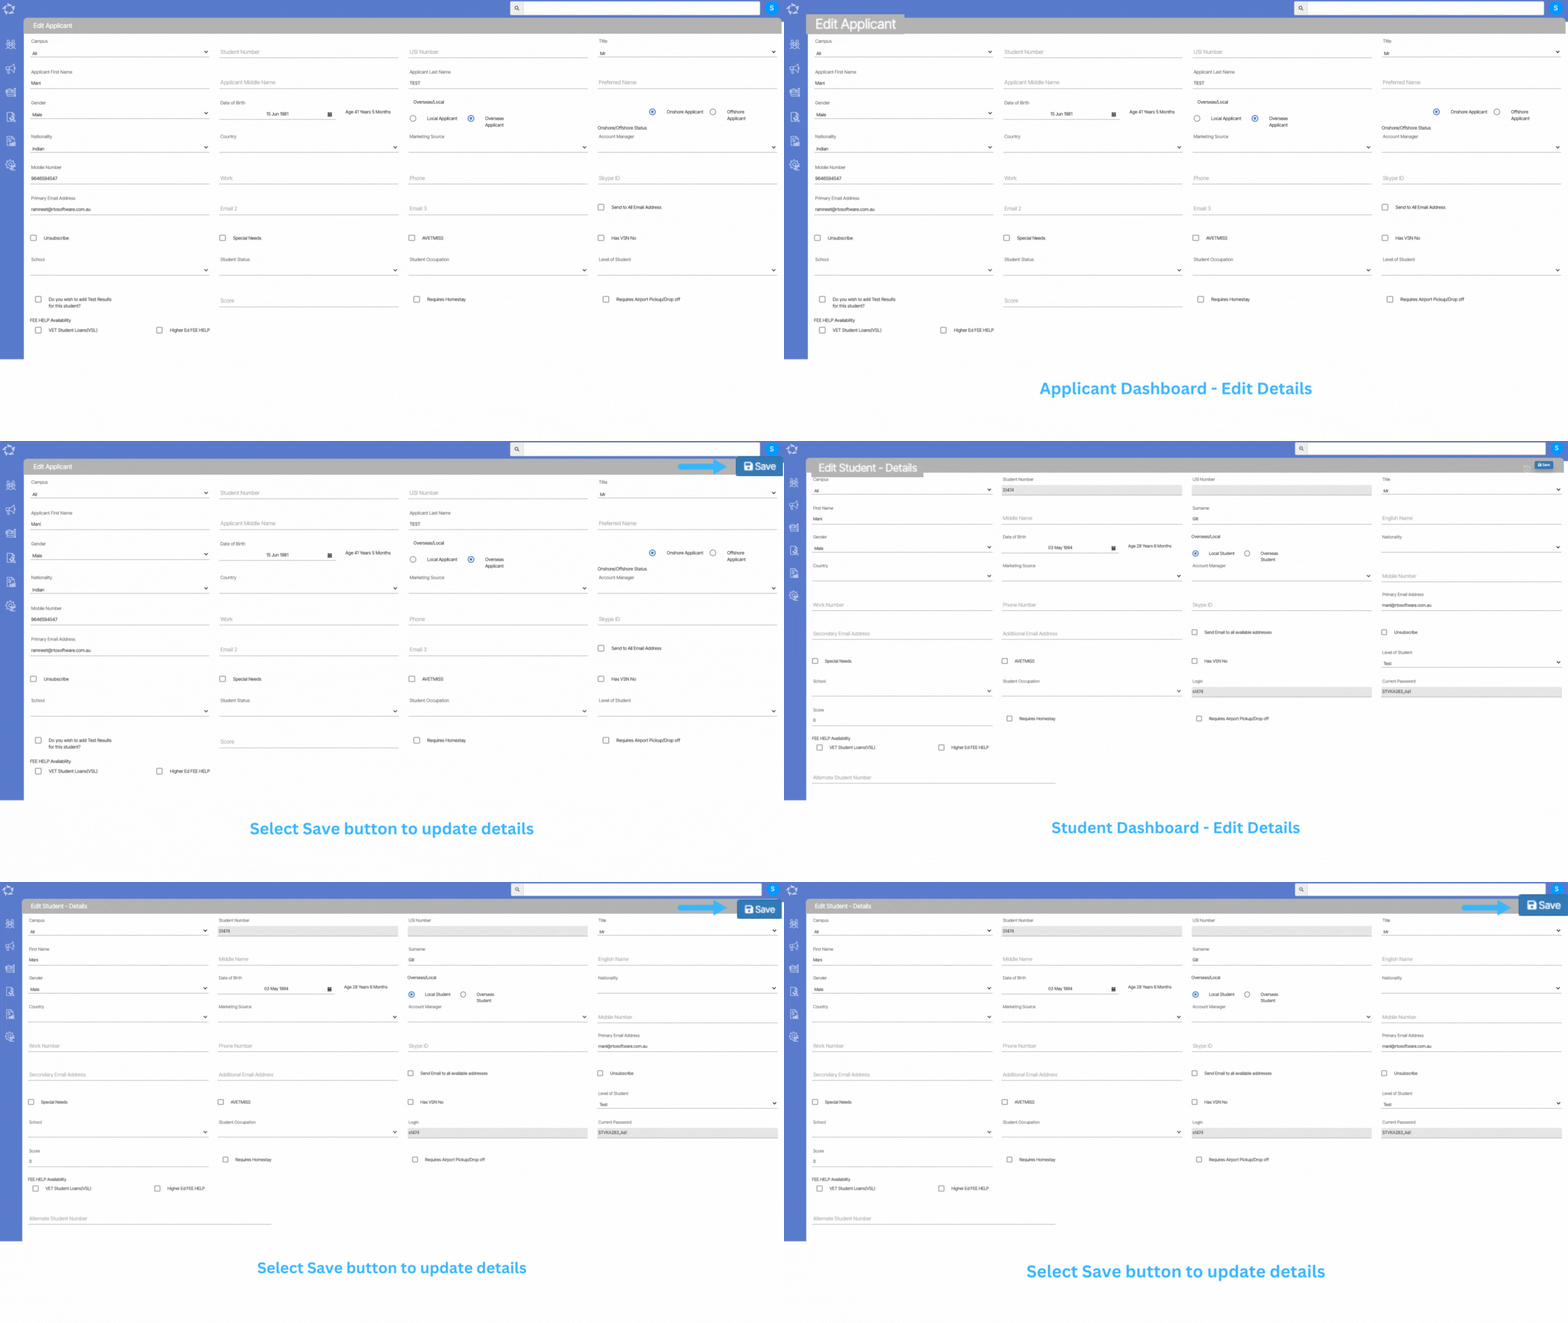
Edit Applicant/Student Details Screen

These screens will allow you to add/edit the information about the Applicant and Student. You can find these screens under:

Applicant Dashboard > Applicant Profile Tile > Edit Applicant Screen

Student Dashboard > Student Profile Tile > Edit Student Screen

Note Once the Applicant is converted to a Student then you won’t be able to add/edit any details at the applicant level. However, you can make changes from the Student Dashboard > edit student screen.

Explanation of the Fields

ColumnExplanation
CampusIt is a dropdown field, where you can select a campus for students. You can also select all as an option if the student has enrolments in different campuses.
Student NumberIt is a system generated field.
USI NumberThis is a Unique Student Identifier number and is a read only field.
TitleIt is a user code field, we can help you to add more titles if needed.
First NameYou can add the first name of the student here.
Middle NameYou can add the Middle name of the student here.
SurnameYou can add the Surname or last name of the student here.
English NameYou can add the English name of the student here.
GenderIt is a dropdown field, where you can select the specific gender of the student.
Date of BirthThis field shows a calendar where you can select the date of birth of the student.
Local StudentYou can select this option if the student is a local resident of the country where he/she is studying.
Overseas StudentThis is for international students. If the student is studying in the same country then select “onshore” but if the student is studying from a different country then please select “offshore
Nationality Nationality of the student.
CountryCountry of the student.
Marketing SourceThis is a user code field, you can select the options from the drop-down. If you need to set up any other options, kindly contact support.
Mobile NumberYou can add the mobile number of the student in this field.
Work NumberAdd the work contact number of the student.
Phone numberPhone number of the student.
Skype IDYou can add the student’s skype ID here.
Primary Email AddressThis email address will be used for all communications with the student.
Secondary Email AddressAdd the secondary email address of the student
Additional Email AddressYou can add another email address here
Send Emails to all available addressesIf this tick box is ticked, the system will send emails to all other email addresses too including the primary email addresses i.e. secondary email addresses and additional email addresses.
UnsubscribeBy ticking this tick box, you can unsubscribe from all the marketing emails. That means the student will not receive any marketing emails.
Special NeedsIf the student has any special requests or needs. You can tick the tick box and then can add special notes in the note box.
Always make sure to hit back at the notes icon after entering the notes to save it.
AVETMISSIf you are going to report this student to the government and the student is studying in any VET course, kindly tick this tick box. This is very important for compliance.
Has VSN NoYou can update the Victorian Student No in this field.
Level of StudentYou can select the level of the student if he/she is studying an ELICOS course.
School
Student OccupationYou can update the occupation of the student here.
LoginIt is a system-generated field where login details of the student portal or moodle will be populated.
Current passwordIt is a system-generated field where the password for the student portal or moodle will be populated.
ScoreHere You can update the English test score of the student.
Would you like to book homestay accommodation?You can select if students want to book accommodation (with or without meals) from the college. 
DurationYou can update the duration of the stay for a student.
Would you like to book our airport pick-up services?If the student wants to book airport pick-up services, you can select this option.
Do you require us to arrange Overseas Student Health Cover for you?If the student wants to arrange Overseas Student Health Cover, you can select this option.
Alternate Student numberStudent numbers given to a student other than system generated student numbers should be added in this field.

Offer Letter

history of changes

An Offer Letter is a proposed confirmation of enrolment into one or many programs and what the dates and costs for the applicant are. Generally a college emails this Offer Letter to the student or agent and they review and either confirm or decline the offer.

In this step of the New Application process, you can generate your Offer Letter. Depending on the type of RTO/college you are and the type of student you are doing an application for, will determine what you may call an Offer Letter.

For example, for ESOS/CRICOS Providers who manage and deliver training to students from overseas in Australia on Student visas the standard terminology is either an Offer Letter or a Letter of Offer (LOO). However, for a local/domestic based RTO/college, you may call an Offer Letter an Enrolment Acceptance Advice. Either way, it is the same thing and you can customise the master template and have as many as you wish in the system.

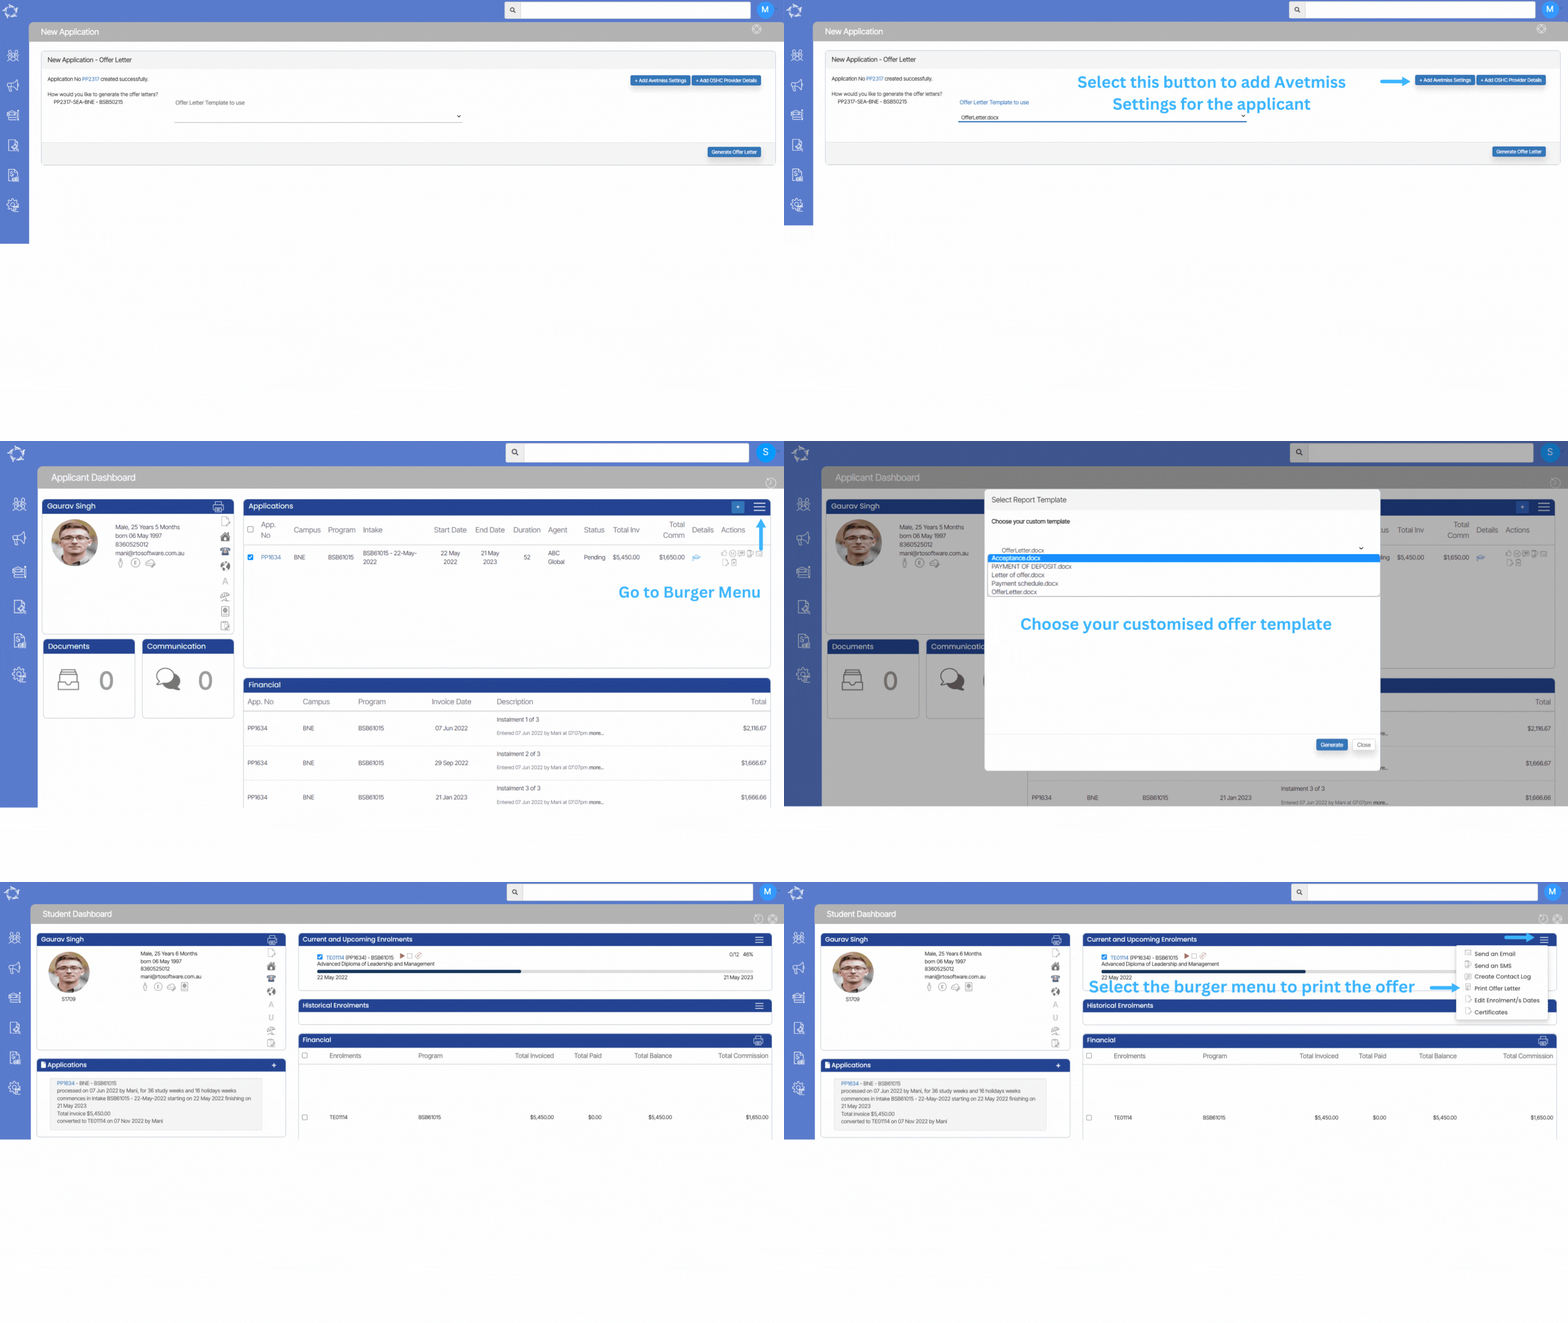
Also, on the Application Finished screen, you will see two buttons called +Add OSHC Provider Details and +Add AVETMISS Settings.

Upon selecting the OSHC Provider Details button, a pop-up window will appear on the screen, which will allow you to enter and save the OSHC (Overseas Student Health Cover) details for the application. This new functionality will provide you with a more convenient way to add and manage OSHC information within the application process. Or you can also add their OSHC details for the application from the Applicant Profile by clicking on the Overseas icon.

Upon Selecting the AVETMISS Settings Button, this will take you to the Application Dashboard > Application AVETMISS Settings screen, where you can update both the application level AVETMISS settings and the subject level AVETMISS settings. This page allows you to customise the settings that determine how your application handles AVETMISS data, which is essential for managing and reporting on vocational education and training in Australia.

Note: Offer letters can be generated from different screens in TEAMS.

Applicant Dashboard > Applications Tile
Applications Dashboard > Application profile Tile
Student Dashboard > Current and Upcoming enrolments tile > Burger Menu

Please see below the process to generate an Offer Letter.

New Application

Dashboard > Marketing Menu > New Application

history of changes

This process (wizard) allows you to create applications for new applicants or existing students in the system.

Although this process is called a new application, it does not mean you create one application at a time for each program that an applicant or student wishes to enrol in. You can add one or multiple programs to the application and once you finish the process the system will generate individual applications for the applicant/student. You can then choose to view the information as a summary from the Applicant Dashboard or the individual applications (programs of study) from the Application Dashboard.

When you finish the process and select the FINISH button the system will take you to a step so you can generate the Offer Letter. For domestic based colleges, you may not call it an Offer Letter you may call it an Enrolment Acceptance letter etc. Please see the report explanation for this and the final step in this process for New Application – Offer Letter for more information.

Note: There are different ways to access the New Application process in the system. You can access this process from

Marketing Dashboard > Summary Tile
Applications listing Screen
Applicant Dashboard > Applications Tile
Student Dashboard > Applications Tile

The New Application process has a number of different steps in it. To view this post you can choose to either use the next arrow below and you will be able to walk through each step OR you can select specific links below to go directly to the relevant step.
New Application – Student Selection

New Application – Choose Programs

New Application – Subjects Delivery Dates

New Application – Fee Selection

New Application – Edit Invoices

New Application – Edit Invoices

New Application – Offer Letter

New Application – Student Selection

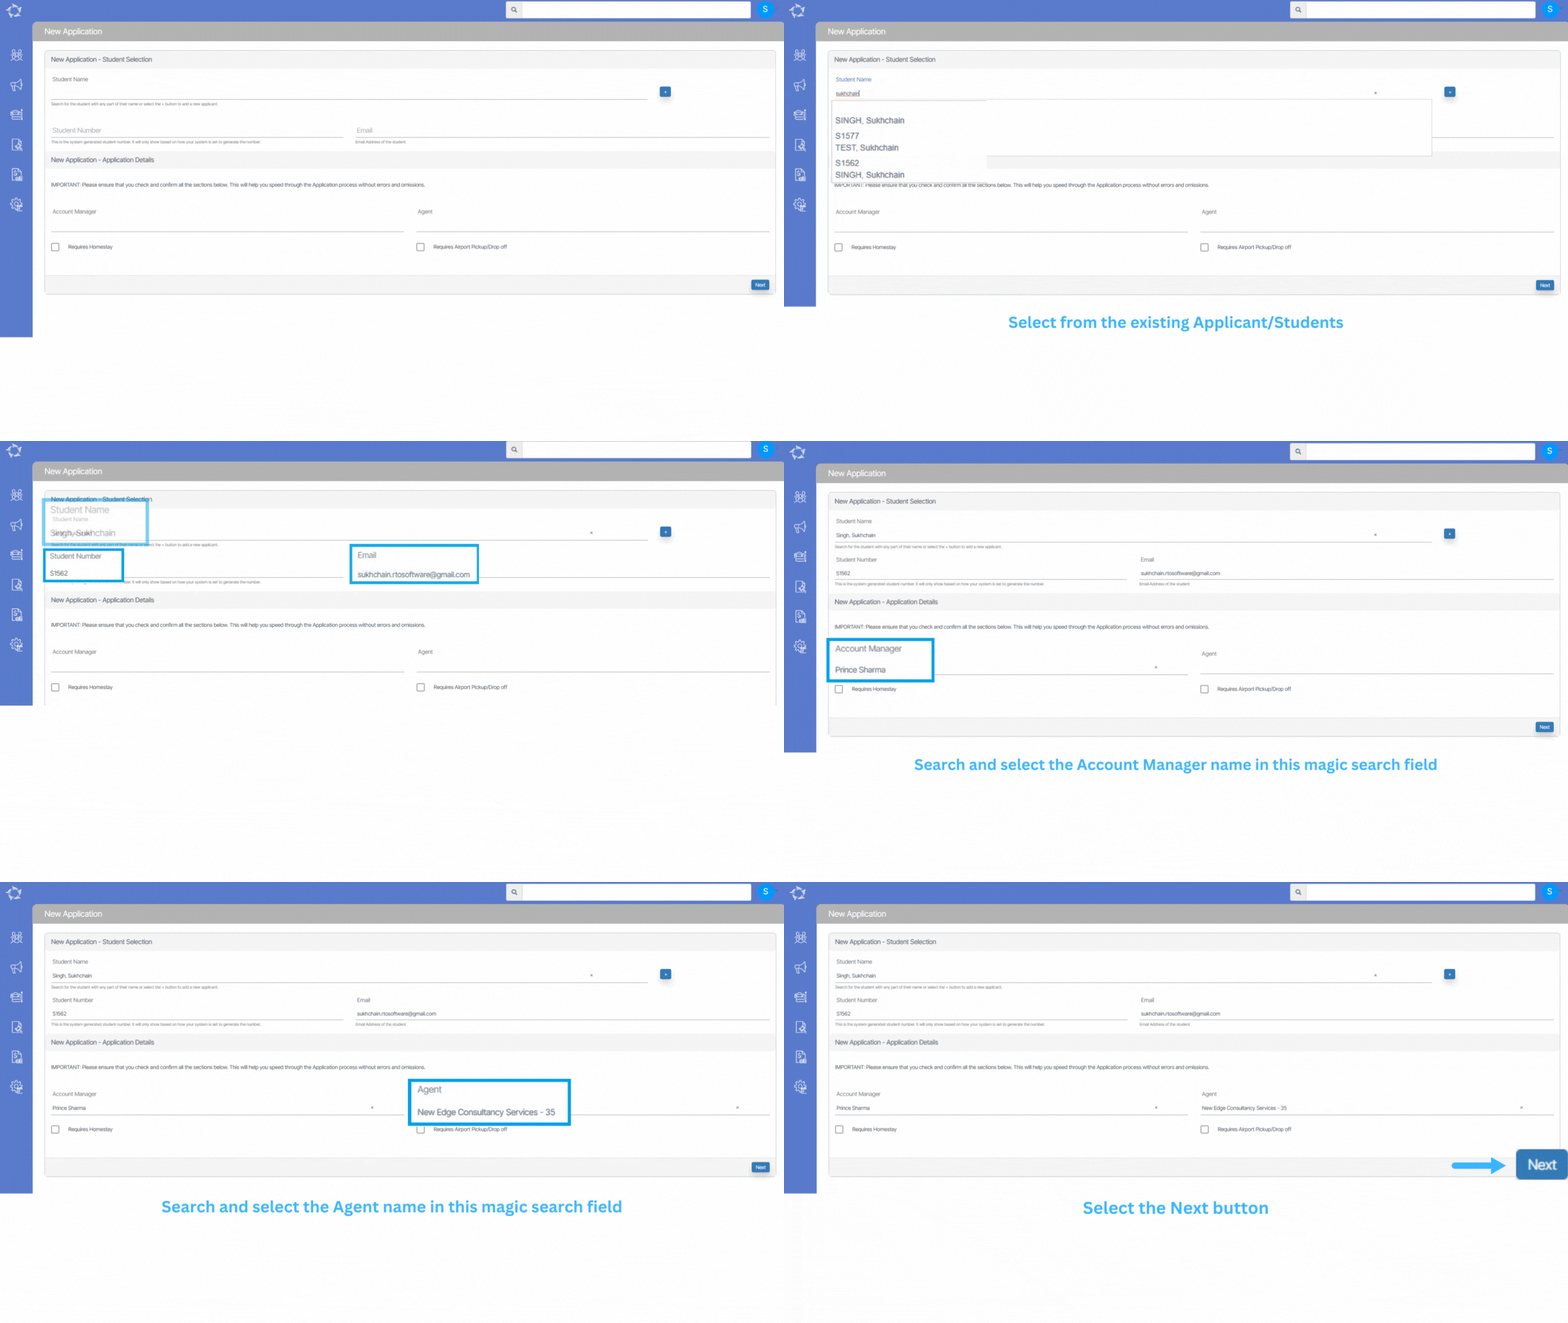
In this step, you either enter a new applicant or search and select an existing applicant or student from your system. Once you have entered or selected the correct applicant/student the system will load their name in the Student Name field below.

Note: DO NOT close your browser while you are walking through the steps of this process, as you will lose what you have entered. When you select the NEXT button in each step of this process the system does not save what you have done to the database. It allows you to go back in the process to change what you have selected, however, it is not until the final step where you select the FINISH button that the system will fully save everything to the database for you.

In the table below we have explained each of the fields/sections in this step.

Student Selection FieldsExplanation
Student NameThe first step is to find out if your applicant has previously studied with you and is already in the system. To do this, enter part of the applicant’s name into this field and if their name shows up select it from the list. If it doesn’t then you will need to select the icon for + to add them as a new applicant in the system.
When you search on an applicant’s name the system looks at enquiry students, applicants and students to see if the name is there and if they are will show you a relevant icon as to whether they are an enquiry, applicant or student.
You can select this button to add a new applicant in the system. You will be taken to the New Applicant entry screen and once you have entered all the required information and select the SAVE button, the system will bring you back to this step in the process again.
Student NumberYou can search based on a student number, however, if you are entering a new applicant this will not show unless your system has been setup to generate a student number at the application stage. It will only generate the number when you FINISH the application.
Typically, most colleges only issue a student number on approval/conversion of applications to enrolments so generating a student number at the application level is not set as a standard.
EmailThe system will load this information once you have selected a student or entered and saved your new applicant.
Account ManagerIf you have setup Account Managers in the system, you can link one to the application. Enter part of the account manager’s name into the field and the system will show you the results and just select one.
AgentIf you have setup Agents in the system, you can link one to the application. Enter part of the agent’s name in the field and the system will show you a list and select one from the list.

New Application – Edit Invoices screen

history of changes

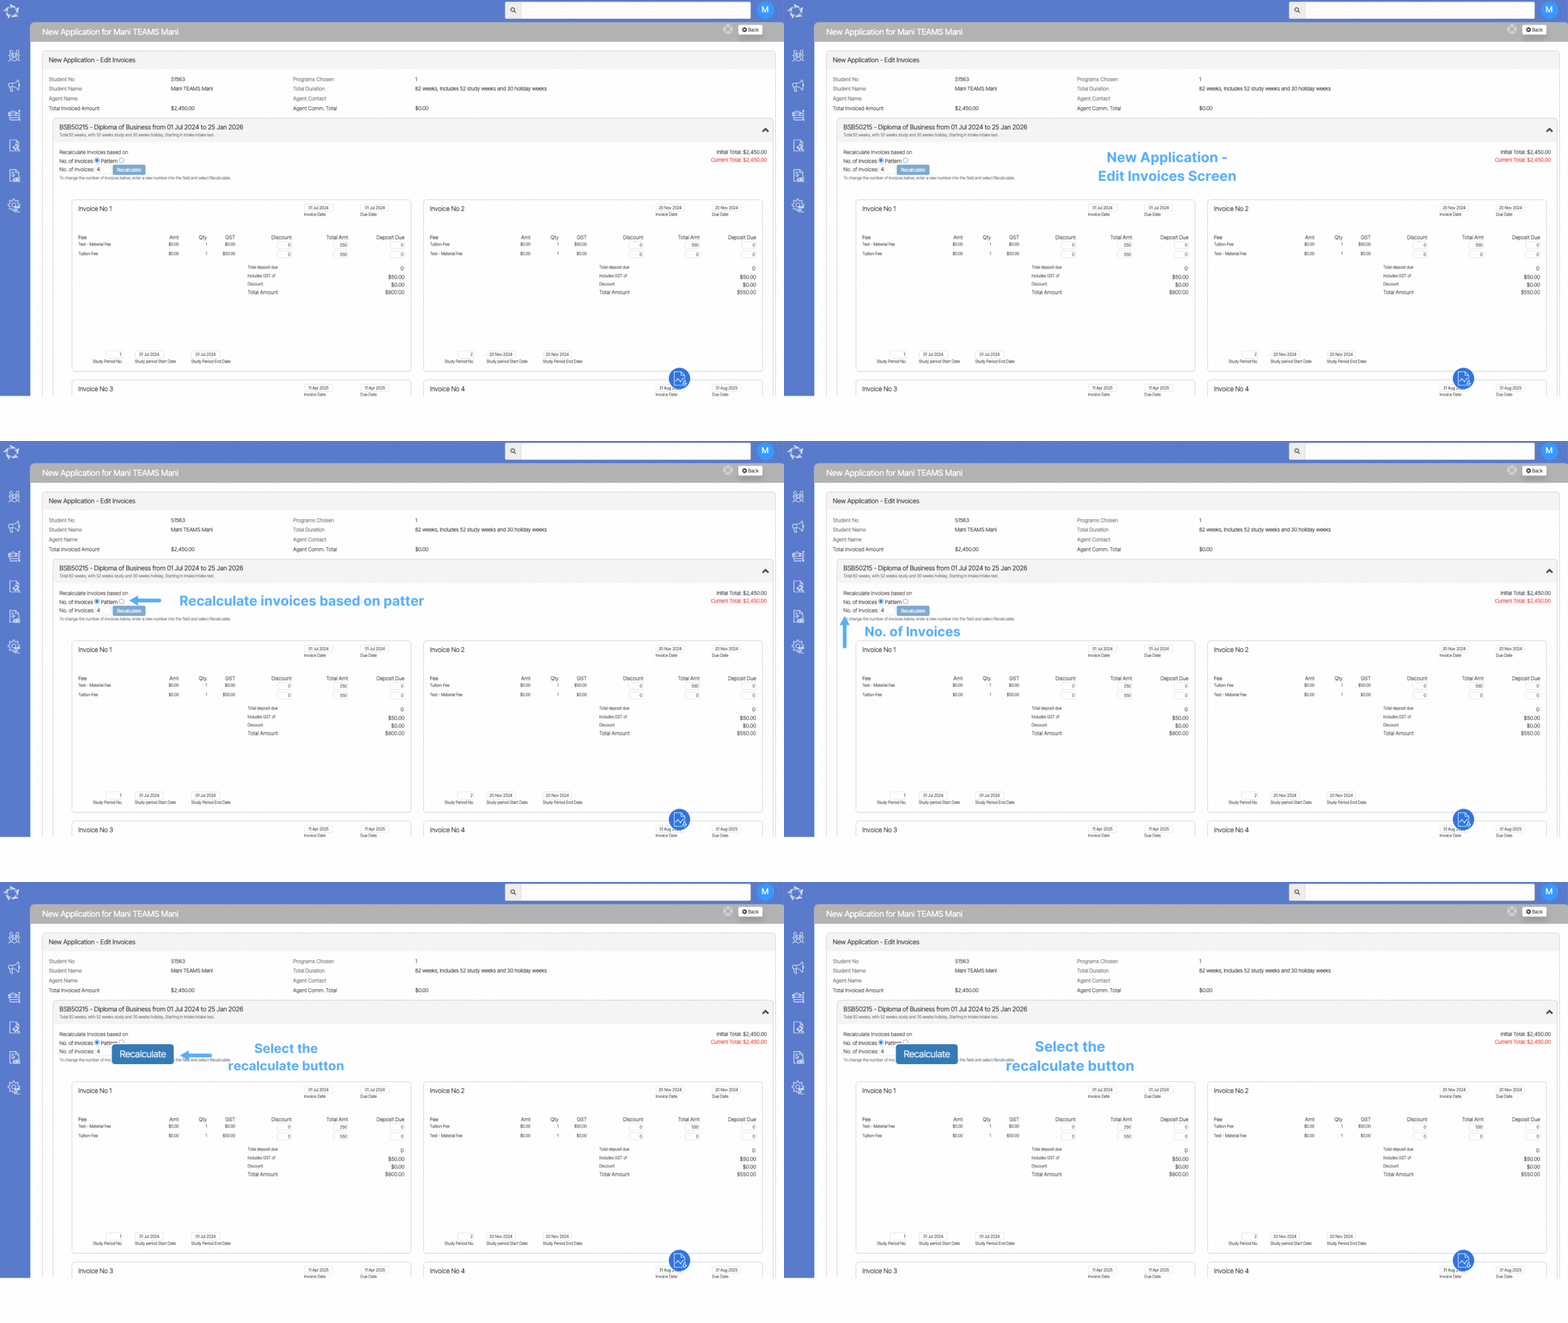
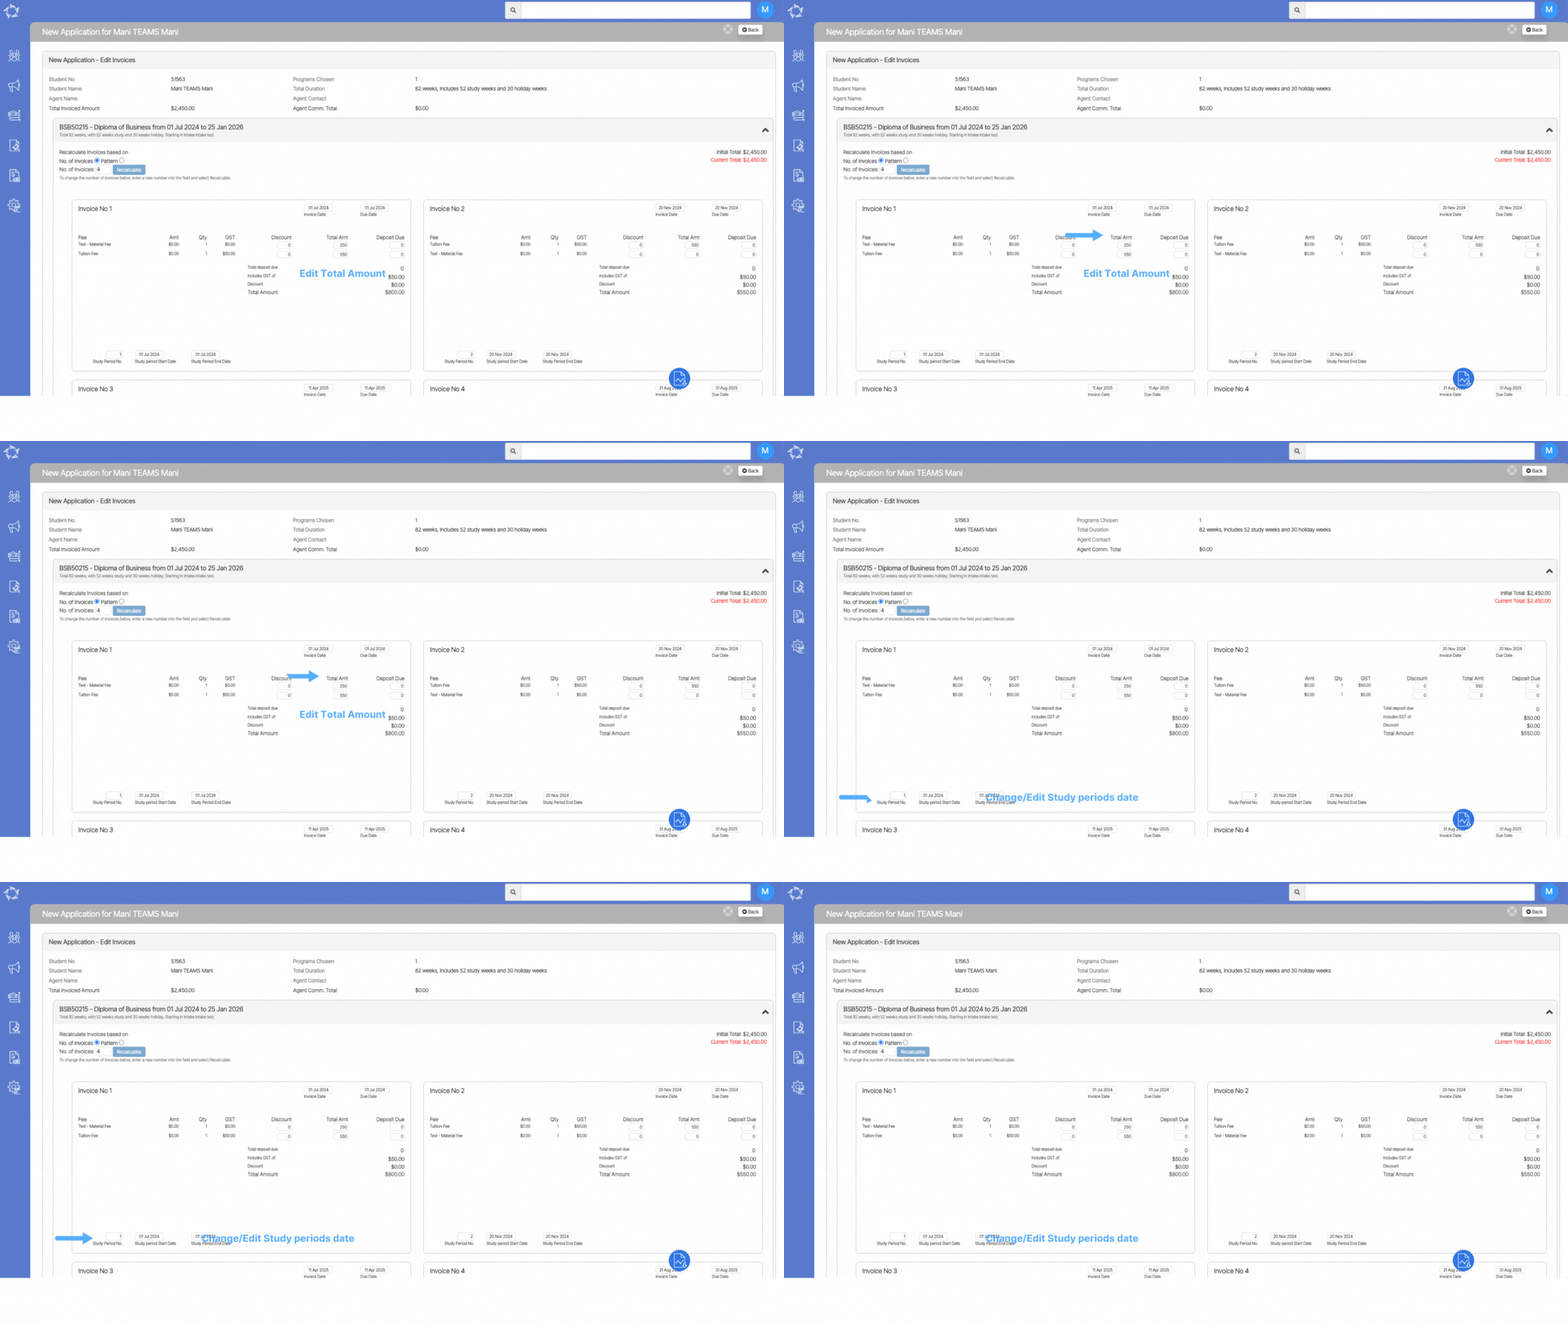
This screen will allow you to edit invoices and you can (change invoice date, and due date, fee amount, study periods and recalculate the number of invoices.

NoteDO NOT close your browser while you are walking through the steps of this process, as you will lose what you have entered. When you select the NEXT button in each step of this process the system does not save what you have done to the database. It allows you to go back in the process to change what you have selected, however, it is not until the final step where you select the FINISH button that the system will fully save everything to the database for you.

IMPORTANT – If you want to change the number of invoices then you need to add the desired number in the box and then select the Recalculate button, the system will recalculate the invoices into the desired number.

For example, as you can see below, the No. of invoices was 4 and there were 4 invoices generated for the application and then the no. of invoices is selected as 5 and the system generated 5 invoices accordingly.

IMPORTANT – If you have selected any instalment plan while the fee selection process and you wish to edit the number of invoices and recalculate then the instalment plan will be ignored and new invoices will be created. New dates and amounts will be distributed proportionally and the initial instalment plan will be lost.

Once you are happy with the above requirements, you can then make changes to the fee amount, can add the deposit due, and select the number of study periods including their SD and ED which will show you the initial total and current total on right hand side of the screen. You then need to select the Next button complete the application process.

New Applicant

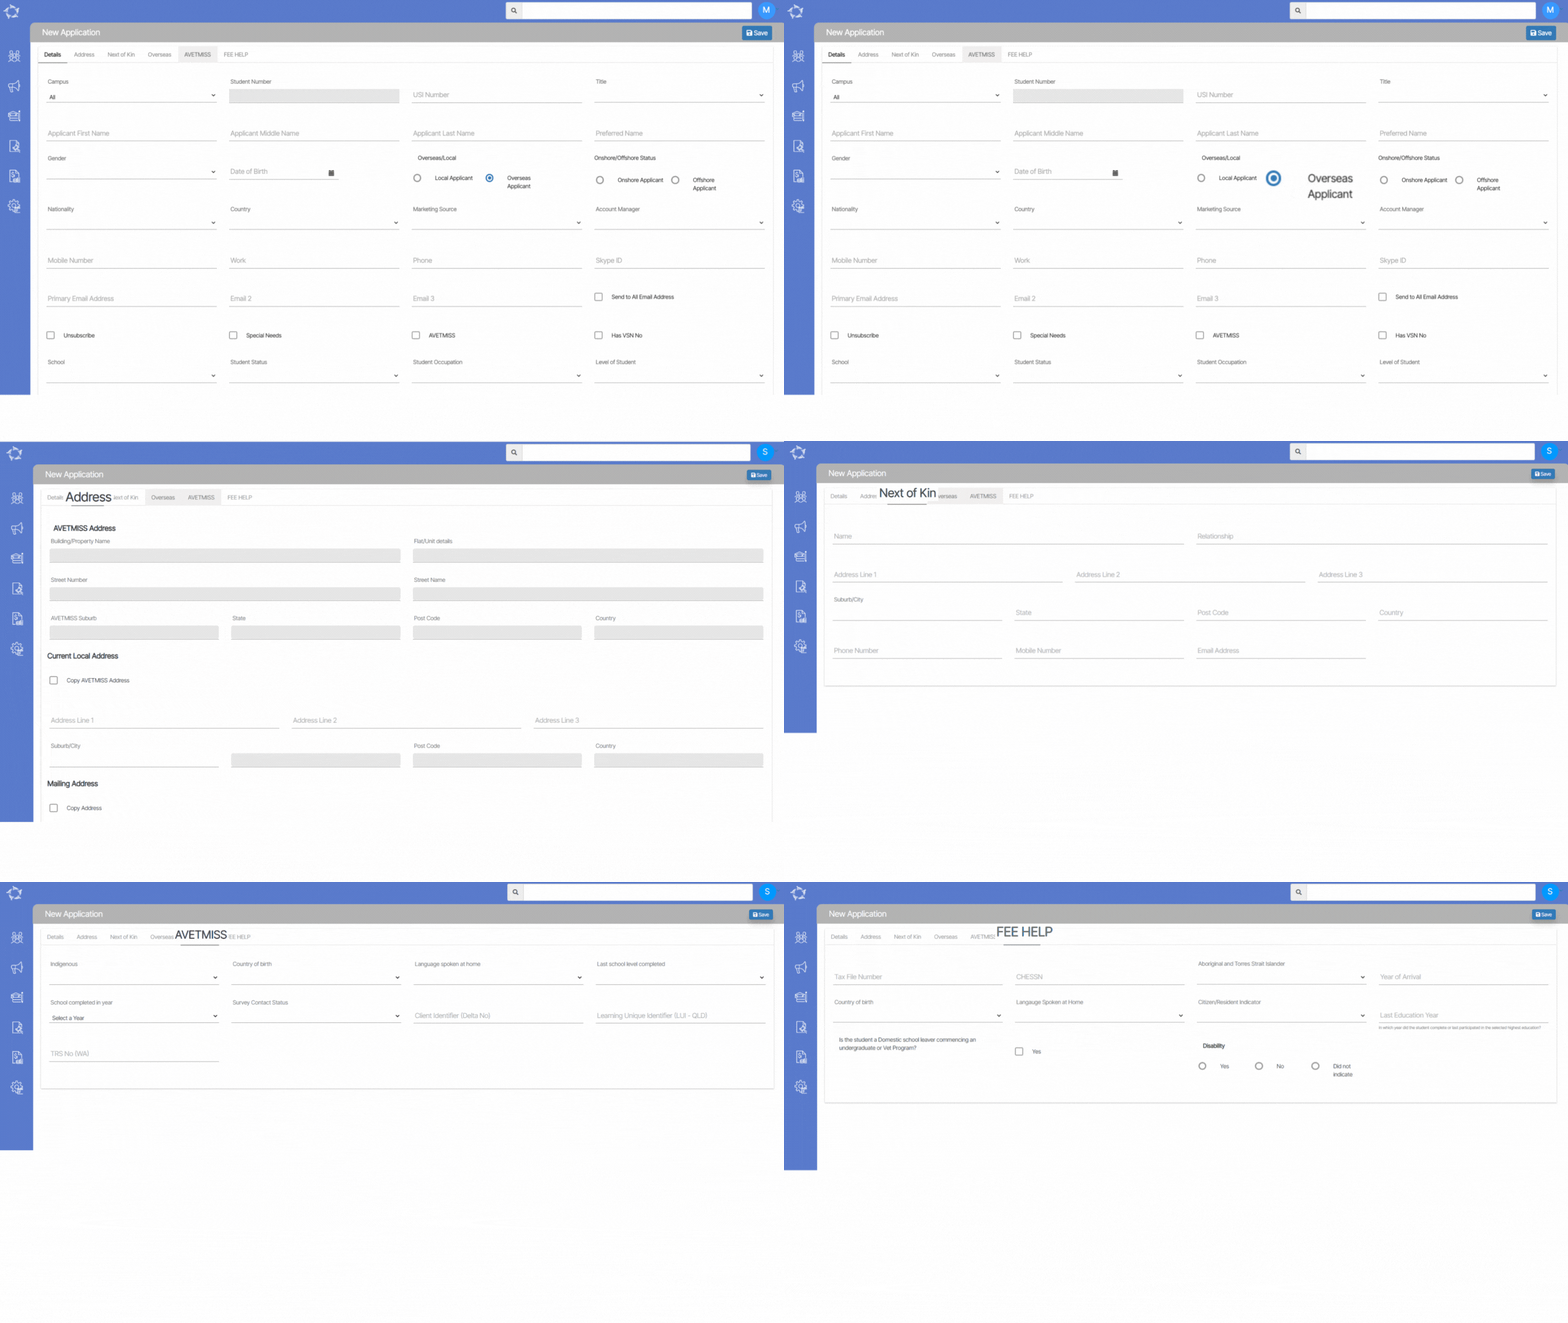
This screen allows you to add a New Applicant to your RTO with their basic details. This screen has different tabs where the system will allow you to add the details accordingly.

Note: The Overseas tab will only be visible if you select the Overseas/Applicant radio button while adding the applicant’s details and the same as you need to select the AVETMISS tick box to see the AVETMISS tab.

Tabs Description
DetailsThis tab will allow you to add basic information for the applicant. Some fields are very basic and self-explanatory, for other important fields in this tab you can read more here.
Address This tab will allow you to add the applicant’s Australian address information. From Local and Mailing addresses to the specific AVETMISS address format for VET students. It is important to note that for a VET student, you should enter the AVETMISS address first then you can select the copy tick box to copy the address to the local and/or mailing address fields. The system cannot copy from the local/mailing address fields to the AVETMISS address fields. For more information on Addresses click here.
Next of Ki This tab will allow you to add information for the student’s Next of Kin. For more information click here.
Overseas You will only be able to add the information under this tab if the applicant is set as an overseas student. To do this you need to select the radio button for Overseas Applicant that is under the field heading of Local/Overseas. When you do this, you also need to then update the student’s Onshore/Offshore Status by selecting a radio button to identify if the student/applicant is Onshore or Offshore. For more information click here.
AVETMISS You need to select the AVETMISS tick box on the details tab to make the AVETMISS tab visible. When you do this, you will be able to add the AVETMISS details for the Applicant.
FEE HELP You can add Fee HELP information for the applicant in this tab.

New Application – Subjects Delivery Dates

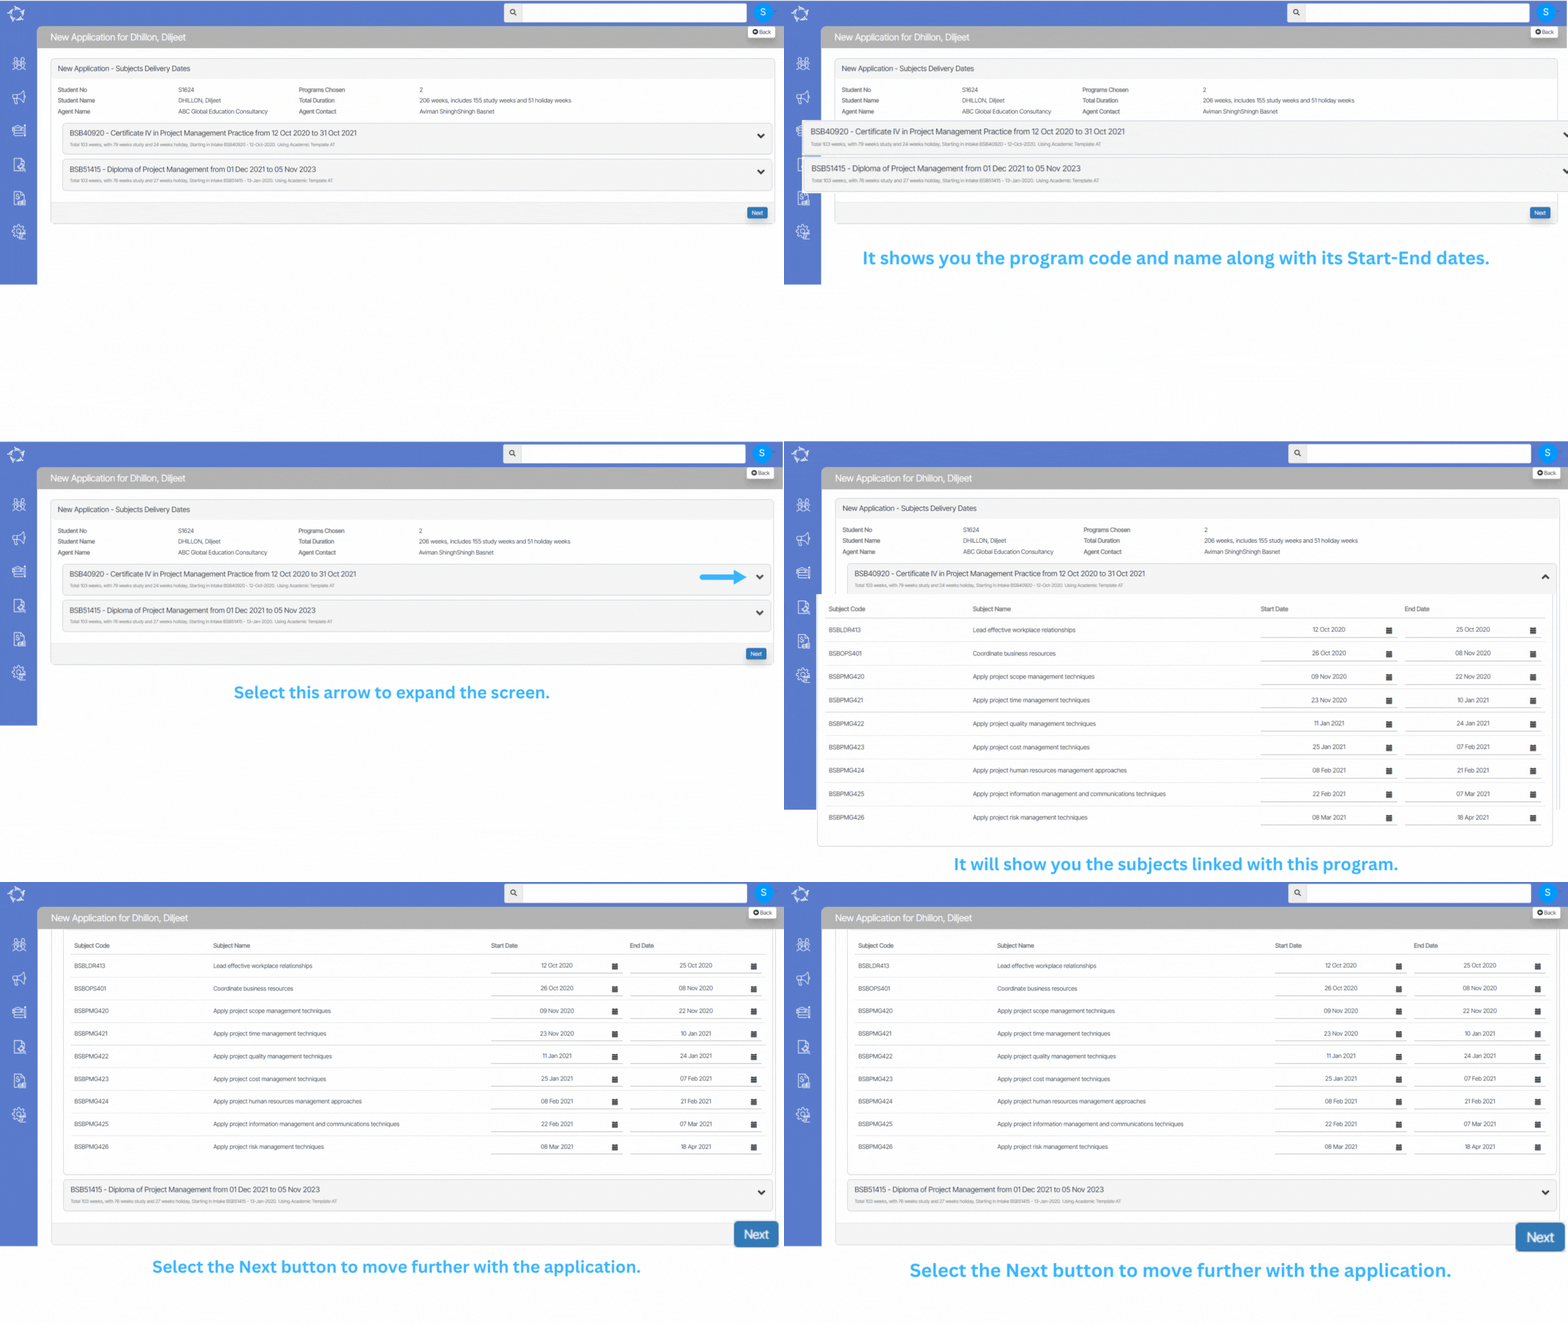
This screen will show you the Program details along with the subjects and their delivery dates. The system will show the subject dates according to the option selected for the Populate subject dates using the New Application – Choose Programs screen.

Note – DO NOT close your browser while you are walking through the steps of this process, as you will loose what you have entered. When you select the NEXT button in each step of this process the system does not save what you have done to the database. It allows you to go back in the process to change what you have selected, however, it is not until the final step where you select the FINISH button that the system will fully save everything to the database for you.

Once you select the Drag down button, the system will expand the screen and you will be able to see the subjects linked to the program.