Search Bar Changes

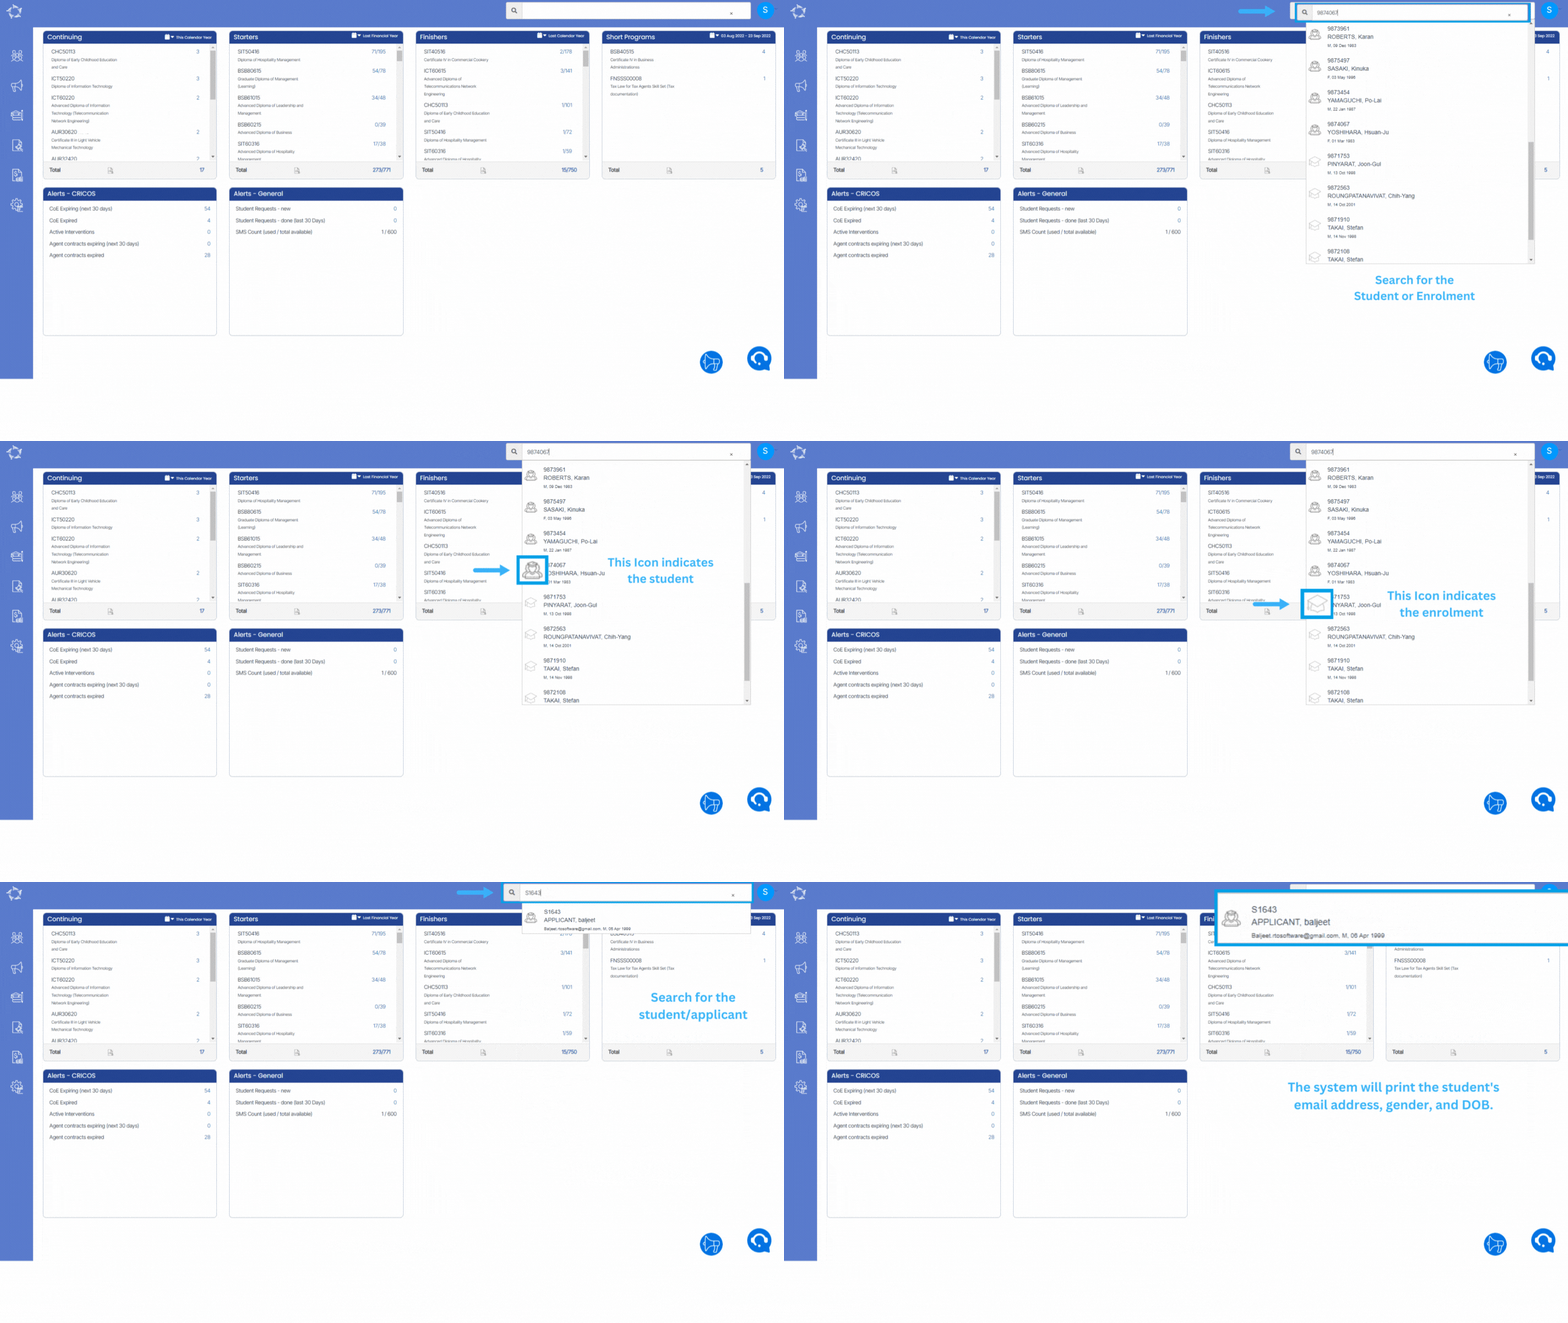
The Main Dashboard Search Bar has undergone recent changes, including the addition of icons against search results to help you distinguish between enrolments and students in the search results list.

In addition to the icons, the Main Dashboard’s Search Bar now also displays the current level of the searched object. This means that when you search for any object using the search bar, it will display its current level; whether it is an enquiry, applicant, student, or enrolment. This feature is designed to help you search for the specific record you are looking for by narrowing down the search results for you.

Also, the student’s email address, gender, and date of birth will now be visible when searching in the search bar.

New Application – Edit Invoices screen – History

Below are the changes that we have made to the New Application – Edit Invoices screen.

Email Template Screen – New Merge Fields

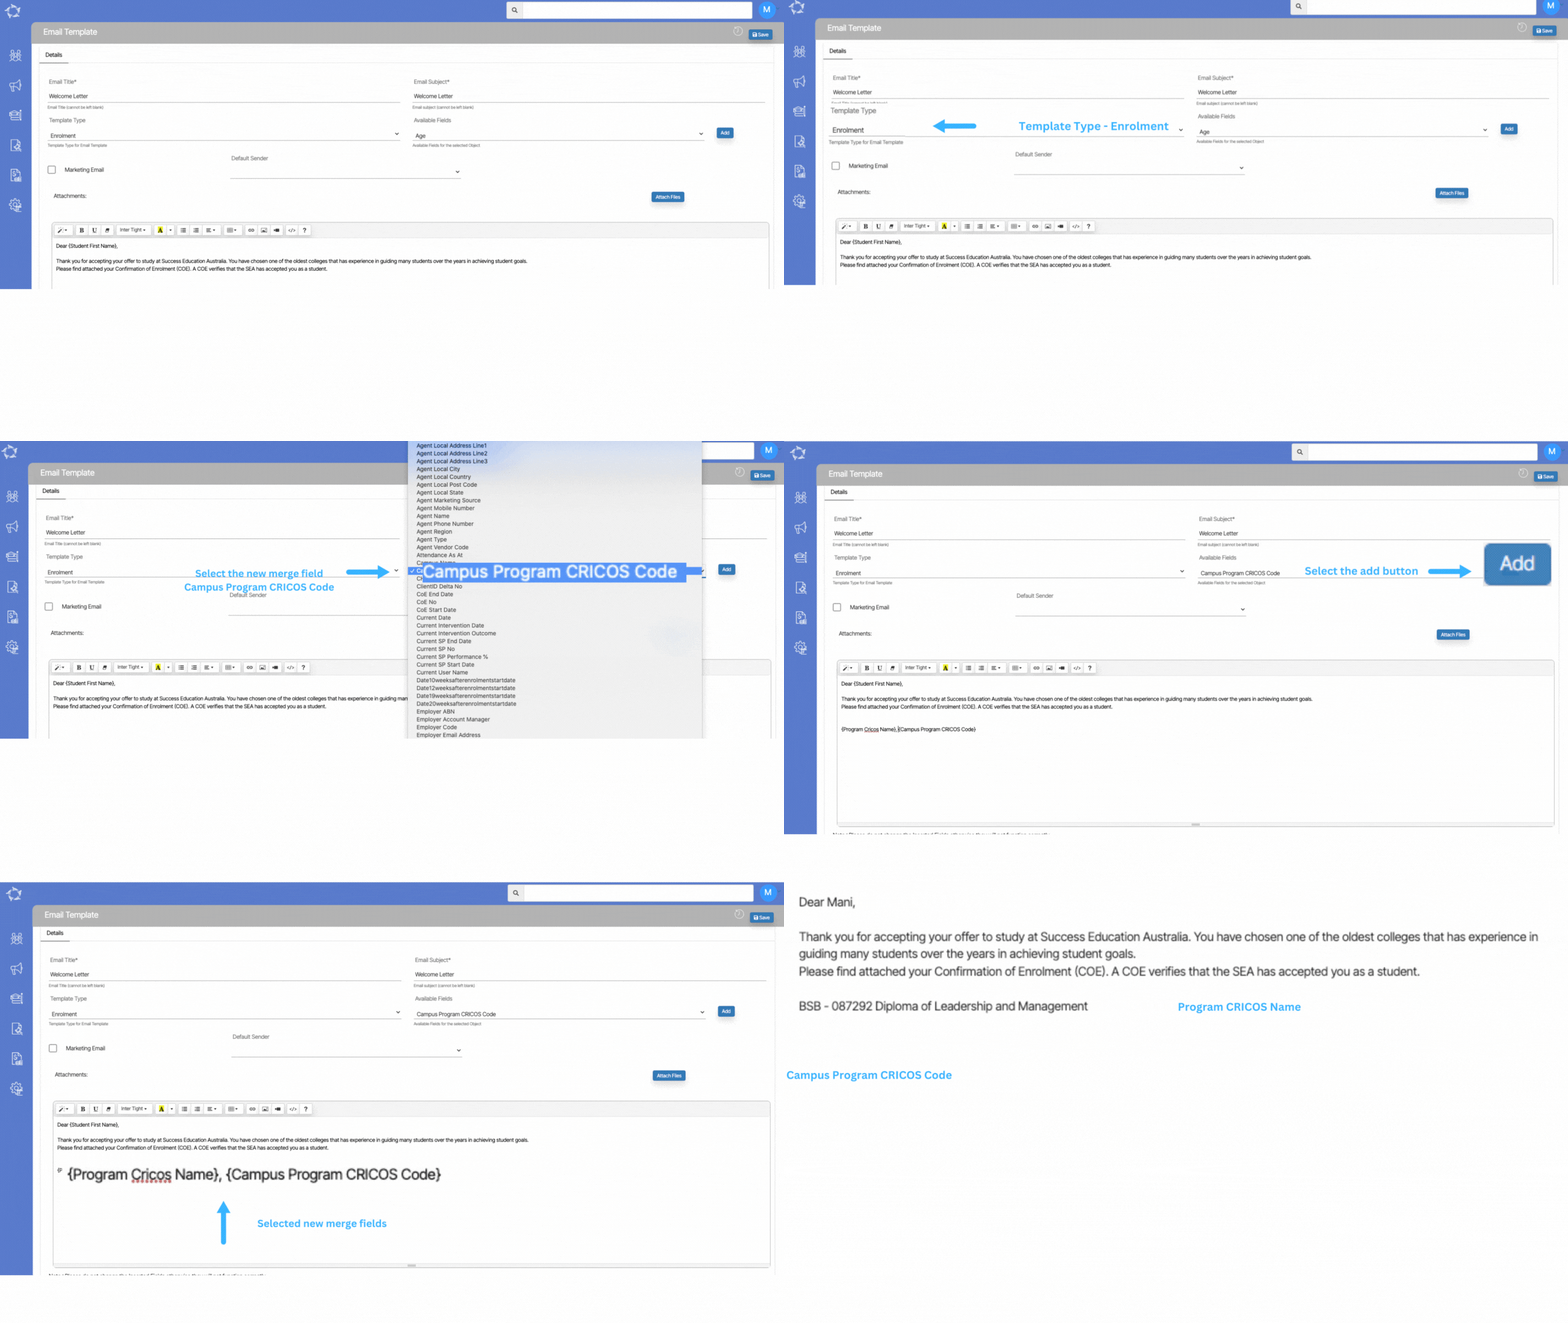
We have added new merge fields for Campus Program CRICOS code and Program CRICOS Name for customising the enrolments Email Template.

When you’re creating an email template for enrolments, you can now use these merge fields to automatically fill in the Program CRICOS code and campus program CRICOS code into the email.

Note – If the CRICOS code for the campus program is not updated on the “Campus > Linked Program” screen and the CRICOS name for the program is not updated on the “Program Entry” screen, then the information will not be printed in the merge fields when sending emails.

Applicant Dashboard – Edit Application/s dates

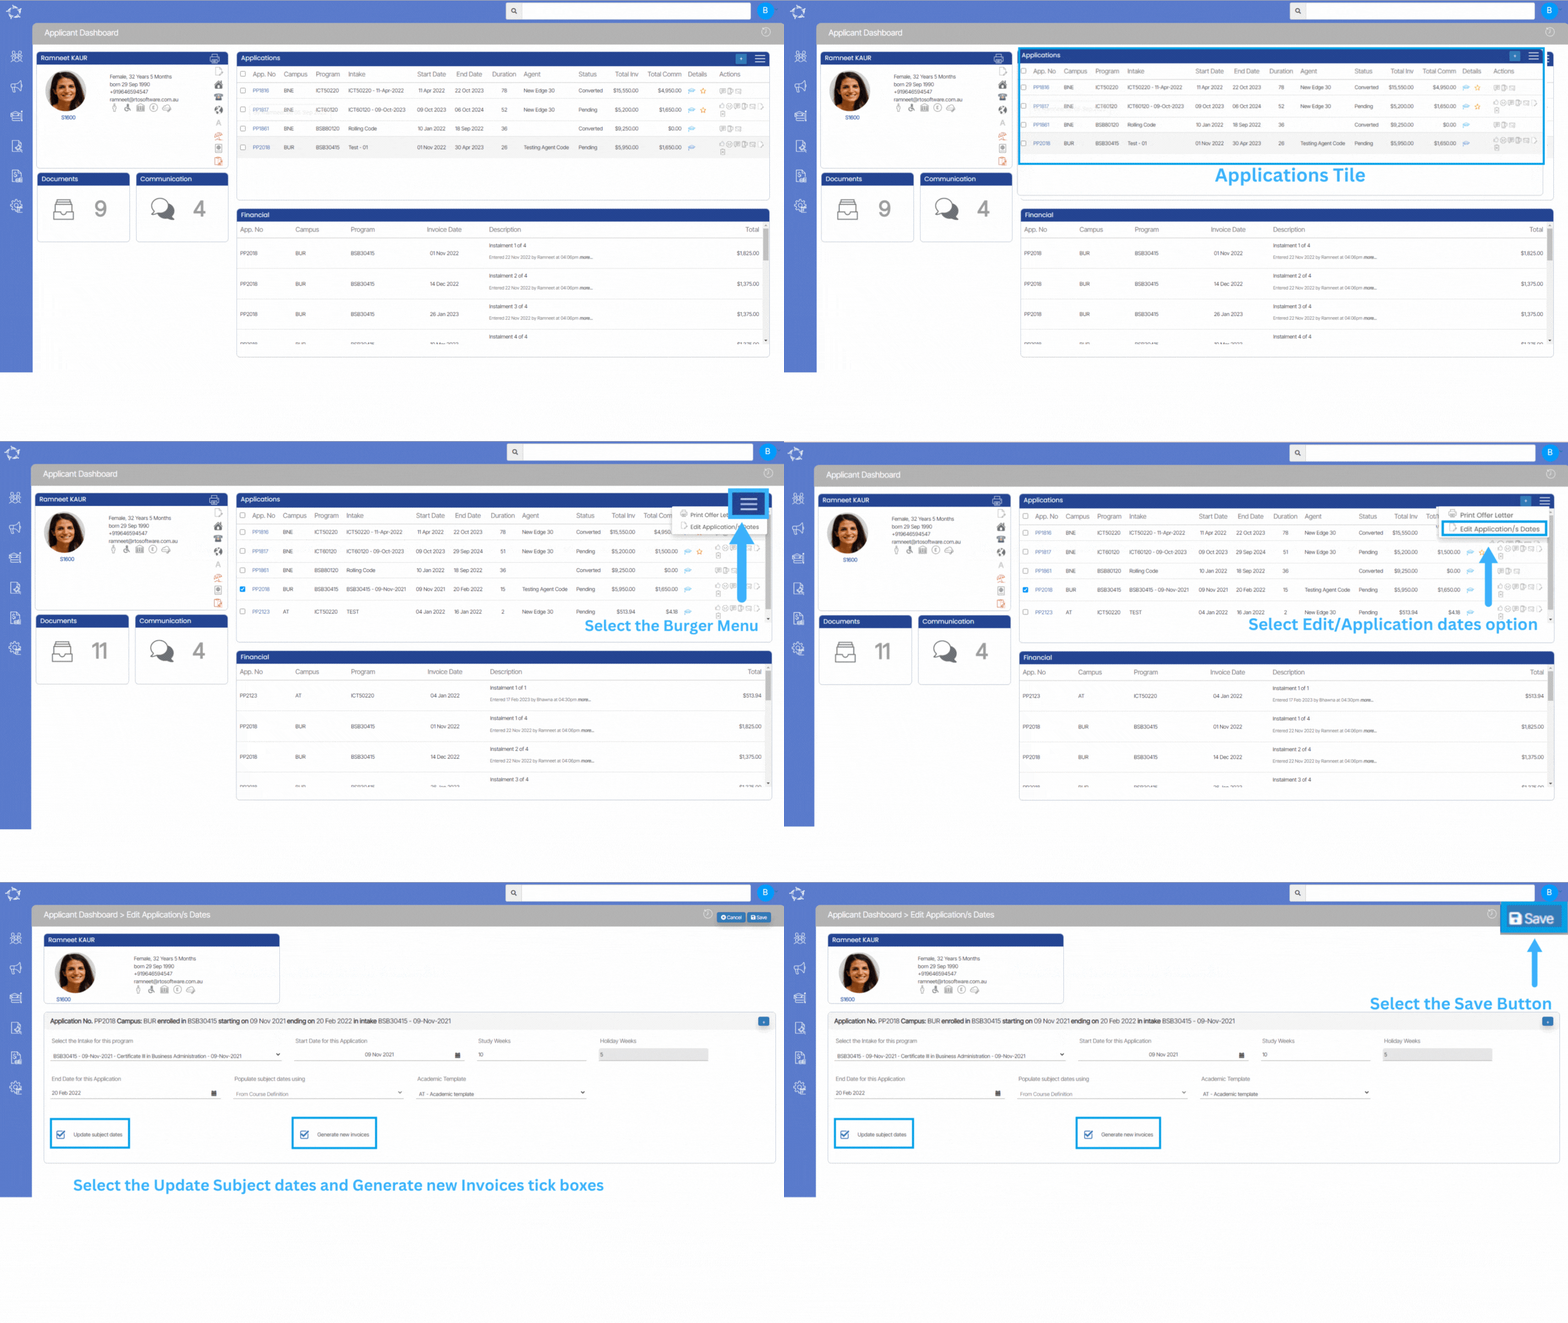
Applicant Dashboard > Applications Tile > Burger Menu

This screen allows you to modify the intake date for an applicant’s application at the applicant level when the application is not converted. This can be helpful in cases where the student needs to defer their application due to a visa delay or personal reasons. To simplify the process and save time, you can now modify the intake dates for multiple applications of the same applicant at once.

Note: When using this screen, ensure that all necessary changes to application dates are made before converting the application. If changes need to be made after the application is converted then you can make the changes from the Student Dashboard – Edit Enrolment/s Dates screen.

The below steps will explain to you how you can change the intake date:

  • To utilise this option, you need to select the specific application number for which you want to modify the intake dates.
  • Select the Burger menu icon on the Applications Tile where you manage the applicant’s application information. The Burger menu icon typically looks like three horizontal lines stacked on top of each other.
  • Look for the option titled “Edit Application/s Dates” and select.
  • The screen will then take you to the Edit Application/s Dates screen where you can modify the intake dates for one or more applications.
  • By default, the system will show the section for 1st application and you can expand other application sections by selecting the expand (+) button.
  • To enrol the applicant in a new intake, you must select the desired intake from a dropdown menu. Once an intake is selected, the system will automatically populate other fields such as the start date, study weeks, holiday weeks, and end date.

IMPORTANT – When changing the intake for an application, it may be necessary to update various dates associated with that application, including invoice dates, invoice due dates, and subject dates.

To make this process easier and more efficient, the system appears to have a checkbox labeled “Update subject dates and Generate New Invoices“. By selecting this checkbox, the system will automatically update the relevant dates and new invoices associated with the application to match the new intake. It is recommended that users always check this box to avoid the need for manual updates on a case-by-case basis.

Once all the above steps are done, select the save button, and the system should update the application dates as per the changes you have made. It is recommended that you double-check all dates and information to ensure that everything is correct before proceeding.

New check on Training Plan and Results screen – History

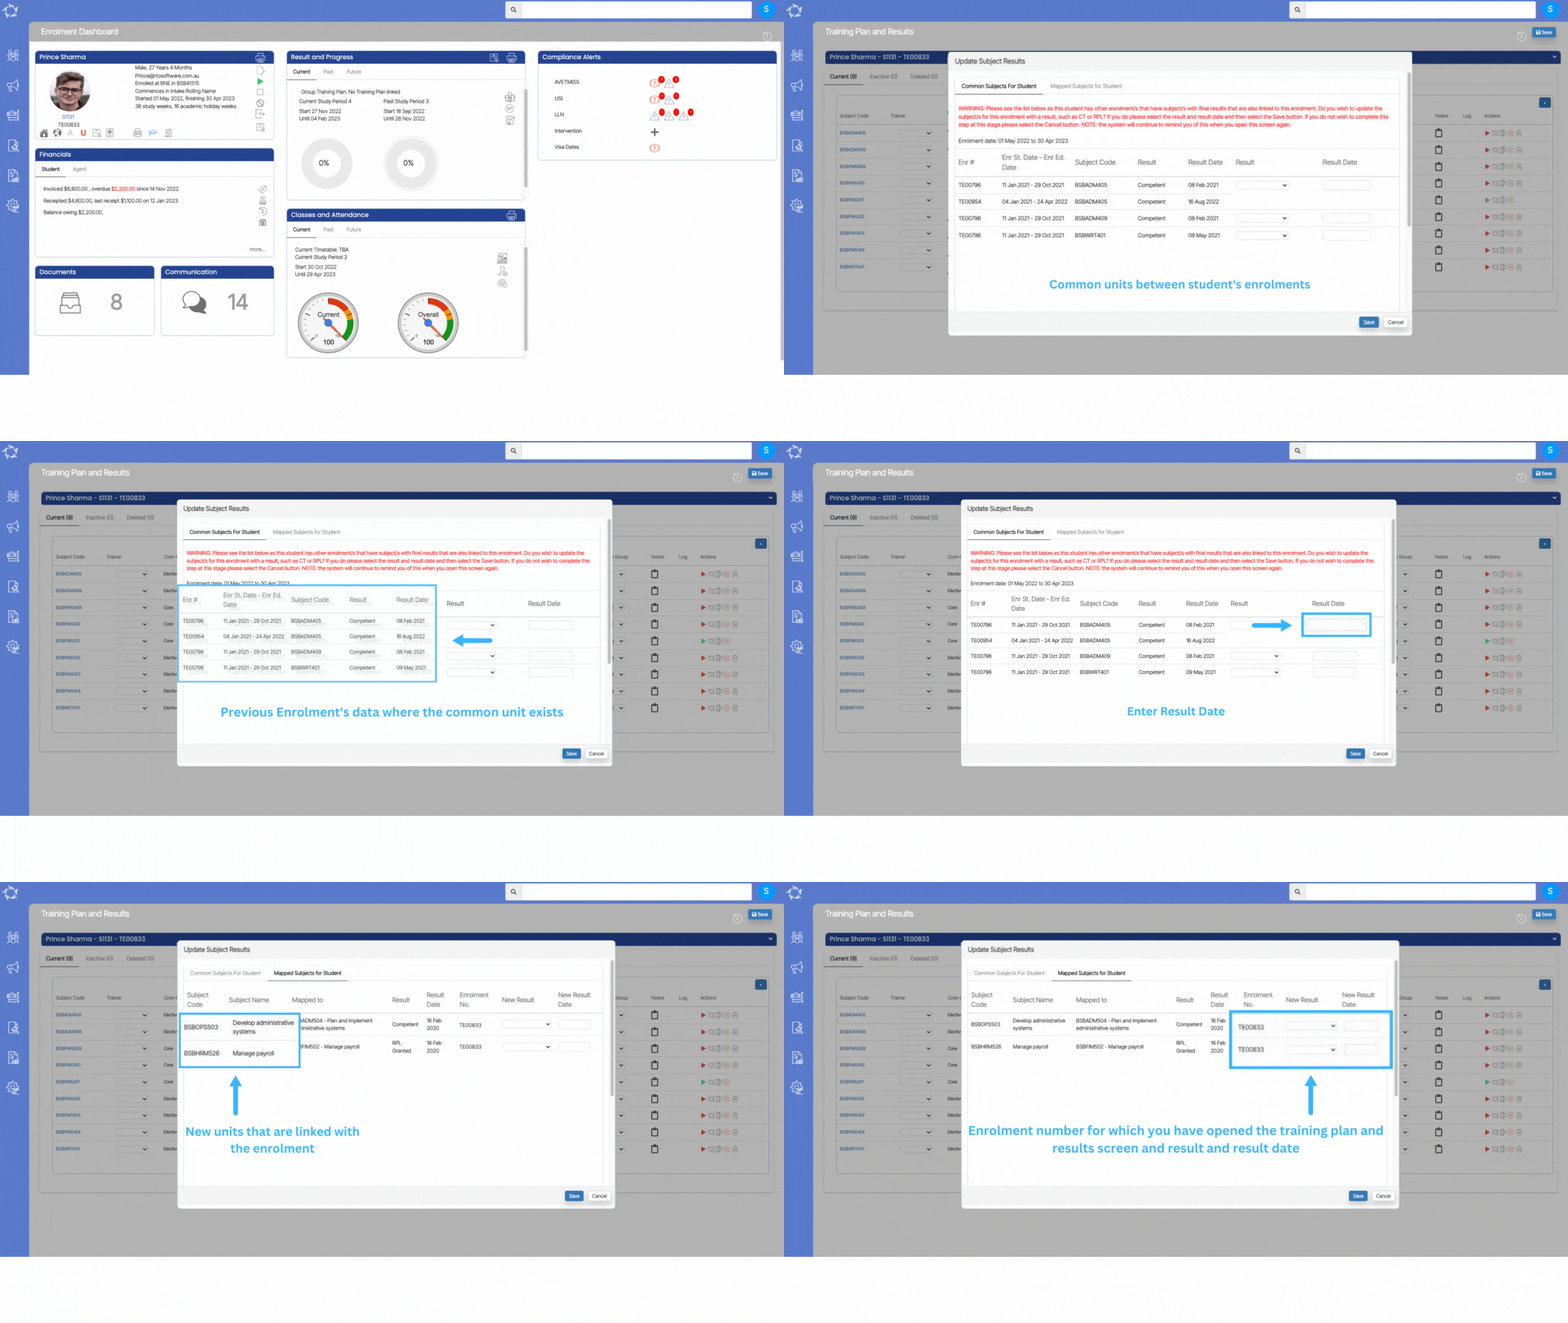
In the Enrolment Dashboard, we have introduced a new check on the training plan and results screen. This check will make it easier for you to mark results when you get a pop window for Common Units and Superseded Units.

Common units: Let’s take an example, a student who is studying more than one program with you and there are some units that are common in both programs. Now that the student has studied and successfully completed the program 1’s all units and when you will open program 2, then the system will give you a popup window to show you all the common units and their results. From that popup itself, you can mark the results for those units such as credit transfer etc in one go. The popup window which will appear every time the, system will find common units between student’s enrolments:

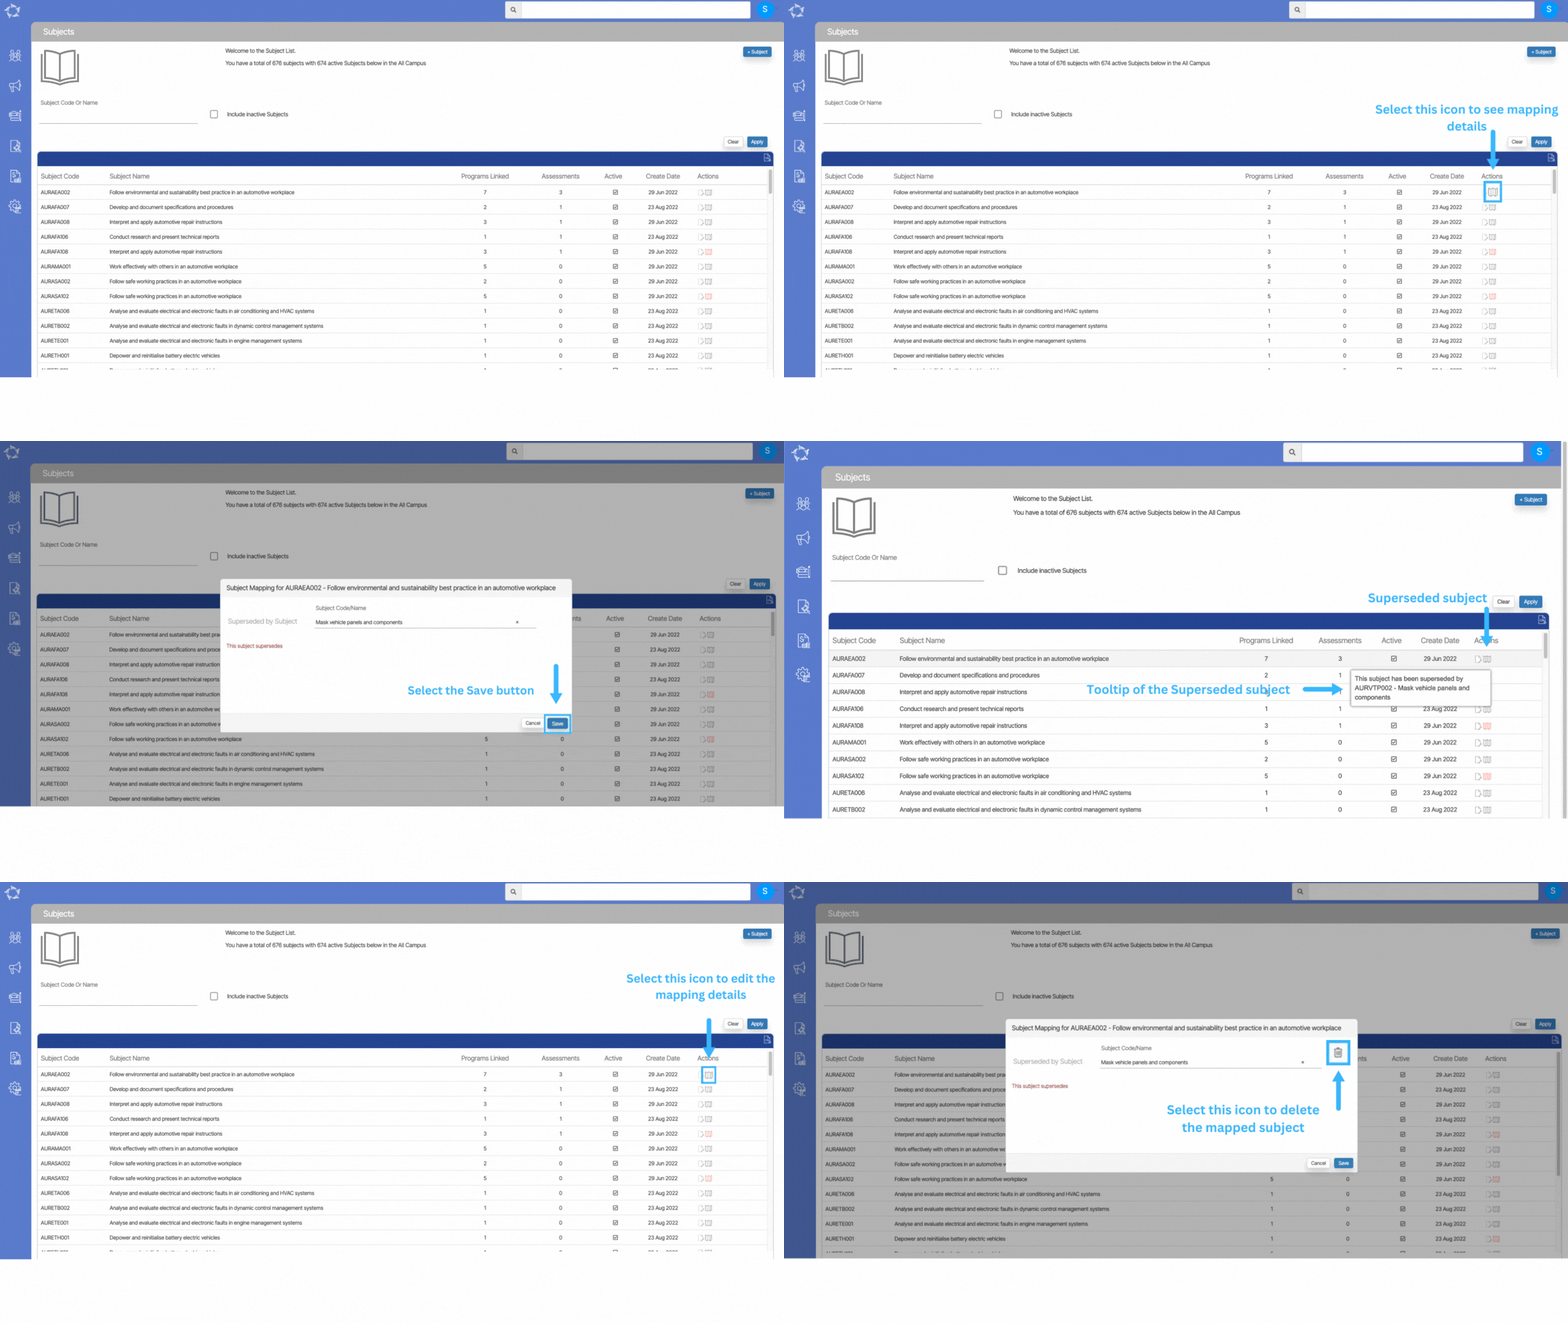
Superseded Units: Other than the common units, there might be some units that are superseded, and now you will be able to see on the training plan and results screen if any unit is superseded. The system will do the mapping for you. we have 2nd tab called “Mapped Subject for student”.

The 2nd check which is for superseded units, will only work if you have updated the subjects at the Subject Welcome Screen. On the subjects screen which you can access from Academics > Subjects, you need to search for the unit which has now been superseded.


History – 26th Jan 2023

We hope you all are having a great start to 2023.

This update is a small update with no main changes to the front end of the system.

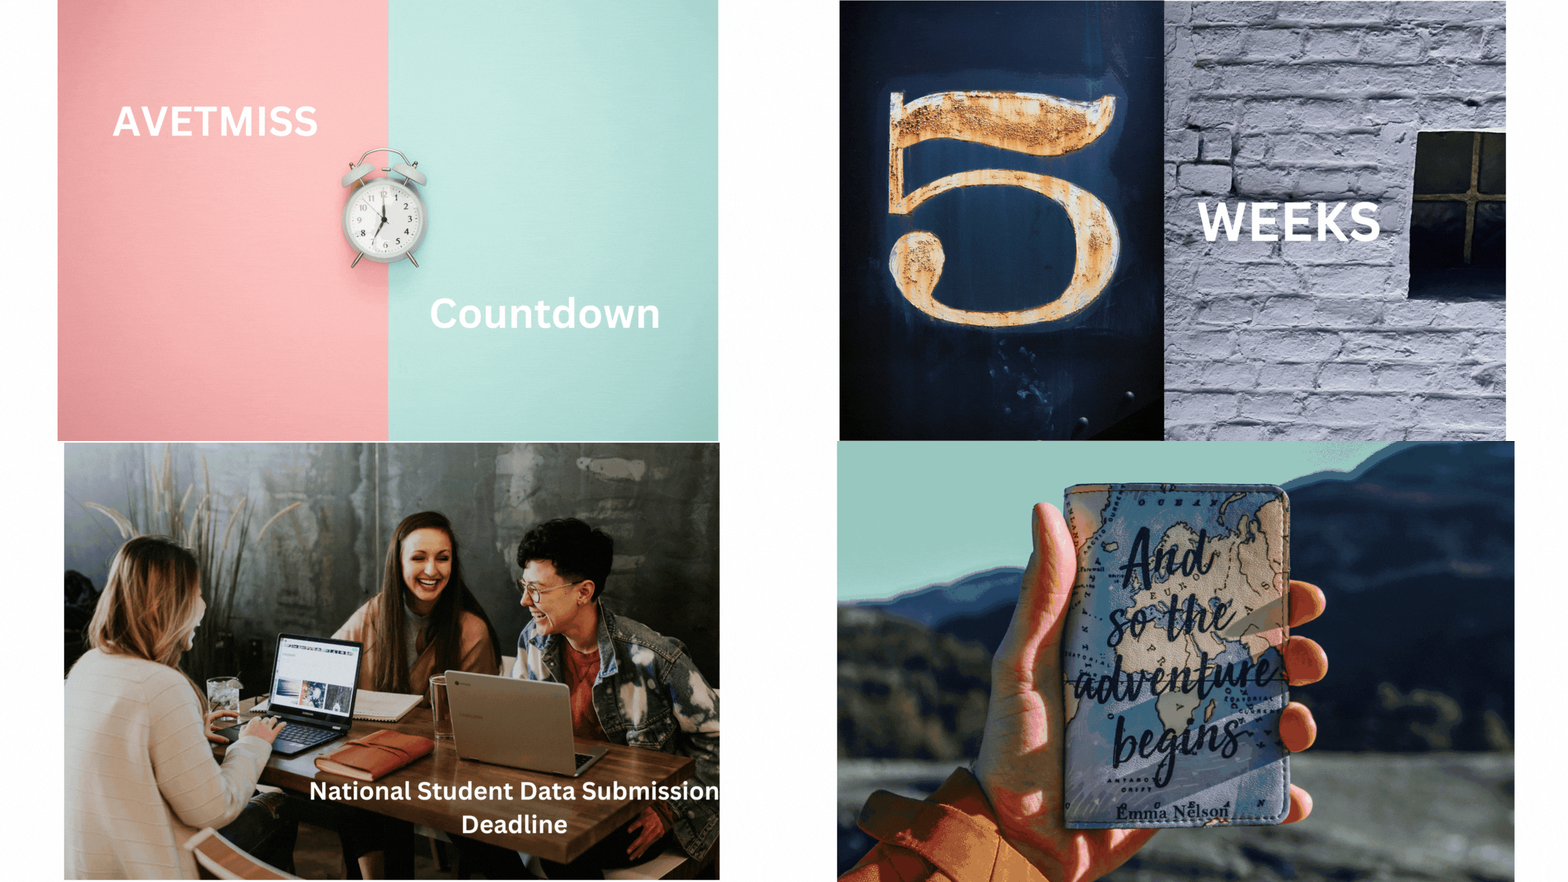
For your National AVETMISS 2022 student data submissions, did you know there are only 5 weeks left until the last day to have a successful data submission?

How are you going with your steps for reviewing and cleaning up your data? Please see the AVETMISS countdown section below for more information. If you would like to consider our Virtual Admin (VA) service to assist you with this review and cleanup, please contact our support staff for more information.

We have also introduced a new Q&A section to our What’s New summary. Here we will provide answers to the questions that are most frequently asked about TEAMS.

NCVER Annual Student Data Submission

Have you been maintaining and managing your student data this year in preparation for your annual student data submission? In this post, we walk through the first two steps of what you need to do in TEAMS.

We highly recommend you start these steps now, as these are critical to future steps where the larger volume of data is and where the biggest list of errors comes from.

Q&A

Do you have a TEAMS question?

Make a list of your questions, send them to our support teams and we will send you the answer and add them to our fortnightly update.

Select the read more button as here are some questions we get asked and then answers on how to do them in TEAMS.

Our mission is to build software that helps you do things more efficiently. Your input and engagement are vital in helping us improve our service and offerings for your college. We are always open to listening to your feedback.

Any questions, please feel free to reach out to us. We look forward to serving you to the best of our ability.

Please review the changes and if you would like further clarification, please contact our Support team.

A big thank you to so many of you who have been actively participating in helping us bring these new improvements to life.

Next update is due on Thursday, 9th February 2023

Note: Please alert other team members within your college if the changes outlined above affect their role or department.

Thank you for taking the time to read this post.