Training Plan & Results – Academic Templates

The Academic Information section provides essential details about the enrolment, including the campus name, course code, and the start and end dates of the enrolment period. To populate the subject dates, you can choose from various options available in the dropdown menu. This includes using an academic template that you have created in your TEAMS site, extracting information from the course definition, or simply utilising the enrolment’s start and end dates.

By selecting the From Course Definition option, you have the ability to update the start date and end date of subjects based on the sequence number and the number of days or weeks defined at the program level.

When you choose the Use Enrolment Start and End Dates option, the subject dates will be updated to match the start and end dates of the enrolment itself. This means that the enrolment start date will be set as the start date for each subject, and the enrolment end date will be set as the end date for each subject.

The Add/Update Group Training Plan option allows you to manage the group training plan associated with the enrolment. By selecting the corresponding icon , a pop-up window will open, presenting you with further options. In the pop-up window, you can select the appropriate group training plan from a dropdown menu. Once you have made your selection, simply select the save button to apply the changes.

UPDATE – Wednesday, 21 July 2021

Please note, we have successfully completed  TEAMS client update

Wednesday, 21st July 2021

With the continued effort to make TEAMS more efficient and smart for you, we always try to make changes and add new things to TEAMS. In this update, we have introduced re-instate functionality on the enrolment dashboard for you to un-cancel a cancelled enrolment.

Also, we have added a delete icon to delete agent payments from the agent financial screen. Moreover, you can now select more than one campus while creating a timetable or adding a term break.
 We strongly recommend that you introduce a TEAMS update process where someone at your RTO regularly reads the Newsletters that we send.

Any critical changes for compliance or the system that may require you to do something in TEAMS or notify other users of TEAMS about

  • What has been changed in the system
  • What new features are being added to the system, that you and other staff may wish to use

By following this update process your business will always be up to date with what TEAMS can offer and take those new features to the relevant decision makers for review and consideration.

We will also warn you of new items (screens and processes) or changes that we have made for compliance reasons and when necessary we will mark them as urgent, where you are required to change or add something to your processes in TEAMS to meet the compliance requirements.

Major Process Changes

General Screen Changes

If you have any further questions or encounter an issue, please contact our support staff on
1300 85 05 85 or support@rtosoftware.com.au 

Have a great day!

Student Progress Matrix Report Filters

Student Progress Matrix Report screen has a General Filters tab and the below table will show you Filters with their Explanation.

Note -In addition to selecting the campus and program, the Intake and report start/end dates are also required when using the Student Progress Matrix Report screen. However, if an intake is selected, then the report start and end dates become optional. Likewise, if the report start and end dates are selected, then the intake becomes optional.
This flexibility allows you to adjust filters according to the reporting needs and focus on specific timeframes or intake groups as necessary.

If the intake selected is set as a Rolling intake, then these date fields remain mandatory.

General FiltersExplanation
CampusThis is a mandatory field and cannot be left blank. You can select the Campus from the dropdown.
ProgramThis is a mandatory field and cannot be left blank. You can select the Program from the dropdown.
IntakeSelect an intake from the dropdown
Report Start Dateselect the start date from the calendar icon
Report End Dateselect the end date from the calendar icon
Enrolment to includeThis dropdown has three options (Current, To Start, and Finished) and you can select them while generating the report.

Click on the “Print” Icon to generate the report. After clicking on it, the system will direct you to the report dashboard screen. You can see the report status over there if it’s generated or not. Once it’s generated, download the report.

Change – AGD – send emails with attachments

Agent Dashboard > Communications Tile > Communication log > Burger menu > Send an Email

From the Communication Log that you access from the Agent Dashboard (AGD) > Communication Tile, you now can send an email with attachments.

This works in the same way that you use the attachments when sending emails from the Student or Enrolment Dashboards.

How to send an email with attachment/s

Step 1: Open the Agent Dashboard and click on the count displayed in the Communications Tile, in the screen shot below this means click on the 0.

Step 2: when the Communication Log screen opens, from the Burger menu select the option for Send an Email, as shown below.

Step 3: when the Email Log screen opens either select an Email template to use or write you message in the Message section. You then have two options to attach documents to the email that include:

  • Attach documents linked to the Agent – this will show you a list of all the documents that have been uploaded to the Documents tab for the Agent. This will show both documents uploaded by a user or generated by the system.
  • Attach documents from your computer/network – this will allow you to navigate to your computer and network to find and select relevant documents to attach to your email.

Based on the button you select for the one of the options above, you will see a popup window with a list of documents.

The above is the list of all the documents present in the document log screen, as shown below) for the same agent.

Step 4: Once all the required documents are selected, click on Add to Email Attachment button. It will show the attached documents on the email log screen as shown below.

Step 5: After attaching the documents, click on the send button and the system will send the email with the attached documents to the agent.

If you have any queries, please do not hesitate to contact us on 1300 85 05 85 or email us via support@rtosoftware.com.au

Student Profile Tile

This tile will give you an overview of the basic information of the student. You can upload the student profile picture here and edit the details of the student.

Basic Information

You will see some basic information about the student displayed in this tile. It will show the gender and the age of the student in the first line. In the second line, it is displaying the date of birth of the student. It will display the mobile number and primary email address of the student further.

Upload Student Profile Picture

For uploading or changing the student profile picture, you need to bring your cursor near the thumbnail 
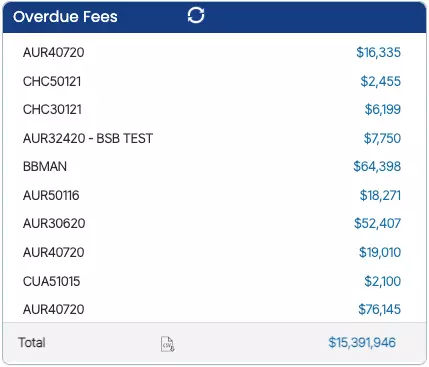
of the picture and the system will show two icons as shown below.
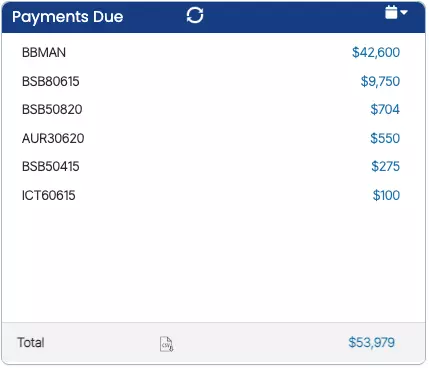
To upload the student profile picture by clicking the picture using the system upload, click on this icon.
To save the student profile picture after uploading the picture from your computer, click on this icon.

Vertical Icons

Horizontal Icons

Special Needs Required

Student Dashboard – History

Compliance

Main Dashboard > Compliance

The Compliance section in the main menu offers a range of icons that provide access to various screens and reports related to monitoring data in compliance with government requirements. These icons enable you to generate NAT files for AVETMISS submission and perform other necessary compliance-related tasks.

By selecting the appropriate icon, you can quickly navigate to the desired screen or report and efficiently manage your compliance obligations. Whether it’s tracking student progress, monitoring attendance, or ensuring compliance with regulatory requirements, the Compliance section provides a one-stop-shop for managing all compliance-related activities.

Subject Invoicing

Overview

Originally the system was generating only Program based invoices. However, we have introduced new functionality called Subject Invoicing. This will allow you to raise invoices at the subject level in the application process.

Note: To use Subject invoicing you need to set the Invoicing method to use for your site. To do this you must have System Administration permissions to access the settings or speak to your manager about this.

Program Invoices

For program based invoices, we select the fee at the Fee selection step of an application.


And all the generated invoices will be displayed on the Invoice preview screen

Subject Invoices

For subject based invoices, we select the fee at the new application – subject delivery dates screen for all subjects.

And all the generated invoices will be displayed on the Invoice Preview screen.

If you have any queries, please do not hesitate to contact us on 1300 85 05 85 or email us via support@rtosoftware.com.au

Change – Displaying subjects in sequence order

Enrolment Dashboard > Result and Progress > Training plan & Results icon

On Training Plan and Results screen, we have made a visual change. Now a user will be able to see the subjects in the grid as per the sequence numbers allocated to all the subjects.

All the subjects will be displayed in the ascending sequence numbers.

THINGS TO REMEMBER

> The system is showing the sequence numbers from the course definition. A user can edit the same at the training plan and result screen.

Financial Dashboard

Main Dashboard > Finance Menu > Financial Dashboard

The dashboard is divided into tiles, each representing a different category of information. These tiles contain various bits of data that can be explored in more detail by drilling down into them. Additionally, the system allows for sending bulk emails and SMS messages to students, specifically related to information such as overdue fee warnings. This feature enables effective communication and notification regarding important matters to ensure smooth operations within the system.