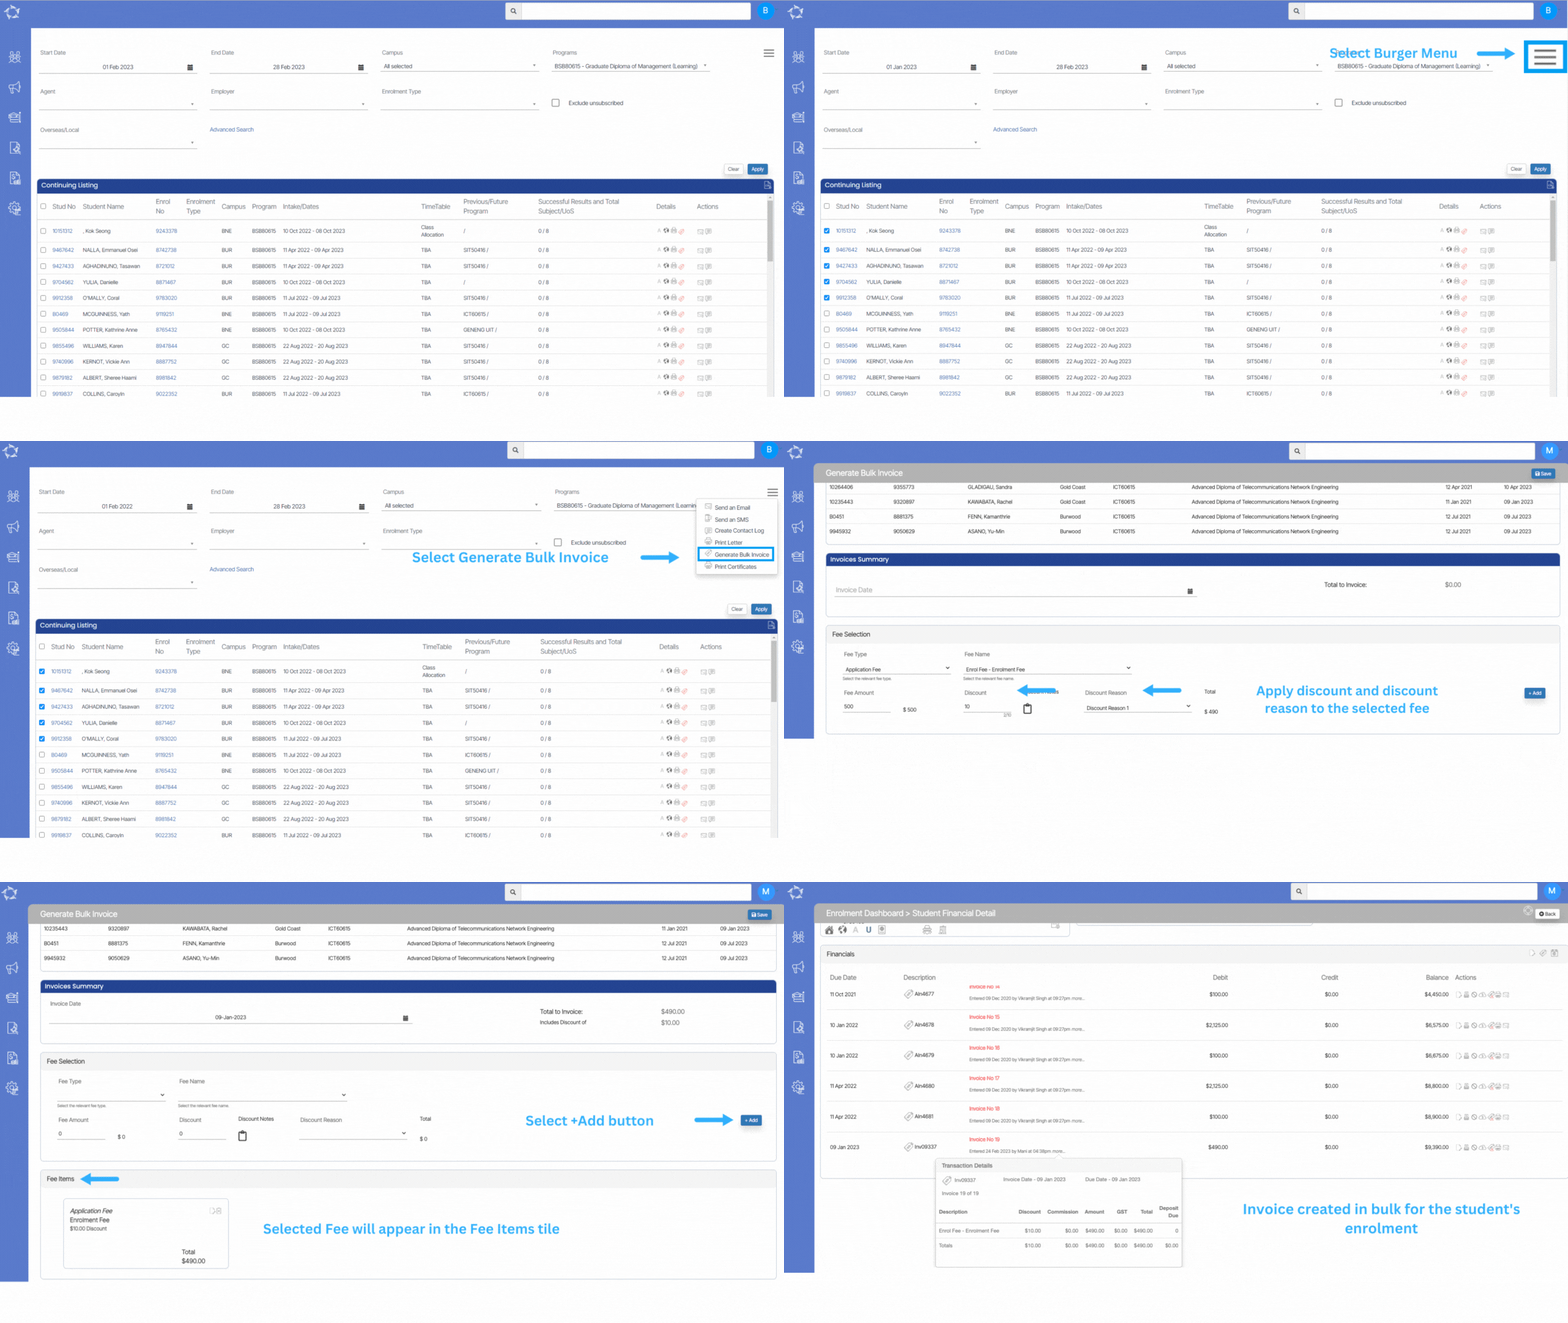
When you have many students with overdue invoices or need to raise fees for a class of students, it can be time-consuming to do so one by one from the Enrolment Dashboard. Instead, you can use bulk invoicing options available in TEAMS. To raise invoices in bulk, you typically need to select the relevant listing screens Continuing Listing Screen, Starters Listing Screen, Finishers Listing Screen, Short Program Listing Screen etc displaying the students.
Choose the group of students for whom you want to raise invoices, and create the invoices or fees with the necessary details such as amount, due date, and any other relevant information. Review and confirm the invoices or fees before submitting them, and the system should generate and send them automatically to the selected students.
Here are some general steps you can follow to generate invoices in bulk:
IMPORTANT – When generating invoices in bulk, it’s important to note that you can complete steps 3 and 4 in any order. However, it’s crucial to remember not to select the “SAVE” button until you have completed both steps. In step 3, you will need to select the fees you want to include in the invoice, while in step 4, you will need to enter invoice information such as the date and any discounts or adjustments. Once you have entered all the relevant fees and invoice details, be sure to select the “SAVE” button at the top of the screen to save the invoice.
Step 1 – Navigate to the Continuing, Starters, or Finishers listing screen and select the tick box next to the student numbers for the students you want to generate invoices.
Step 2 – Select the “Burger Menu” (typically three stacked lines) in the top right-hand corner of the screen. From the dropdown menu that appears, select “Generate Bulk Invoices
Step 3 – When generating bulk invoices, you will need to select the fees you wish to include in each invoice. The process for selecting fees is similar to that of creating individual invoices from the Enrolment Dashboard. To select fees, go to the Fee Selection section and choose the Fee Type from the list. The system will then refresh the dropdown list for Fee Name, and you can select the relevant fee for the invoice. If necessary, you can adjust the amount or add a discount before adding the fee to the Fee Items section. It’s essential to select the “+Add” button to ensure the fee is added to the invoice. Once you have selected all necessary fees, you can proceed to review the invoice details and generate the invoices in bulk.
Step 4 – After selecting the fees for the invoices in the Fee Items tile, you can proceed to the Invoice Summary section. Here, you will see the total amount that will be invoiced, which includes any applicable discounts or adjustments. For example, you might see a total of fees that have been selected along with a discount of 10%. You will also need to select the invoice date, which will be used as the due date for the invoice. Once you have entered all of the necessary information, be sure to select the “SAVE” button located in the top right corner of the screen. This will ensure that the invoice is saved and linked to the selected enrolments.
Step 5 – To view invoices for a particular student, you can go to the Enrolment Dashboard and select the Financials tile. From there, select the Student tab and then select the “more…” option next in the bottom right corner of the screen. This will take you to the Student Financial detail screen to view a list of all the invoices associated with the selected enrolment. You can then review each invoice to see details such as the fees included, the invoice date, and the amount due.

If you have any queries, please do not hesitate to contact us on 1300 85 05 85 or email us on support@rtosoftware.com.au
