It will open the Report Template Screen where you need to select the Report Name in the search field where you want to upload the customised template.
Once you enter the report name, the system will refresh the screen and shows you other customised reports in the grid.
You need to select the Add button on the top right corner of the screen which will show you a pop up of local storage files and you need to select the appropriate document and select upload button.
Note – On the upload pop window, you will see Campus dropdown (where you can select the specific campus or All as you required) and Default tick box (if you want to see the upload template as default for the selected campus).
Also, the Custom Template that you are going to upload should always be in the Word Document format, so the document extension should be in docx extension.
Once the customised template is uploaded, you can start generating reports.
We have five Word reports that you can customise in TEAMS:
Offer Letters
Academic Docs: These are used to customise certificates, transcripts, records of results, completion letters, statements of attainments, etc. that you wish to print for the students.
Invoices: This report template is used to customize the student invoices.
Payments: This is used for the refunds and receipts templates.
Letters and warnings: You can use this report template to customise your fee warnings, attendance warnings, and also to create student ID cards etc.
How to download the Master Template of any Report in TEAMS
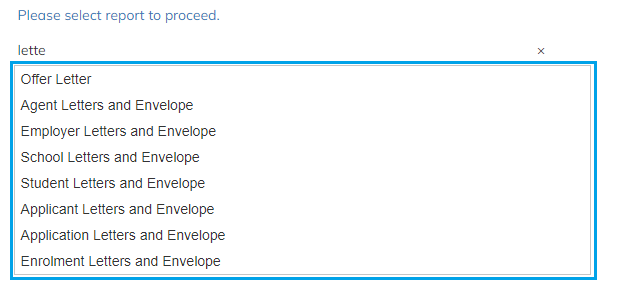
Select the report in the search field to proceed. For example, if you are going to search for an offer letter then try typing 3 initial letters of it and the system will show you all report templates starting with those 3 initials. Simply select the required one.
Once you selected it, the screen will refresh and shows you the customised offers in the grid.
Now if you are going to customise any new offer letter, you need to select, the download icon beside the report name. This will download the Master version of the offer letter template which will help you to customise the offer letter for your RTO.
Below are the steps and explanations to customise the report template in TEAMS.
When you download any master template, it will show you some basic information about the template at the start and then shows you different sections that we have in every word report. You will find two categories of merge fields.
Individual Merge Fields
Table Merge Fields
Individual Merge Fields
Anything in the curly brackets in the template is merge field and so let’s say you want to populate a student number or student name in your customised version then you need to copy and paste this merge field into your custom template so that every time when you generate any report, it will populate student number automatically for you. That’s how the merge fields will work for you for the students, enrolments, agents, and employers.
In the custom template, you can see that this table has basic information about the student like name, DOB, gender, and so on if you want the system to print this data for you then you need to copy all the individual merge fields related to the fields and to do so, you can simply copy the merge field from the master template and paste it. You can also edit the text format(font and size) of the merge fields according to your preferences.
IMPORTANT – If you are copying any merge field from the master template then you must copy it including the curly brackets. if you simply copy the text then the system will not print any data in your customised template.
Tables
let’s say the student is enrolled into a program and you want to print the application number, Program descriptive code, Program descriptive name, and application dates then you need to find a table with all the required merge field columns and simply copy the whole table and paste it into the template that you are customising. In case, If you do not need any columns from the table you copied from the master template then you can delete those columns in your custom template.
How to use table merge fields in the report
If you don’t want the default first column of the table or you wanted to adjust the first column position, then you need to cut the «TableStart:ProgramSummaryTable» merge field and paste it before the merge field of the column that you wanted to be first in the table. Then you can delete or adjust that first column in your table.
The same rule applies to the last columns as well. For Example, In this table, the total duration is the last column and you don’t want the table to print the total duration columns in your custom template and you want the Holiday Weeks to be the last column in this table. Then in such case, you need to copy the merge field that is «TableEnd:ProgramSummaryTable» and paste it into the holiday weeks column after the holiday weeks table merge field.
IMPORTANT – Always remember whenever adding tables in your custom template, kindly check there are always table start and table end merge fields present in the first and last column of the table respectively.
Also, we have group tables in the master templates that will print the merge fields along with the data in the grid for the table. For example, course details table, here application no, course name and course dates are merge fields and under this, you will see the grid having columns instalment date, Study Period, Start Date, End Date etc.
You need to select the whole group table from this merge field «BeginGroup:CourseDetails» from the master template till «EndGroup:CourseDetails» and paste it into your custom template. You can adjust or delete the other table columns along with their merge fields but the «BeginGroup:CourseDetails» and «EndGroup:CourseDetails» merge fields should never be deleted or adjusted in the custom template.
Once all the editing is done, save the document with the name of the offer letter in Word document format i.e docx extension into your system and upload the custom template in the Report Template screen.
In the system, there are address fields for each object such as Applicant/Student, Agent, Employer and Schools. There is also address information at the user and campus etc.
For each of these objects there will be one or many types of addresses that you can enter as follows:
Applicant/Student – Local Address (Australian address), Mailing Address (Australian address), AVETMISS Address (specifically for AVETMISS exports & submissions), International Address and Next of Kin address.
Agent – Local Address (Australian address), Mailing Address (Australian address) and International Address.
Employer – Local Address (Australian address), Mailing Address (Australian address) and International Address.
School – Local Address (Australian address) and Mailing Address (Australian address).
User – Local Address (Australian address), Mailing Address (Australian address) and Next of Kin address.
When you look at the standard address fields they will look similar to this:
Whereas the AVETMISS address will look like this:
Each of the fields for addresses then becomes a merge field in our MS Word report templates. For example, for a Applicant/Student the merge fields for the standard address fields are as follows:
Note: merge fields are also used in the Email and SMS Templates as well and will follow the same format as you see above.
For any of the objects that have a standard address, then in our MS Word report templates there will be a matching merge field for it. They will follow a standard format as above and the first word in the name of the merge field identifies the object, such as Student Local Address Line 1. If you were looking at the Agent standard address merge fields you would see one for Agent Local Address Line 1.
IMPORTANT: there are two very important things to remember when using merge fields in your customised templates. They are:
1. Always insert the merge field with the {} brackets, do NOT change them to any other style of bracket such as (), the system looks for the {} ones and will not work if you use any other style of brackets. 2. Always use as many of the Address Line 1, 2 & 3 merge fields in your templates that you are using to enter information into the system. For example, a students address may be as follows:
If you have entered the address for the student as above on the left, then in your templates you should use all the relevant merge fields for Address Line 1, 2 & 3. If you don’t add the Address Line 3 merge field but have entered the address above then the system will not print the information of 1234 The Esplanade in the report you have customised. So never do this in your templates:
Note: when you are customising your templates, MS Word and email especially; we do not recommend using address merge fields in SMS templates and messages, always consider using a two column table to have one column (left hand side) for a label (hard coded text) such as Residential Address and then in the second column for the same row in the table have all the merge fields for the address so it looks similar to this:
Do not use commas or enter (shift + enter) for each Address Line merge field, just have the Address Line 1, 2 and 3 together with a space between them. If you do it this way, MS Word will not leave an empty space where Address Line 2 or 3 have no data. It will just insert the next merge fields which typically would be Suburb, State, Post Code and country. Even if you reduce the size of the column, MS Word will not leave an empty space. It is only if you put a merge field per row or you do a shift + enter in the same column/cell that it would then leave an empty space.
If you have any queries, please do not hesitate to contact us on 1300 85 05 85 or email us via support@rtosoftware.com.au
Earlier the system used to show the Agent Invoice Report on the Report template screen but now we have changed the name of the report from Agent Invoice Report to Agent Pending Invoice as shown below:
If you have any queries, please do not hesitate to contact us on 1300 85 05 85 or email us via support@rtosoftware.com.au
Student Dashboard > Current and Upcoming Enrolments Tile > Enrolment Dashboard > Print icon
We have changed the report name from Letters and Envelopes to Letters and Warnings on various dashboards and screens.
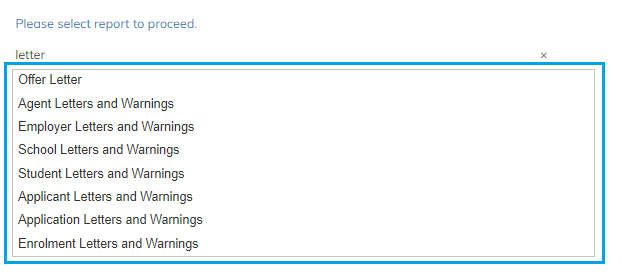
Change on report templatescreen – Earlier on the Report Template screen, the system used to show letters and envelopes upon selecting the report but now it has started showing the report name as letters and warnings as you can see the old and new report names in the below screenshot.
Old
New
Change on the Student Dashboard – The report name has been changed on Student dashboard under the print icon as highlighted below.
Change on Enrolment Dashboard – The report name has been changed on the Enrolment dashboard under the print icon as highlighted below.
In TEAMS, academic docs consist of students’ certificates, transcripts, record of results, statement of attainment, completion letter and any summary document for a student’s units. You were only be able to generate the academic docs from Enrolment Dashboard only. However, now you will be able to generate the academic docs in bulk from the Student Dashboard as well.
The option is available on the student dashboard > Burger Menu > Academic Docs
This new option is available under both the tiles – Current and Upcoming Enrolments and Historical Enrolments
To use this option, select your enrolments for which you wish to generate the Academic Doc in bulk.
Important to Consider before using this option: This option can only be used if you are going to generate the academic doc for the same program. Let’s take an example, a student who started studying SIT30816 in Jan intake and in between the studies, he wanted to have a break for let’s say 2-3 months due to some personal reason. In that case, some RTO keep the same enrolment and apply student’s personal holidays with that enrolment. However, that’s not the case with every RTO. Some RTO terminate that enrolment and create a new enrolment into the same course for remaining units which student hasn’t completed in the previous enrolment. They create it when student arrives after his holidays. Hence why, in such cases, there will be more than 1 enrolment for that student into the same course.
After student finishes both the enrolments and asks for a certificate or transcript etc, it becomes difficult for an RTO to issue such documents. They manually have to edit it to have all units in one transcript because some results are marked in one enrolment and some in another enrolment.
To make it easy for such RTOs, we have introduced this feature, where they can generate the academic docs in bulk for these cases.
After you have selected your enrolments, go to the Burger Menu > Academic Docs.
The system will direct you towards another screen as below:
More Details about the screen: This screen will show you some basic details for the enrolments that you have selected to generate academic doc. It will also show you the results for the enrolments for each unit.
To demonstrate, a student has two enrolments in the same course SIT30816 and there are total of 25 units for SIT30816 each enrolment. The 1st enrolment, in which the student completed some of the units, has a final outcome and 2nd enrolment has final outcome for remaining units. This screen will show you 50 units in total – 25 each enrolment. It will show you what the result and result date are for each unit. However, it will print only 25 units in the academic doc that you are going to print. It will not populate the units from the 2nd enrolment if it already has a final outcome in the 1st enrolment. Logically, a transcript will have just 25 unique units for SIT30816 that student has completed with your RTO.
Select your parameters/filters that you usually use to generate the academic docs. Update Parchment Issue date and Parchment number as well. Select your template.
After you have updated your parameters/filters, hit the Print icon.
The system will direct you towards the report dashboard screen from where, you can download the generated report.
This is how you can generate the academic docs in bulk from the Student Dashboard.
In the system, we have introduced the new merge field called {Results} for the enrolment object. This merge field will be used in the email template body and it will print a table that will include the below columns:
Subject Code
Subject Name
Result
Result Date
This merge field will only work if you set the email template type to Enrolment from the dropdown as shown below:
Then select and add the new merge field (Result) from the Available field dropdown as highlighted below in the screenshot.
Note: It will print all the Subjects linked to the enrolment in the table and will show only final results. Where a subject has a progressive result of Not Yet Started or Continuing Enrolment, it will print in the table but the columns for result and result date will be empty.
As you can see in the below screenshot, the enrolment has Progressive and final results and results with it’s result dates. So when sending an email from the enrolment dashboard > Communication tile > Send an email, the system has only printed the subject’s code and name for the Progressive results (BSBCUS501 and BSBCMM401).
This how the table will show in the email.
You can also use this merge field from the main dashboard tiles to send emails in bulk, compose email part is the same as you use to do earlier you just need to select the email template in which the {Results} merge field has been added.