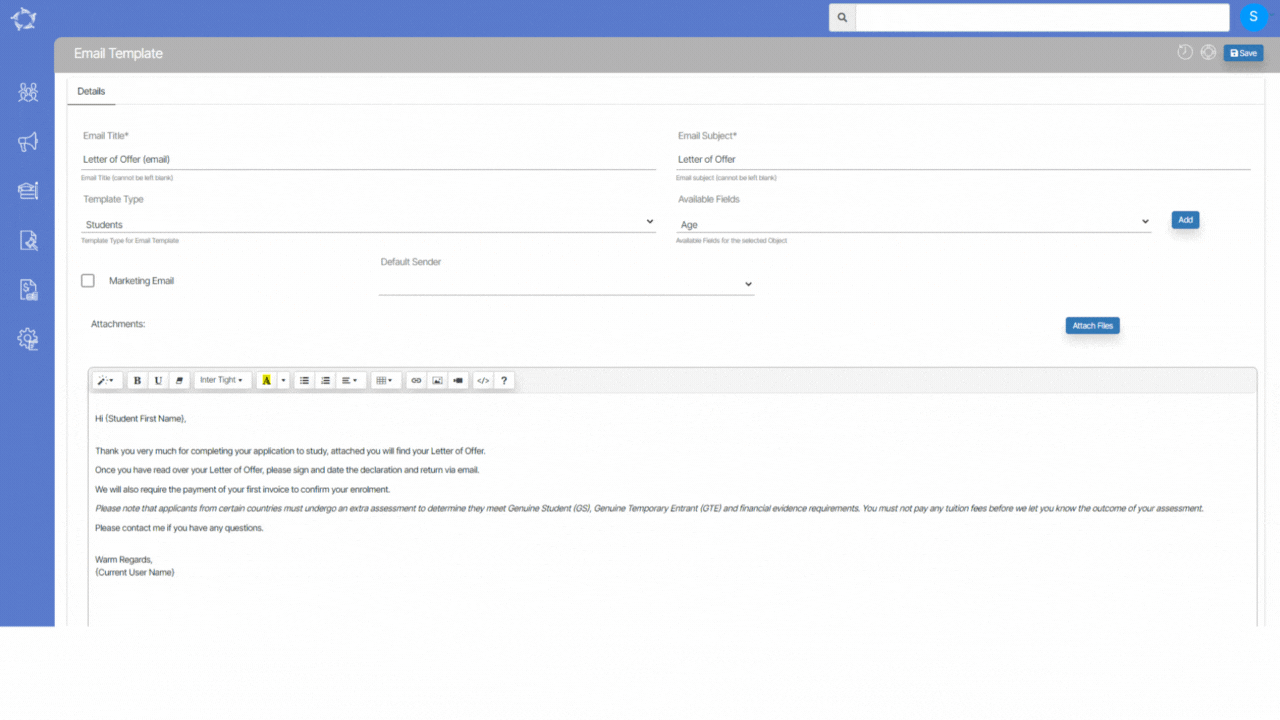
Compose Email – Sender Email Address option Changes

We’ve implemented a new feature in the compose email screen that allows you to edit the sender’s email address. To access this feature, simply select the Add different sender address tick box located next to the sender dropdown when composing an email. This change provides you with greater flexibility when sending emails, allowing you to easily switch between multiple email addresses or use a custom email address for each message you send.

Set Send email to all as yes by default – New System Setting

A new system setting has been implemented in the system, which is called Set Send email to all as yes by default. This setting applies to the campus level, and when it is enabled, the Send to All Email Address tick box will be selected by default on the New Applicant, Edit Student, and Add/Edit Agent screens.

This means that emails will be sent to all email addresses by default, without requiring you to manually select the tick box.

IMPORTANTThis is a system setting and if you wish to turn on this setting, please contact our support team and they will assist you in making the necessary changes to your organisation site.

If your organisation’s Set Send emails to all as yes by default setting is enabled, you will receive a prompt message on the Applicant, Student and Agent levels. However, if the Send to All Email Address option is not enabled for applicants/students or agents, you will need to select the corresponding tick box for Send emails to all and save the changes.

Search Bar Changes

The Main Dashboard Search Bar has undergone recent changes, including the addition of icons against search results to help you distinguish between enrolments and students in the search results list.

In addition to the icons, the Main Dashboard’s Search Bar now also displays the current level of the searched object. This means that when you search for any object using the search bar, it will display its current level; whether it is an enquiry, applicant, student, or enrolment. This feature is designed to help you search for the specific record you are looking for by narrowing down the search results for you.

Also, the student’s email address, gender, and date of birth will now be visible when searching in the search bar.

Attendance Step 1

Main Dashboard > Student Management > Attendance

history of changes

Overview

This screen allows you to do two things –

  1. You can mark attendance for a class of students.
  2. You can mark results for any Subject or Unit of Studies (UoS) linked to a class.

When taking attendance, you will need to indicate whether each student in the class is present (attendance) or absent. The options you select will depend on how the timetable for the class was set up.

In the summary section of Step 2, after selecting the class, the system will display what you are marking – either absence or attendance – so that you can ensure you are recording the correct information.

Follow the below-given steps to mark the Attendance/Absence and Result of the student:

  • Select the timetable and date range for the attendance records you wish to view or update. This step enables you to filter and select a specific timetable for a particular campus. After selecting a date range (start and end dates) and a timetable, select the Go button to proceed.

Can’t find your Timetable in the Select Timetable dropdown?

You will only see timetables that meet the filters you have chosen for Campus, Attendance Start and End Dates.

Reasons for not finding a particular timetable that you may be looking for can be –

1. There are no classes in that timetable within that date range.

2. You have selected a date range that is incorrect.

  • Once you select the Go button, a list of classes that you can mark attendance or absence for will be displayed. To view the list of students enrolled in a particular class, select the Class Name link in the first column. This will take you to a new page that shows the list of students for that class.

Final Step Classes Preview

In this step, you will be able to view all the classes that you have created or edited. Once you are satisfied with the changes, you can select the Finish button to complete the process of creating the classes. However, you can still make further edits and add any new class during this step. It’s important to ensure that all the necessary classes are created accurately and efficiently to avoid any issues in the future.

Copy Timetable Step 2 Select Classes

In this step of the process, the system displays all the classes that were linked to the previous timetable. The information for each class remains the same, except for the start and end dates which will now be different. The system will automatically copy over the timetable dates entered in the previous step and apply them to all the classes.

In addition to displaying the previously linked classes, this step also allows you to create new classes and make edits to existing ones. This gives you the flexibility to make any necessary changes or additions to the class. Select all the classes that you wish to copy in this new timetable.

Copy Timetable Step 1 Information & Resource Selection

During this step, the system will replicate all the data and resource selection from the previous timetable. However, the Timetable Code, Timetable Name, and Timetable Dates will not be copied. To complete this step, you will need to enter details into these four fields. Additionally, you have the ability to modify the information in other fields as well. This allows for flexibility in creating a new timetable while still retaining some of the previous data and resources.

Note – Please be aware that when you enter the start and end date for the new timetable, the system will refresh the information related to intakes, term breaks, and public holidays. This means that any changes made to these dates in the previous timetable will not carry over to the new timetable. It is important to review and verify all information related to intakes, term breaks, and public holidays to ensure that they are accurate the new timetable.