Enrolment – Statement of Account

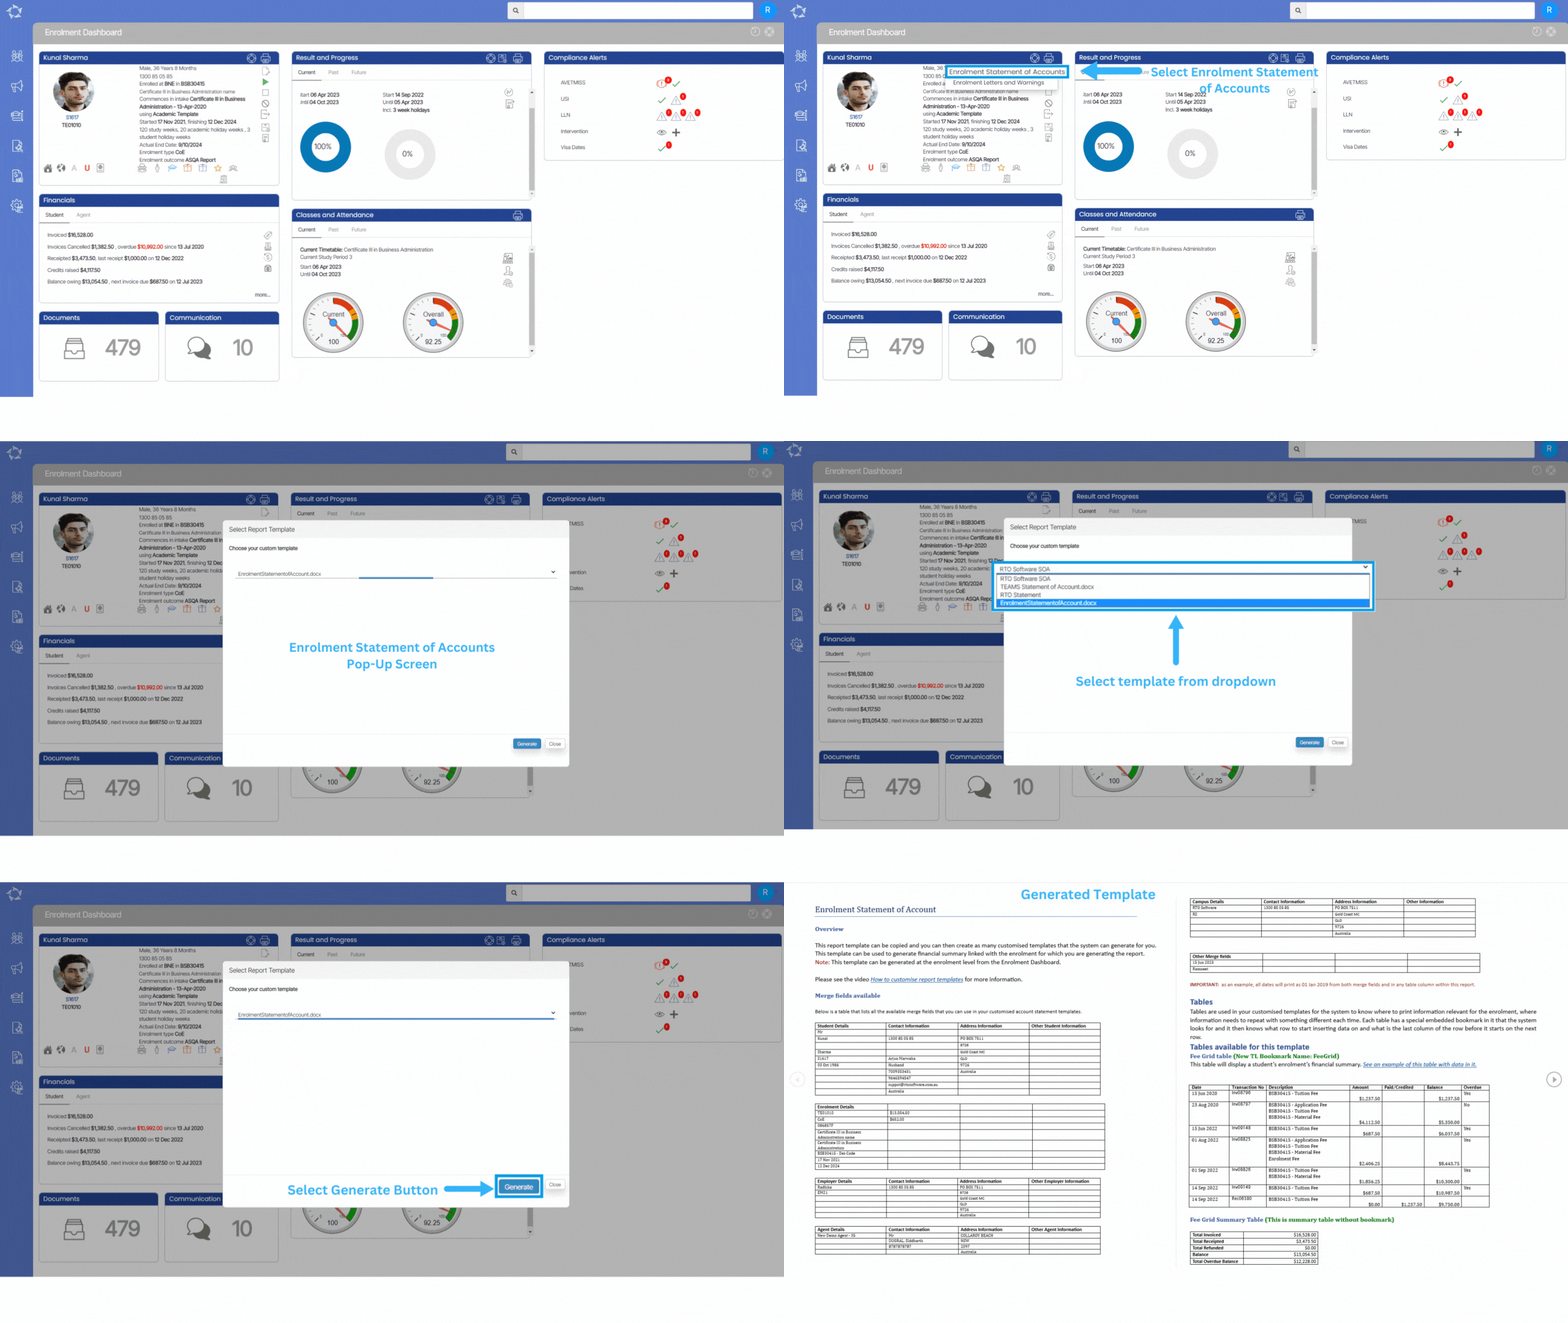
Enrolment Dashboard > Profile Tile > Print Icon

The enrolment statement of account report is used to generate financial summaries. It is specifically linked to a particular enrolment for which the report is being generated. This report provides a detailed overview of the financial transactions and activities related to the enrolment, including fees, payments, and any outstanding balances.

The report can be generated at the enrolment level from the Enrolment Dashboard. The system allows you to create customised templates for tailored financial summaries, which can be selected from a dropdown menu. Once the appropriate template is chosen, you can initiate the report generation process by clicking the designated Generate button.

Upon successful generation, the resulting report template is made available for download in either PDF or DOC format on the Report Dashboard.
Task Management -Actions Details

Tasks Details > Action Information > Preview Icon > Action Details Screen

history of changes

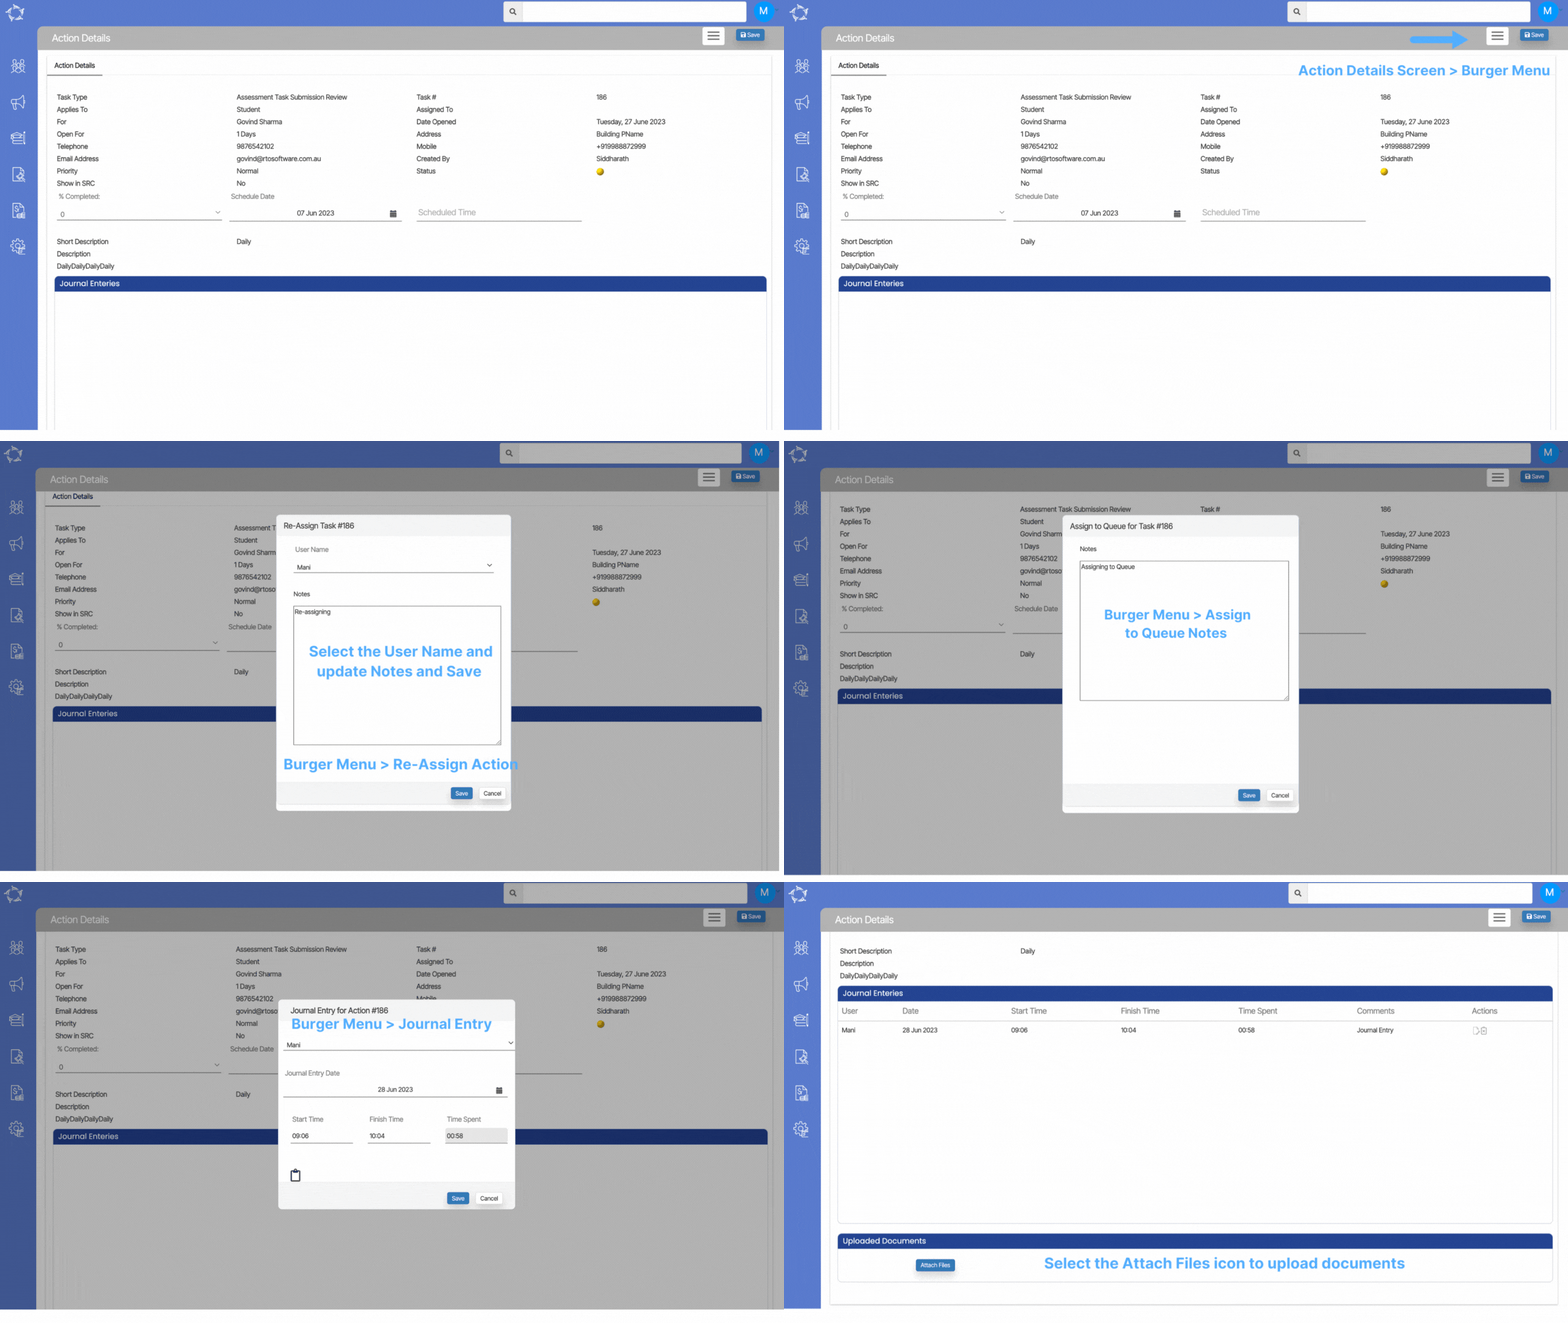
When you select the Preview Icon within the Action Information pop-up on the Task Details screen, you will be directed to the Actions Details Screen. This screen provides a comprehensive view of all the details associated with the task created from the Task Entry Screen. Additionally, you have the option to attach documents to the task directly from this screen, facilitating efficient documentation and reference.

Furthermore, you will notice a Burger Menu icon positioned on the right-hand side of the screen. This menu offers various options to manage the task effectively. Within this menu, you can choose to re-assign the action to a different person, edit the action details if necessary, mark the action as complete to indicate its fulfilment, assign the action to a queue for further processing, or cancel the action if it is no longer needed. The flexibility provided by this menu empowers users to make necessary adjustments and updates to the task based on changing requirements. In addition, through the burger menu, you can also add a Journal Entry, which allows you to include any relevant information or notes pertaining to the task.

Overall, the Actions Details Screen, accompanied by the Burger Menu functionality, offers a comprehensive platform for managing tasks efficiently. You can access task specific information, attach documents, and utilise the menu options to make necessary updates, track progress, and maintain accurate records of their actions.

How do the Burger Menu options work?

  • Re-Assign Action – When you select this option from the Burger Menu, a pop-up window will appear, allowing you to re-assign the action to a different person.
  • Edit Action – Upon selecting the edit action, the system will take you to the Action Entry/Task Entry Screen where you can make the necessary changes to the task.
  • Mark Complete – When you choose this option, a pop-up message will appear at the top of the screen, prompting you to select OK to complete the task or Cancel to leave it as it is.
  • Assign to Queue – Selecting this option triggers a pop-up message with Yes and No options. You can indicate whether you want to assign the action to a queue or not. If you select Yes, the system will display another pop-up window where you can add notes related to the action and save them.
  • Cancel – Upon selecting this option, a message will appear at the top of the screen asking, Do you want to cancel the Action? You can choose Yes or No based on your preference.
  • Journal Entry – When you choose this option, a pop-up window will appear. Within this window, you can update the Journal entry date, and start and finish time (the system will calculate the total time and update it in the “Time Spent” field). If you wish to add any notes, you can do so by selecting the Notes Icon and saving them. After saving the Journal Entry, the screen will refresh, and the journal entry will appear in the Journal Entries Grid on the Action Details screen. You will have the flexibility to edit and delete the Journal Entry from the grid using the edit and delete icons available in the Actions column.

Task Management

Main Dashboard > Task Management Tile

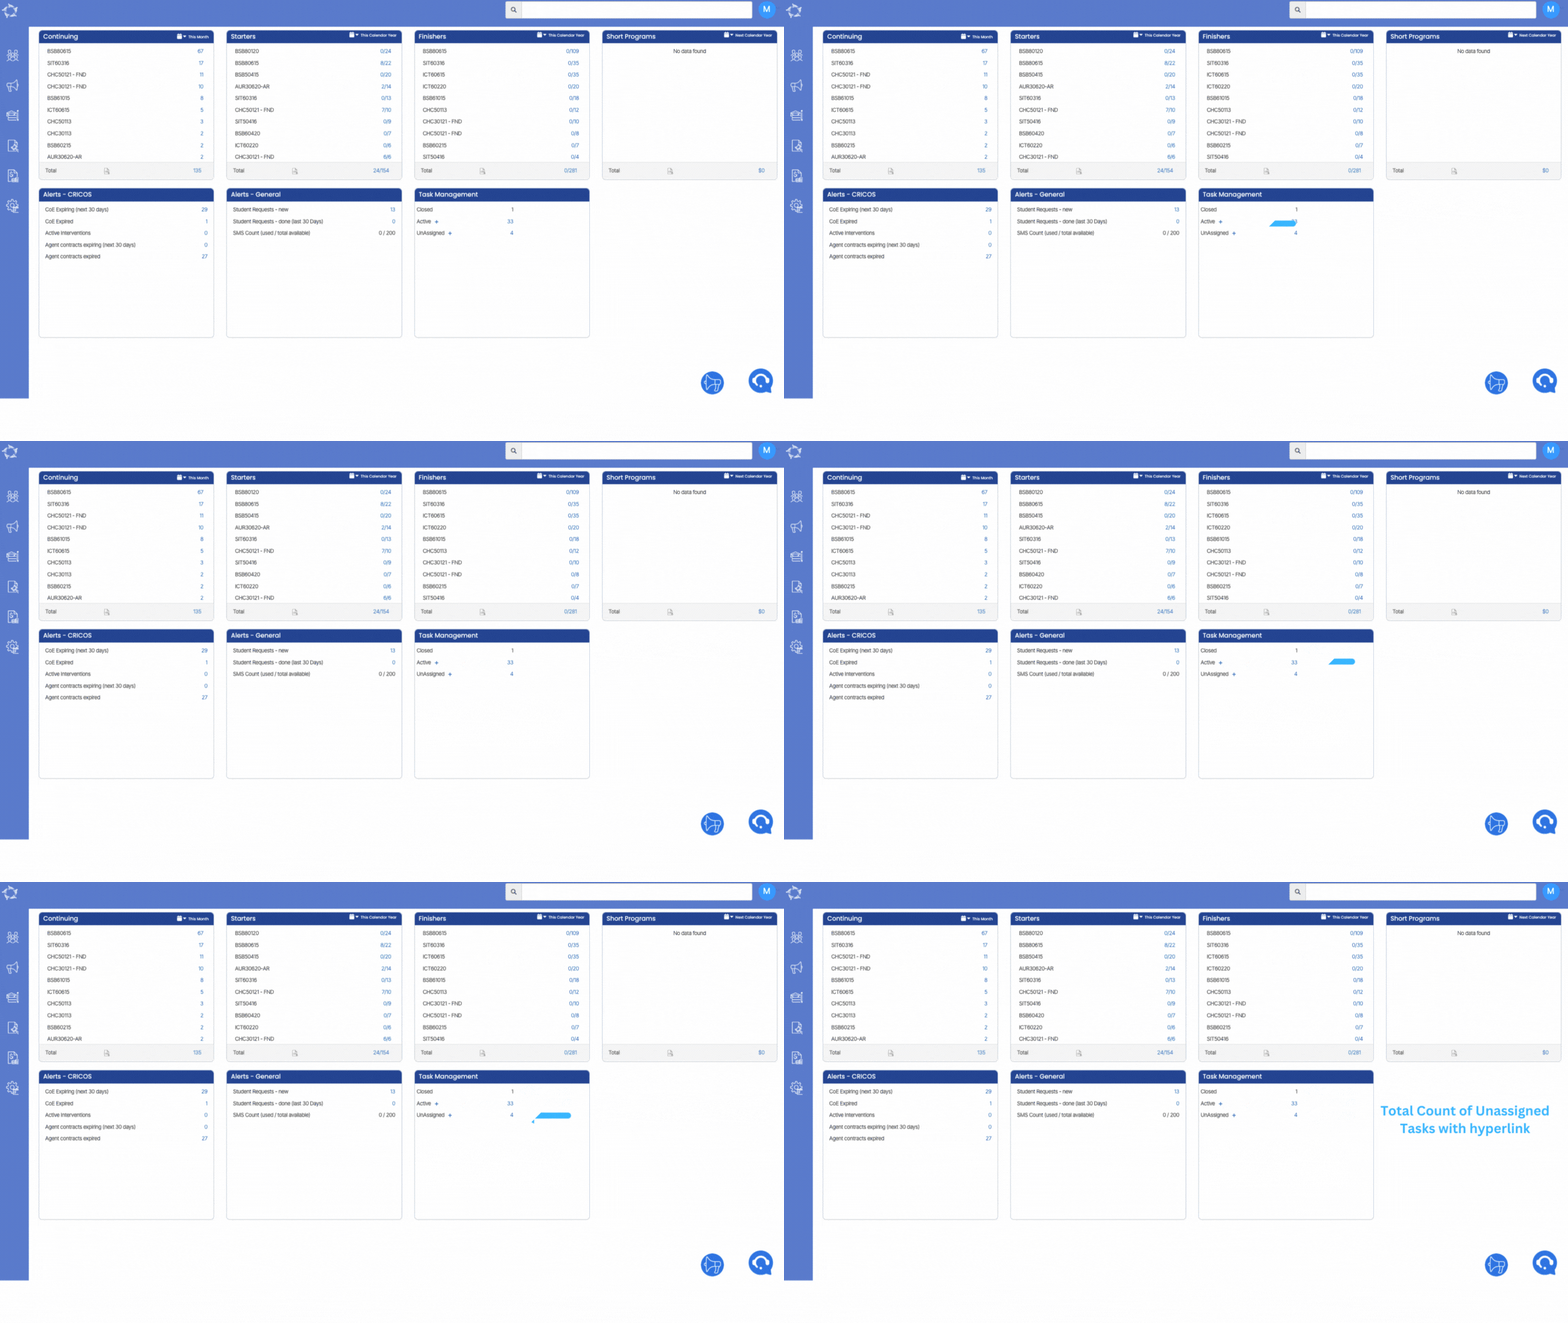
A new feature: Task Management, has been introduced in the system for you to efficiently manage and organise tasks related to various objects in TEAMS; Students, Enrolments, Agents, Employers, and more. The Task Management tile provides an overview of different task categories, including Closed tasks, Active tasks and Unassigned tasks. Each of these sections has dedicated screens that let you perform specific actions on tasks.

IMPORTANT – It is of utmost importance to note that Task Management is a system setting that exists within the system. Should you desire to enable this setting for your RTO, it is imperative that you contact our support team, who will then provide you with the guidance and support required to proceed with the subsequent actions involved in enabling this setting.

The Task Management tile will show you:

  • Closed Tasks – When a task is completed, it is moved to the closed tasks section. This allows users to have a clear record of tasks that have been successfully completed, providing a realistic overview of progress and helping with performance analysis.
  • Active Tasks – You will be able to add new tasks and view the existing ones from this section. Click on the Task Details screen link to know more about its subsequent actions.
  • Unassigned/Overdue Tasks – When you select this option, the system will direct to you to the Task Details screen, where you will be able to see the unassigned and overdue tasks..

Student Result Listing Report – New Subject Type Column

Dashboard > Student Management > Student Result Listings

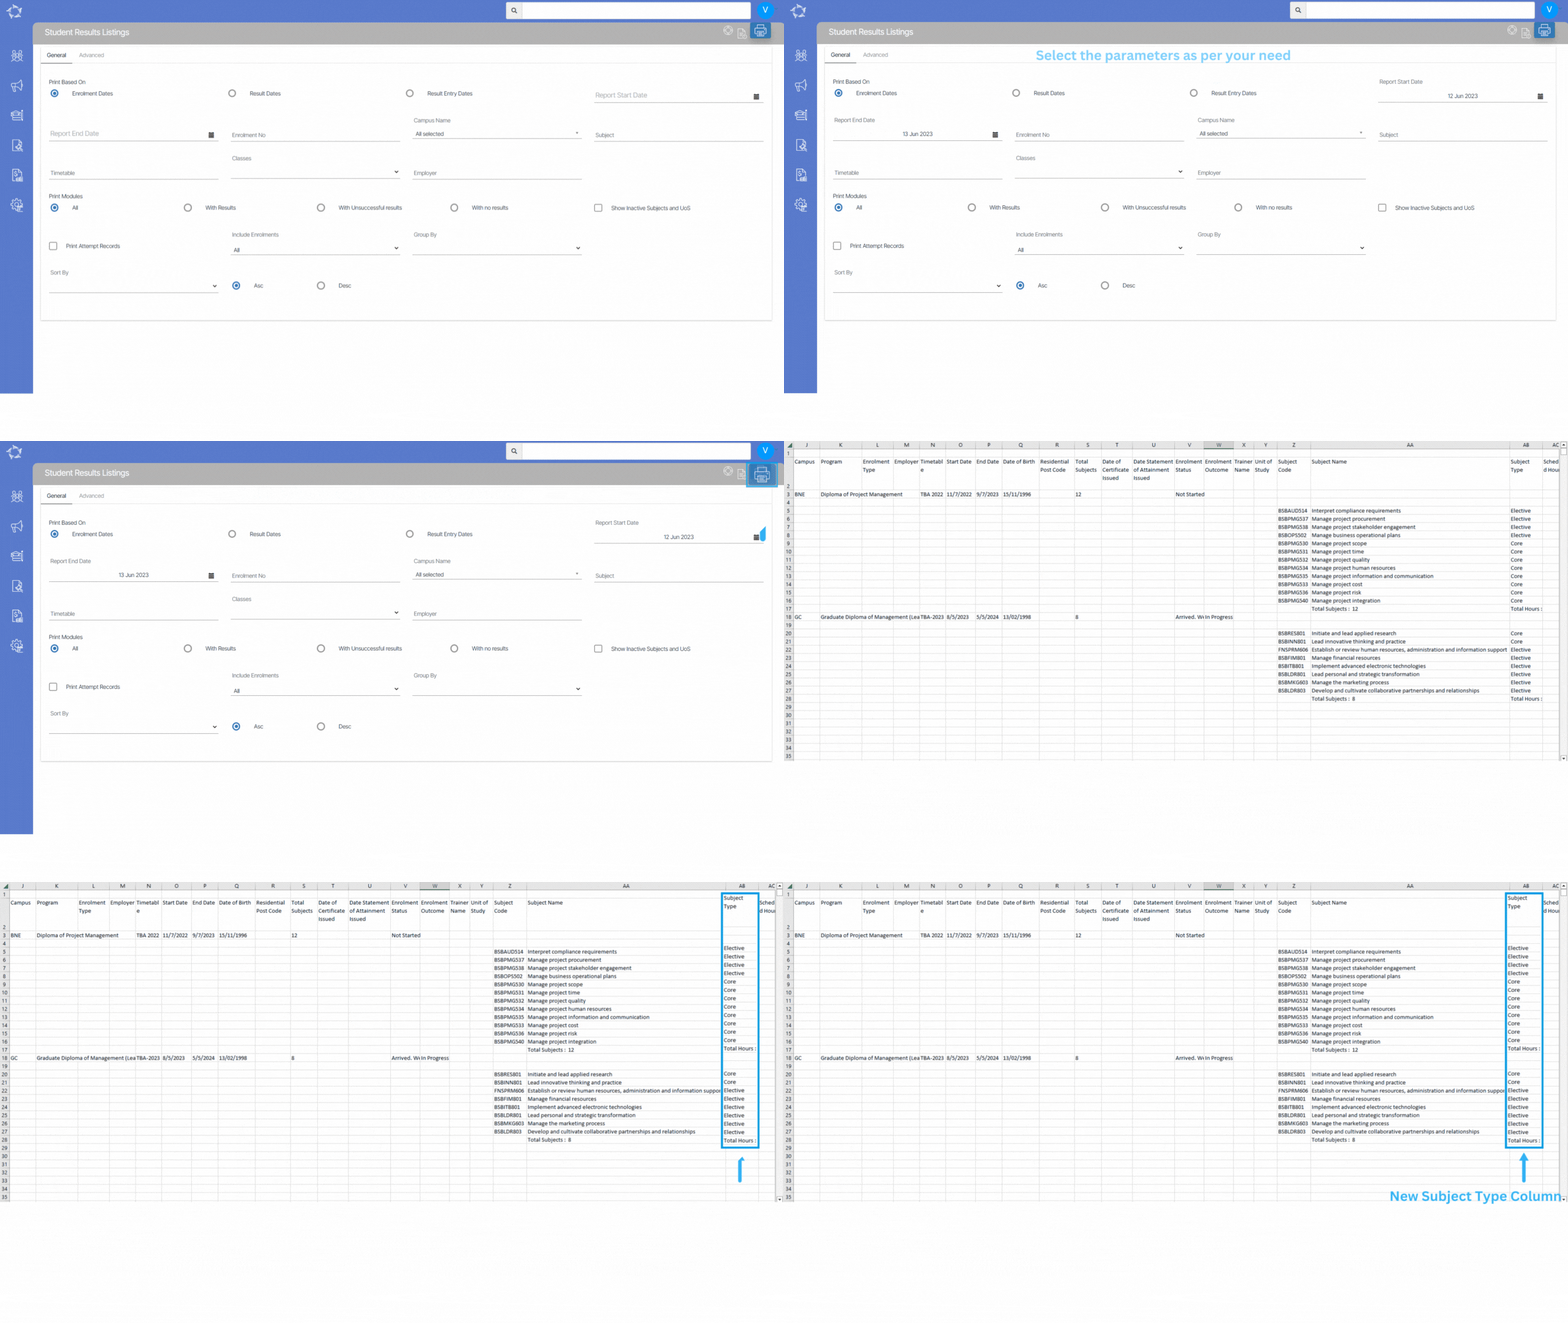
A new system setting has been implemented for the Student Result Listing report that will allow you to show a separate Subject type column for each subject.

In the Student Result Listing report, the subject type refers to the classification of each subject based on its role in the curriculum. It helps differentiate between core subjects, which are essential and mandatory for all students, and elective subjects. This classification allows you to easily identify whether a student has competent or failed in core or elective subjects, providing a comprehensive overview of their academic performance in subject type.

Invoice Due Date change for Agent Commission Invoices

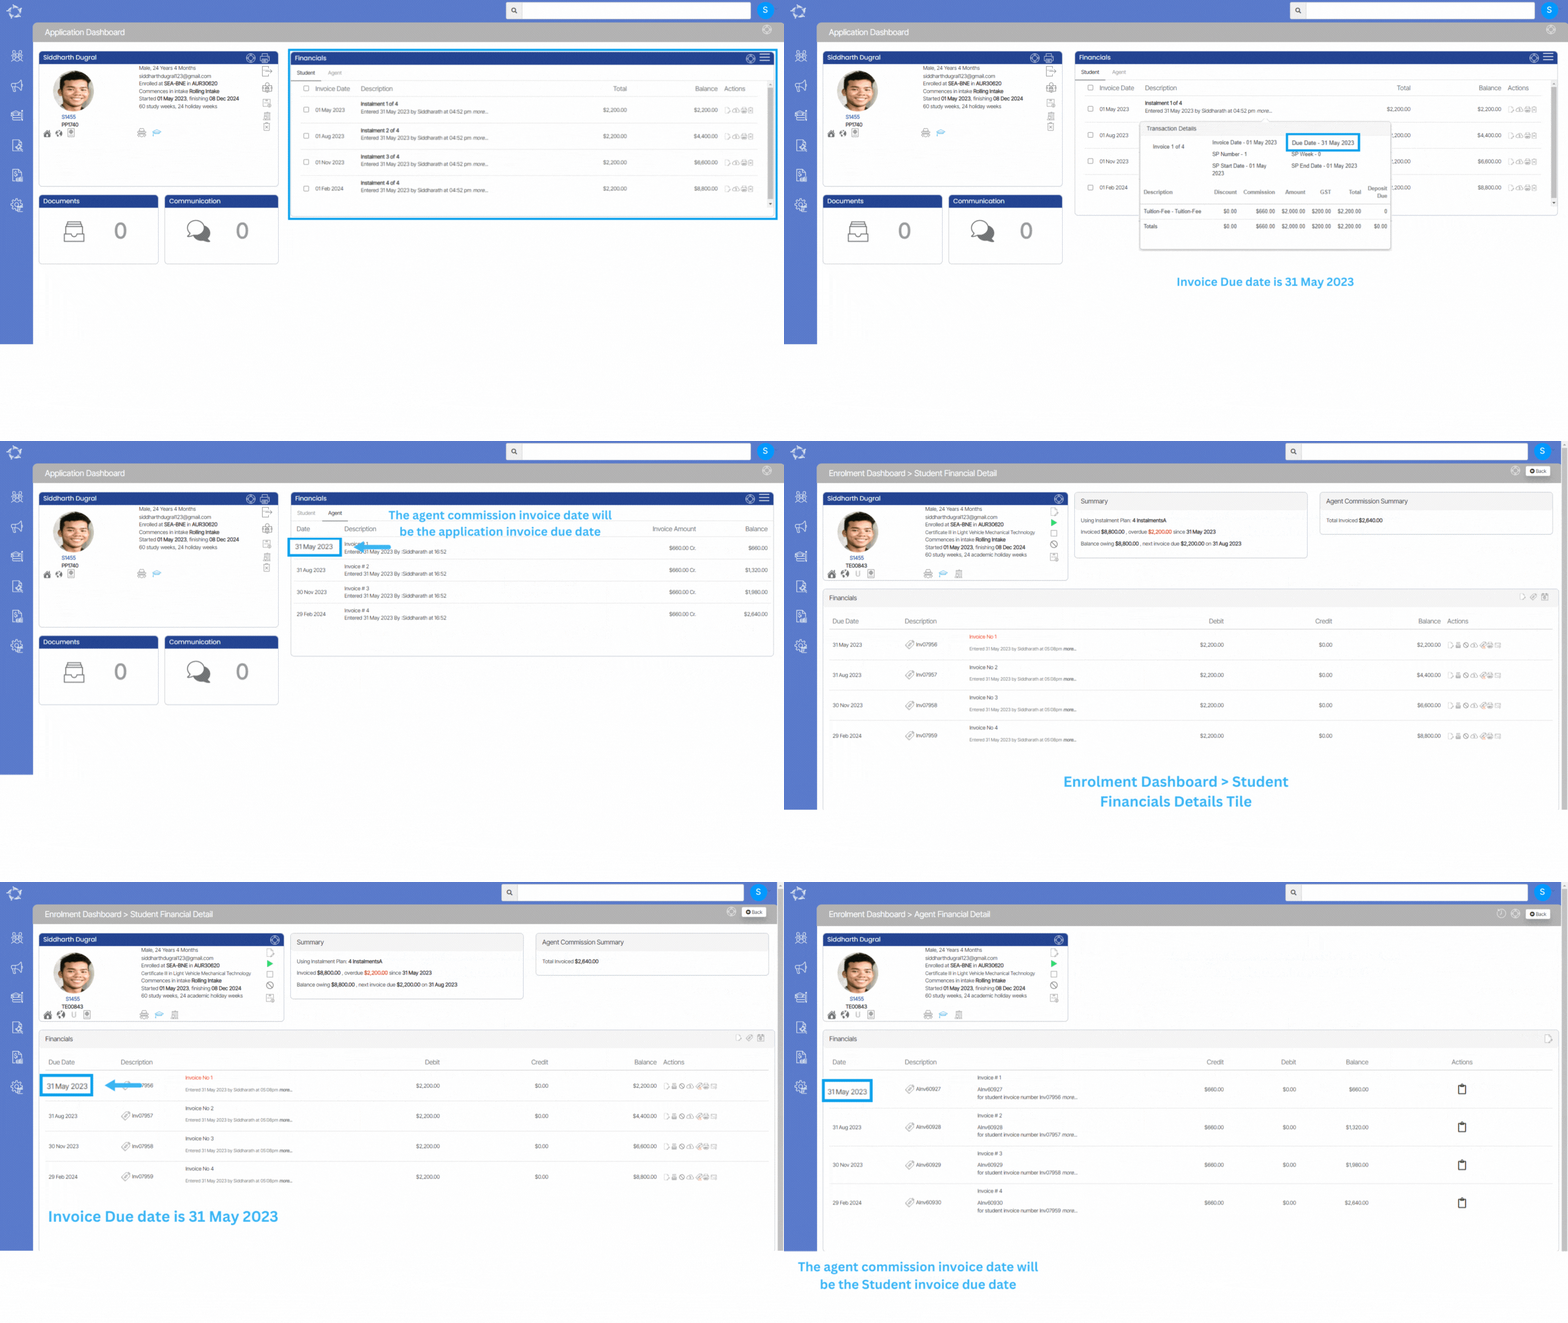
Previously, the system was using the student invoice date as the agent commission invoice date. With this new change, the system will now look at the student invoice due date and use it for the agent commission invoice date instead.

Note – The system will only do this for new transactions in the new application process and where you are raising invoices/instalments for applications and enrolments

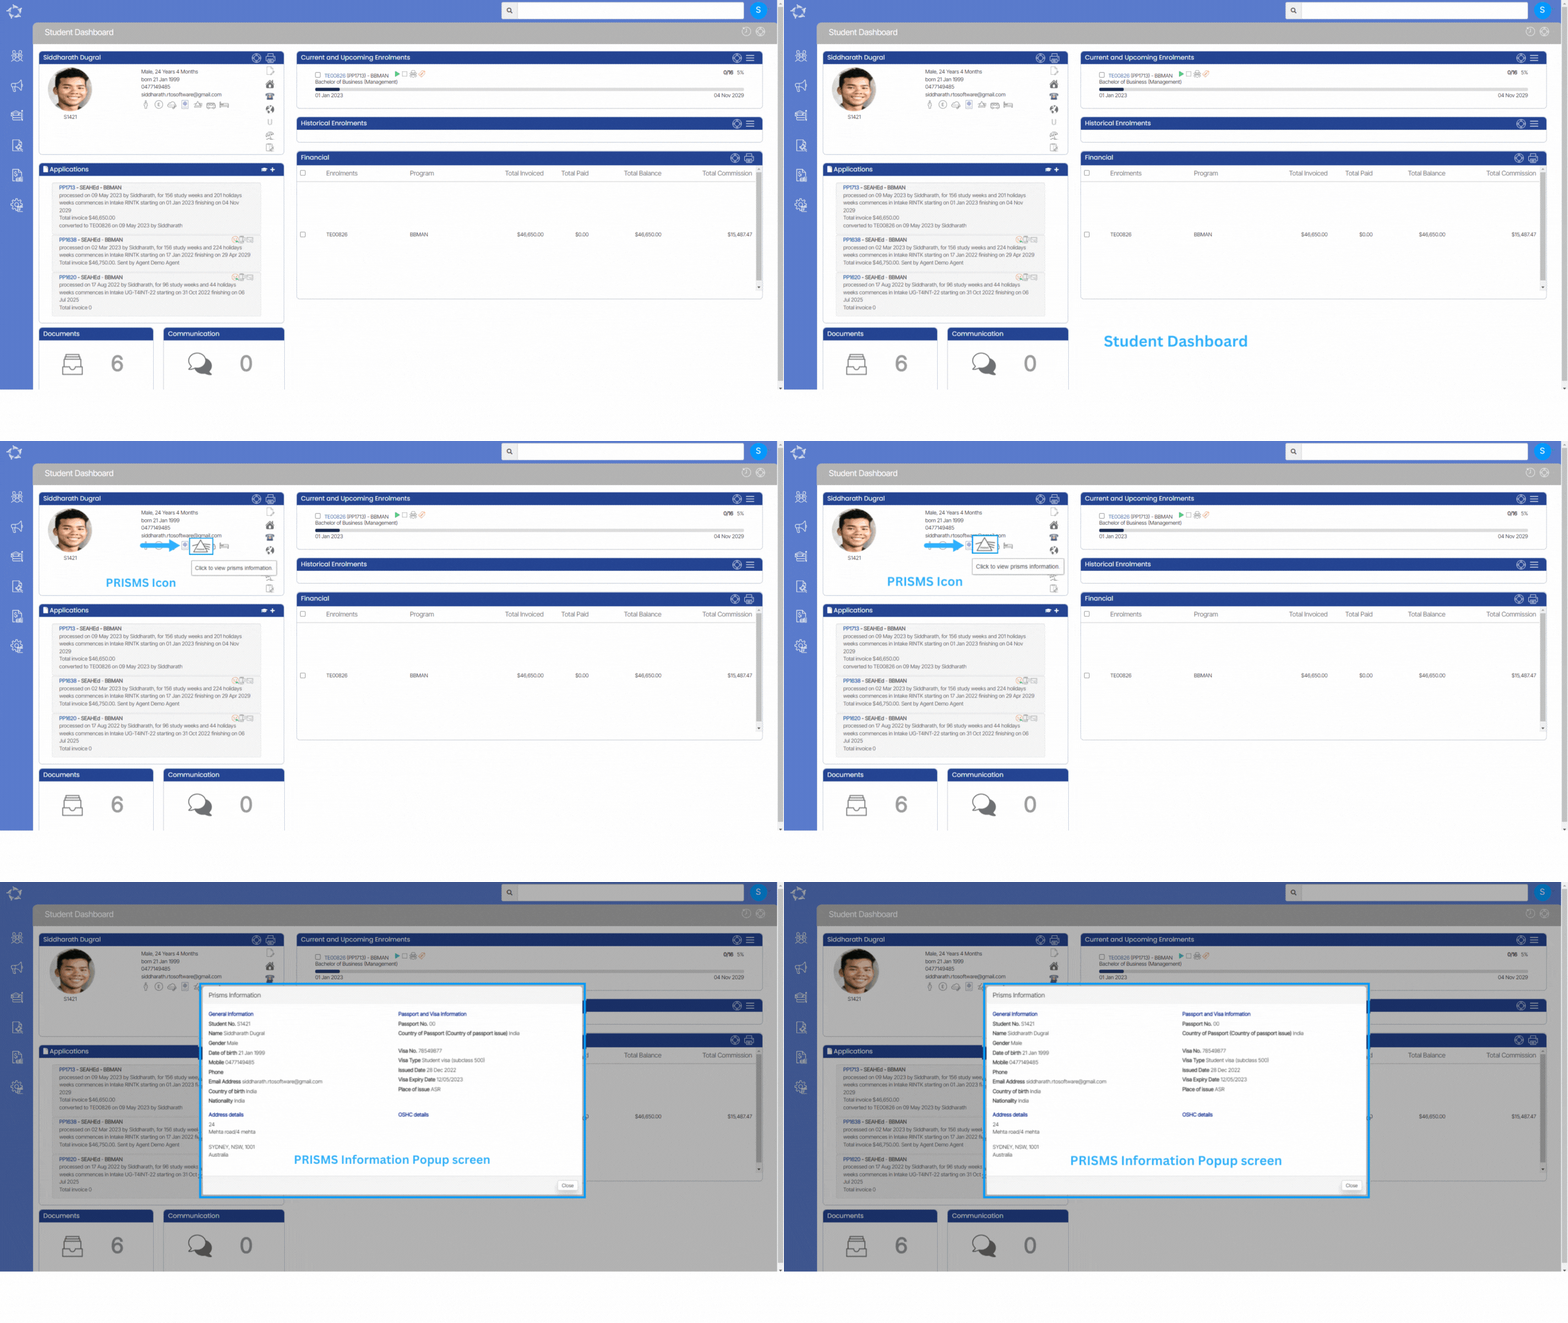
Student Dashboard – New PRISMS Icon

We have added a new icon under the Student/Applicant profile tiles for the overseas students. By selecting this icon, the system will open the popup window which consolidates all the student’s related information under one screen.

This will help you to easily copy the information from this popup window to paste it in PRISMS to create CoE, so that you do not have to select the icons separately on the profile tiles to check the student’s information. This new icon will help you to see the student’s information altogether.

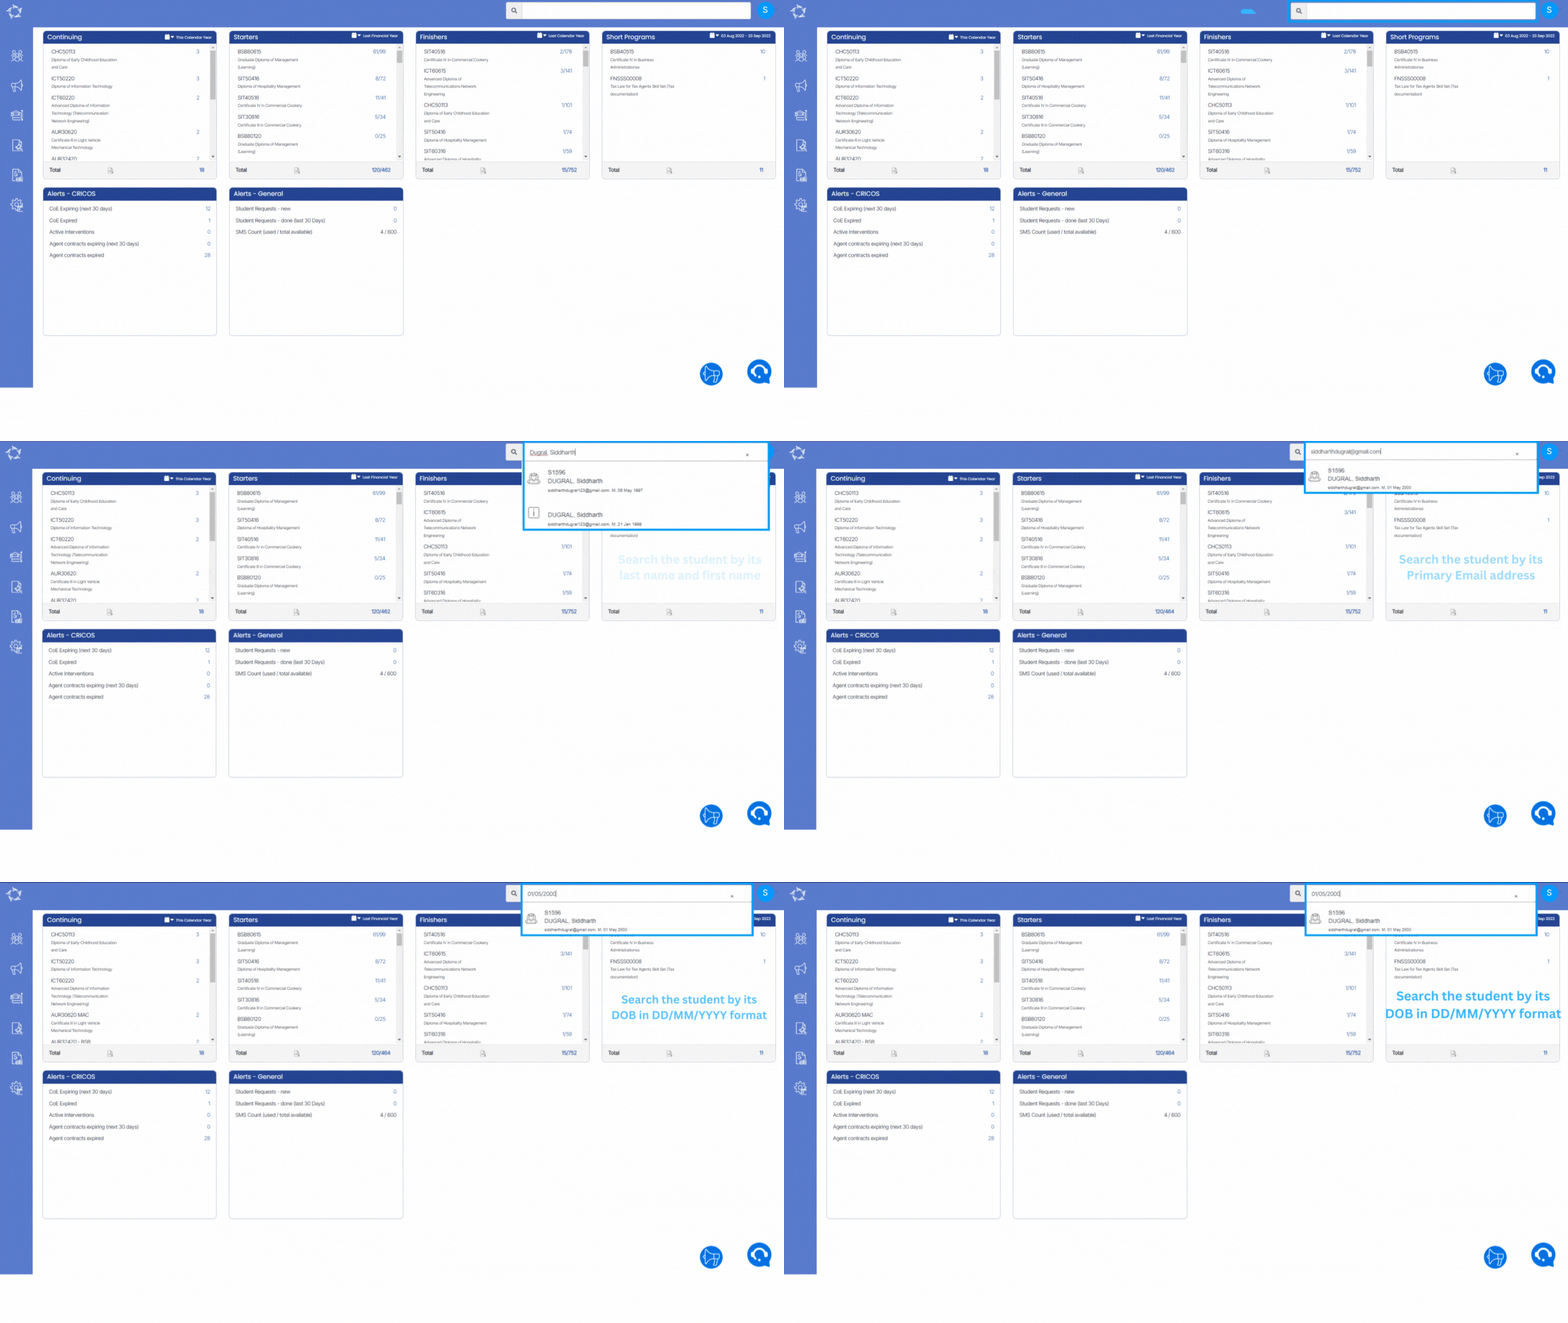
Search Bar – Improved Search Functionality

The Main Dashboard’s Search Bar has undergone some changes. With these changes, you will be able to search for a specific student by their Primary Email address, their DOB, or by typing their last name followed by their first name, separated by a comma.

Example: If you want to search for a student whose first name is Siddharth and last name is Dugral, simply type ‘Dugral, Siddharth’ in the search bar or enter his DOB in the DD/MM/YYYY format.

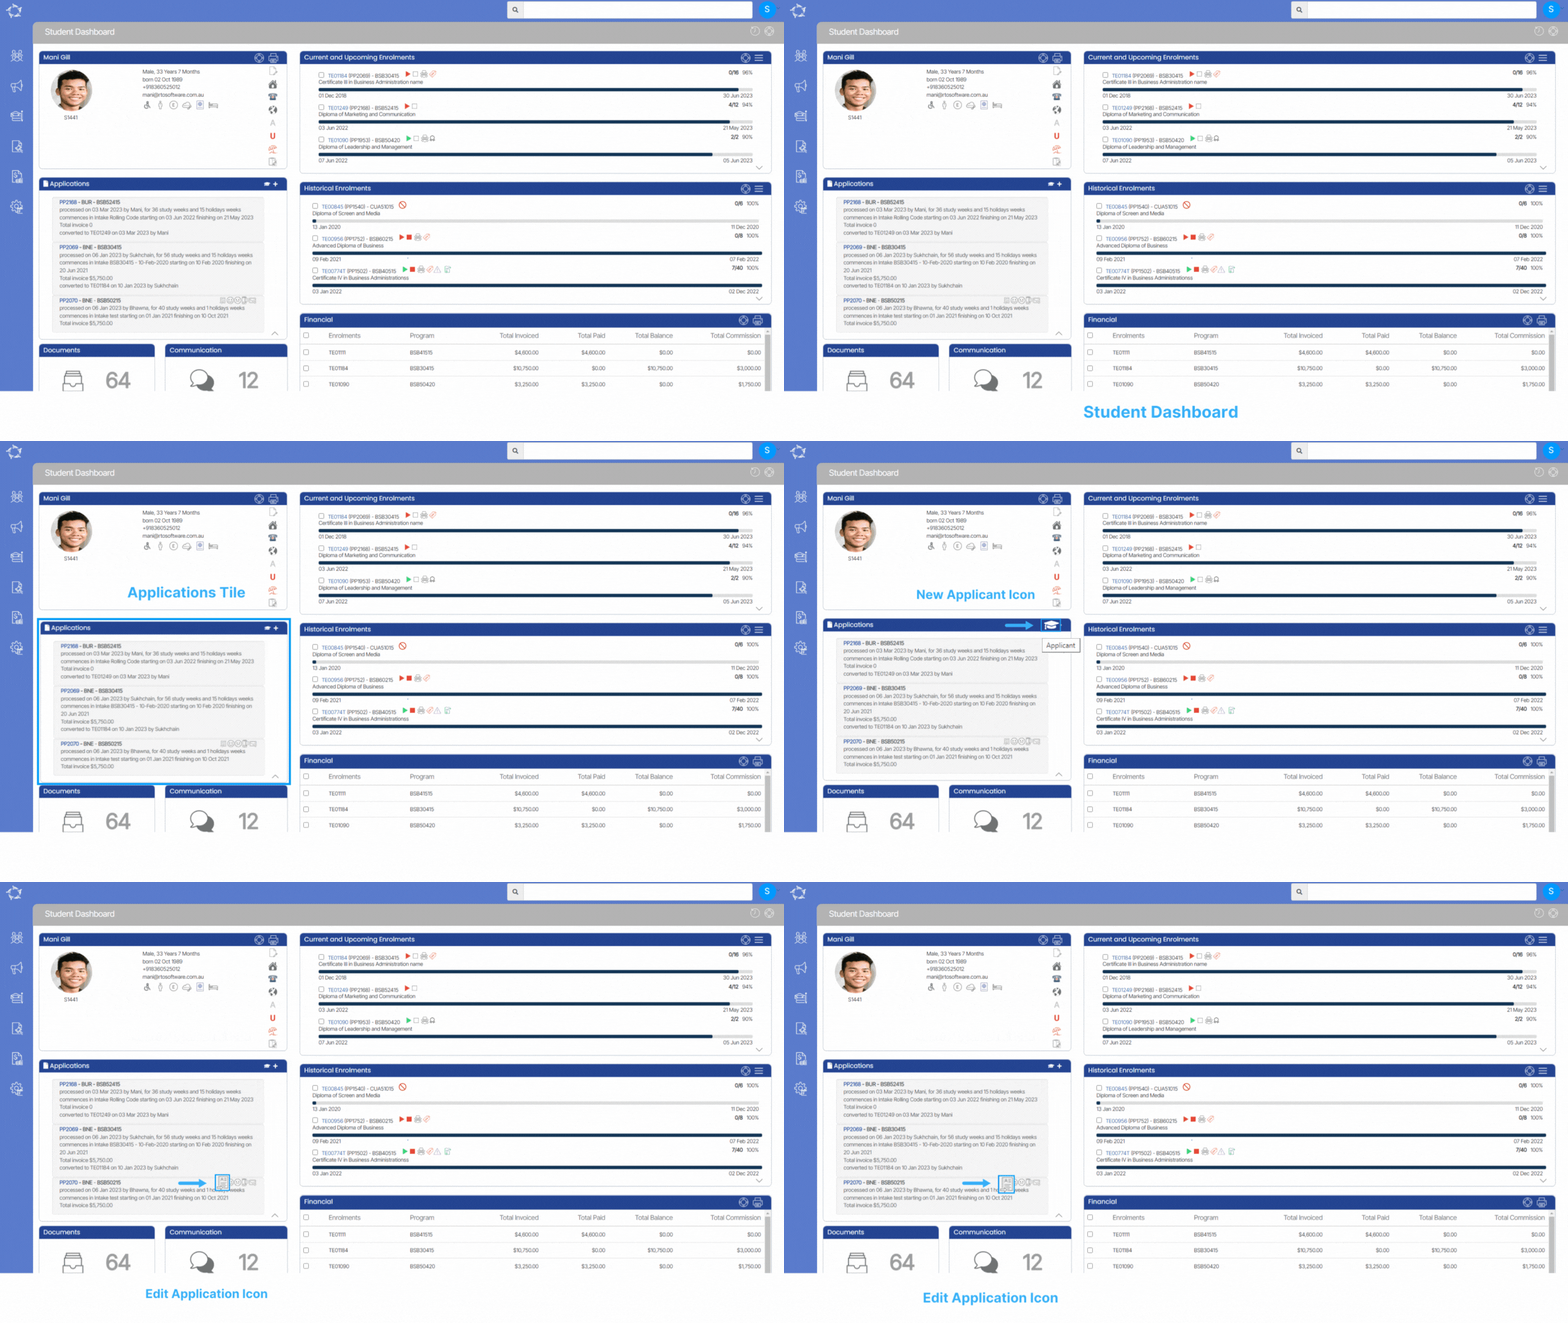
Student Dashboard – Application Tile – New Icons

The Student Dashboard has undergone an update with the introduction of new icons in the Applications tile. These icons will provide easy access to the student’s Applicant Dashboard, allowing for quick navigation to view and edit the student’s pending application.

This icon will allow you to go to the Applicant dashboard for the particular student.

This icon will allow you to edit the pending application of the student. Please note this icon will only appear if the students have any pending application for them.

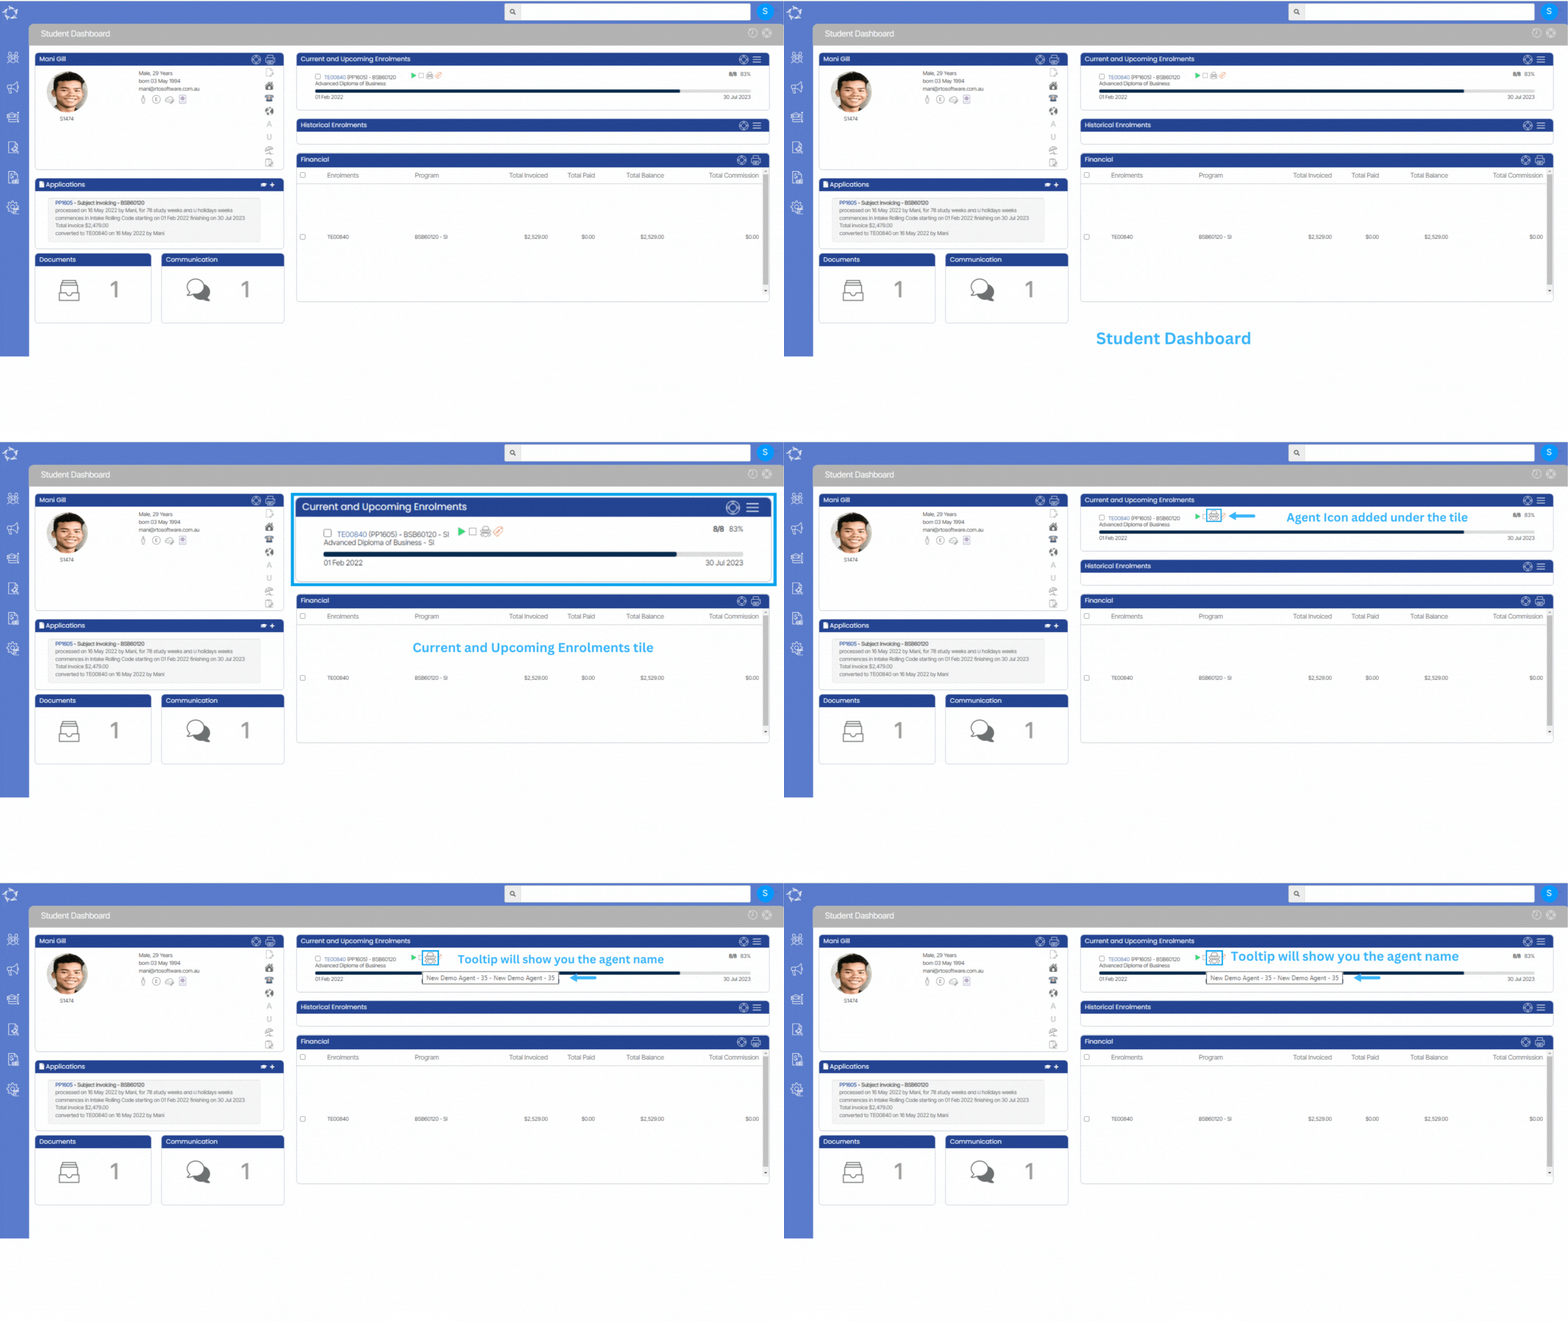
Student Dashboard – New Agent Icon for Enrolments

On the Student Dashboard, a new Agent Icon has been added beneath the Current and Upcoming Enrolment tile. When hovering the cursor over the icon, a tooltip will appear displaying the name of the agent. This icon will allow you to identify the designated agent linked to an enrolment.

Note – The Agent Icon will only be visible on the Student Dashboard if the agent is linked to an enrolment. If the agent is not assigned to a particular enrolment, the icon will not appear.