Generate Offer Letter > Student Dashboard

Initially, the system was generating the offer letter from the application level but now the users can generate the offer letter from the Student Dashboard too.

Note: A user can select more than one enrolment to generate the offer letter.

To generate an offer letter, you need to go to the student dashboard > select the enrolment’s tick box and then select the Burger menu and Print offer letter as shown below:

When the Print offer letter is selected, the floating window will open and you can select your customised offer letter template from the drop down and select the generate button as shown below.

Finishers Report Data Columns

Below is the table that will show you the columns and their explanation that will get printed in the generated report.

ColumnsExplanations
Student NoStudent Number generated by TEAMS
Student NameStudent’s First name, Middle name and Last name
Campus NameThis will show the number of enrolments linked with the campuses
Enrol NoEnrolment Number generated by TEAMS
Program CodeThe system will print the code of the program saved on the Program entry screen
Program NameThe system will print the name of the program saved on the Program entry screen
Enrolment TypeThis is a user code and the system will print the enrolment type from the Enrolment Dashboard > Edit Enrolment Details screen
Start DateStart Date of the Enrolment
End DateEnd Date of the Enrolment
No of WeeksTotal duration of the course i. e. Study weeks + Holiday weeks
Study WeeksTotal study weeks of enrolment
FinishedIt will show yes, if the enrolment is flagged finished
Agent NameAgent linked with the enrolment
Employer NameEmployer selected at the enrolment level
CountryCountry of the student from student level
Account ManagerIt will show the Account Manager selected at the enrolment level
Currently OwingThis is the overdue amount till the present date
Total OwingIt is the difference of total invoiced and total receipted 
Visa typeIt will show the Visa type selected at the Student level
ClassesThe system will show the classes linked to enrolments
Future ProgramsFuture enrolments of the student 
Enrolment OutcomeThe outcome of enrolment selected on the Enrolment Dashboard > Edit Enrolment Details screen
Subjects Successfully CompletedThis will display all the subject codes with the successful results
Subjects Not Completed SuccessfullyThis will display all the subject codes with the unsuccessful results
Overall Attendance PercentageThis is the total of enrolment’s average attendance percentage for the entire enrolment duration
Total Subjects CompletedThis column will display the count of total successful subjects/total number of subjects linked to the enrolment.
For example: 3/8 so 3 will be the count of successful subjects and 8 will be the count of total subjects linked with the enrolment
StageIt will show the commencement status from the Training Plan and Results screen > Qualification Information tile.
Notes
VSNThis is the VSN number selected at the student entry screen
VSN EligibleIt is Yes, if VSN number is valid
Enrolment StartedIt will display Yes if the enrolment is flagged as started
AVETMISS StateAVETMISS state is the State Training Authority selected at the Enrolment level > Enrolment AVETMISS settings screen
DOBStudent’s date of birth entered at student entry screen
Email AddressStudent’s primary email address updated on the student entry screen
Email Address 2Student’s secondary email address updated at the student level
Email Address 3Student’s additional email address updated at the application/Student level
NationalityNationality of the student
USIStudent’s USI number updated on the Student Dashboard > USI screen
Mobile NoStudent’s mobile number updated on the Edit Student screen

How to search for a student with a Delta No

From the Student Search you now can search for a student using their Delta No which is also known in the system and in AVETMISS as the Client Identifier.

Note: Delta No’s are only used for funded students, there is no need to enter anything here if you are not a funded RTO who has purchasing contracts that require the Delta No.

  • If you want to search a student with the Delta No in TEAMS then it should be updated on the Student Dashboard > AVETMISS Icon > Edit Student screen as highlighted in the screen shot below:
  • So when you are on the Main Dashboard, you can search the student in the search bar with it’s Delta No and it will show the Student’s name and TEAMS Student Number as highlighted below:


How to manage your 2021 NCVER Student Data submission and errors in TEAMS

Below are the steps on how to manage your 2021 Student Data submissions for NCVER in TEAMS.

Part 1 – Before you even do an AVETMISS export from TEAMS do all these steps below

  1. Generate your Starters report – use the date range of 01/01/2021 to 31/12/2021 and look at all your VET starters and confirm that all that started have been flagged as started in TEAMS.

  2. Generate your Current Students report – use the date range of 01/01/2021 to 31/12/2021 and look at all the enrolments that started and/or finished and review the following data listed below (column heading names) in the report as it is all mandatory information that needs to be in your NAT files exported from TEAMS.

    • DOB – if this is missing you MUST update this against the student.

    • AVETMISS Student – if this says NO and the student’s enrolment is in a VET course/qualification then you need to go to the Student and select the AVETMISS tick box and SAVE. If you DO NOT do this the student’s enrolment data will NOT be in the NAT files.

    • Sex – this is the gender of the student and is mandatory, if it is empty you must update the student with their correct gender.

    • Status – this will identify either Not Started, Finished or Arrived. Week # of #. You need to confirm any that say Not Started (if you have already reviewed your starters report and fixed there, then you should not find any mistakes here. If there are some that did start and are showing as Not Started you MUST go and start their enrolments. For entries that have Arrived. Week # of # such as Arrived. Week 48 of 48 then check their enrolment end date and if it is in the past then you have NOT flagged the enrolment as finished and you MUST do this. You should also then follow the steps list in this email for Finalising a VET enrolment in TEAMS.

    • USI # – if you have enrolments in VET courses/qualifications and the USI is missing then you must urgently chase students up and get their USIs entered. Until you do this you will NOT have a successful submission.

    • Completed, Total No. of Units and No. of Units Successfully Completed – you need to compare these 3 columns of data together as follows:

      1. Completed = Full then the number in the columns for Total No. of Units and No. of Units Successfully Completed should be the same. If it isn’t then you need to review the results and fix them to successful results OR change the completed qual status from Full to either SoA or N/A.

      2. Completed = SOA then the number in the columns for Total No. of Units and No. of Units Successfully Completed should NOT be the same. If they are then either you need to change the completed qual status from SoA to Full or fix the results to match the SoA outcome.

      3. Overseas – if you are a 100% CRICOS VET college then this should say YES for all your students. Where you have ELICOS students as well or domestic students then you do need to evaluate this column even closer. For every student is on a Student VISA and enrolled in a VET course/qualification or set of competencies then you MUST make sure they are set as Overseas in two locations that are:

        • Student level (student entry screen)
        • Enrolment level (enrolment centre > Action > Edit AVETMISS > Overseas tick box must be set).

  3. Generate your Overdue Competencies/Modules with no Results report – this report is under the TEAMS > Student > Academic Reports menu. Use the date range of 01/01/2021 to 31/12/2021 and look at the list of all your VET enrolments in this report. This will show you, if you are using them the Competency/module Code and then the Start and End Date for them that is entered in the Enrolment Centre > Enrolment Subjects/Modules screen. If you have enrolments there with competency/module end dates in 2021 this means they have NO final outcome/result such as Competent, Not Yet Competent, Withdrawn, Credit Transfer, RPL Granted etc and it means you will get errors. This needs to be cleaned up by either:

    • Updating the final outcome for each competency/module OR

    • Updating the end date of the competency module to a 2022 end date. You can only do this if the enrolment end date is greater than 2021.


      CRITICAL – this must be fully cleaned up as this is one of the reasons you will get 1000’s of errors in your submission.

  4. Generate your Finishers report – use the date range 01/01/2021 to 31/12/2021 and look at all your VET enrolments in the report and review the following data columns to fix problems you see. They include:

    • Finished – if this is set to NO then you need to either flag the enrolment as finished for edit the enrolment and change the enrolment end date to a data greater than 2021.

    • Competencies Completed and Stage – if you have followed step two above for Generate your current students report and followed all of the steps completely then you would not need to look at this column of data. If you haven’t then it is worth reviewing these columns and following the same rules as outlined above.

      Note: you can also reconfirm that DOB and USIs are there for these students in this report.

  5. Once all the above steps are done and you have thoroughly cleaned up your data then finally look at the Qualifications Issued report – use the dates 01/01/2021 to 31/12/2021 you can find this report under TEAMS > Student > Academic Report 3 menu option.


    In the report, if you have followed the Finalising a VET enrolment in TEAMS process, then you will see all the Certificates (Full) and SoA’s that you have issued in 2021 or other specific calendar year. The data columns to look at are:

    • Qual Issued – it will show a Full or SoA and is based on what you selected for the completed status in the Enrolment Centre > right hand top section for summary information.

    • Parchment Number and Parchment Date – if this information is missing you MUST update the enrolment with this information. You need to open the enrolment in the Enrolment Centre and go to Academic menu button > Student Results.

Part 2 – do an AVETMISS export from TEAMS and submit your data to NCVER. When you get an error report we recommend the following:

  1. Always use the option to Export Details from AVS as it will give you a csv (excel) file with a list of all the errors in it.

2. Once you have downloaded/received the csv (you can open it in excel version if you like) you will see there is a column for File ID and it will show a NAT file number/name in it such as NAT00085 etc. The NAT files that TEAMS exports that you submit online are grouped as follows:


Your RTO information and what are the Training Locations that you deliver training of the competencies/modules for students

NAT00010
Training Organisation – this should only be a one line entry (for one RTO) and is your RTO ID and information from TGA.

NAT00020Training Organisation delivery location – this will be related to Training Locations (this is NOT campuses in TEAMS). In TEAMS you have campuses but for each campus there is one or many Training Locations and you MUST link at least one Training Location to the enrolment. If you do not do this you will get errors. This file lists all the training locations used against the enrolments in the NAT00120.

Your Qualifications/Courses and Competencies/Modules that you are delivering training in

NAT00030
Program – this lists all the qualifications/courses that are listed in the NAT00120 for the students studying in 2021

IMPORTANT: this is where you can get hundreds, sometimes thousands of errors (based on the number of enrolments in a course/qualification that are listed in the NAT00120) when you do not setup your qualifications/courses in TEAMS with the correct AVETMISS settings. For each student listed in the NAT00120 with a specific course/qualification (where there is a setting that is wrong/missing) that is how many times you will get the same error. So once you fix/add the correct setting for the course/qualification in TEAMS those specific errors will disappear for those hundreds or thousands of rows in your next export and submission. The logic is fix in one spot and it will fix many rows of data in the NAT00120. 

For example you have course 1 that has 3 different errors as it is missing 3 different AVETMISS settings in TEAMS. For that course in the NAT00120 you have 400 students listed, this means each setting is a different error so you will have 400 rows of errors for one setting and for all 3 settings you will have 1200 rows of errors. BUT once you go to that course in TEAMS and add those 3 settings and do your next export and submission all 1200 rows of errors will not be there. This is a general rule but is NOT always the case.


NAT00060Subject – this lists all the competencies/modules that are listed in the NAT00120 for the students and what their results are etc in 2021

IMPORTANT: this is where you can get hundreds, sometimes thousands of errors (based on the number of enrolments in a competency/module that are listed in the NAT00120) when you do not setup your qualifications/courses in TEAMS with the correct AVETMISS settings. For each student listed in the NAT00120 with a specific competency/module (where there is a setting that is wrong/missing) that is how many times you will get the same error. So once you fix/add the correct setting for the competency/module in TEAMS those specific errors will disappear for those hundreds or thousands of rows in your next export and submission. The logic is fix in one spot and it will fix many rows of data in the NAT00120.

For example you have module 10 that has 2 different errors as it is missing 2 different AVETMISS settings in TEAMS. For that module in the NAT00120 you have 700 students listed, this means each setting is a different error so you will have 700 rows of errors for one setting and for the 2 settings you will have 1400 rows of errors. BUT once you go to that module in TEAMS and add those 2 settings and do your next export and submission all 1400 rows of errors will not be there. This is a general rule but is NOT always the case.


Your students information – only students listed in the NAT00120 (with their student number) will be in these files

NAT00080
Client – this is the list of students and their basic information such as gender, dob etc

NAT00085Client Contact Details – this is the list of students and their address and contact information

NAT00090Disability – this file will only have data in it if you have set in TEAMS that a student has special needs

NAT00100Prior Educational Achievement – this will only have data in it if you have set in TEAMS > Enrolment Centre > Action > Edit AVETMISS that the student has Prior Education.


Training activity and outcomes for your students and their competency/modules

NAT00120
Training Activity – this file will list each student number and show all the relevant competency/module codes and information for them such as, but not limited to the following:

          a) Start and End date of the training activity – this is in the Enrolment Subject/Module screen in TEAMS

          b) Result for the competency/module – this includes Continuing Enrolment and Not Yet Started, not just final outcomes such as Competent, Not Yet Competent, Credit Transfer etc.

          c) Training Location

          d) Funding Source National ID

IMPORTANT: This file is where you will always get large volumes of errors that can be in the 1000’s and will have to do with not setting and following rules for your data in TEAMS correctly.

NAT00130Program Completed – this is a summary of all your students who completed their enrolments and if you issued them a qualification (Certificate) or statement of attainment (SoA) – it really should match your Qualifications Issued Register. This is and the NAT00120 is where NCVER gets the statistics from for the Completion counts for your RTO etc.

Recommendation – always start with the NAT00120 and the NAT00080 errors as generally speaking they will have the largest number of errors and will take the longest to clean up in TEAMS. If possible have more than one person managing error fixing in TEAMS so you can turn around the clean up and submissions quickly. It is not unusual for clients to have to do upwards of 6+ AVETMISS exports and submissions before they get a successful validation and submission completed. 

Finalising a VET enrolment in TEAMS

It isn’t as simple as setting your enrolments as finished in TEAMS. You need to update information such as:

  1. Final results for all the competencies/modules linked to the enrolment with correct result dates.
  1. Set the correct complete status to either Full (you issued the qualification/certificate for this enrolment to the student), SoA (you issued a Statement of Attainment for the enrolment to the student) or N/A (you issued nothing to the student at all).
  1. Parchment number and parchment issued date are entered for all enrolments
  1. Set and write the record of Results Issued = yes so the system writes the entry to the qualifications issued register in TEAMS
  1. Then set the enrolment as Finished.

Continuing listing screen – New parameter show only Smart and Skilled enrolments

Dashboard > Continuing Tile

We have added a new parameter in the Continuing List screen, which is accessed from the Continuing tile on the Dashboard as shown below:

When you are in the Continuing List screen select the Advanced Search option as shown below:

You will then see the new Show only Smart and Skilled enrolments. Select this option and select the Apply button to see those specific enrolments.

Please Note: for a Smart and Skilled enrolment to show in this list the enrolment must be flagged as one. To do this go to the Enrolment Dashboard and from the profile tile select the Enrolment AVETMISS Settings icon as shown below:

The Enrolment AVETMISS Settings screen will open and in the bottom right hand corner you will see the tick box for Smart and Skilled enrolment as shown below.

Enrolment Dashboard > Class Allocation Screen – Study Periods Column removed

Dashboard>Search Student>Select the Enrolment

Overview

From the Enrolment Dashboard > Classes & Attendance tile > Classes icon on the Classes Listing screen there used to be an option to select the Study Period or the Dates. In order to make it more user friendly, we have removed the Study Periods option from the Choose new Classes for Allocation section as shown below.

On selecting the Show Classes button, you will be able to view all the available classes for the date range you entered.

After selecting the class/s you wish to allocate to the enrolment you then select the next button and complete the steps of the process.

NOTE: we have also changed the Classes Listing Screen that you see from the Enrolment Dashboard > Classes & Attendance tile > Classes icon

In the screen shot below, this is how the old Classes Listing Screen used to look like with the Study Periods column which made it hard for a user to read.

We have removed the Study Periods column and now it looks like this.

If you have any queries, please do not hesitate to contact us on 1300 85 05 85 or email us via support@rtosoftware.com.au

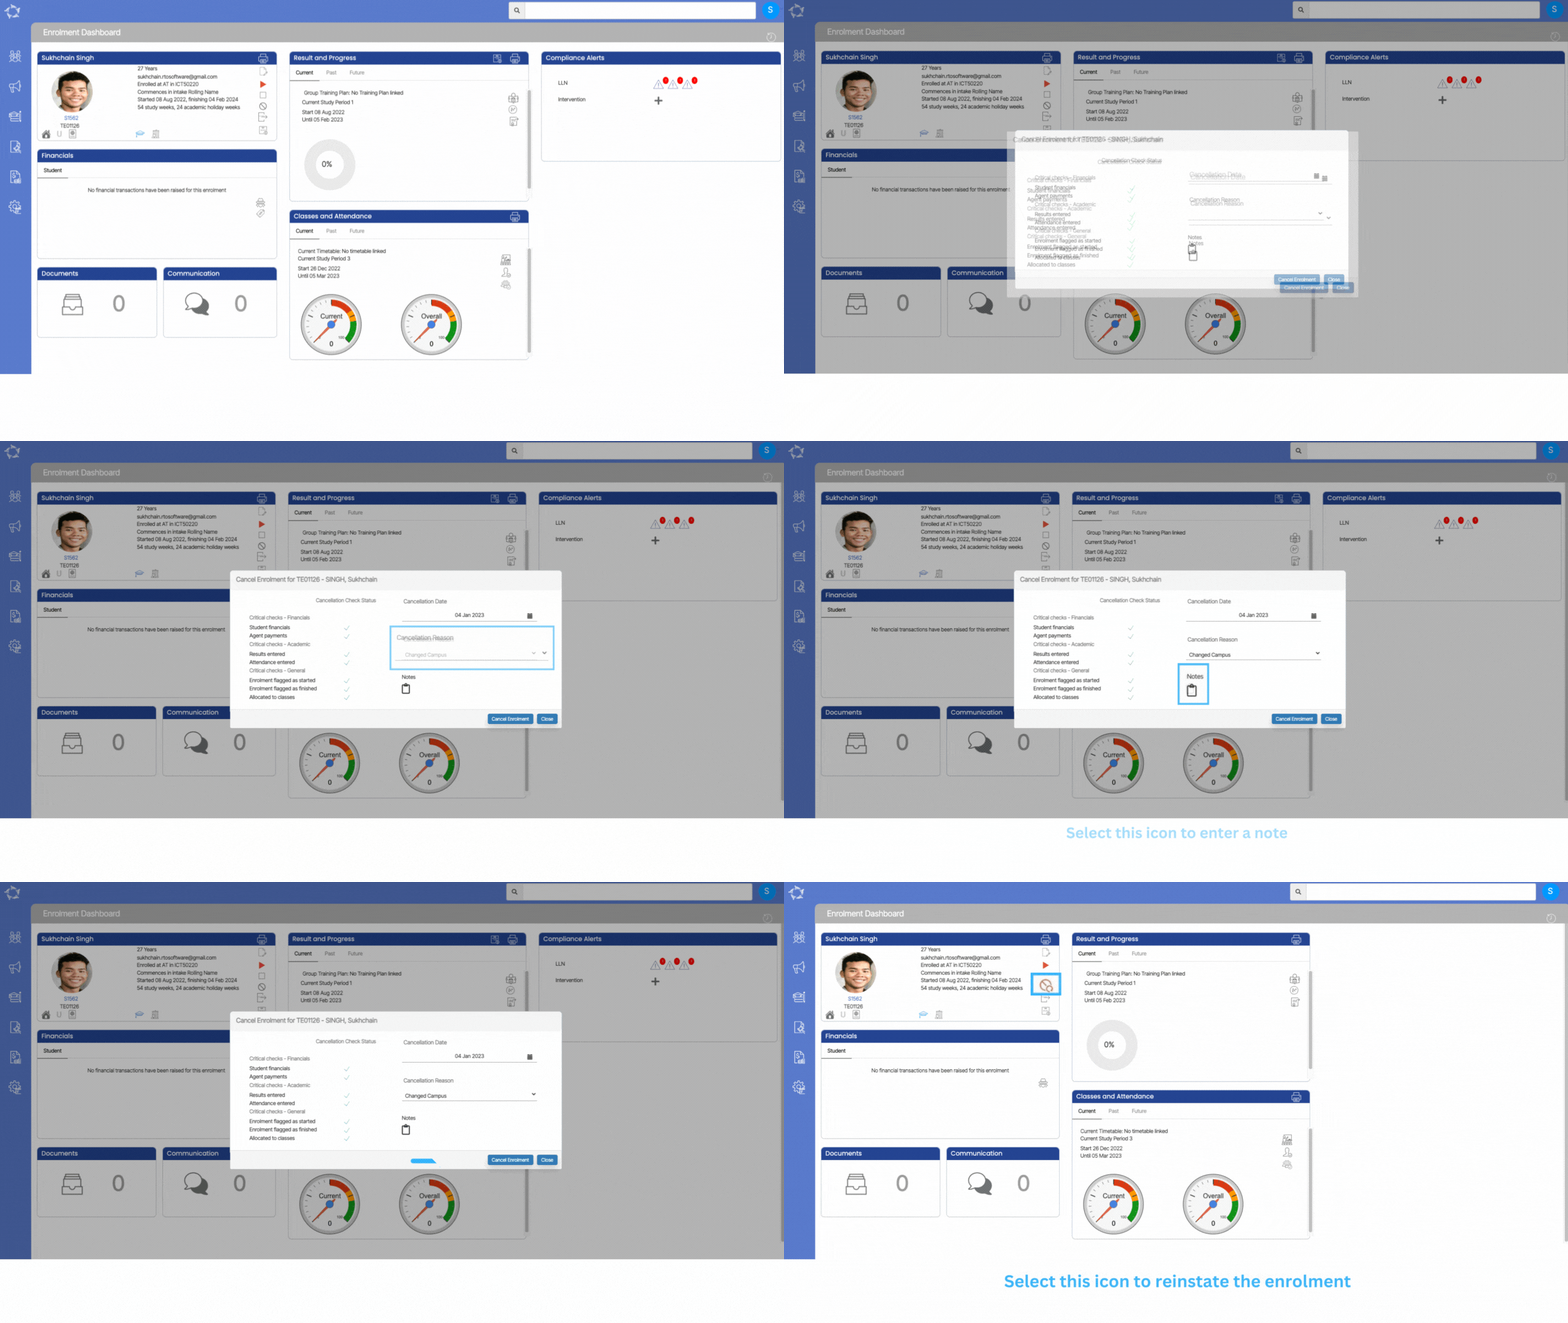
How and when to Cancel an Enrolment?

Enrolment Dashboard > Enrolment Profile Tile > Cancel Icon

history of changes

When you select the Cancel icon, a popup will show on the screen. This popup will show you the list of all the critical checks that the system will go through before cancelling any enrolment. If all the critical checks have a green tick in front of them, that means that you are eligible to cancel the enrolment. But, if the check status shows the red cross instead of a green tick then it means that you have to fix it and then only you will be allowed to cancel the enrolment

When all checks result in a green tick then you can cancel the enrolment. Just enter the Cancellation Date, Cancellation Reason and Note.

IMPORTANT: There are some checks you can fix before cancelling if those results in a fail. For example, Enrolment flagged as started or Enrolment flagged as finished. One can easily unstart or unfinish the enrolment from Enrolment Dashboard and then you can cancel the enrolment. By cancelling enrolment, the system will also cancel all the invoices which do not have any transactions related to them. The compliance tile will be hidden after cancelling an enrolment. Also, you will not see any action button on any of the tiles.

Starters Report Data Columns

Below is the list of data columns which will get printed in the report.

ColumnsExplanation
Student NoStudent Number generated by TEAMS
Enrolment NoEnrolment Number generated by TEAMS
Application NoApplication Number generated by TEAMS
Student NameStudent (First name)(Middle name)(Last name)
GenderStudent’s gender selected at the Applicant/Student levels
DOBStudent’s date of birth selected at the Applicant/Student levels
CampusThis will show the number of enrolments linked with the campuses
CRICOS CodeCRICOS code of the Program updated on the Program Entry screen
Program NameThe system will print the name of the program saved on the Program entry screen
Enrolment TypeThe system will print the enrolment type updated on the Edit enrolment details screen
Start DateStart Date of the enrolments
End DateEnd Date of the enrolments
Duration WeeksThis is the total weeks of the enrolment which includes total study weeks, and total academic holiday weeks.
For example, if the enrolment has study weeks = 40 and academic holiday weeks = 12 then the total duration will be 40+12=52 weeks
StartedThis is the status of the enrolment, if it is started then it will show Yes
Agent NameThis system will show the agent name which is selected at the application or enrolment level
CountryCountry of the student
Account ManagerIt will show the Account Manager selected at the Application or Enrolment level
TimetableThe system will show the timetable allocated to the enrolment
Currently OwingThis is the overdue amount till the present date
Total OwingIt is the difference of total invoiced and total receipted 
Visa TypeIt will show the Visa type selected at the Student and Enrolment level
CoE NoThis will show you the COE number updated at the Enrolment Dashboard > Enrolment profile tile
NationalityNationality of the Student updated at the Applicant or Student levels
ClassesThe system will show the classes linked to enrolments
Future ProgramFuture enrolment of the student 
Previous ProgramHistorical enrolment of the student
Enrolment OutcomeOutcome of enrolment selected on the Enrolment Dashboard > Edit enrolment details screen
Employer NameEmployer selected at the enrolment level
StageIt will show the commencement status from the Training Plan and Results screen > Qualification Information tile.
NotesProgram Notes
Total OverdueIt is the difference of total amount of pending invoices and total receipted till date
Tuition FeeThis is the total invoiced amount of Tuition fee
Other FeeTotal amount of all other fees invoiced excluding tuition fee
Marketing SourceMarketing source selected at the application level
Level Of StudentIt will populate the user code you selected at the student level on the student entry screen.
VSNThis is the VSN number selected at the student entry screen
VSN EligibleStudent level at student entry screen.
AVETMISS StateAVETMISS state is the State Training Authority selected at the Enrolment level > enrolment AVETMISS settings screen
Group Training PlanSelected at the enrolment level > Training Plan and Results screen > Training Plan and Academic Template tile
Overseas StudentIf the student is selected as overseas on the student entry screen then it will show Yes
Special NeedsThis is a tick box at the student level on the student entry screen.
Special Needs NotesIt will populate the Notes updated for the Special needs on the Student Entry screen
EmailStudent’s email address updated on the Edit Student Details screen
MobileStudent’s mobile number updated on the Edit Student Details screen
PhoneStudent’s phone number updated on the Edit Student Details screen
International PhoneStudent’s international phone number updated on the Student Dashboard > Overseas screen
Passport NoStudent’s Passport Number updated on the Student Dashboard > Overseas screen
USIStudent’s USI number updated on the Student Dashboard > USI screen
Student Payment No
AVETMISSIt will show Yes, if the AVETMISS tick box is selected at the student level on edit student details screen.
No of Successful ResultsThis is the total count of successful subjects
No of Unsuccessful/Not Yet Achieved ResultsThis is the total count of unsuccessful subjects
Total Subjects EnrolledThis is the total number of the subjects linked to enrolment
Program CodeThis is a Program code saved on the Program Entry Screen
USI VerifiedThis is the status of USI, if it is verified will populate as Yes and if is not verified will populates as No
Student First NameStudent’s First name updated at the Applicant/Student levels
Student Last NameStudent’s Last name updated at the Applicant/Student levels
Student Email Address 2Student’s Secondary email address updated at the Applicant/Student levels
Student Email Address 3Student’s Additional email address updated at the Applicant/Student levels
Student TypeThis is the student type (New Student and Returning Student) selected at the Enrolment level
Orientation RequiredIt will show the Orientation date updated at the enrolment level
Upsell or ExtensionThis will show Yes if the tick box is selected or No if the tick box is not selected
Internal Package TypeThis is a user code in TEAMS and you can let us know your Internal Package type and we will get it updated on your TEAMS site
External Package TypeThis is a user code in TEAMS and you can let us know your External Package type and we will get it updated on your TEAMS site
External Start DateThis relates to the external package type. Once you have selected the external package, the system will ask for the external start date.