This screen will allow you to edit invoices and you can (change invoice date, and due date, fee amount, study periods and recalculate the number of invoices.
Note – DO NOT close your browser while you are walking through the steps of this process, as you will lose what you have entered. When you select the NEXT button in each step of this process the system does not save what you have done to the database. It allows you to go back in the process to change what you have selected, however, it is not until the final step where you select the FINISH button that the system will fully save everything to the database for you.
IMPORTANT – If you want to change the number of invoices then you need to add the desired number in the box and then select the Recalculate button, the system will recalculate the invoices into the desired number.
For example, as you can see below, the No. of invoices was 4 and there were 4 invoices generated for the application and then the no. of invoices is selected as 5 and the system generated 5 invoices accordingly.
IMPORTANT – If you have selected any instalment plan while the fee selection process and you wish to edit the number of invoices and recalculate then the instalment plan will be ignored and new invoices will be created. New dates and amounts will be distributed proportionally and the initial instalment plan will be lost.
Once you are happy with the above requirements, you can then make changes to the fee amount, can add the deposit due, and select the number of study periods including their SD and ED which will show you the initial total and current total on right hand side of the screen. You then need to select the Next button complete the application process.
This screen will allow you to select the fees for the application including (Tuition Fee, Application Fee, Material Fee, etc.) The first section of the screen will show you the basic information about the applicant, and then you select the drag down button to expand, which will show you the fee section.
NOTE – DO NOT close your browser while you are walking through the steps of this process, as you will lose what you have entered. When you select the NEXT button in each step of this process the system does not save what you have done to the database. It allows you to go back in the process to change what you have selected, however, it is not until the final step where you select the FINISH button that the system will fully save everything to the database for you.
IMPORTANT – if you have set up the Tuition fee and any other fees in the system, then only you will be able to see and select the fees from the dropdown.
Also, if you have selected the agent’s commission for the tuition fee of the program, then the Pay Commission tick box will be automatically ticked while selecting the tuition fee otherwise and if it is not selected at the fee level then you can select the Pay commission tick box for the tuition fee.
Once you have selected the required fees for the application you need to select the Next button to complete the further actions.
Note – When selecting the Rate Based Tuition fee and inputting the quantity on the New Application Fee Selection Screen, selecting the next button will show you the Amount column, and Quantity column. You can easily view the amount based on the quantity you have selected for the rate based tuition fee.
This screen allows you to choose the programs for the application and you can select multiple programs for the application as shown below:
Note – DO NOT close your browser while you are walking through the steps of this process, as you will lose what you have entered. When you select the NEXT button in each step of this process the system does not save what you have done to the database. It allows you to go back in the process to change what you have selected, however, it is not until the final step where you select the FINISH button that the system will fully save everything to the database for you.
When you select the Add button it will show you the total number of Programs in the New Application – Programs selected for the application grid. The tiles will show you basic information about the program. If you wish to make the changes in the selected programs then you can select the edit icon from the program tile or you can delete the program by selecting the delete icon.
Once you are happy with what you have selected for the application, you then need to select the Next button for further actions to complete the application.
Explanation of Fields :
Fields
Explanation
Application Types
This is a user code and you can create any application type as you required.
Select the Campus that you wish to use for this application
If you have multiple campuses then this dropdown will show you all the campuses where you can select a specific campus for the application.
Select the Program that you wish to use for this application
It will show you the list of Programs linked to the campus selected.
Program Notes
You can add the Program notes
Select the Intakes for this program
This will show you the intakes that are linked to the program.
Start Date for this Application
If you have selected the intake then the system will populate the start date for the application and if you are using the rolling intake then you select the date from the calendar icon for your rolling intake.
Study Weeks
This will show the total study weeks of the application.
Holiday Weeks
Total holiday weeks.
End Date for this Application
The system will populate the end date for the application when the Program and Intake get selected.
Agent Commission Template
This will show you the agent’s commission for the selected agent in the first step of the application.
Populate subject dates using
This dropdown will show you the fields that how you want to show the subject dates for this application.
Batch
Type of student
New Student or Returning Student
Was this an Upsell or Extension?
Select the tick box
Does this Enrolment require Orientation?
Once you select the tick box, it will show you induction/Orientation field to select the date.
This listing screen is comprised of two parts. The top part shows us a list of fields that we can use to filter the list. The bottom part is a list of all the continuing/current students. Continuing students are those that are not starting or finishing in the date range and program selected from the Continuing tile.
For example: on the Continuing tile if you select from the calendar option This Month, it will show you a list of all the students who have an enrolment where the enrolment start and end dates are not within This Month. The system considers these enrolments to be Continuing, as they are continuing to study within this month.
When you select This Month, the system looks at today’s date and what month it is to then use as the month to find enrolments.
How to get a total number of students in the college for the month?
If you want to get an actual total number of students in your college for the month, you would set the calendar option in the Continuing tile as well as in the Starters and Finishers tiles to the option for This Month. If you then look at the totals for all three tiles and add them together, that will then be the total of all your students expected to be in your college for the month. If you wanted it for let’s say next month, chose the same calendar option in all three tiles for Next Month and do the sum of the totals in the same way.
IMPORTANT: as part of getting your total number of students for This Month or Next Month and so on, you need to take care of the Starters and Finishers tiles with which number to use in the sum as mentioned above. The Starters and Finishers tiles show two numbers such as 12/15. This means that there are 15 starters or finishers and of this, only 12 have been set as started/finished in the system. To make sure you get an accurate number for how many students are in your college this month, you must use the left hand side number to sum up, such as 12, not the right hand side number of 15.
Filters/Parameters section:
To open this screen, you would have selected the link for a specific program code or at the bottom of the Continuing tile you would have selected the link for the total number count. Based on what you selected the system will open the screen and populate the information in this section. For example, it will show you the start and end dates that were used in the tile as well as the campus/s and program/s that were displayed or selected in the tile.
For an explanation of each filter and how the system will use it, please click here for more information.
Continuing Listing
Each continuing student and their enrolment details are shown in this list.
There are a few columns in this grid that do need some explanation, those columns are as follows:
Previous/Future Program Column
This allows you to see, for each student in the grid, if they have a future enrolment to commence after the current one or if prior to their current enrolment had they completed a previous one with you. If it is a previous enrolment you will see that program code to the left of the / and if it is a future enrolment you will see the program code to the right of the /. Where the student has no previous or future enrolments, only the current enrolment, then you would only see the / in the column for that student.
Successful Results and Total Subject/UoS column
This gives you a count of the total Subjects or UoS linked to the enrolment and how many have a successful result. The total count linked to the enrolment is on the right hand side of the / in the column and the total successful result count is on the left of it.
The system uses the following rules to give you the counts in this Tile.
Rules
1. Look for any enrolment that is continuing enrolment within the calendar date option selected.
2. Do not count any enrolment that has been flagged as cancelled. This means you should see the word Cancelled in red against the enrolment NOT that the Enrolment Outcome is set to Cancelled only.
3. Look at programs set to inactive and see if any enrolment in the program is continuing enrolment within the calendar date option and if yes count them and display them.
IMPORTANT -Staying informed about the latest developments in our software is vital for optimising your experience and maximising the benefits of using our system. To view the latest updates and modifications on the Starters Tile and Starters Listing Screen, click on the History icon , to the right of the breadcrumbs. To see the rules for the Starters Tile and to gain access to a detailed log of all the recent changes made to the screens, click on the Rules icon .
IMPORTANT: The system will recognize that a student has commenced their studies only when you mark their enrollment with the Started flag.
Understanding the Tile
To the right of the Program code . you will see two numbers with a “/” separator . The two numbers mean the following:
On the left – Number of student enrolments marked as “started”. On the right – Total number of students who were supposed to start within the selected date range.
Where the two numbers do not match, their difference is the number of student enrolments who did not start. Using the example image for the program below, we can see that 72 (145-73) students did not start. This means that only 73 students out of 145 have been marked as “started”.
IMPORTANT: These numbers may not be accurate due to failure of the staff in flagging an enrolment as “started”. Make sure to update your student’s enrollment status so that the system can give you accurate counts.
Note
Do not count any enrolment that has been flagged as “Cancelled”.
If there is any enrolment within the selected date range for a program marked “inactive”, it will not be displayed in the tile.
Upon clicking on the count of started students against each program code, you will be redirected to the Starters Listing Screen for that particular program.
To download a CSV file of all the programs and their data, click on the CSV icon at the bottom of the tile.
We have added a new column under the Attendance screen in the bottom grid for Visa Type. It will reflect the student’s visa-type information, where it has been entered.
We have added a new check in the application process on the New program – Choose Programs screen where the system will not allow you to add the program to the application if the program’s start date and end date are selected is more than five years.
Also, when you are on the Enrolment Dashboard – Edit Enrolment Screen, you will not be allowed to edit the enrolment dates for more than five years.
IMPORTANT: If Program/s is selected as VET on the program entry screen > settings tab or the subject type for the subject/s is selected as Unit of Competency (UoC) – Nationally Accredited then you are not allowed to add the application dates of more than 5 years. BUT, if the User Choice Tick box is selected on the Program entry screen for them then you will be allowed to add the application dates of more than five years.
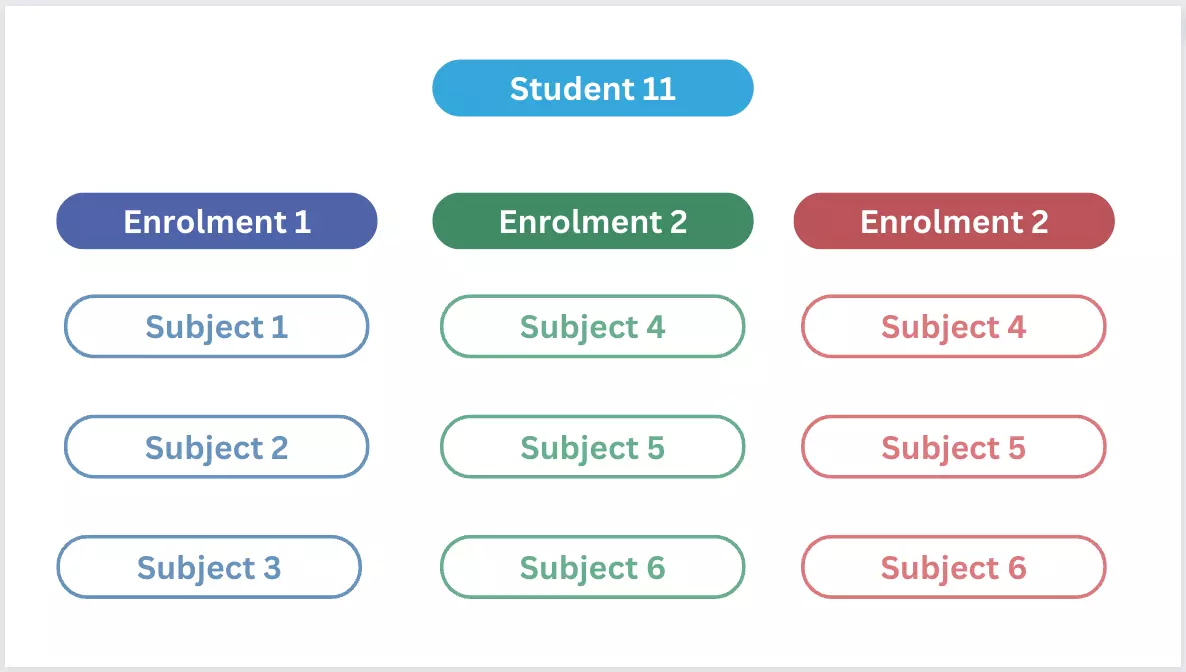
As you all know, students can have multiple enrolments with multiple subjects in the system. However, you may not be aware that for each subject linked to an enrolment you can also have Assessments and mark results at that level instead. This new rule impacts anyone using assessments in the system.
Using the student and enrolment examples above there are two scenarios that will help to explain how the new check works.
Scenario 1
As you can see in the above image, Subject 1 has three assessments and their results have been marked as Successful with result dates for each assessment result. Based on the last assessment result you enter and its result date, the system will take that assessment result date and at the Subject level automatically update the Subject result to Competent and it uses the last assessment result date as the Subject result date. In the example above, you can see that for Assessment 3 its result date has been marked as 02/08/2022 and the system has updated Subject 1 with the final result of Competent and the result date as 02/08/2022.
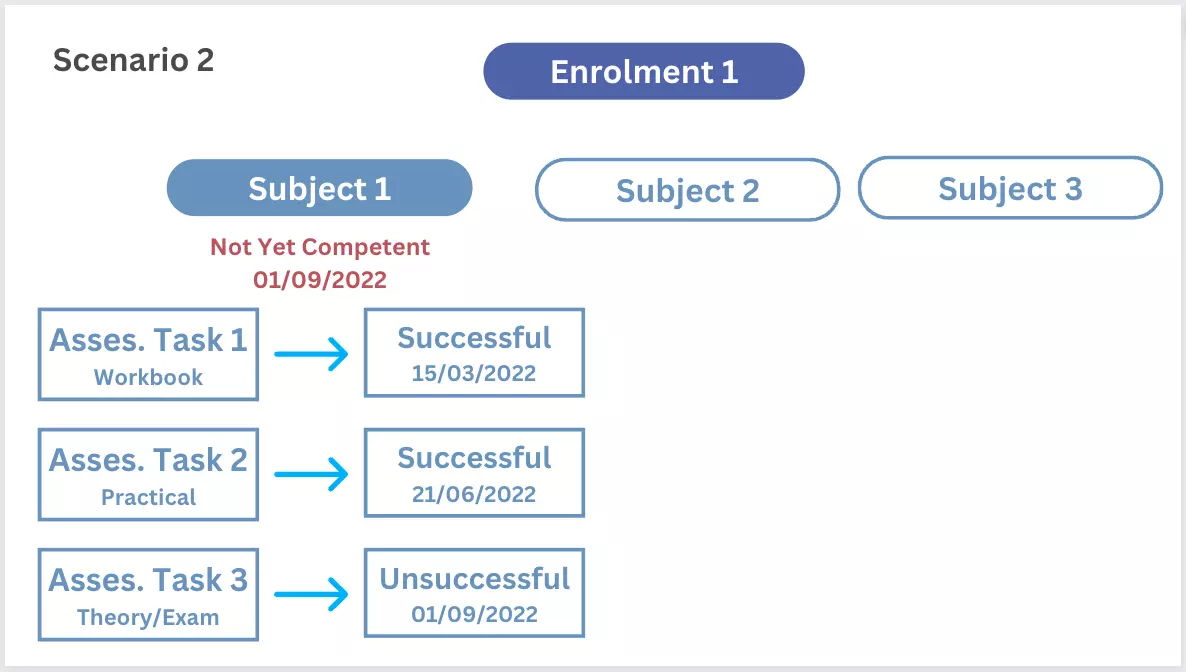
Scenario 2
Another scenario for the same could be that one of the assessments has a result of Unsuccessful, as you can see with Assessment 3 above. Based on all assessment having a result the system has then update Subject 1 with a result of Not Yet Competent and again used the Assessment 3 result date of the 01/09/2022 as the Subject result date.
New Check Explanation
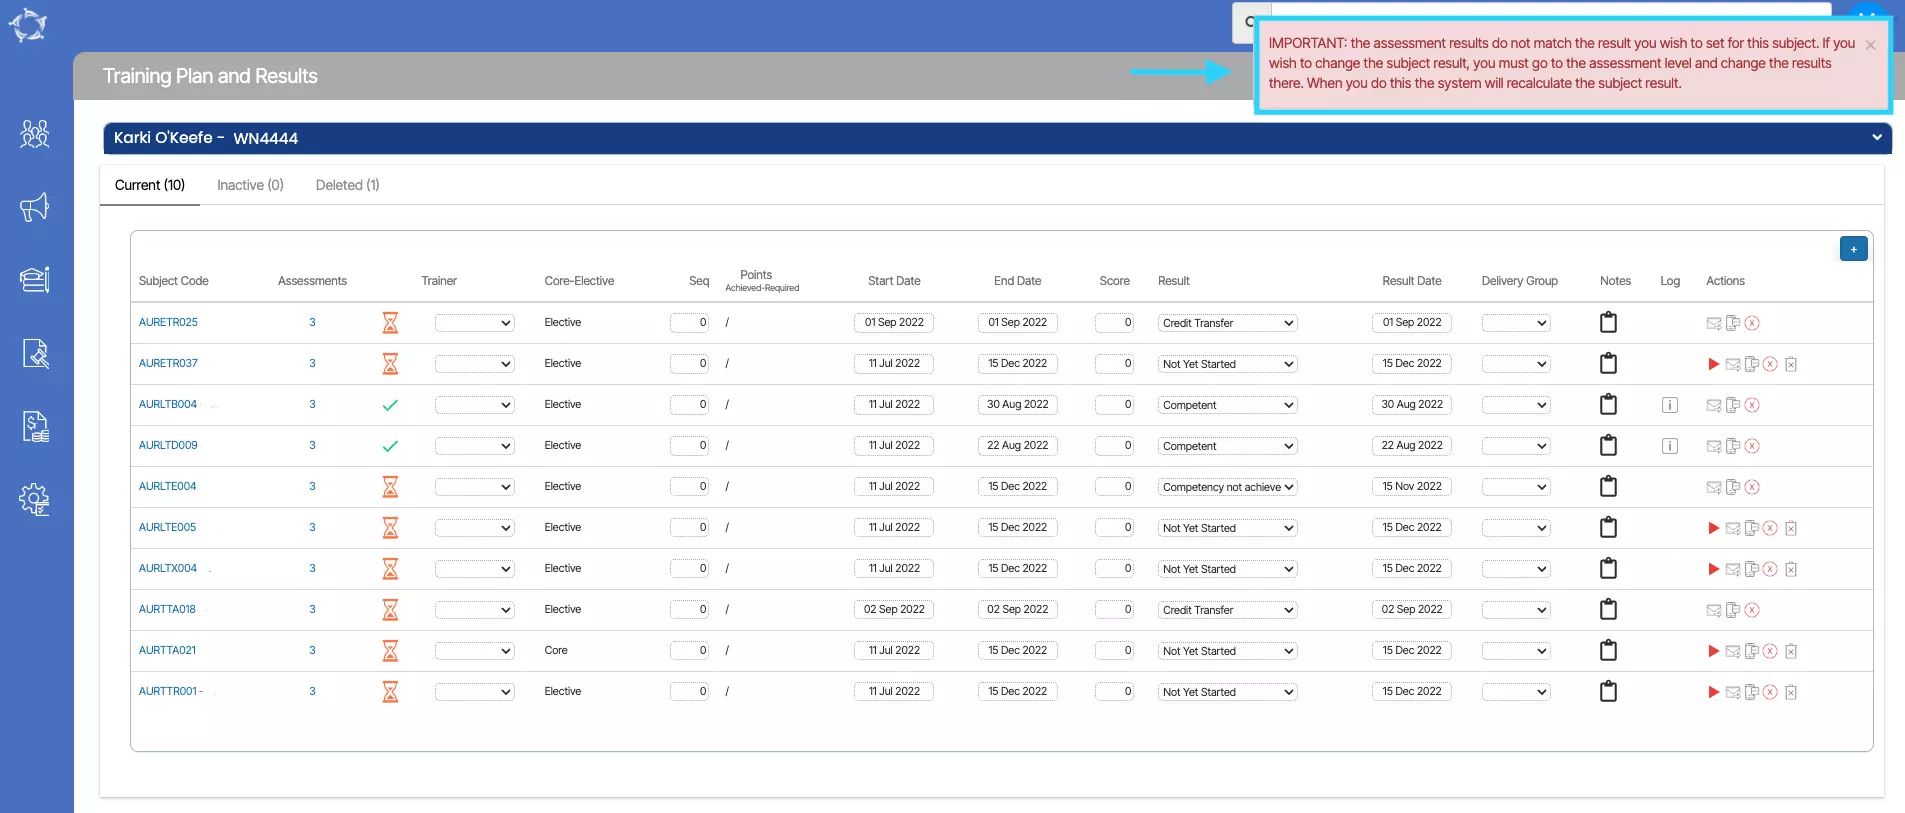
Using either of the above scenarios, it doesn’t matter what the final result is (successful or unsuccessful) if a user goes to the Subject level and tries to change the result so that it clashes with the assessment level results it will stop you from changing the Subject Result.
For example, using Scenario 1 above, if a user went to the Training Plan & Results screen and tried to change the Subject 1 result from Competent to Not Yet Competent or any other result the system would stop you and you would see this message below:
To change the Subject Result you must go to the Enrolment Assessment Results screen and change the relevant assessment result and save and then the system will re-calculate and update the correct result against the Subject.