Certificate Report Enhancement

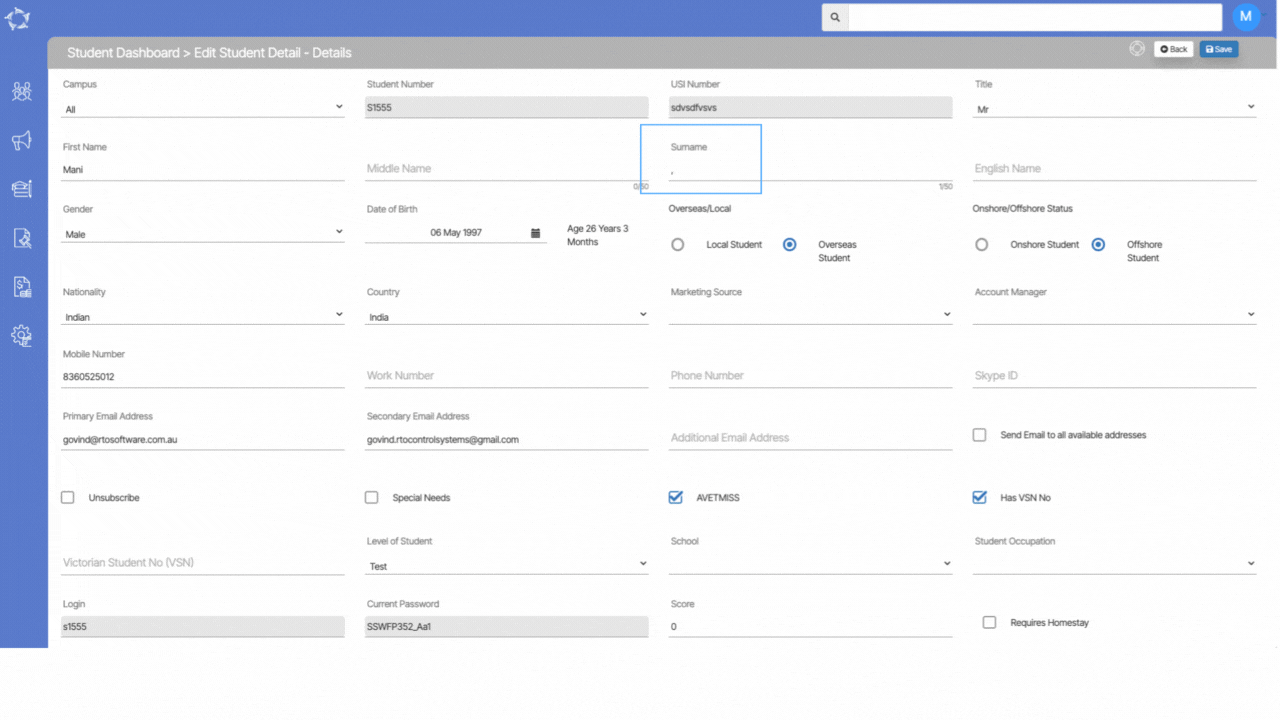
We have implemented notable enhancements in the certificate reporting process, particularly pertaining to the handling of names within the merge fields.

In the first scenario, where a student’s last name is a mandatory field and if a student’s record lacks a last name and incorporates special characters like commas or periods within the last name field, the newly improved system ensures that the generated certificate will solely display the student’s first name. Special characters in the last name are omitted from the certificate, contributing to a cleaner and more accurate representation.

In the second instance, when a special character is not utilised within the last name field, yet the student’s first name is duplicated as the last name, the system’s upgraded functionality comes into play. Upon generating the certificate, only the student’s first name is printed, eliminating redundancy in the data presented. These enhancements collectively enhance the precision and professionalism of the certificate reports, offering streamlined and error-free documentation of student achievements.

What’s New – 10th August 2023

Welcome to the latest update for TEAMS

Some key changes made in this update are:

  • New Current Student by Nationality Forecast has been added under the Student Management menu
  • New Survey Data Export report has been introduced in TEAMS under the System Admin menu
  • Bulk updates of trainers to enrolments from Continuing and Starters listing screens
  • Main Dashboard now allows you to conveniently track SMS communications right from the Email/SMS tile
  • New Font Size option has been added under the Email Template Entry screen
  • Search students with their Last Name from the Search Bar
  • Student’s Name column changes on the Bulk Class Allocation Step 2

For a full list of what has been done in the system, please see the below list:

Current Student by Nationality Forecast Report

Introducing our latest addition, the Current Student by Nationality Forecast report. This innovative report is designed to provide a comprehensive overview of our student enrolment categorised by nationality.

Survey Data Export

With the Survey Data Export report, you can now efficiently manage and examine the survey data, allowing for deeper insights and informed decision-making.

Listing Screens New Feature – Bulk Update Trainer

We have announced the incorporation of a new feature – the Bulk Update Trainer – into our system. This enhancement empowers you with the capability to efficiently modify or include trainers for multiple student enrollments at once. This can be seamlessly achieved through both the “Continuing” and “Starters” listing screens.

Main Dashboard – Email/SMS Sent Tile New Functionality Enhancement

This means that from now on, you can conveniently monitor both email and SMS communications in one centralised location.

Email Template Screen – New Font Size Option

With this latest enhancement, you can now have greater control and customisation when creating new email templates. When composing an email, you will find the Font Size option, which allows you to adjust the text size according to your specific requirements.

Certificate Report Enhancements

This refinement ensures that the certificate reports are even more accurate and polished, effectively eliminating redundancy and maintaining a high standard of professionalism in the presented information.

Search Bar – Student’s Last Name Enhancement

You can now conveniently find students by simply typing in their last names in the search bar. Even if a student has two last names, our system accommodates this by allowing you to search using either of the last names or both of them combined.

Bulk Class Allocation Step 2 – Student’s Name Column Changes

A significant improvement has been made to the Bulk Class Allocation Step 2 screen. Specifically, we have made changes to the Student’s Name Column to enhance the user experience. Now, when allocating classes in bulk, the student names will be displayed in ascending order.

Our mission is to build software that helps you do things more efficiently. Your input and engagement are vital in helping us improve our service and offerings for your college. We are always open to listening to your feedback.

Any questions, please feel free to reach out to us. We look forward to serving you to the best of our ability.

Please review the changes and if you would like further clarification, please contact our Support team.

A big thank you to so many of you who have been actively participating in helping us bring these new improvements to life.

Next update is due on Thursday, 24th August 2023

Note: Please alert other team members within your college if the changes outlined above affect their role or department.

Thank you for taking the time to read this post.

Current Student by Nationality Forecast Report Data Columns

The below table will explain about the explanation of the columns that will get printed in the report.

Data ColumnsExplanation
Week Starting When you select the date from the calendar on the filters/parameters screen, the system will print 12 week’s date falling on Monday in different columns.
NationalityThis Column will show you the Nationality Name of the students
EnrolmentThis is the total number of enrolments falling in 12 weeks time from the selected date.
PercentThis is the total percentage of the Nationalities for the enrolments shown in the report.
Enrolments/ProposalsWhen you select the Both Percentage And Enrolments radio button from the filters screen, the system will split the enrolments and proposals data in the report.

Current Student by Nationality Forecast Report Filters

Below is the table that will show you the general filter’s explanation.

Filters/ParametersExplanations
Date FromWhen selecting the date from the calendar, it is recommended you select the date that falls on Monday because the system will not pick any other date or day.
Campus NameThe Campus Name dropdown will show you a list of campuses as a check box in the dropdown. You can select your campus by selecting the tick box against the campus name.
Course NameThe Course Name dropdown will show you a list of Courses as a check box in the dropdown. You can select your Course by selecting the tick box against the campus name.
TimetableThis is a magic search field and you can search and select the appropriate timetable linked to the campus and course.
PrintThe print field will give you three radio buttons-: Please note that you can only select one radio button at a time.

All Students – Select this radio button to print the report for all students in the system.
Only Started Students – Select this radio button to print only started students.
Not Yet Started – Select this radio button to print not yet started students.
Include Proposal/EnrolmentsThe Include proposal/enrolments field will give you three radio buttons-: Please note that you can only select one radio button at a time.

Show Enrolments – You can select this radio button to see only enrolments in the report.
Show Proposals – Select this radio button to print only Proposals in the report.
Both Proposal And Enrolments – Select this radio button to print both proposal and enrolments.
Sort ByYou have the option to sort the report by Nationality, Students and percentages.
Asc/DescFor Asc/Desc, Please see TEAMS Basic.

Current Student by Nationality Forecast Report

We have recently implemented a new report in our system called “Current Student by Nationality Forecast.” This report provides comprehensive insights into the enrollment statistics of our students based on their nationalities. It offers both the total number of enrollments and the corresponding percentage breakdown for each nationality category.

IMPORTANT – It’s important to keep in mind that when generating this report, it’s advisable to choose a date that falls on a Monday. This selection is crucial, as the system restricts the option to select any other day from the calendar. Additionally, the generated report will cover a span of 12 weeks starting from the chosen date on the calendar.

Please select the below links that will explain the filters and columns for the report.

Current Student by Nationality Forecast Report Filters

Current Student by Nationality Forecast Report Data Columns

Listing Screens New Feature – Bulk Update Trainer

10 Aug 2023

We are excited to announce the latest addition to our software – the Update Trainer in bulk feature, now available on both the Continuing Listing Screen and the Starters Listing Screen. To access this feature, simply navigate to the Burger Menu located on the respective screens. With this new functionality, managing multiple enrolments is easier than ever before.

To update trainers for multiple enrolments simultaneously, begin by selecting the tick boxes next to the student numbers from the grid. After making your selections, click on the Update Trainer option from the burger menu. A convenient pop-up window will appear, displaying the selected enrolment numbers alongside a dropdown menu of available trainers. you can choose the desired trainer from the dropdown list according to your specific requirements. Once you have made your selection, hit the Update button to confirm the changes. The system will then automatically refresh the screen, seamlessly taking you back to the respective listing screen.

NOTE – Once you have successfully updated the trainer in bulk using our convenient feature, the system takes care of automatically updating the changes across all relevant screens. This includes the Edit Enrolment Details screen, where you can find the updated trainer information for each enrolment. Additionally, the Training Plan and Results screen will also reflect the latest trainer assignments, ensuring accurate and up-to-date records.

IMPORTANT – Let’s explore the three different scenarios of how the Update Trainer in bulk feature operates:

Scenario 1, when there is no trainer currently linked to the enrolments, and you proceed to update the trainer in bulk for those specific enrolments, the system acts swiftly and efficiently. It simultaneously updates all the selected enrolments with the newly assigned trainer, ensuring seamless integration and accurate records.

Scenario 2 involves enrolments that already have a trainer linked, visible on both the Edit Enrolment Detail and Training Plan & Results screens. In this case, when attempting to update the trainer for these enrolments in bulk, the system identifies that no changes are necessary. As a result, it retains the existing trainer assignments and does not update anything on the selected enrolments.

Scenario 3, suppose the trainer is already associated with the enrolment and appears on the Training Plan and Results screen for certain subjects. If you choose to update the trainer for this enrolment in bulk, the system intelligently updates only those subjects where the trainer was not previously linked.

New Feature – Main Dashboard – Email/SMS Sent Tile

In our previous update, we introduced version 1 of the Email Sent tile on the Main Dashboard. Now, we have introduced a significant enhancement by including SMS Sent data alongside the Email Sent information.

The main dashboard now features a consolidated tile – Email/SMS Sent, providing you with a more comprehensive overview of your communication activities. The tile displays the number of Emails and SMS messages sent, making it easier for you to track your outreach efforts in one centralised location.

To access the SMS Sent listing screen, click on the number within the SMS Sent section of the tile. This listing screen offers a detailed and comprehensive list of all the emails and SMS sent to various recipients. You can easily access essential information, like the Message Date, Recipient Type, Template Name, and the respective sender Username.

One of the key enhancements is that you now have the ability to view the content of the sent SMS messages directly from the listing screen. By clicking on the View icon under the actions column, you can preview the SMS content conveniently.

Email Template Screen – New Font Size Option

We are pleased to announce that a new font size option has been implemented on the Email Template Screen. With this latest enhancement, you now have the ability to adjust your font size seamlessly, allowing you to switch between smaller and bigger font sizes effortlessly.

This new feature offers increased flexibility and customisation for your email templates, ensuring that you can tailor your messages to suit your preferences and needs. Whether you prefer a more compact font or a larger, more prominent one, the choice is now yours.

Survey Data Export

Main Dashboard > System Admin Menu > Survey Data Export

A survey export report contains the results and responses collected from a survey. When you conduct a survey, whether it’s through online survey platforms, the data is typically compiled and can be exported into a more manageable and analysable format.

How to generate survey data Export in TEAMS?

Firstly, you need to go to Main Dashboard > System Admin Menu > Survey Data Export. When you select the Survey Data Export sub menu, the system will take you to the filters /parameters screen. from this screen, you can select the required filters and generate the survey data export. Please see the below table that will give you the filter’s explanation.

Filters/ParametersExplanation
Survey TypeThe Survey Type is a User Code and one can create them from the user code screen in TEAMS. You can select the Survey Type from the dropdown. For example Enrolment, Employers etc.
SurveyWhen you select the Survey Type, the Survey dropdown will show you the name of the users.
Year of ExportSelect the year from the dropdown as you required.
CampusThis is a multiselect dropdown and if you have multiple campuses, you can select them from the dropdown.
ProgramsThis is a multiselect dropdown and you can select the programs by selecting the tick boxes against them from the dropdown
Email AddressThis field will display your email address
Export ButtonWhen you select this button, you will be taken to the Survey Export log screen. When you are on this screen, you need to select the Click here to Download the file label to download your Survey export.

Payment Due Tile and Payment Due Listing Screen – History

Below are the changes that we have made to the Payment Due Tile and Payment Due Listing Screens