Webform – Edit Applicant/Student

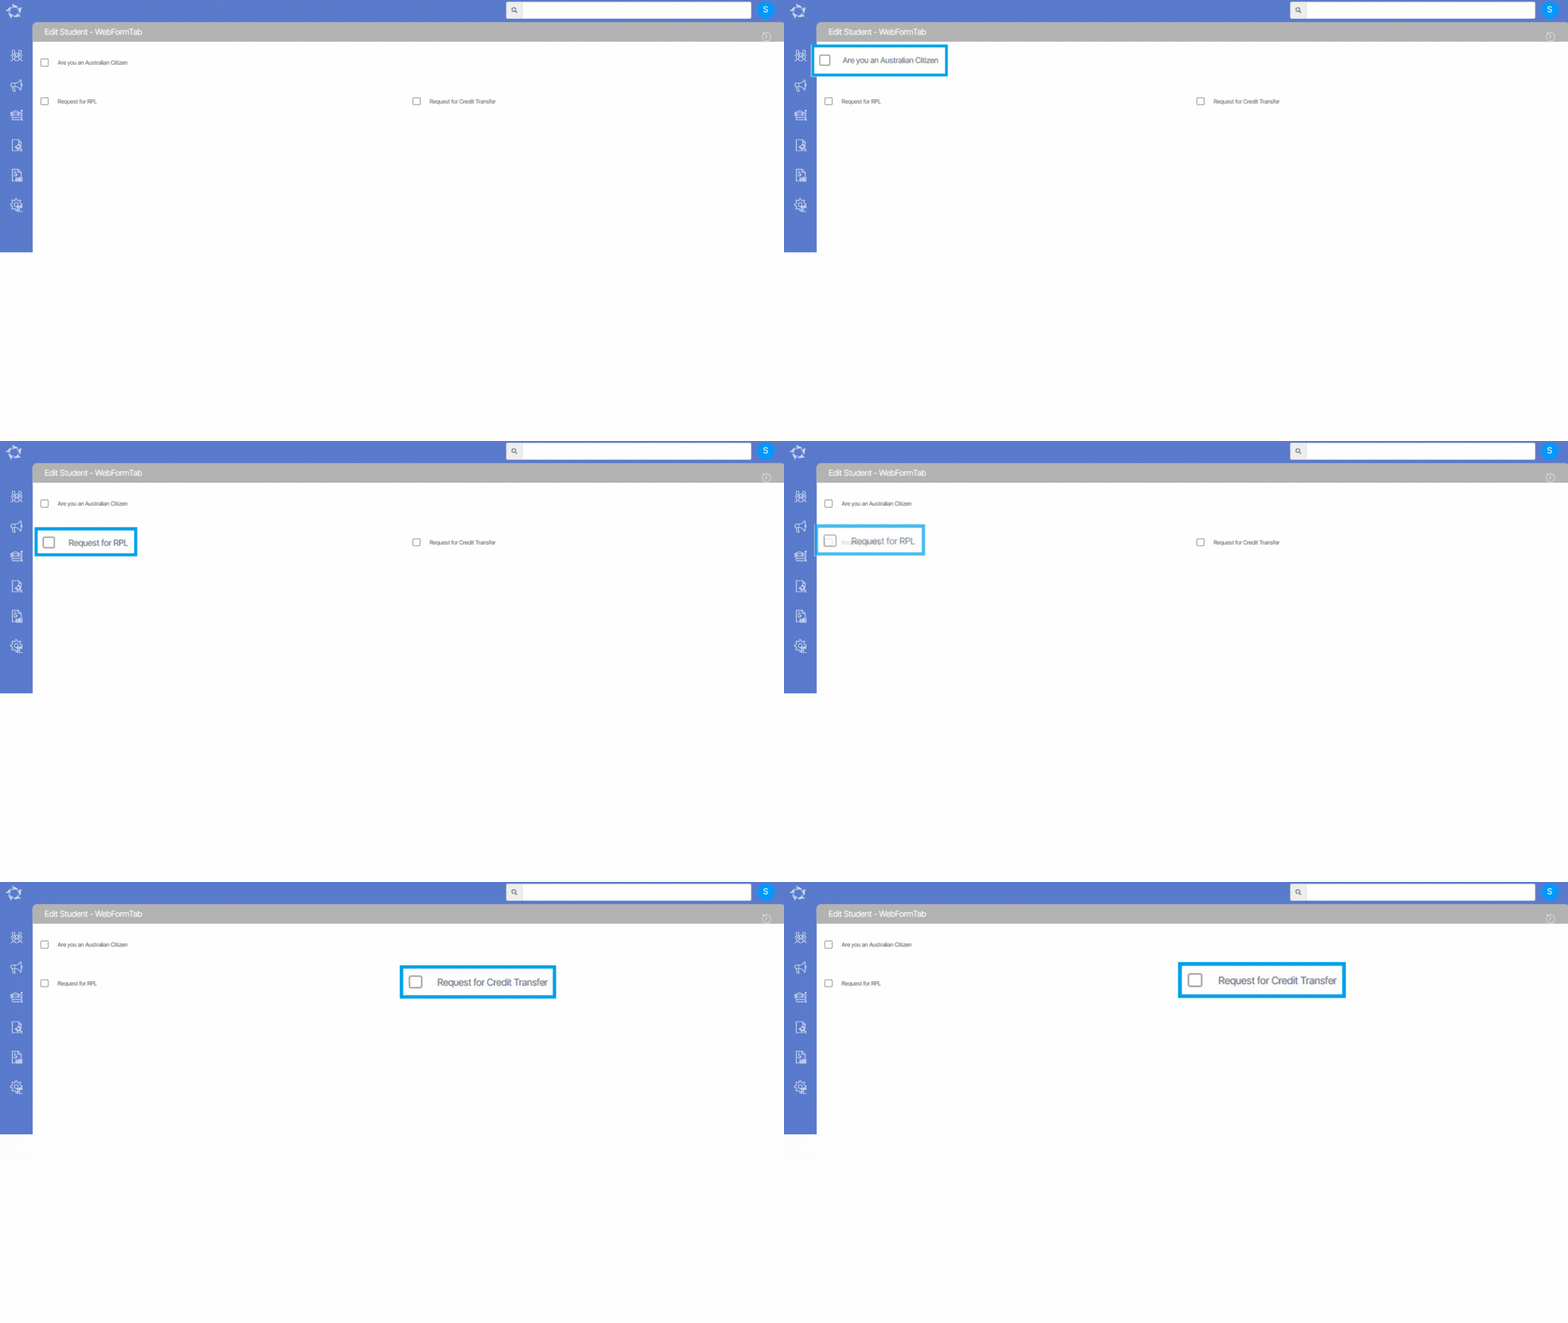
This screen will show you all the fields being displayed in the student web form. If you are using any student webforms on your site, then the icon will show you the summary of all the fields that are selected in the webform on the Applicant and Student profile tiles

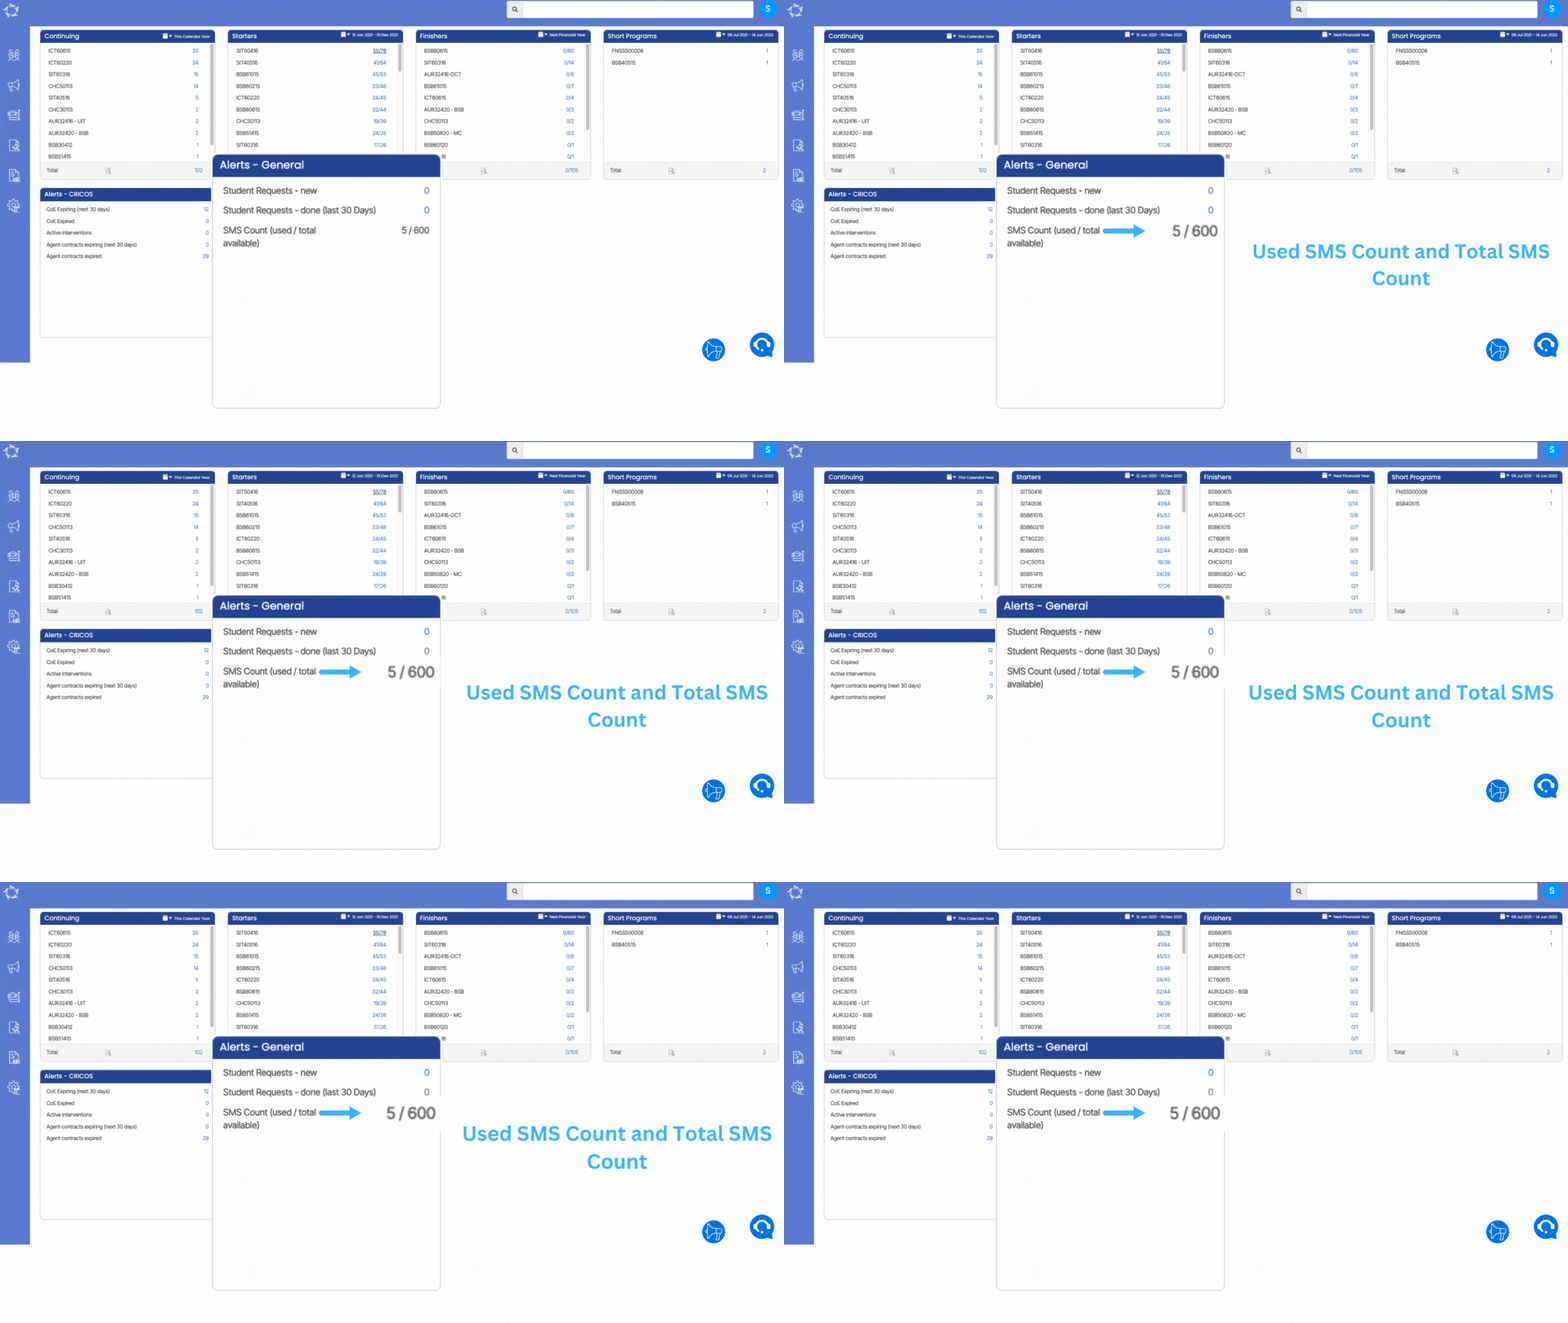
SMS Count

SMS count alert will show you the number of SMSs that have been used by a client. The number on the right side is the total count of SMSs which have been allocated for a month and the number on the left side is the count of SMSs that have been used by the client in a month.

Important : 5 is the count of SMSs that is used by Client. 600 is the total count of SMSs.

Continuing Tile

Dashboard > Continuing Tile

history of changes

IMPORTANT – We believe that staying informed about the latest developments in our software is vital for optimising your experience and maximising the benefits of using our system. To view the latest updates and modifications on the Continuing Tile and Continuing Listing Screen, we kindly request you to navigate to the History icon history of changes showing above in the top right of the breadcrumbs and to see rules for the continuing Tile, please select the Rules icon . By selecting these icons, you will gain access to a detailed log of all the recent changes and rules made to the screens.

Overview

This tile allows you to view the list of continuing students for each program within the selected date range. Continuing Students are those students for whom the enrolment has been started but not finished yet. Also, the selected date range should fall within the enrolment start date and end date.

IMPORTANTThis tile will display the inactive programs too if those inactive programs have data to display. Cancelled enrolments are not included in the count.

How to use

Each program has its own count of students. Each count is a hyperlink that will take you to the Continuing Listing Screen for that specific program.

Also on the bottom end of this tile, a total count of all programs will be displayed which is again a hyperlink that shows you the records of all continuing students for all the programs being displayed on the tile for the selected date range. There we are showing a CSV icon to download CSV file for all the programs and counts being displayed in this tile.

Select here to learn about the Calendar option

New Applicant

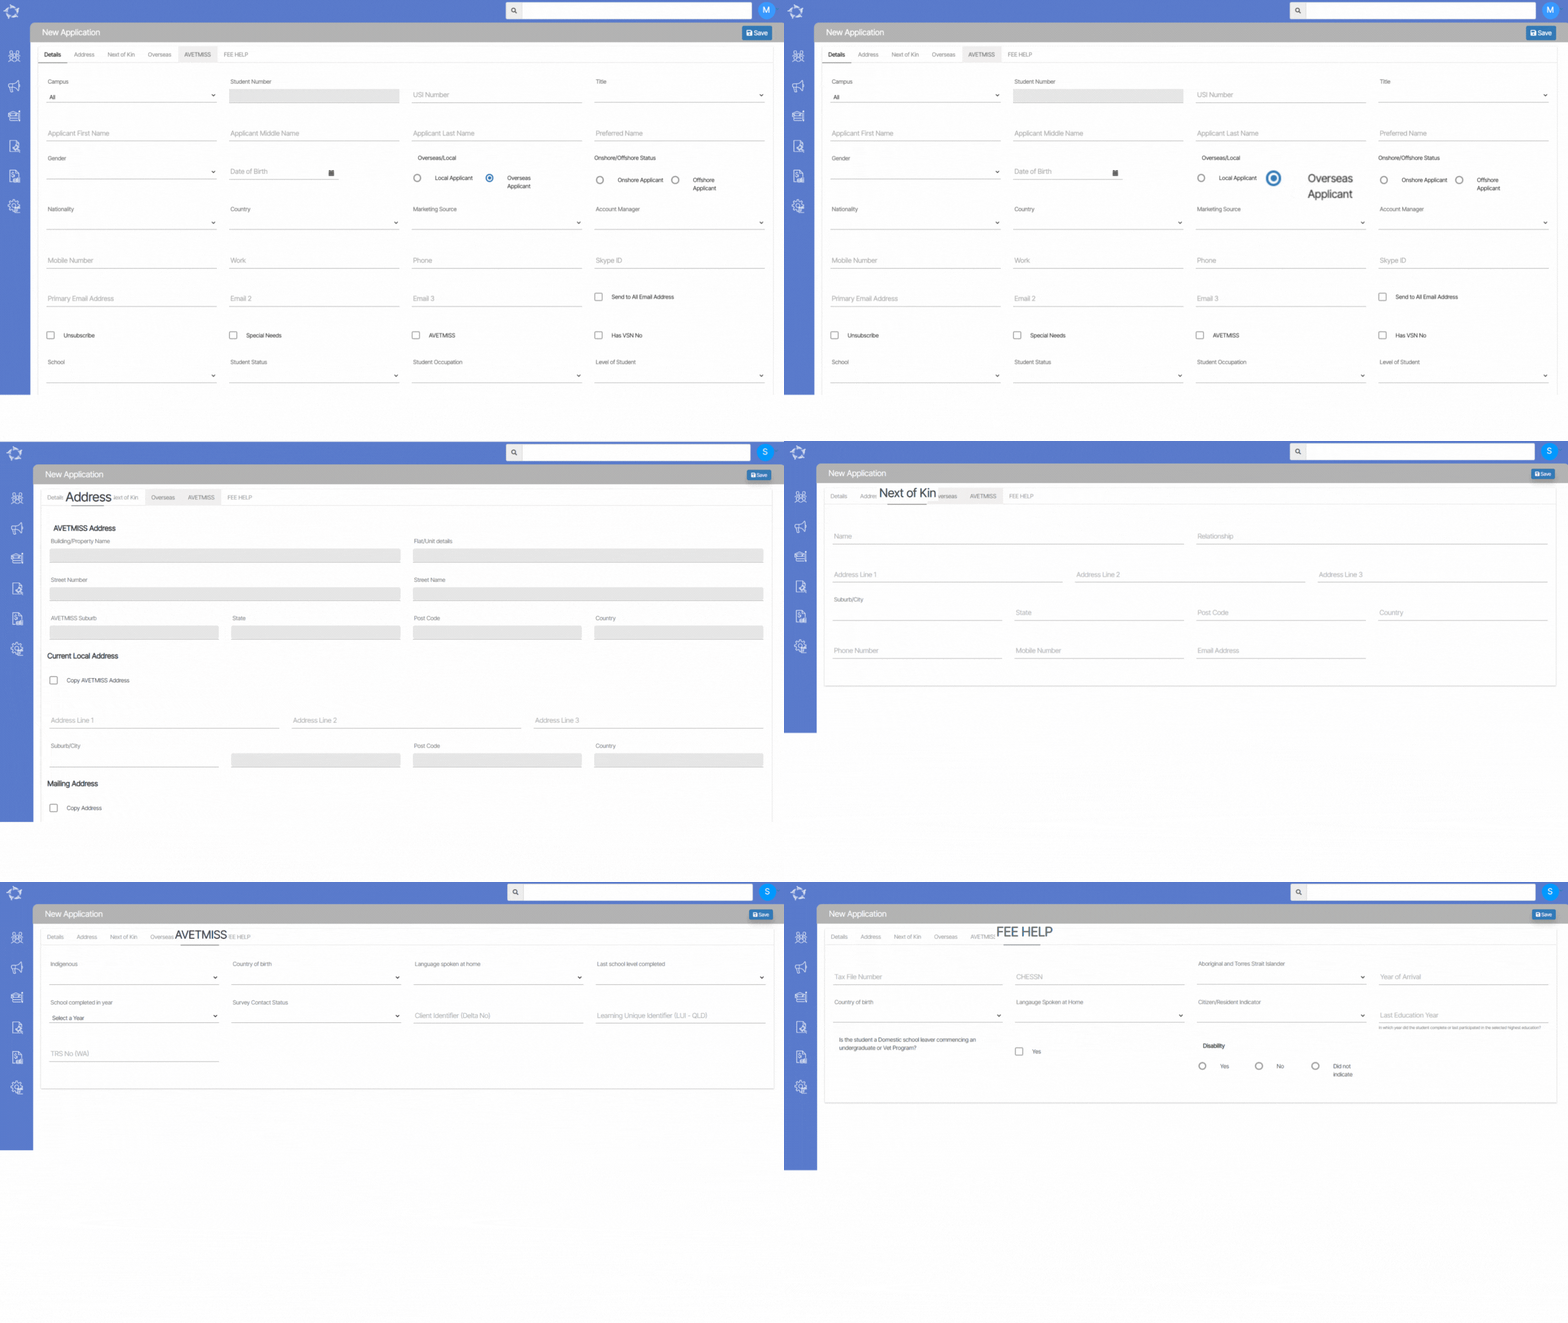
This screen allows you to add a New Applicant to your RTO with their basic details. This screen has different tabs where the system will allow you to add the details accordingly.

Note: The Overseas tab will only be visible if you select the Overseas/Applicant radio button while adding the applicant’s details and the same as you need to select the AVETMISS tick box to see the AVETMISS tab.

Tabs Description
DetailsThis tab will allow you to add basic information for the applicant. Some fields are very basic and self-explanatory, for other important fields in this tab you can read more here.
Address This tab will allow you to add the applicant’s Australian address information. From Local and Mailing addresses to the specific AVETMISS address format for VET students. It is important to note that for a VET student, you should enter the AVETMISS address first then you can select the copy tick box to copy the address to the local and/or mailing address fields. The system cannot copy from the local/mailing address fields to the AVETMISS address fields. For more information on Addresses click here.
Next of Ki This tab will allow you to add information for the student’s Next of Kin. For more information click here.
Overseas You will only be able to add the information under this tab if the applicant is set as an overseas student. To do this you need to select the radio button for Overseas Applicant that is under the field heading of Local/Overseas. When you do this, you also need to then update the student’s Onshore/Offshore Status by selecting a radio button to identify if the student/applicant is Onshore or Offshore. For more information click here.
AVETMISS You need to select the AVETMISS tick box on the details tab to make the AVETMISS tab visible. When you do this, you will be able to add the AVETMISS details for the Applicant.
FEE HELP You can add Fee HELP information for the applicant in this tab.

What’s New – 3rd Nov 2022

In this update, we have released the new Agent Portal. This will allow any of your agents; that you give permissions to, the ability to view information that they would normally email or call you about. They will also be able to create applications in TEAMS and you will be notified. Also, we have introduced a new view icon to allow you to view a password for specific fields in the system. A new filter (tick box) on the Application Listing screen has been added, that will allow you to search based on application dates. And new filters and column heading changes have been made to the bulk results screen. For a full list of what has been added in this release, please see below.

Agent Portal

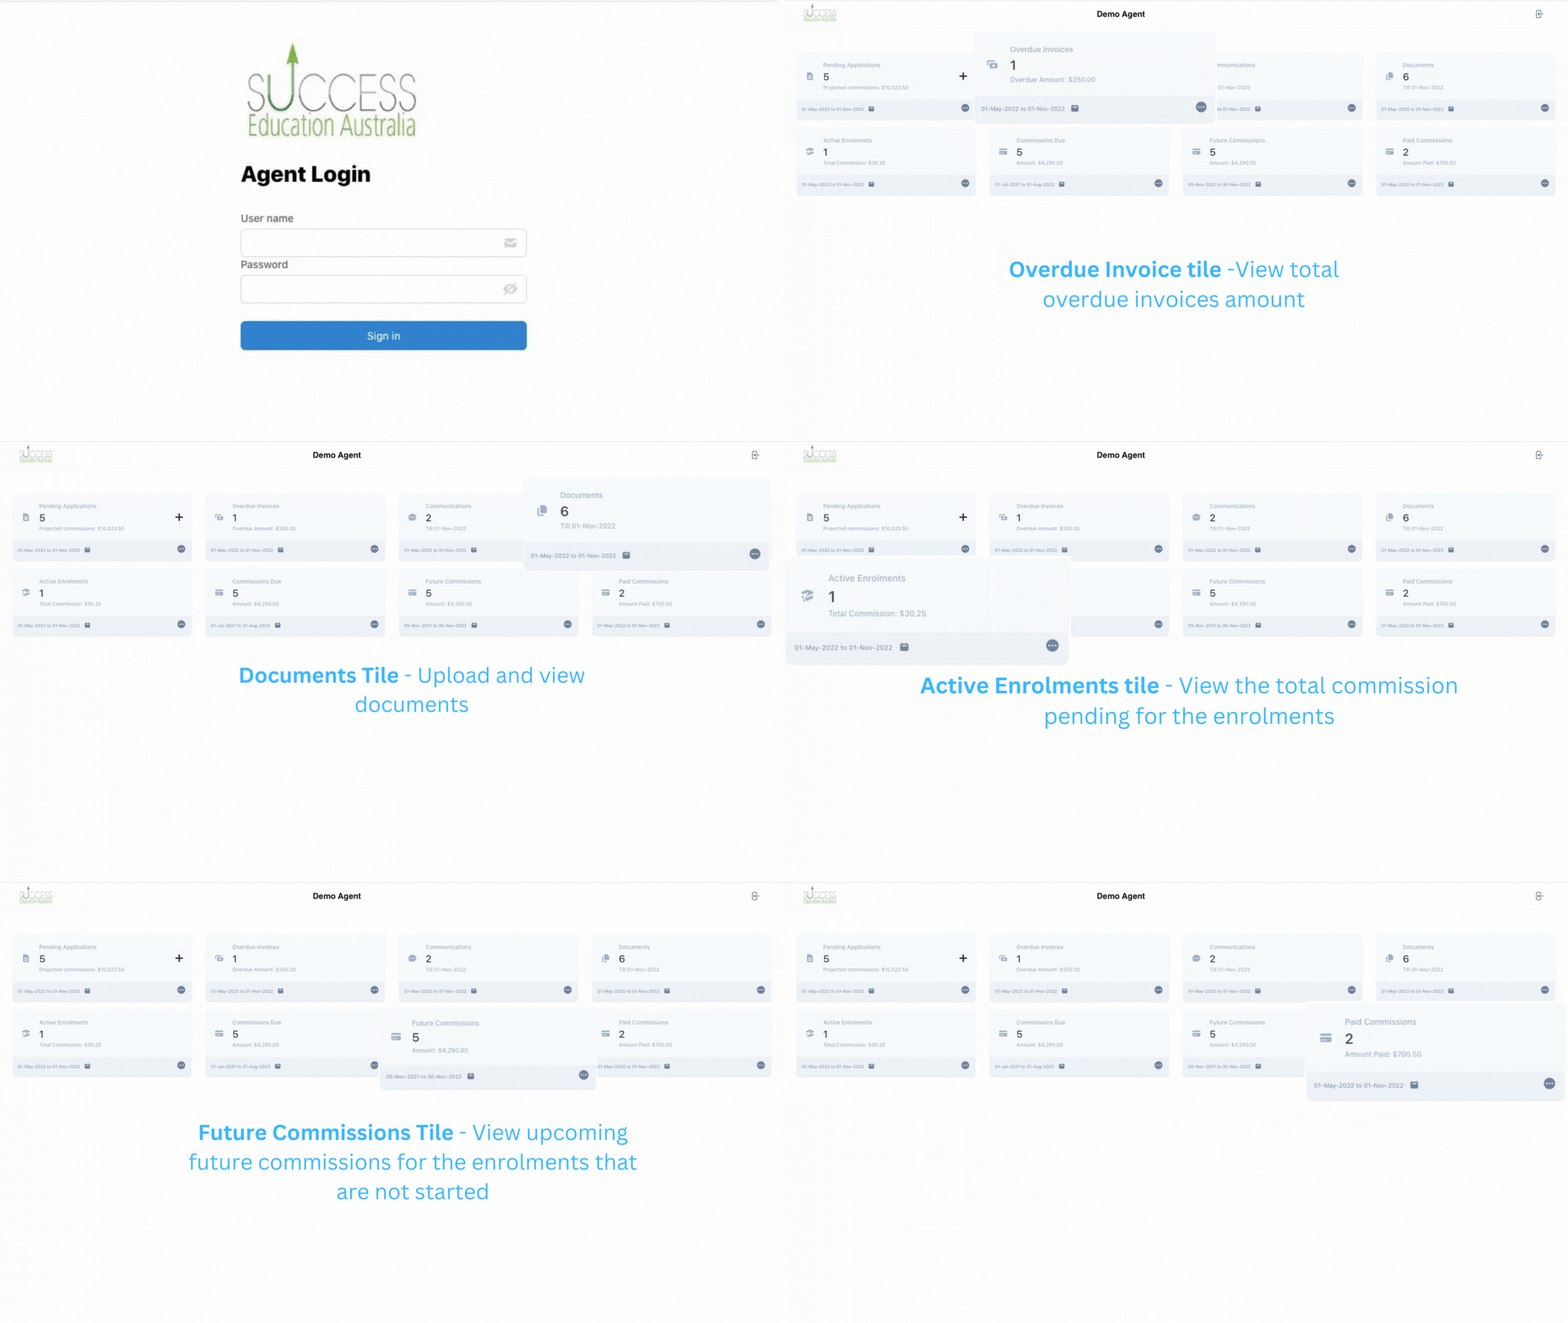
We have released the New Agent Portal. Agents will be able to view information that they would normally email or call you about, such as current students and commission invoices overdue etc. They will also be able to do applications that are directly in TEAMS and you will receive notifications.

As part of the Agent Portal, we have made some changes on the Agent entry screen for you to be able to setup their login details.

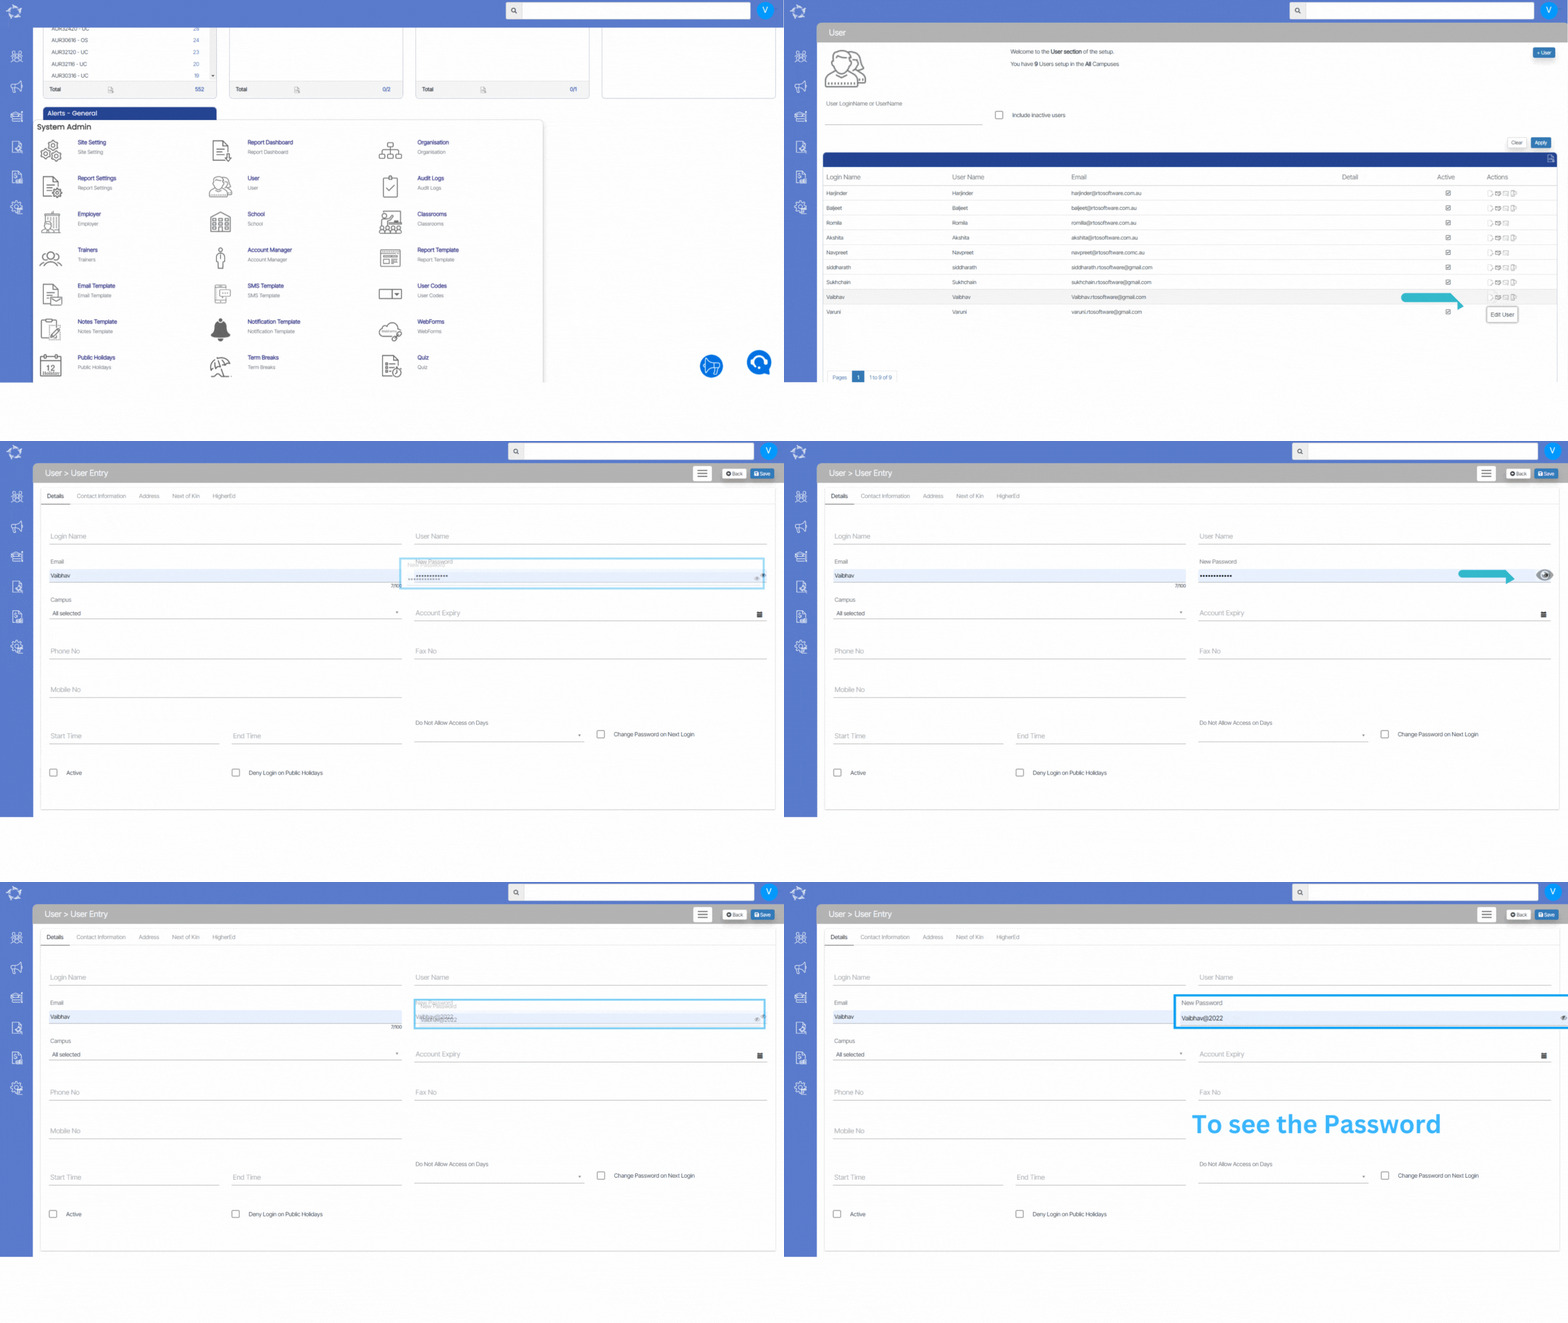
New Icon – View Password

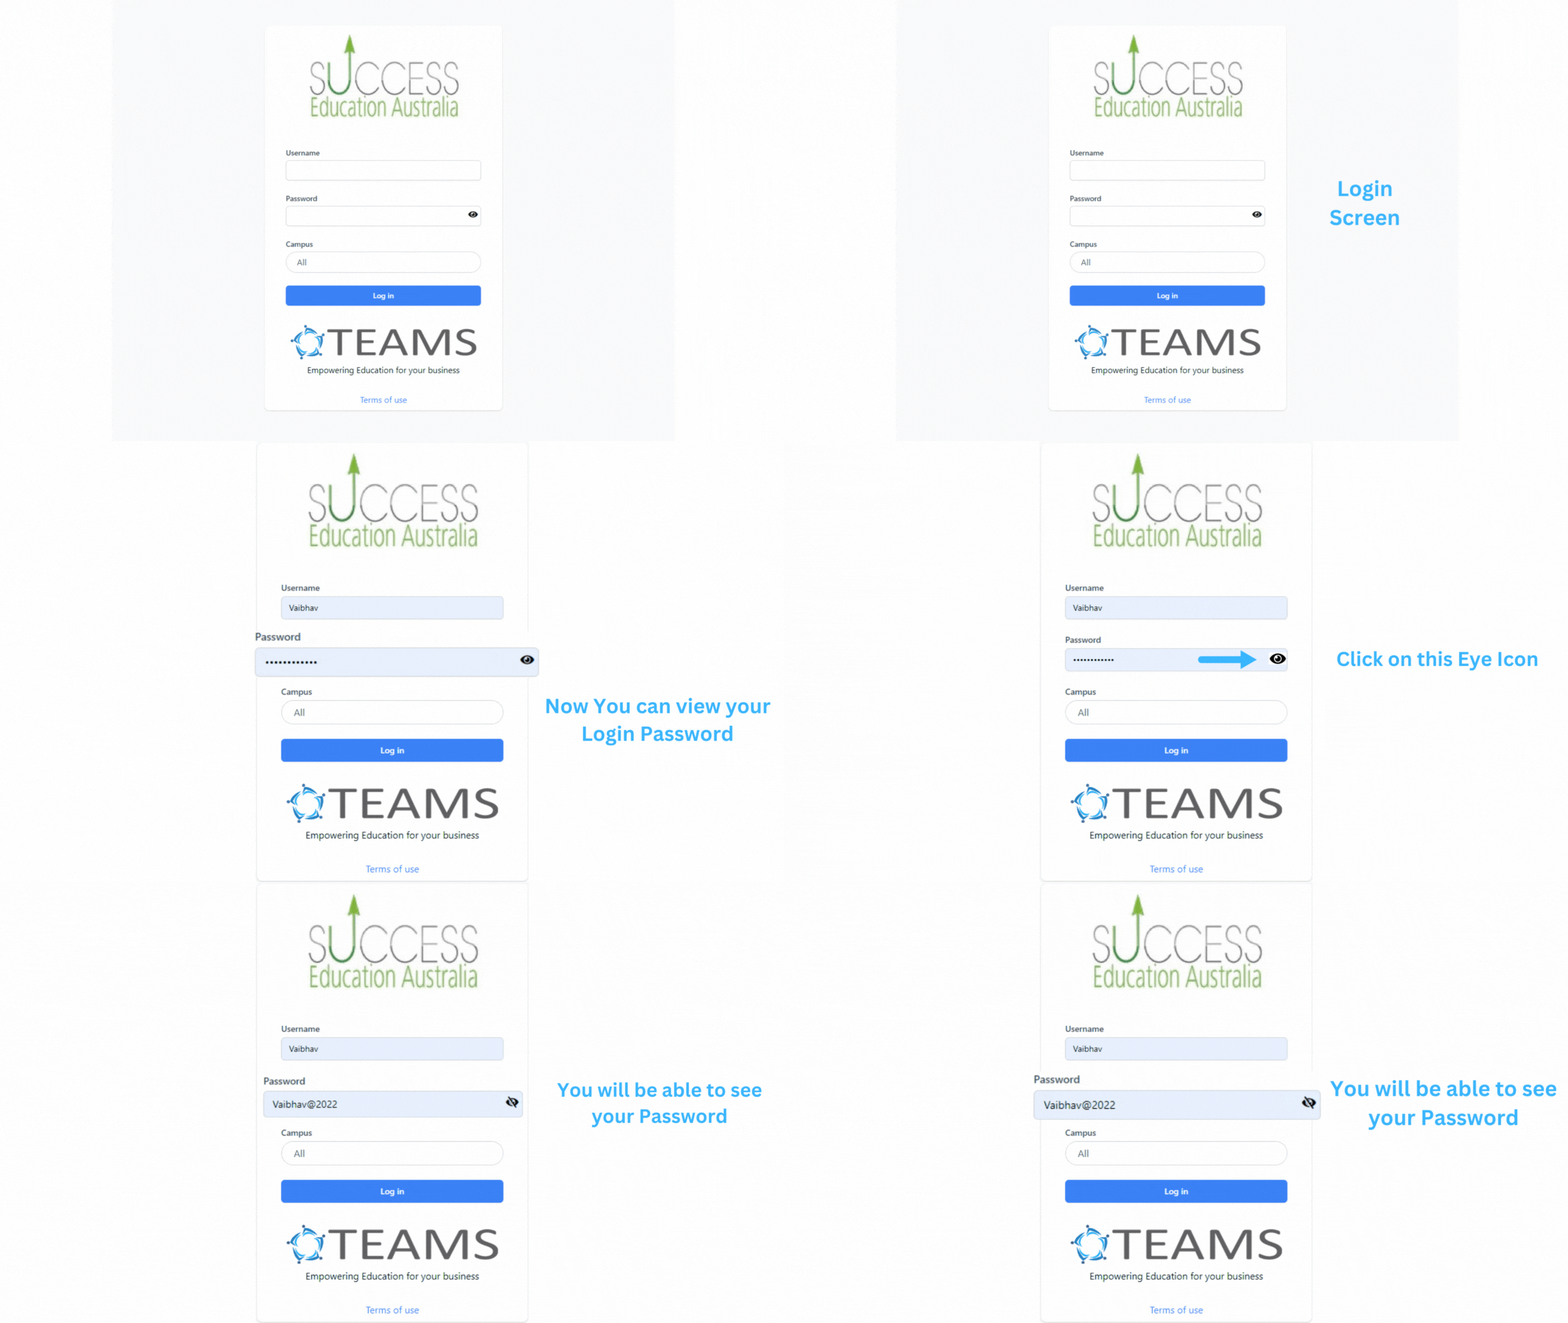
We have made some further improvements and added a new icon on the user login screen and User entry screen. Now the user will be able to view their password by selecting the view icon in the password field.

New Filter – Use Application Dates

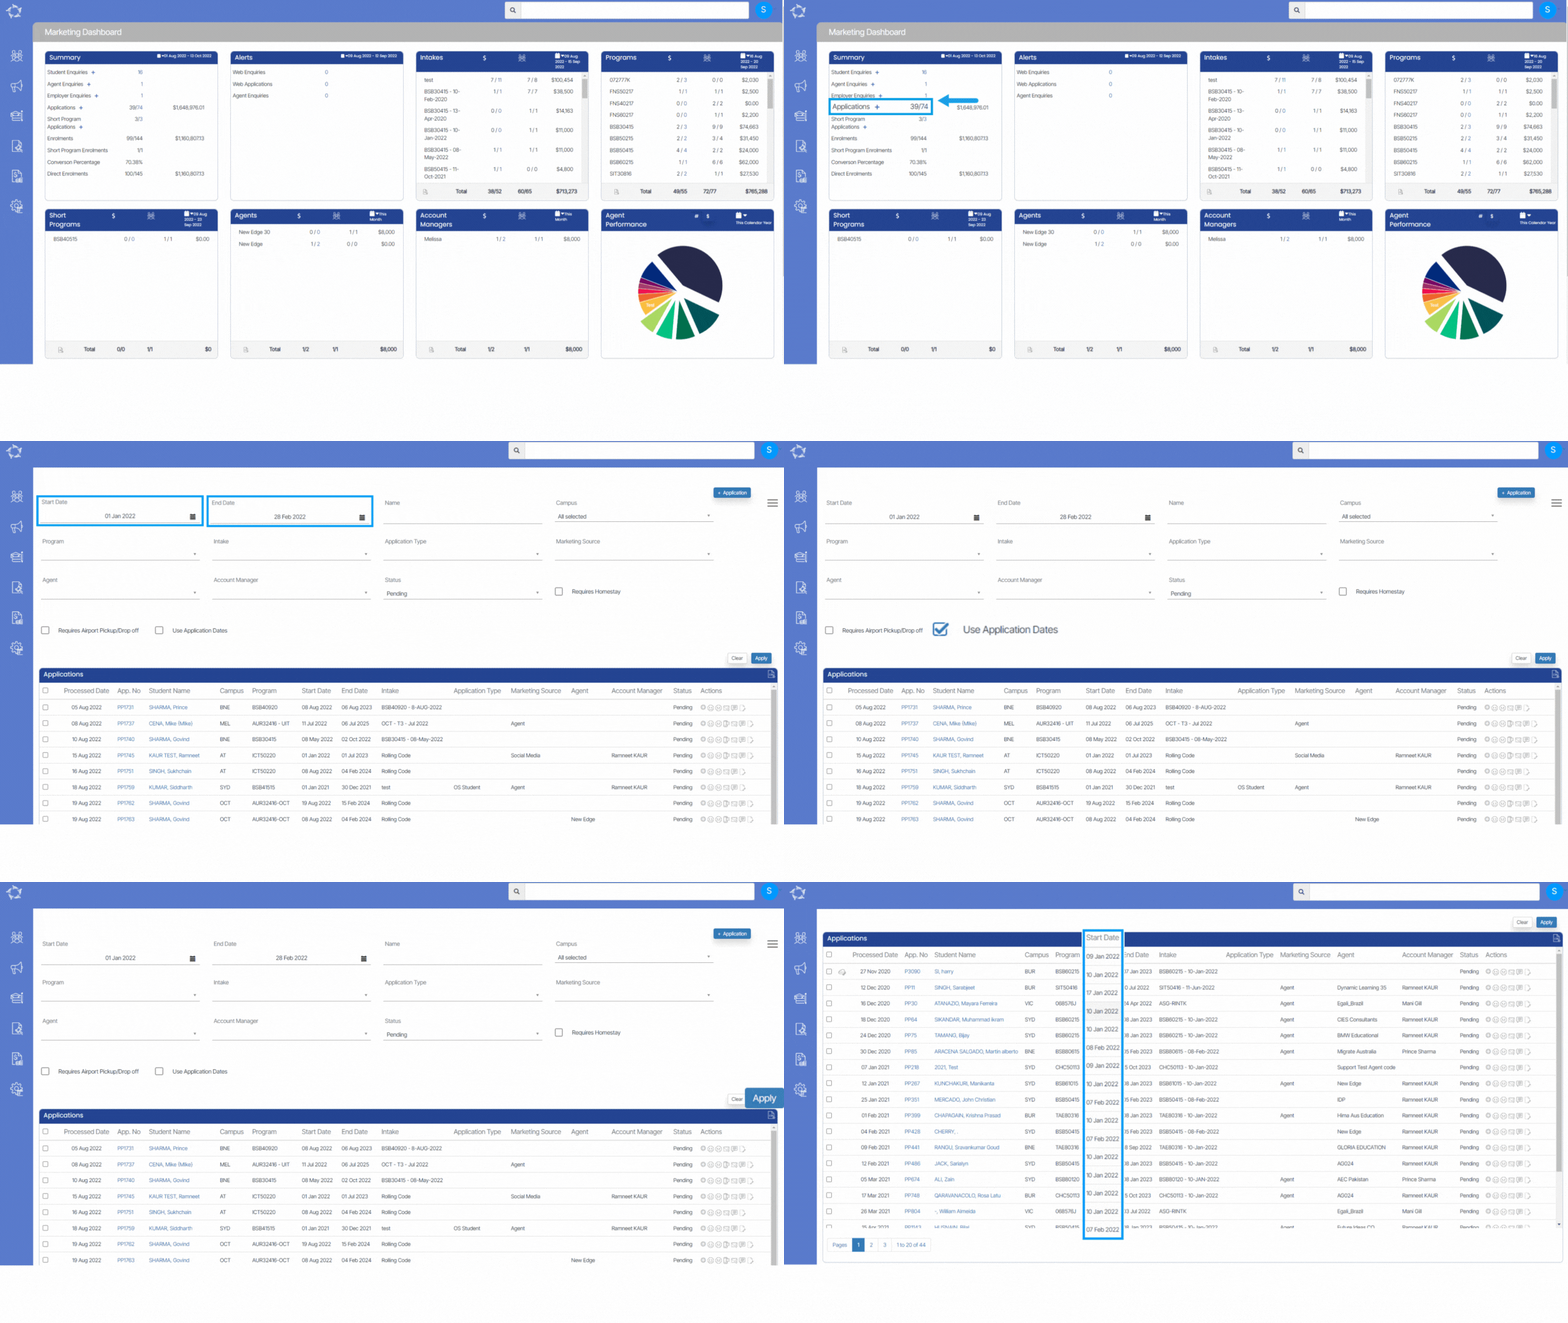
By default, the system uses the creation date of an application to search and display results in the Application List screen. We have added a new filter for Use Application Dates. If you select this the system will search based on the application dates. You can access this screen from the Marketing Dashboard.

Bulk Results Screen

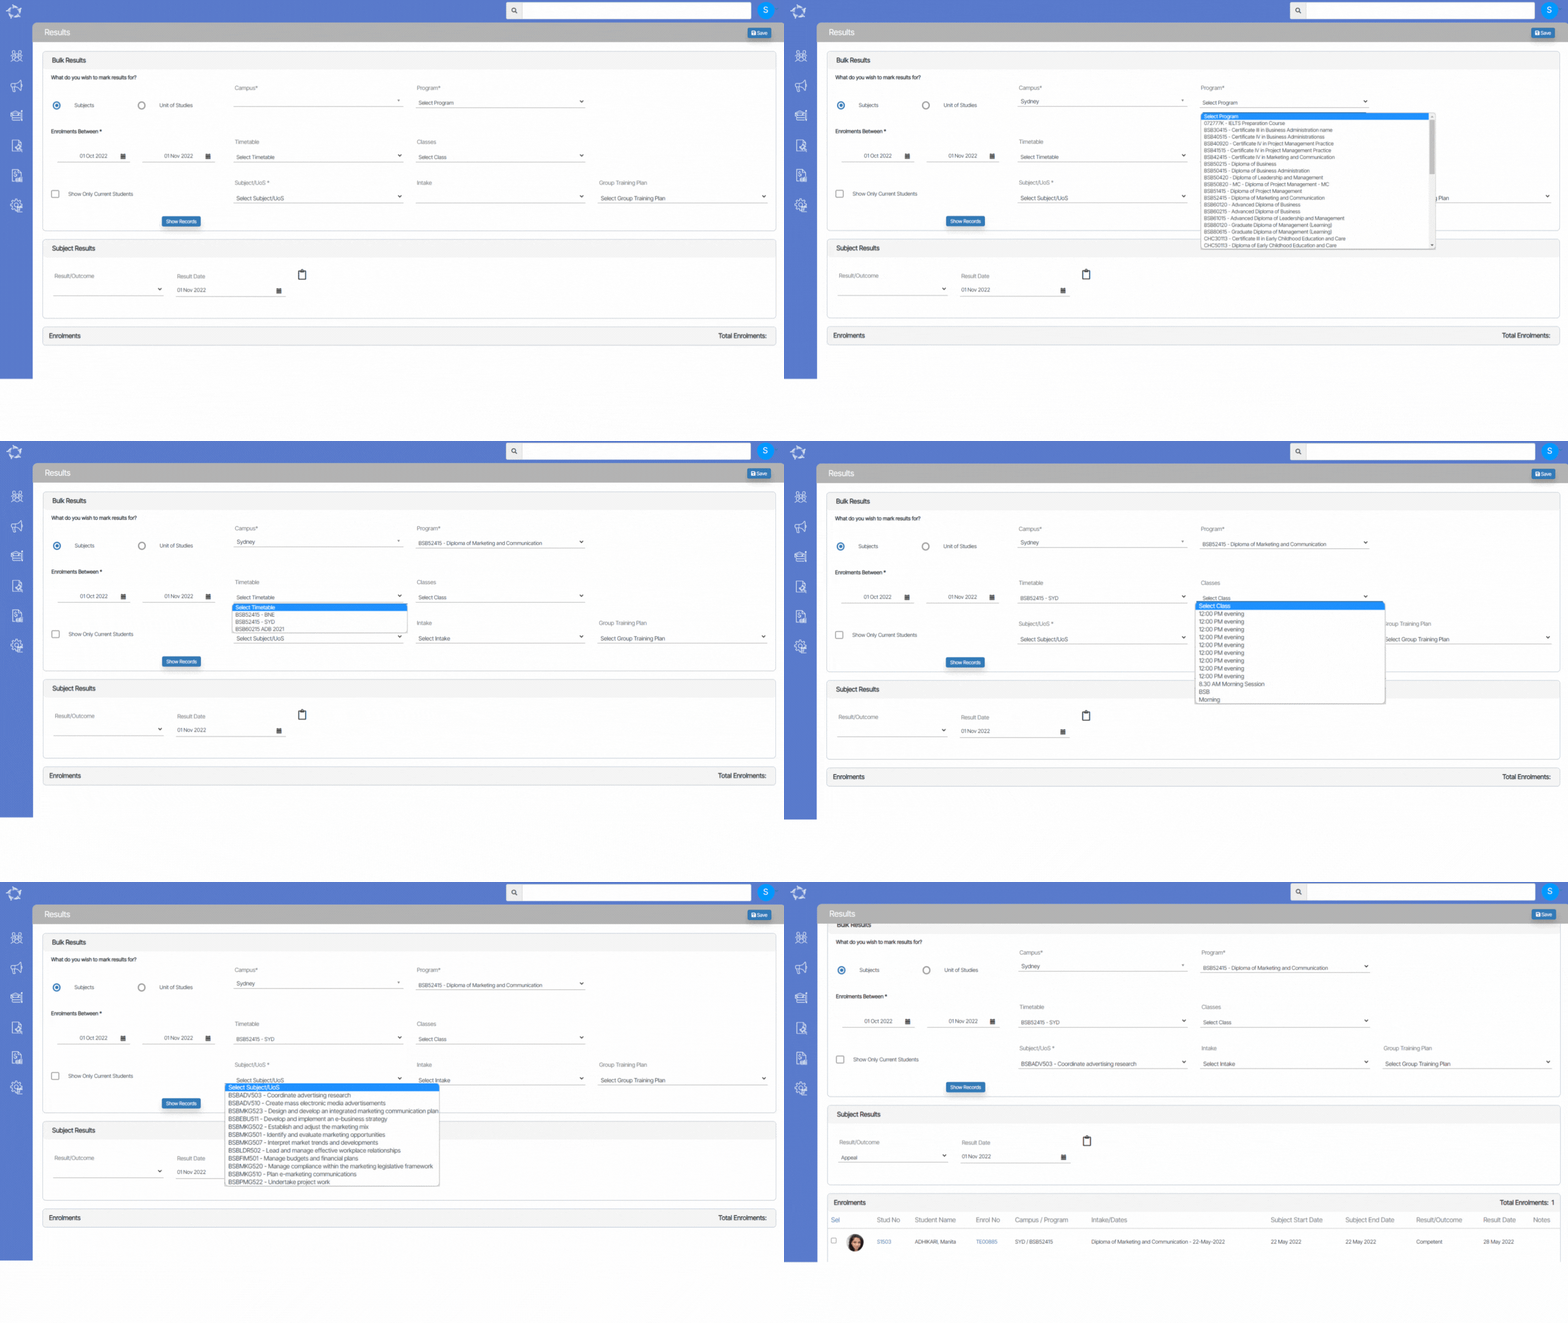
We have made some changes to the Filters and how the system behaves when you select information in them. Also, we have changed the name of some of the column headings in the grid and have added a new column to the grid as well.

ED – Agent Financial Details new payment information

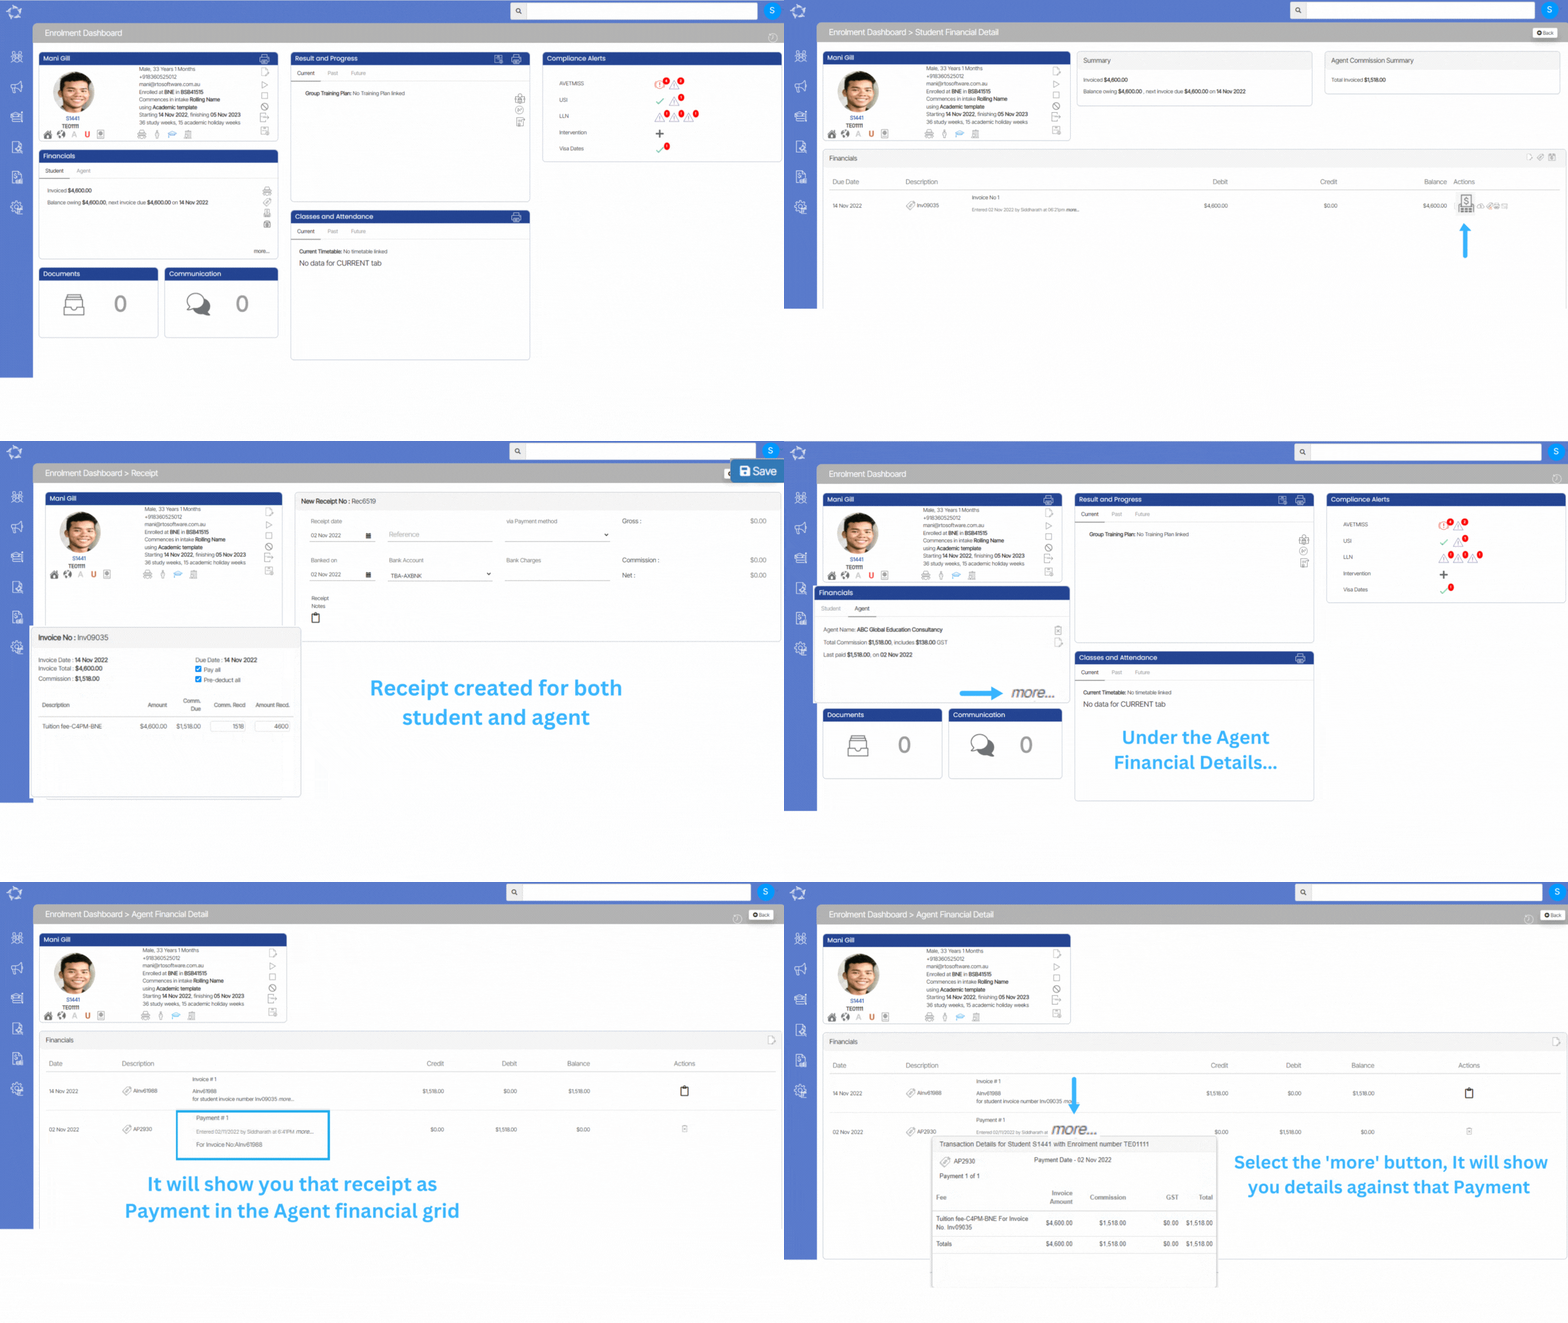
We have made some changes on the Enrolment Dashboard > Agent Financial screen. Now you will be able to see Agent’s payments (what invoice was done for both student and agent payments and who did the payments.

Agent – new login fields for Agent Portal

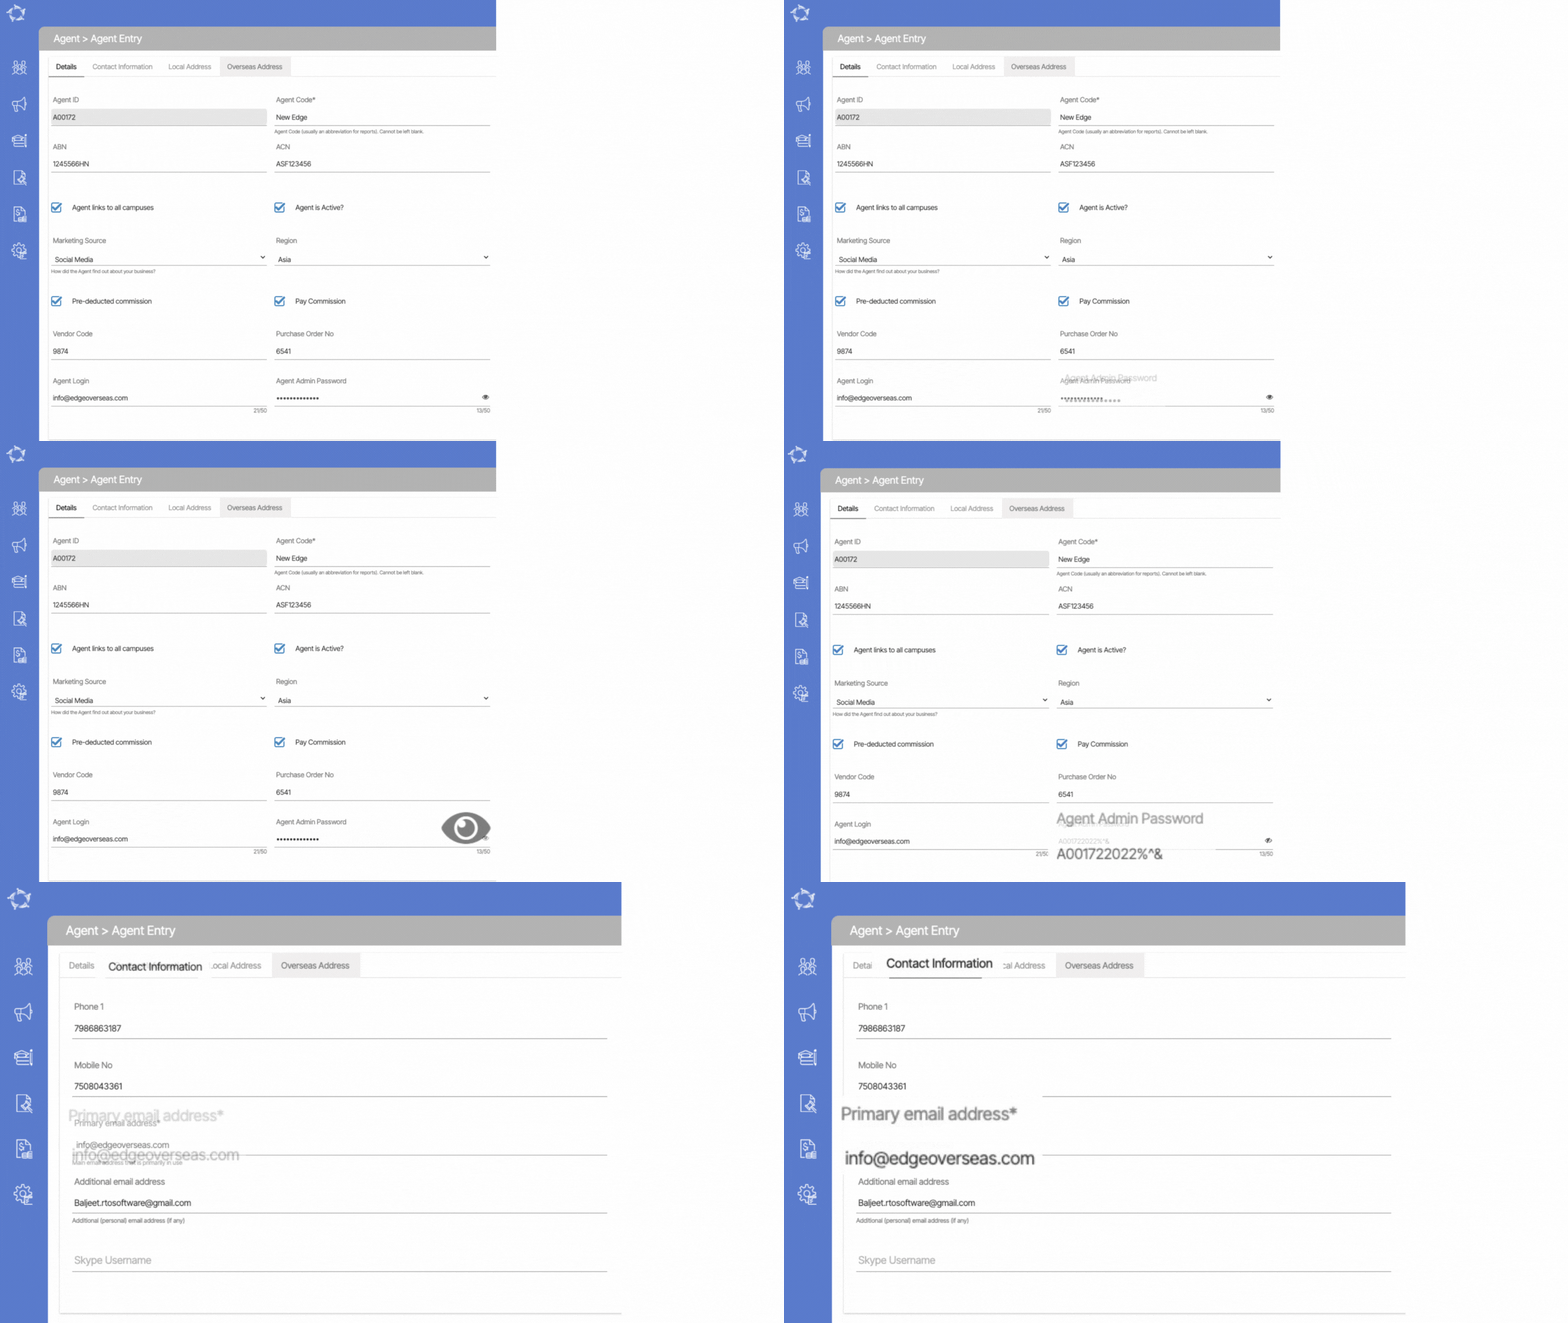
We have now added two new fields Agent login and Agent Admin password on the Agent entry screen

We have also added a new eye icon on the screen to view the agent admin password.

Our mission is to build software that helps you do things more efficiently. Your input and engagement are vital in helping us improve our service and offerings for your college. We are always open to listening to your feedback.

Any questions, please feel free to reach out to us. We look forward to serving you to the best of our ability.

Please review the changes and if you would like further clarification, please contact our Support team.

A big thank you to so many of you who have been actively participating in helping us bring these new improvements to life.

Next update is due on Thursday, 17th November 2022

Note: Please alert other team members within your college if the changes outlined above affect their role or department.

Thank you for taking the time to read this post.

Program Screen – New Field

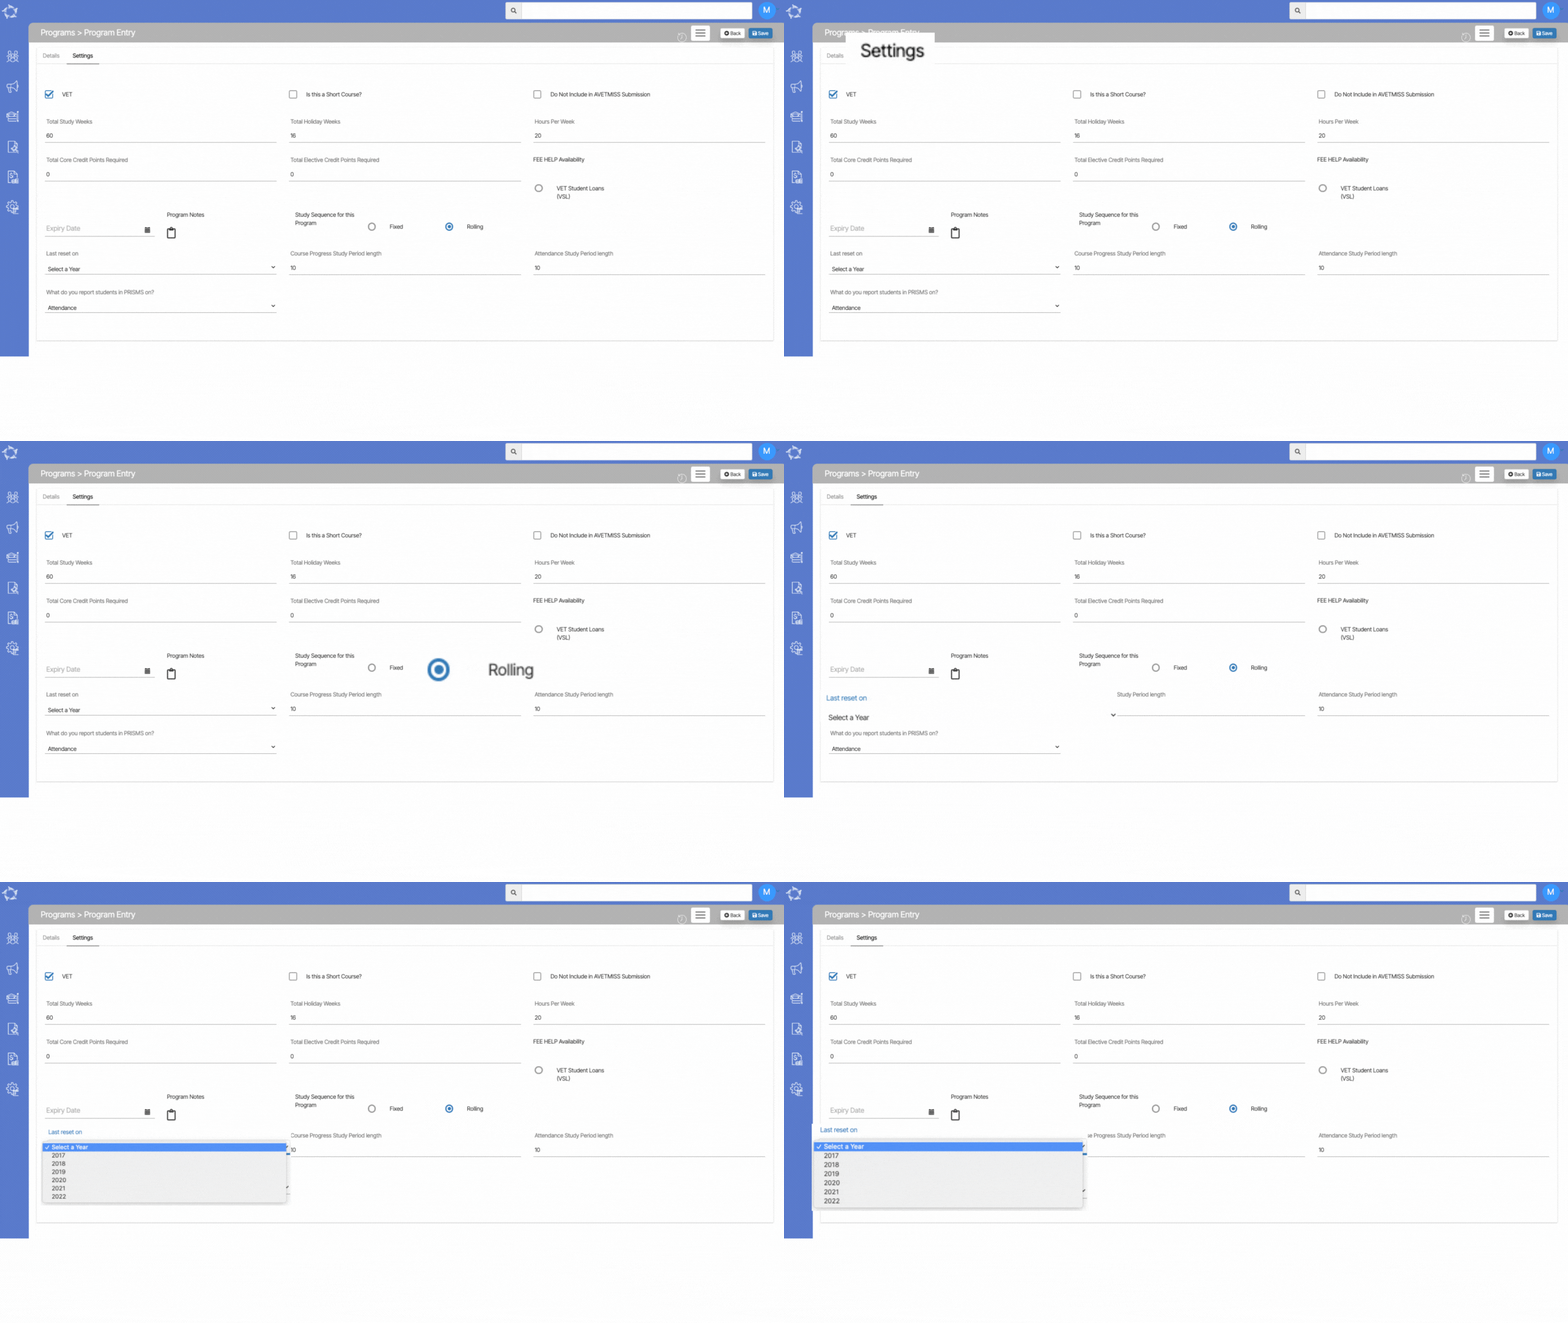
We have added a new field Last Reset on to the Program Screen > Settings tab and you will only see this field if you have set up the study sequence of the program as rolling in your TEAMS site.

You can set the last reset year as rolling from the dropdown.

Agent – new fields for Agent Portal

We have now added two new fields for Agent login and Agent Admin Password to allow you to setup an agent with a login to the Agent Portal. For the new password field you will also see the new View icon.

Note: When setting up login details for an agent to access your Agent Portal, it is our recommendation that you follow a standard format that your staff must use when creating logins for agents. The recommended format is as follows:

Agent Login: use the agent’s primary email address for this, such as info@edgeoverseas.com – the agent’s primary email address is on the Contact Information tab of the Agent Entry screen.

Agent Admin Password: use the Agent ID that the system automatically generates for an agent. This can be found on the Details tab of the Agent Entry screen. In the example below, the Agent ID is A00172. Then add a mix of numbers and symbols to make it a stronger password. So for this agent below it could be something like A001722022%^&

Both of the pieces of information we have recommended are unique to a specific agent. There can be no mistaking what agent the login is for and no chance that a user will use the same login details for two different agents.

Agent Portal Dashboard – Future Commissions Tile

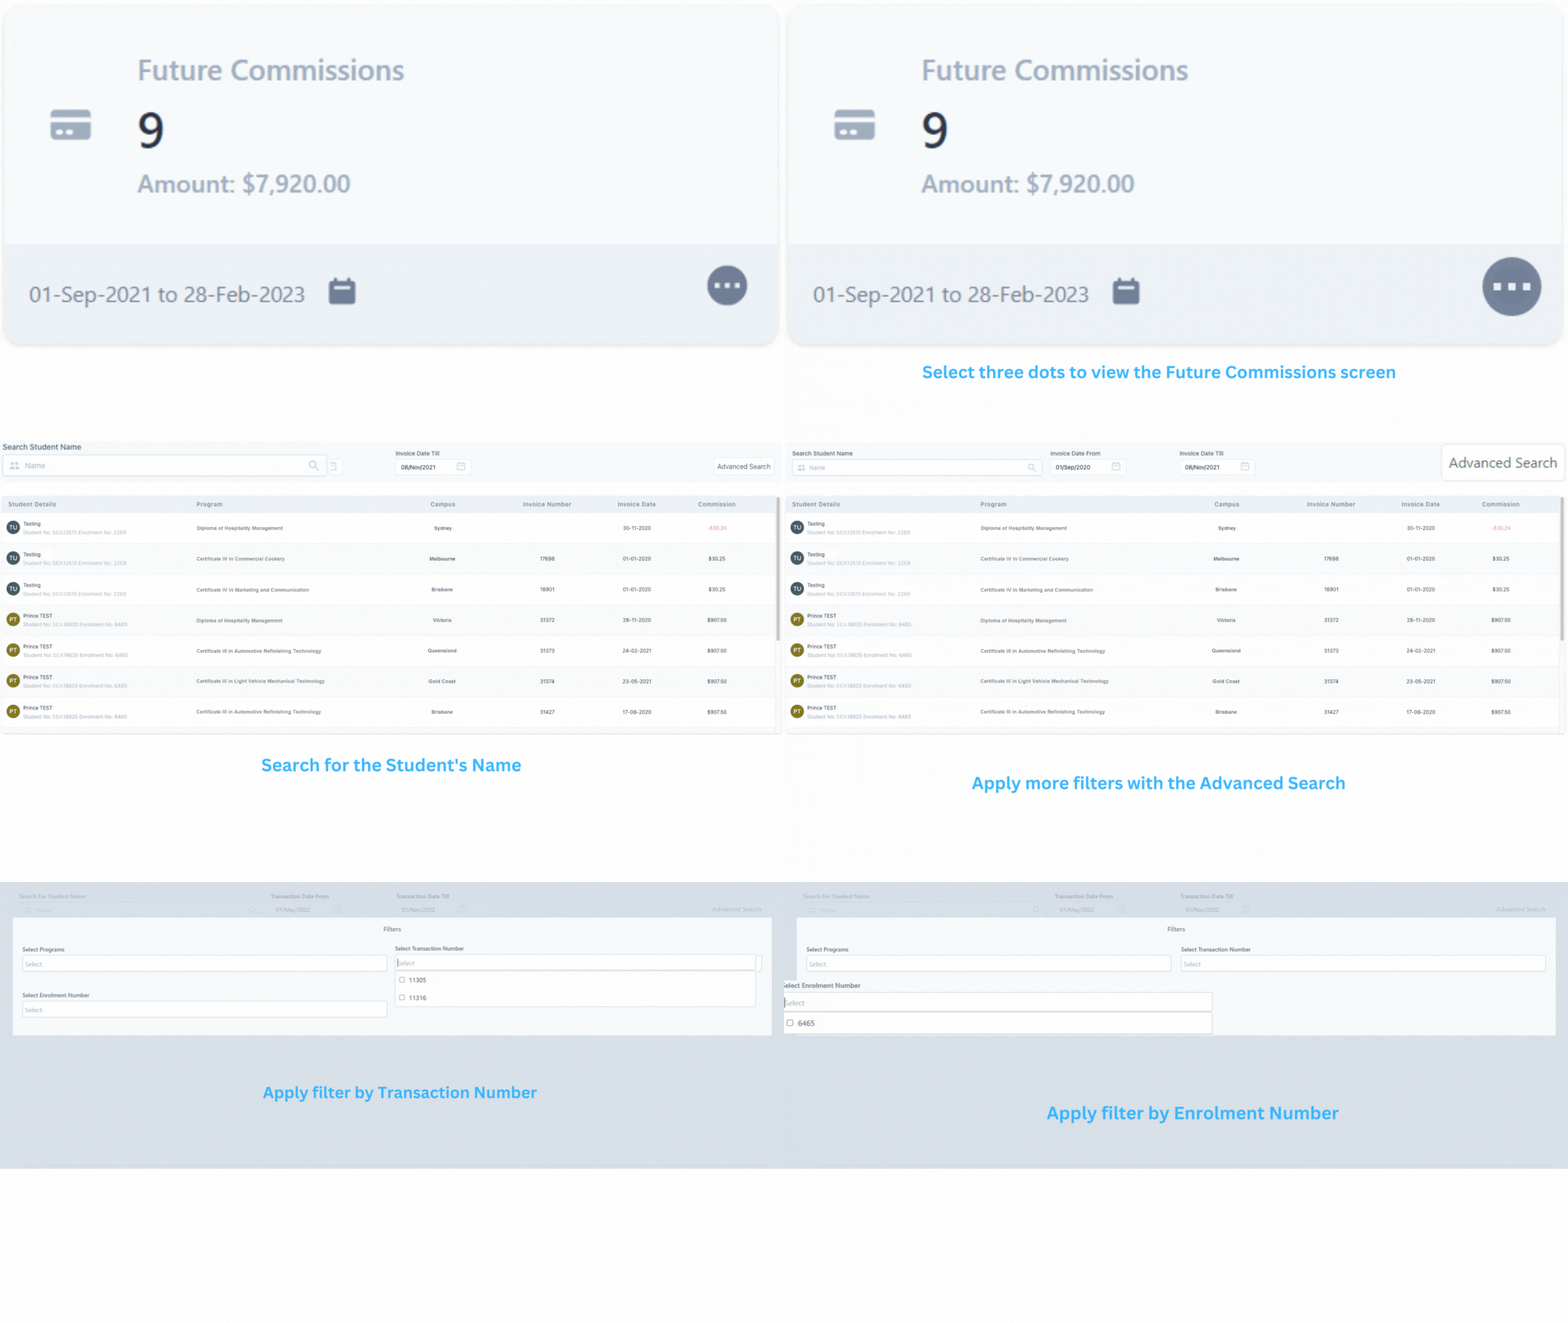
This tile will show you all the Future Commissions that the Agent will receive from the student, this screen will allow the agent to do the following-

  • You can Select the date range from the calendar to view Future Commissions accordingly
  • You can Select three dots to view the Future Commissions screen
  • You can search by Student’s Name
  • You can apply a Date Range (Date From and Date Till)
  • Apply more filters with the Advanced Search
  • Apply Filters by Programs, Enrolment Number, or by Transaction Number.