Current Students Report Data Columns

The below table will explain about the explanation of the columns that will get printed in the report.

ColumnsExplanation
Student NoStudent Number generated by TEAMS
Student Name Student first name, middle name, last name
First NameStudent’s First Name
Family NameStudent’s Last Name
DOBStudent’s date of birth
MobileStudent’s mobile number
PhoneStudent’s phone number
Work PhoneStudent’s work phone number
Campus NameName of the campus linked to the enrolment
Enrolment NoEnrolment Number generated by TEAMS
Enrolment TypeThis is a user code and the system will print the enrolment type from the Enrolment Dashboard > Edit enrolment details screen
Visa TypeIt will show the Visa type selected at the Student and Enrolment level
CRICOS CodeThis is the CRICOS code of the Program updated on the Program Entry Screen
ProgramProgram Name updated on the Program entry screen
Start DateEnrolment’s Start Date
End DateEnrolment’s End Date
Duration in WeeksThe system will show you the total number of the Enrolment’s week i.e. sum of study and academic holiday weeks
AgentName of the agent linked to the enrolment
Employer NameEmployer name linked to the enrolment
Employer Email AddressEmployer’s email address
Employer PhoneEmployer’s phone number
NationalityNationality of the student
CountryCountry of the student
Account ManagerDisplays Account Manager’s name linked to enrolment
TimetableTimetable name linked to the enrolment
Marketing SourceThe system will print the marketing source selected while processing the application
Last Class Attended onThis is the date of the last class attended by student
AVETMISS StudentThis will show Yes if the student is selected as AVETMISS
Client IDThis will show the client Identifier entered at Student Dashboard > Edit AVETMISS information screen
Training Contract IdentifierThis will show the training contract Identifier entered at Enrolment Dashboard > AVETMISS Settings screen
Ecoe Start DateStart date of the CoE
Ecoe End DateEnd date of the CoE
SexGender of the student (Male, Female and other)
Recommencement Enrolment
StatusStatus of the enrolment as Started, Not Started etc.
AAC Details
Program CodeProgram code updated on the Program entry screen
NotesProgram Notes
Payment Type
Enrolment OutcomeThe outcome of enrolment selected on the Enrolment Dashboard > enrolment details screen
User
Total InvoiceTotal Invoiced amount of the enrolment
Total ReceiptTotal receipted amount of the enrolment
Purchasing ContractThis is the Purchasing Contract number updated on the Enrolment’s AVETMISS settings screen
Funding Source – StateFunding source – state selected on the enrolment edit avetmiss screen
Level of StudentLevel of student updated on the edit student details screen
OverseasThis is a tick box selected on the enrolment AVETMISS settings screen
VSNThis is the VSN number selected at the student entry screen
VSN EligibleThis relates to the VSN tick box and once you have selected the system will ask you for the VSN number on the student entry screen
Enrolment StartedThe system will show you the status of the enrolment as Yes or No
AVETMISS StateAVETMISS state selected on the enrolment’s AVETMISS settings screen
Program Delivery Schedule
Total Tuition FeeThis is the total invoiced amount of the tuition fee
Special NeedsThis is a tick box selected on the student entry screen
Special Needs NotesThis relates to the special needs tick box and once you have selected the tick box, the system will ask you for the special needs notes.
Has DisabilityThis will show Yes if the disability tick box is ticked on the Enrolments AVETMISS screen
DisabilityThis relates to the Disability tick box and once you have selected the tickbox, the system will ask you for the disability.
Language SpokenStudent’s language spoken at home
Field of Study
Skype NameSkype ID of the student
CoE NoThis is the number updated on the CoE details screen from the enrolment dashboard
TrainerTrainer’s Name
Completed QualIt will show the commencement status from the Training Plan and Results screen > Qualification Information tile.
Student Payment No
USIStudent’s USI number
USI VerifiedIt will show Yes if the USI is verified and No if not verified
Total No. of UnitsTotal number of subjects linked with enrolments
Last Date of Result
No. of Units Successfully CompletedTotal number of subjects completed
School Name
Email Address 1Student’s primary email address
Email Address 2Student’s secondary email address
Email Address 3Student’s additional email address
Program NotesProgram Notes
Future ProgramsStudent’s upcoming enrolments
Study End DateEnrolment’s end date
Enrolment NotesEnrolment Notes
Enrolment DateProcessed date of the enrolment
Application NoEnrolment’s application number

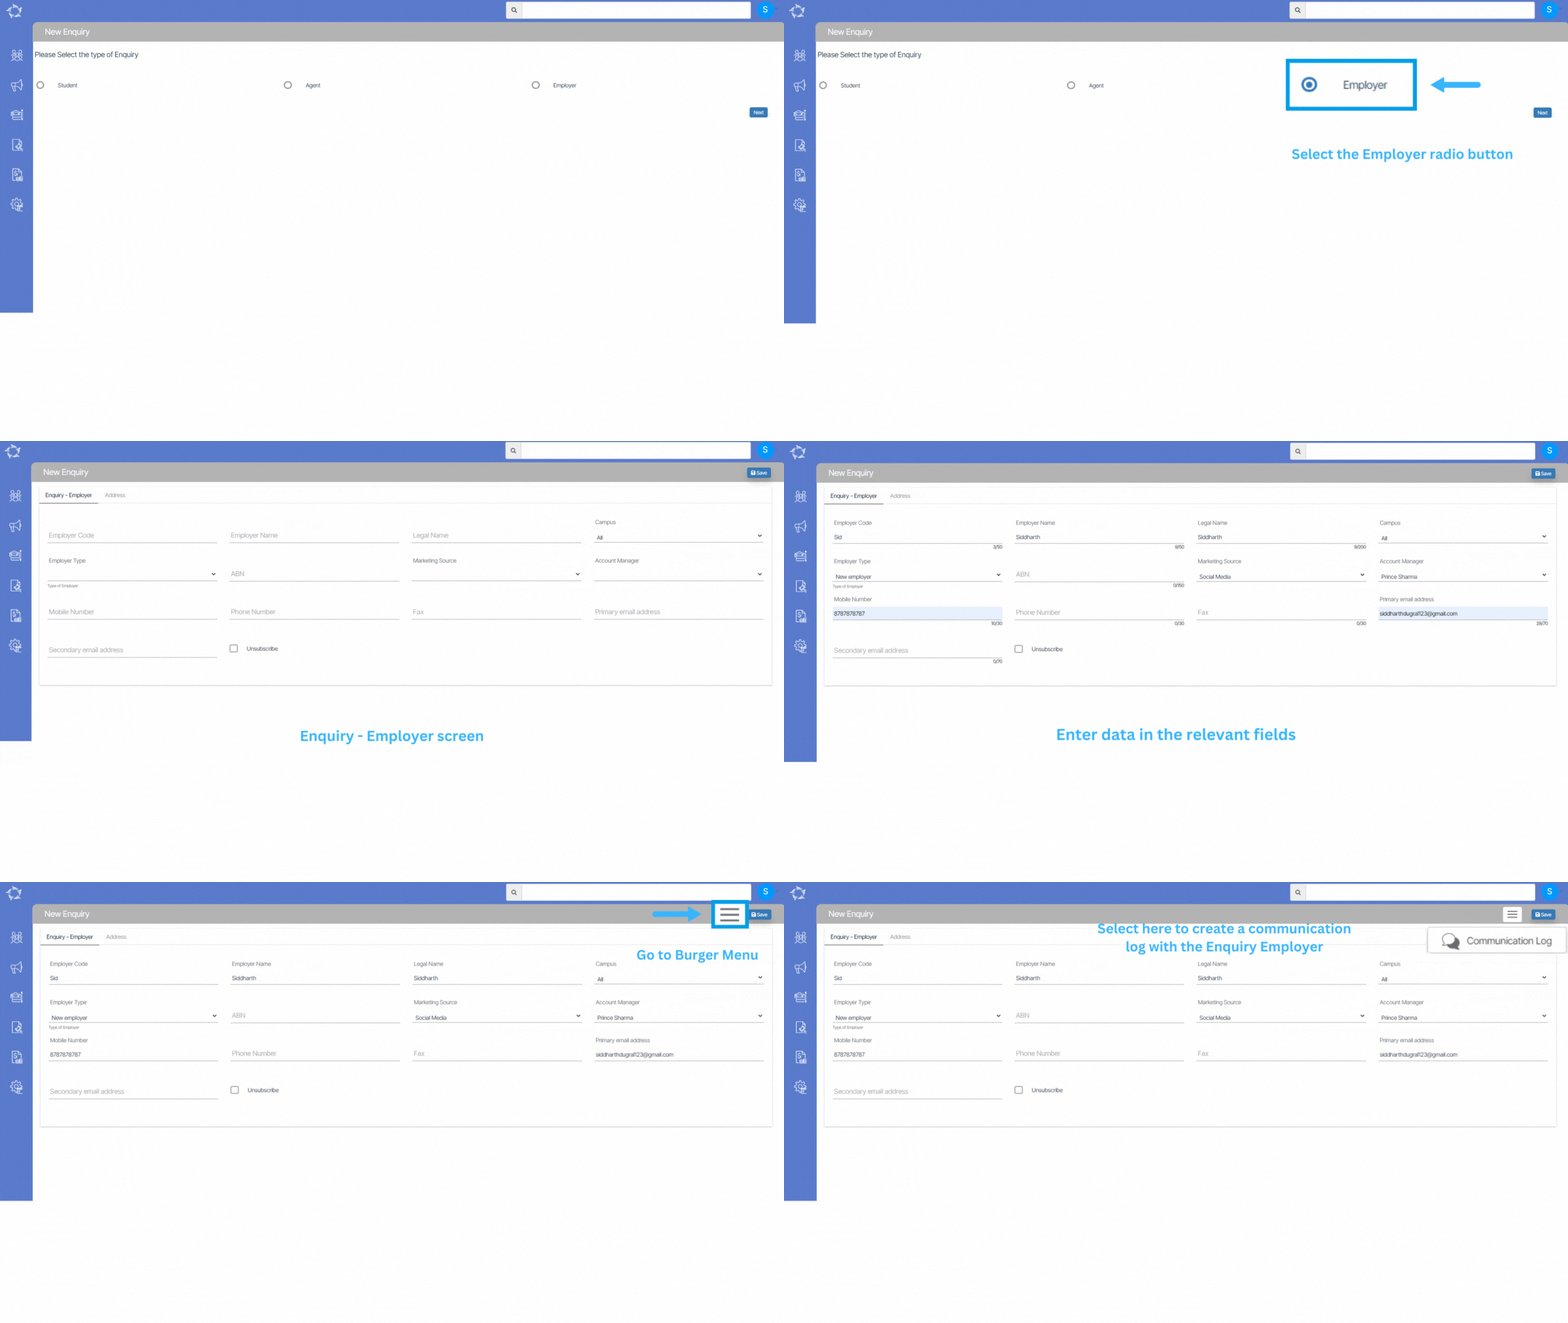
New Enquiry – Employer

Main Dashboard > Student Management > New Enquiry Sub-Menu > Employer Enquiry

Overview

This screen allows you to enter enquiries (new leads) of the Employers, so you can track communication and the progression of discussions with them.

Follow the below steps to create an Enquiry

  • Select the New Enquiry sub-menu.
  • Select the Employer radio button and select the Next button.
  • Enter data into the relevant fields and select the Save button.

Note: On the new enquiry screen when you select the save button, the enquiry will be created and you can see the Burger Menu icon beside the Save button in the top right corner which allows you to perform some important functions for that enquiry.

You can create a Communication Log and New Application from the burger menu.

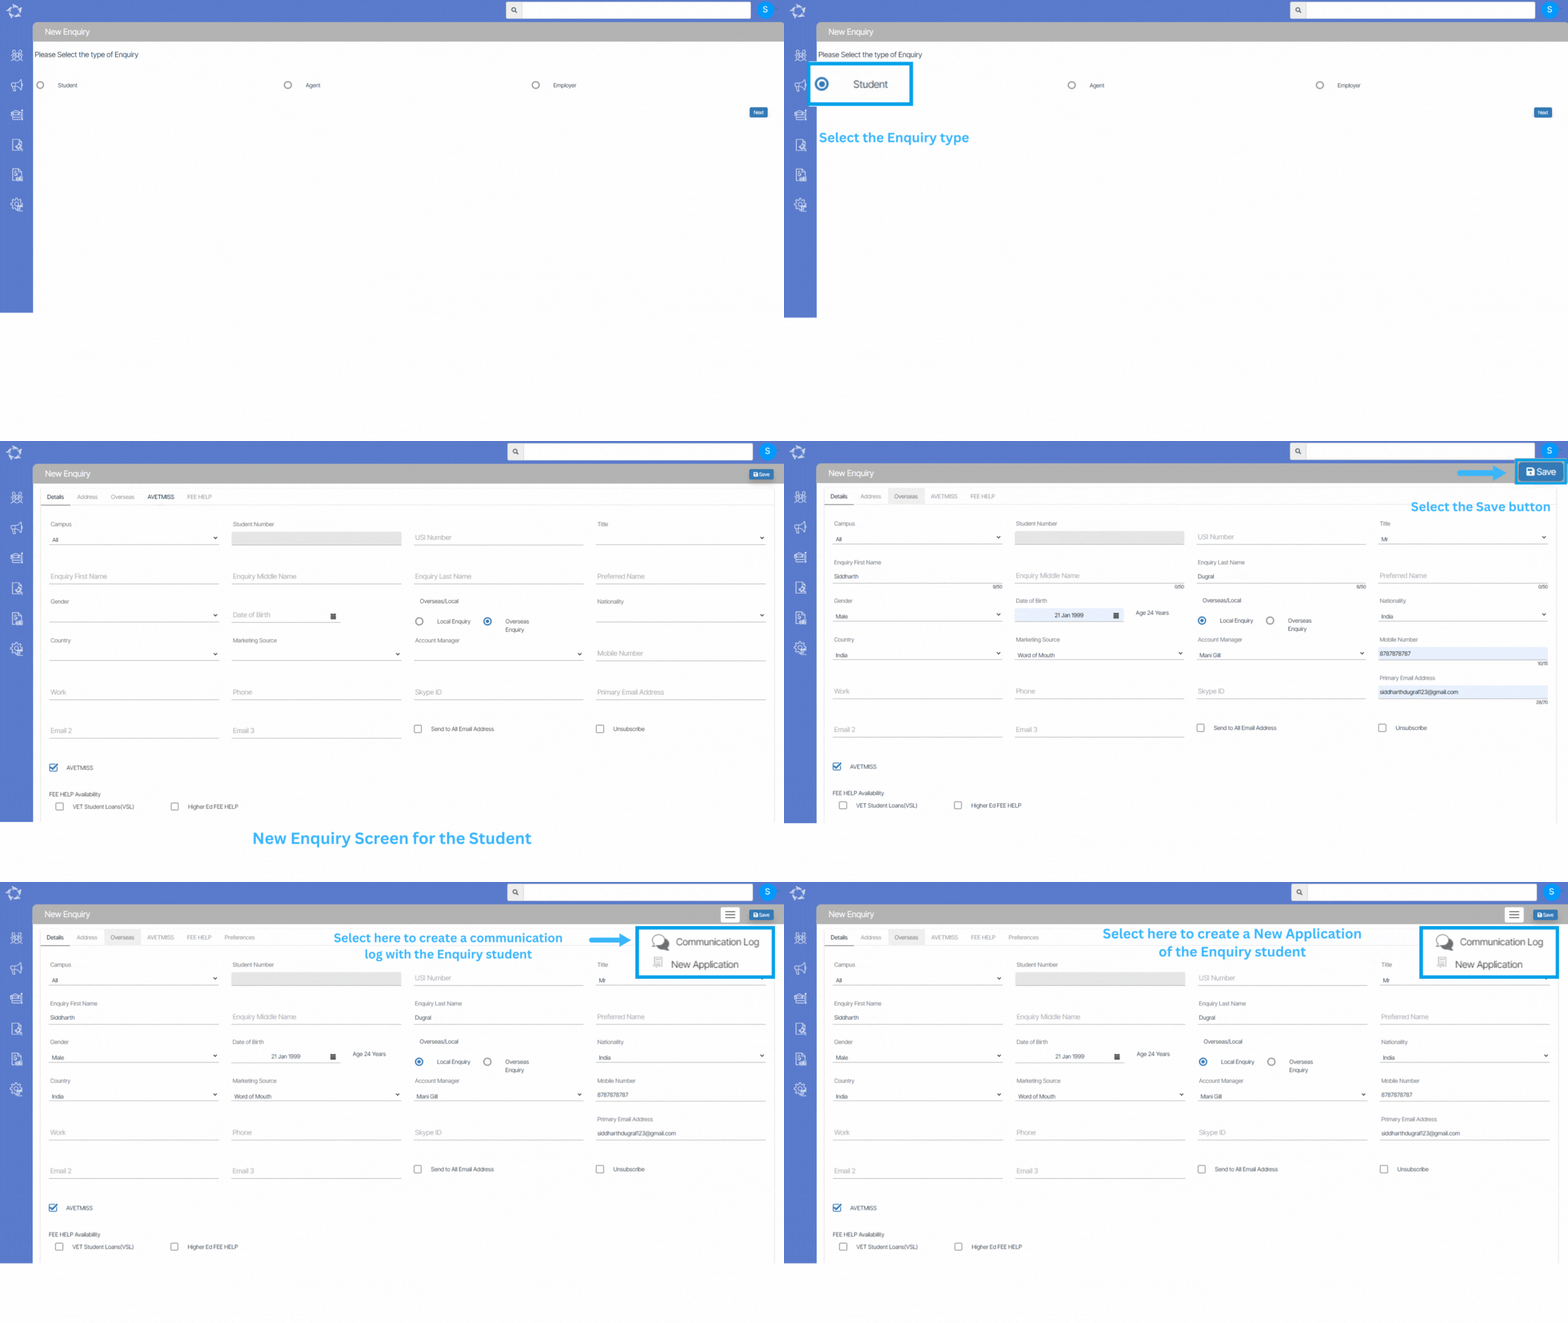
New Enquiry – Student

Main Dashboard > Student Management > New Enquiry Sub-Menu > Student Enquiry

Overview

This screen allows you to enter enquiries (new leads) of the students, so you can track communication and the progression of discussions with them.

Follow the below steps to create an Enquiry

  • Select the New Enquiry sub-menu.
  • Select the Student radio button and select the Next button.
  • Enter data into the relevant fields and select the Save button.

Note: On the new enquiry screen when you select the save button, the enquiry will be created and you can see the Burger Menu icon beside the Save button in the top right corner which allows you to perform some important functions for that enquiry.

You can create a Communication Log and New Application from the burger menu.

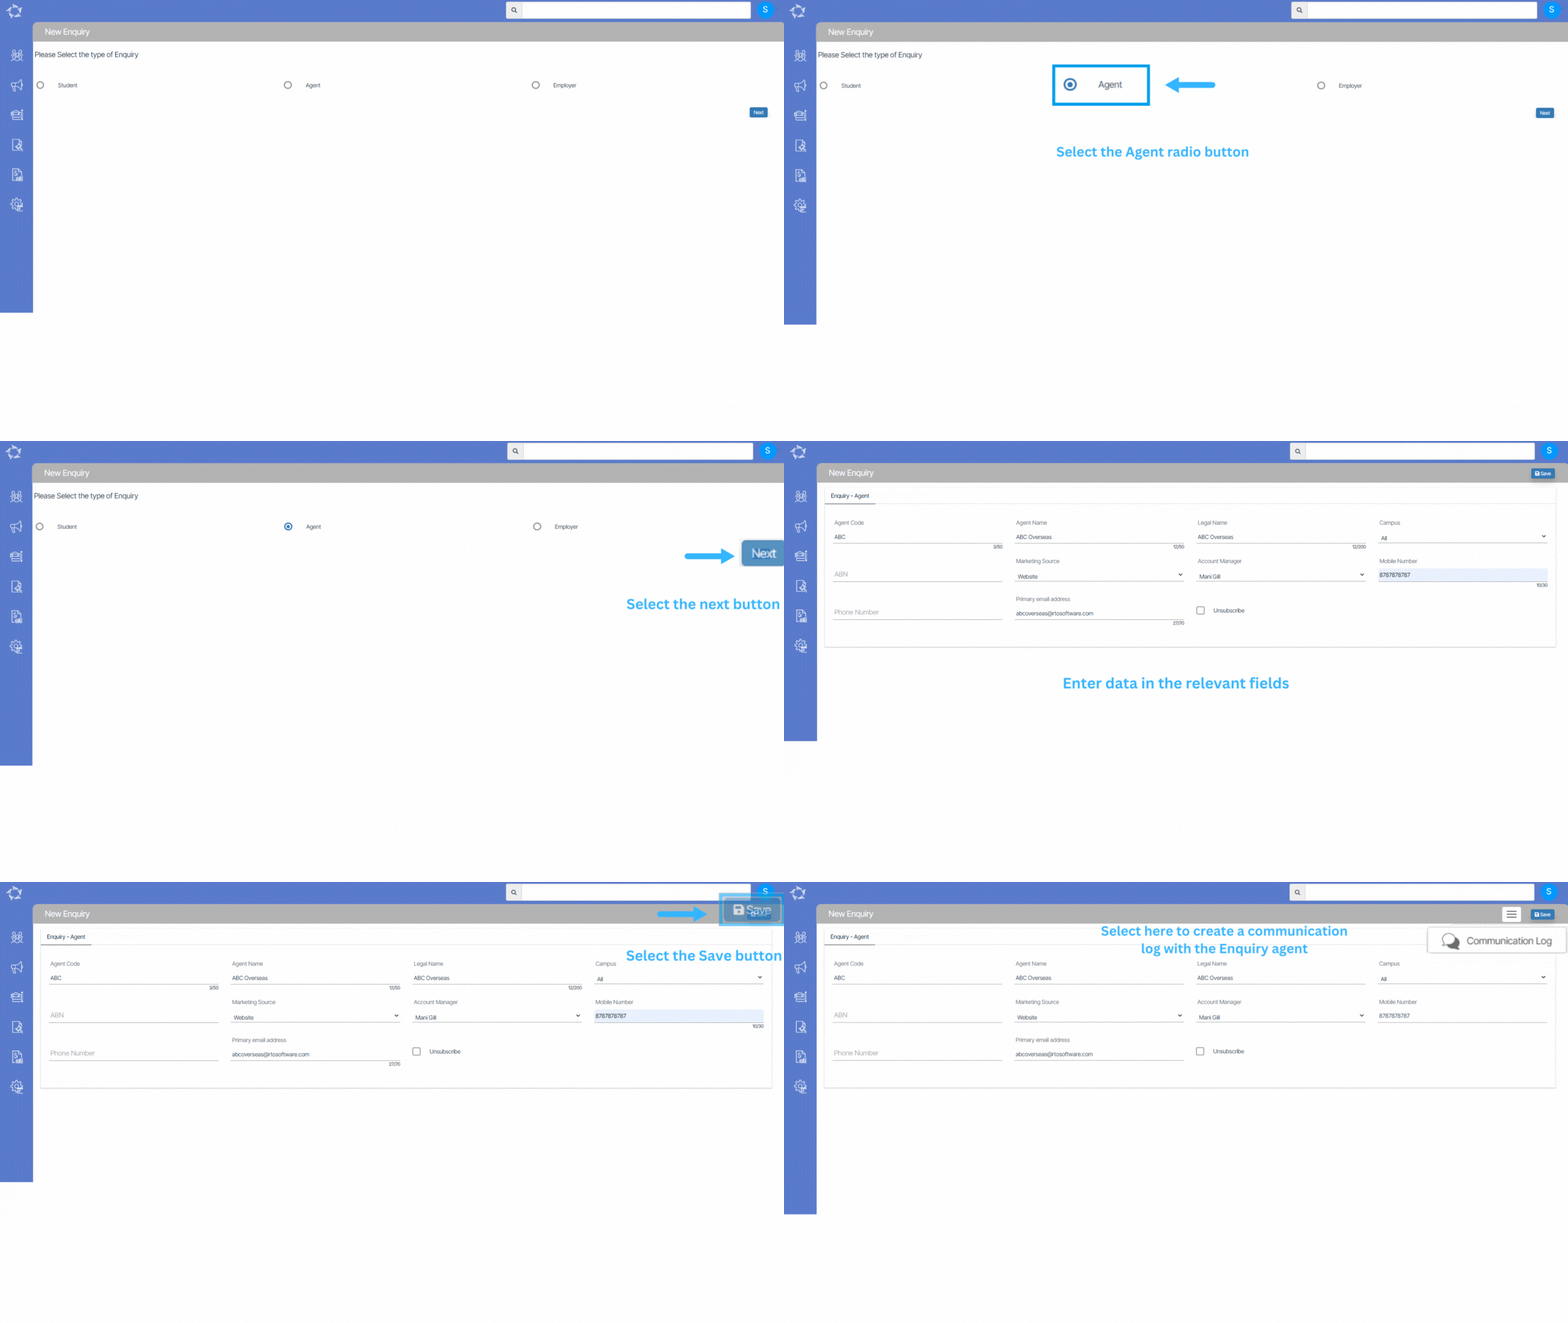
New Enquiry – Agent

Main Dashboard > Student Management > New Enquiry Sub-Menu > Agent Enquiry

Overview

This screen allows you to enter enquiries (new leads) of the agents, so you can track communication and the progression of discussions with them.

Follow the below steps to create an Enquiry

  • Select the New Enquiry sub-menu.
  • Select the Agent radio button and select the Next button.
  • Enter data into the relevant fields and select the Save button.

Note: On the Agent enquiry screen when you select the save button, the enquiry will be created and you can see the Burger Menu icon beside the Save button in the top right corner which allows you to perform some important functions for that enquiry.

You can create a Communication Log and New Application from the burger menu.

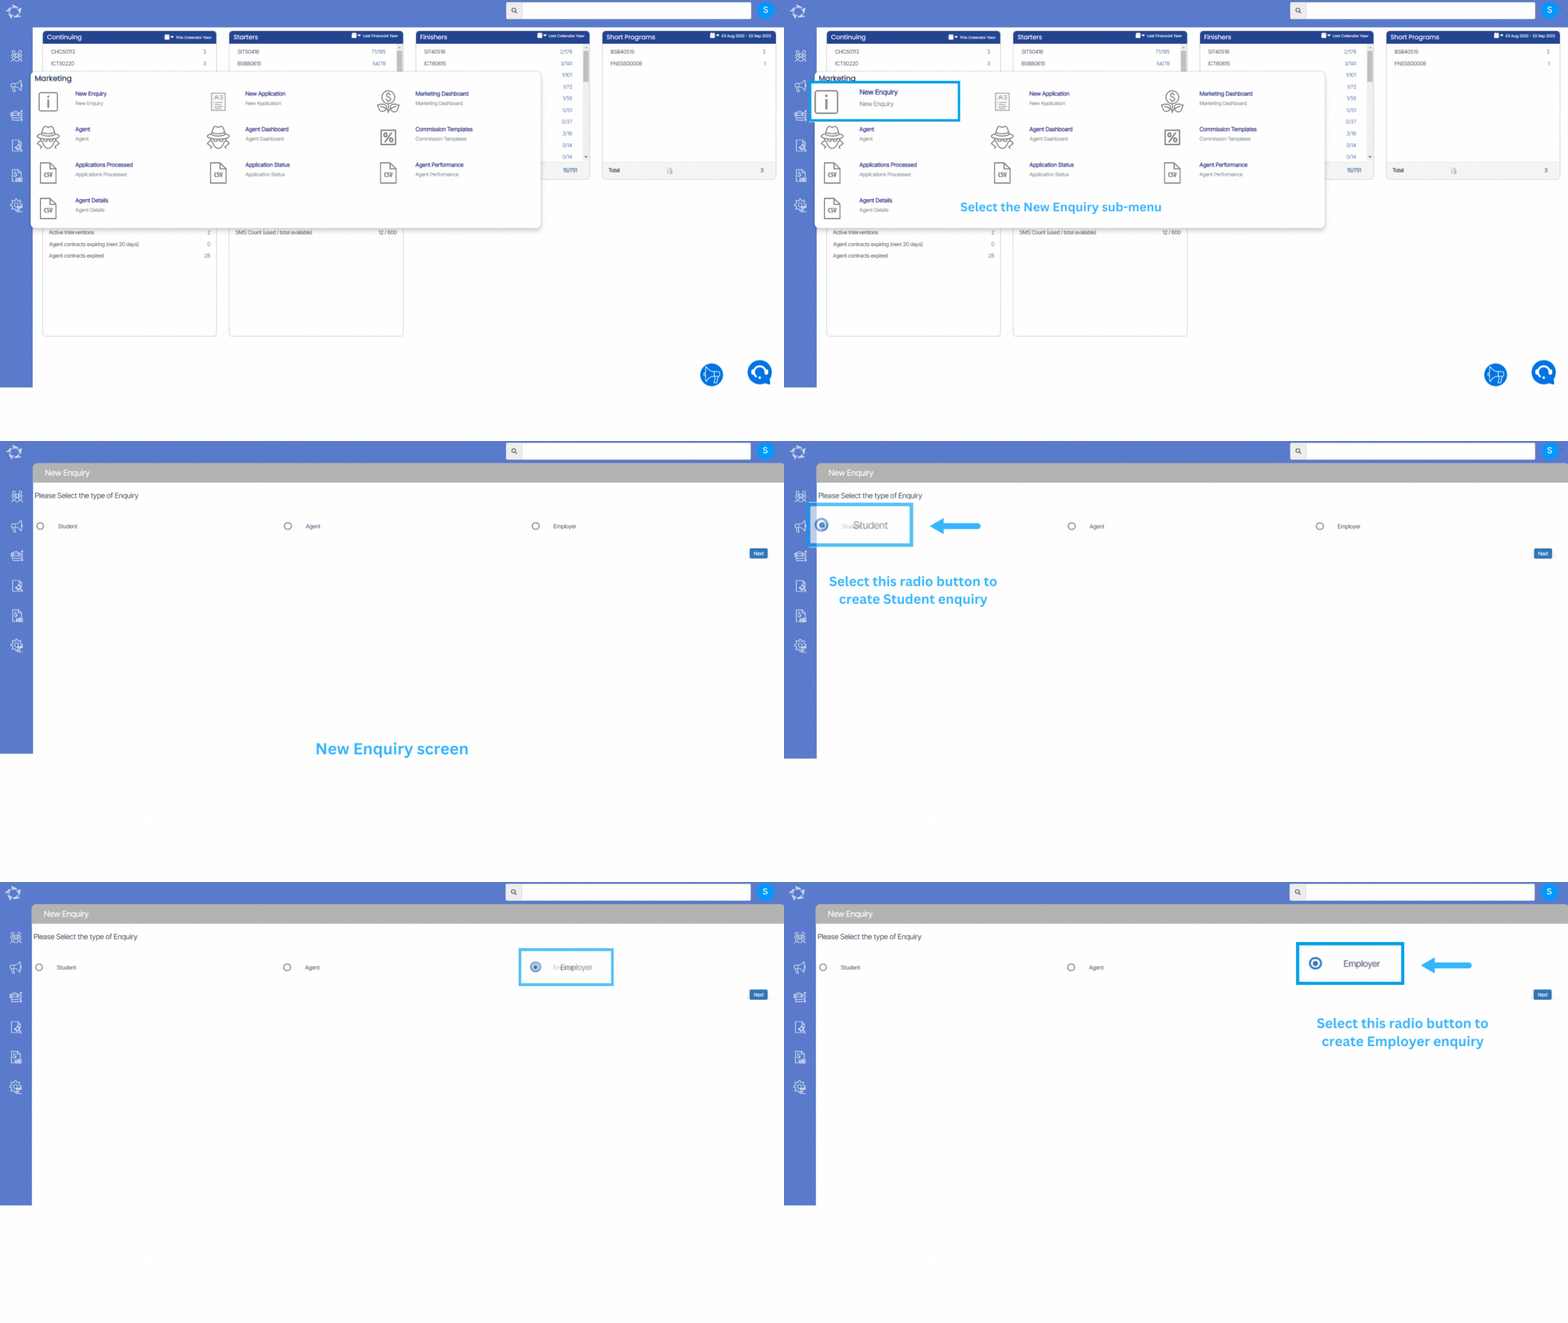
New Enquiry

Main Dashboard > Student Management > New Enquiry Sub-Menu

Overview

This screen allows you to enter enquiries (new leads) so you can track communication and the progression of discussions with them. Based on the type of college you will determine what type of enquiry you are entering. There are three enquiry types that are –

  • Student – This option would be used by any college type.
  • Agent – This option is typically used by CRICOS colleges to track their marketing of potential new agents.
  • Employer – This option is typically used by domestic funded or fee-for-service (FFS) colleges, to track their marketing of potential new employers as a source of training their staff.

NCVER AVETMISS Student Data Submissions – Classic TEAMS Step 5

Subject Data

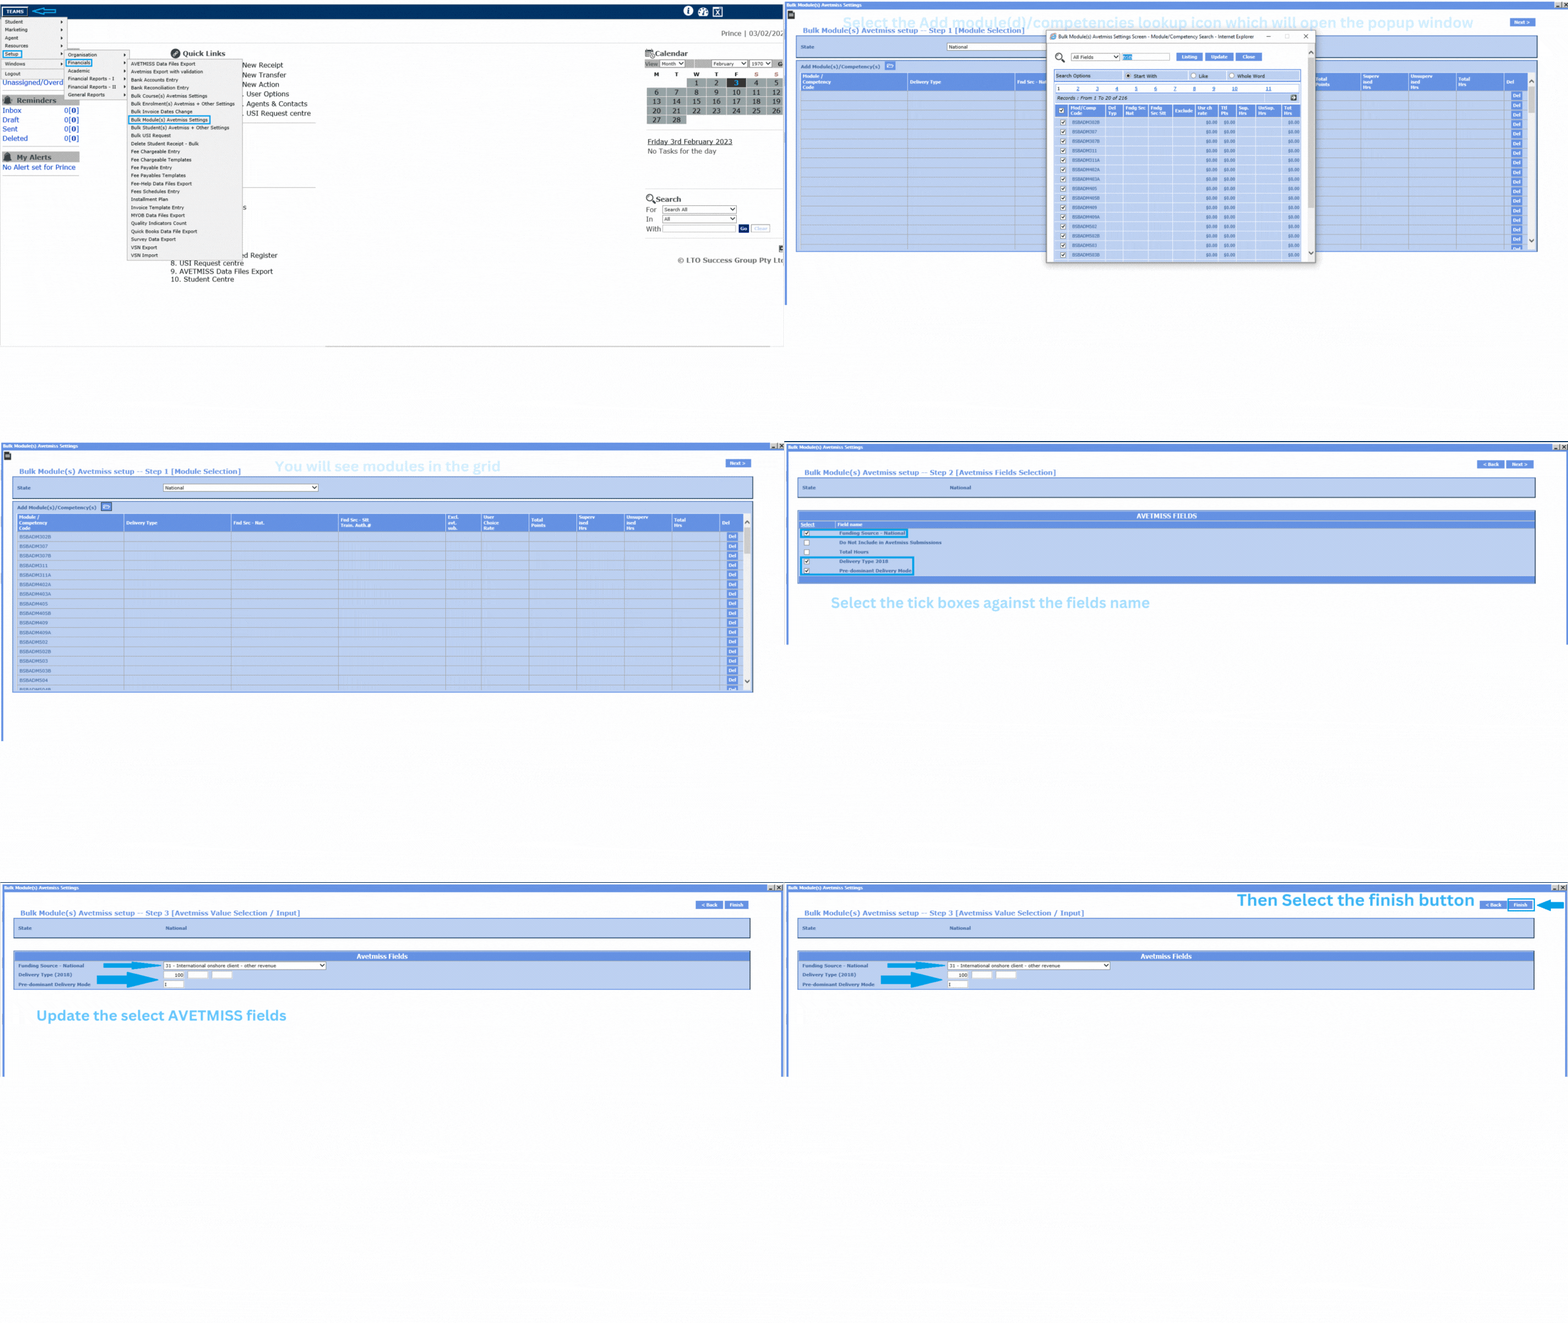
The Subject data is exported into NAT00060 file. this lists all the competencies/modules that are listed in the NAT00120 for the students and what their results are etc in 2022.

IMPORTANT – this is where you can get hundreds, sometimes thousands of errors (based on the number of enrolments in a competency/module that are listed in the NAT00120) when you do not setup your qualifications/courses in TEAMS with the correct AVETMISS settings. For each student listed in the NAT00120 with a specific competency/module (where there is a setting that is wrong/missing) that is how many times you will get the same error. So once you fix/add the correct setting for the competency/module in TEAMS those specific errors will disappear for those hundreds or thousands of rows in your next export and submission. The logic is fix in one spot and it will fix many rows of data in the NAT00120.

For example – you have module 10 that has 2 different errors as it is missing 2 different AVETMISS settings in TEAMS. For that module in the NAT00120 you have 700 students listed, this means each setting is a different error so you will have 700 rows of errors for one setting and for the 2 settings you will have 1400 rows of errors. BUT once you go to that module in TEAMS and add those 2 settings and do your next export and submission all 1400 rows of errors will not be there. This is a general rule but is NOT always the case.

To review and clean up any data for Subjects/module/competencies you need to go TEAMS > Setup > Financials > Bulk Module(s) AVETMISS Screen to updated the AVETMISS settings for the module in bulk.

Note – To update the Descriptive Code and Descriptive Name for the Module, you need to go to TEAMS > Setup > Academic > Module ( On this screen you need to search for the module and update the correct module descriptive code and name) and to update the Nominal hours for modules in TEAMS, you need to go to TEAMS > Setup > Academic > Module. On this screen you need to search for the module and then go to AVETMISS tab to update the Nominal hours.

The Module Descriptive Code and Module Descriptive Name is a mandatory field in TEAMS and you can update the correct descriptive code and Name from the TGA site (training.gov.au) and that’s what will print in a record of results. For the Subject Name field on the subject screen, you can have whatever you want as they are internal.

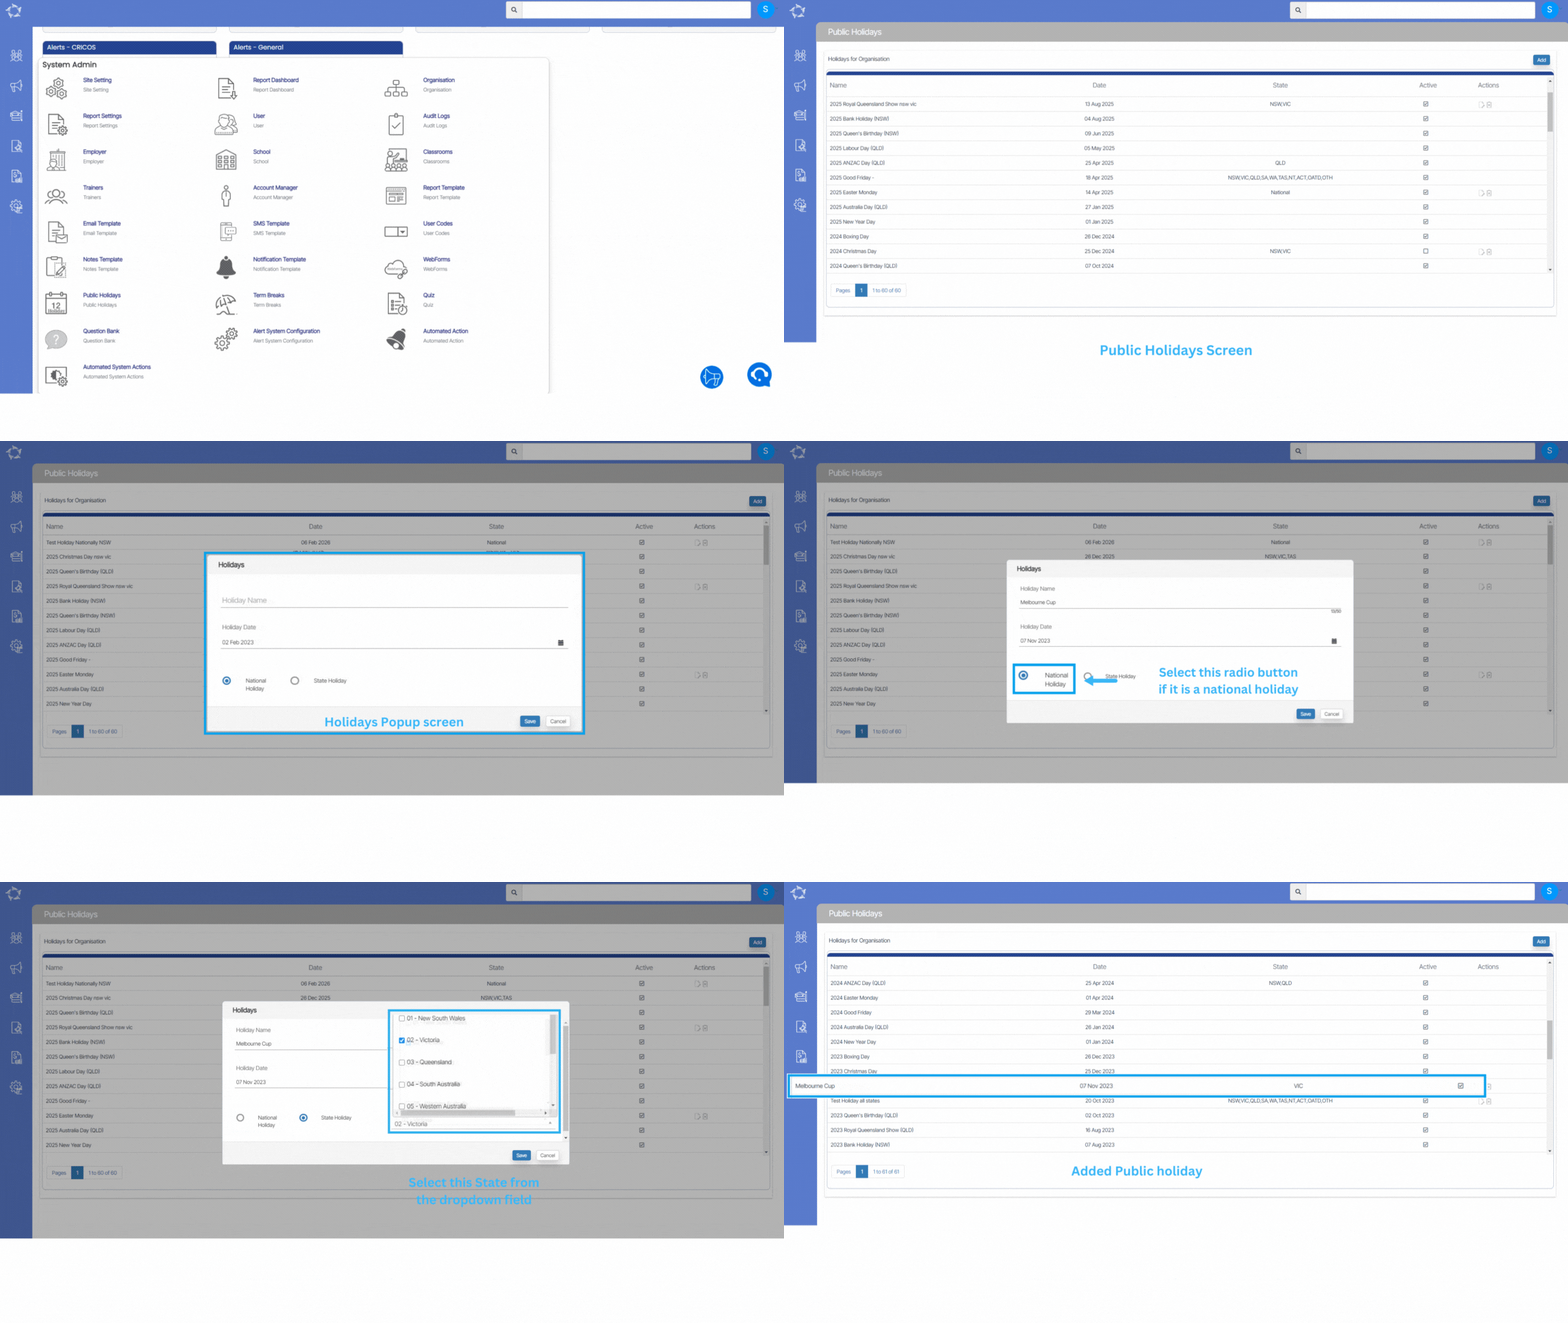
Public Holidays – New Radio Buttons (National or State)

We have added two new radio buttons (National and State) on a Public Holidays Screen in the system. By using these radio buttons, you can manage the National level and State level holidays for your RTO.

State Holidays

  • When you select the radio button for State, the system will show you a dropdown next to the State radio button and you can select states manually by selecting the tick boxes. Once you select and save, you will be able to see those selected states in the grid on the public holidays screen.

National Holidays

  • When you select the radio button as National holiday , it will display National in the State column on the holidays screen.

Applications Processed Report Data Columns

Below is the table that will show the columns and their explanations.

ColumnsExplanation
Student NoStudent number generated by TEAMS
Student NameStudent name entered on the edit student details screen
CampusCampus name in which the student/applicant is enrolled
Enrolment NoEnrolment number generated by TEAMS
Enrolment TypeIt will show you the enrolment type selected on the Edit Enrolment details screen
CRICOS CodeCRICOS code updated for the programs
ProgramProgram name
Start DateStart date of the Enrolment/Application.
Processed DateProcessed date of the Enrolment
StartedThis column will display as Yes if the enrolment is started and No if the enrolment is not started
FinishedThis column will display as Yes if the enrolment is finished and No if the enrolment is not started
End DateEnd date of the Enrolment/Application
Duration WeeksThe total duration of the programs linked to the enrolment in weeks
Study WeeksThe total study weeks of the Enrolment
Account ManagerThe Account Manager linked to the Student/Applicant
AgentThe Agent linked to the enrolment
NationalityThe Nationality of the student/applicant
Visa TypeVisa type of the Student/Applicant selected on the Visa Details screen
Enrolment DateEnrolment processed date
Amount OwingThe Amount Owing by the Student/Applicant.
Tuition FeeTotal Tuition Fee of the Student/Applicant
CountryThe Country of the student/applicant selected in the Edit Student
UserUser name by which the Student/Applicant has been created.
Agent AddressAddress details of the agent linked to the student/applicant.
Marketing SourceThe Marketing Source (Social Media, Word of Mouth etc)
Level of StudentThe Level of student/applicant selected in the Edit Student
Enrolment OutcomeIt will show you the enrolment outcome selected on the Edit Enrolment details screen
RegionRegion of the Student/Applicant
Skype NameSkype name of the student/applicant
EmailEmail address of the student/applicant
MobileMobile number of the student/applicant
PhonePhone number of the student/applicant
International PhoneInternational number of the student/applicant
EmployerThe Employer name linked to the Student/Applicant.
Enrolment StatusThe Enrolment Status (started, not yet started) will display under this column.

Applications Processed Report Filters

Below are the filters and their explanation for the Applications Processed Report.

General Tab FiltersExplanations
Report start dateSelect the report start date from the calendar
Report end dateSelect the report end date from the calendar
CampusSelect specific campus from the dropdown.
ProgramThis is a magic search field and you can search and select the program
Enrolments to includeThis dropdown will show you (current, to start and finished). You can select them as you required
Group ByPlease see TEAMS Basics
Sort byPlease see TEAMS Basics
Asc/DescPlease see TEAMS Basics
Advance Tab Filters
Enrolment TypeYou can select the Enrolment Type from the drop-down

Select the “Print” Icon  to generate the report. After clicking on it, the system will direct you towards the report dashboard screen. You can see the report status over there if it’s generated or not. Once it’s generated, download the report.

Application Status Report Data Columns

The below table will show you the columns and their explanation that will get printed in the report.

ColumnsExplanation
Application Creation DateCreation date of the application
Application NoApplication number generated by the system
Applicant NameApplicant name updated on the Edit applicant details screen
Date of BirthDate of birth of the Applicant
CampusCampus name under which the applicant is enrolled
ProgramProgram name under which the applicant is enrolled
Preference
NationalityNationality of the Applicant
AgentAgent name linked to the applicant
Employer NameEmployer name linked to the applicant
Start DateStart date of the program
DurationDuration (in weeks) of the program
Total FeeThe total fee of the program
UserUser name
Application TypeApplication type (CoE or Non CoE) selected in the system
Application StatusThe current Application status (Current or Converted) will display under this column
Student NoThe student number generated by the system
Marketing SourceThe marketing source of the applicant (Newspaper, agent etc)
Account ManagerThe account manager’s name selected at the Applicant level
Total Tuition FeesThe total tuition fees of the program
Total Other FeesThe total amount of other fees will display under this column
Program NameName of the program
Level of StudentThe Level of the applicant selected in the Edit Student screen
RegionRegion of the Student/Applicant
Phone NoPhone number of the applicant
Mobile NoMobile number of the applicant
Email AddressEmail Address of the applicant
International Phone NoInternational phone number of the applicant
Last ContactThe last contact log that has been made in the system
Agent Email IDEmail address of the agent
SkypeSkype ID of the applicant
Onshore/Offshore StatusOnshore or Offshore status of the applicant
Agent CommissionTotal agent commission