Unit of Studies – Entry Screen

Main Dashboard > Academics > Unit of Studies > Unit of Study Button

To add or edit a unit of study, start by selecting the + Unit of Study button. This will take you to the Unit of Study Entry screen, where you’ll find various fields to complete. Make sure to enter all the necessary information in each field, including the code and name of the unit of study, its descriptive code and descriptive name, the campus name and other relevant details. Once you’ve filled in all the required fields, select Save. This will ensure that your unit of study is properly recorded and can be easily accessed and managed in the future.
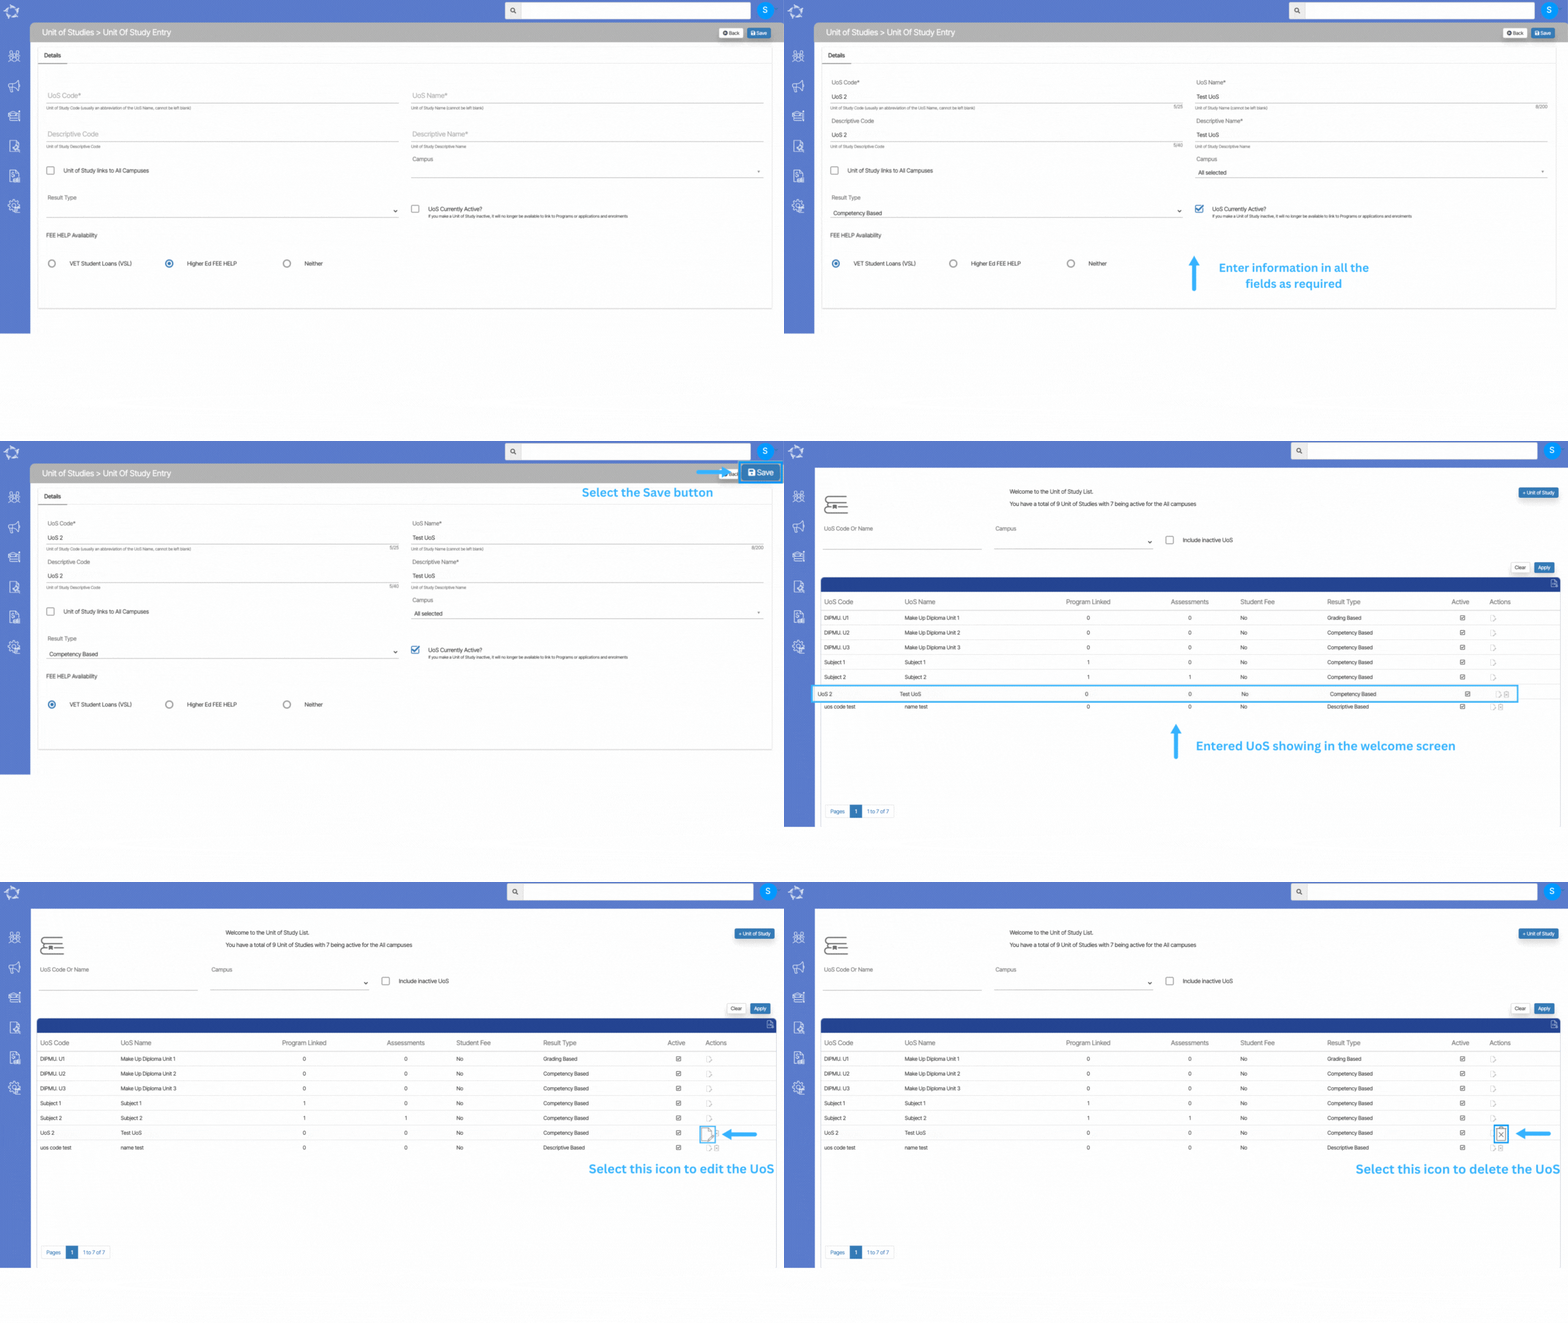
Explanation of the fields on the Unit of Study Entry Screen is below:

FieldsExplanation
UoS CodeThis is a mandatory field and this field cannot be left blank
UoS NameThis is a mandatory field and this field cannot be left blank
Descriptive CodeYou can write UoS Descriptive Code in this field.
Descriptive NameYou can write UoS Descriptive name in this field.
Unit of Study to All CampusesSelect this box if you want to link the UoS to all campuses.
CampusYou can select desired campuses manually from this dropdown.
Results TypeFrom the dropdown, you can select the result type as Competency Based, Descriptive Based or Grading Based
UoS Currently ActiveSelect this box to make the UoS active.
FEE-HELP availability.This field has two three radio buttons: VET Student Loans (VSL), Higher Ed FEE HELP and Neither. Select the desired option.

ASQA Class Roll Report Filters

Below table will show you the explanation of the filters on the ASQA class roll report filters screen.

General FiltersExplanations
Week Start DateSelect the week Start date from the calendar icon
Week End DateSelect the week End date from the calendar icon
Campus NameSelect any specific campus for which you want print the report
TimetablesYou can select multiple campuses from the timetable dropdown and this dropdown will show you only those campuses which are linked to the selected campus
Load Sessions from above SchedulesThis is a button and when you select, it will show session in the sessions dropdown
SessionsYou can select sessions as All or any specific session from the dropdown
Print This dropdown will show you two options (only started students and all students). You can select them as you required
Sort By 1Please see TEAMS Basics
Asc and DescPlease see TEAMS Basics

Click on the “Print” Icon  to generate the report. After clicking on it, the system will direct you towards the report dashboard screen. You can see the report status over there if it’s generated or not. Once it’s generated, download the report.

Subject Entry Screen

Main Dashboard > Academics menu > Subjects Entry

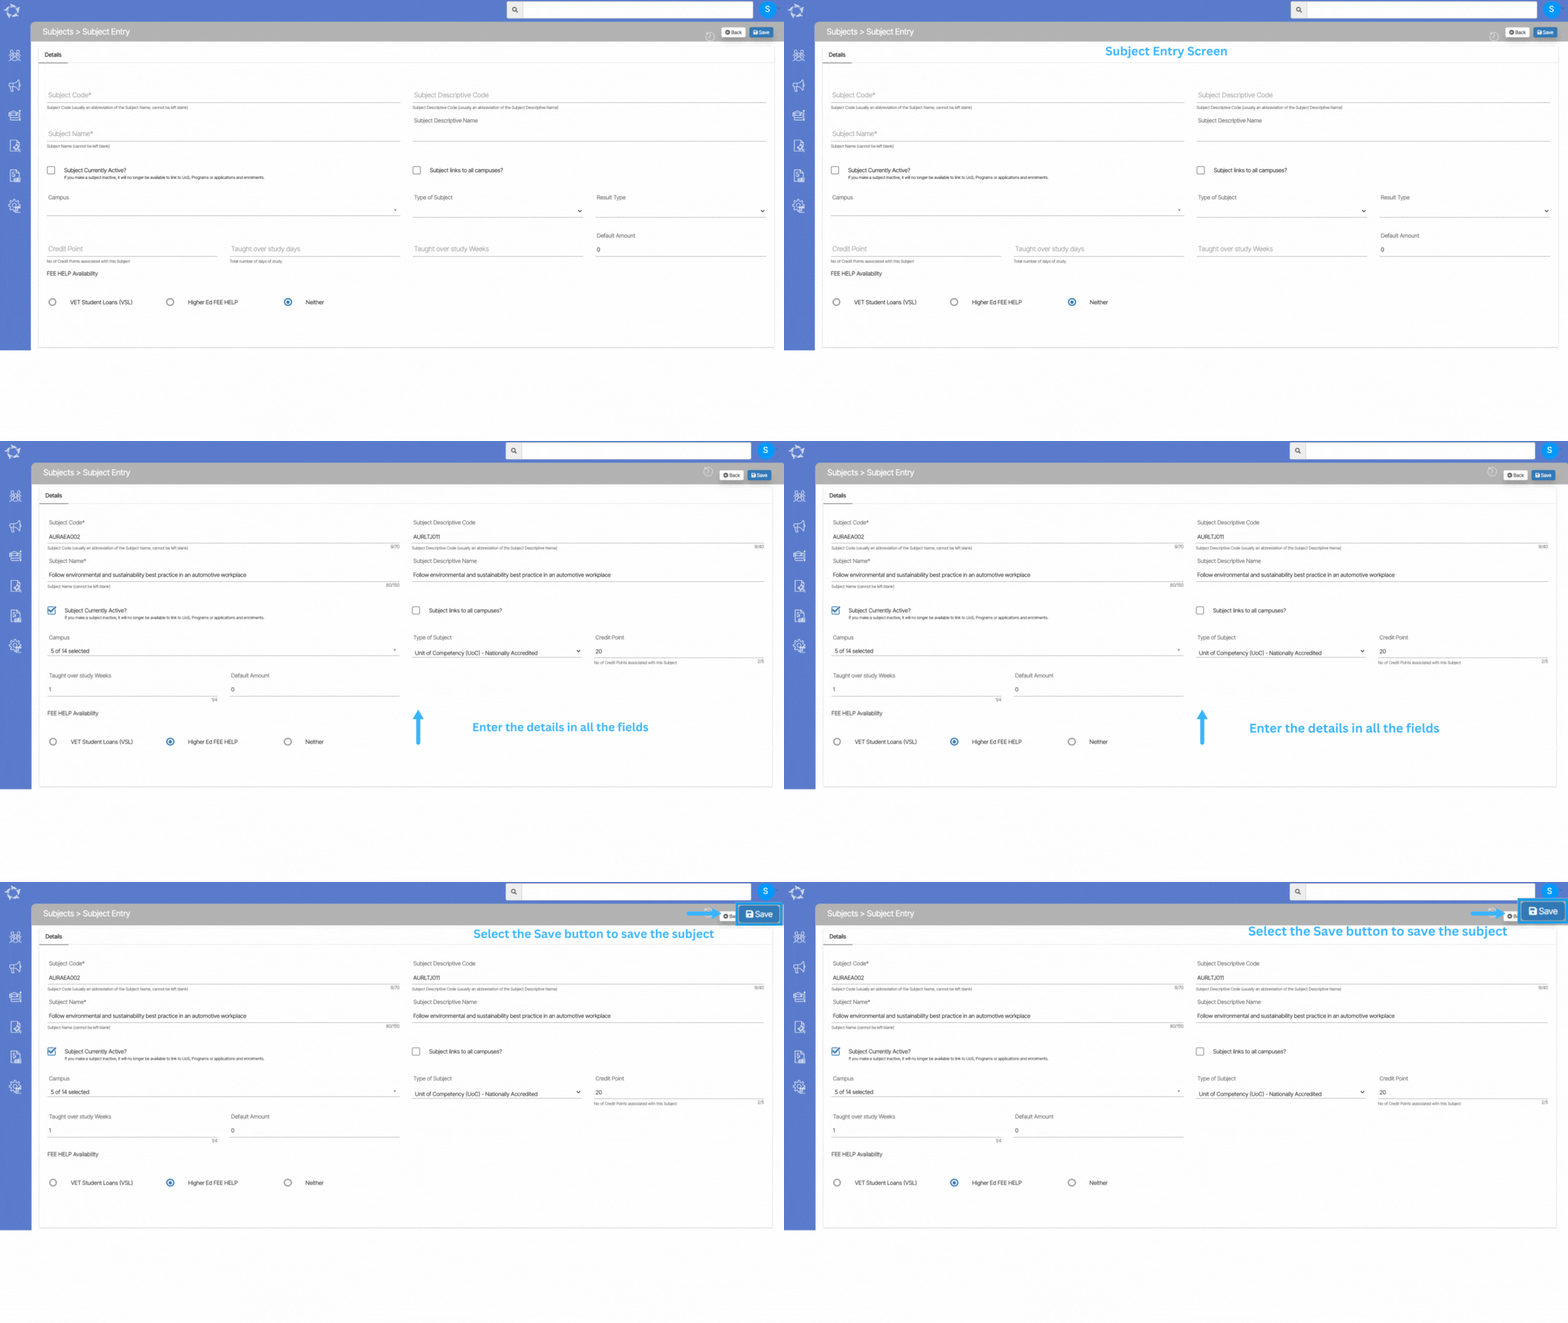
When accessing the Subjects Entry screen, you will be presented with several fields where you can enter and edit subject details. It is essential to fill out all the required fields to ensure accurate and complete information.

Each field serves a specific purpose, such as the subject code, subject name, subject descriptive code, subject descriptive Name and subject prerequisites. By providing all the necessary information, you can easily manage and organise subjects and facilitate a smooth learning process.

Explanations of the fields are below:

FieldsExplanation
Subject CodeThis code serves as a unique identifier for the subject and is used to differentiate it from other subjects.
To ensure accuracy, it is recommended to search for the subject code from the training.gov.au website, which is a database of nationally recognised training and qualifications in Australia.
Subject Descriptive CodeYou can add Subject Descriptive Code in this field.
Subject NameThe subject Name serves as a unique identifier for the subject and is used to differentiate it from other subjects.
To ensure accuracy, it is recommended to search for the subject code from the training.gov.au website, which is a database of nationally recognised training and qualifications in Australia.
Subject Descriptive NameYou can add Subject Descriptive Name in this field.
Subject Currently Active?When adding or editing a subject, there is typically an option to select a box indicating whether you want to make the subject currently active.
Subject links to all campusesThere may be an option to select a box indicating whether you want to make the subject available for all campuses.
This means that the subject can be studied at any campus location where it is offered.
Type of SubjectThis is a User Code in TEAMS and you will see two subject types under the dropdown.

Unit of Competency (UoC) – Nationally Accredited – is the smallest component of a Training Package that can be assessed and recognised. It gives a description of the skills and knowledge required to perform effectively to a specific standard in a particular workplace role or function.

Subject – Other -By choosing this particular option, you will gain the ability to access an additional field known as Result Type for the subject labeled as other. This option provides an opportunity to further refine and specify the type of results you are seeking for the given subject.
Result TypeThis dropdown will show you three different results Competency Based, Descriptive Based and Grading based.
Credit PointIn this field, you can enter the credit point value for the given subject. This value represents the number of credits that the subject is worth in a particular academic program.
Taught over study daysYou can enter the total number of days that you have studied or will study a particular subject
Taught over study weeksIn this field, you can enter the total number of weeks that a particular subject is taught over.
Default amount If you prefer to only raise invoices based on subjects then select this option instead.
VET Student Loans (VSL)This tick box is used to indicate whether the subject is eligible for VSL (VET Student Loans) or FEE-HELP. VSL FEE-HELP is an Australian government loan program that helps eligible students pay for their education-related expenses.
Higher Ed FEE HELPThis tick box is used to indicate whether the subject is eligible for FEE-HELP (Higher Education Loan Program) financial assistance.
NeitherThis tick box is used to indicate that the subject is not eligible for FEE-HELP availability.

NCVER AVETMISS Student Data Submissions – Classic TEAMS Step 6

Program Data

The Program data is exported into NAT00030 NAT File. This will list all the Programs that are listed in the NAT00120 for the students studying in 2022.

IMPORTANT – This is where you can get hundreds, sometimes thousands of errors (based on the number of enrolments in a course that are listed in the NAT00120) when you do not setup your course in TEAMS with the correct AVETMISS settings. For each student listed in the NAT00120 with a specific course (where there is a setting that is wrong/missing) that is how many times you will get the same error. So once you fix/add the correct setting for the course in TEAMS those specific errors will disappear for those hundreds or thousands of rows in your next export and submission. The logic is fix in one spot and it will fix many rows of data in the NAT00120. 

For example – you have Course 1 that has 3 different errors as it is missing 3 different AVETMISS settings in TEAMS. For that course in the NAT00120 you have 400 students listed, this means each setting is a different error so you will have 400 rows of errors for one setting and for all 3 settings you will have 1200 rows of errors. BUT once you go to that course in TEAMS and add those 3 settings and do your next export and submission all 1200 rows of errors will not be there. This is a general rule but is NOT always the case.

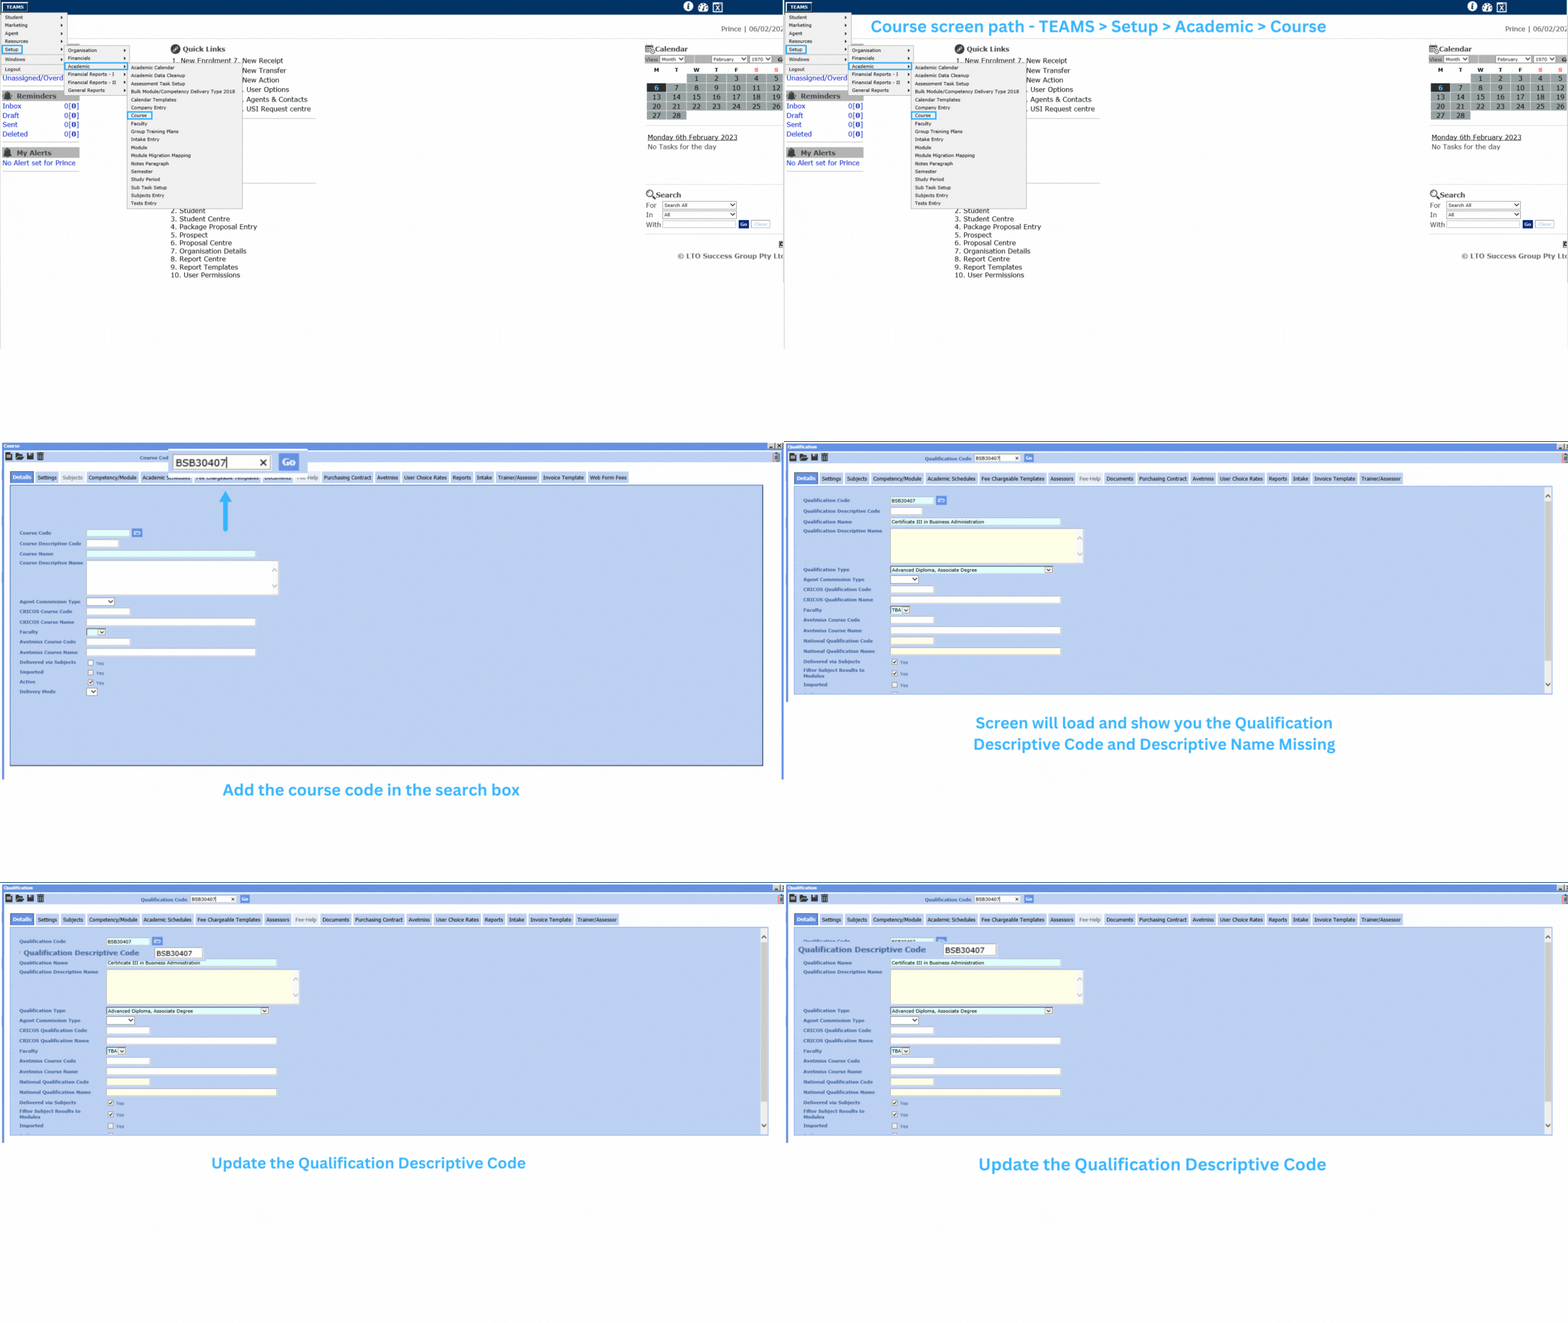
To update the descriptive code and name of the qualification, you nee to go to TEAMS > Setup > Academic > Course.

Please note – To update the Qualification Descriptive Name in TEAMS, you need to speak to our support team. You can reach via support@rtosoftware.com.au or call us on 1300 85 05 85.

What’s New – 09th Feb 2023 – Q and A

Here are some recent questions that we get asked and the answers on how to do them in TEAMS.

QuestionsAnswers
1. Enrolment is not appearing in the AVETMISS Export?The post will explain you how you can get the enrolment in AVETMISS Export. To know more select the read more
2. Difference between Commencement and Completed?The post will explain you the difference between Commencement and Completed. To know more select the read more

Enrolment is not appearing in AVETMISS Export

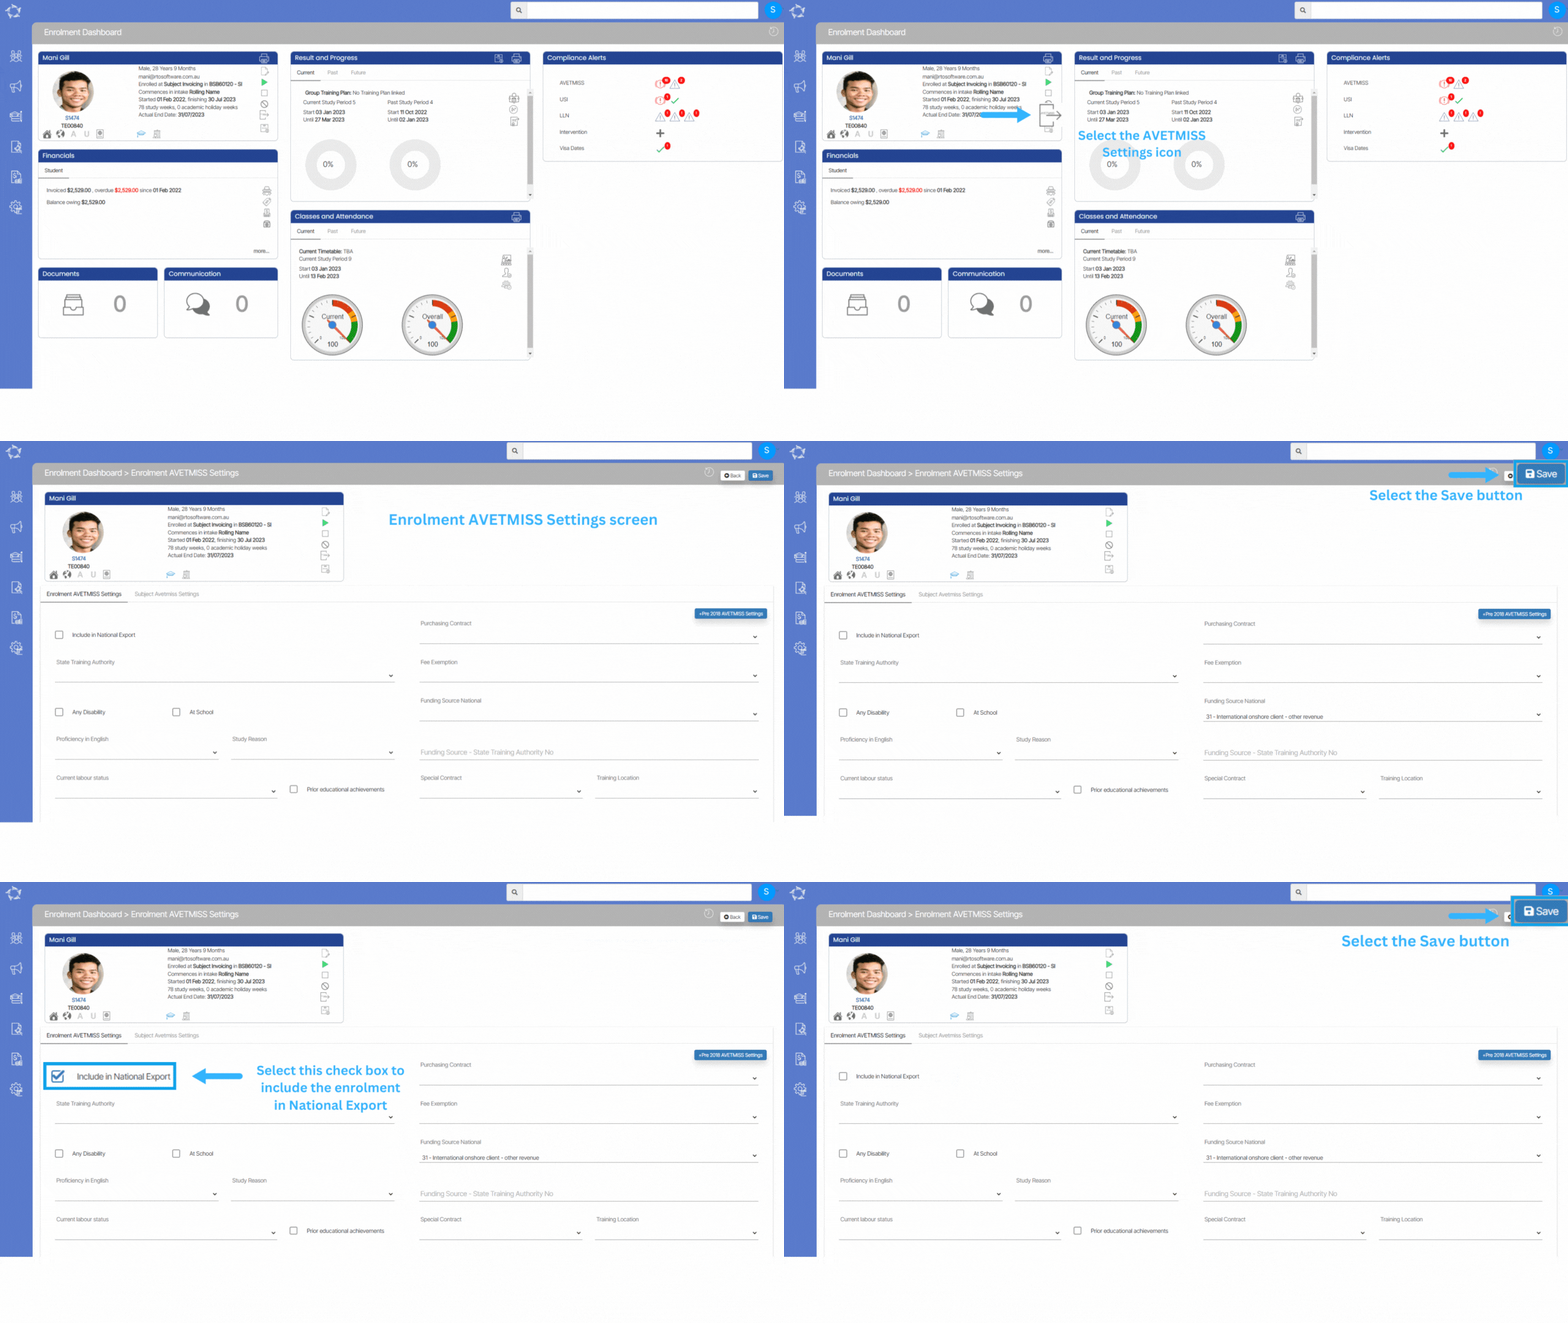
We have recently got asked a question about the enrolment not appearing in the AVETMISS Export. The enrolments don’t show up in AVETMISS export when the Include in National Export is not selected on the Enrolment Dashboard > Edit AVETMISS Screen.

Please see the below steps to select the Include in National Export.

Note – If you have not selected the Funding Source National on this screen then system will not let you select the Include in national Export tick box. Once you have selected and saved the required fields then you need to regenerate the AVETMISS Export to see that enrolment.

Difference between Commencement and Completed Statuses

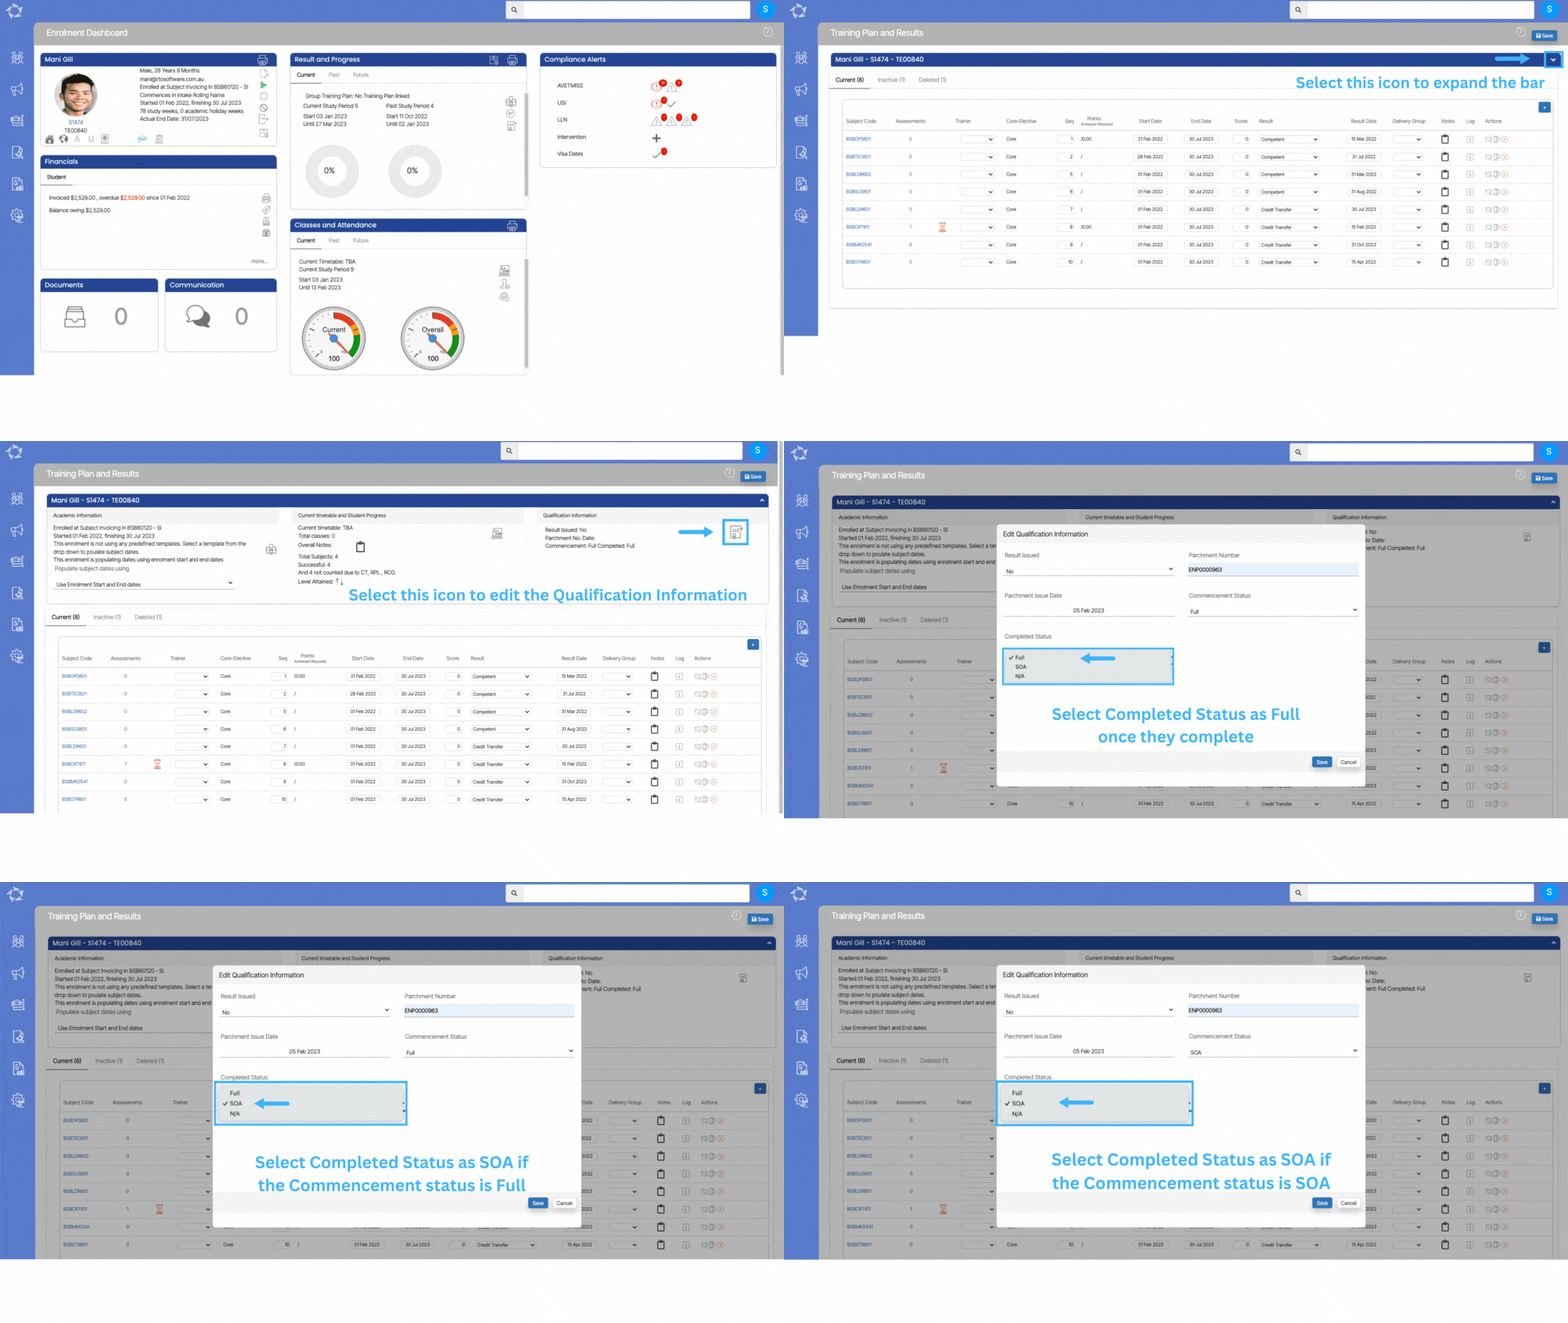
We have recently got asked about the difference between Commencement and Completed statuses of an enrolment. Please see below points to understand the qualification Information process on the Training Plan and Results screen.

Commencement StatusCompleted Status
If you are a CRICOS and the student is on their student visa and their intension is to complete the full qualification.
Then in such cases you need to set the commencement status as Full
Then the completed status should be selected as Full once they complete their qualification
If you are a Domestic and the student is studying a short course or a competency and their intension is to complete full qualification then also you need to set the commencement status as FullThen the completed status should be selected as Full once they complete their qualification
If you have students where they have the intension to commence full qualification and you set their commencement status as Full. They studied 2 or 3 subjects but in between the enrolment period they withdraw or cancel their enrolment then in such cases the commence status will stay as FullAnd you will select the completed status as SOA
There are some cases where you are aware that the student will study only 1 or 2 subjects then in that case you can select the commencement status as SOAWhere the Completed Status will also be SOA

Agent Profile Tile

Main Dashboard > Marketing > Agent Dashboard > Agent Profile Tile

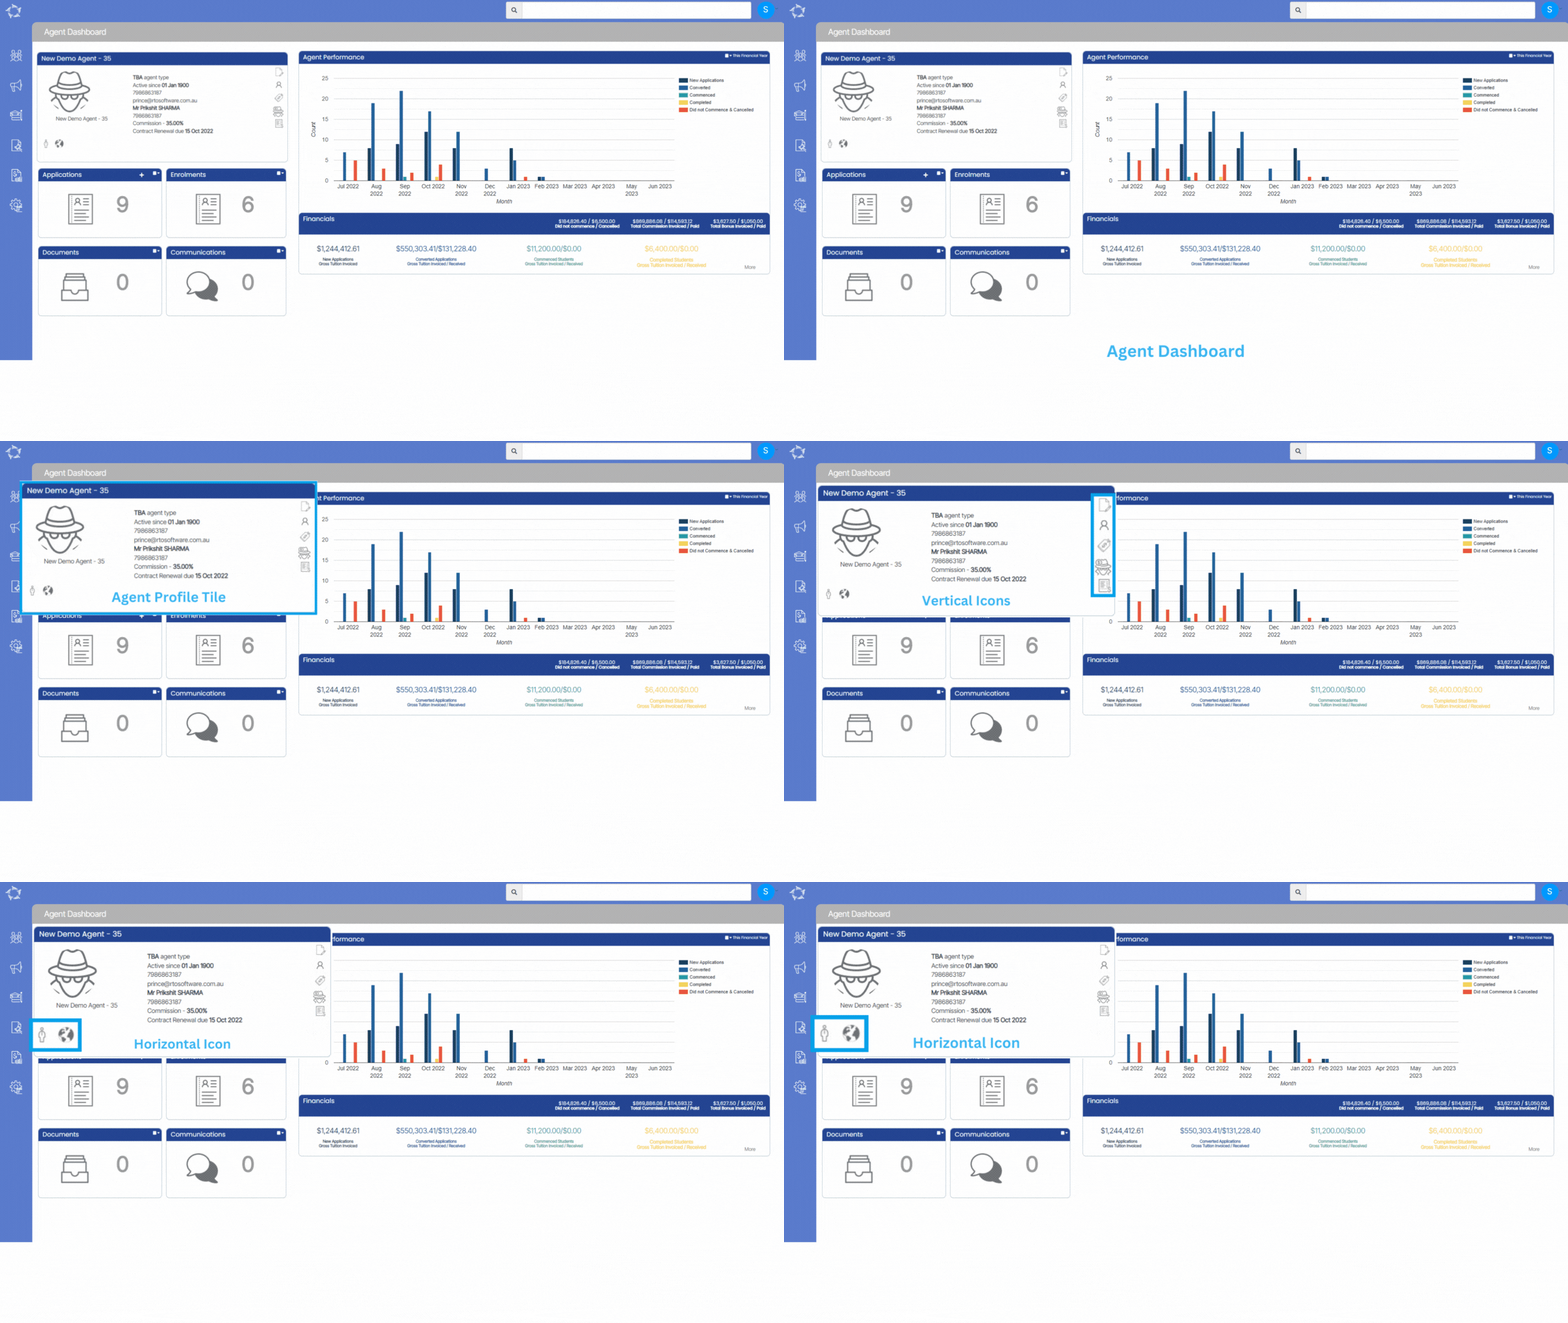
This tile provides you with basic information about an Agent and allows you to perform various actions related to the Agent’s account. Users can upload a profile picture for the Agent and edit their details as needed. Additionally, the tile displays any pending payments for the Agent, providing users with an overview of their financial status. Users can also create bonus invoices for the Agent through this tile, allowing them to reward the Agent for exceptional performance. The tile features different icons that allow you to update the data and perform different actions related to the Agent’s account.

You can upload an agent’s profile picture from here and edit the details as well for an agent.

Vertical Icons

Contacts

This is a tooltip and you can move your cursor on the
icon to view contacts for this agent

Commission Templates

This is a tooltip and you can move your cursor on the
icon to view Commission Template for this agent

Horizontal Icons

Account Manager

This is a tooltip and you can move your cursor on the
icon to view the Account Manager of this agent

Overseas

The Overseas Icon will be visible on the agent profile tile
if the agent is set as an offshore Agent.

NCVER AVETMISS Student Data Submissions – RTO TEAMS Step 6

Programs Data

The Program data is exported into NAT00030 NAT File. This will list all the Programs that are listed in the NAT00120 for the students studying in 2022.

IMPORTANT – This is where you can get hundreds, sometimes thousands of errors (based on the number of enrolments in a Programs that are listed in the NAT00120) when you do not setup your programs in TEAMS with the correct AVETMISS settings. For each student listed in the NAT00120 with a specific program (where there is a setting that is wrong/missing) that is how many times you will get the same error. So once you fix/add the correct setting for the programs in TEAMS those specific errors will disappear for those hundreds or thousands of rows in your next export and submission. The logic is fix in one spot and it will fix many rows of data in the NAT00120. 

For example – you have program 1 that has 3 different errors as it is missing 3 different AVETMISS settings in TEAMS. For that program in the NAT00120 you have 400 students listed, this means each setting is a different error so you will have 400 rows of errors for one setting and for all 3 settings you will have 1200 rows of errors. BUT once you go to that program in TEAMS and add those 3 settings and do your next export and submission all 1200 rows of errors will not be there. This is a general rule but is NOT always the case.

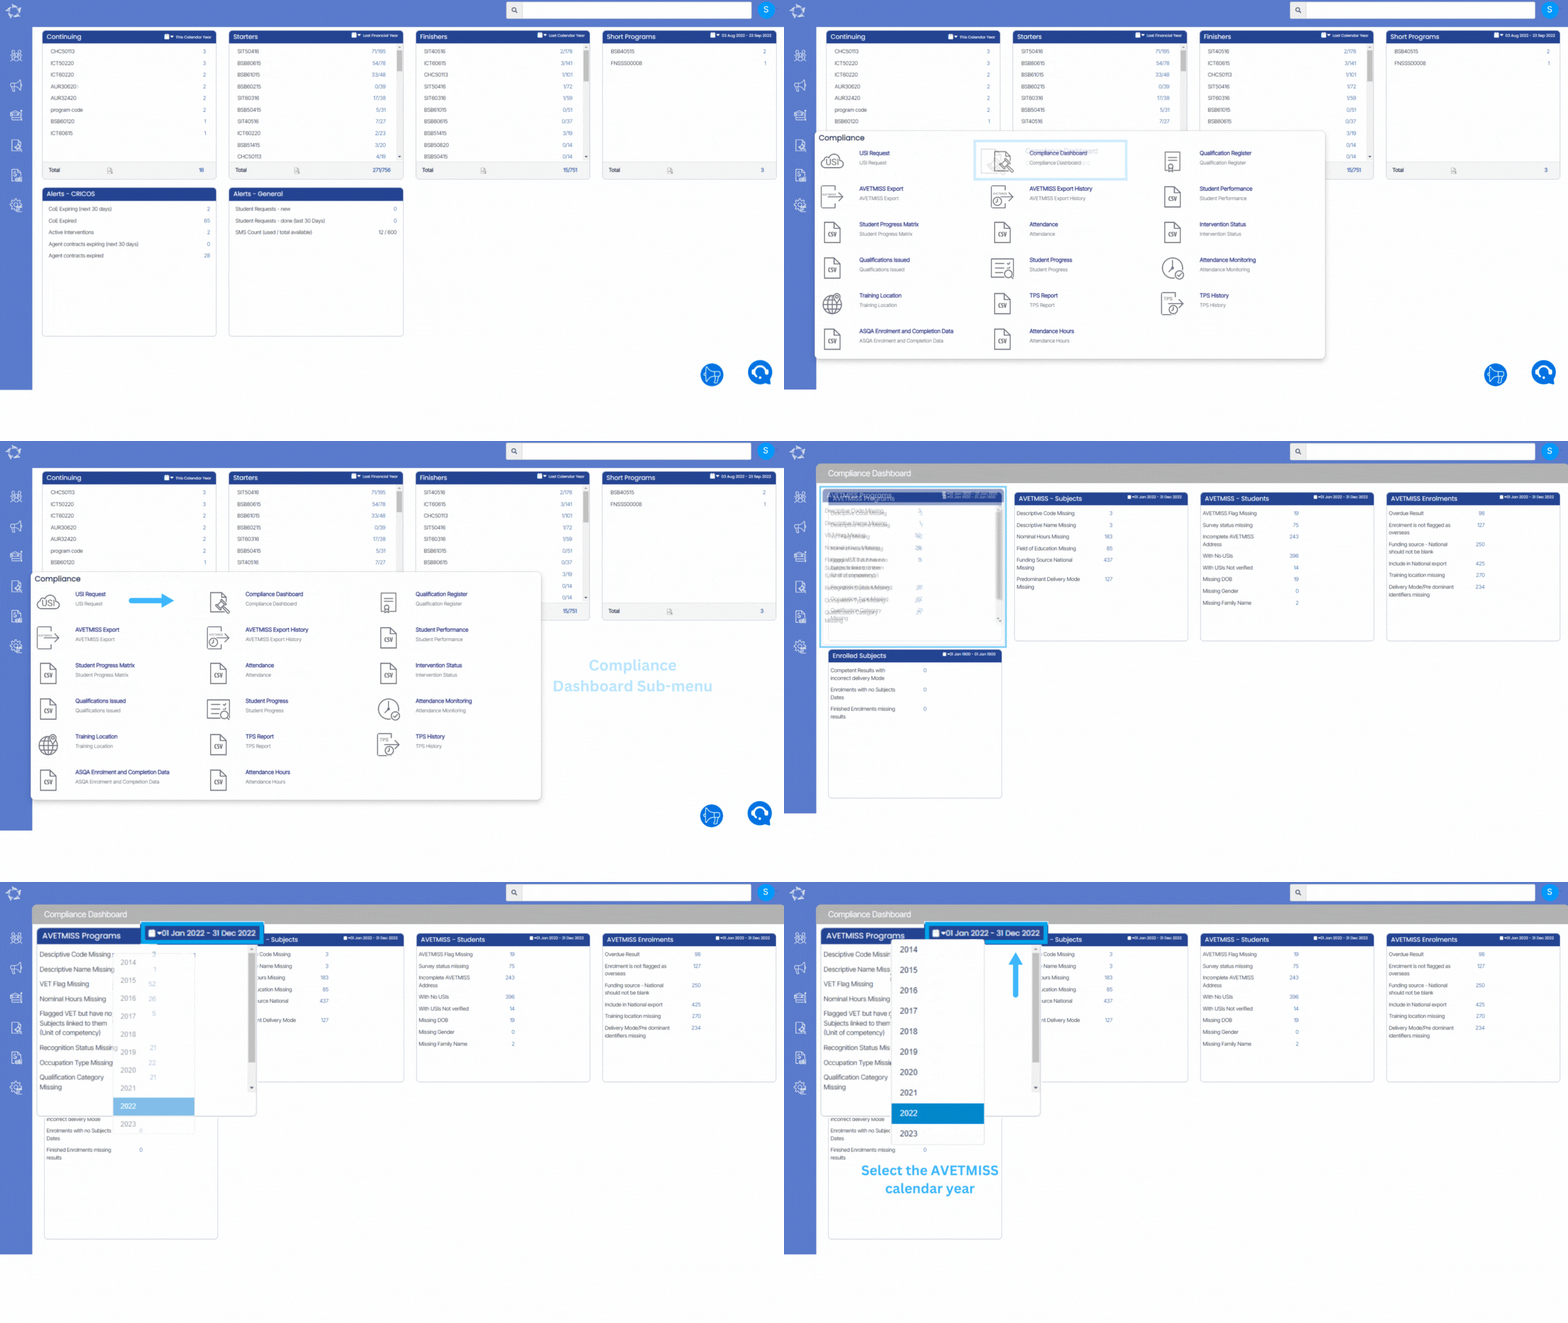
To review and clean up any data for Programs you need to go to the Main Dashboard > Compliance Menu > Compliance Dashboard.

To Know more about the AVETMISS Program data, select the below links.

Programs Descriptive Code Missing

Programs Descriptive Name Missing

Note – The other errors such as VET Flag Missing, Nominal Hours Missing, Flagged VET but have no Subjects linked to them (Unit of competency), Recognition Status Missing, Occupation Type Missing, Qualification Category Missing, Qualification Field Of Education Missing are non mandatory error for National submission. If you are doing a submission for State level then you need to focus on these errors in TEAMS.

Finishers Report Filters

The Finishers Report filters have two tabs General and Advance and the below table will show you the Filters with their explanation.

General FiltersExplanation
Report Start &End DatesThe system considers only the enrolment end dates to find enrolments within the specified date range.
CampusReport End Date is a date from till when we want our Report to end
ProgramThis is a Magic search Field from where you can select any Program from the Drop down
Enrolments to IncludeThis field has three radio buttons and you can select any of them one at a time. For example:
Show only Started – If you select this, it will only show you Finished students.
Show only to Start – It will show you students that are about to Finish.
Both – by selecting both the report will print Finished and about to Finish students.
Include Cancelled EnrolmentsThe system will only search for enrolments with end dates within the specified report period that have been canceled using the cancel enrolment function. It will not include enrolment outcomes marked as canceled for this purpose.
Group By and Sort ByPlease see TEAMS Basics
Advance FiltersExplanation
Timetable and ClassesThis is magic search field and you can search and select multiple timetables.
Print class names for enrolments in a report?To include class names linked to enrolments in the report, select the tick box. Please note that generating the report may take longer due to the possibility of one enrolment being associated with multiple classes, and the system will list all allocated class names.
Enrolment TypesThis is a user code in TEAMS and one can create the user code in TEAMS as you required. You can select multiple enrolment type from the dropdown.
Enrolment OutcomeIf you have setup the enrolment outcome on the User Code screen then it will appear under this dropdown.
Visa TypesSelect the Visa type from the dropdown.
AgentSearch and select multiple Agents in this field.
EmployerSearch and select multiple Employer in this field.
Account ManagerSelect multiple Account Manager from the dropdown.
CountrySelect multiple Campus from the dropdown.

Click on the “Print” Icon to generate the report. After clicking on it, the system will direct you towards the report dashboard screen. You can see the report status over there if it’s generated or not. Once it’s generated, download the report.