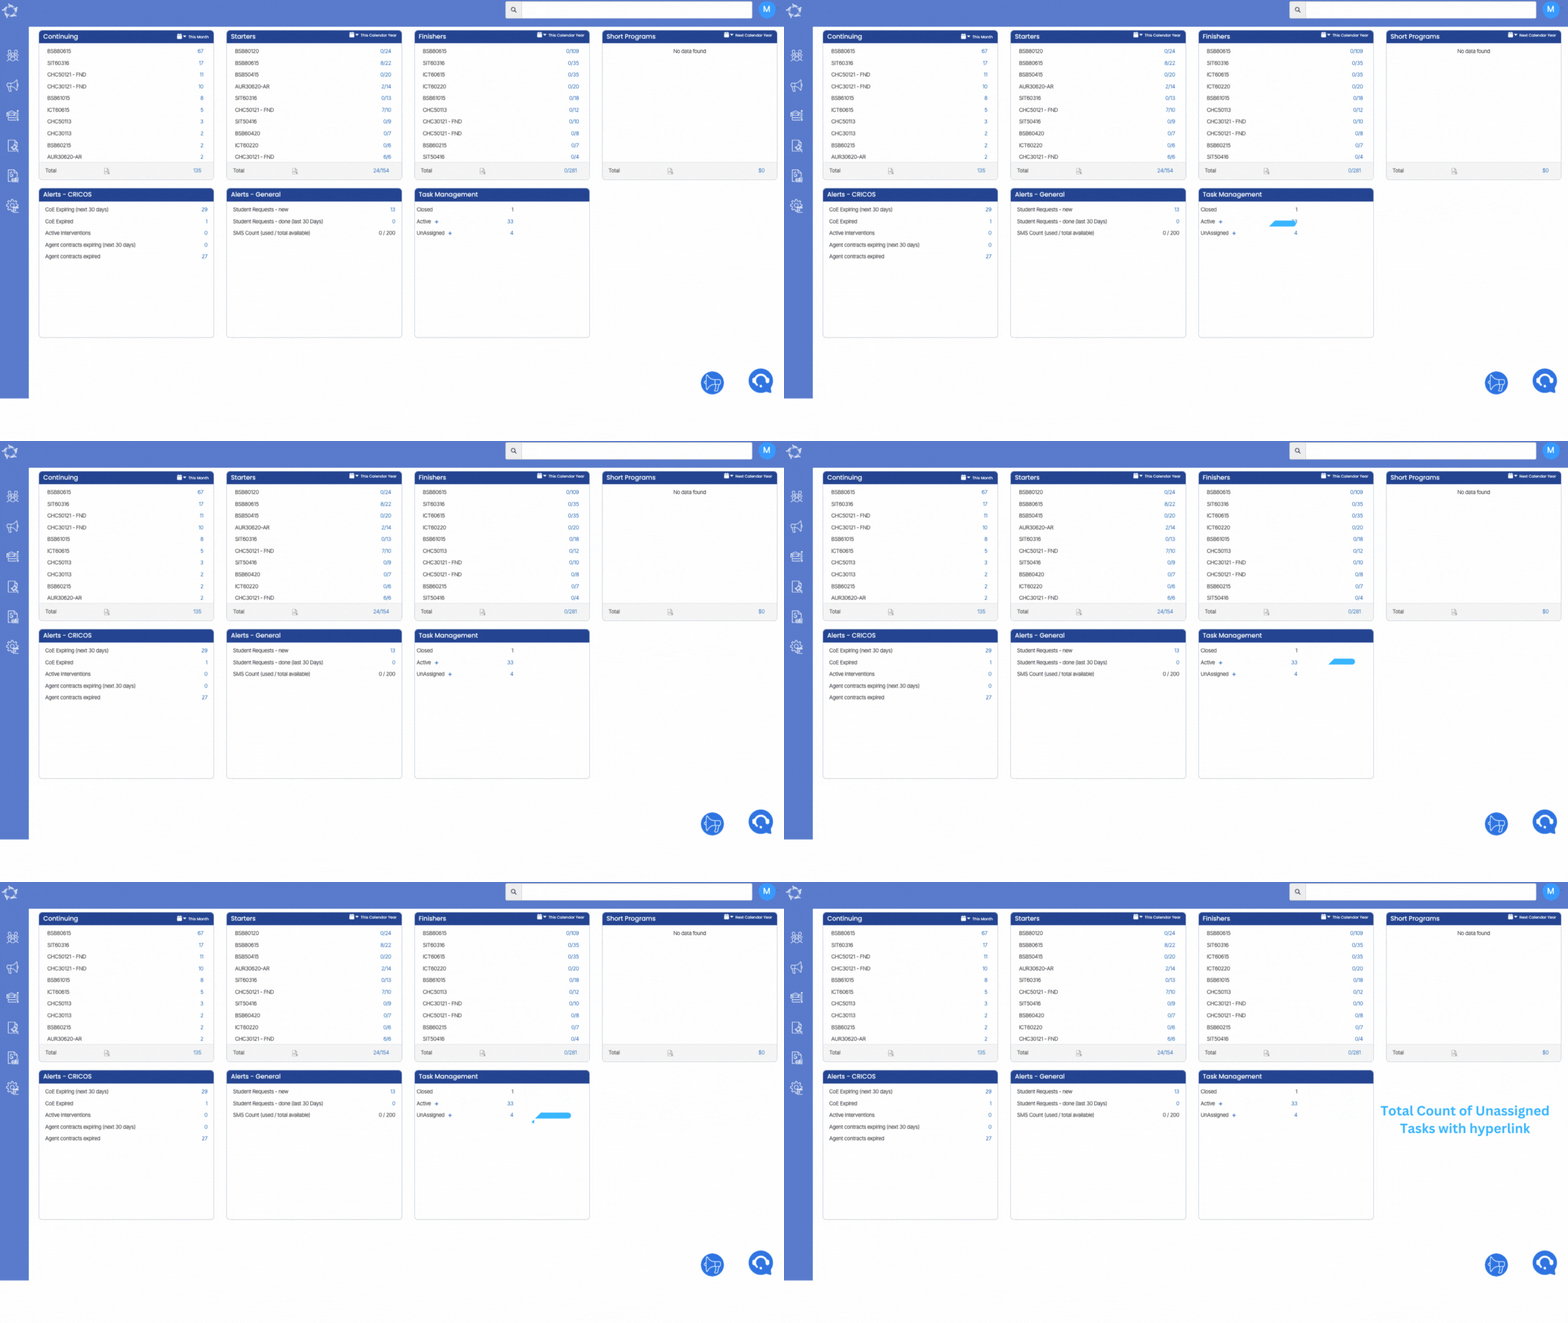
Task Entry > Set Recurrence Button

When you select the Task Recurrence button, a pop-up window will appear on your screen, providing several options for configuring the task recurrence:

Schedule Type:

Within the pop-up window, you will find three radio buttons—Daily, Weekly, and Monthly. By selecting one of these options, the system will schedule the task according to your choice.

If you choose Daily Radio Button, you can specify the task recurrence on the daily basis. The system will show you the below fields as shown in the table.

Fields Explanation
Range of RecurrenceThis field allows you to define the date range for the recurring task. You can set a start date to determine when the recurrence should begin and end.
End AfterIf you select this radio button, you can specify the number of occurrences after which the task will automatically end. For instance, if you set it to 10, the system will repeat the task 9 times because the system will include the task that you have created the recurrences for.
End ByAlternatively, if you choose this radio button, you can select a specific end date for the task recurrence using the calendar icon. The task will continue repeating until the specified end date is reached.
Every daysThis is a mandatory field. If you are choosing, the End After radio button for the specified occurrences then you must select the number of days for this field so that the system will look and create the task accordingly. For example – If you have entered the number 2 then the system will create a recurrence every second day.

Same as if you select the End By radio button and update the end date the system will look and create the task accordingly.

If you choose Weekly Radio Button, you can specify on which day of the week and for how long the task should recur. The system will show you the below fields as shown in the table.

Fields Explanation
Range of RecurrenceThis field allows you to define the date range for the recurring task. You can set a start date to determine when the recurrence should begin and end.
End AfterIf you select this radio button, you can specify the number of occurrences after which the task will automatically end. For instance, if you set it to 10, the system will repeat the task 9 times because the system will include the task that you have created the recurrences for.
End ByAlternatively, if you choose this radio button, you can select a specific end date for the task recurrence using the calendar icon. The task will continue repeating until the specified end date is reached.
Every WeeksThis is a mandatory field. If you are selecting, the End After radio button for the specified occurrences then you must select the number for every week, so that the system will look and create the task accordingly. For example – If you have entered the number 2 then the system will create a recurrence every 2 weeks.

Same as if you select the End By radio button and update the end date the system will look and create the task accordingly.

Please Note – You will also see tick boxes for the days of week (Sunday, Monday, Tuesday, Wednesday, Thursday, Friday and Saturday). When you select the days the system will create the recurrence every 2 weeks on the same days.

If you choose Monthly Radio Button, you can specify on which day of the month and for how long the task should recur. The system will show you the below fields as shown in the table.

Fields Explanation
Range of RecurrenceThis field allows you to define the date range for the recurring task. You can set a start date to determine when the recurrence should begin and end.
End AfterIf you select this radio button, you can specify the number of occurrences after which the task will automatically end. For instance, if you set it to 10, the system will repeat the task 9 times because the system will include the task that you have created the recurrences for.
End ByAlternatively, if you choose this radio button, you can select a specific end date for the task recurrence using the calendar icon. The task will continue repeating until the specified end date is reached.
Day of MonthThis is a mandatory field. If you are selecting, End After radio button for the specified occurrences then you must select the day of the month, so that the system will look and create the task accordingly. For example – If you have entered number as 2 then the system will create the recurrence on every second day of the month.

Same as if you select the End By radio button and update the end date the system will look and create the task accordingly.
Every MonthThis is a mandatory field. If you are selecting, the day of the month then you must mention the number for every month field. For example – If you have entered the number as for the day of the month and selected the number as 2 in every month field then the system will create the recurrence on the second month.

Same as if you select the End By radio button and update the end date the system will look and create the task accordingly.

After, selecting the above desired radio buttons, select the save button.

Group Training Plans Entry Screen Optimisation

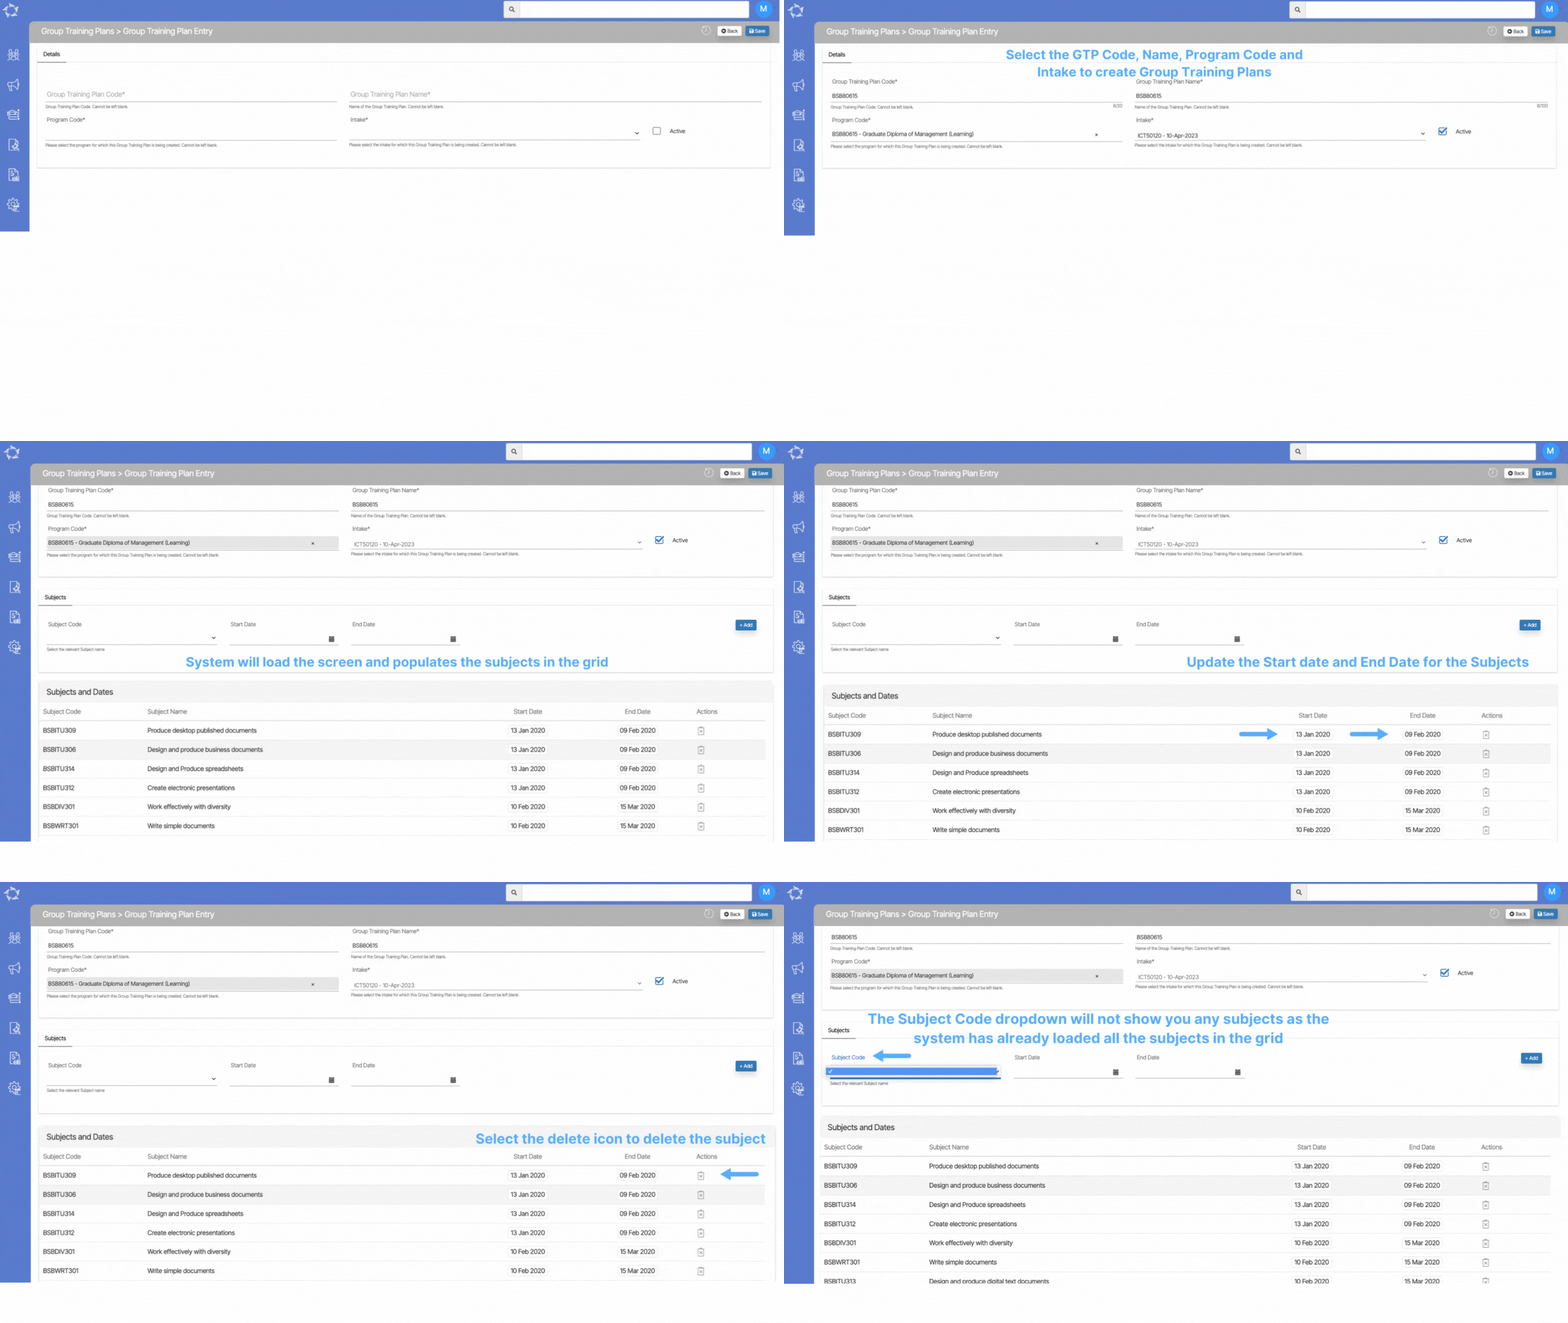
We have implemented significant optimisations and enhancements to the Group Training Plans entry screen. Previously, you had to manually input the subject, start date, and end date for each group training plan in the grid. However, we have introduced a new feature that simplifies the process.

Now, when you create a new group training plan, it automatically generates its own definition based on the program it is linked to, including the program code and name. It is important to note that certain fields, such as Group Training Plans code and name, Program Code, and Intake, are mandatory and must be filled in. Leaving these fields blank is not allowed.

Once the mandatory fields are saved and the Group Training Plan is created, it will automatically populate all the compulsory subjects from the selected program into the group training plan. You can then remove any subjects that are not required, eliminating the need for manual selection and addition of subjects to the grid.

In the grid, you have the flexibility to edit the dates of the subjects directly from the Start date and End date columns. Additionally, you can delete subjects using the delete icon located in the actions column.

Previously, you had to add subject dates one by one, but with this new enhancement, you can now edit the dates of multiple subjects simultaneously, by saving your valuable time and effort.

These improvements streamline the process of creating and managing group training plans, ensuring a more efficient and user friendly experience. We are committed to continuously enhancing our software to meet the evolving needs of our users and provide them with tools that improve productivity and ease of use.

NOTE – the Subjects tile, comprising the Subject Code dropdown, start date, and end date fields, will not display any subjects or their respective dates. Instead, the grid will show all the subjects linked to the program.

In the event that you delete a subject from the grid, it will reappear in the dropdown, allowing you to re-link it to the training plan at a later time. To do so, simply select the subject from the dropdown, specify the desired start and end dates, and add it back to the grid.

This functionality provides flexibility and ensures that subjects can be easily managed within the group training plan. It allows you to make changes to the plan’s composition and adjust subject dates as needed, providing a dynamic and customisable approach to training program creation and maintenance.

Financial Dashboard – New Refresh Icon on Financial Tiles

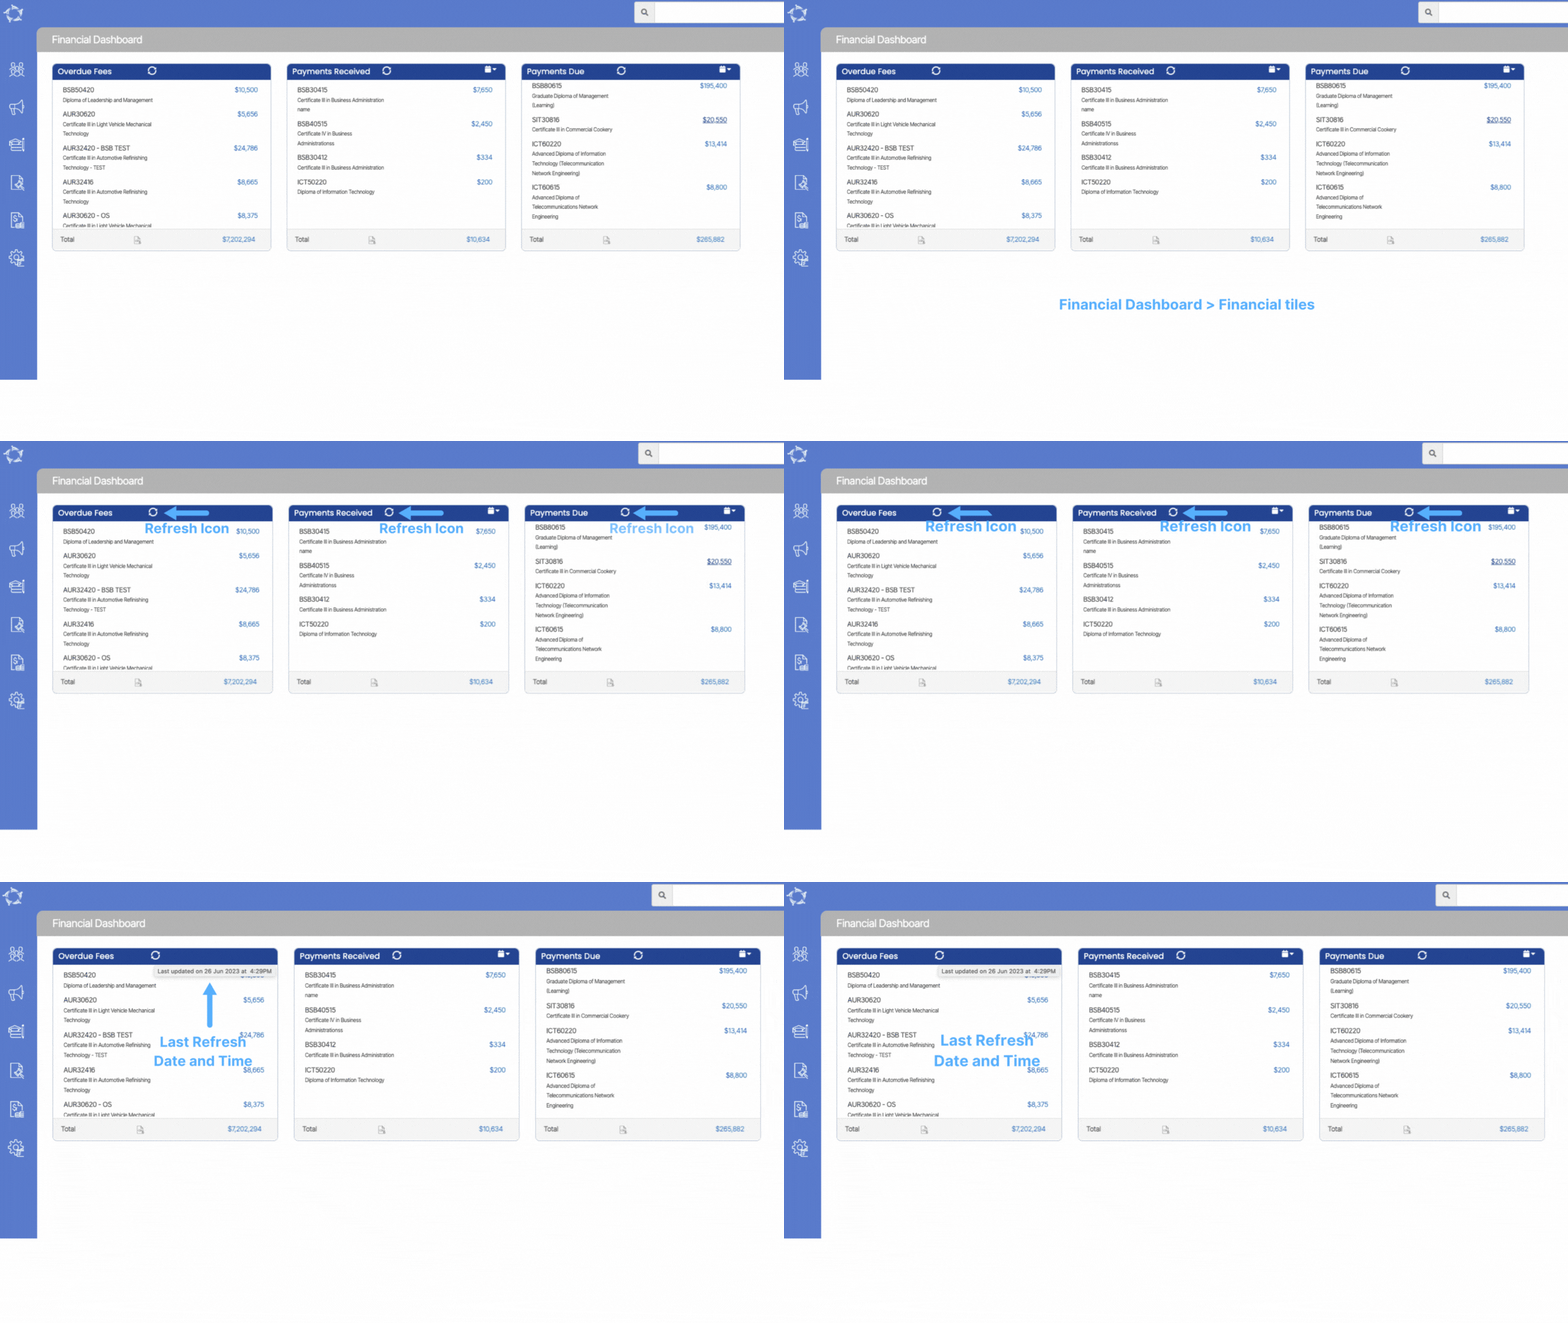
A new feature has been added to the Financial Dashboard that will make managing your finances even easier. You will now notice a new refresh icon accompanying the financial tiles, specifically the Overdue Fees, Payments Received, and Payments Due. With the new refresh icon, you can easily update and retrieve the most recent data related to overdue fees, received payments, and upcoming payments.

NOTE – We have addressed the issue regarding the extended loading time for financial tiles on the Financial Dashboard, which had been causing frustration and delays for our clients. Recognising the importance of quick and reliable access to financial data, we have made significant improvements to enhance usability and overall satisfaction.

Our dedicated development team has optimised the performance of the Financial Dashboard and its corresponding tiles. As a result, when you access the Financial Dashboard now, you will experience a remarkable reduction in loading time for the financial tiles. They will appear within a matter of seconds, allowing you to quickly access the last rendered data without having to wait for the screen to load repeatedly.

Additionally, if you have made any recent updates to fees and payments, you can easily view the latest data by using the new refresh icon. This feature enables you to load the most up to date information without any hassle.

These improvements highlight our commitment to providing a seamless and efficient experience. We understand the significance of accessing financial data promptly, and we are constantly striving to meet and exceed our clients’ expectations.

IMPORTANT – An important addition to our recent updates is the tooltip feature associated with the refresh icon. When you hover your cursor over the refresh icon, a tooltip will be displayed, providing you with the date and time of the last refresh. This tooltip serves as a valuable reminder of when the data was last updated, ensuring that you have access to the most recent information.

By incorporating this tooltip functionality, we aim to enhance the user experience by providing transparency and clarity regarding the freshness of the data. We want to ensure that you have all the tools and information necessary to make informed decisions based on the latest financial insights.

What’s New 29th June 2023 – Q&A

Here are some recent questions that have been asked, along with their corresponding answers. Our answers aim to offer clear and concise explanations, step-by-step instructions, and valuable insights. Whether you’re looking for guidance on a specific task or seeking to expand your knowledge in various fields, these questions and answers are here to provide you with useful and reliable information.

QuestionsAnswers
Unable to see the icons on the Classes and Attendance tilePlease select the read more link to know the answer.

Unable to see the icons on the Classes and Attendance tile?

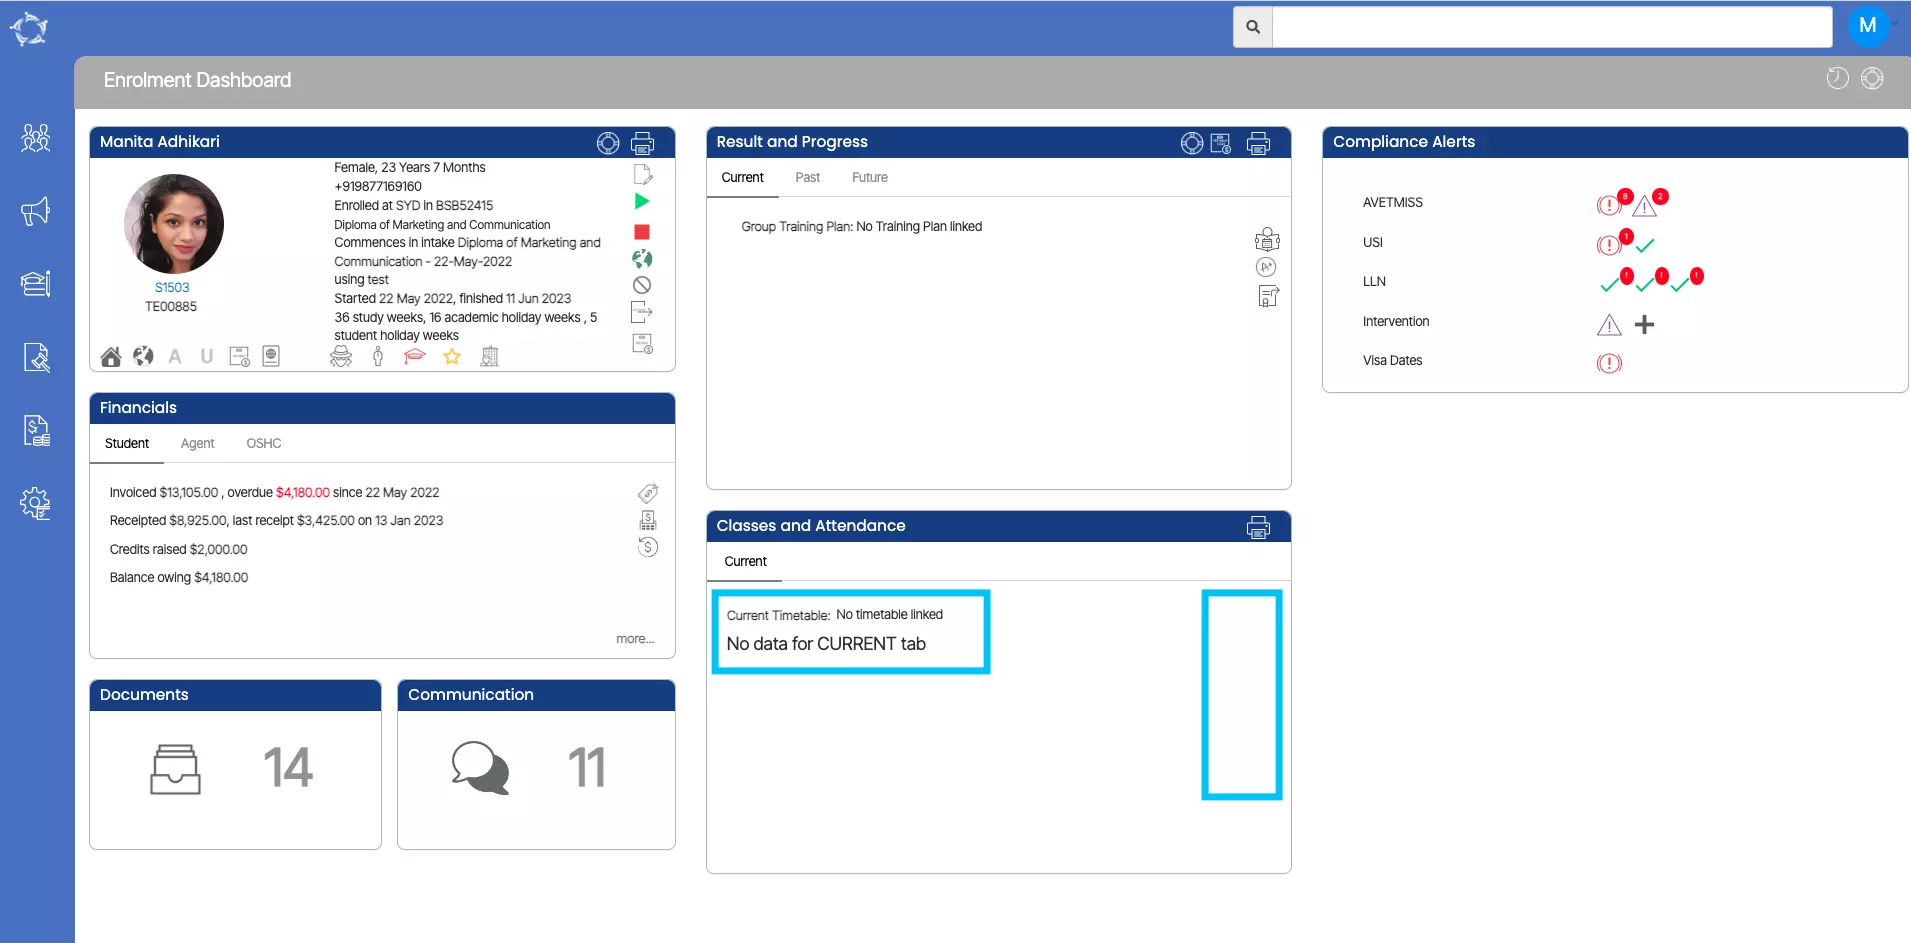
When the icons on the Enrolment Dashboard’s > Classes and Attendance tile are not visible, it is likely due to a holiday that has been linked to the enrolment. This holiday is scheduled to begin exactly on the enrolment’s start date. Consequently, the system does not display any study periods or icons on that tile. This issue is specific to students who start their enrolment on the same day as the holiday. Those who do not have a holiday scheduled for that day will not encounter this problem.

What’s New – 29th June 2023

Welcome to the latest update for TEAMS

Some key changes made in this update are:

  • Implemented changes to the Task Management tile and tiles screens
  • New enhancements to the Group Training Plans Entry Screen
  • New Refresh Icon introduced for Financial Tiles
  • Student Passport Merge Field introduced for student Certificates
  • New default Site Setting has been introduced for Completed Qualification
  • Enhanced Trainer’s User-Related Restrictions
  • New label for Negative Invoice Reference

You will also see the Q&A section of our What’s New summary. Here we will provide answers to the questions that are most frequently asked about TEAMS.

Task Management – Enhancements

Task management plays a crucial role in efficiently organising and handling tasks associated with different entities in TEAMS, including Students, Enrolments, Agents, Employers, and more.

Group Training Plans Entry Screen Optimisation

An improvement has been made to the entry screen for group training plans, resulting in a more efficient process. With this enhancement, there is no longer a need to manually input the subjects and their corresponding dates.

Financial Dashboard – New Refresh Icon on Financial Tiles

You will now notice a new refresh icon accompanying the financial tiles, specifically the Overdue Fees, Payments Received, and Payments Due sections.

Certificate Report – Student Passport Number New Merge Field

This merge field is designed to incorporate and print the student’s passport number on the certificate.

Completed Qualification – Default Setting

We have introduced a new system setting that aims to simplify the process of managing qualification information for your students. This system setting is added under the System Admin > Site Setting menu.

Enhanced Trainer’s User-Related Restrictions

Now, when a user is linked to a trainer, they will have restricted access to the Dashboards and Screens within the system.

Negative Invoice Reference – New Label

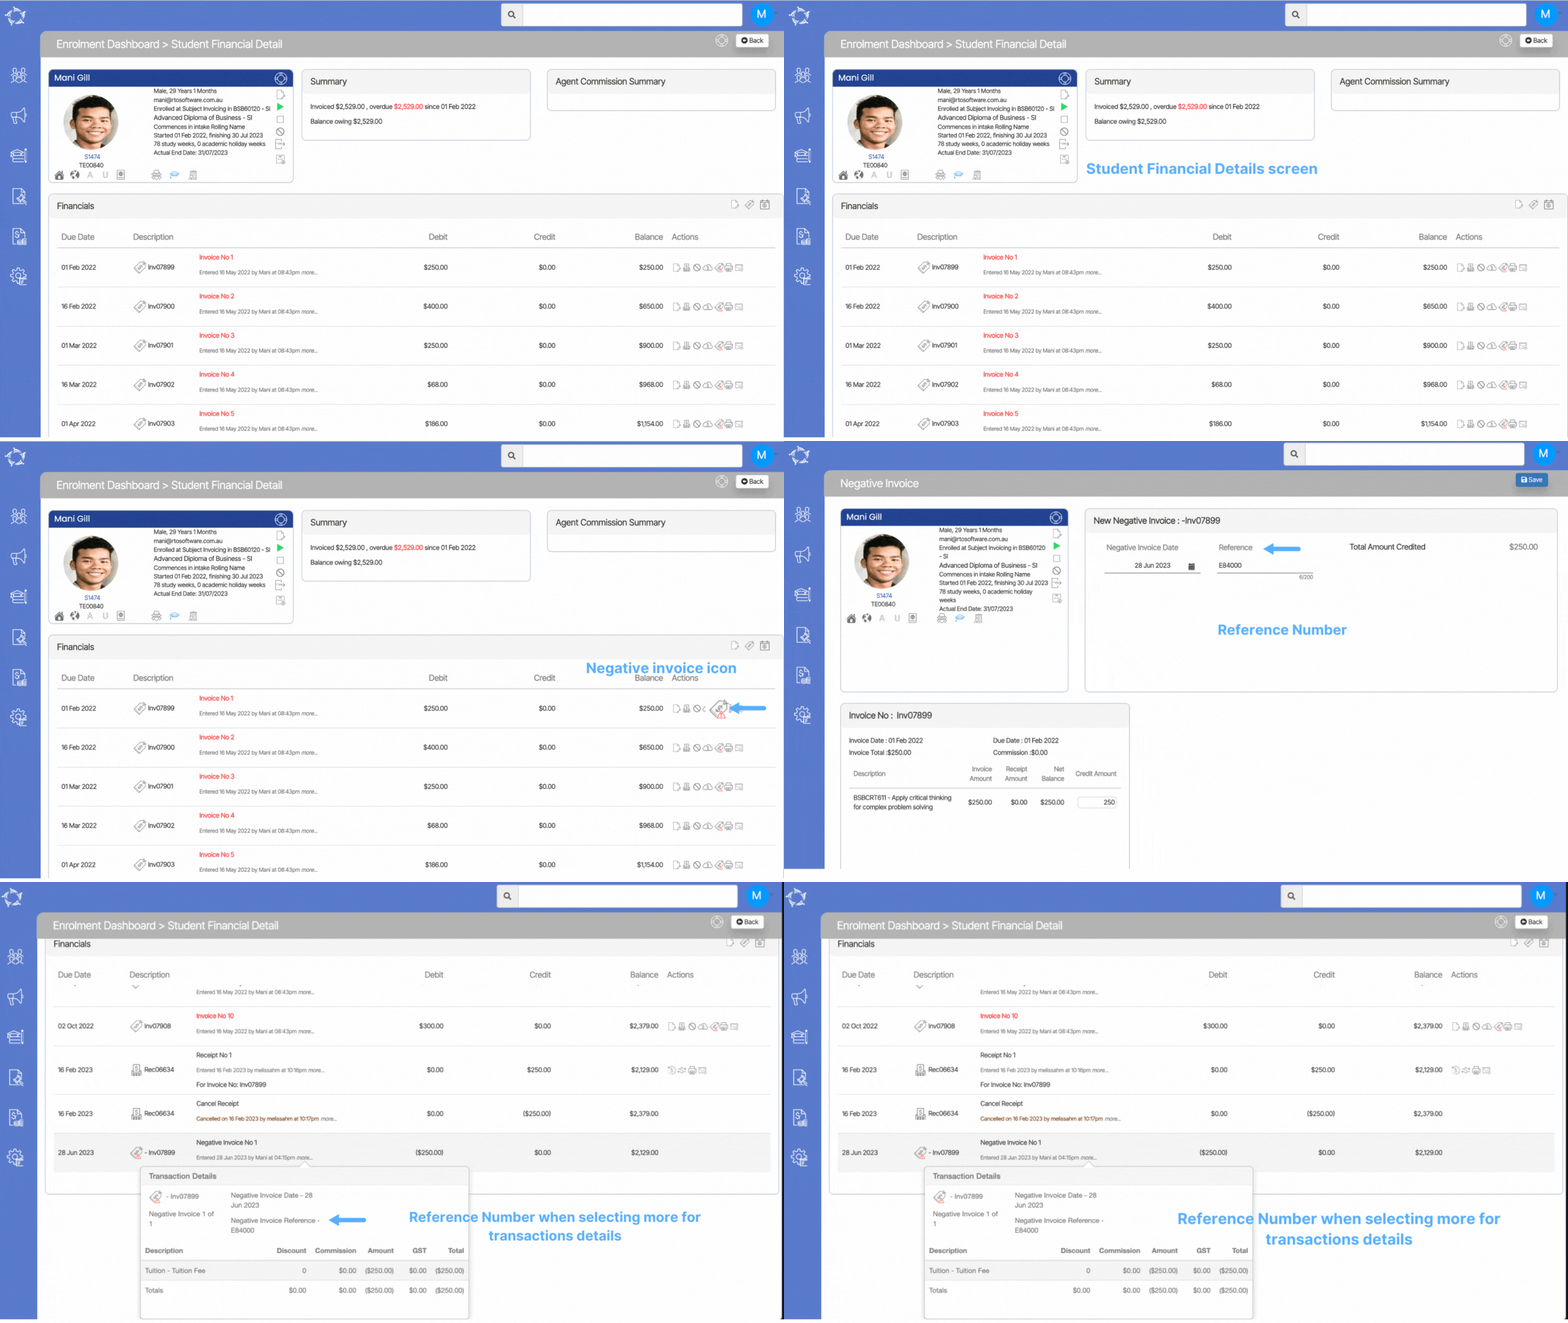
The system will now display this Negative Invoice Reference Number in the Transactional Details section for that particular Negative Invoice.

Q&A

Do you have a TEAMS question?

Make a list of your questions, send them to our support teams and we will send you the answer and add them to our fortnightly update.

Select the read more button as here are some questions we get asked and then answers on how to do them in TEAMS.

Our mission is to build software that helps you do things more efficiently. Your input and engagement are vital in helping us improve our service and offerings for your college. We are always open to listening to your feedback.

Any questions, please feel free to reach out to us. We look forward to serving you to the best of our ability.

Please review the changes and if you would like further clarification, please contact our Support team.

A big thank you to so many of you who have been actively participating in helping us bring these new improvements to life.

Next update is due on Thursday, 13th July 2023

Note: Please alert other team members within your college if the changes outlined above affect their role or department.

Thank you for taking the time to read this post.

Enhanced Trainer’s User-Related Restrictions

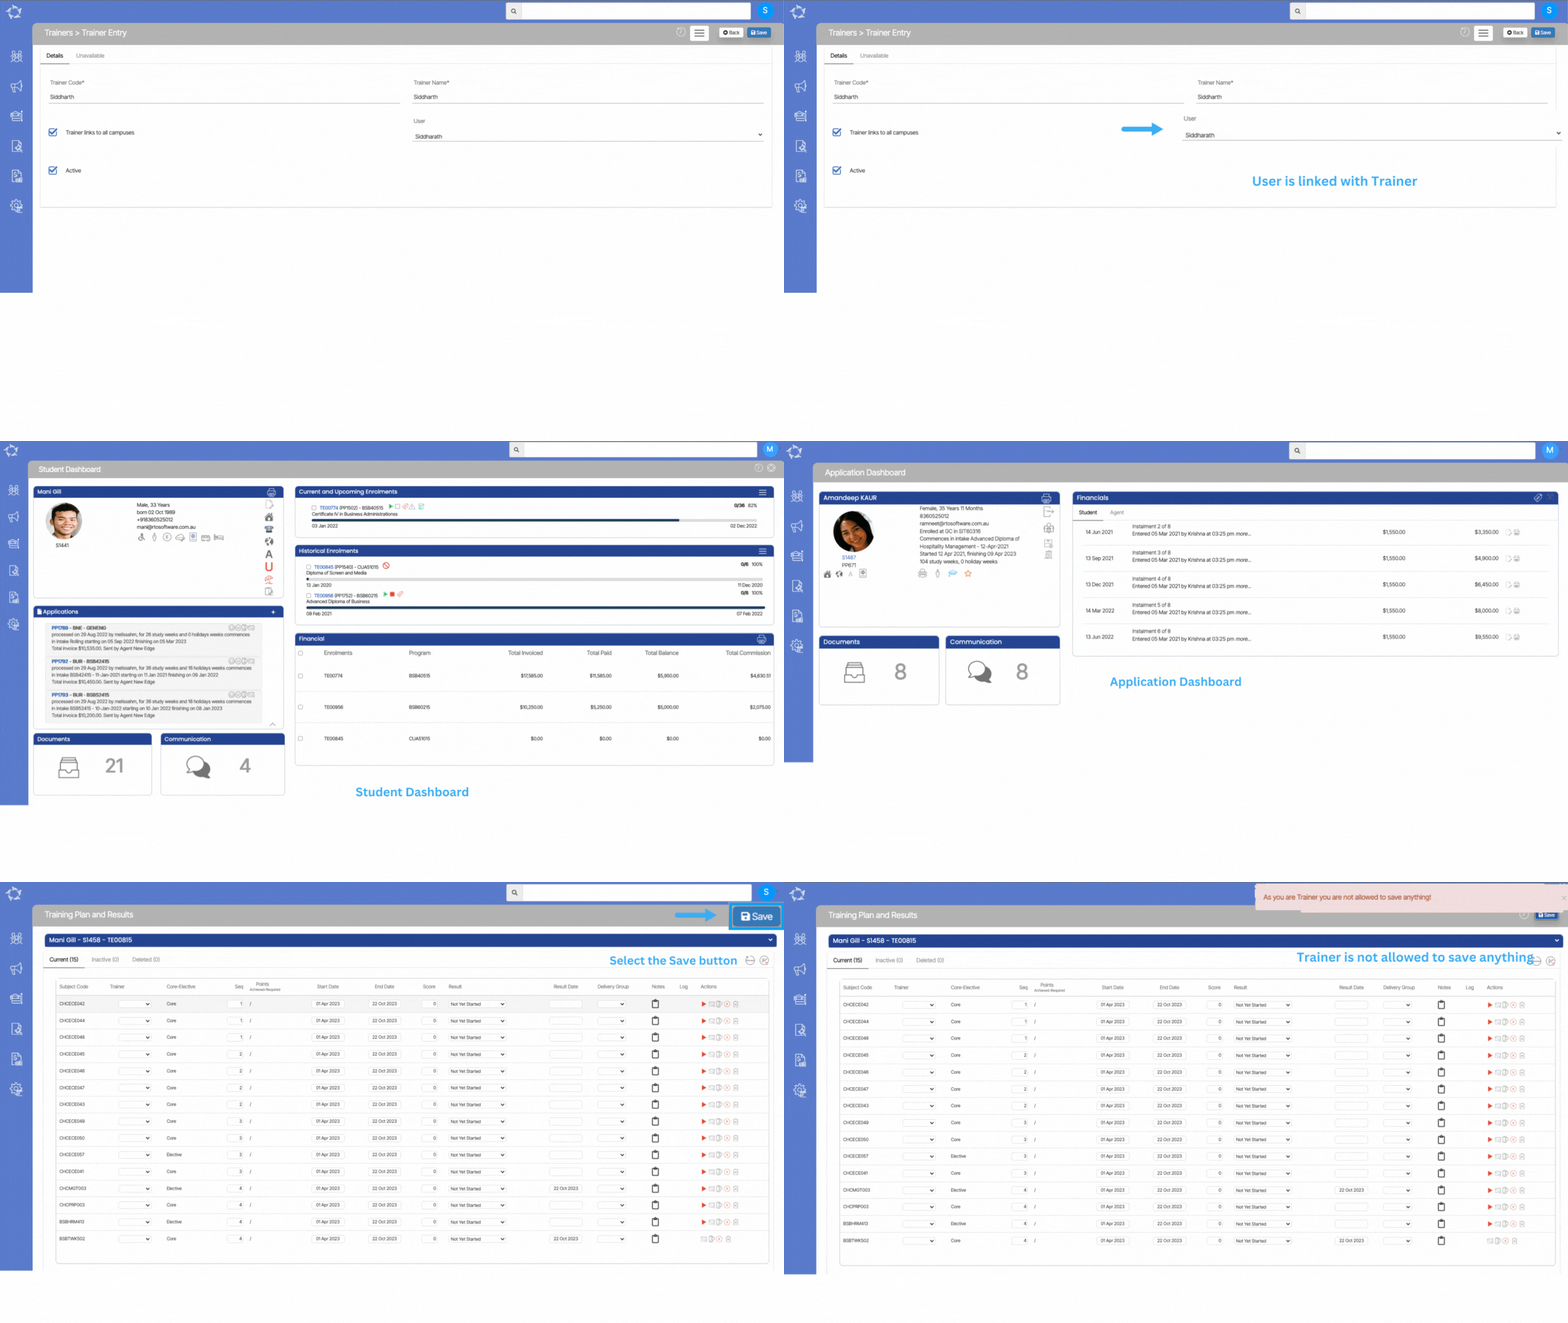
We have recently implemented user related restrictions to enhance the efficiency of our training process. As part of these changes, users who are linked to trainers will now experience restricted access to certain Dashboards and screens within the system.

With these restrictions in place, users linked to trainers will no longer have the ability to make changes to various Dashboards, including the Student Dashboard, Enrolment Dashboard, Applicant Dashboard, and Application Dashboard. Furthermore, they will be unable to edit or mark results on the Training Plan or Results screen for any enrolment. By granting trainers sole authority over these areas, we ensure the integrity and consistency of Training Plans and Results, while enabling trainers to provide personalised guidance and support to their assigned students.

This will empower trainers in overseeing the students’ progress effectively, while maintaining a structured and reliable framework for the training process. We believe that these enhancements will contribute to an improved training experience and foster an environment of personalised mentorship and support.

Certificate Report – Student Passport Number New Merge Field

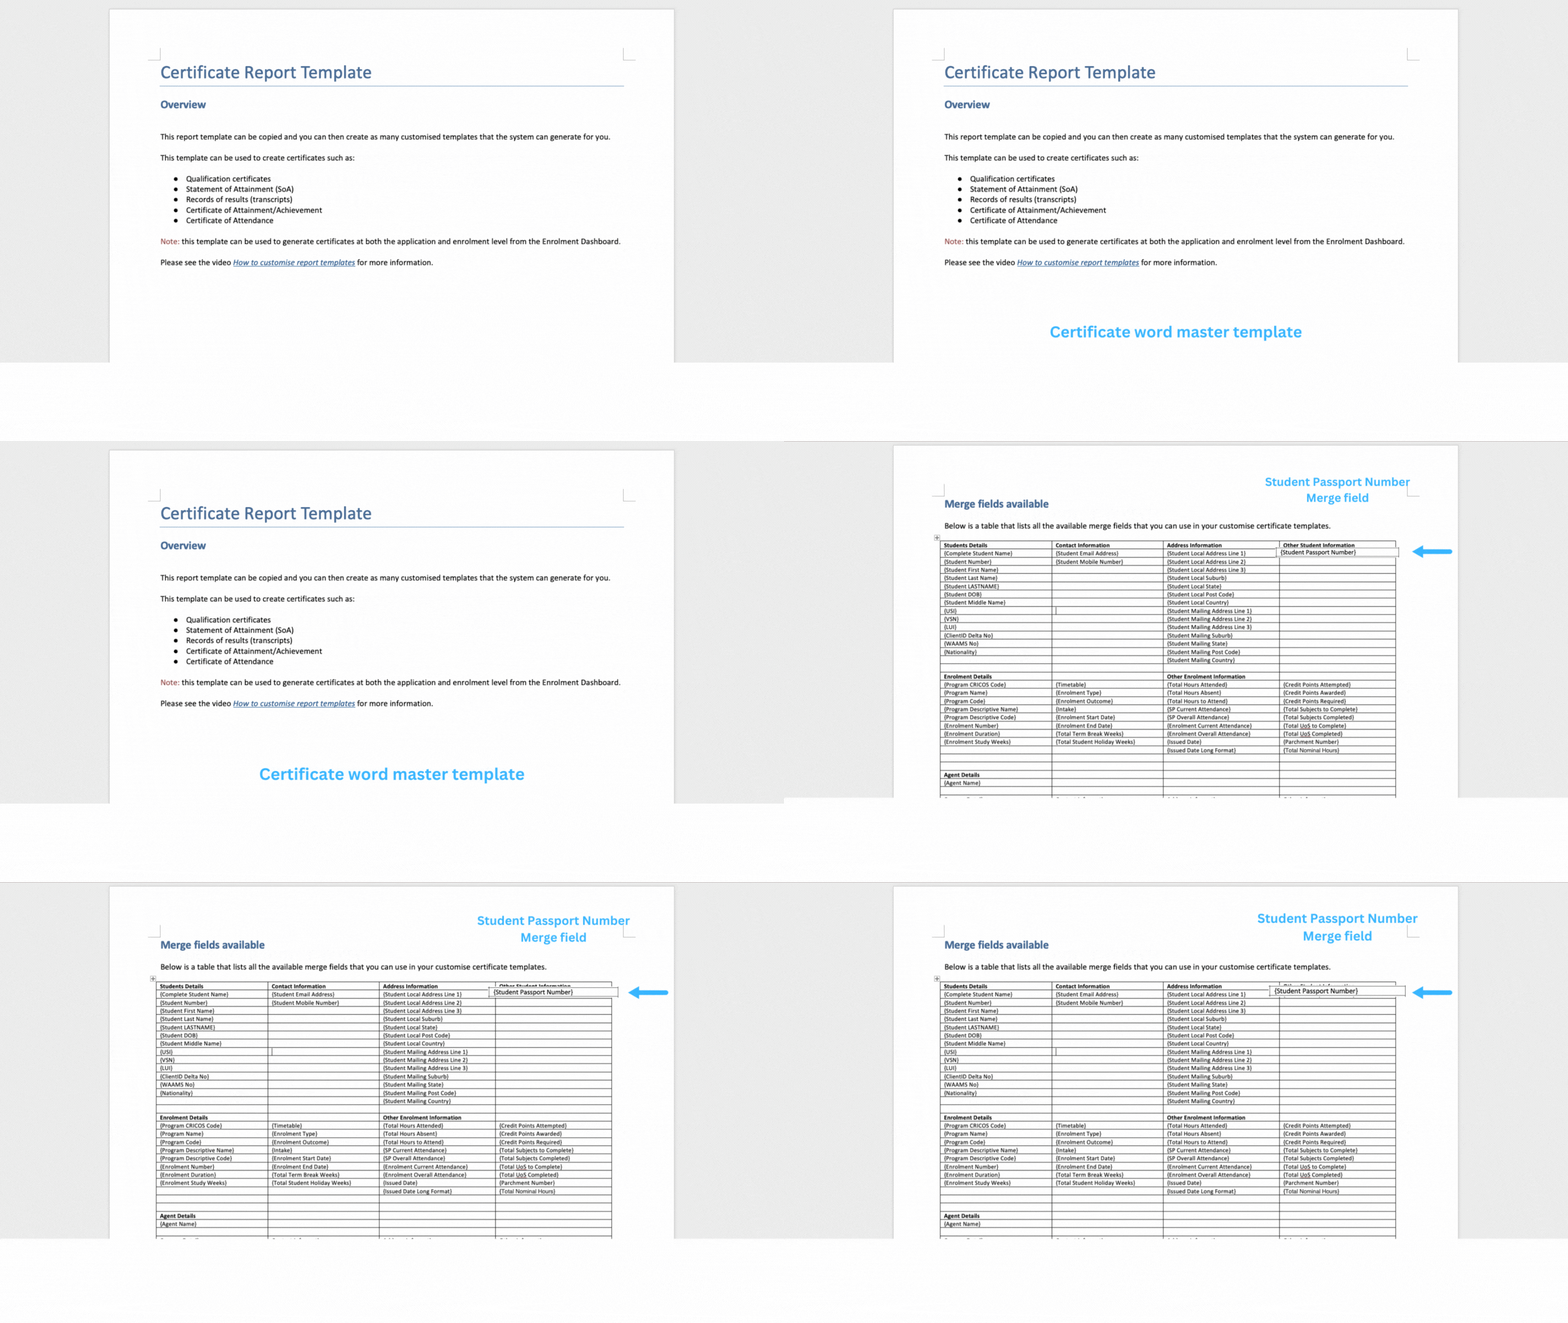
We have recently added a new merge field called Student passport number to the Certificate report word master template. This merge field is designed to incorporate and print the student’s passport number on the certificate.

To utilise this new feature, you can simply copy and paste the Student Passport Number merge field from the TEAMS Certificate Master template into your custom certificate word template. This will enable you to effortlessly include the student’s passport-related details on the certificates you generate through our system.

Completed Qualification – Default Setting

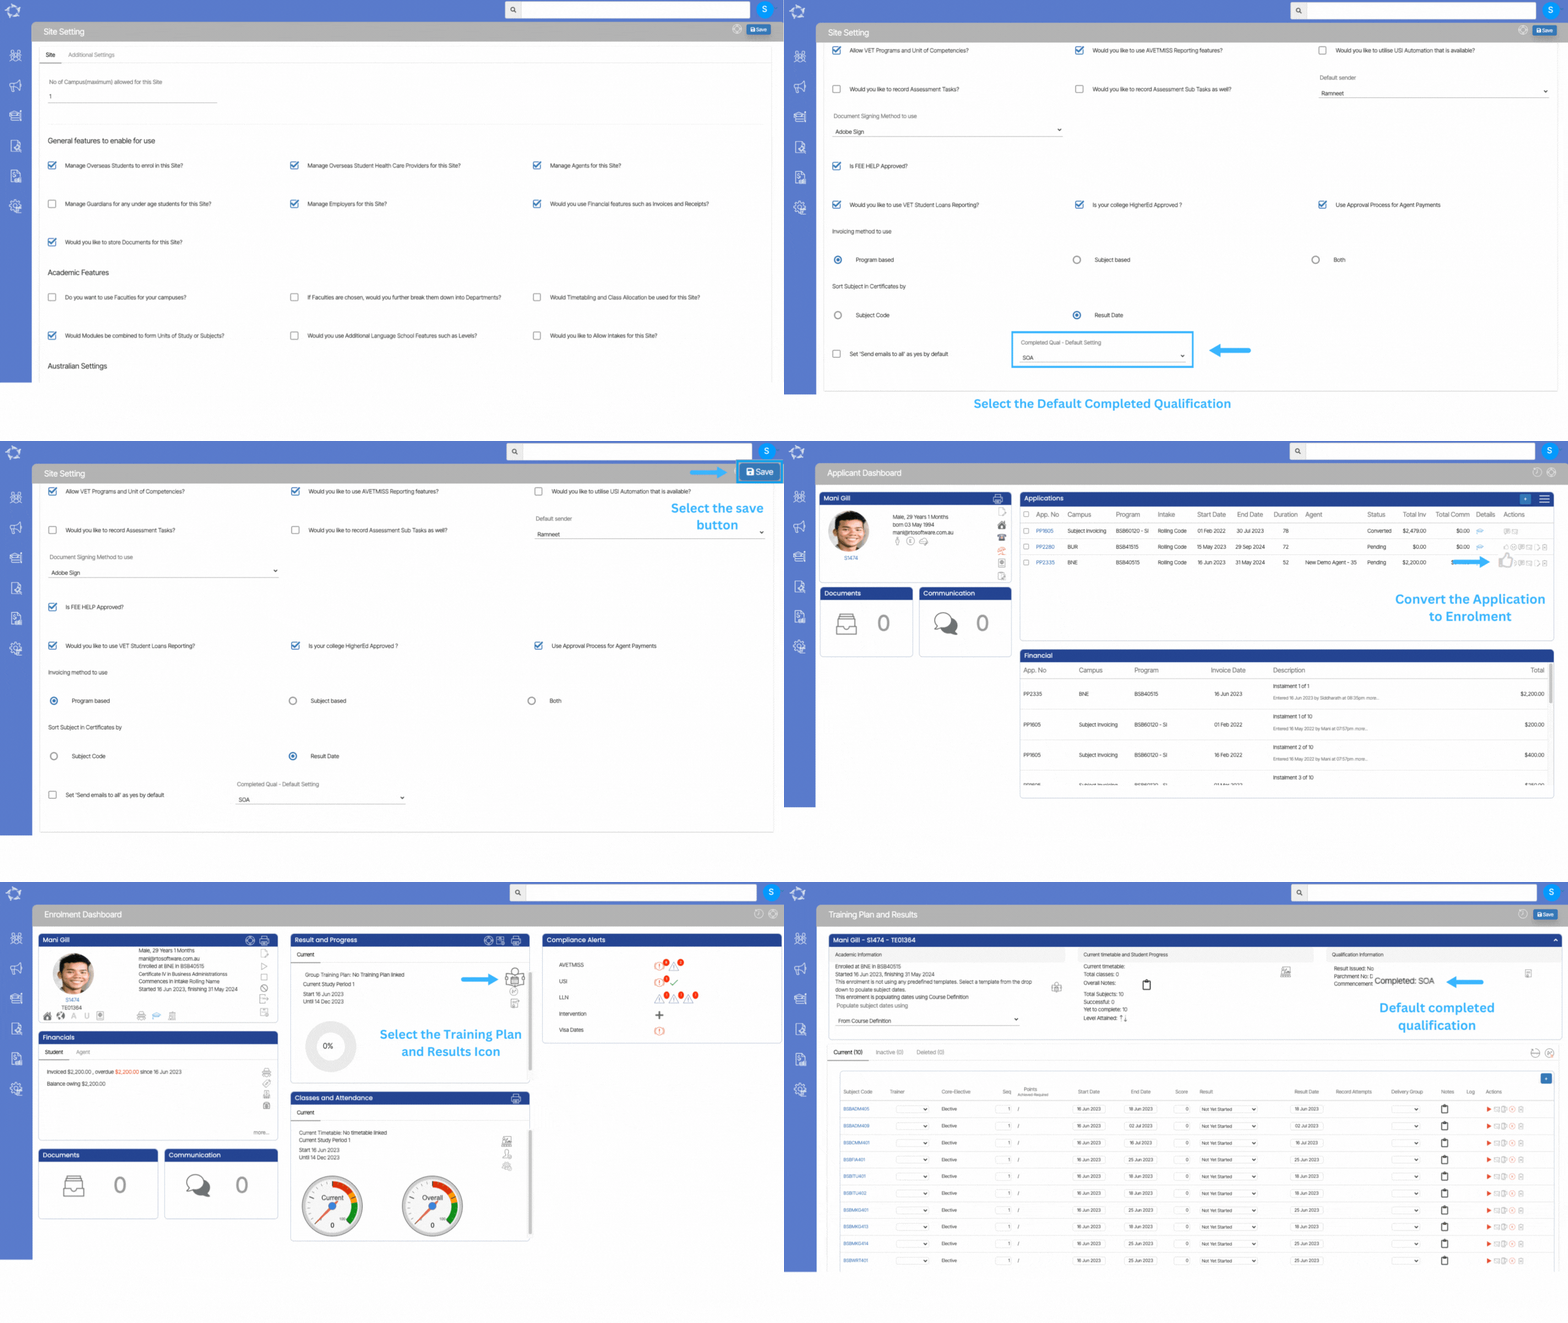
We have introduced a new system setting that aims to simplify the process of managing qualification information for your students. This system setting is added under the System Admin > Site Setting menu.

With this addition, you now have the ability to set a default Completed Qualification status for your students. Once a student’s application for enrolment is approved, the system will automatically select and assign the completed qualification status to the respective qualification information in the Training Plan and Results screen.

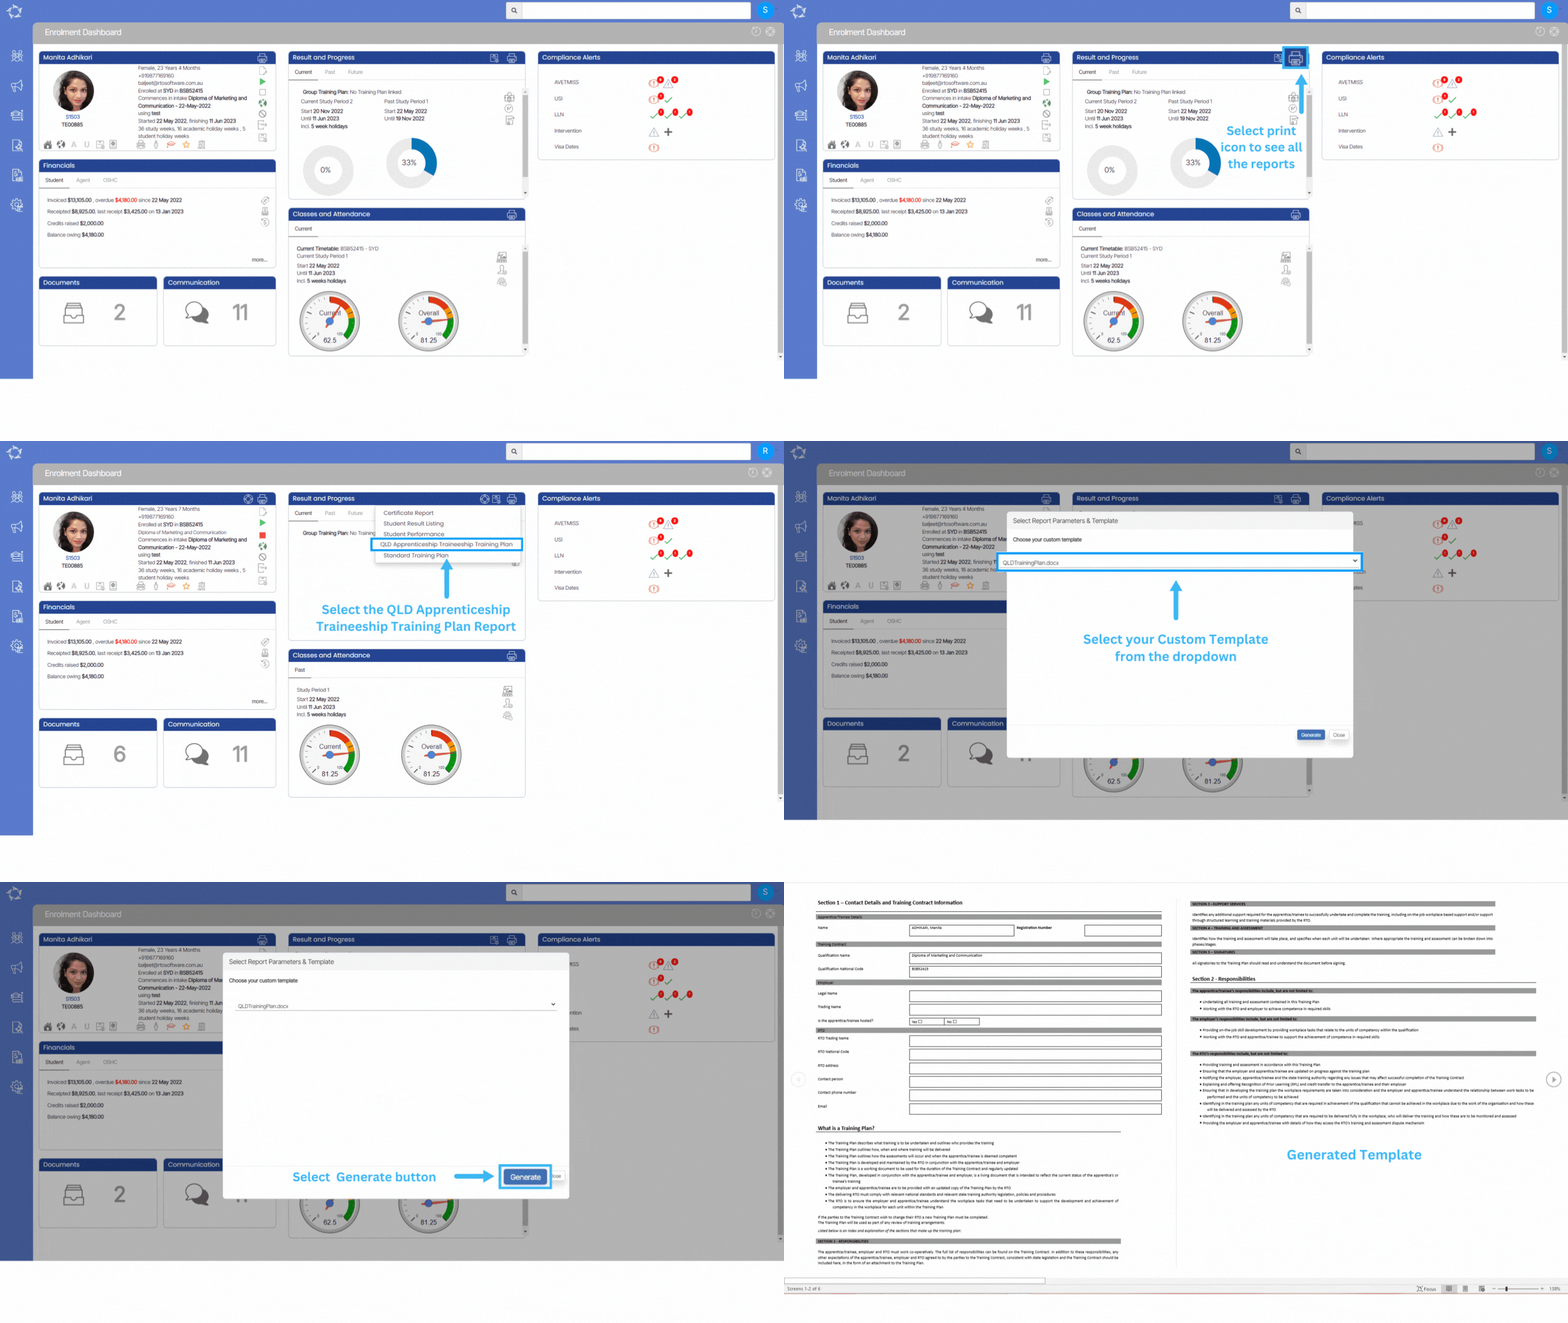
Enrolment – QLD Apprenticeship Traineeship Training Plan Report

Enrolment Dashboard > Result and Progress Tile > Print Icon


The Training Plan is a crucial document that outlines the training program for apprentices or trainees. It specifies the training content and who will provide it, as well as the details of when, where, and how the training will be delivered. The plan also explains the assessment process and when the apprentice/trainee will be deemed competent. Developed collaboratively by the RTO, apprentice/trainee, and employer, the Training Plan is a dynamic document that reflects the current status of the training and is regularly updated. It ensures compliance with standards, clarifies workplace tasks, and serves as a basis for reviewing and evaluating the training program.

In the Training Contract, all parties (apprentice/trainee, employer, and RTO) must fulfil their responsibilities as outlined.

Please select the desired template from the dropdown menu and select the Generate button. Once successfully generated, you can easily download the template in either PDF or DOC format.

IMPORTANT – To receive further guidance on customising the report templates according to your requirements, we recommend referring to the instructional post titled Report Templates. This post provides step-by-step instructions on modifying the templates to match your desired format and content.