Application Process – Study Period Changes

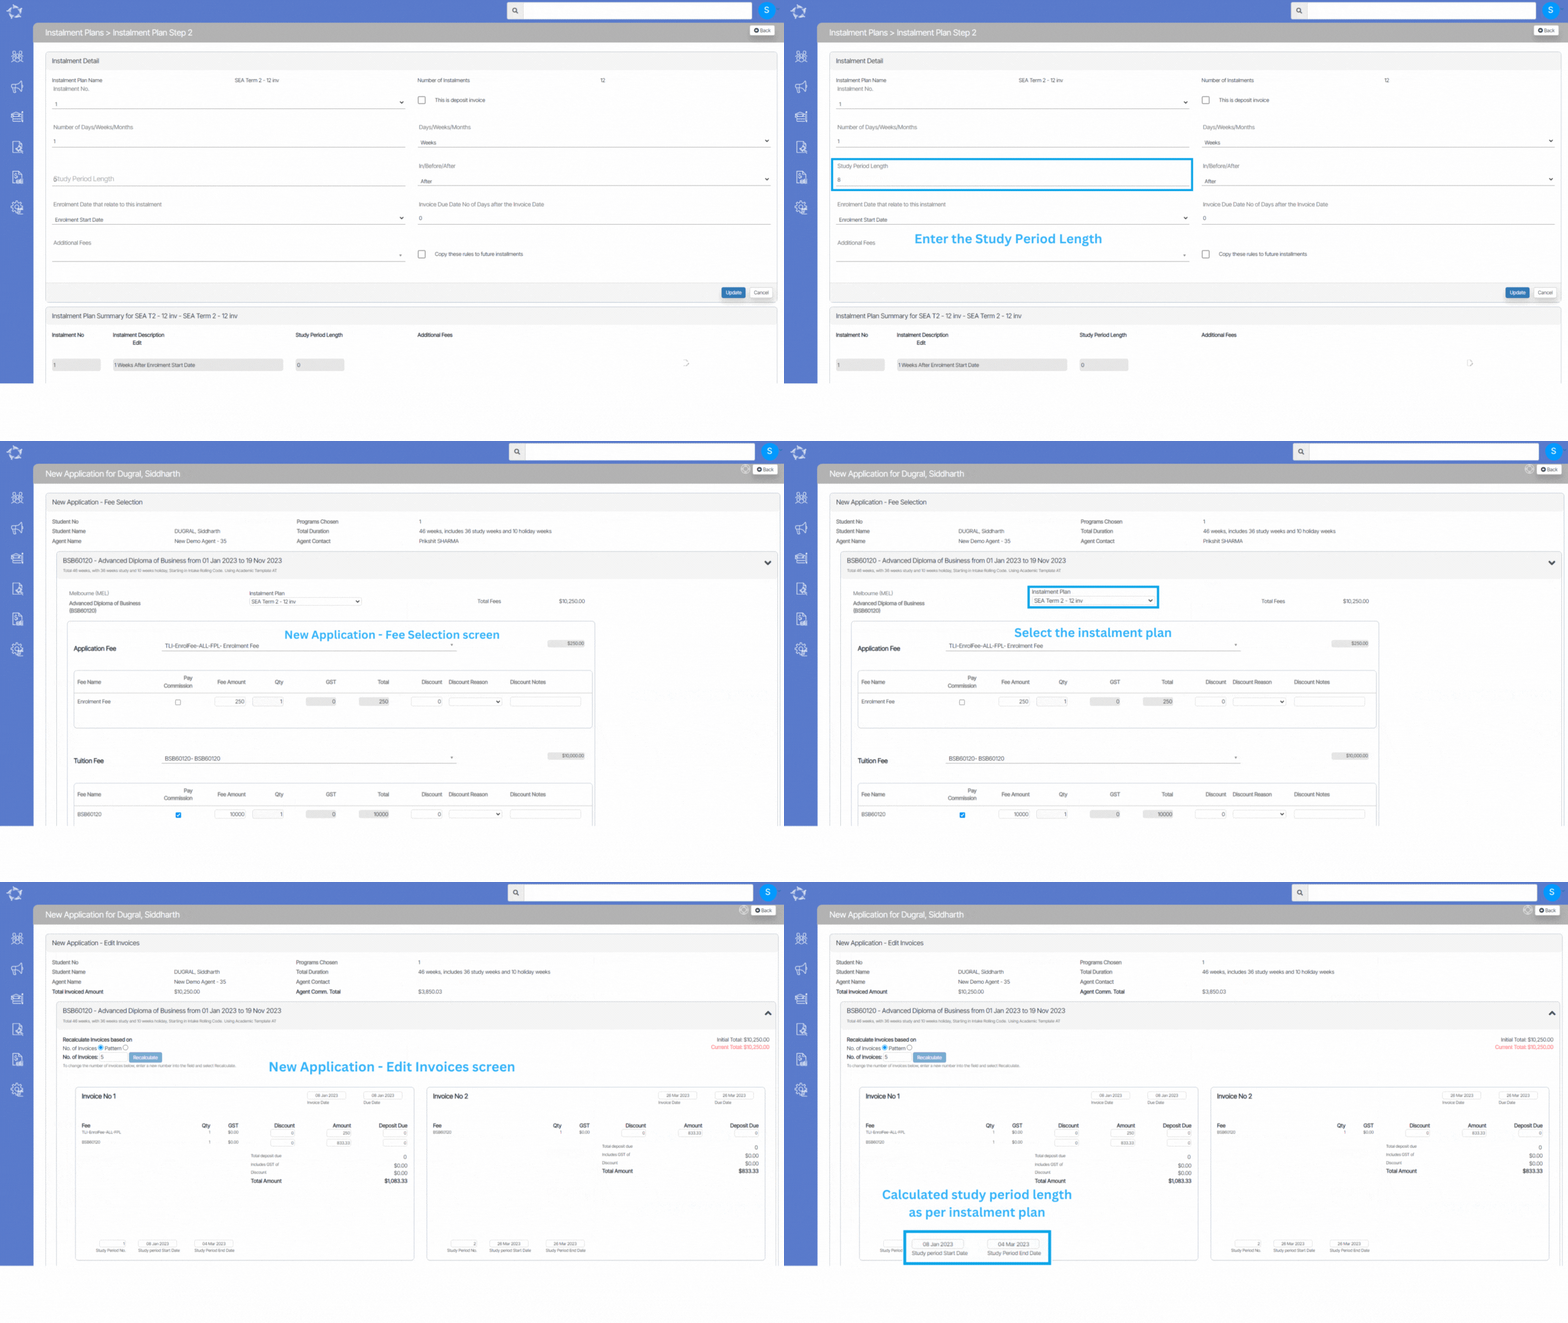
When using the study period start date as the invoice date or invoice due date while the application process, the system automatically calculates the study period dates for you.

To update the length of your study periods in your instalment plans, you can follow a few simple steps. First, navigate to the second step of the instalment plan settings, where you can edit the details of each instalment. You can enter the length of the study period in weeks for each instalment, based on the actual duration of your course or program. Once you have entered this information, be sure to save your changes.

By updating your instalment plan in this way, the system will be able to automatically use the invoice dates as the study period start date and will use the number of weeks specified as the study period length in the instalment plan to calculate the study period end date.

Note: if you still need any assistance in setup the study period length, you can contact our support team.

TPS Report Data Columns

The generated report will contain a table with several columns and their corresponding explanations. This table provides a summary of the data or information presented in the report in a structured and organised manner. Each column is labeled with a title that describes the type of information contained within it.

ColumnsExplanations
TPS Calendar YearThe year selected to generate the report
CRICOS Provider CodeThe system will show this code from the Campus Entry Screen
Institution NameThis comes from the campus entry screen
InstitutionTradingNameThis again comes from the campus entry screen. If the CRICOS provider code, Institution name/Trading name is blank on the campus entry screen.
Kindly add them. If you are unsure of what to enter there, kindly check training.gov.a
Campus CodePopulates the code setup for the campus on the Academics > Campus entry screen
Campus NamePopulates the name of the campus
Student NoStudent Number generated by TEAMS
Complete NameStudent (First name )(Middle name)( Last name)
Enrolment NoEnrolment number generated by TEAMS
CRICOS Program CodeThis is the CRICOS code for the program and will be populated from the Academics > Program entry screen
Program Descriptive CodeThe descriptive code of the program is saved on the program entry screen
Program Descriptive NameThe descriptive name of the program is saved on the program entry screen.
Enrolment TypeIt will show the application type saved for the enrolment on the Edit Enrolment Detail screen
Enrolment OutcomeIt will show the enrolment outcome saved for the enrolment at the Edit Enrolment Detail screen
Enrolment StatusIt will show the current status of the enrolment. For example – Started, Not Started, Finished, and Cancelled.
Enrolment DatesStart date and End date of the enrolment
Enrolment Duration WeeksThis will be the total weeks of the enrolment which includes total study weeks, total academic holiday weeks, and the student personal holiday weeks.
For example, If enrolment has study weeks = 40, academic holiday weeks = 12, and student personal holiday weeks = 2. Then the total enrolment duration will be 40+12+2=54 weeks
Enrolment Duration DaysThe system will show the total of study days, academic holidays, and student personal holidays.
Total Tuition to payThis is the total invoiced amount of the Tuition Fee for enrolment
Overall Total PaidThis is the total receipted amount of the Tuition Fee for enrolment
Daily Payment AmountThe total tuition to be paid is divided by the total enrolment duration in days.
Total No. of Days PaidTotal receipted divided by the daily payment amount
Total Paid for TPS Calendar YearTotal receipts within the TPS calendar year for the enrolment
ESOS LengthDuration of the enrolment within the TPS calendar year
ESOS DaysDuration of the enrolment within the TPS calendar year in days
ESOS AmountDaily Payment Amount * ESOS days

TPS Report Filters

The General Filters tab on the TPS Report screen provides a list of filters that can be used to refine the data displayed in the report. Below is a table that shows the filters and their explanations: Using these filters, you can customise the report to show only the information that is relevant to your needs, making it easier to analyse and take action based on the report data.

General FiltersExplanation
Calendar Year for ReportIt means that the data included in the report covers the entire period from January 1st to December 31st of a particular year.
CampusSelect a specific campus or select multiple campuses for your RTO if you are submitting this report for multiple campuses.
ProgramThis is a multi select Program field that allows you to select multiple programs from a list of options. If you do not select any programs in this field, the system will automatically select all the programs that are linked with the campuses that the user has selected.

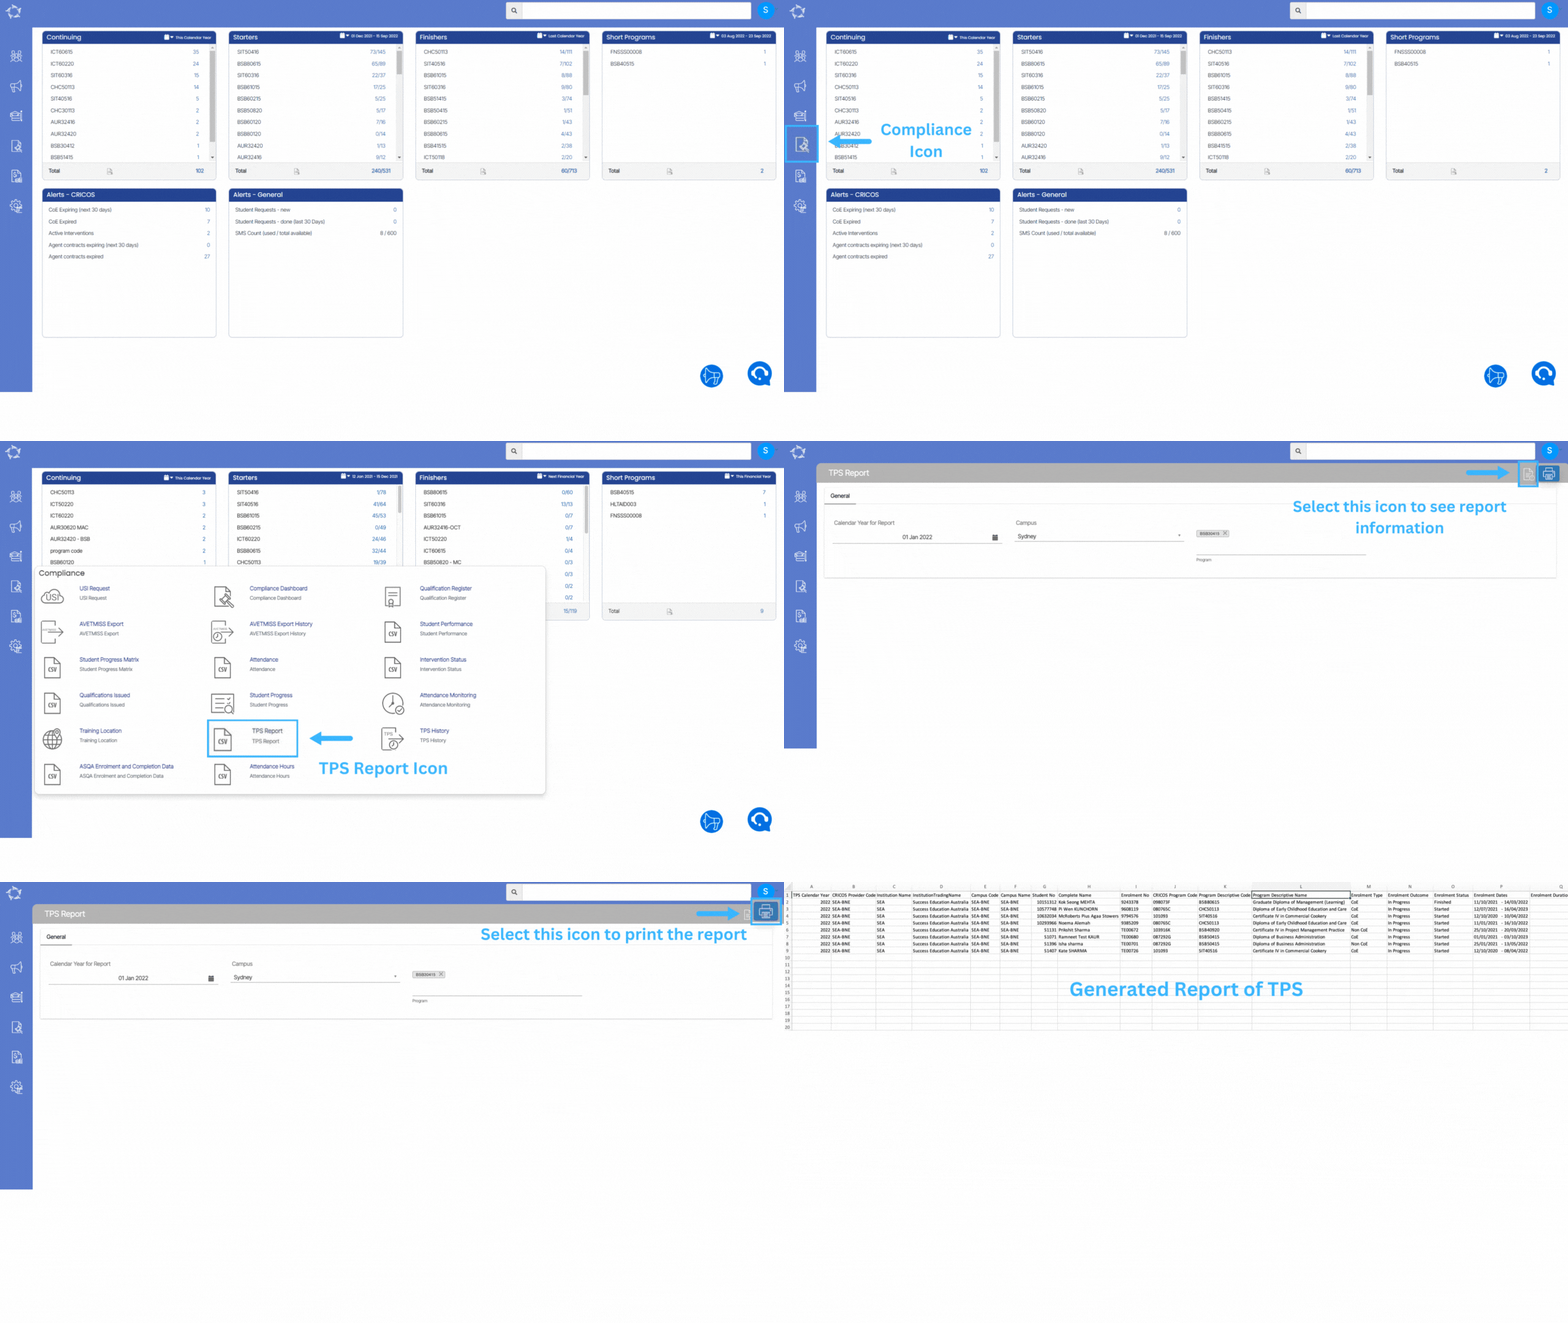
Click on the “Print” Icon to generate the report. After clicking on it, the system will direct you to the report dashboard screen. You can see the report status over there if it’s generated or not. Once it’s generated, download the report.

TPS Report

Main Dashboard > Compliance > TPS Report

Overview

This report pertains to the total amount of tuition fees paid or outstanding for a specific calendar year and is a mandatory requirement for all CRICOS (Commonwealth Register of Institutions and Courses for Overseas Students) colleges. Such colleges must submit this report to the government every year. The purpose of this report is to provide the government with accurate and up-to-date information on the total tuition fees received or expected to be received from overseas students studying at these institutions.

To know more about the Filter and columns and their explanations, please select the below links.

TPS Report Filters

TPS Report Data Columns

Training Location Entry Screen

Compliance Menu > Training Location > Add Button

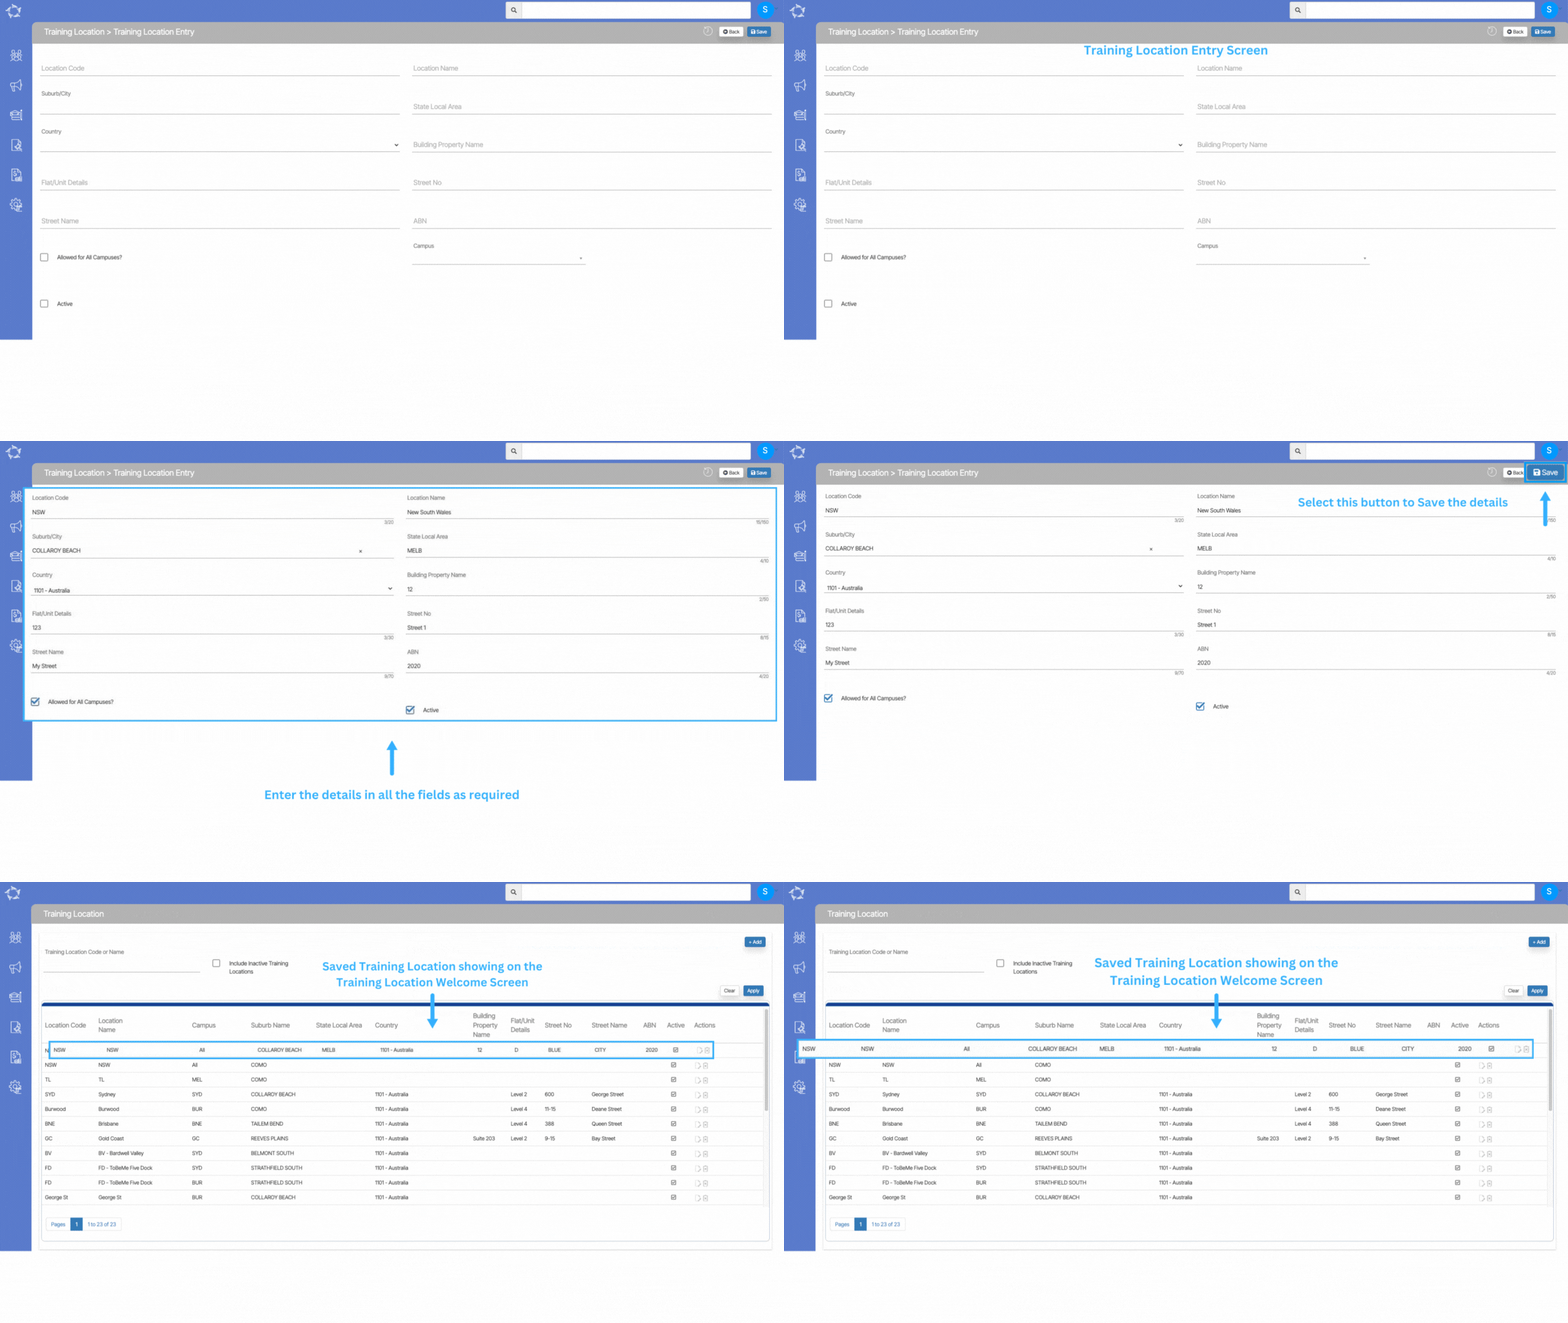
When you select the + Add button on the training location welcome screen, you will be directed to the Training Location Entry Screen. This screen contains various fields that allow you to add a new training location into the system. Additionally, if you already have a training location that you want to modify, you can make changes to it using this screen.

The fields on this screen will likely include information such as the code and name of the training location, the address, contact information, and any other relevant details. By filling out these fields accurately and completely, you can ensure that the training location is properly recorded in the system and that all necessary information is readily available when needed.

Note – The fields on this screen are clear and easy to understand. You can add any additional fields as needed. Simply input the relevant information into each field and the system will process it accordingly.

Compliance Reports

Below is a list of all the reports available under this Compliance menu in the system. You can see the name of the report with either an icon that has the letters CSV in it or an MS Excel icon. Generally, all reports in the system generate to a CSV (Comma-separated Values). There will be times when a report generates to Excel, primarily as it requires a page break in it which you can’t do in CSV, however, in this menu, there are no Excel reports.

Each report listed below is a link to a post where you can understand the report, and its parameters and view an example of the report.

Student Performance Report Data Columns

The Below table will show you the columns and their explanation that will get printed in the generated report.

ColumnsExplanations
Student NoStudent Number generated by TEAMS.
Enrolment NoEnrolment Number generated by TEAMS
Student NameStudent (First name)(Middle name)(Last name).
CampusThe system will show you the campus linked to the enrolment.
ProgramProgram Name under which the student is enrolled.
Start DateStart date of the enrolment.
End DateEnd date of the enrolment.
TimetableTimetable linked to the enrolment.
No of Successful ResultsThe number of successful results for the subjects.
No of Unsuccessful/Not Yet Achieved ResultsThe number of Unsuccessful/Not Yet Achieved results for the subjects.
Results Completed RatioThe ratio of the result completed by the student.
Completed PercentageThe Percentage of the result completed by the student.
Study Weeks CompletedA number of study weeks completed by the student.
Total Study WeeksTotal study weeks.
Duration Percentage RatioPercentage Ratio of the duration
NationalityNationality of the student.
Enrolment OutcomeEnrolment outcome selected on the Edit Enrolment Details screen
Purchasing ContractThis column will display Purchasing Contract as Yes or No.
Exclude from AVETMISSIt will show Yes or No if the enrolment is Excluded from AVETMISS.
OverseasThis column will print Yes if the student is overseas and No if the student is not from overseas.
VisaTypeStudent Visa Type.
Local AddressThe full local address of the student.
Mailing AddressThe full mailing address of the student.
Account ManagerAccount Manager of the student.
Total OwingThis is the total balance owing for the student’s enrolment.
Total OverdueThis is the total overdue invoice for the student’s enrolment.

Student Performance Report Filters

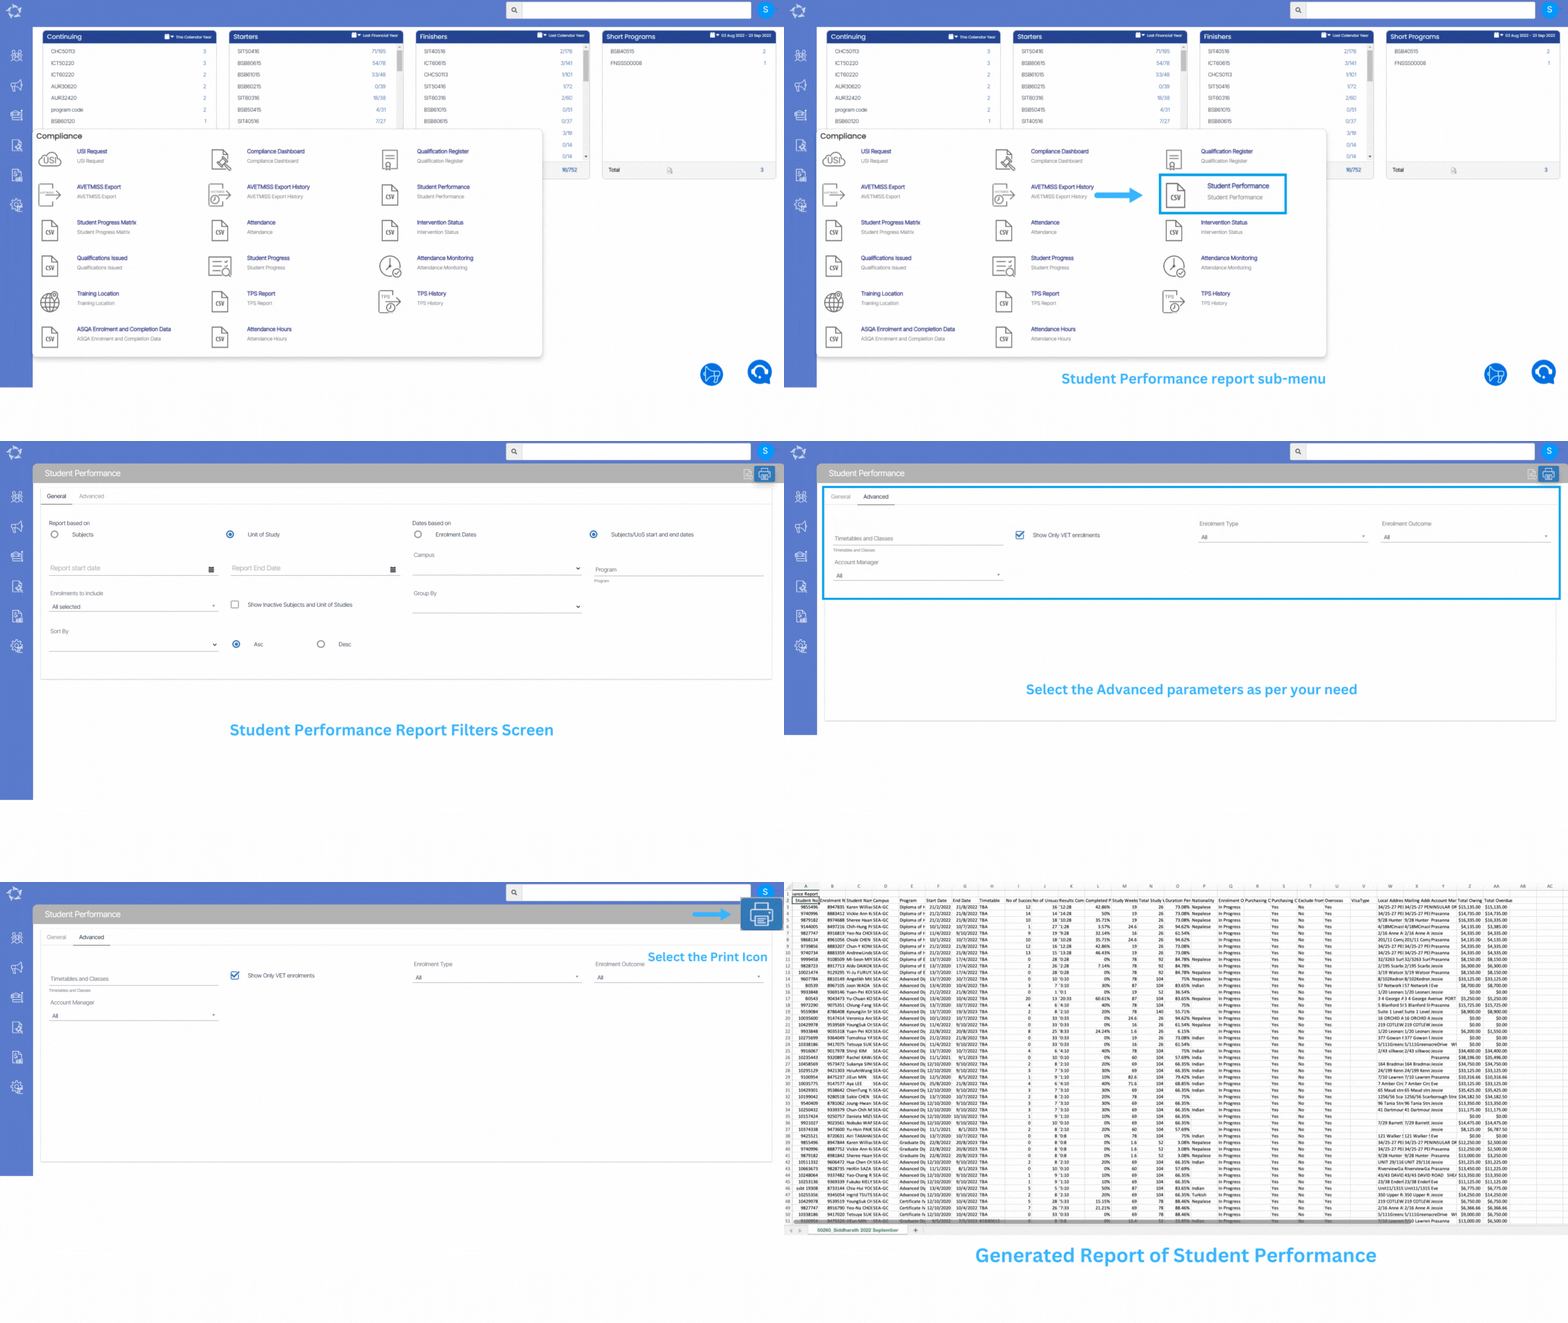
The Student Performance Report provides two tabs for filtering data, namely General and Advance. Once the user has selected the desired filters from either tab, the system will generate a report based on those selections. The below table will show you the Filters and their explanation.

General FiltersExplanation
Report based onYou will see two radio buttons under this section:

Subjects – Select this radio button, if you are delivering subjects.

Unit of Study – Select this radio button, if you are delivering Unit of Studies.
Dates based onYou will see two radio buttons under this section:

Enrolment Dates – When you select this, you will be able to print the report based on the report start date and end date or you can select the As on date from the calendar which is today’s date.

Subjects/UoS start and end dates – When you select this radio button, you will on be able to print the report based on its start and end date.
CampusSelect a specific campus from the dropdown.
ProgramThis is a magic search field and you can search for multiple Programs by typing the Program Code.
Enrolment to includeYou can include enrolments such as Finished and Started tick boxesSelect Enrolment to include, Finished and Starter
Show Inactive Subjects and Units of StudiesSelect this tick box if you want to see inactive subjects and unit of studies in the report
Group ByPlease see TEAMS Basics
Sort ByPlease see TEAMS Basics
Asc/DescPlease see TEAMS Basics
Advance FiltersExplanation
Timetable and ClassesThis is a magic search field and you can search and select multiple timetables.
Show only VET enrolmentsTo view enrolments linked to specific programs in AVETMISS-enabled systems, select the VET tick box in program settings. Deselecting this option enables generating a report for student performance across all programs.
Enrolment TypeThis is a user code and one can create the user code in TEAMS as you required. Based on the user code created for the enrolment type, you can select from the dropdown.
Enrolment OutcomeSelect the Enrolment Outcome from the dropdown.
Account ManagerSelect the Account Manager from the dropdown.

Click on the “Print” Icon to generate the report. After clicking on it, the system will direct you to the report dashboard screen. You can see the report status over there if it’s generated or not. Once it’s generated, download the report.

Student Performance Report

Main Dashboard > Compliance > Student Performance

Overview

A student performance report provides information about a student’s academic progress and achievements in a particular subject or course. It typically includes details about the student’s successful and unsuccessful results, completed percentages and other relevant information. The report may also include basic information about the student including student number, enrolment number and program dates.

Student Performance Report Filters

Student Performance Report Data Columns

Qualifications Issued Report Data Columns

Below is the table that will show you the columns and their explanation that will get printed in the generated report.

ColumnsExplanations
Issued DateThe parchment date is the issued date.
Enrolment NoEnrolment number generated by TEAMS.
Student NameStudent (First name)(Middle name)(Last name).
Campus / Program Code / Program NameThis column will print the Campus code / Program code / Program name under which the student is enrolled.
Start DateStart date of the enrolment.
End DateEnd date of the enrolment.
TimetableThe system will show the current timetable allocated to the enrolment.
Enrolment TypeThis is the enrolment type selected on the Edit Enrolment Details screen.
Enrolment OutcomeEnrolment Outcome selected on the Edit Enrolment Details screen.
Employer NameEmployer Name
Qual IssuedQual Issued, Full, SOA, N/A
Student NoStudent number generated by TEAMS
Certificate NoCertificate number generated by TEAMS
Authorising OfficerAuthorising Officer
Organisation CodeOrganization code
Parchment NumberParchment number updated on the Training Plan and Results > Edit Qualification Information
Parchment DateParchment Issue Date updated on the Training Plan and Results > Edit Qualification Information
USI NumberUSI number of the student.