Compliance Alerts

Enrolment Dashboard > Compliance Alerts Tile

history of changes

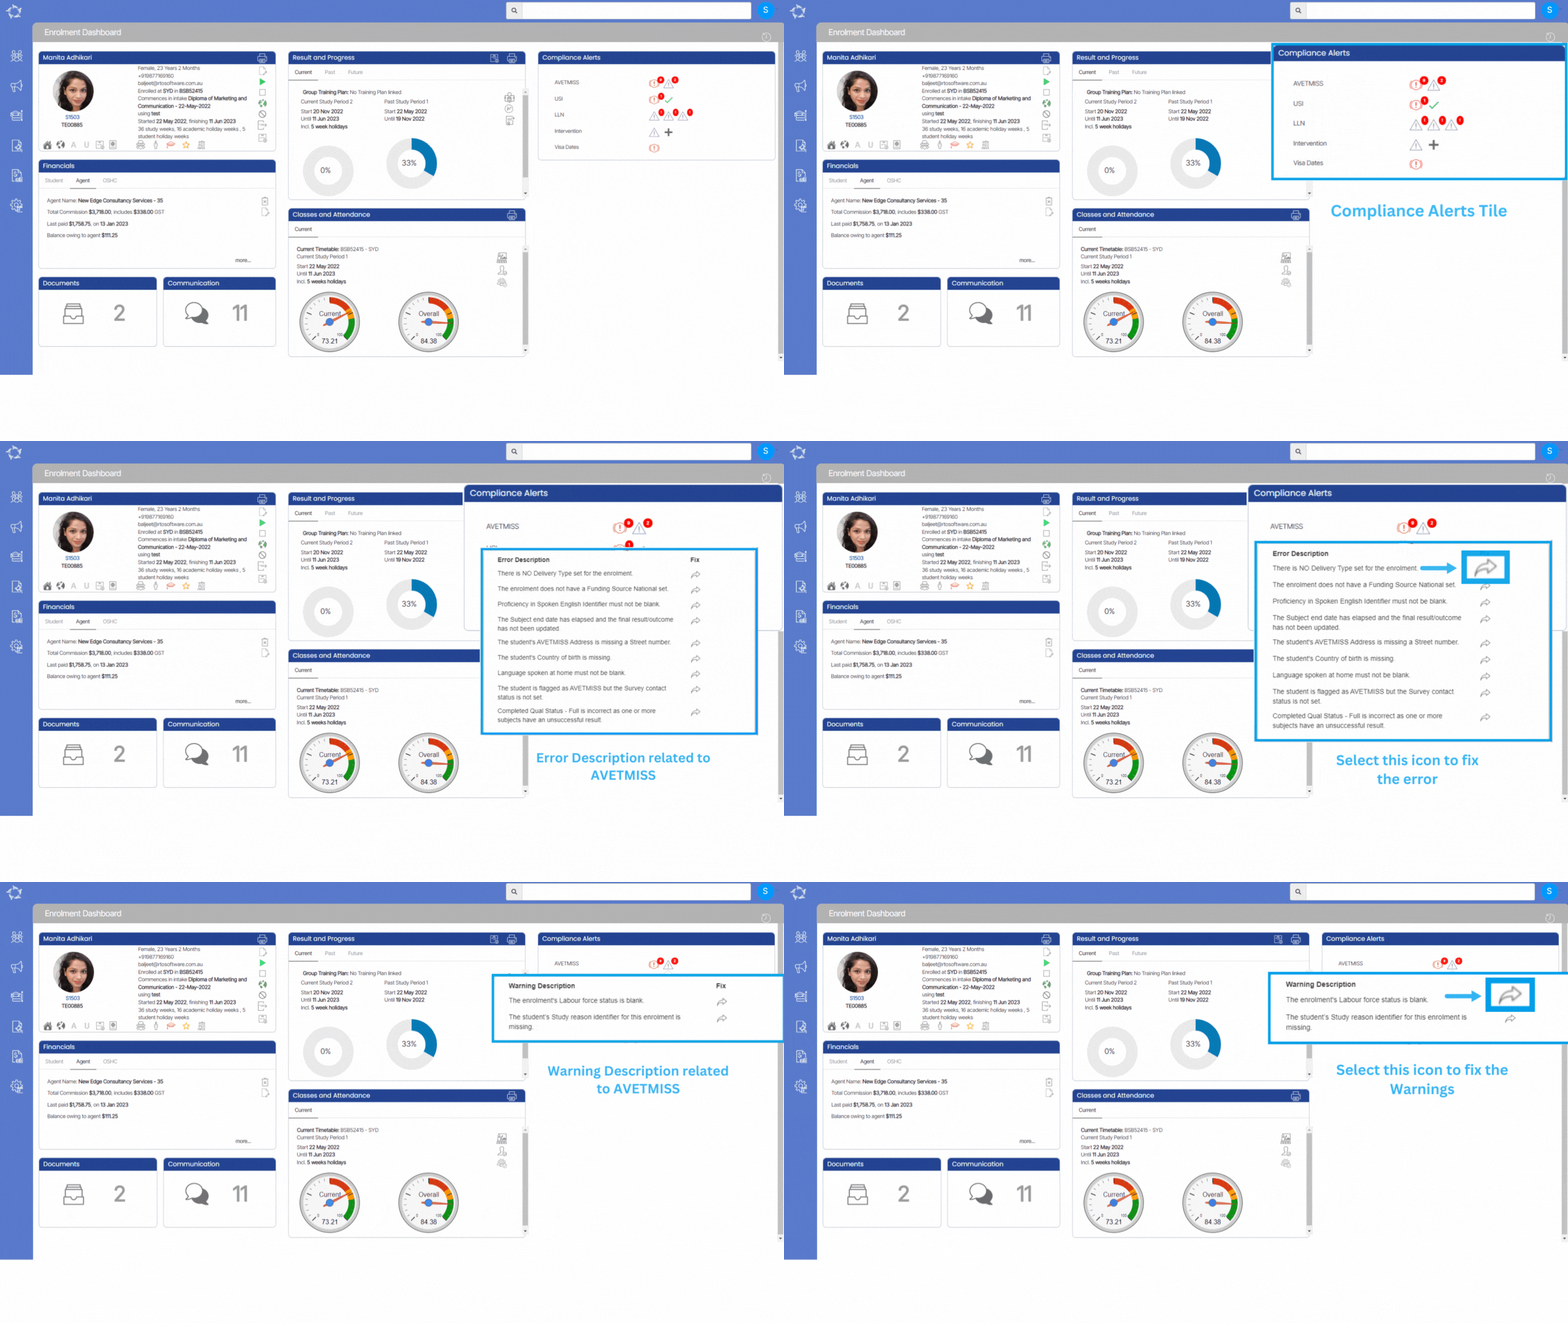
This tile will show you all the Errors and Warnings with their descriptions for enrolment with the red numbers for different objects.

Different icons and their function under the compliance tile are explained below:

  • This icon will show you the number of errors in red and when you select this error icon, it shows the error descriptions as shown below:
  • This icon is called the fix icon and when you select this icon, it will take you to the particular screen where you can fix the error according to the description.
  • This icon will show you the number of warnings in red and when you select this error icon, it shows the warning descriptions as shown below:
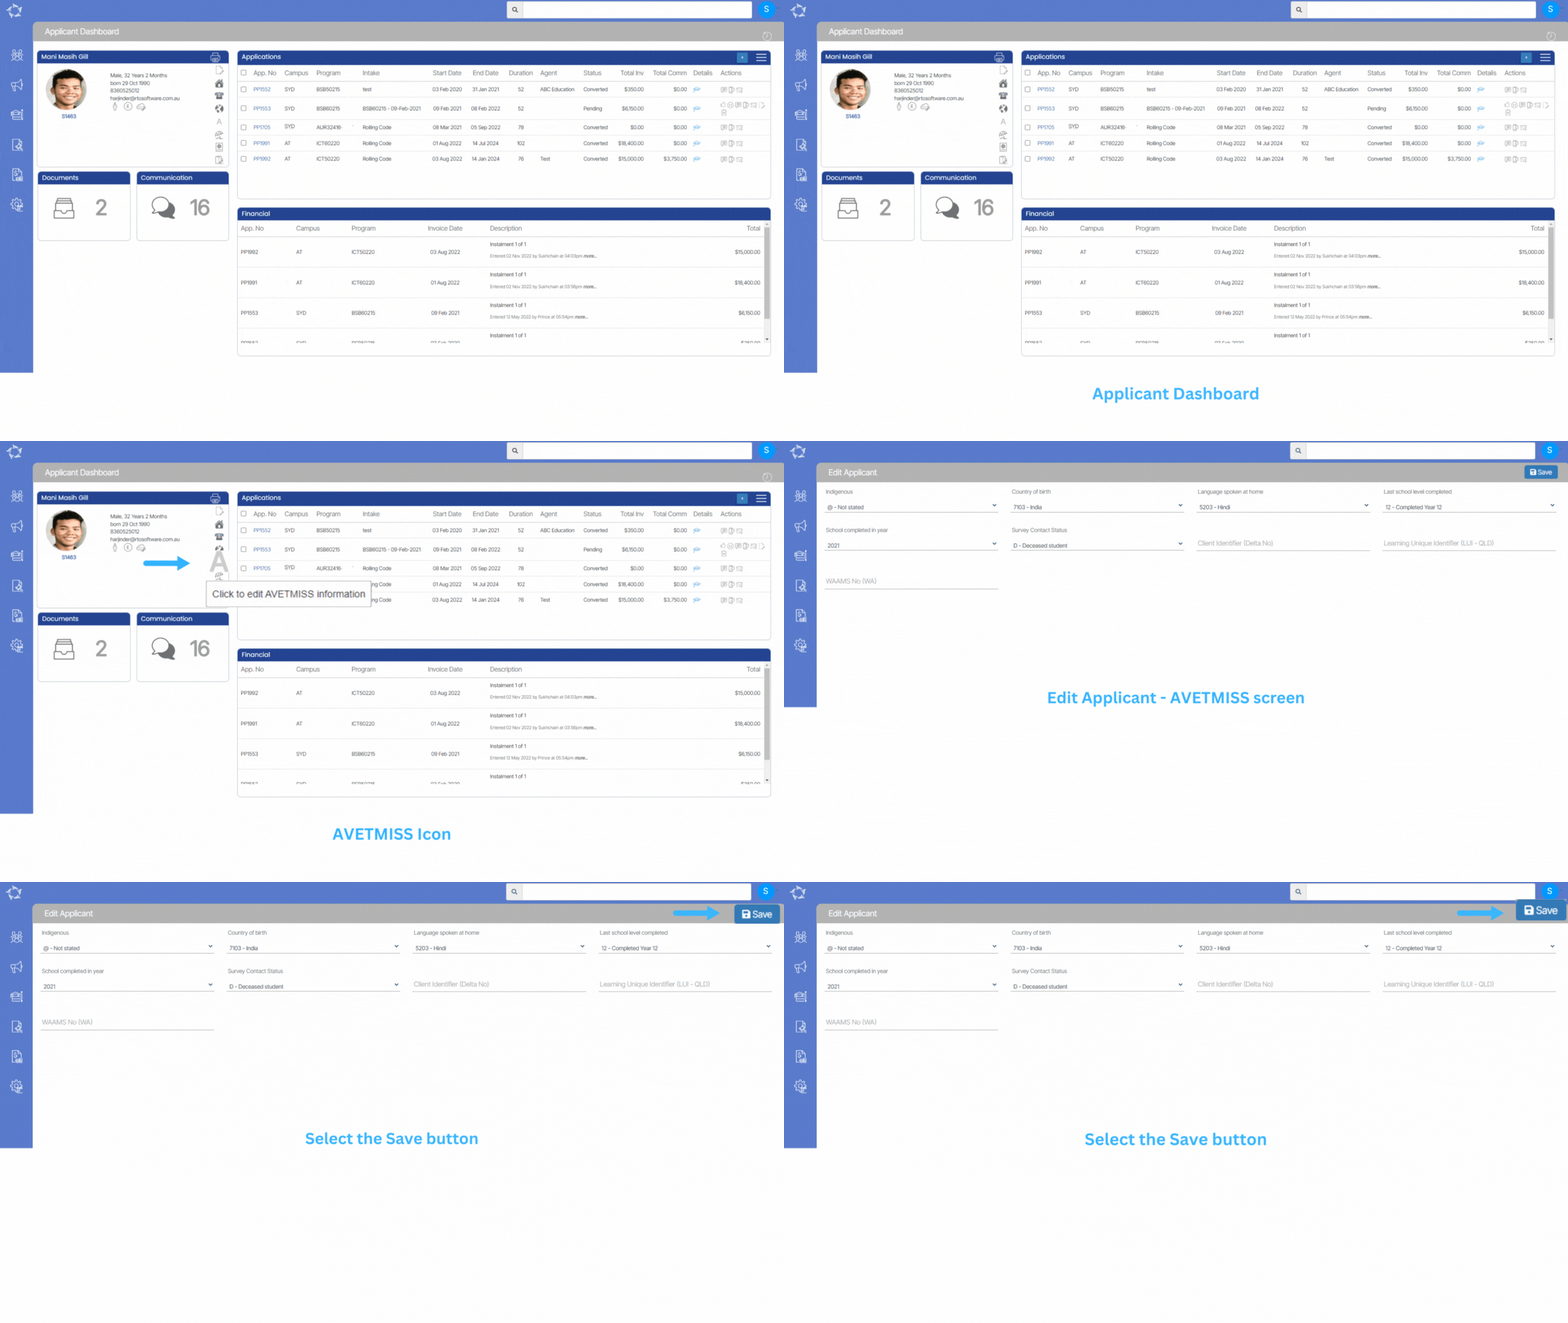
Edit AVETMISS – Applicant

Applicant Dashboard > Applicant Profile Tile > AVETMISS Icon

The first thing to know is that AVETMISS stands for the Australian Vocational Education and Training Management Information Statistical Standard. It is the national data standard that ensures consistent and accurate capture and reporting of Vocational Education and Training (VET) information about students.

The below screen allows you to add/edit the AVETMISS information of a applicant. Some of the fields are very important in the AVETMISS submissions. For example, if you do not select the survey contact status, you will get errors in NCVER submissions. We will recommend you to enter all the AVETMISS fields to avoid compliance issues.

IMPORTANT – Once the application is converted from the applicant to a student then you won’t be able to add/edit any details at the applicant level. However, you can do the changes from the Student Profile Tile.

Note – On this screen, you will see dropdowns for the fields and these dropdowns are user codes in TEAMS. Please select here o know more about User Code.

Explanation of the Fields

ColumnExplanation
IndigenousIt is a UserCode dropdown field where you can select the indigenous status of the applicant.
Country of BirthSelect the country of an applicant.
Language spoken at homeSelect the language that the applicant speaks at home.
Last school level completedYou need to select the last school level completed year.
School completed in yearSelect the completed year of the school.
Survey Contact StatusIt is a UserCode dropdown field used to update the survey contact status of the applicant.
Client Identifier (Delta No)In this field, you can enter the Delta number of an applicant.
Learning Unique Identifier (LUI – QLD)It is a 10 digit learner unique identifier number used to log in learning account.
WAAMS No (WA)In this field, you can enter the WAAMS number of the applicant

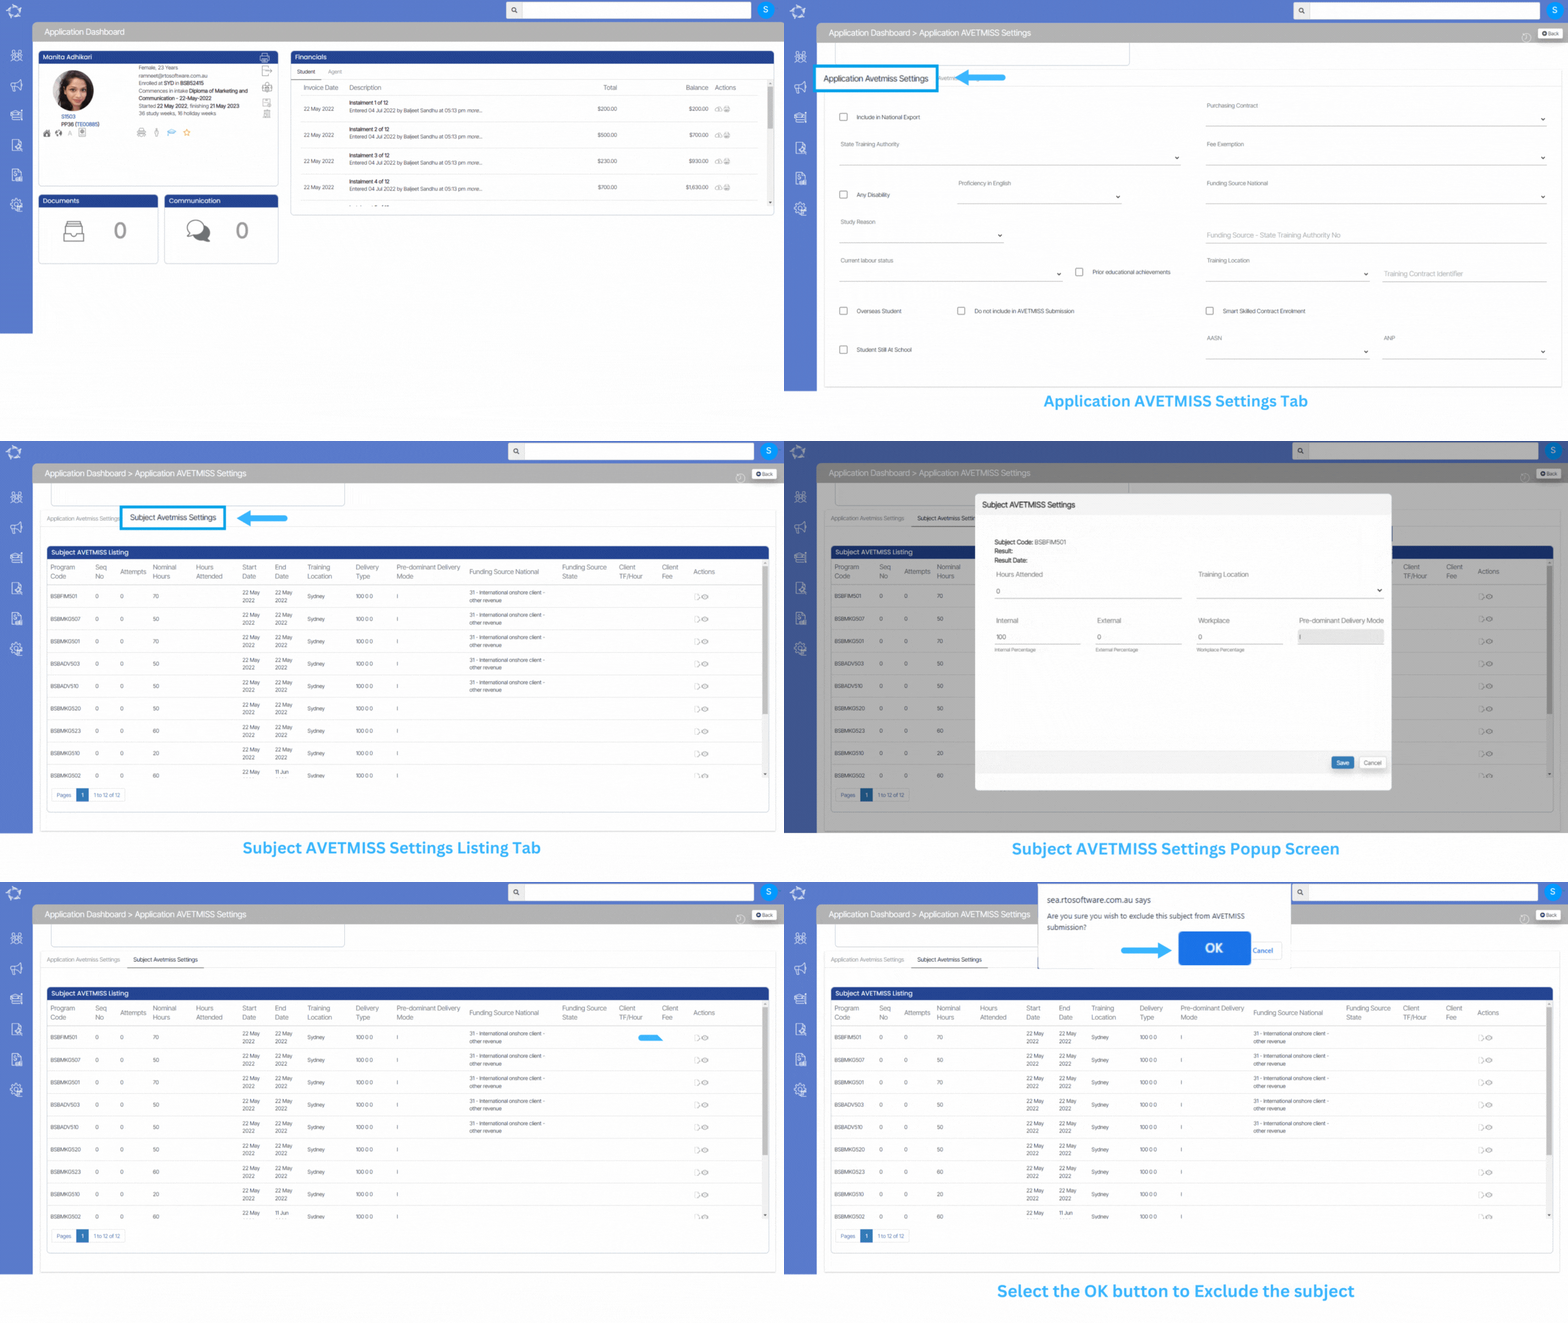
AD – AVETMISS Settings

Application Dashboard > Application Profile Tile > Application AVETMISS Settings icon

This screen will allow you to edit the AVETMISS details of an Application and Subject. When you are on this screen, you will see two different tabs:

Application AVETMISS Settings – In this tab, you can update the AVETMISS settings for the application.

Subject AVETMISS Settings – In this tab, you can update the subject AVETMISS settings.

Explanation of the fields below for Application AVETMISS settings

Application AVETMISS SettingsExplanation
Include in National ExportYou can tick this box if you want to include this application in national export.
Purchasing ContractYou can select the purchasing contract from the dropdown menu.
State Training AuthorityYou can select the state training authority from the dropdown menu.
Fee ExemptionFrom the dropdown menu, you can select the reason for fee exemption.
Any DisabilityYou can tick this box if the applicant is disabled and select their disability from the dropdown.
Proficiency in EnglishYou can select an applicant’s proficiency in English from the dropdown.
Funding Source NationalYou can select the funding source of the applicant from the dropdown.
Study ReasonYou can select the applicant’s reason for studying a particular course from this dropdown.
Funding Source – State Training Authority NoState training authority numbers should be added in this field.
Current labour statusFrom the dropdown, you can select the applicant’s labour status.
Prior educational achievementsTick this box and you will be able to select the applicant’s prior education achievements.
Training locationFrom the dropdown, you can select the training location.
Training Contract IdentifierYou can add a training contract identifier number in this field.
Overseas StudentTick this box if the applicant is from overseas.
Do not include in AVETMISS submissionTick this box if you do not want to include a particular application in the AVETMISS submission.
Smart Skilled Contract EnrolmentTick this tick box if the application is a smart skilled application, also when you tick this tick box Funding source national and state training authority number should be auto-filled.
Student Still At SchoolTick this box if the student is still in school and select the school type from the dropdown.
AASNHere you can add information about the Australian Apprenticeship Support Network.
ANP

Fields Explanation below for Subject AVETMISS settings

FieldsExplanation
Hours AttendedYou can add the hours attended by the student for the specific subject.
Training LocationFrom the dropdown, you can select the training location.
InternalYou can make the internal value 100 if the applicant wants to study onshore (classroom-based).
ExternalYou can make the external value 100 if the applicant wants to study offshore.
WorkplaceIf the applicant is employed and wants a work-based study, then you can make the workplace value 100. Pre-dominant Delivery Mode – It will be auto-populated according to the values you will put in the Internal, External, and Workplace fields.

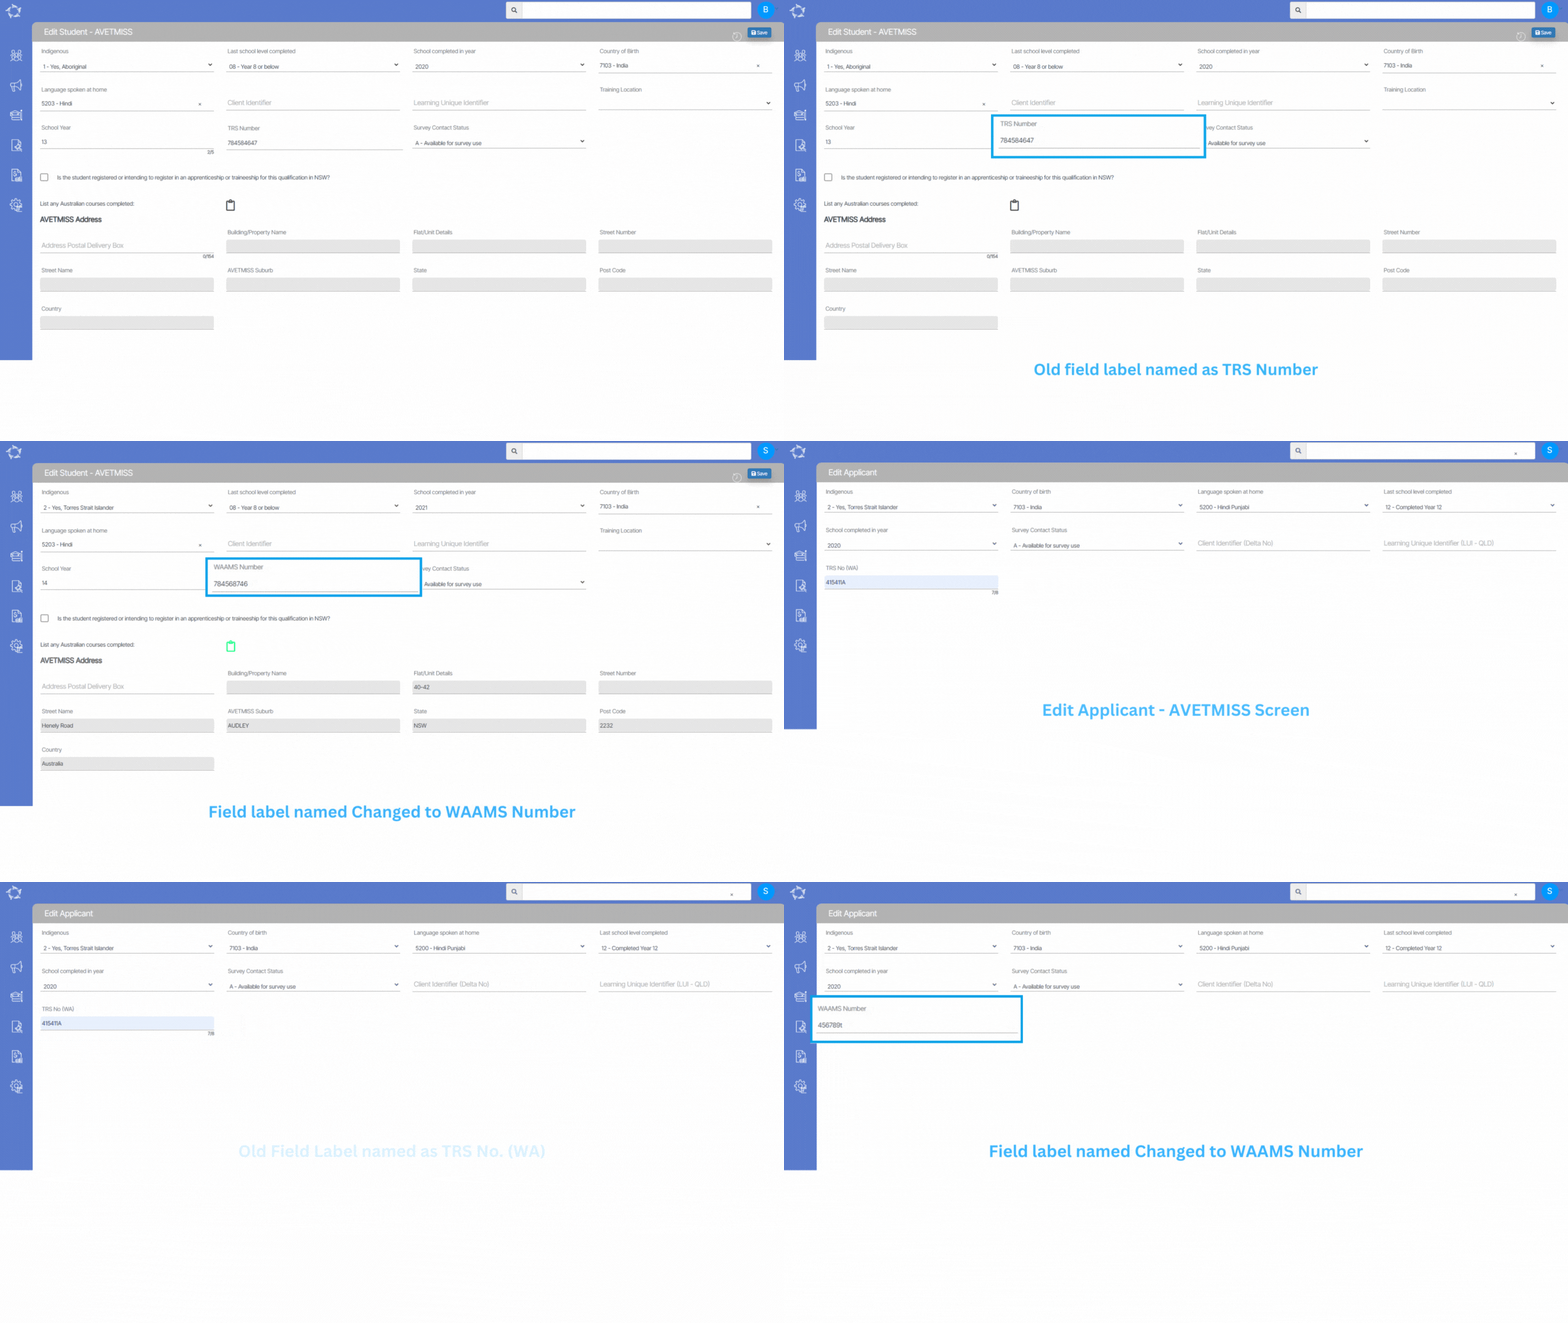
TRS Number Field Label Change

We have changed the label name from TRS Number to WAAMS Number in the system. Now the Field label will display WAAMS Number (Western Australian Apprenticeship Management).

The Change is reflected on the screens

Applicant Dashboard > Edit AVETMISS Screen

Student Dashboard > Edit AVETMISS Screen

The change reflected in the reports and templates

Offer Letter
Applicant Letters and Warnings
Student Letters and Warnings
Certificates Template
Email Template
SMS Template

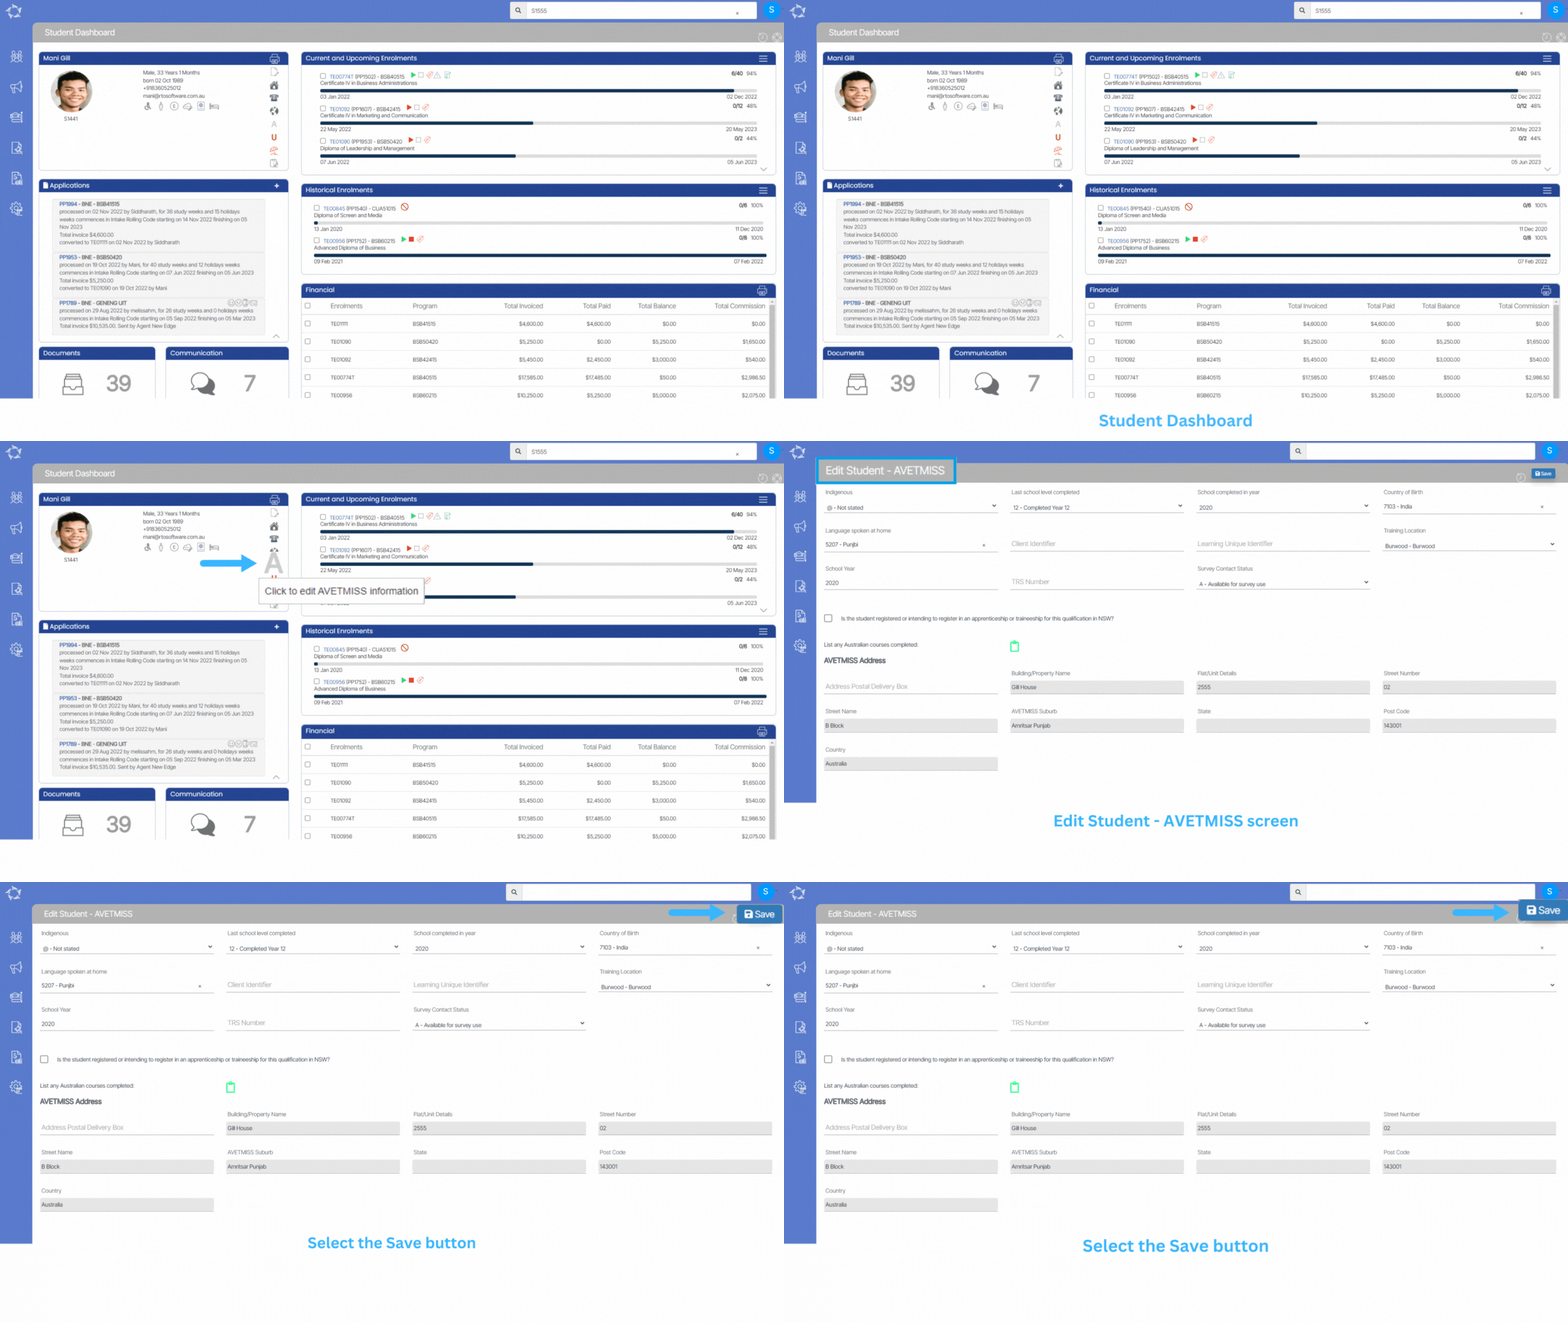
Edit AVETMISS – Student

Student Dashboard > Student Profile Tile > AVETMISS Icon

The first thing to know is that AVETMISS stands for the Australian Vocational Education and Training Management Information Statistical Standard. It is the national data standard that ensures consistent and accurate capture and reporting of Vocational Education and Training (VET) information about students.

The below screen allows you to add/edit the AVETMISS information of a student. Some of the fields are very important in the AVETMISS submissions. For example, if you do not select the survey contact status, you will get errors in NCVER submissions. We will recommend you to enter all the AVETMISS fields to avoid compliance issues.

Explanation of the Fields

ColumnExplanation
IndigenousAll the values defined in the AVETMISS data element definitions: edition 2.3 by NCVER will be shown in this drop-down. Select the appropriate Indigenous status identifier.
Last school level completedAll the values defined in the AVETMISS data element definitions: edition 2.3 by NCVER will be shown in this drop-down. Select the appropriate School level identifier
School completed in yearSelect the year in which the student completed school.
Country of BirthIn this field, you will see 4-digit Standard Australian Classification of Countries code validated by NCVER. Select the appropriate country.
Language spoken at homeThis field uniquely identifies the main language other than English spoken at home by the student. All the valid 4-digit Australian Standard Classification of Languages codes will be shown in the drop-down.
Client IdentifierClient identifier is assigned by the training organisation. This will usually be the student’s ‘student number’.
Note – Unique Student Identifier (USI)
codes are not to be assigned to the client as the Client identifier and Client identifier must not contain spaces.
Learning Unique IdentifierIt is a 10 digit learner unique identifier number used to log in to the learning account of the student.
Training LocationIt is a dropdown field where you can select the training location of the student.
School YearEnter the school year of the student
WAAMS NumberThis is a Western Australian Apprenticeship Management System number used as a training contract identifier for WA state. This should be in uppercase.
Survey Contact StatusSurvey contact status identifies reasons to exclude excludes from the Student Outcomes Survey and
other communications. 
Is the student registered or intending to register in an apprenticeship or traineeship for this qualification in NSW?Tick this if applicable
List any Australian courses completedThis is a note box. You can enter the list of all the courses here. To save the entered data kindly click again on the notes box.
AVETMISS Address
Address Postal Delivery BoxPostal delivery code can be added in this field.
Building/Property NameAuto populated field
Flat/Unit DetailsAuto populated field
Street NumberAuto populated field
Street NameAuto populated field
AVETMISS SuburbAuto populated field
StateAuto populated field
Post CodeAuto populated field
CountryAuto populated field

Reasons an enrolment is not in the AVETMISS export files

There are a few rules that will stop an enrolment from being exported in the AVETMISS export files which are listed below.

Firstly, there are two different types of AVETMISS exports in the system that are:

  1. National Export – this is to export files to submit to NCVER
  2. State Export – this allows you to select a specific State and the files will be exported to meet the state level rules for submission to that State


Reason’s that an enrolment will not be in the National Export

  1. The student is not flagged as AVETMISS. How to check this? Go to the student dashboard and select the Edit Student icon and see if the AVETMISS tick box is selected or not?

  2. Enrolment is not flagged as Include in National Export. How to check this? Open the Enrolment Dashboard and go to AVETMISS Settings and see if this is selected.

  3. Result dates for the subjects linked to the enrolment do not fall within the calendar year you selected for the export. How to check this? Open the Enrolment Dashboard > Results & Progress Tile > Training Plan and Results screen. Then look at each subject and its result date, if there are none within the calendar year you selected that is why and you may need to update the result date/s where needed. If you don’t remember or are unsure what calendar year you selected for the export, go to the main menu for Compliance > AVETMISS Export History screen. From the list, look for the last export you did and in the Filters column it will show you the calendar year you selected.

  4. Enrolment is flagged as Do not include in AVETMISS submission. How to check this? Open the Enrolment Dashboard and go to the Edit Enrolment and see if this is selected.

  5. Enrolment is not flagged as started. How to check this? Open the Enrolment Dashboard and in the Enrolment Profile tile see if the icon for Started is green or red? If it is red, then it is not started.

  6. Enrolment is flagged as cancelled. How to check this? Open the Enrolment Dashboard and in the Enrolment Profile tile see if the icon for Cancelled is grey or red? If it is red, then it is cancelled. IMPORTANT: this is the only setting that tells the system that the enrolment is cancelled. If you have an Enrolment Outcome that says cancelled, this is not considered by the system at all as cancelled.

Reason’s that an enrolment will not be in a State Export

  1. The student is not flagged as AVETMISS. How to check this? Go to the student dashboard and select the Edit Student icon and see if the AVETMISS tick box is selected or not?

  2. An incorrect state is selected on the enrolment AVETMISS screen. How to check this? Open the Enrolment Dashboard and go to AVETMISS Settings and see if there is a state selected for the State Training Authority field and is it the correct State?

  3. Result dates don’t fall under the export year parameters. How to check this? Open the Enrolment Dashboard > Results & Progress Tile > Training Plan and Results screen. Then look at each subject and its result date, if there are none within the calendar year you selected that is why and you may need to update the result date/s where needed. If you don’t remember or are unsure what calendar year you selected for the export, go to the main menu for Compliance > AVETMISS Export History screen. From the list, look for the last export you did and in the Filters column it will show you the date range you selected.

  4. Enrolment is flagged as Do not include in AVETMISS submission. How to check this? Open the Enrolment Dashboard and go to the Edit Enrolment and see if this is selected.

  5. Enrolment is not flagged as started. How to check this? Open the Enrolment Dashboard and in the Enrolment Profile tile see if the icon for Started is green or red? If it is red, then it is not started.

  6. Enrolment is flagged as cancelled. How to check this? Open the Enrolment Dashboard and in the Enrolment Profile tile see if the icon for Cancelled is grey or red? If it is red, then it is cancelled. IMPORTANT: this is the only setting that tells the system that the enrolment is cancelled. If you have an Enrolment Outcome that says cancelled, this is not considered by the system at all as cancelled.

Program – AVETMISS

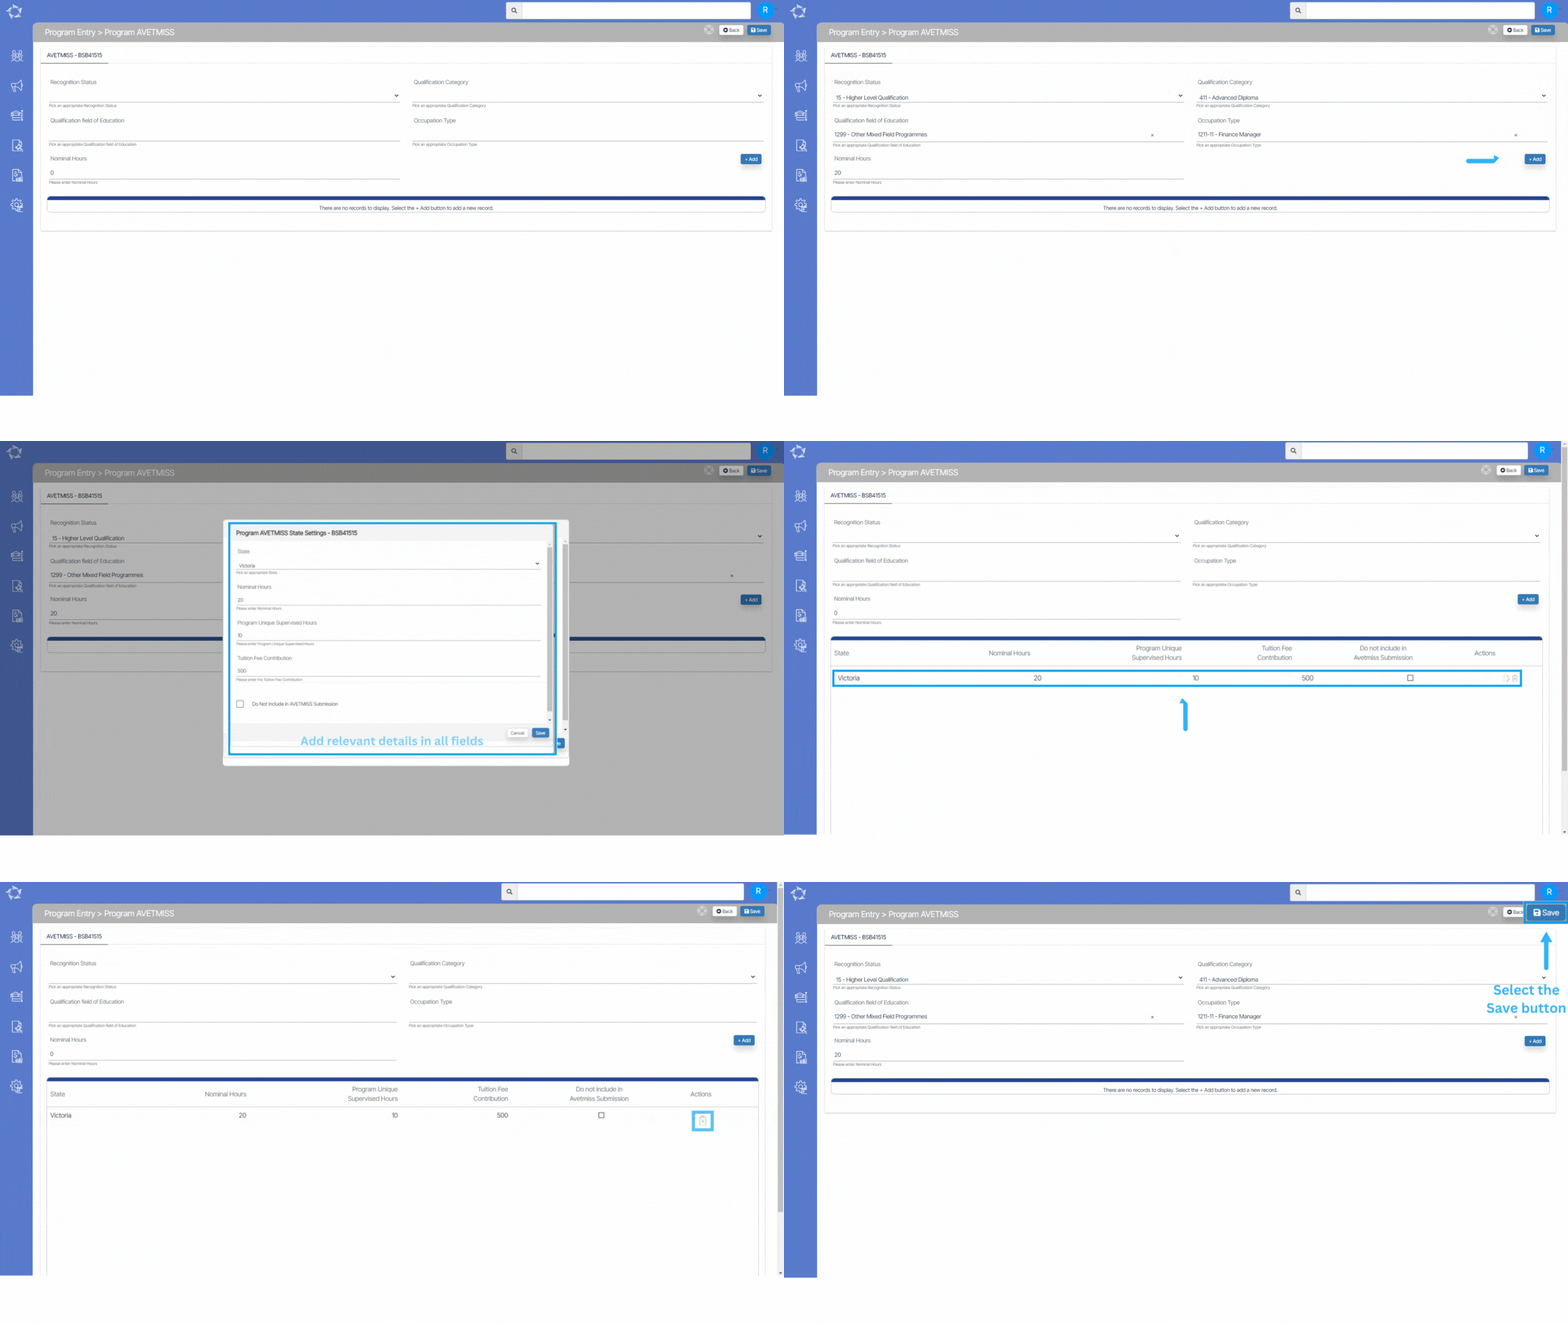
In AVETMISS reporting, Program AVETMISS settings refer to the specific data elements used to describe and report vocational education and training (VET) programs and qualifications. This screen will allow you to update the Avetmiss details for a program as well as Program AVETMISS State Settings.

IMPORTANT – It’s important to note that AVETMISS reporting requirements may be subject to updates and changes. Therefore, it is advisable to consult the official AVETMISS documentation and guidelines provided by the National Centre for Vocational Education Research (NCVER) or the relevant state or territory training authority for the most accurate and up-to-date information regarding AVETMISS settings for student programs in colleges in Australia.

Explanation of the fields below:

  • Recognition Status – From the dropdown menu, you can select the recognition status of the program.
  • Qualification Category – From the dropdown menu, you can select the qualification category of the program.
  • Qualification field of Education – It is a magic search field where you have to put the code of qualification field of education, and you can select the appropriate code from the suggestions.
  • Occupation Type – It is a magic search field where you have to put the code of occupation type, and you can select the appropriate code from the suggestions.
  • Nominal Hours – Here, you have to put the sum of all the nominal hours of the subjects linked with the program.

After that, you can select the +Add button to update the Program AVETMISS State Settings. Once you select the +Add button, the floating window will appear as shown below:

Explanation of the fields below:

  • State – You can select the state from the dropdown.
  • Nominal Hours – Here you have to write the nominal hours.
  • Program Unique Supervised Hours – Here you can add the total number of unique hours of supervised training and assessment activity for the Program.
  • Tuition Fee Contribution – Here you can add the total tuition fee contribution set by the government as per Band 1, Band 2, and Band 3.
  • Do Not Include in AVETMISS submission – Tick this box if you do not want to include this program in AVETMISS submission.

Then hit the save button to save these details.

Change – New Application > AVETMISS Address tab

While creating a new applicant, if you are not selecting the AVETMISS tick-box on the New Application > Details tab then the system will not allow you to add the AVETMISS address on the address tab.

As the AVETMISS address fields are read-only fields and you will only be able to add an AVETMISS address under the address tab if you select the AVETMISS tickbox.

If you have any queries, please do not hesitate to contact us on 1300 85 05 85 or email us via support@rtosoftware.com.au

Student Profile Tile

This tile will give you an overview of the basic information of the student. You can upload the student profile picture here and edit the details of the student.

Basic Information

You will see some basic information about the student displayed in this tile. It will show the gender and the age of the student in the first line. In the second line, it is displaying the date of birth of the student. It will display the mobile number and primary email address of the student further.

Upload Student Profile Picture

For uploading or changing the student profile picture, you need to bring your cursor near the thumbnail of the picture and the system will show two icons as shown below.

To upload the student profile picture by clicking the picture using the system upload, click on this icon.
To save the student profile picture after uploading the picture from your computer, click on this icon.

Vertical Icons

Horizontal Icons

Special Needs Required

How to search for a student with a Delta No

From the Student Search you now can search for a student using their Delta No which is also known in the system and in AVETMISS as the Client Identifier.

Note: Delta No’s are only used for funded students, there is no need to enter anything here if you are not a funded RTO who has purchasing contracts that require the Delta No.

  • If you want to search a student with the Delta No in TEAMS then it should be updated on the Student Dashboard > AVETMISS Icon > Edit Student screen as highlighted in the screen shot below:
  • So when you are on the Main Dashboard, you can search the student in the search bar with it’s Delta No and it will show the Student’s name and TEAMS Student Number as highlighted below: