We have introduced new functionality on all the welcome screens in TEAMS. Now, you can hit the enter key as well to apply the filters/parameters. Earlier, you could only apply them by clicking on the Apply button.
For instance, if you are searching for an agent on the Agent Welcome screen. All you have to do is to type in your agent code or name and then simply hit the Enter key
This functionality works on Campus Welcome Screen, Program Welcome Screen, Unit of Studies, Subjects, Timetable and all other welcome screens in the system.
When the “Pay Commission” is turned on but the commission template is not linked with the agent, it can cause issues. This means that the system has enabled the commission calculation but it is not properly set up to assign commissions to specific agents
To link the agent commission template and raise the agent invoices, you can follow the following steps:
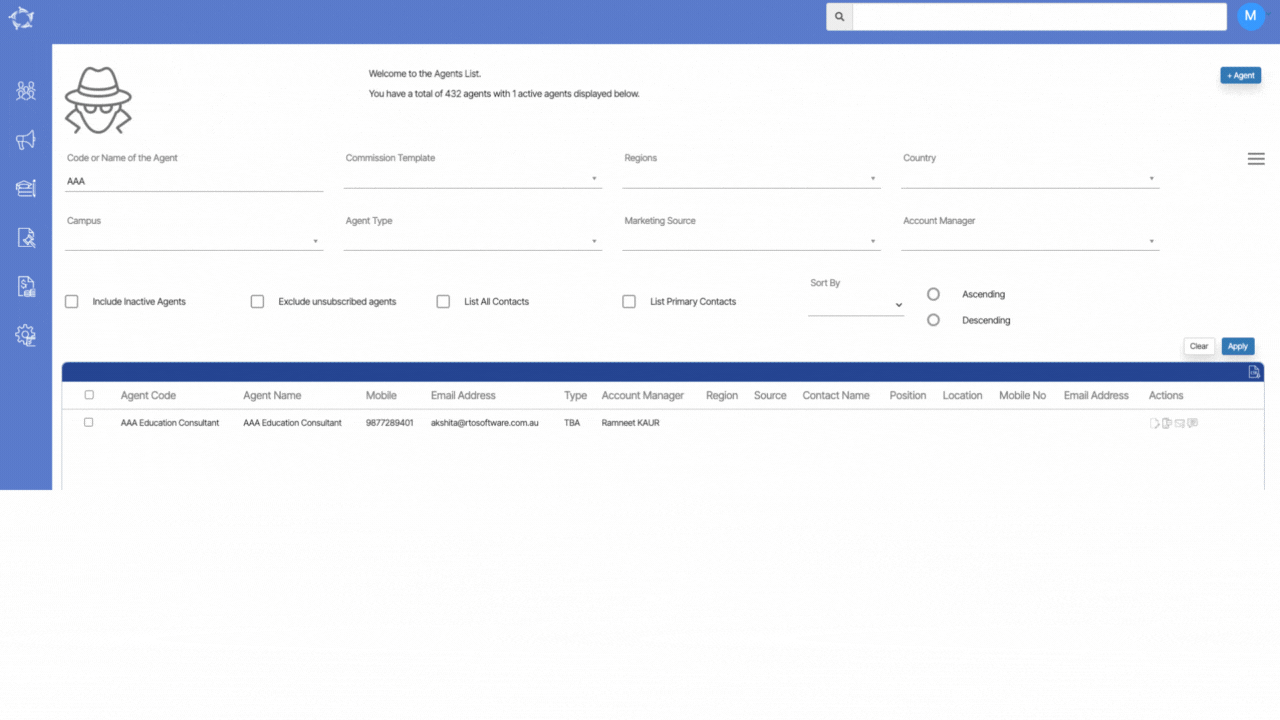
The first step is to select the main menu icon for Marketing, followed by selecting the icon for Agent. This action will direct the user to the Agent Welcome List screen. From there, the user can search for a specific agent by using the search bar or by scrolling through the list of agents displayed.
Once the user has accessed the Agent Welcome List screen, the next step is to select the agent by entering their code or name and clicking the Apply button. The system will then search for the agent and display the relevant information on the screen.
To edit the agent’s information, the user needs to locate the Edit icon in the Actions column of the agent’s record and select it.
When accessing the agent entry screen, it is possible to see whether the pay commission tick box is selected or not. However, it is important to note that the commission templates must also be selected in order for the system to properly calculate and allocate commissions. This can be done by using the “Default Commission Template” dropdown menu.
In addition to the “Default Commission Template” dropdown, there is also another dropdown menu available on the agent entry screen that allows the user to select optional commission templates. These templates are typically used when an agent is eligible for commissions based on multiple sales.
After selecting the appropriate commission template/s for the agent and making any necessary changes to their information, the next step is to click on the save button to save the changes.
The new invoice step 2 is an invoice preview screen where you will be able to see the student invoices and agent invoices preview on the different tabs:
You can enter the Study period number in the SP No. field if you want to, if you will enter the student period No the system will automatically calculate the study period start date and end date.
Student Invoice tab:
Agent Invoice tab:
Once you will verify all the things are fine on the preview screen, you just need to click on the Finish button and the system will create the new invoice and take you to the final step.
Below I have explained the Print and the snd button:
This is the print icon from where you will be able to generate the created invoice, Once you will click on this button the template selection floating window will appear, you can choose the template from the dropdown and select the Generate button to generate the invoice.
By selecting the Send Button you will be able to send the created invoice via email to the student. Once you will select the send button the system will take you to the compose email screen. You can choose your email template and select the send button to send the email.
Note: Whatever template you will select the receipt merge field needs to be added to the template, only then the system will print the invoice in the email.
If you have any queries, please do not hesitate to contact us on 1300 85 05 85 or email us via support@rtosoftware.com.au
Agent Dashboard > Communications Tile > Communication log > Burger menu > Send an Email
From the Communication Log that you access from the Agent Dashboard (AGD) > Communication Tile, you now can send an email with attachments.
This works in the same way that you use the attachments when sending emails from the Student or Enrolment Dashboards.
How to send an email with attachment/s
Step 1: Open the Agent Dashboard and click on the count displayed in the Communications Tile, in the screen shot below this means click on the 0.
Step 2: when the Communication Log screen opens, from the Burger menu select the option for Send an Email, as shown below.
Step 3: when the Email Log screen opens either select an Email template to use or write you message in the Message section. You then have two options to attach documents to the email that include:
Attach documents linked to the Agent – this will show you a list of all the documents that have been uploaded to the Documents tab for the Agent. This will show both documents uploaded by a user or generated by the system.
Attach documents from your computer/network – this will allow you to navigate to your computer and network to find and select relevant documents to attach to your email.
Based on the button you select for the one of the options above, you will see a popup window with a list of documents.
The above is the list of all the documents present in the document log screen, as shown below) for the same agent.
Step 4: Once all the required documents are selected, click on Add to Email Attachment button. It will show the attached documents on the email log screen as shown below.
Step 5: After attaching the documents, click on the send button and the system will send the email with the attached documents to the agent.
If you have any queries, please do not hesitate to contact us on 1300 85 05 85 or email us via support@rtosoftware.com.au
Main Dashboard > Enrolment Dashboard > Financial Tile
If the agent was not initially linked to the enrollment process, it is now possible to establish this connection directly from the enrollment dashboard. By utilizing the agent linking feature, you gain access to a comprehensive range of information and capabilities related to financial transactions. These functionalities empower you to efficiently handle financial transactions and ensure accuracy in financial records.
To link an agent with an enrollment, please follow the steps below:
Access the Enrollment Dashboard.
Navigate to the Financial tile, located directly below the enrollment student profile tile.
Click on the agent icon within the student financial tile to open a pop-up window for agent linking.
Utilize the magic search field within the pop-up to search for the desired agent. As you type, the search suggestions will display matching agents.
Select the appropriate agent from the suggestions and click the update button. The screen will refresh, and the agent tab will appear in the financial tile.
From the Enrolment Dashboard > Financials Tile > Agent tab it shows that there is no financials for the agent linked to the enrolment, this could be because the Agent is not set with Pay Commission.
To raise the agent commission the Pay Commission should be turned on and at least one commission template should be linked to the agent which is explained below.
Select the main menu icon for Marketing and then the icon for Agent. This will take you to the Agent Welcome List screen where you can search to find the Agent.
Enter the Agents code or name and select the Apply button. The system will search and display the agent and you then just need to select the Edit icon in the Actions column as highlighted below.
On the Agent entry screen select the tick box for Pay Commission as shown below:
After selecting the Pay Commission tick box, two new fields with drop downs will show for Default Commission Template and Optional Commission Templates.
You must select at least one Default Commission Template from the drop down for the system to calculate commission for the agent. You can only select one Default Commission template.
If the agent sometimes receives different commission percentages, you can always select other commission templates in the Optional Commission Template drop down. The system will allow you to select more than one from this list.
Now you need to go back to the enrolment dashboard, select the edit icon from the agent tab as shown below:
In the pop up window select the Update button as shown below. By doing this the system will refresh the screen and will have calculated and created, where relevant, the commission invoices for the enrolment.
There could be a number of reasons why the system is not calculating an agent’s commission invoices for an enrolment. The following posts will help you identify the reason.
This report is used to generate the outstanding/ pending commission invoices for the agent, where you have used the Agent Pending Payments process.
If you wish to send the invoice from TEAMS for their pending payments; this is approved pending commission invoices to be paid, you can use this report to generate the invoice/s.
How to generate the report?
This is a word report and can be generated either from the Pending Payment Welcome screen
or from the final confirmation step of Pending Payments as shown below.
To know more about the Pending Payment process, click here Pending Payments.
This report template can be copied and you can then create as many customised templates that the system can generate for you. To know more about the tables used in the template, you can download the master template from the Report Templates Screen.
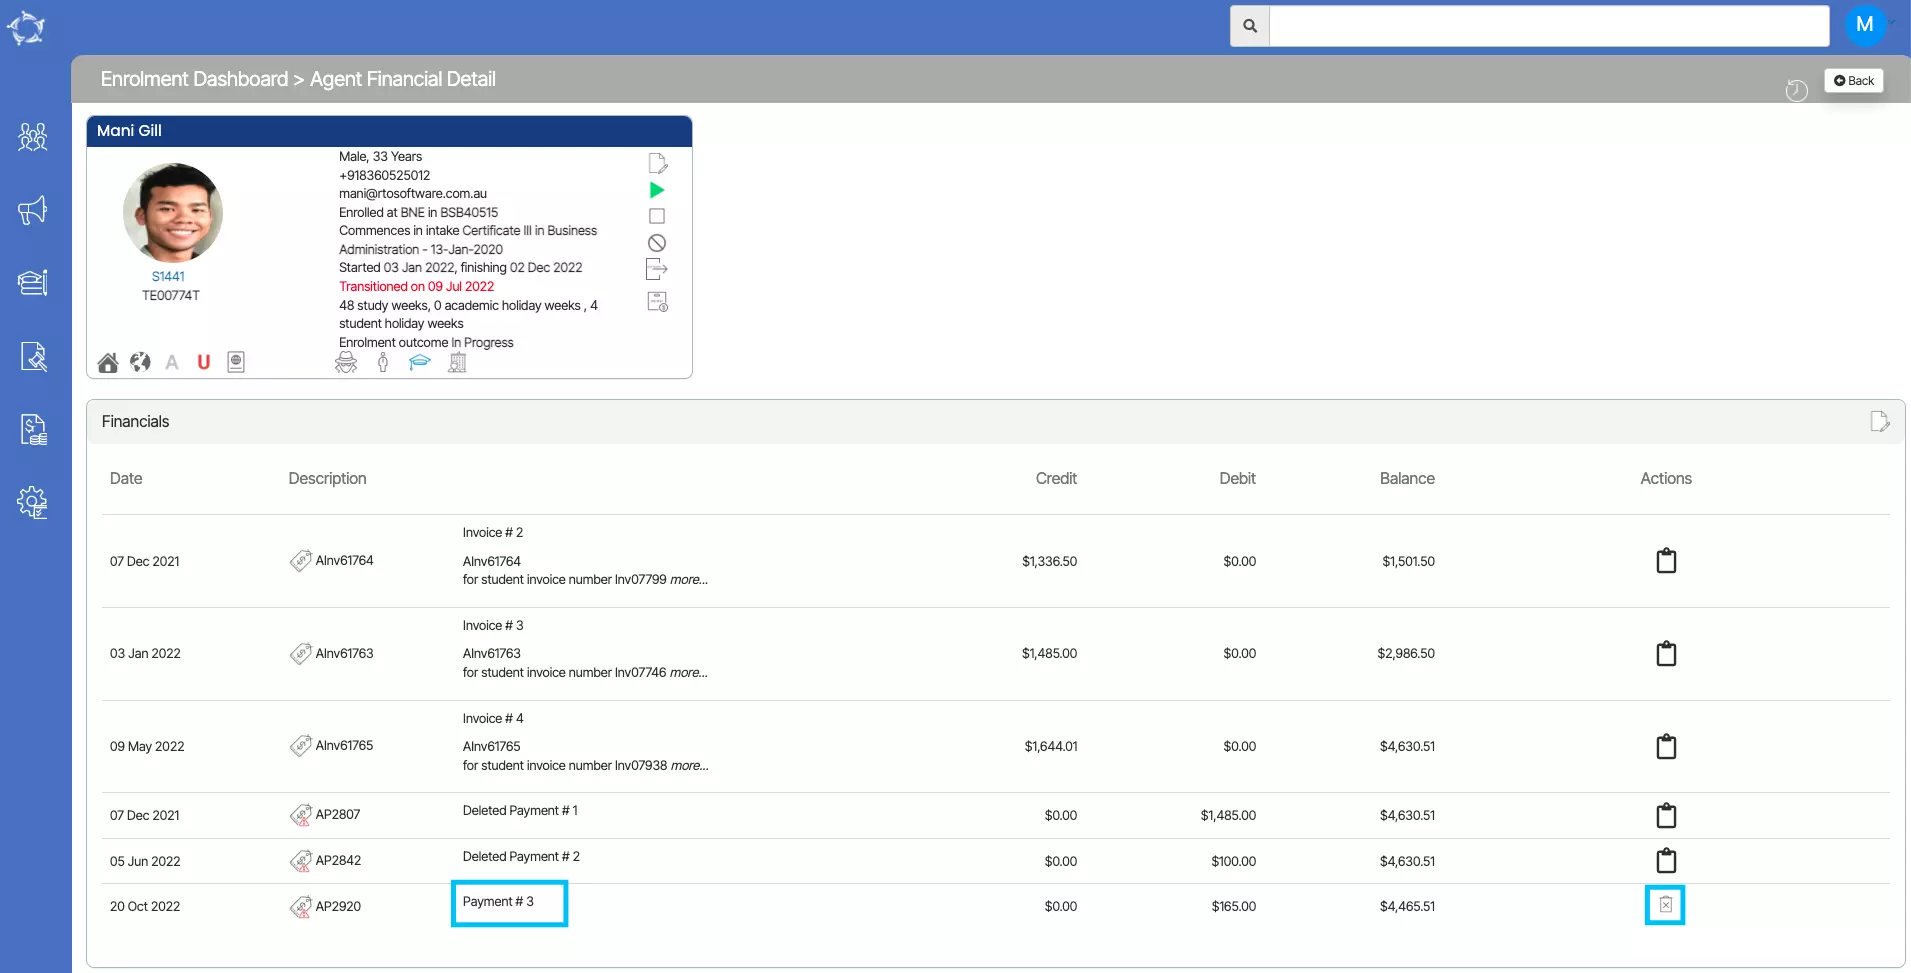
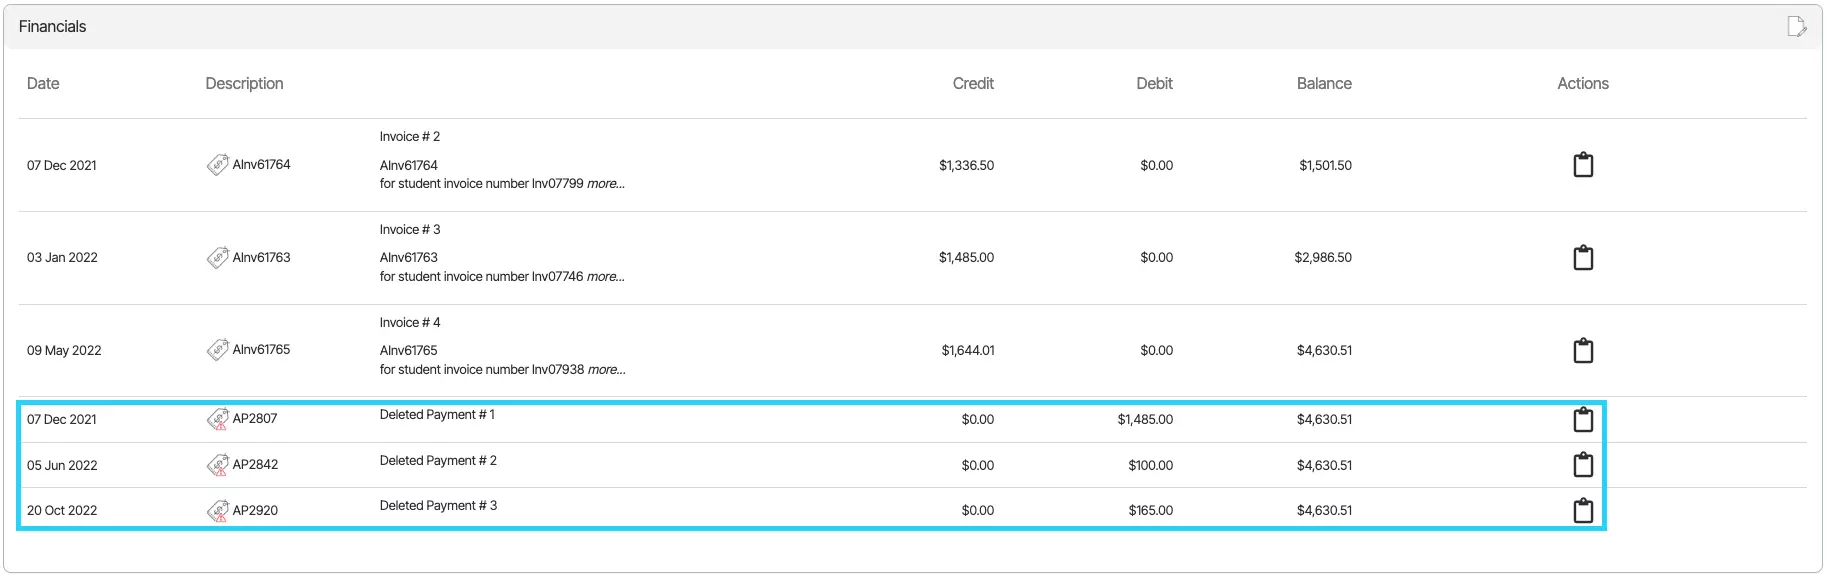
We have added a delete icon on the Agent Financial screen and now you can delete agent payments made for the students/enrolments.
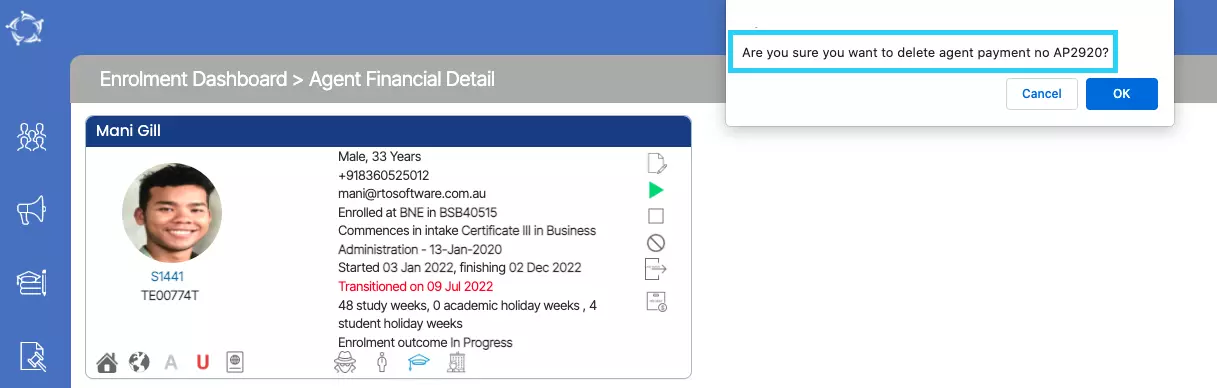
Once you select the delete icon, a pop-up will appear on your screen to confirm to delete the agent payment with the payment number. You can select OK to continue or Cancel to leave.
When you select OK, you will see the deleted payment details in the grid.