Below is the list of the changes that we have made to the Certificate Report.
academics
Finishers Tile and Finishers Listing Screen – History
Below is the list of the changes that we have made to the Finishers Tile and and it’s Listing Screen.
| Date Updated | Changes Made |
|---|---|
| 19 Oct 2023 | Listing Screens – New Page Limit Option |
| 21 Sep 2023 | New Option – Select Multiple Student Records Across Pages for Email Sending |
| 27 July 2023 | Main Dashboard Tiles Optimisation |
| 13 July 2023 | Listing Screens – Intake/Dates Column Changes |
| 23 Mar 2023 | Main Dashboard – Tiles Changes |
| 15 Dec 2023 | Unstart/Unfinish Enrolments In Bulk |
Starters Tile and Starters Listing Screen – History
Please see the below changes that we have made to the Starters Listing Screen.
| Date Updated | Changes Made |
|---|---|
| 19 Oct 2023 | Listing Screens – New Page Limit Option |
| 21 Sep 2023 | New Option – Select Multiple Student Records Across Pages for Email Sending |
| 10 Aug 2023 | Listing Screens New Feature – Bulk Update Trainer |
| 27 July 2023 | Main Dashboard Tiles Optimisation |
| 13 July 2023 | Listing Screens – Intake/Dates Column Changes |
| 23 Mar 2023 | Main Dashboard – Tiles Changes |
| 15 Dec 2022 | Starters Listing Screen – New Column |
| 15 Dec 2022 | Unstart/Unfinish Enrolments In Bulk |
Certificate Report Enhancement
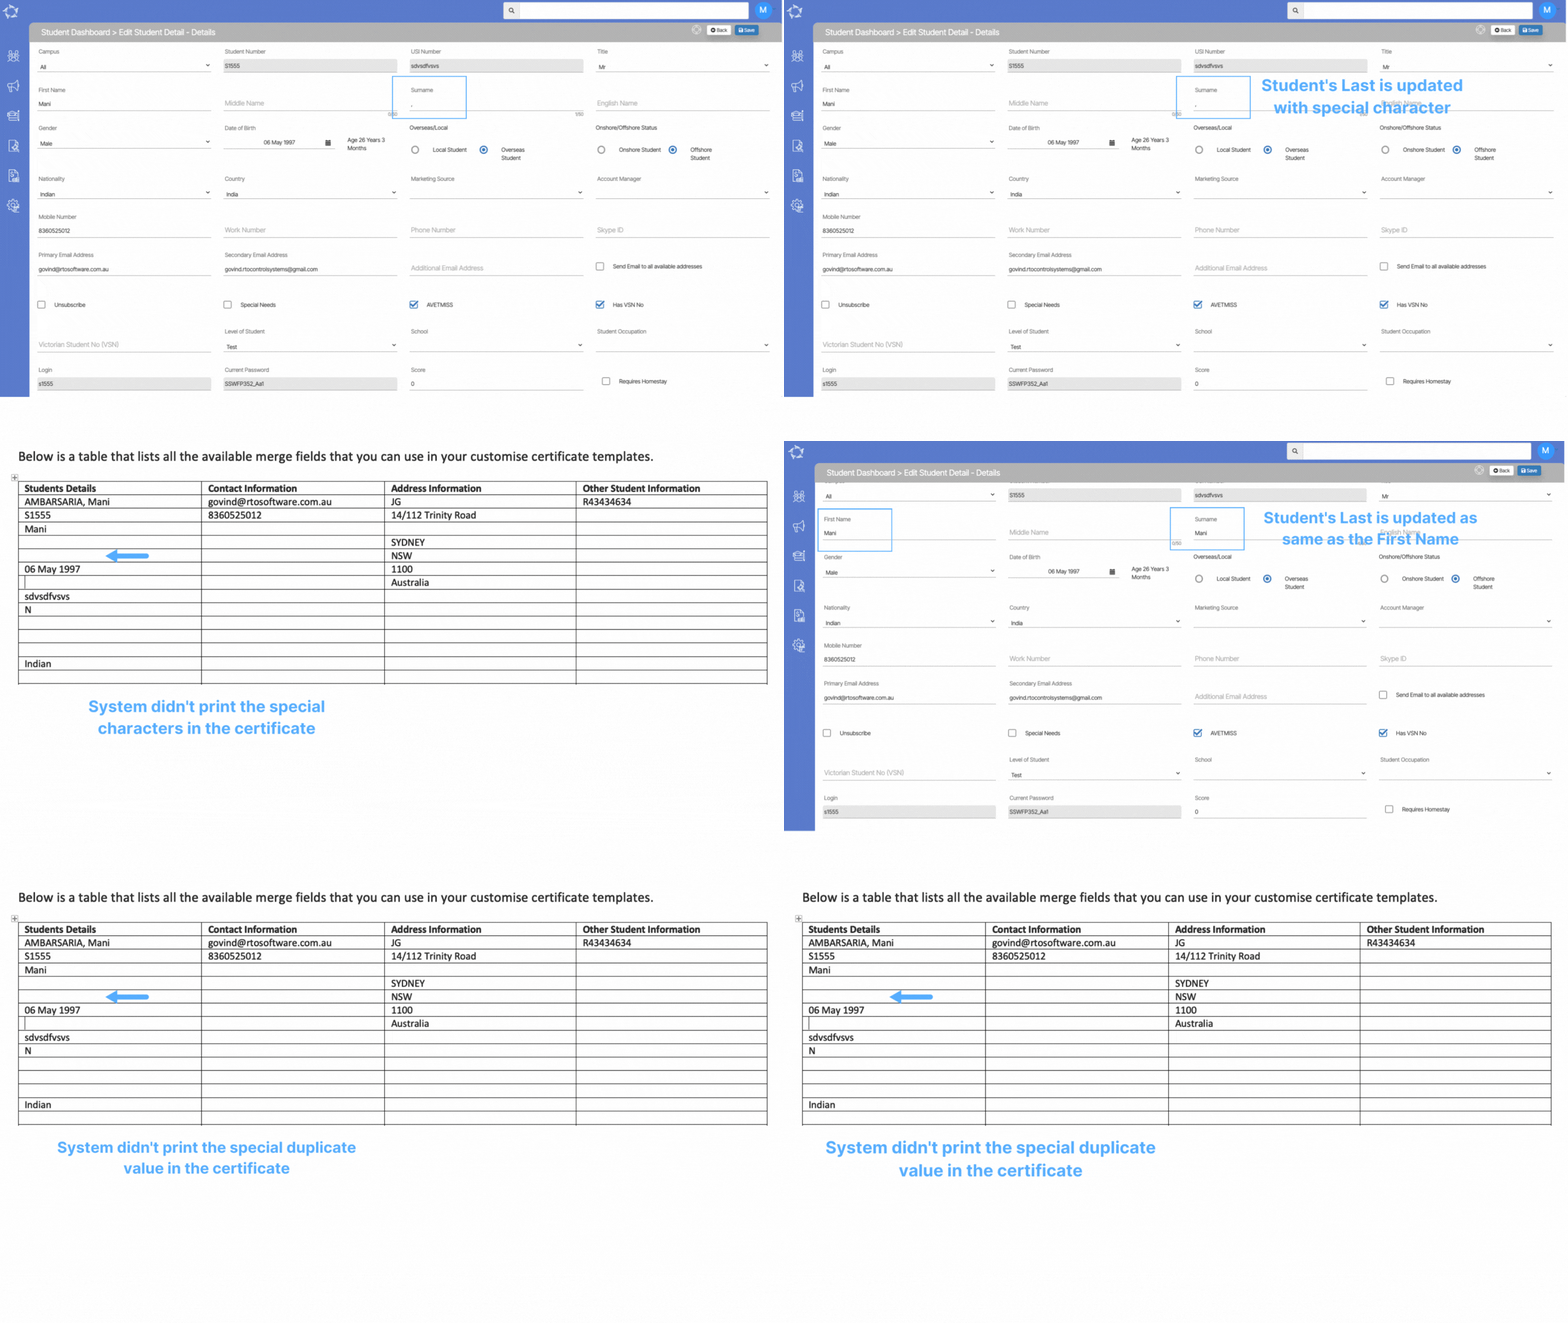
We have implemented notable enhancements in the certificate reporting process, particularly pertaining to the handling of names within the merge fields.
In the first scenario, where a student’s last name is a mandatory field and if a student’s record lacks a last name and incorporates special characters like commas or periods within the last name field, the newly improved system ensures that the generated certificate will solely display the student’s first name. Special characters in the last name are omitted from the certificate, contributing to a cleaner and more accurate representation.
In the second instance, when a special character is not utilised within the last name field, yet the student’s first name is duplicated as the last name, the system’s upgraded functionality comes into play. Upon generating the certificate, only the student’s first name is printed, eliminating redundancy in the data presented. These enhancements collectively enhance the precision and professionalism of the certificate reports, offering streamlined and error-free documentation of student achievements.
Listing Screens New Feature – Bulk Update Trainer
10 Aug 2023
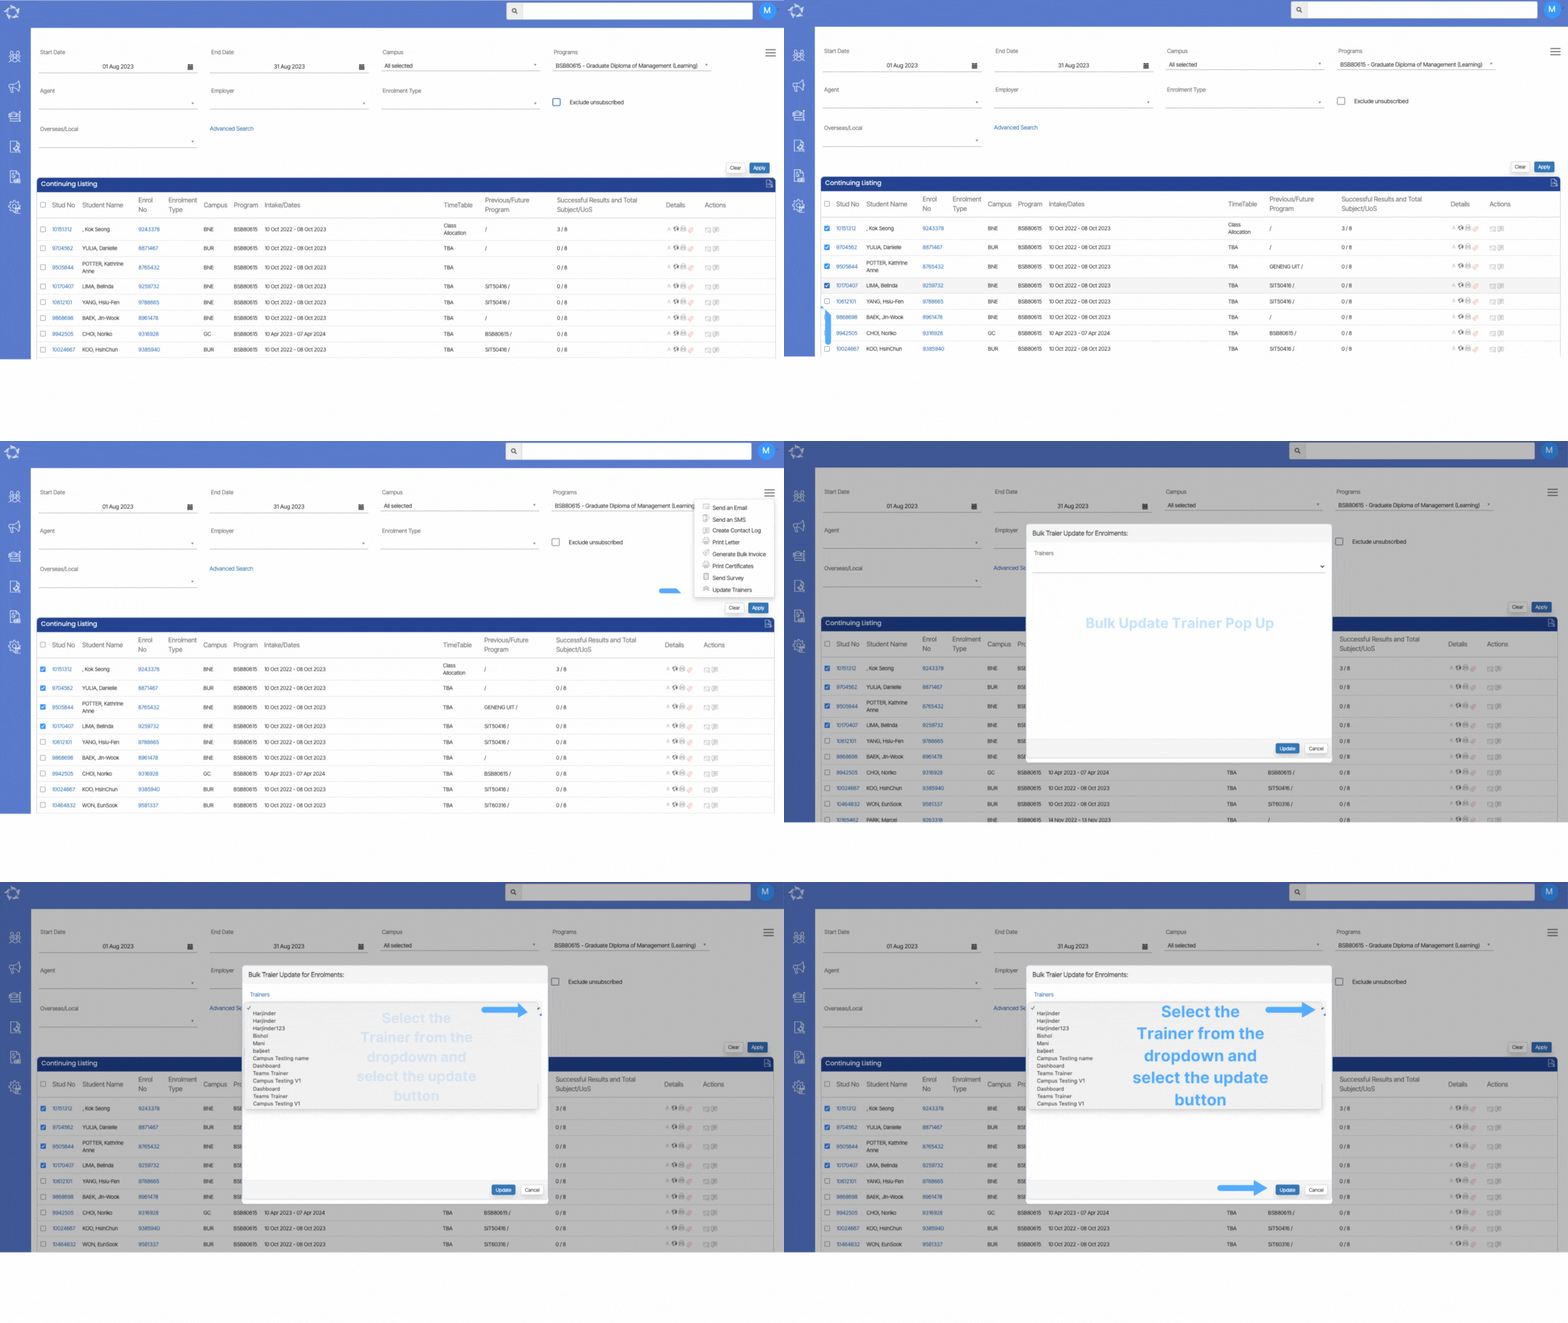
We are excited to announce the latest addition to our software – the Update Trainer in bulk feature, now available on both the Continuing Listing Screen and the Starters Listing Screen. To access this feature, simply navigate to the Burger Menu located on the respective screens. With this new functionality, managing multiple enrolments is easier than ever before.
To update trainers for multiple enrolments simultaneously, begin by selecting the tick boxes next to the student numbers from the grid. After making your selections, click on the Update Trainer option from the burger menu. A convenient pop-up window will appear, displaying the selected enrolment numbers alongside a dropdown menu of available trainers. you can choose the desired trainer from the dropdown list according to your specific requirements. Once you have made your selection, hit the Update button to confirm the changes. The system will then automatically refresh the screen, seamlessly taking you back to the respective listing screen.
NOTE – Once you have successfully updated the trainer in bulk using our convenient feature, the system takes care of automatically updating the changes across all relevant screens. This includes the Edit Enrolment Details screen, where you can find the updated trainer information for each enrolment. Additionally, the Training Plan and Results screen will also reflect the latest trainer assignments, ensuring accurate and up-to-date records.
IMPORTANT – Let’s explore the three different scenarios of how the Update Trainer in bulk feature operates:
Scenario 1, when there is no trainer currently linked to the enrolments, and you proceed to update the trainer in bulk for those specific enrolments, the system acts swiftly and efficiently. It simultaneously updates all the selected enrolments with the newly assigned trainer, ensuring seamless integration and accurate records.
Scenario 2 involves enrolments that already have a trainer linked, visible on both the Edit Enrolment Detail and Training Plan & Results screens. In this case, when attempting to update the trainer for these enrolments in bulk, the system identifies that no changes are necessary. As a result, it retains the existing trainer assignments and does not update anything on the selected enrolments.
Scenario 3, suppose the trainer is already associated with the enrolment and appears on the Training Plan and Results screen for certain subjects. If you choose to update the trainer for this enrolment in bulk, the system intelligently updates only those subjects where the trainer was not previously linked.
New Feature – Main Dashboard – Email/SMS Sent Tile
In our previous update, we introduced version 1 of the Email Sent tile on the Main Dashboard. Now, we have introduced a significant enhancement by including SMS Sent data alongside the Email Sent information.
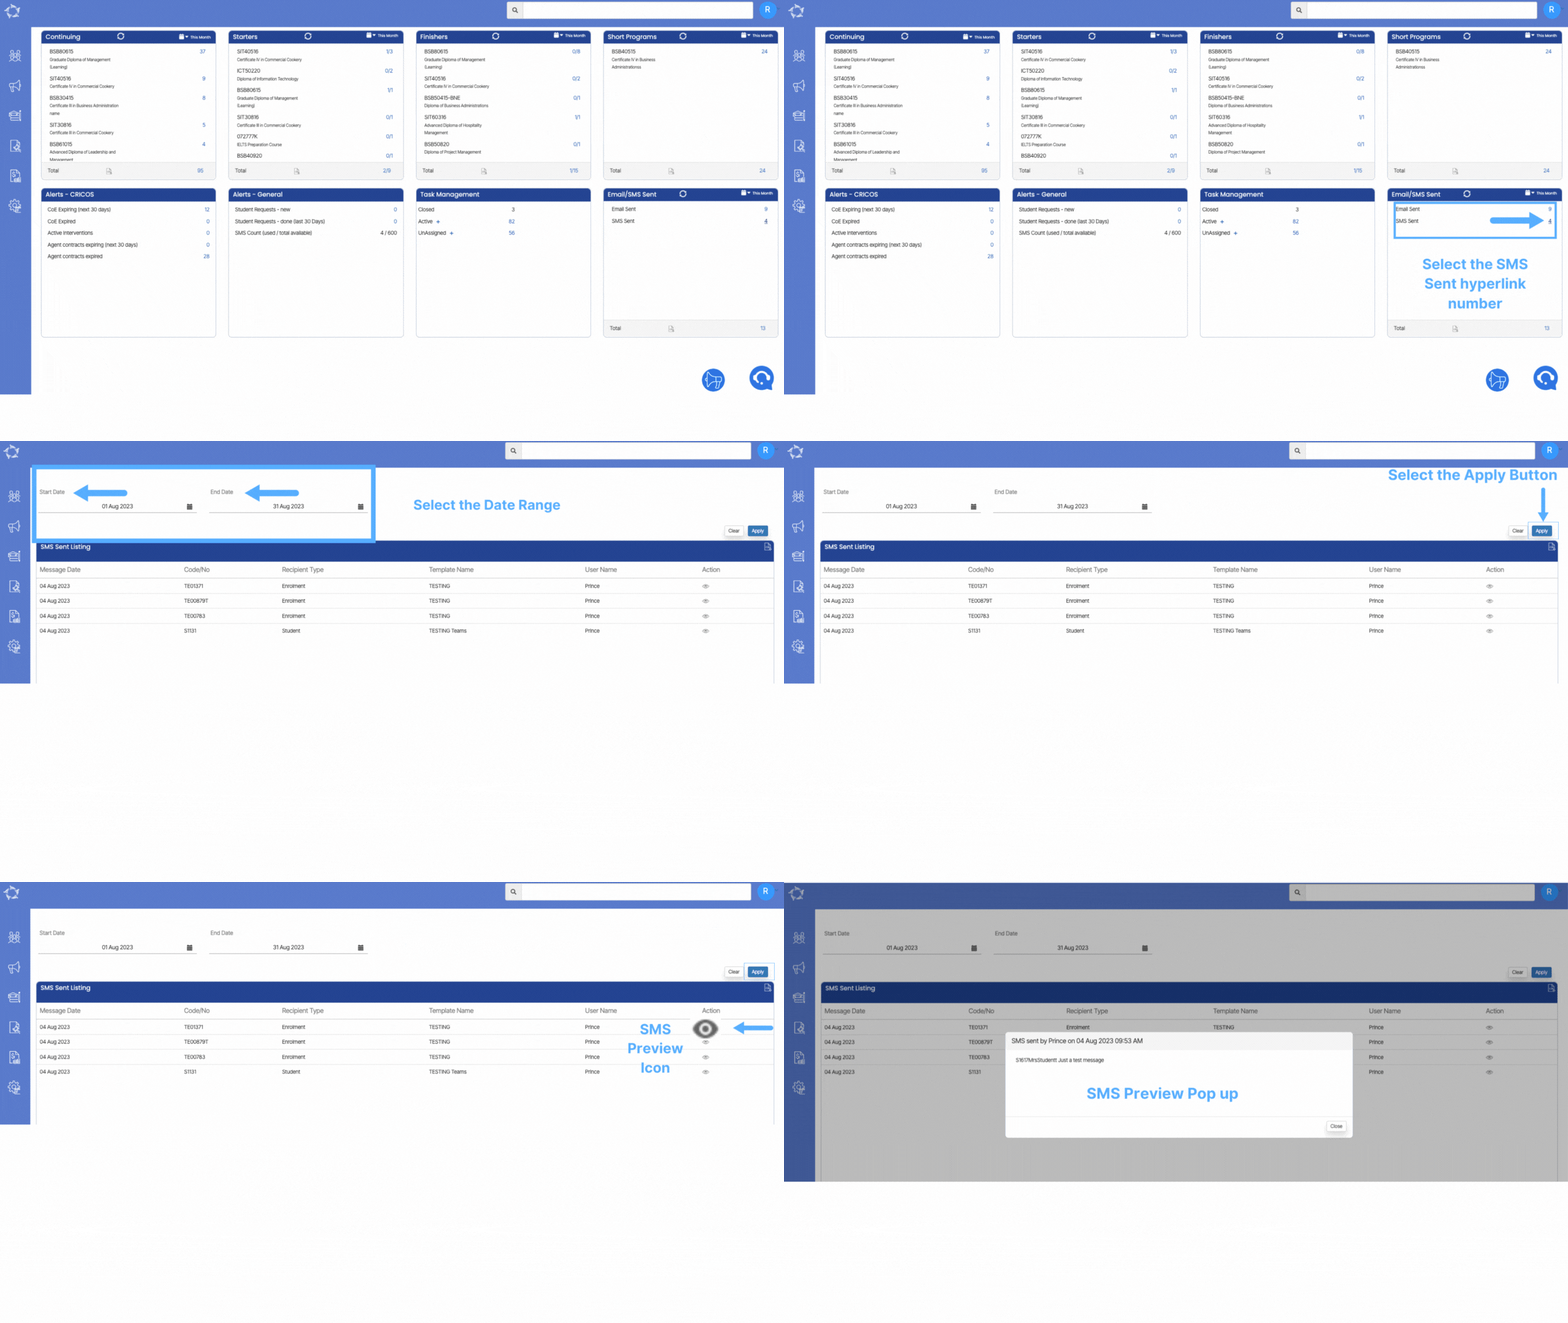
The main dashboard now features a consolidated tile – Email/SMS Sent, providing you with a more comprehensive overview of your communication activities. The tile displays the number of Emails and SMS messages sent, making it easier for you to track your outreach efforts in one centralised location.
To access the SMS Sent listing screen, click on the number within the SMS Sent section of the tile. This listing screen offers a detailed and comprehensive list of all the emails and SMS sent to various recipients. You can easily access essential information, like the Message Date, Recipient Type, Template Name, and the respective sender Username.
One of the key enhancements is that you now have the ability to view the content of the sent SMS messages directly from the listing screen. By clicking on the View icon under the actions column, you can preview the SMS content conveniently.
How to setup Program Structure in TEAMS?
In TEAMS, setting up Program Structure involves a series of essential steps and guidelines. Firstly, creating and defining the subjects that will be offered within the system. Then, establishing the overall program framework, outlining the program and subjects. Next, linking specific subjects to the corresponding program ensures a well-organised curriculum for each student. To account for breaks and time off, public holidays are incorporated into the system.
Additionally, configure intakes, allowing students to enrol at specific times throughout the year. Financial aspects are also managed within TEAMS, with the ability to set up fees and instalment plans for students’ convenience. For offering group training, you need to create group training plans to accommodate such arrangements. Lastly, the program is linked with the campus, ensuring seamless communication and data management between different locations. By following these steps and guidelines, TEAMS facilitates an efficient and structured student management system, enhancing the overall educational experience.
Please see the below steps and processes to create a program structure in TEAMS-:
Step 1 – Subjects
It is recommended, to create a Subject and update the subject’s AVETMISS settings before you set up a program in TEAMS.
a) Go to the Main Dashboard > Academic Menu > Subjects
b) When you select the Subjects icon, the system will present you with a Subject Welcome Screen. This screen will show you all the active subjects that are already present in your database. To know more, select here – Subject Welcome Screen
c) For adding a new subject, select the +Subject Button from the subject Welcome Screen.
d) Once you have successfully created the subject and saved it, the system will show you a Burger Menu Icon. You need to select the AVETMISS Settings option to update the Subject AVETMISS settings for a subject.
Step 2 – Programs
Once you have completed Step 1, you need to set up the Program and its settings along with the Program AVETMISS Settings.
a) Go to the Main Dashboard > Academic Menu > Programs
b) When you select the Programs Icon, the system will present you with the Program Welcome Screen. You need to select the +Program Button to create a new program in the system.
c) Once you have successfully created the Program along with the settings, the system will show you a Burger Menu Icon. Now from there, you need to select the Subjects option to link the subjects to the program.
d) Once you have successfully linked the subjects with the relevant fields, you then need to select the Program AVETMISS Settings option from the Burger Menu Icon to update the Program’s AVETMISS Settings.
Step 3 – Public Holidays
It is recommended that if you are creating Intakes then you need to create Public Holidays in the system as a prior step.
Step 3 – Intakes
NOTE – Before you create Intakes, you need to understand how your site is set up by our Onboarding team. Whether they have created your Academic Template or not. If your Academic template is not set up then you need to go to Main Dashboard > System Admin Menu > Term Breaks icon to create the Term Break in the system.
If you have a setup of Academic Template then you can simply create Intakes. Once you have created the Intakes, please make sure that you are linking the Intake with the Program. To link the Intake, you need to go to the Program Entry Screen > Burger menu > Program Intakes. Select the Program Intakes option to link the intake with the Program
Step 4 – Fees
After the above steps, you need to set up fees for a program. To create fees, you need to go to Main Dashboard > Finance Menu > Fee Icon. Once you selected the Fees Icon, the system will take you to the Fee Welcome Screen and there you need to select the +Add Button to create a fee in the system. Please note – You don’t have to link fees to the programs because while creating fees, the screen lets you select the Object Type such as Programs, Campus, Subjects etc. So If you are creating the fee for a program, Object type > Program, automatically links the fee with the program you selected.
Step 5 – Instalment Plans
Now again, you have to understand what TEAMS has set up for you. If you are using the pattern for the invoices while creating the Application then you don’t have to use the instalment plans. If our team has already created the instalment plan for you then you simply need to go to the Instalment Plan Welcome Screen and from this screen, you need to select the edit icon under the Actions column from the grid. Once you select the Edit Icon, the system will take you to the Instalment Plan Entry Screen. On this screen, you can search and link your new program from the Program field. You can also create a new Instalment Plan for your program from the Instalment Plan Entry Screen.
Step 6 – Academic Template
If your Academic Template is already set up and you want to make some changes then please it is recommended you contact our support team and they will guide you and help you with the academic template.
Step 7 – Group Training Plans
If your Timetables are already set up and you know the dates of the units that the student will study then you need to create Group Training Plans. Please note that you will only create group training Plans if your Academic template is not set up. So when you create GTP and while creating the Application when you select the GTP, the unit’s date will automatically get populates exactly as per your timetable.
Step 8 – Link the Program with the Campus
Once all the above steps are done, this is the final step, you need to link the program to the campus. When you are on the Campus Welcome Screen, you need to edit the campus from the Edit Icon under the Actions Column from the grid. This will take you to the Campus Entry Screen and there you need to select the Linked Programs option from the Burger menu on the right hand side of your screen.
Pin Payments Integration
Our team has been hard at work to bring you a seamless and efficient experience, and we are excited to unveil our latest feature: the Integration of Pin Payment!
This integration marks a significant milestone for us as it allows us to streamline your payment processes, making transactions easier, faster, and more secure than ever before. Pin Payment is a trusted and widely recognised payment gateway that ensures a smooth and hassle-free payment experience for your students and clients.
There are some of the key benefits of our Pin Payment Integration-:
- Effortless Transactions: With Pin Payment integrated, your students can now make payments directly online. This means no more redirection to external payment portals, ensuring a frictionless and convenient payment process.
- Enhanced Security: Pin Payment implements top-notch security protocols, safeguarding sensitive payment information and reducing the risk of fraudulent activities.
- Simplified Record-Keeping: Our system will automatically record and organise all payment details, saving your administrative staff valuable time and effort.
- Increased Trust and Credibility: By integrating Pin Payment, we demonstrate our commitment to providing you with the best tools and services. This partnership enhances the credibility of your RTO, fostering trust among students.
NOTE – We understand that adopting a new payment system can be both exciting and challenging. To ensure a smooth transition, our dedicated support team is ready to assist you every step of the way.
IMPORTANT – Before you send a Pin Payment email to students, it is recommended to create a Pin Payments Email Template in TEAMS.
Please select the link below to know more about on how to create email template for Pin Payment and how to send pay request email for invoices.
Student Dashboard – Current & upcoming and Historical Enrolments Tiles Changes
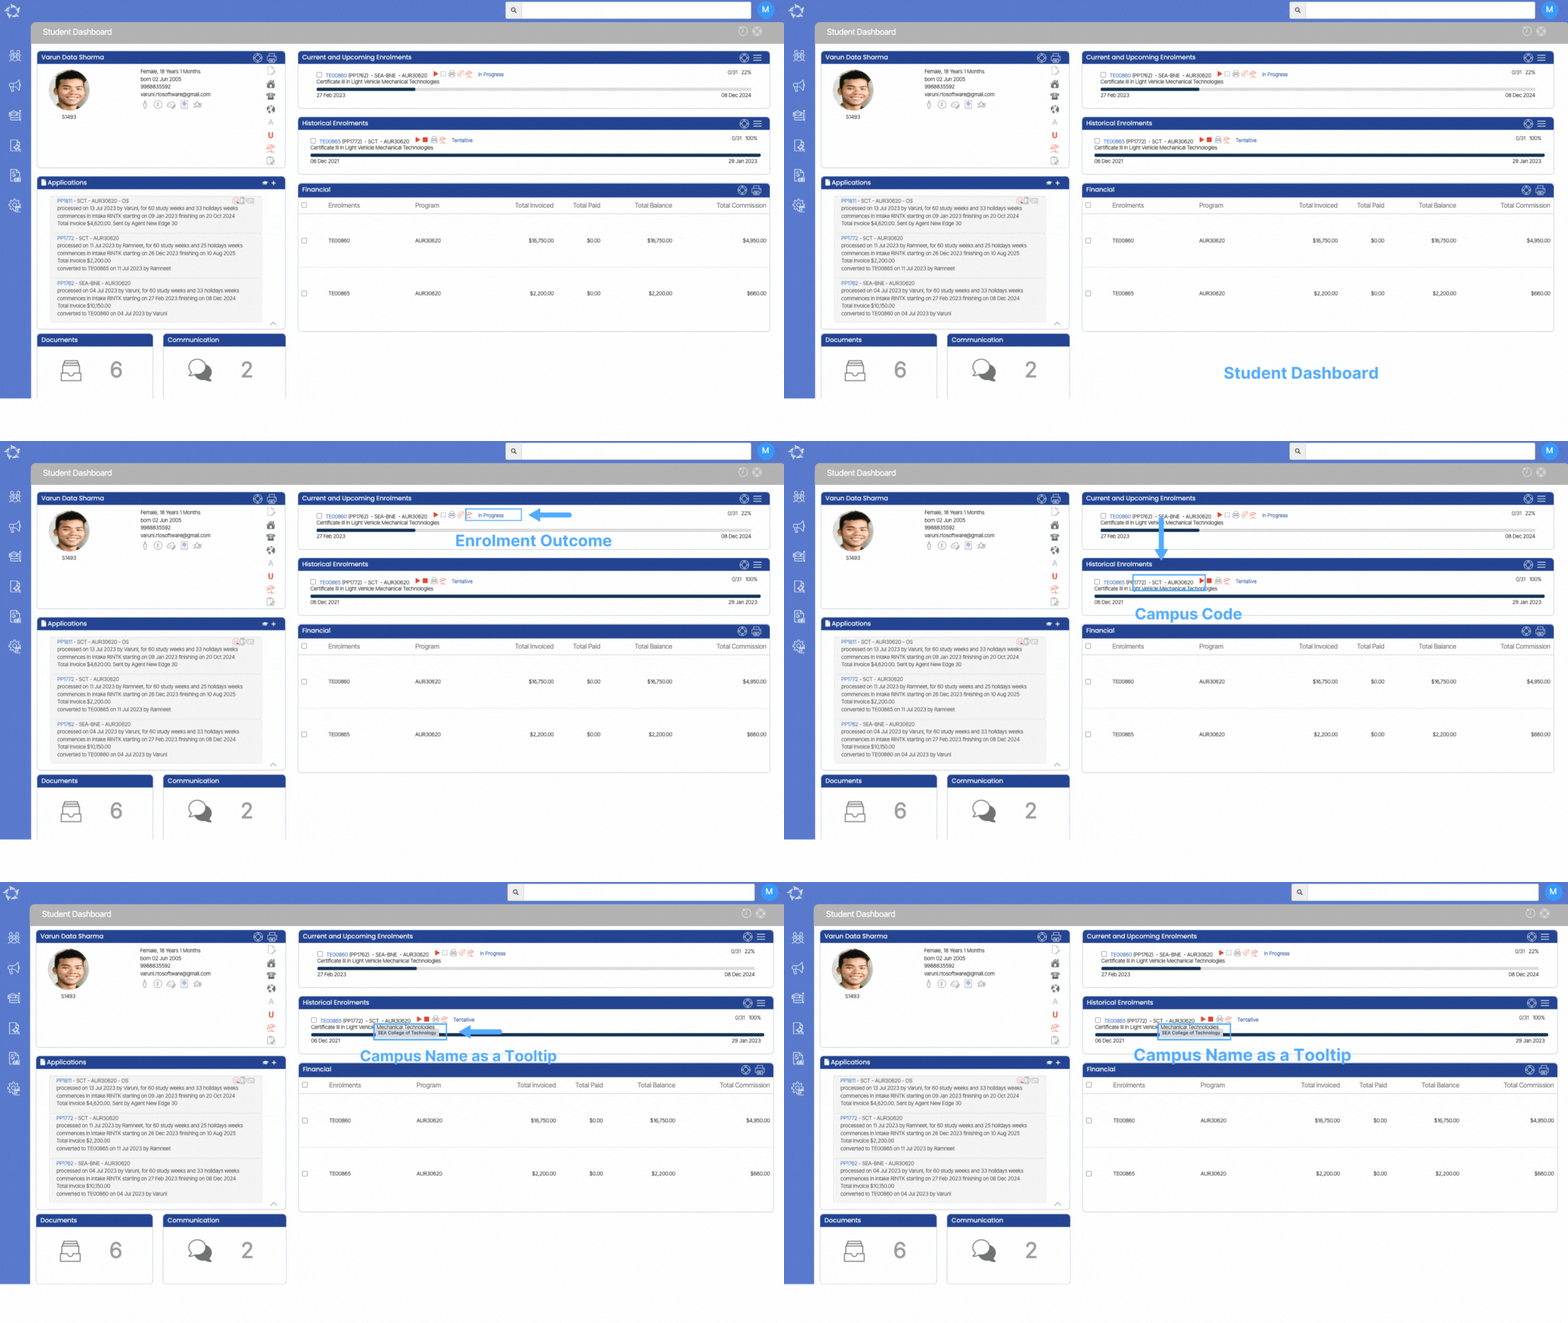
We have recently implemented significant enhancements to the Student Dashboard, particularly to the Current & Upcoming Enrolment tile and the Historical Enrolments tile. With these updates, you can now enjoy increased flexibility in accessing important information.
One notable improvement is the ability to view enrolment outcomes directly from the Student Dashboard, providing a quick overview of a student’s current status. Additionally, we have included the campus code for each enrolment, and by simply hovering the mouse over the code, a tooltip will display the corresponding campus name. This makes it easier and more efficient for you to access vital enrolment details without the need to navigate to the Enrolment Dashboard. Whether it’s a student’s course withdrawal or an updated outcome, all pertinent information can now be readily accessed from the Student Dashboard.
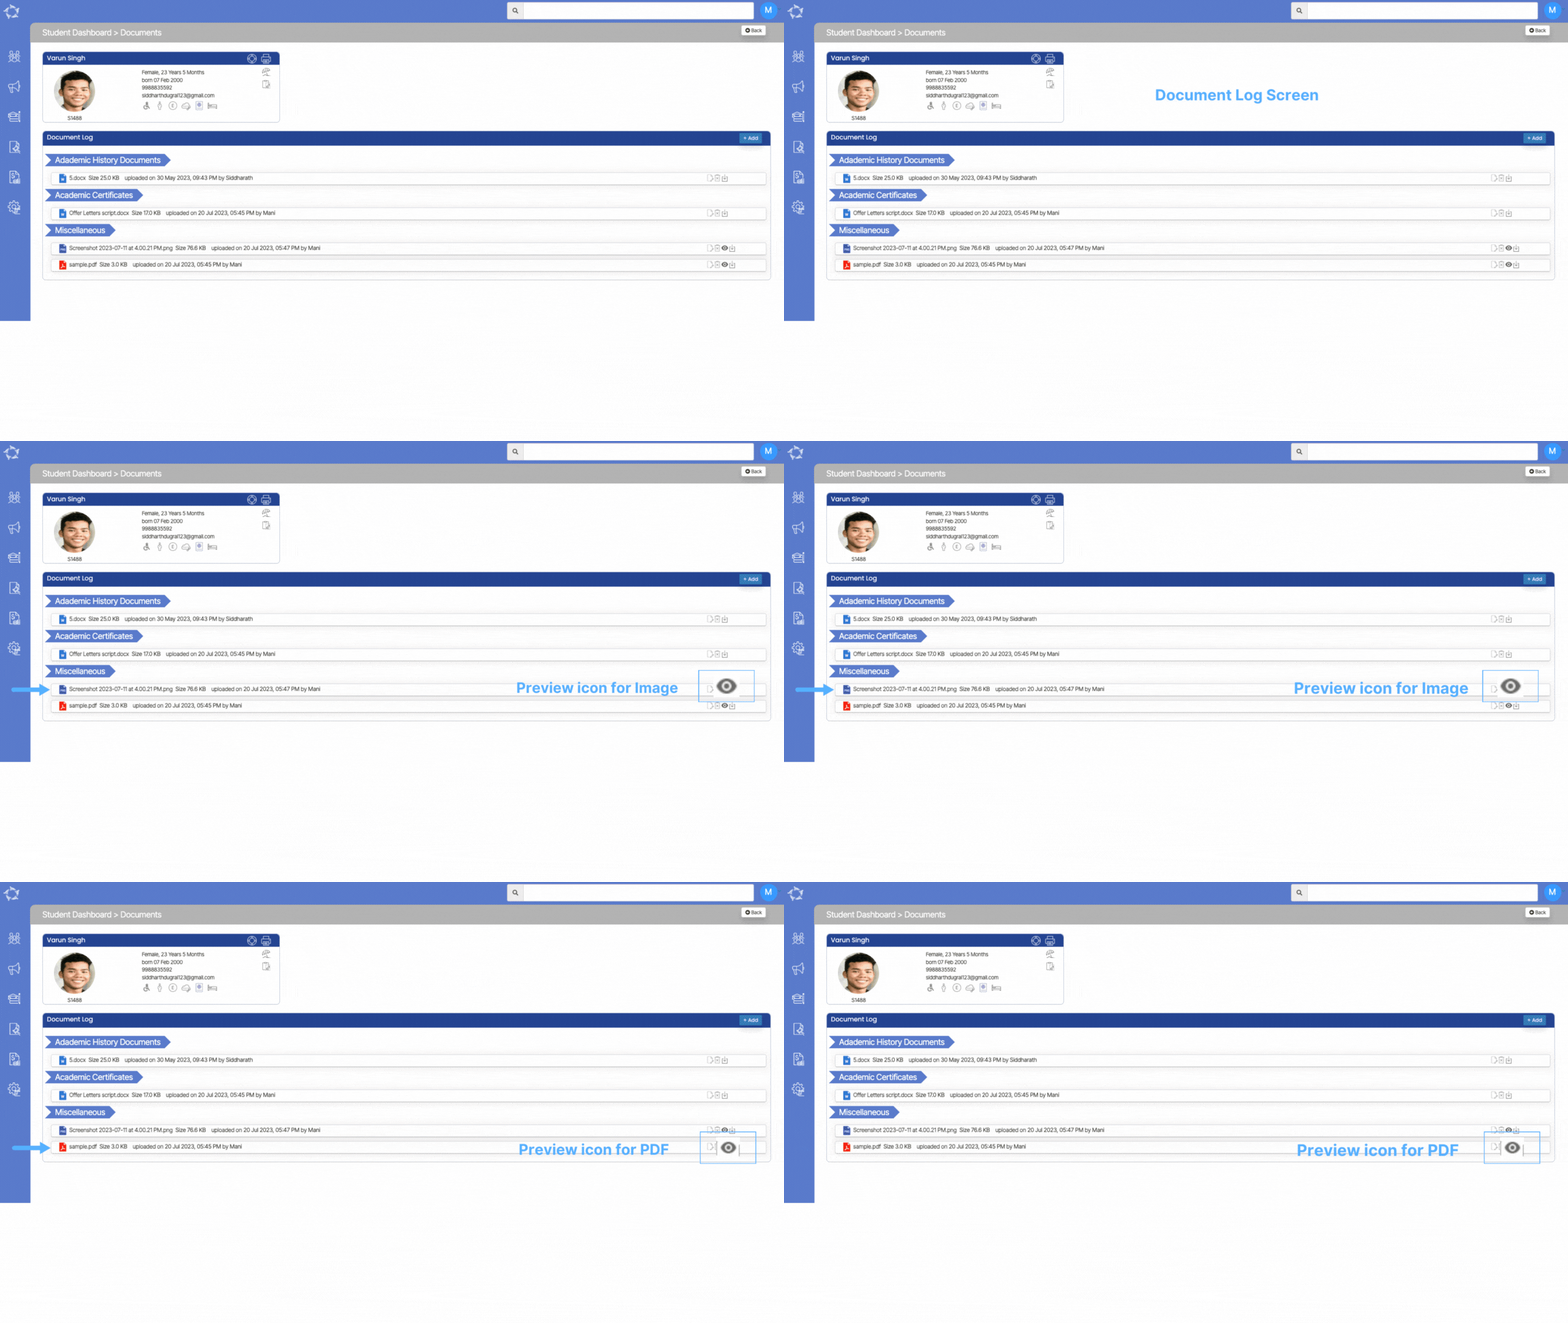
Documents Log – Preview Icon
We are excited to announce a recent enhancement to our Documents log screen—a new Preview Icon. You can access the documents Log screen from Applicant Dashboard, Application Dashboard, Student Dashboard, Enrolment Dashboard etc. This exciting addition allows you to have a more streamlined and efficient document management experience. With the Preview Icon, you now have the convenience of viewing your documents before downloading them. Simply select the Preview Icon and a new window will open, displaying your document in its entirety.
IMPORTANT – The Preview Icon is specifically available for PDF documents and various image formats, offering you the ability to seamlessly access and review these types of files without the need for downloading or opening them in separate applications. However, please note that the Preview Icon will not be visible for Word or Excel file types.
