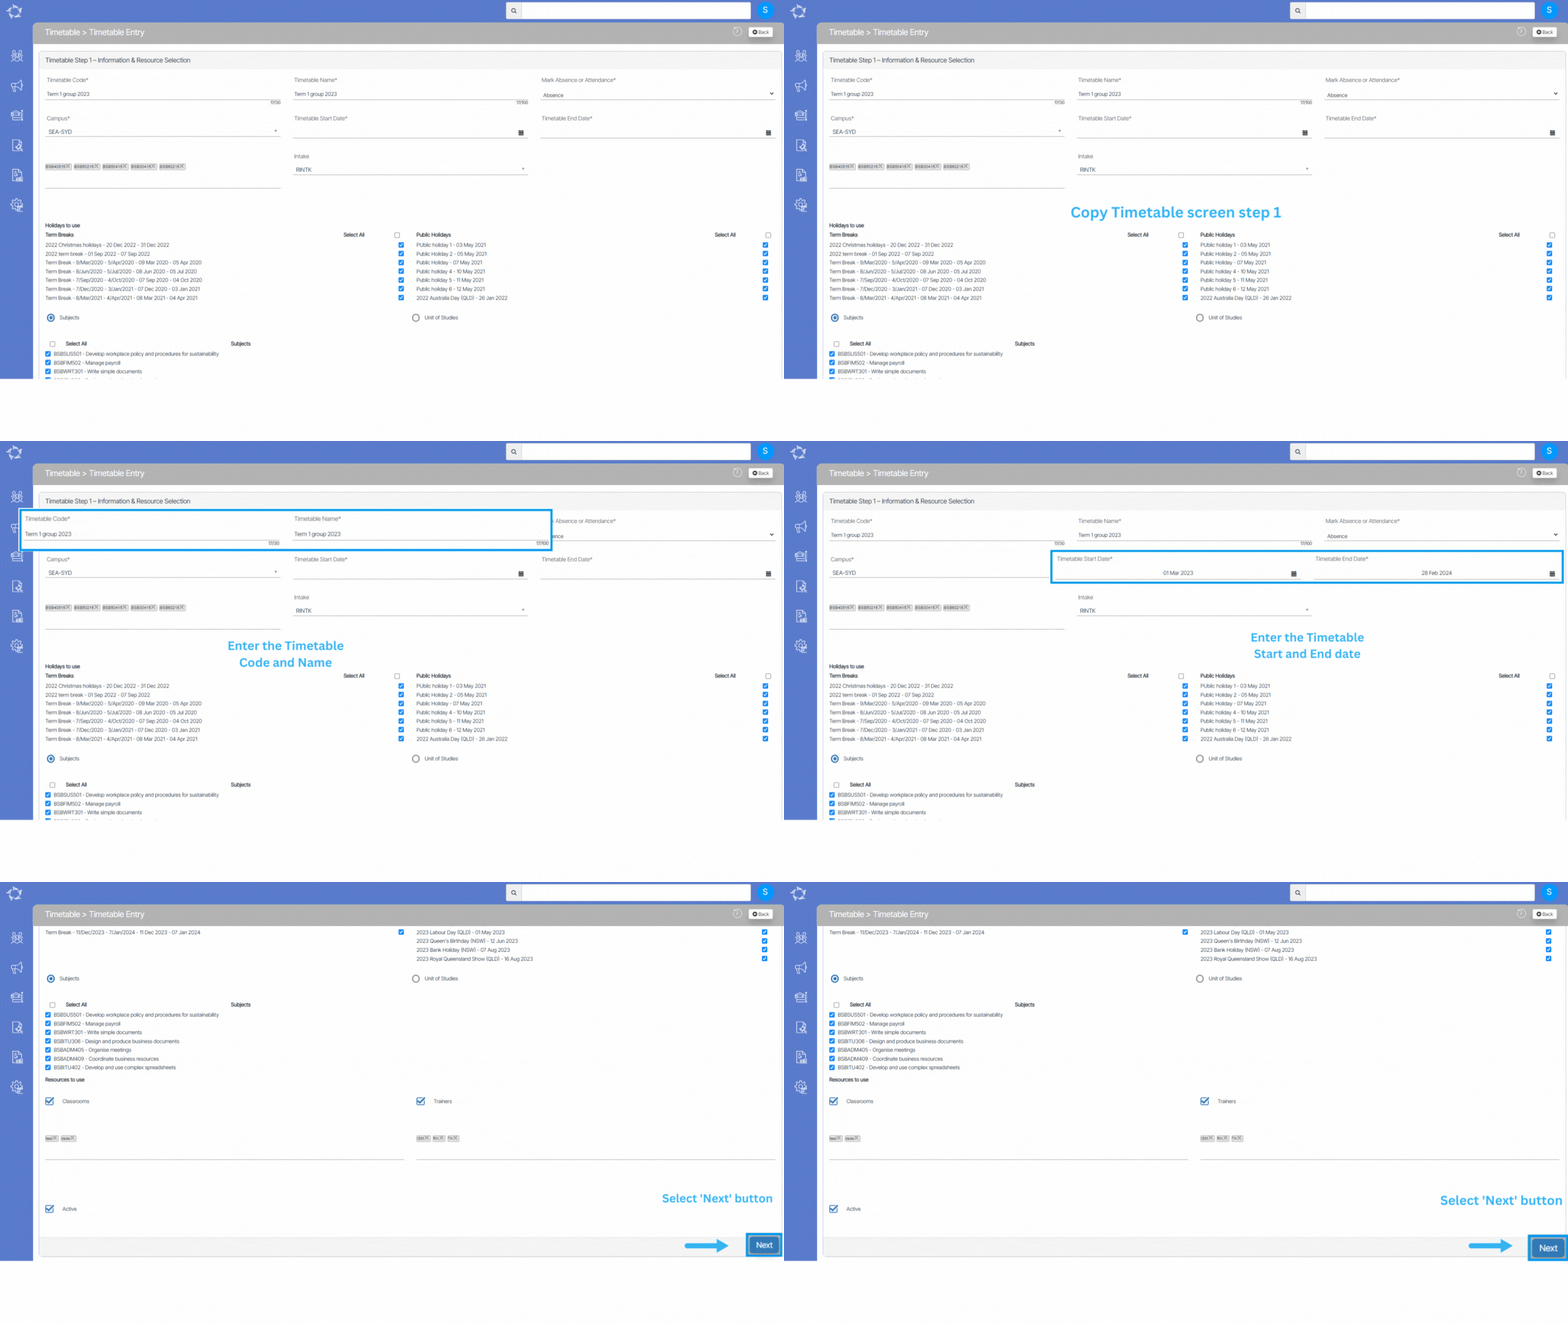
Copy Timetable Step 1 Information & Resource Selection

During this step, the system will replicate all the data and resource selection from the previous timetable. However, the Timetable Code, Timetable Name, and Timetable Dates will not be copied. To complete this step, you will need to enter details into these four fields. Additionally, you have the ability to modify the information in other fields as well. This allows for flexibility in creating a new timetable while still retaining some of the previous data and resources.

Note – Please be aware that when you enter the start and end date for the new timetable, the system will refresh the information related to intakes, term breaks, and public holidays. This means that any changes made to these dates in the previous timetable will not carry over to the new timetable. It is important to review and verify all information related to intakes, term breaks, and public holidays to ensure that they are accurate the new timetable.
Application Process – Study Period Changes

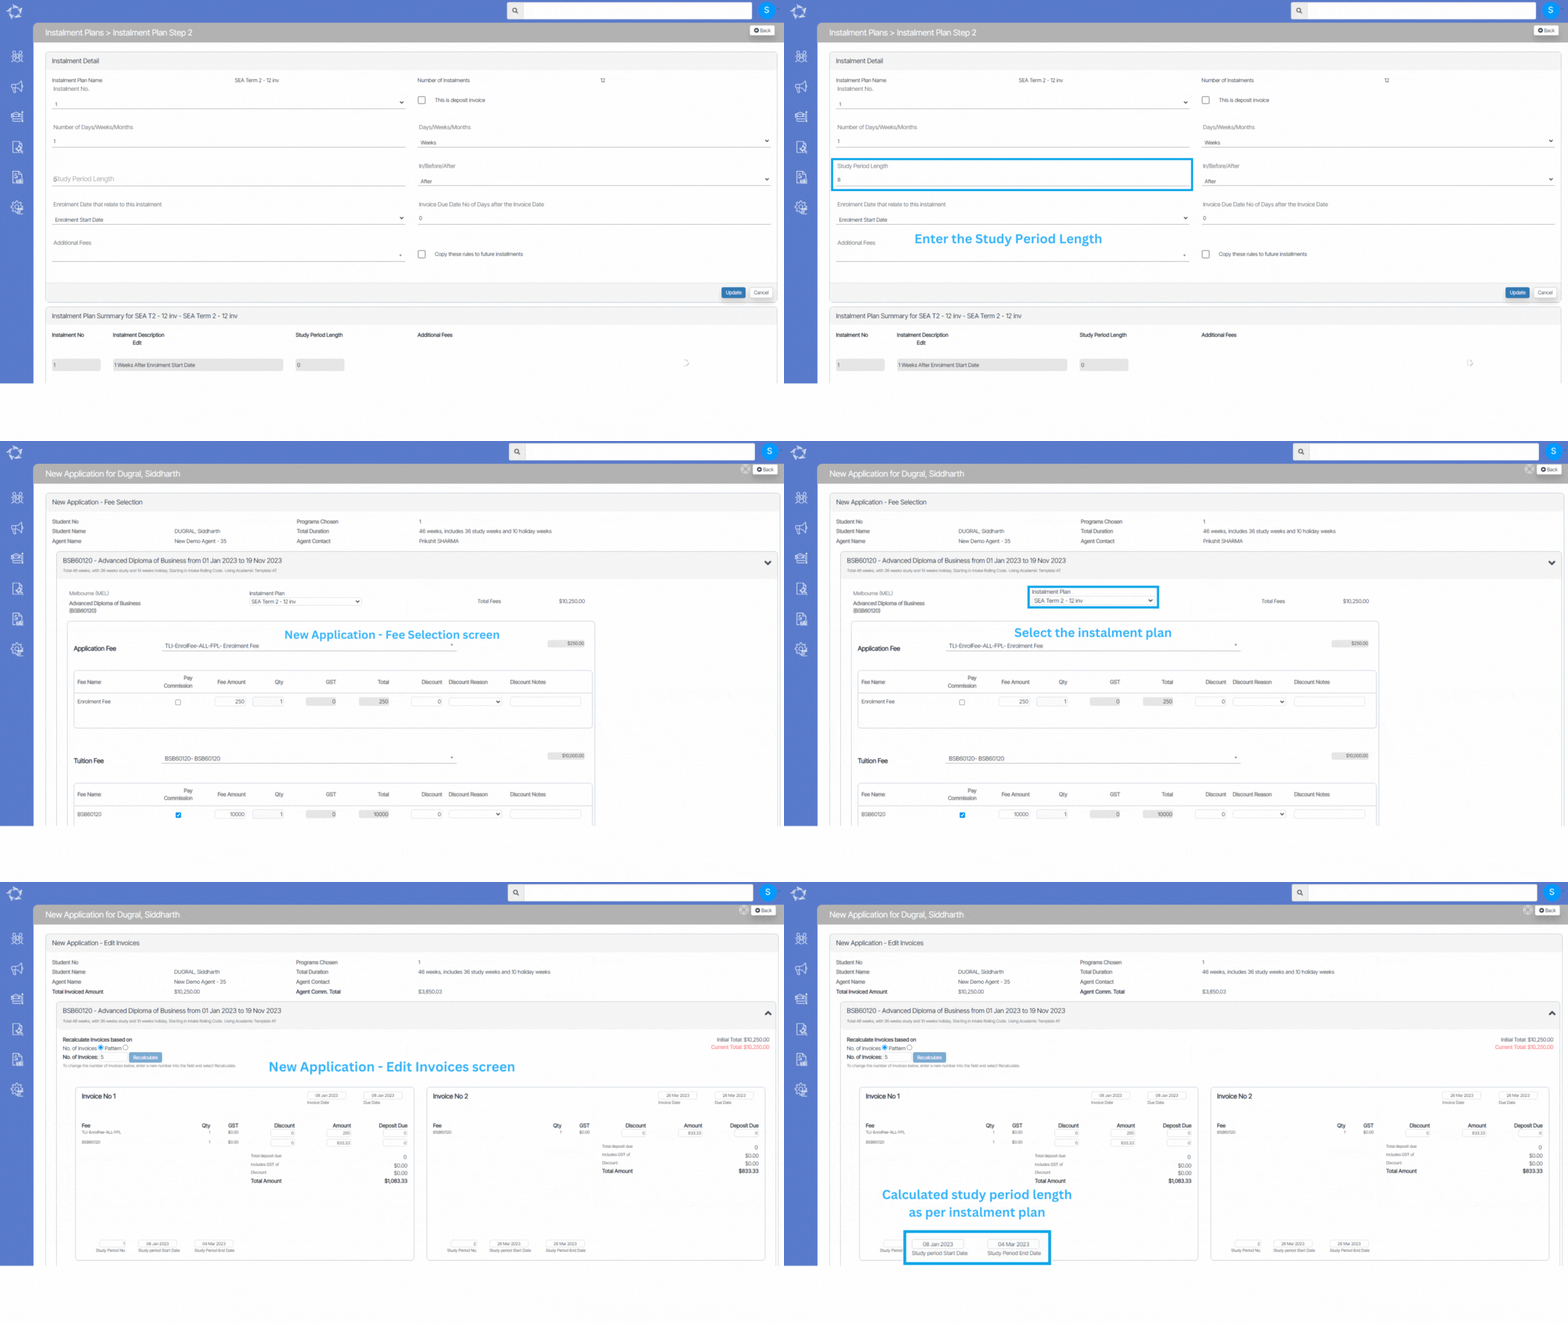
When using the study period start date as the invoice date or invoice due date while the application process, the system automatically calculates the study period dates for you.

To update the length of your study periods in your instalment plans, you can follow a few simple steps. First, navigate to the second step of the instalment plan settings, where you can edit the details of each instalment. You can enter the length of the study period in weeks for each instalment, based on the actual duration of your course or program. Once you have entered this information, be sure to save your changes.

By updating your instalment plan in this way, the system will be able to automatically use the invoice dates as the study period start date and will use the number of weeks specified as the study period length in the instalment plan to calculate the study period end date.

Note: if you still need any assistance in setup the study period length, you can contact our support team.

Certificate Report – New parameters for Result Types

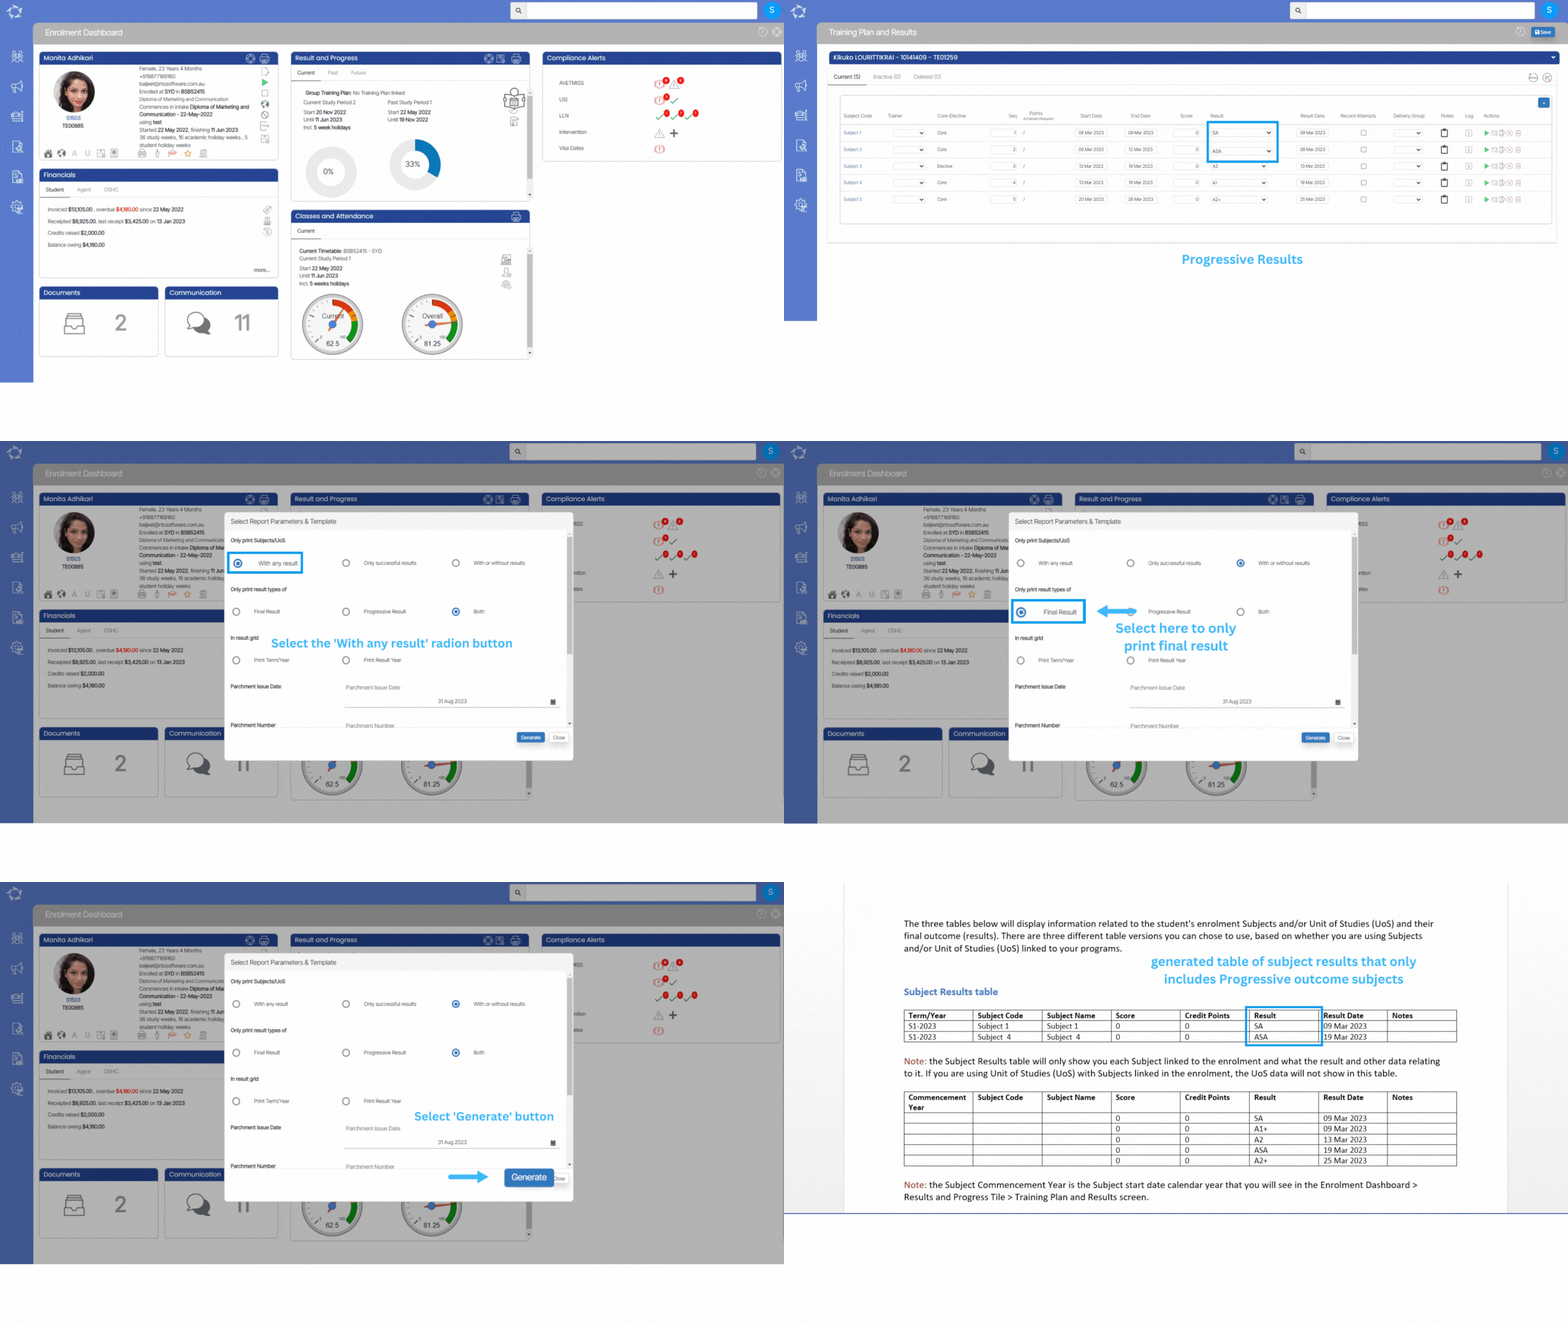
The Enrolment Dashboard now includes new parameters for result types in the Certificates Pop up window. Specifically, you can select from three options: Final Results, Progressive Results, or Both.

Note – We have implemented this for Non-AQTF results (Grading Based), but in upcoming updates, we will implement it on all other result types which includes AQTF results as well.

When printing certificates, it’s important to consider whether to include only progressive results, final results, or both. To do this, you can select the appropriate radio button depending on your preference. If you only want to include progressive results, select the Progressive Result radio button. Conversely, if you only want to include final results, select the Final Result radio button. Finally, if you want to include both types of results, select the Both radio button.

Application Process – New OSHC and AVETMISS Settings Buttons

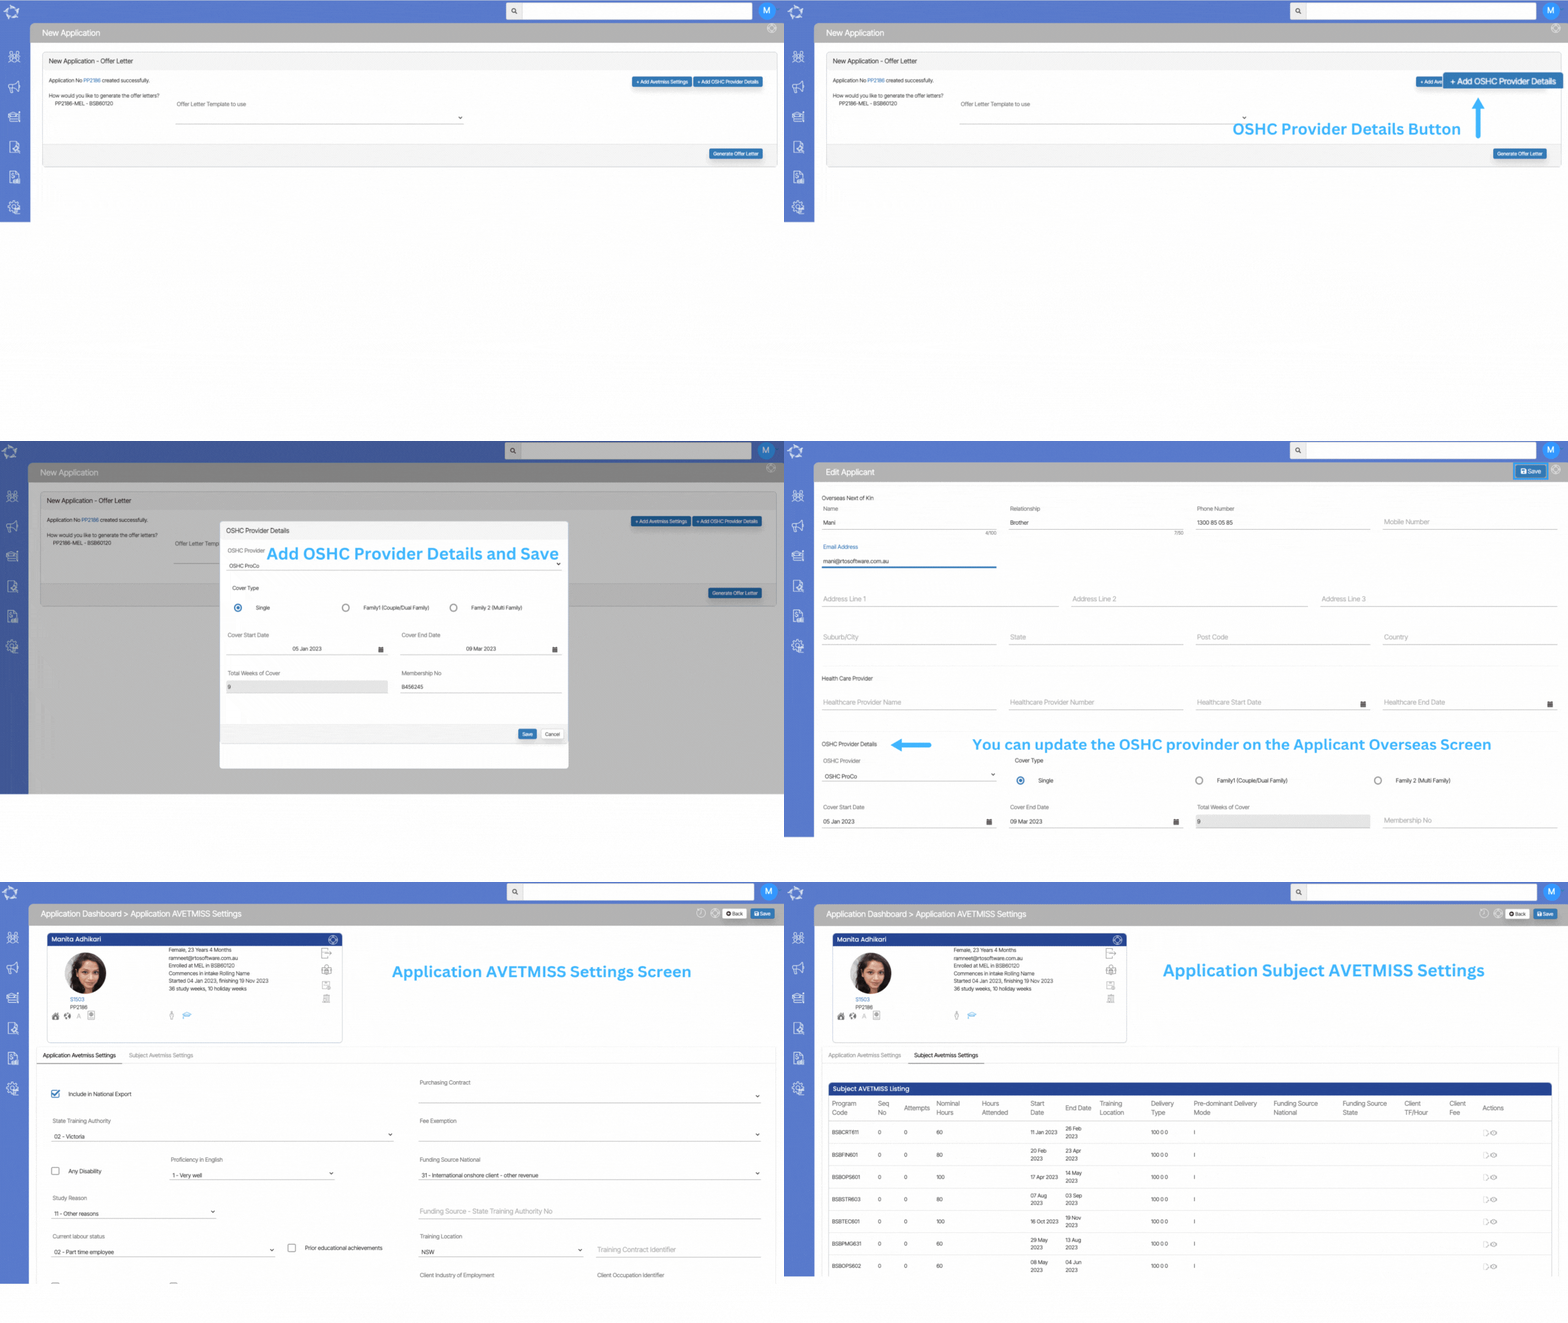
A new feature has been implemented on the Application Finished screen that includes additional buttons called +Add OSHC Provider Details and +Add AVETMISS Settings.

Upon selecting the OSHC Provider Details button, a pop-up window will appear on the screen, which will allow you to enter and save the OSHC (Overseas Student Health Cover) details for the application. This new functionality will provide you with a more convenient way to add and manage OSHC information within the application process. Or you can also add their OSHC details for the application from the Applicant Profile by clicking on the Overseas icon.

Upon Selecting the AVETMISS Settings Button, this will take you to the Application Dashboard > Application AVETMISS Settings screen, where you can update both the application level AVETMISS settings and the subject level AVETMISS settings. This page allows you to customize the settings that determine how your application handles AVETMISS data, which is essential for managing and reporting on vocational education and training in Australia.

Business Rules: When a program is linked to a subject and the subject type is set to Unit of Competency, an option to add AVETMISS settings will appear on the Application Finished process. This allows you to configure the AVETMISS settings for that particular subject, which is important for accurate tracking and reporting of vocational education and training in Australia.

Application Process – Instalment Plan Changes

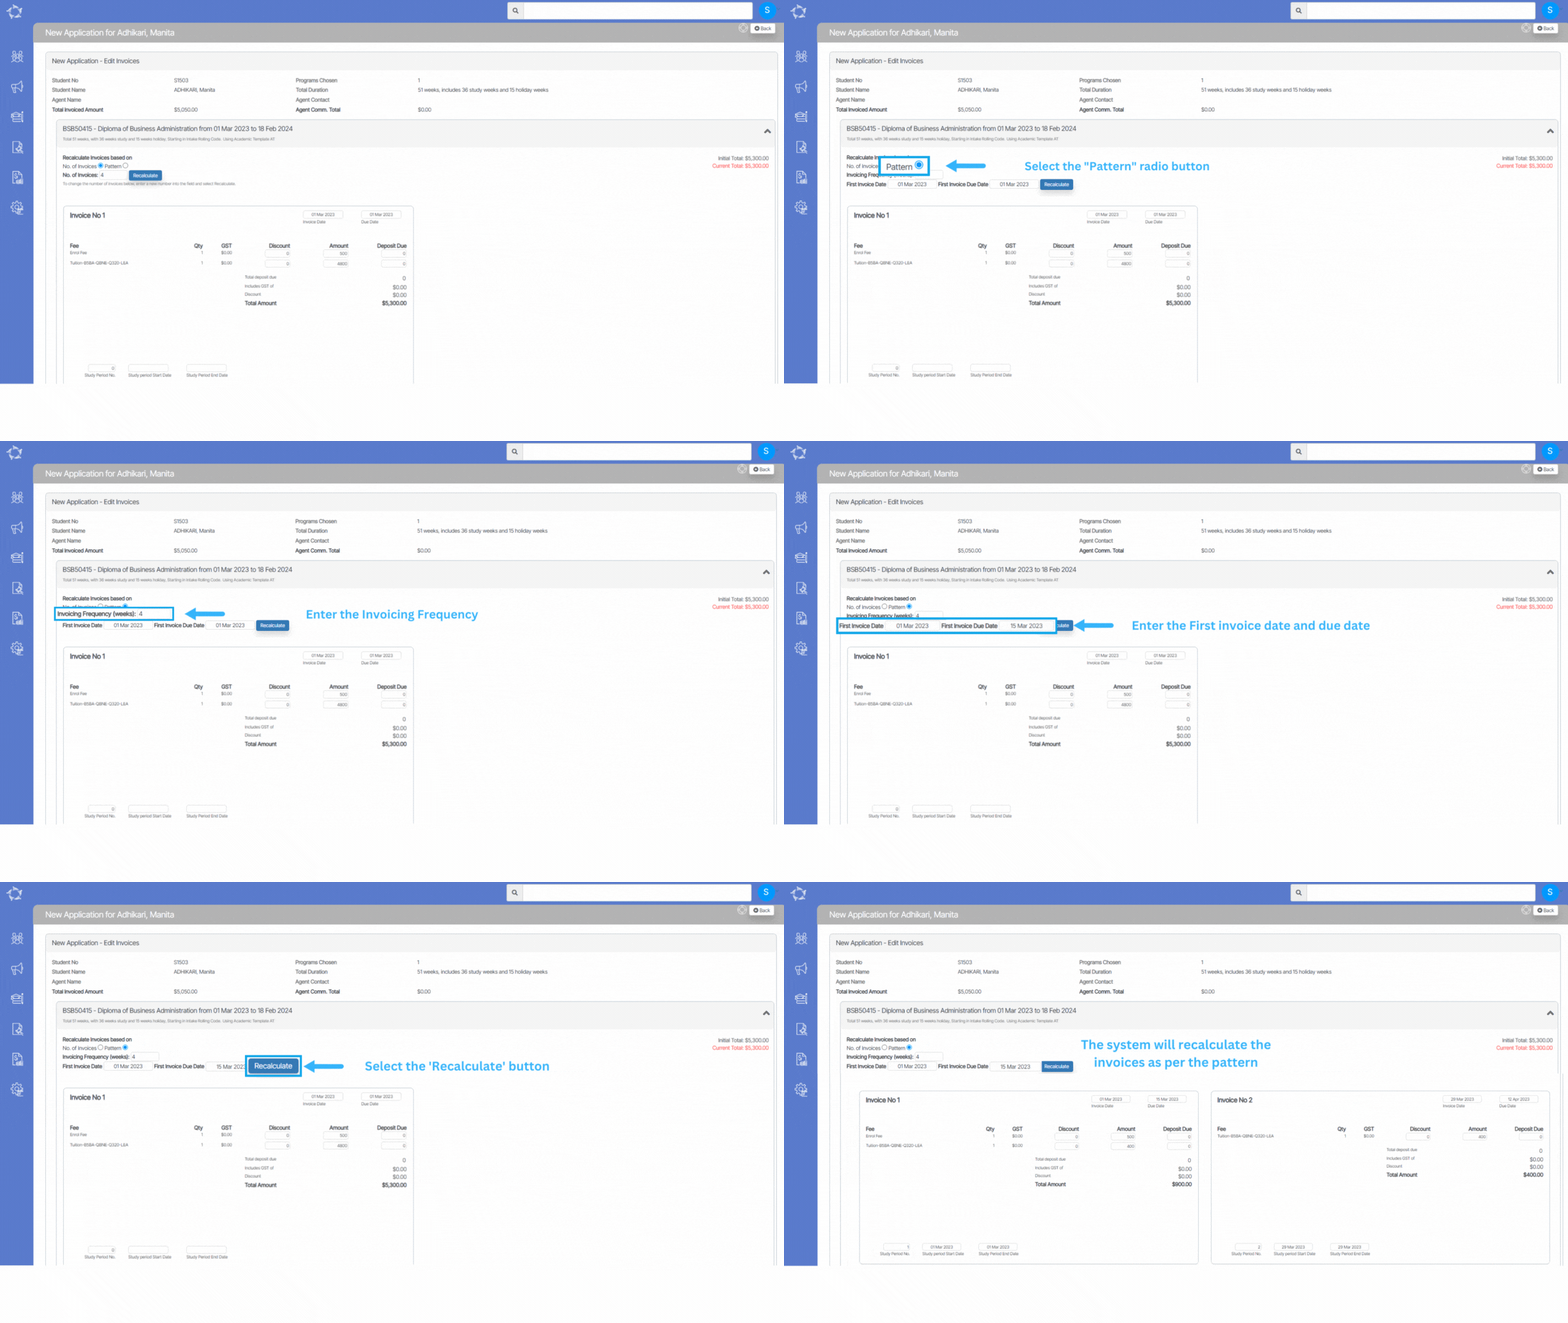
Recently, we have added a new option namely Patter on the New Application – Edit Invoice Screen. This option allows users to recalculate invoices based on their selection. With the Patter option, users can quickly and easily update their invoices without having to manually adjust each item

To calculate the total number of weeks for the enrolment period, the system takes into account the enrolment start and end dates. You can input the total number of weeks in the text box labelled Invoicing Frequency (weeks) by entering an integer value. In addition, need to enter the invoice date and invoice due date to recalculate the invoices based on the selected invoicing frequency. By entering these details, the system will automatically calculate the amount due for each invoice based on the enrolment period and invoicing frequency.

Note – When calculating the invoicing frequency for your enrolment, the system will take the total number of weeks in your enrolment period and divide it by the number of invoicing frequencies that you have entered. For example, if your enrolment period is 52 weeks and you have chosen to invoice every 4 weeks, the system will divide 51 by 4 to give you 13 invoicing periods. This means that you will receive 13 invoices over the course of your enrolment, each covering a 4-week period.

Also, If the quotient obtained by dividing the total weeks of enrolment by the number of invoicing frequencies results in a decimal value, the system will round off the value to the nearest whole number. For example, if the result is 4.3, the system will round it off to 4 and create 4 invoices. Similarly, if the result is 5.7, the system will round it off to 6 and generate 6 invoices.

What’s New – 10th March 2023

Welcome to the latest update for TEAMS

Some key changes made in this update are:

  • New features introduced on the Training Plans & Result screen
  • New Result History screen
  • Introduced new parameters for result type for student certificates
  • Copy Timetable new functionality has been introduced
  • Added new report namely Student Contact Log Report
  • New changes in the financial section of the Application Process
  • New Add AVETMISS settings and Add OSHC Provider details in the application final step

For a full list of what has been added in this release, please see below.

Training Plan & Results Screen – Colour Codings

A new feature has been introduced on the Training Plan and Results Screen, which involves colour coding for both Results and Subject dates.

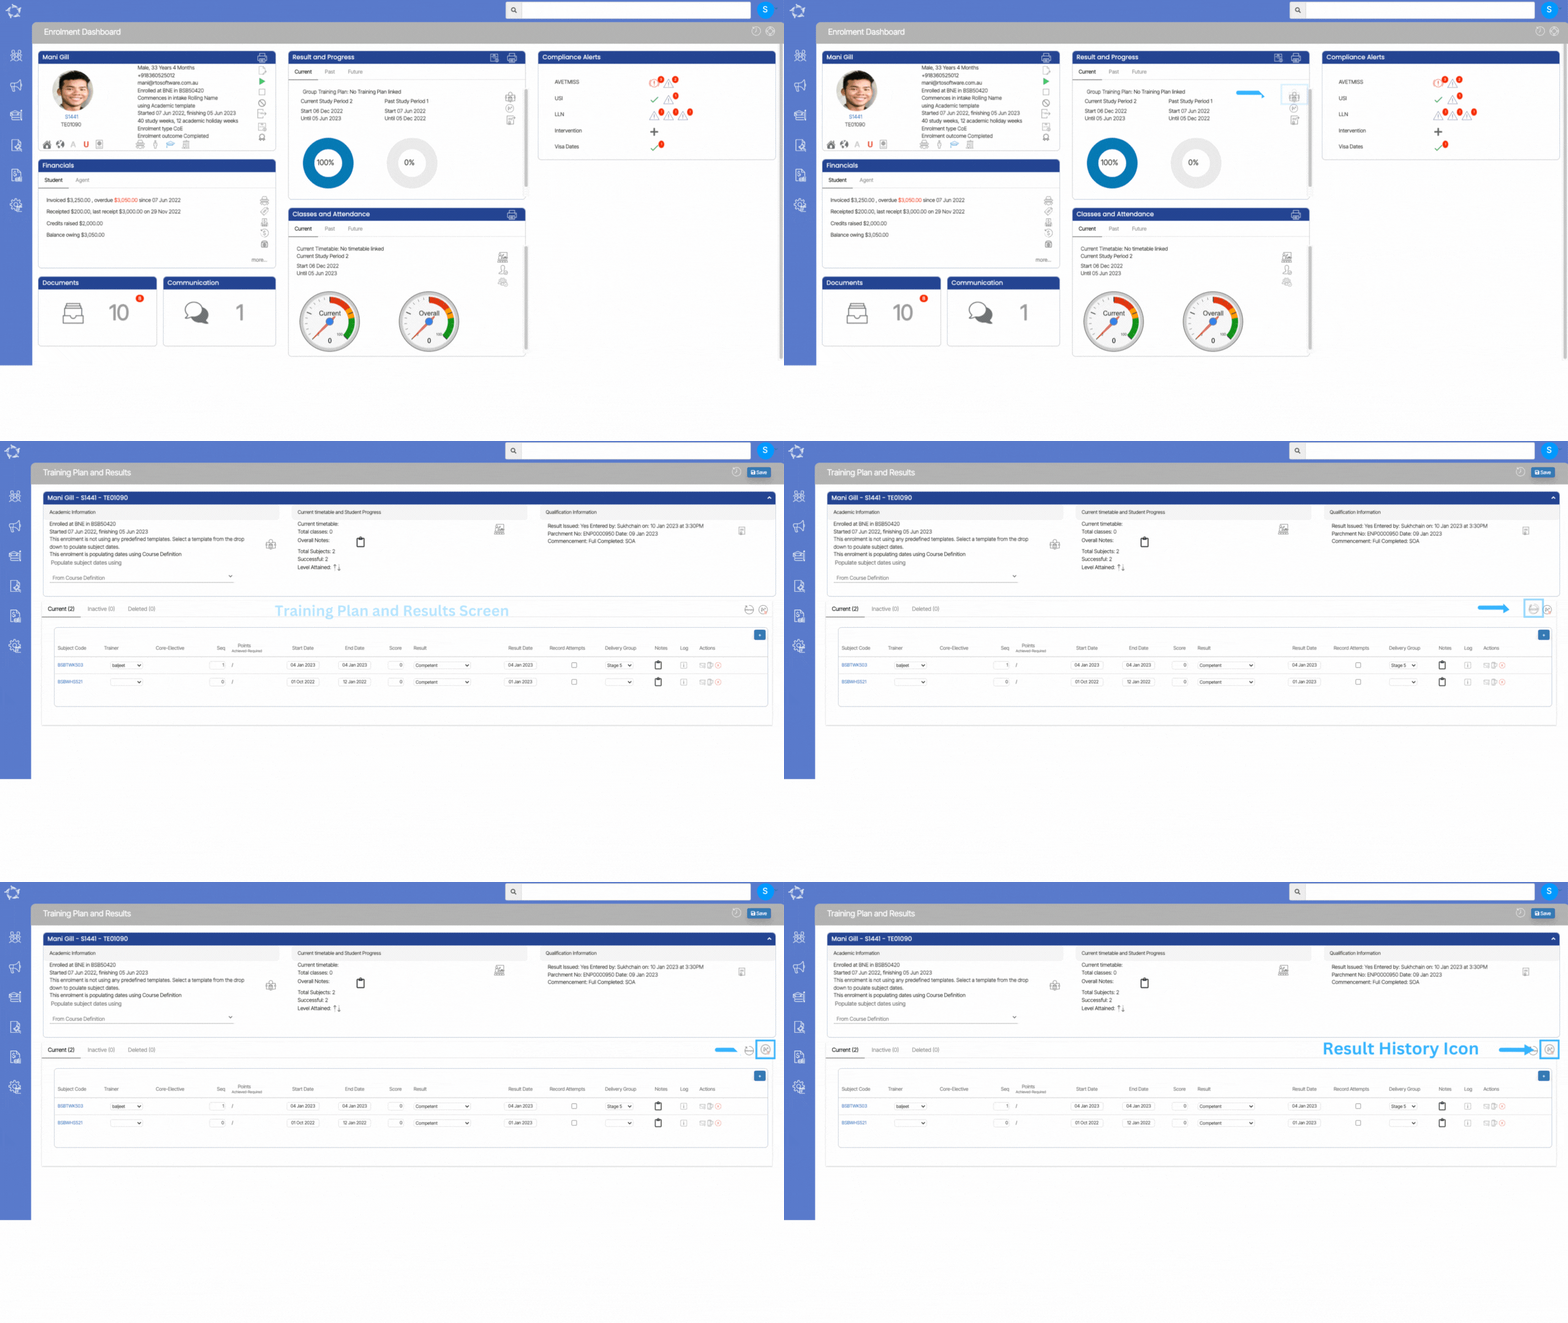
Result History – New Screen

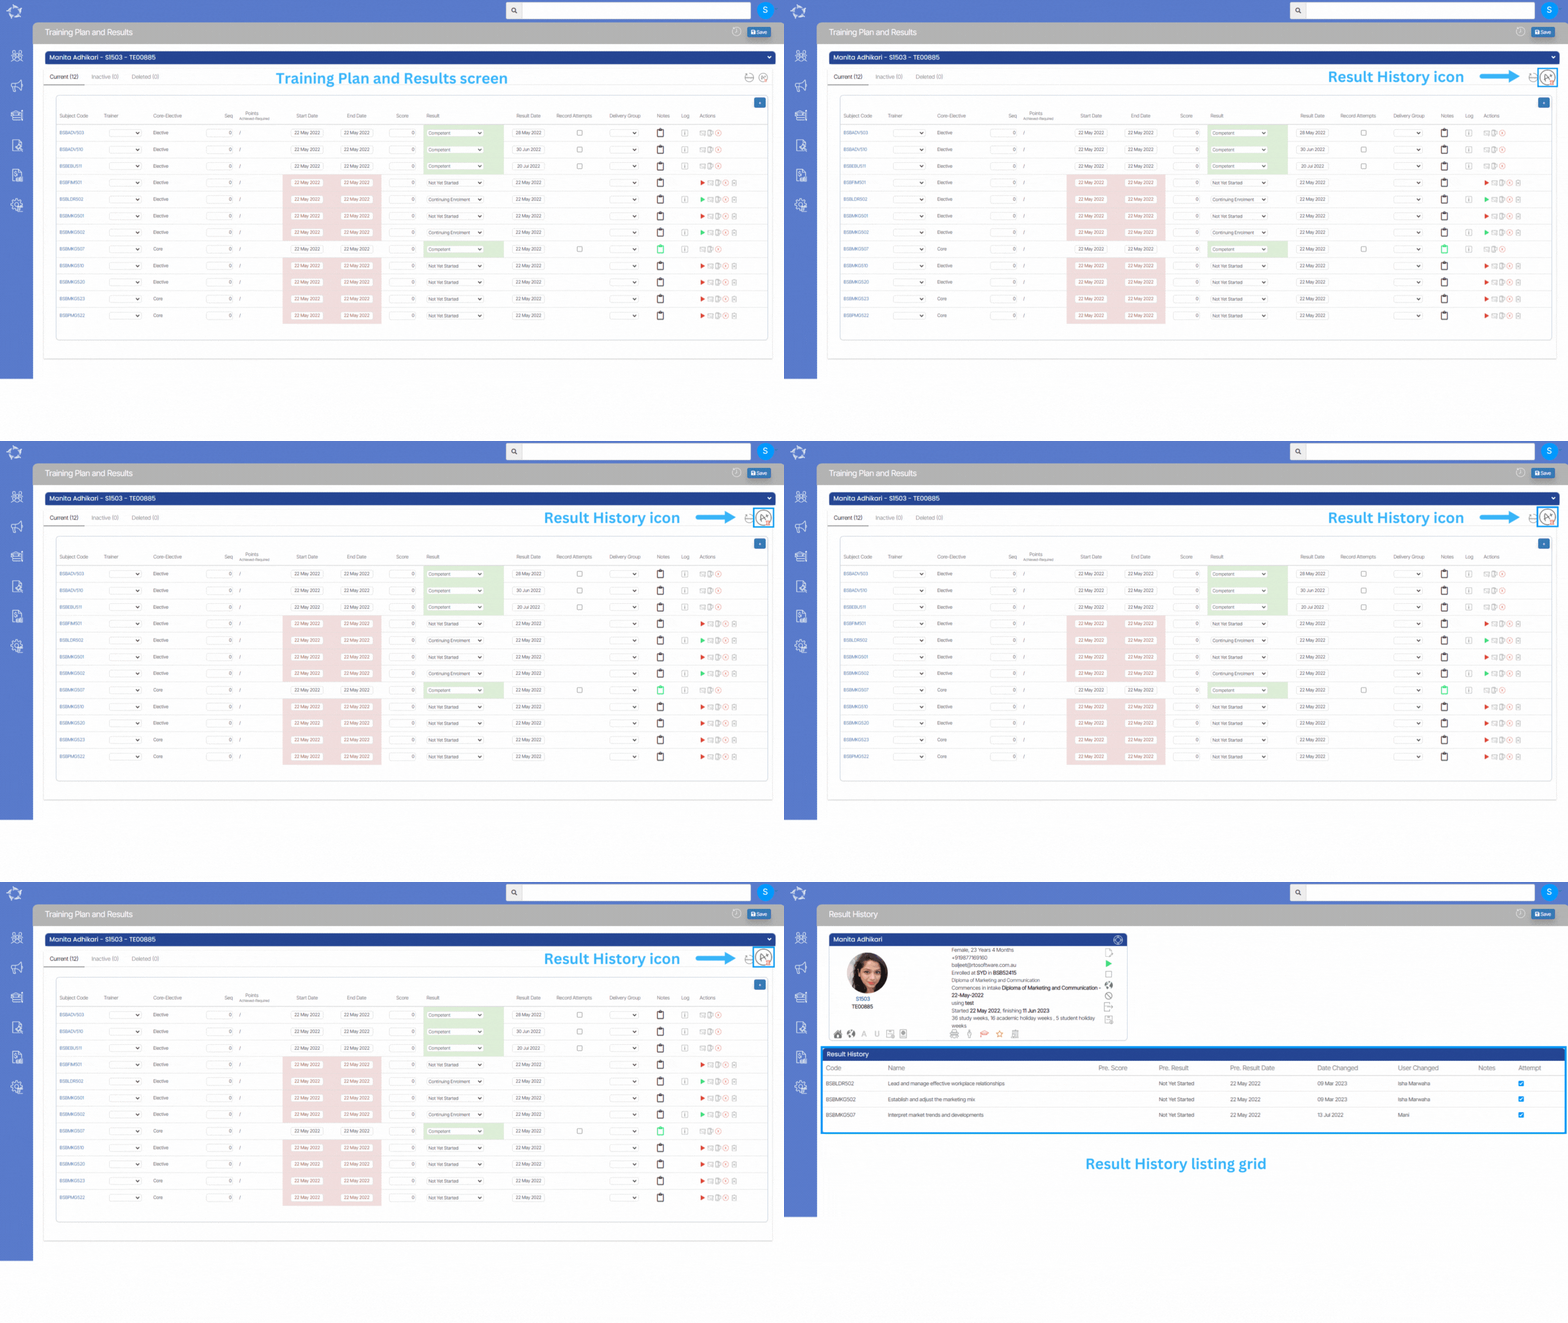
The Result History screen provides a complete record of all past results and their respective dates for specific subjects. You will be able to access this screen from the Training Plan & Results screen > Results History icon.

Certificate Report – New parameters for Result Types

The Enrolment Dashboard now includes new parameters for result types in the Certificates Pop up window. Specifically, you can select from three options: Final Results, Progressive Results, or Both.

Copy Timetable – New Functionality

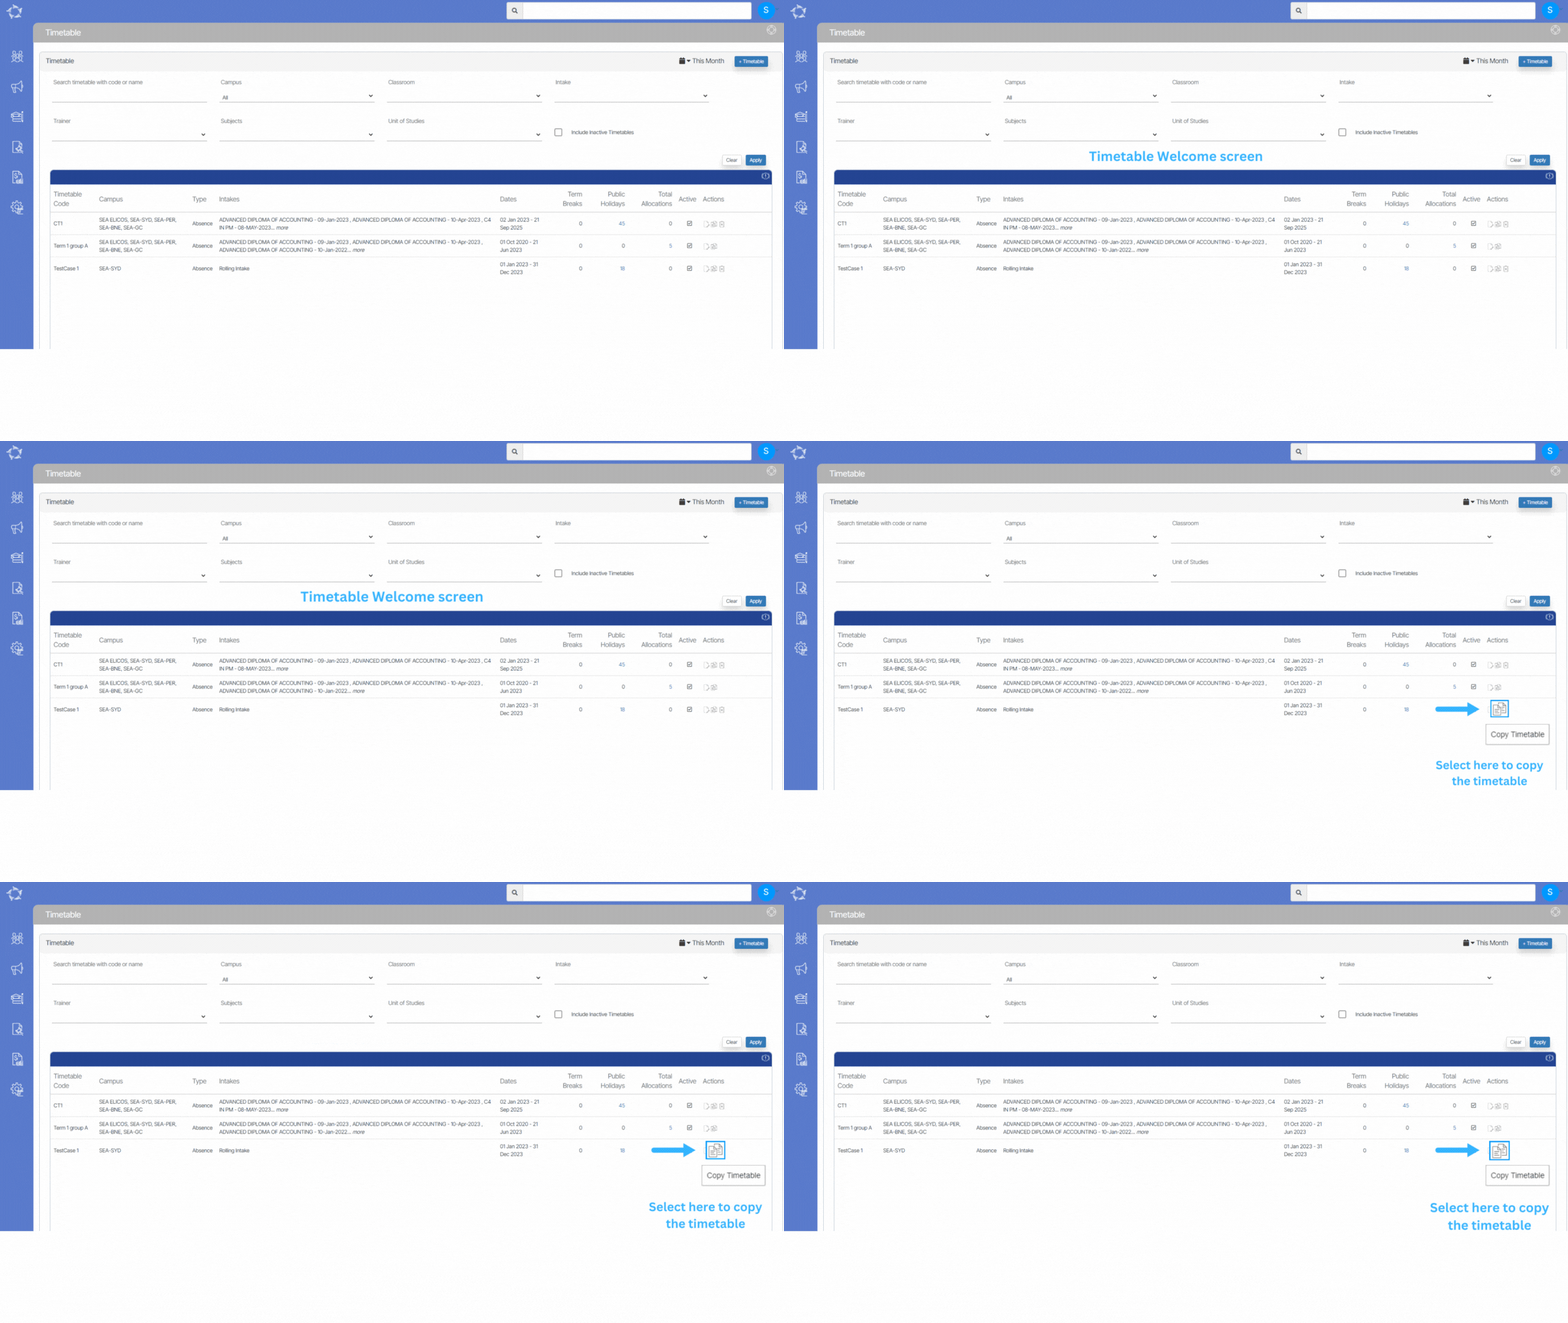
Creating a timetable from scratch can be a time-consuming and tedious task, especially if the same pattern of classes and schedule repeats after a certain period of time. However, there is a more efficient way to create a new timetable with the same pattern, and that is by using the copy timetable functionality.

This feature allows you to duplicate an existing timetable and make necessary changes as required. By doing so, you can save time and effort in creating a new timetable from scratch while ensuring that the schedule and class pattern remains consistent with the previous timetable.

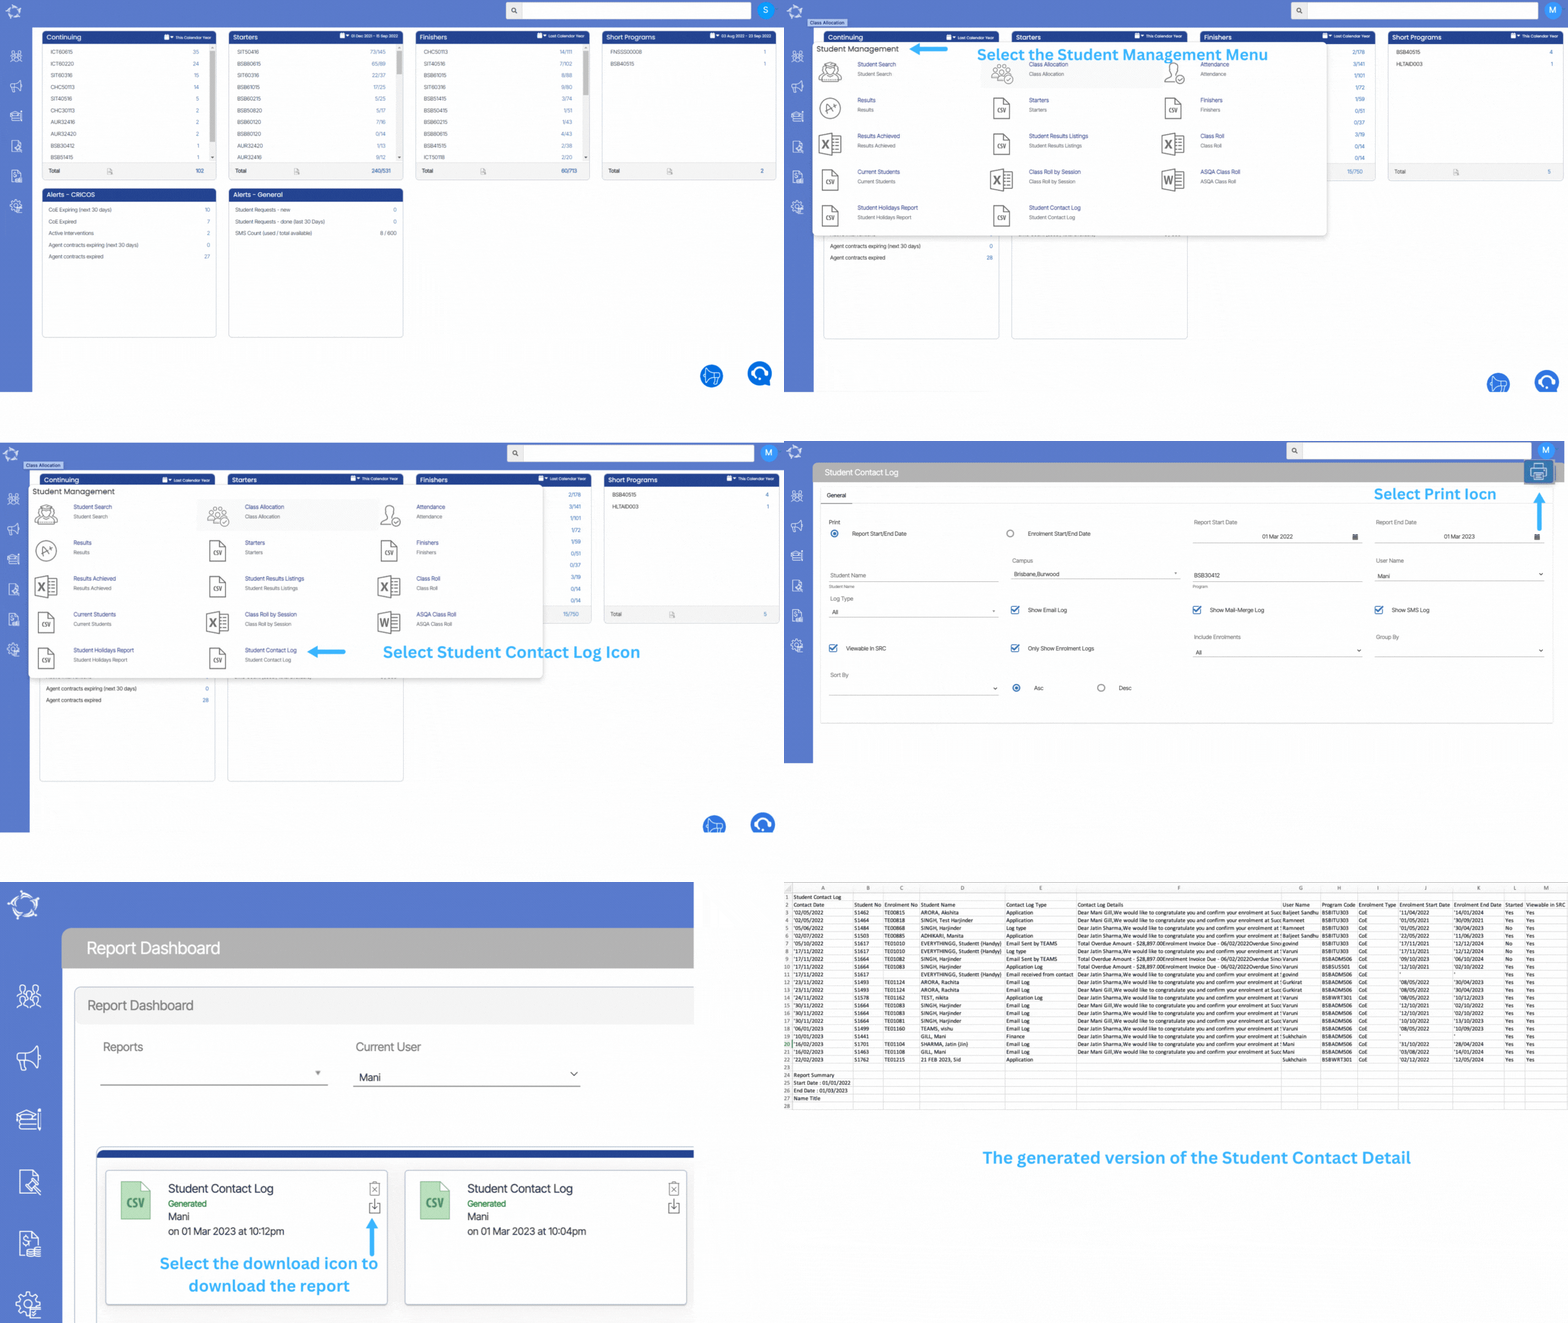
Student Contact Log – New Report

A students contact details give you a list of all the contact log entries you have done in the communication section for a student and/or their enrolment/s. By running this report, you can gain access to past, current, and future contact information for the students, which can be useful for various purposes.

Additionally, having access to this report can help you plan for the future and make informed decisions regarding the student’s education.

Enrolment AVETMISS Settings > +Pre2018 AVETMISS settings button changes

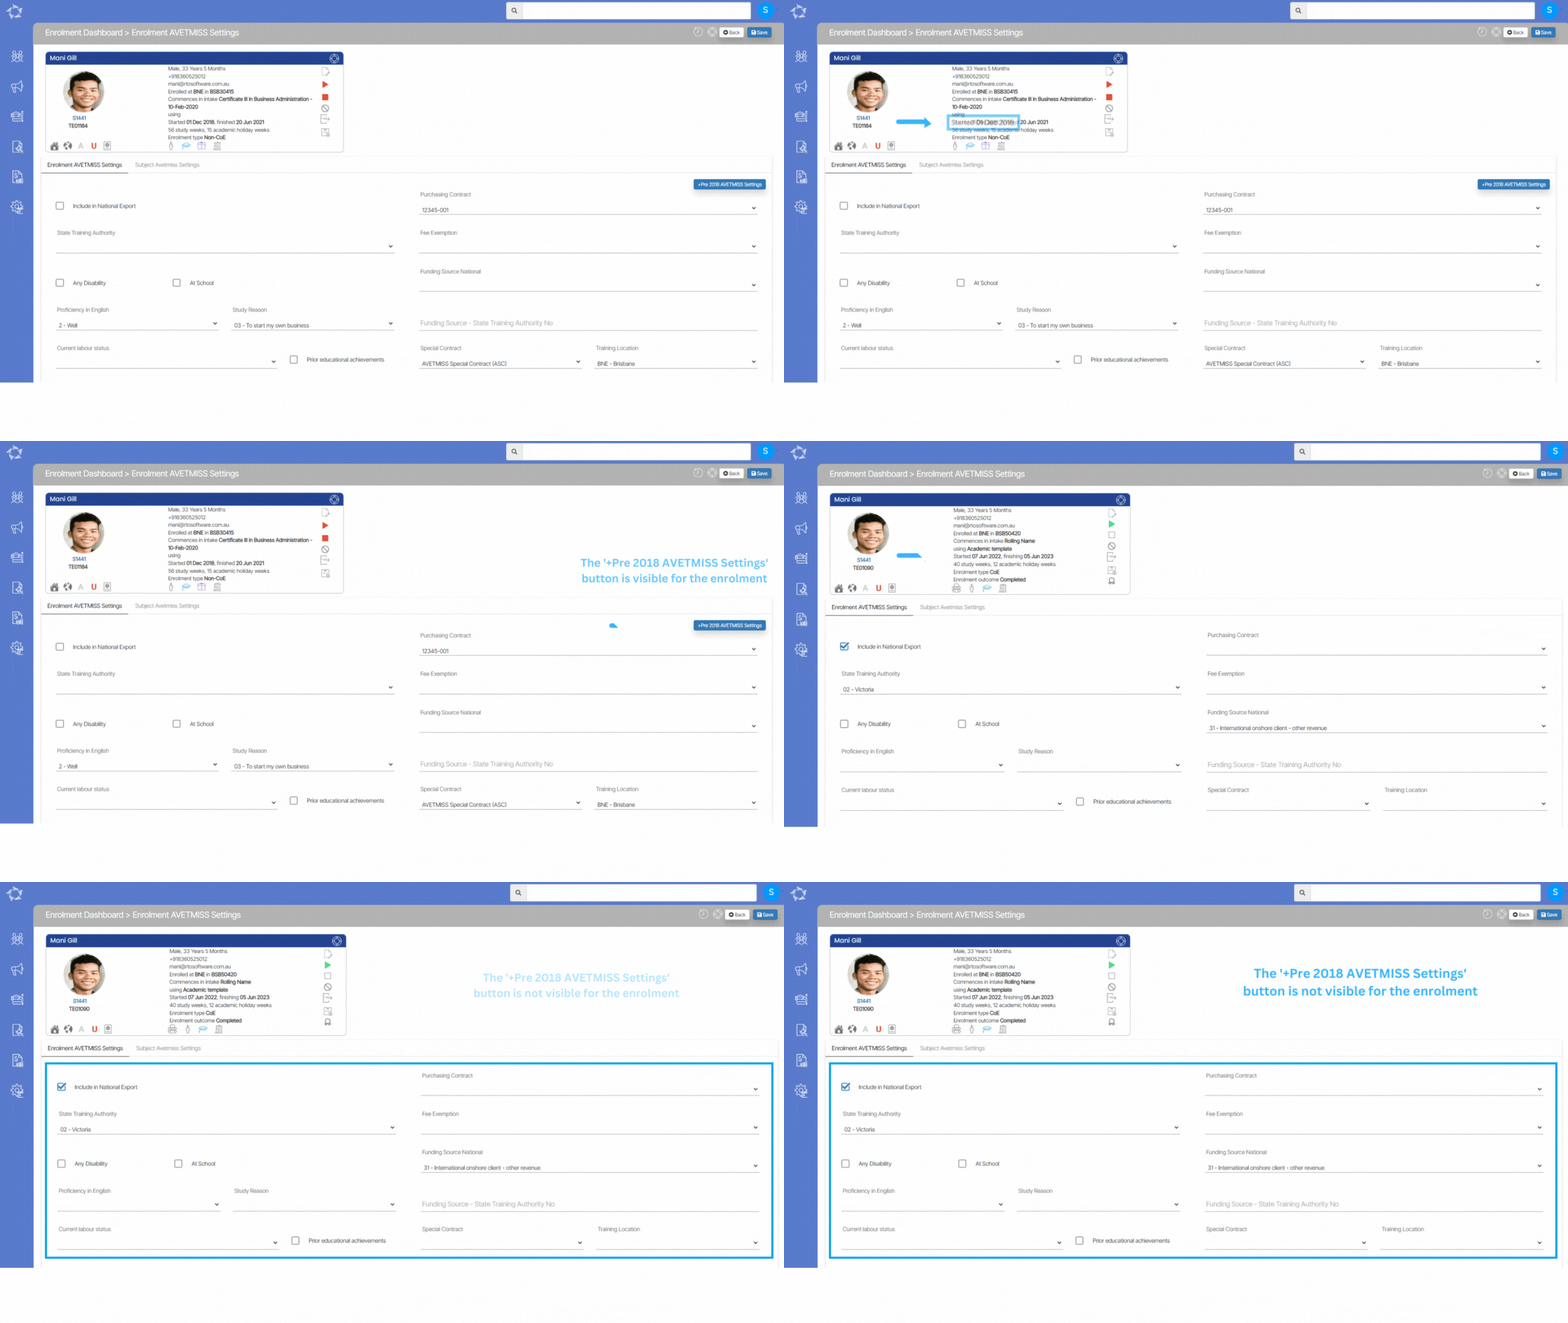
We have made some changes to the +Pre2018 AVETMISS settings button on the Enrolment Avetmiss Settings screen.

The button will now only be visible under specific conditions. Specifically, it will only be displayed if the enrolment start date is earlier than or equal to 01/01/2019. On the other hand, if the enrolment start date is after 01/01/2019, the button will not be visible, and it will remain hidden.

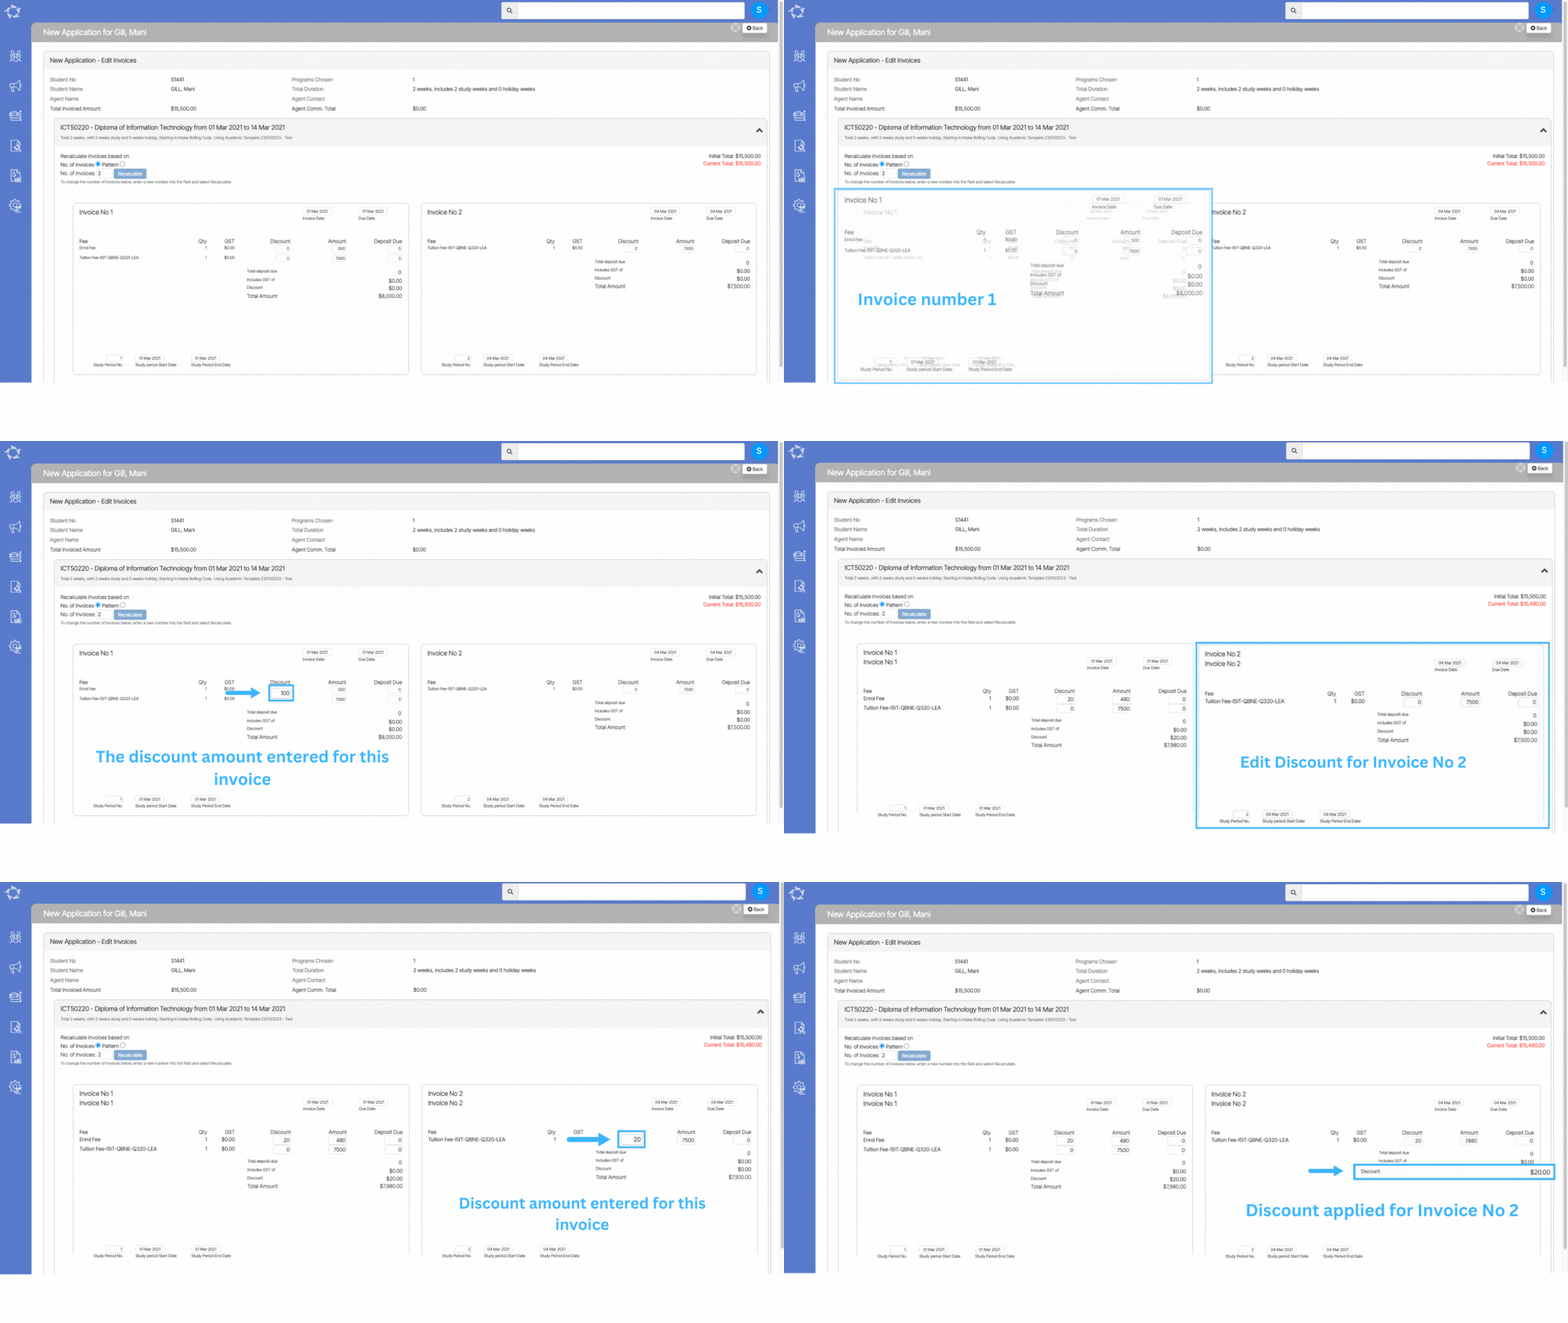
Application Process – edit/add Discount

In the past, the system used to automatically split discounts among each invoice while doing the application.

However, now we have added the ability in the system that allows you to add and edit discounts for each invoice individually.

Application Process – Instalment Plans Changes

Recently, we have added a new option namely Patter on the New Application – Edit Invoice Screen.

This option allows you to recalculate invoices based on the pattern selection. With the Patter option, you can quickly and easily update the invoices without having to manually adjust each item.

Application Process – Study Period Changes

When using the study period start date as the invoice date or invoice due date while the application process, the system automatically calculates the study period dates for you.

Application Process – New OSHC and AVETMISS Settings Buttons

A new feature has been implemented on the Application Finished screen that includes additional buttons called +Add OSHC Provider Details and +Add AVETMISS Settings.

You will be able to update the AVETMISS Settings and OSHC provider details for the application from these buttons.

Our mission is to build software that helps you do things more efficiently. Your input and engagement are vital in helping us improve our service and offerings for your college. We are always open to listening to your feedback.

Any questions, please feel free to reach out to us. We look forward to serving you to the best of our ability.

Please review the changes and if you would like further clarification, please contact our Support team.

A big thank you to so many of you who have been actively participating in helping us bring these new improvements to life.

Next update is due on Thursday, 23rd March 2023

Note: Please alert other team members within your college if the changes outlined above affect their role or department.

Thank you for taking the time to read this post.

Enrolment AVETMISS Settings > +Pre2018 AVETMISS settings button changes

We have made some changes to the +Pre2018 AVETMISS settings button on the Enrolment Avetmiss Settings screen.

The button will now only be visible under specific conditions. Specifically, it will only be displayed if the enrolment start date is earlier or equal to 01/01/2019. On the other hand, if the enrolment start date is after 01/01/2019, the button will not be visible, and it will remain hidden.

IMPORTANT – Our general recommendation is to utilise this button when importing historical data. If you are being able to see this button, we encourage you to contact our support team for assistance.

Application Process – edit/add Discount

In the past, the system used to automatically split discounts among each invoice while doing the application. However, now we have added the ability in the system that allows you to add and edit discounts for each invoice individually.

This feature is available on the New Application – Edit Invoices screen, providing more flexibility and control over the discounting process. By allowing you to apply discounts on a per-invoice basis, it can make it easier to manage and track discounts and ensure that they are accurately applied to each invoice.

Training Plan & Results Screen – Colour Codings

A new feature has been introduced on the Training Plan and Results Screen, which involves colour coding for both Results and Subject dates. Please select the below links to know more about the new rules.

Results Colour Coding

The results colour coding has been implemented to make it easier for users to differentiate between different types of updated results. This will display different colours for each updated result, allowing users to quickly identify the type of result without having to read through each one individually.

To know more, select here – Training Plan & Results – Result Colour Coding

Subject Dates colour Coding

This is a new check on the Training Plan and result screen, if the start date and end date of a subject have already passed, but the result is still updated for it, the subject dates will be displayed in red/pink colour. This will help you quickly identify subjects that may require attention.

To know more, select here – Training Plan & Results – Subject Dates Colour Coding

Training Plan & Results Screen – New Icons

Recently, we have made some changes to the Training Plan and Results Screen by introducing new icons, namely Result Attempts and Result History. These icons will provide you with more information about the student’s progress and performance throughout their training sessions.

The Result Attempts icon will show you how many times the student has attempted a particular subject. On the other hand, the Result History icon will display the student’s past results, allowing you to track their progress and identify areas where they need to improve.