Alert System Configuration

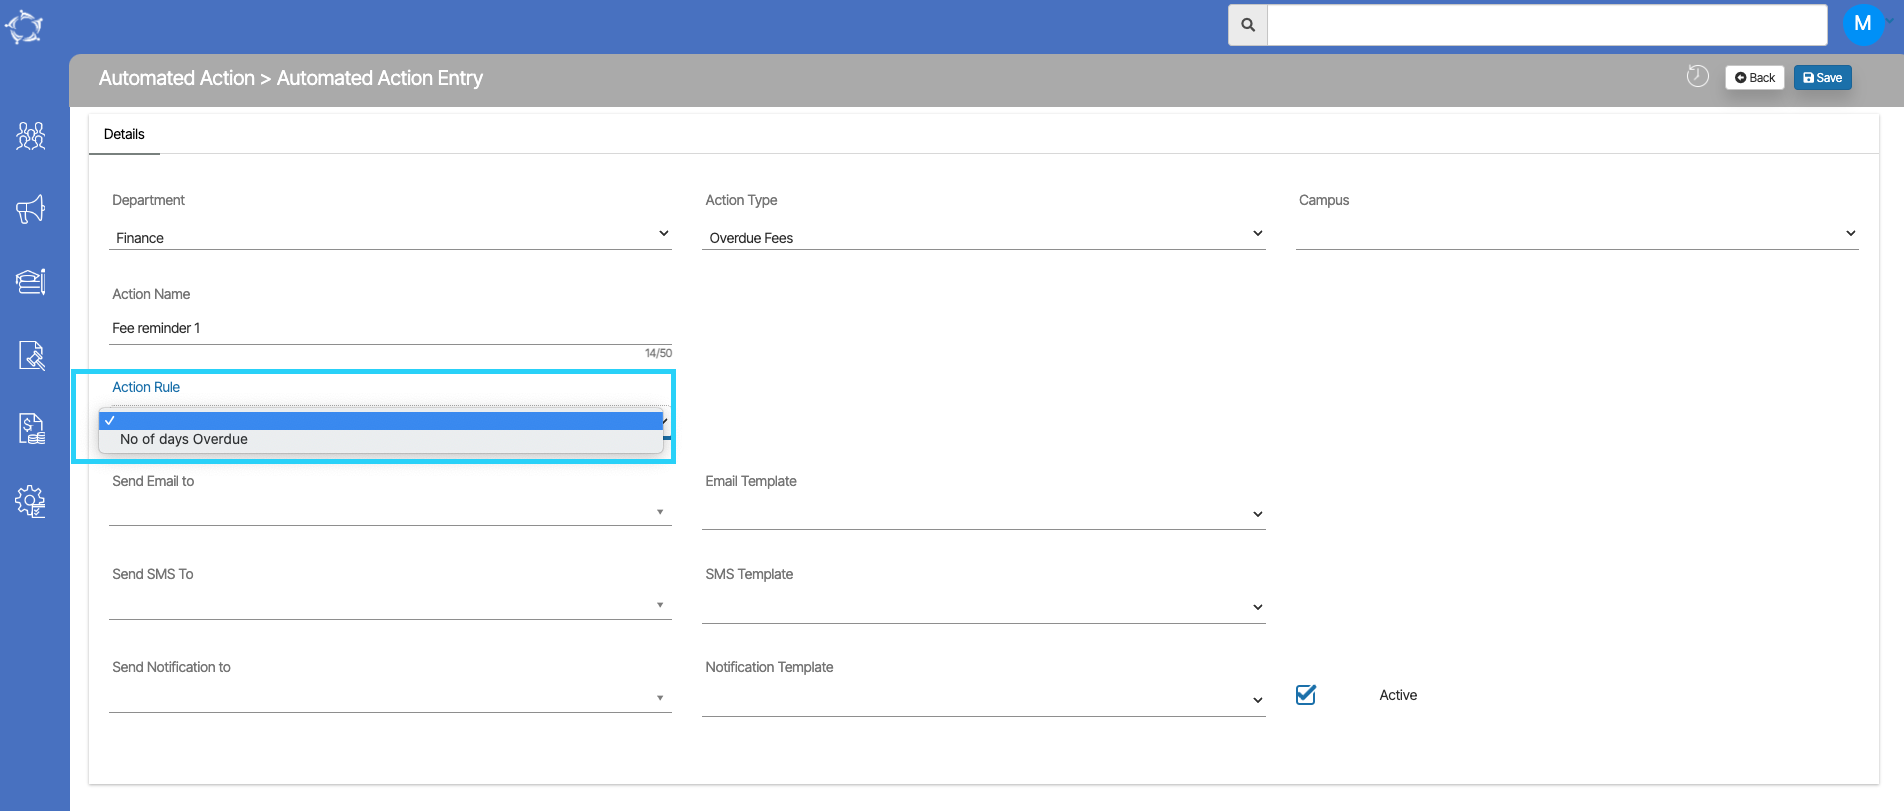
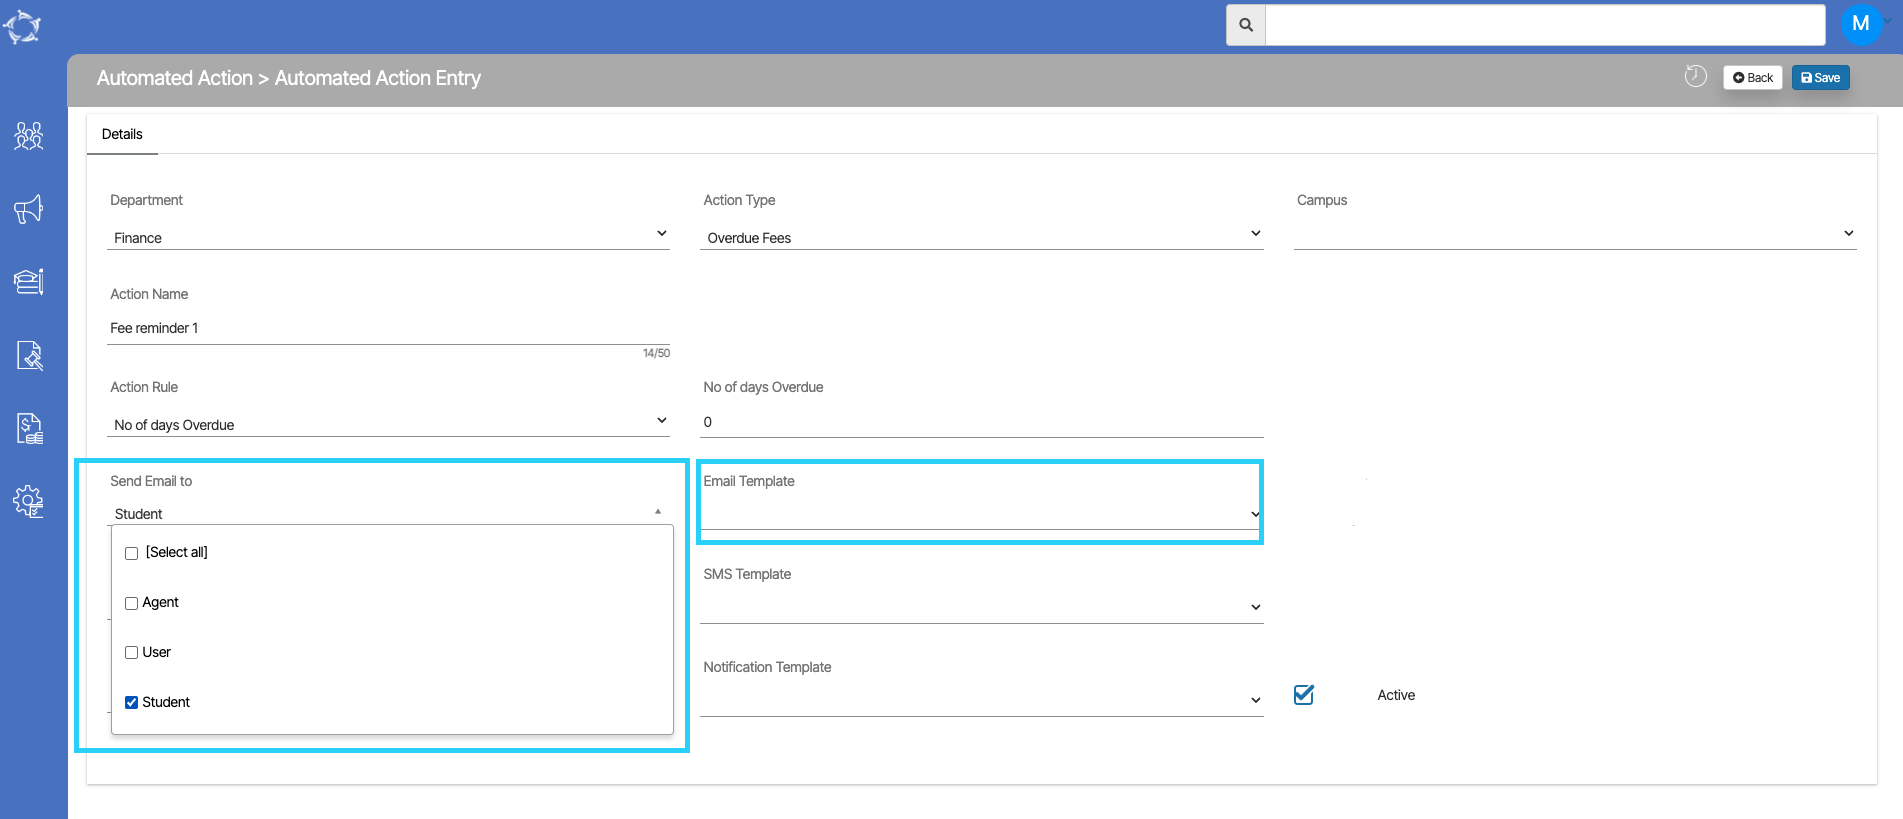
Main Dashboard > System Admin > Alert System Configuration

This screen allows you to configure the initiation and conclusion times for sending emails and SMS through TEAMS. Additionally, you have the option to establish particular days for the system to send reminders or alerts.
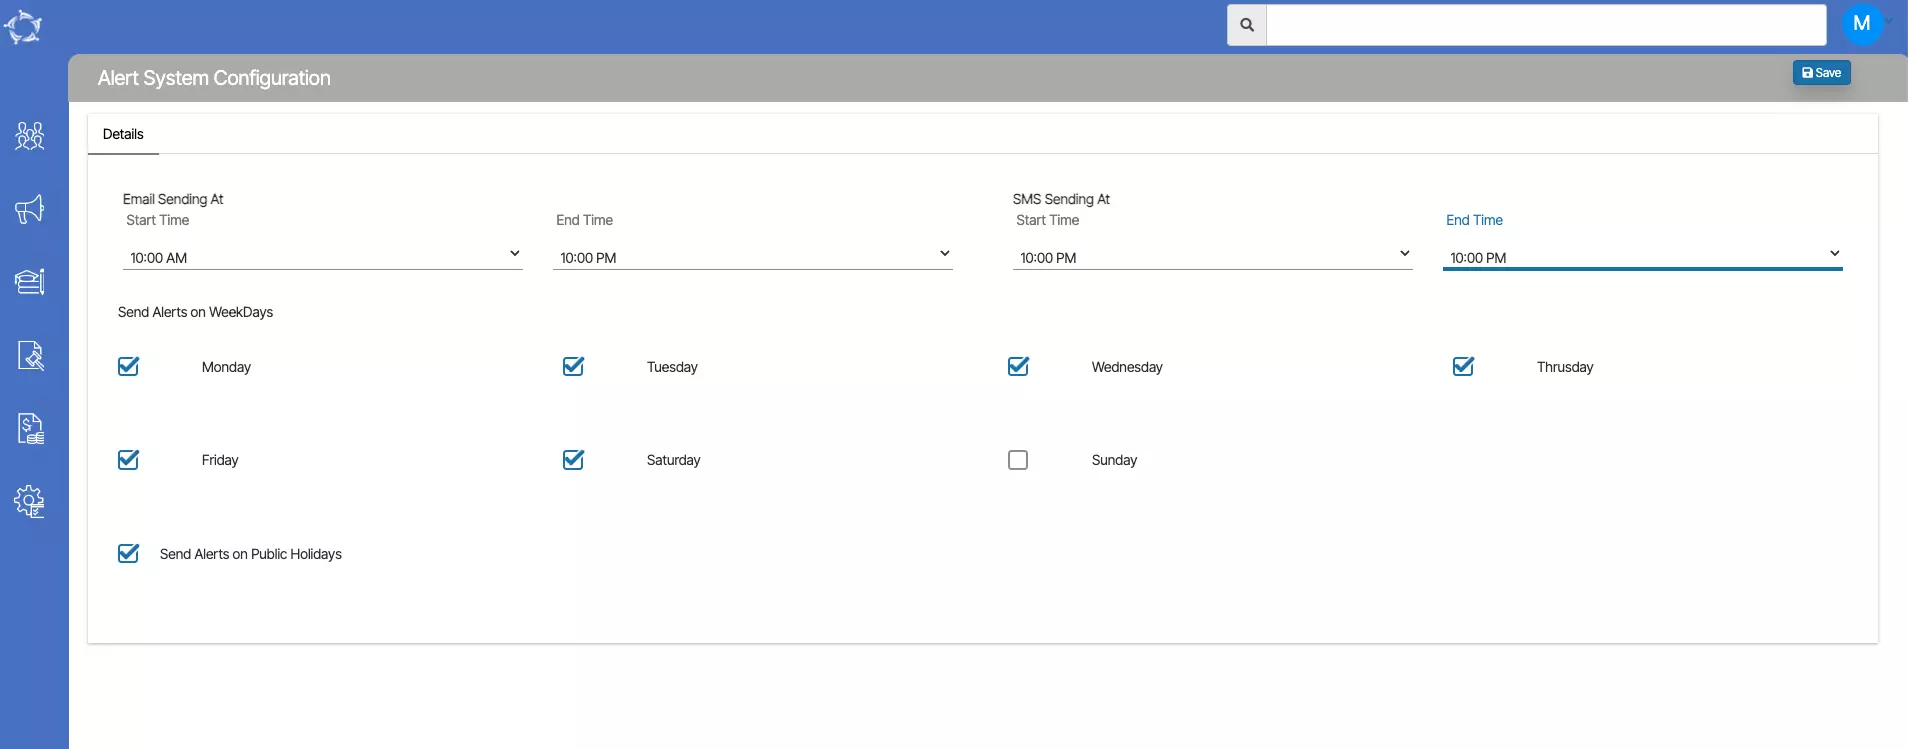
FieldsExplanations
Email Sending AtStart Time – Specify the commencement time for enabling the sending of emails to agents, students, and users for all alerts and actions.

End Time – Input the conclusion time until which you desire all alerts and actions to have the capability to send emails to agents, students, and users.
SMS Sending AtStart Time – Specify the commencement time for enabling all alerts and actions to send SMS to agents, students, and users.

End Time – Input the conclusion time until which you desire all alerts and actions to have the capability to send SMS to agents, students, and users.
Send Alerts on WeekdaysYou have the option to choose the days (Monday to Sunday) for sending both Emails and SMS.

Additionally, you can choose to enable the Send Alerts on Public Holidays checkbox if you want alerts to be sent on public holidays.

How to setup Fee Reminder actions and alerts in TEAMS

Overview

Fee Reminders are generally sent to students on a regular basis depending upon their Invoice due date. Some colleges send only overdue reminders to the students and some also send upcoming invoices.

Note: To set up actions and alerts, please contact the support team as it also has to be activated from the backend to work.

From the Main Dashboard, you need to select the System Admin Menu and then select the Automated Action sub menu.

This will open the Automated Action Welcome Screen. To create fee reminder alerts for upcoming and overdue invoices, select the +Automated Action button on the top right corner of the screen.

IMPORTANT – Please make sure that you have done the setup on the Alert System Configuration screen for sending emails and SMS.

Also, the Business Rule of the reminders is that, it will be sent to Started and Current Students only.

Steps to setup Fee Reminder Actions and Alerts

NOTE – Please note that the dropdown on this is user code and one can create them from the User Code Screen in the System.

Upon selecting the Automated Action button it will open the Automated Action Entry screen.

  • Select the Finance option from the Department dropdown.
  • Once you have selected the finance department, the system will load the Action Type dropdown. Based on the action type created in TEAMS, it will appear under the dropdown. for example – The Overdue Fees option has been selected.
  • After selecting the action types, select the campus for which you wish to create the alert. If you have multiple campuses and you wish to create this alert for all the campuses then you can select the All option.
  • Enter the name of the Action in the Action Name field. After that select the Action Rule from the drop-down. If you have selected Overdue Fees in the action type then in the action rule it will show No of days Overdue.
  • If you have selected the No of Days Overdue in the Action Rule then you need to enter the number value in the number of days overdue field to send reminders to the students after their Invoice due date has passed. For example, if you set it to 6, the system will send reminders to the invoices whose due date was 6 days ago. So if the current date is 12 June 2023, the system will generate alerts and send reminders for the invoice due date of 06 June 2023.
  • When you select the Send Email to dropdown, you will see different options (User, Student, Agent etc). Select the student option from here. Once you select the send email to, the Email Template dropdown will appear.

NOTE: The dropdown will show all the enrolment level email templates. The template will be visible as the tick boxes. Select the tick box against the template and hit the save button to save the action.

  • In the same manner, you can send reminder SMS as well. Select the enrolment in the Send SMS to dropdown and select the SMS Template you want to use to send reminders. Save the action and you are ready to go.

Q&A – The program is not appearing on new application screen

Sometimes happen when you are creating the application, the program doesn’t appear in which you want to enrol the student. That means the program is not linked with the campus that you have selected. Follow the following steps to get the program link with the campus so that it will appear while the creating application:

  • Go to the Academic menu > campus.
  • Open the campus screen and edit the campus by selecting the edit icon from the action column.

  • Once you will be on the campus entry screen you need to select the “Linked Program” option from the burger menu as highlighted below:

  • After selecting the “Linked Program” option the system will open the “Linked Program” screen where the system will show you all the linked programs within the campus.
  • Now you need to select the “+Program” button and the system will show you a floating window.


  • On the “Campus – Program search” floating window search for the program in the program code fields and select it.

  • Once you will select the required program, then you need to select the active box to flag this program as active at the campus level.

  • Select the save button to finish the linking process of the program with the campus.

If you have any queries, please do not hesitate to contact us on 1300 85 05 85 or email us via support@rtosoftware.com.au

Qualification Information

The tile displays important information regarding the parchment number and parchment date, as well as the result status, commencement status, and completion status.

To update or edit the qualification information, you can easily make changes by selecting the designated icon. . Once you select the icon, it will open the pop window where you can edit the information and save it.

Current Timetable and Student Progress

This section will display the information related to the current timetable, and total classes. Also, the total subjects, successful, are yet to complete and not counted due to CT, RPL, and RCG. Other than you can select Level Attained by selecting the icon next to the text.

This tile also navigates you to the class listing screen. Select the icon and you can see the list of all classes allocated to it. To know more, click here.

Training Plan & Results – Academic Templates

The Academic Information section provides essential details about the enrolment, including the campus name, course code, and the start and end dates of the enrolment period. To populate the subject dates, you can choose from various options available in the dropdown menu. This includes using an academic template that you have created in your TEAMS site, extracting information from the course definition, or simply utilising the enrolment’s start and end dates.

By selecting the From Course Definition option, you have the ability to update the start date and end date of subjects based on the sequence number and the number of days or weeks defined at the program level.

When you choose the Use Enrolment Start and End Dates option, the subject dates will be updated to match the start and end dates of the enrolment itself. This means that the enrolment start date will be set as the start date for each subject, and the enrolment end date will be set as the end date for each subject.

The Add/Update Group Training Plan option allows you to manage the group training plan associated with the enrolment. By selecting the corresponding icon , a pop-up window will open, presenting you with further options. In the pop-up window, you can select the appropriate group training plan from a dropdown menu. Once you have made your selection, simply select the save button to apply the changes.

New Invoice step 2

The new invoice step 2 is an invoice preview screen where you will be able to see the student invoices and agent invoices preview on the different tabs:

You can enter the Study period number in the SP No. field if you want to, if you will enter the student period No the system will automatically calculate the study period start date and end date.

Student Invoice tab:

Agent Invoice tab:

Once you will verify all the things are fine on the preview screen, you just need to click on the Finish button and the system will create the new invoice and take you to the final step.

Below I have explained the Print and the snd button:

This is the print icon from where you will be able to generate the created invoice, Once you will click on this button the template selection floating window will appear, you can choose the template from the dropdown and select the Generate button to generate the invoice.

By selecting the Send Button you will be able to send the created invoice via email to the student. Once you will select the send button the system will take you to the compose email screen. You can choose your email template and select the send button to send the email.

Note: Whatever template you will select the receipt merge field needs to be added to the template, only then the system will print the invoice in the email.

If you have any queries, please do not hesitate to contact us on 1300 85 05 85 or email us via support@rtosoftware.com.au

Visa Information – Applicant Dashboard

Applicant Dashboard > Applicant Profile Tile > Visa Information Icon

history of changes

This screen will allow you to add/edit the visa details of an applicant at the application dashboard > Visa Information Screen

IMPORTANT – Once the application is converted to a student, you won’t be able to add/edit any details at the applicant level. However, you can make the changes from the Student level.

Below are the steps to add the visa details for an applicant.

  • When you select the icon 
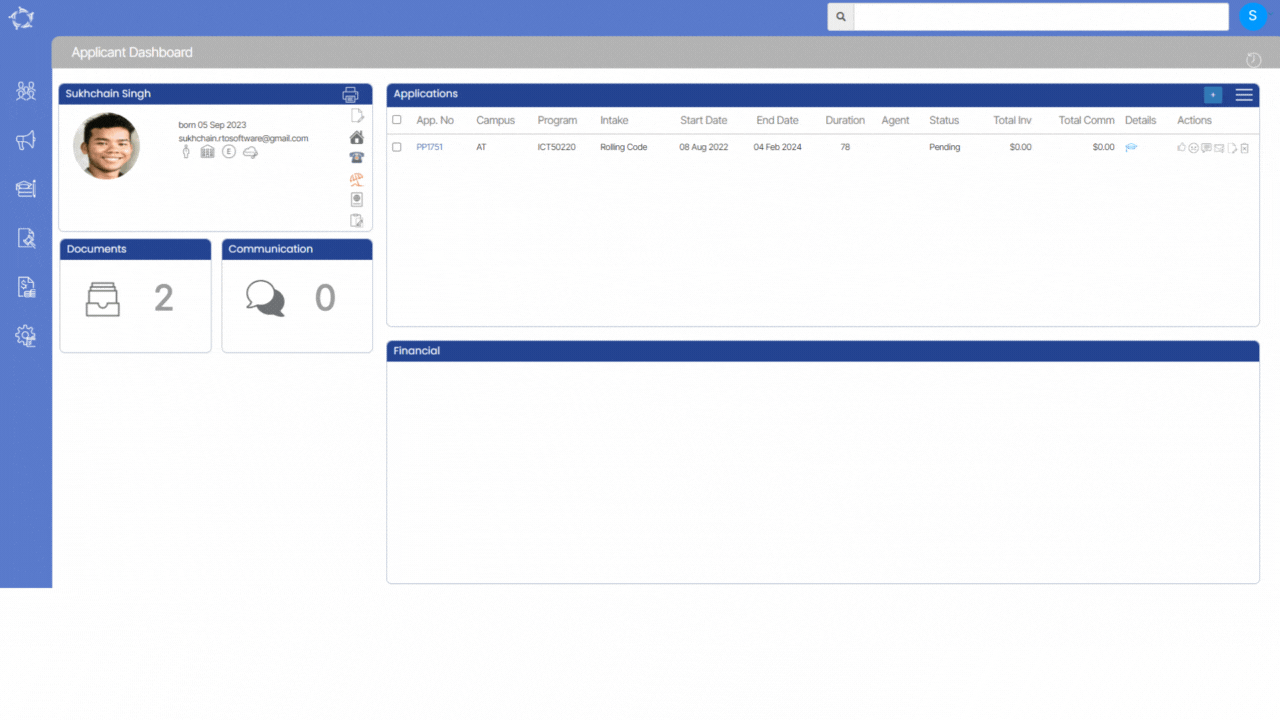
on the Applicant Dashboard, it will take you to the edit visa details screen where you can select the  button to add the visa details of an applicant.
  • Upon selecting the add button, a popup window will open where you can add the visa information for the applicant and select the +ADD button.
  • Once you select the Add button, it will appear in the grid.

Student Dashboard Reports

Different reports are available on different tiles under the Student Dashboard. You can see these reports under the print icon.

Each report listed below is a link to a post where you can understand the report and its parameters and view an example of the report.

Reports on Student profile tile:

  • Student Letters and Warnings

Reports on Current and Upcoming enrolments and Historical Enrolments Tiles

  • Print Offer Letter

Financial Tile

  • Student Statement of Account

Student Dashboard – Application Tile

This tile will show you all the pending and converted applications along with the basic details of the applications.

Note: You will only see icons if the application is pending otherwise you don’t need to see icons.

IconsExplanation
This icon allows you to add a new application for the student from the student dashboard screen and once you click on this icon, the system will take you to the new application screen
This icon shows you a tooltip called Approve and once you click on this icon, the system will show you a pop message on the screen as (are you sure you want to approve this application?) Select Ok to continue or Cancel to leave as it is
This icon shows a tooltip called Decline and once you click on this icon, the system will show you a pop message on the screen as (are you sure you want to approve this application?) Select Ok to continue or Cancel to leave as it is
When you select this icon, the system will open a dialogue box called (compose SMS for application) from there you can send an SMS to the application
When you select this icon, the system will take you to the compose email for the application from there you can send an email to the application