Offer Letter

history of changes

An Offer Letter is a proposed confirmation of enrolment into one or many programs and what the dates and costs for the applicant are. Generally a college emails this Offer Letter to the student or agent and they review and either confirm or decline the offer.

In this step of the New Application process, you can generate your Offer Letter. Depending on the type of RTO/college you are and the type of student you are doing an application for, will determine what you may call an Offer Letter.

For example, for ESOS/CRICOS Providers who manage and deliver training to students from overseas in Australia on Student visas the standard terminology is either an Offer Letter or a Letter of Offer (LOO). However, for a local/domestic based RTO/college, you may call an Offer Letter an Enrolment Acceptance Advice. Either way, it is the same thing and you can customise the master template and have as many as you wish in the system.

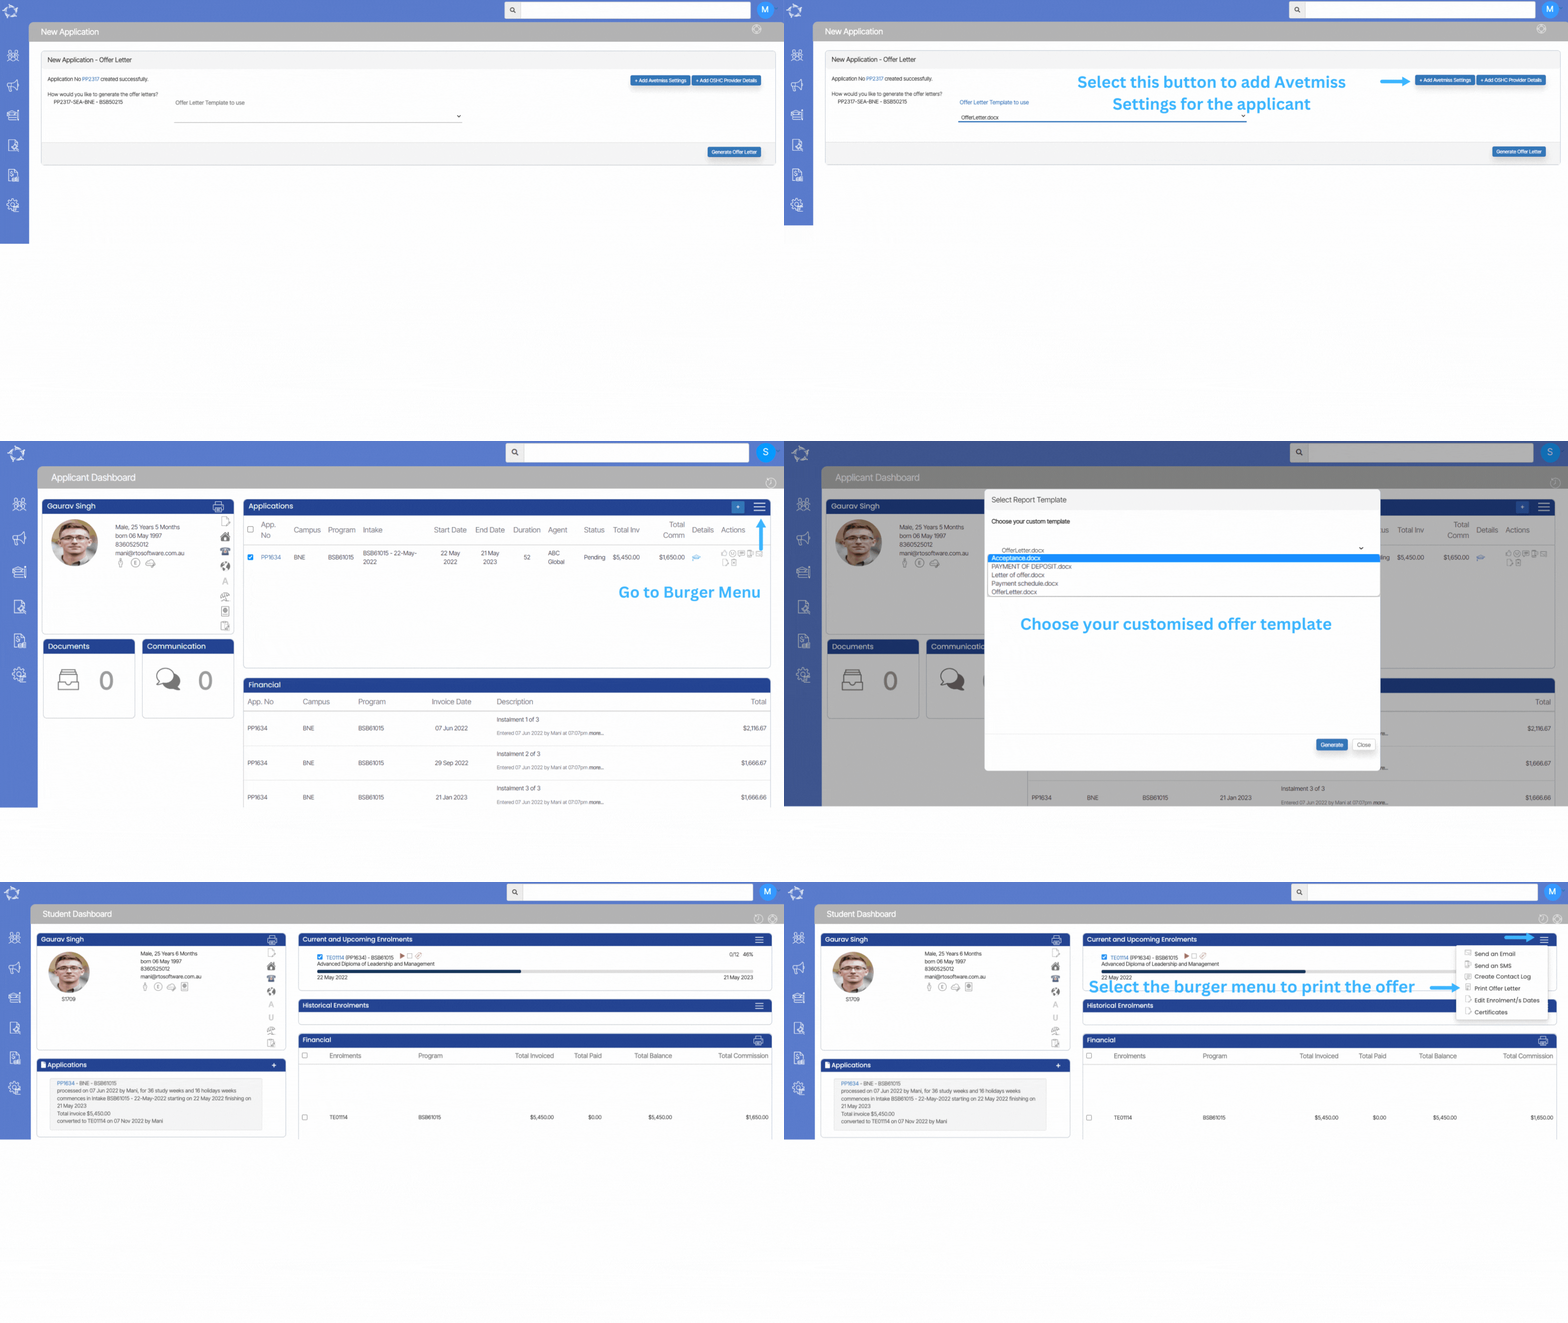
Also, on the Application Finished screen, you will see two buttons called +Add OSHC Provider Details and +Add AVETMISS Settings.

Upon selecting the OSHC Provider Details button, a pop-up window will appear on the screen, which will allow you to enter and save the OSHC (Overseas Student Health Cover) details for the application. This new functionality will provide you with a more convenient way to add and manage OSHC information within the application process. Or you can also add their OSHC details for the application from the Applicant Profile by clicking on the Overseas icon.

Upon Selecting the AVETMISS Settings Button, this will take you to the Application Dashboard > Application AVETMISS Settings screen, where you can update both the application level AVETMISS settings and the subject level AVETMISS settings. This page allows you to customise the settings that determine how your application handles AVETMISS data, which is essential for managing and reporting on vocational education and training in Australia.

Note: Offer letters can be generated from different screens in TEAMS.

Applicant Dashboard > Applications Tile
Applications Dashboard > Application profile Tile
Student Dashboard > Current and Upcoming enrolments tile > Burger Menu

Please see below the process to generate an Offer Letter.
Agent Contracts Expiring (next 30 days)

Main Dashboard > Alerts – CRICOS Tile > Agent contracts expiring (next 30 days)

Overview:

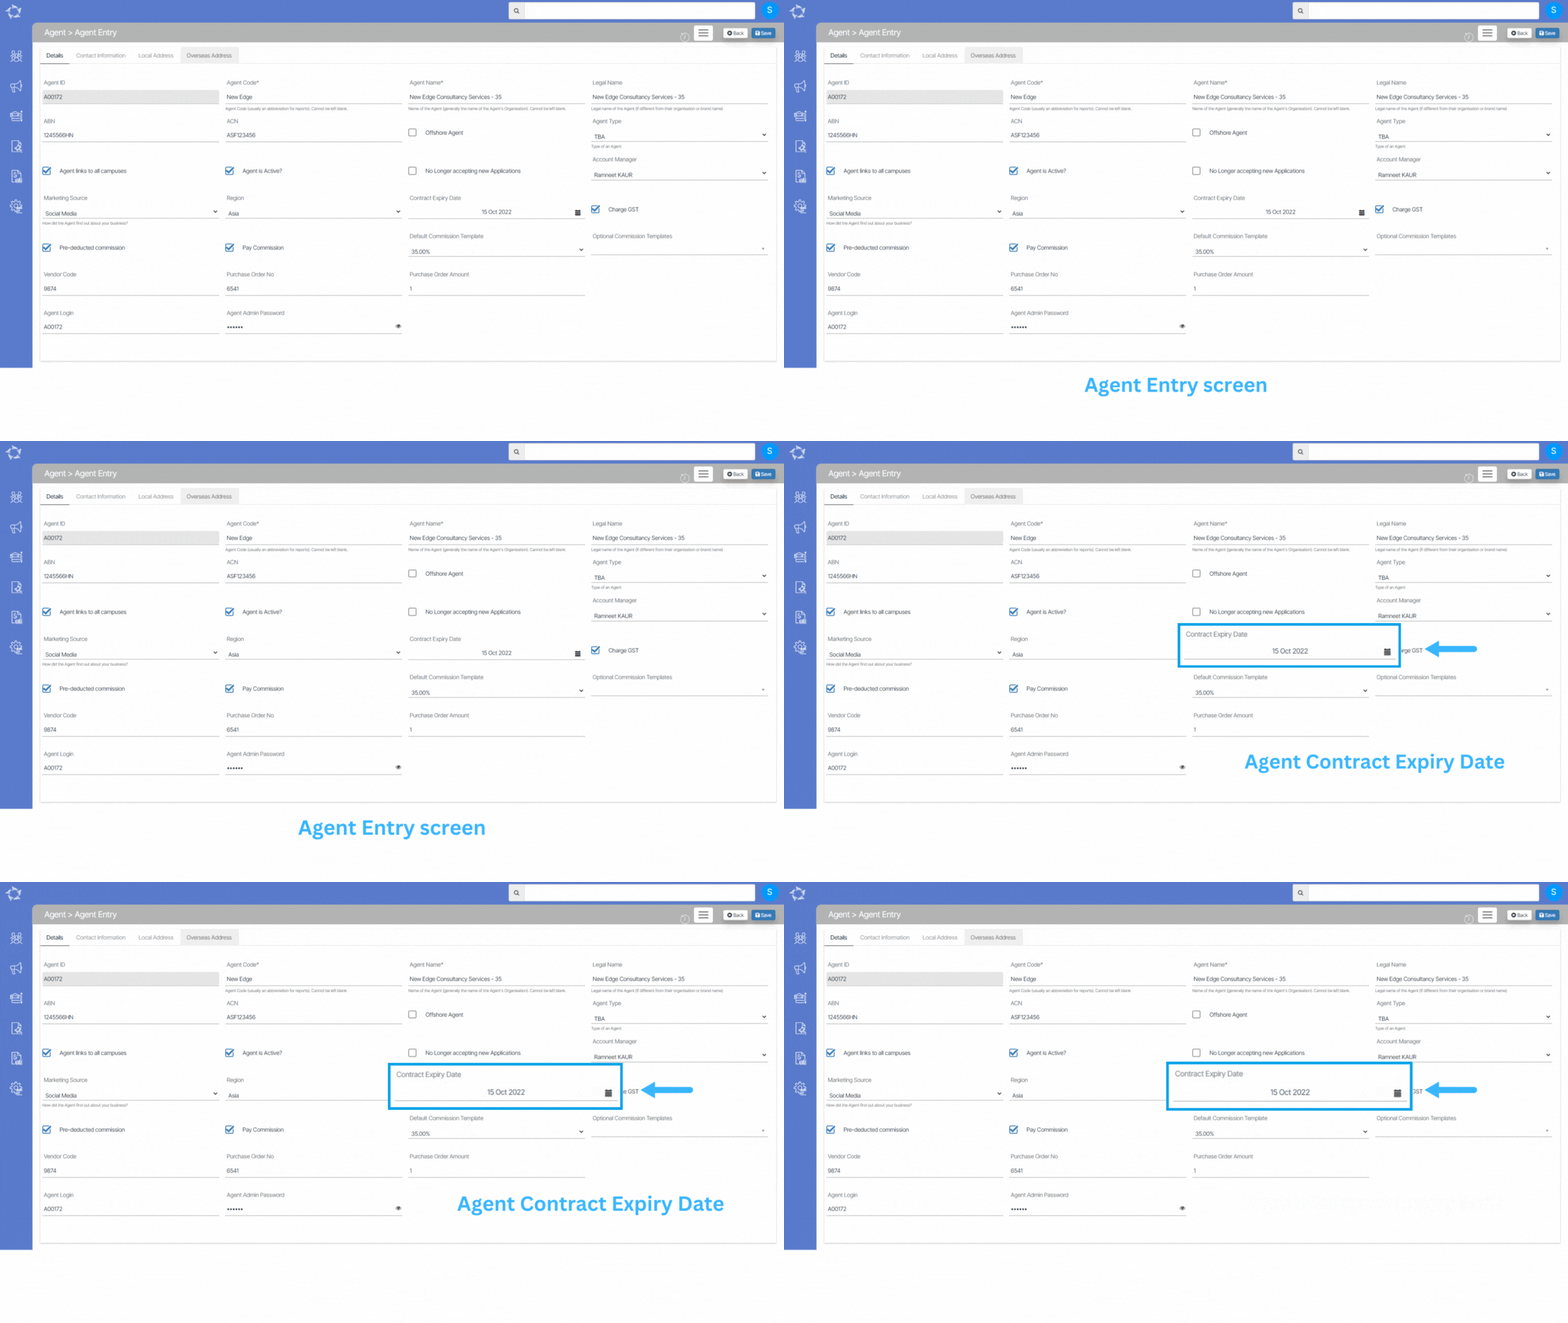
The Agent Contracts Expiring (next 30 days) Tile and the listing screen will show you a count and list of the agent’s contracts that have contracts expiring in the next 30 days. You can enter a Contract Expiry date for an agent in the Agent entry screen as below.

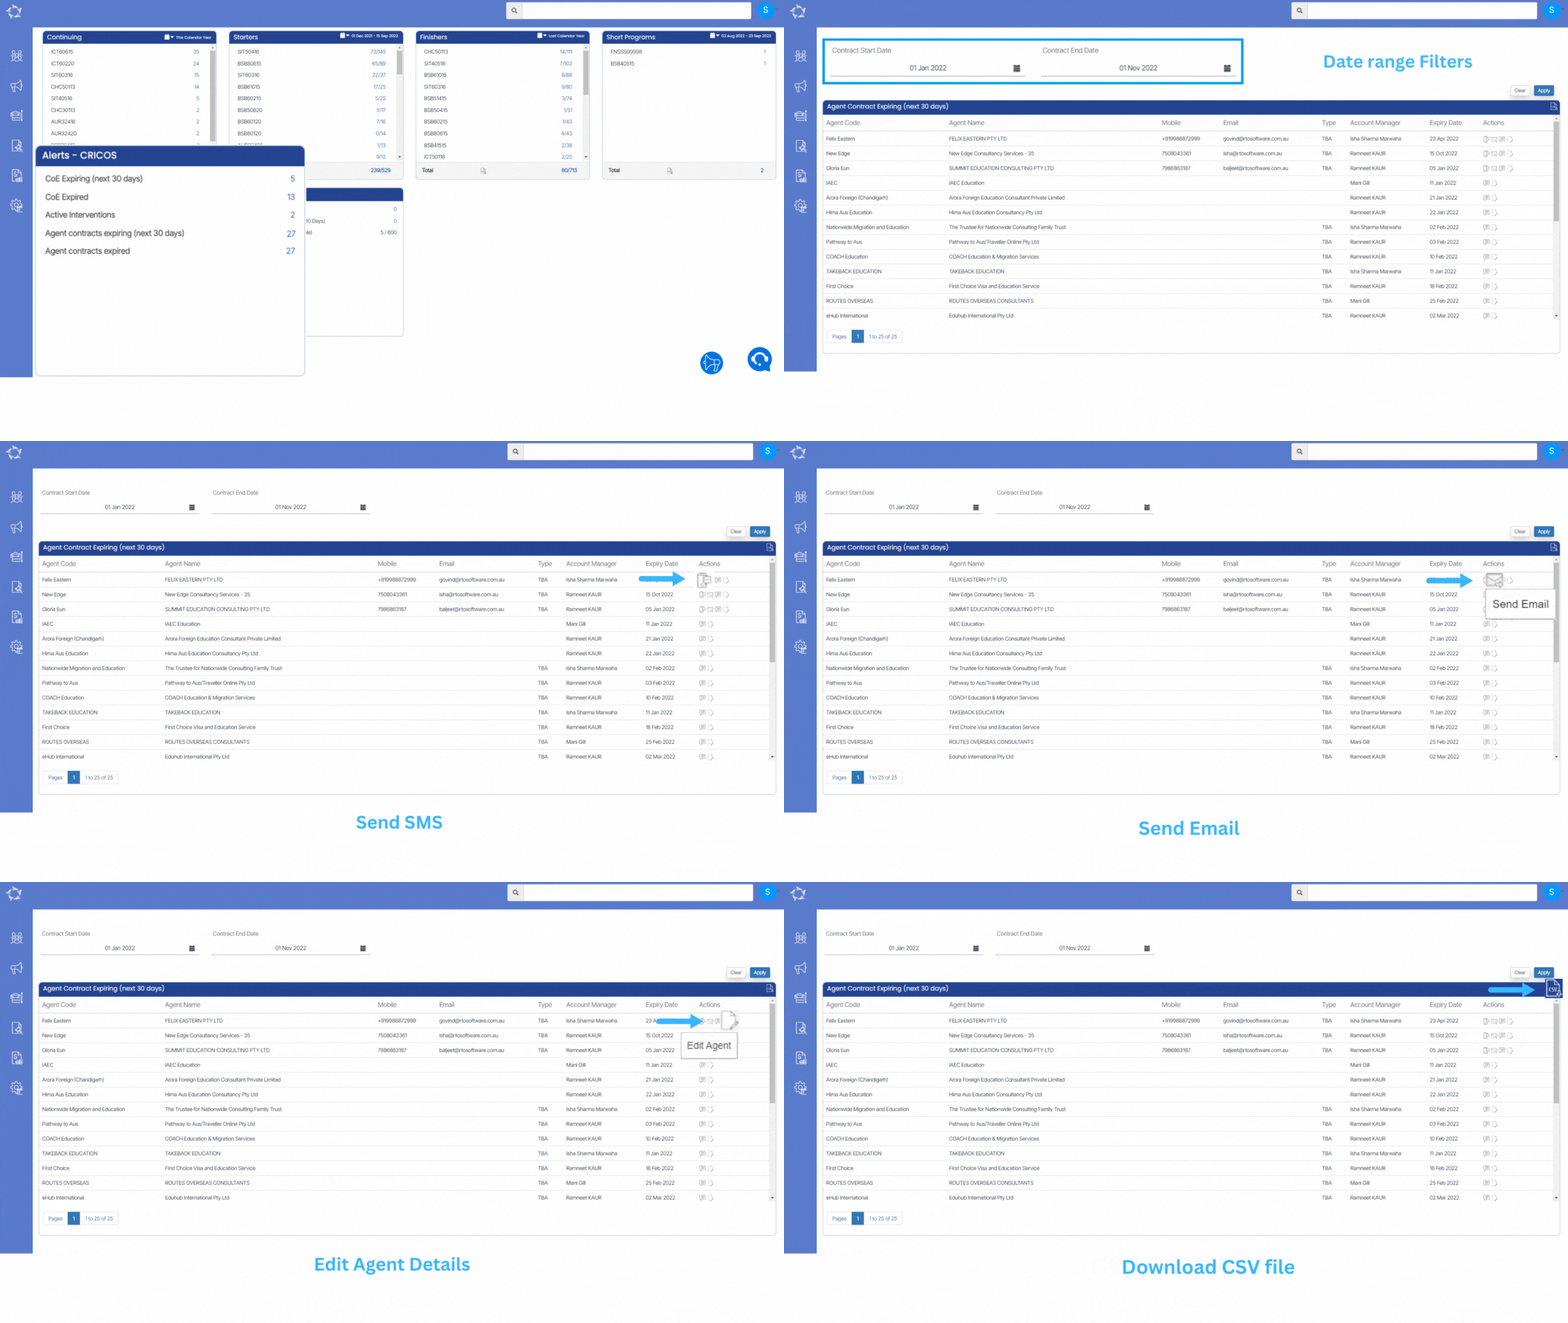
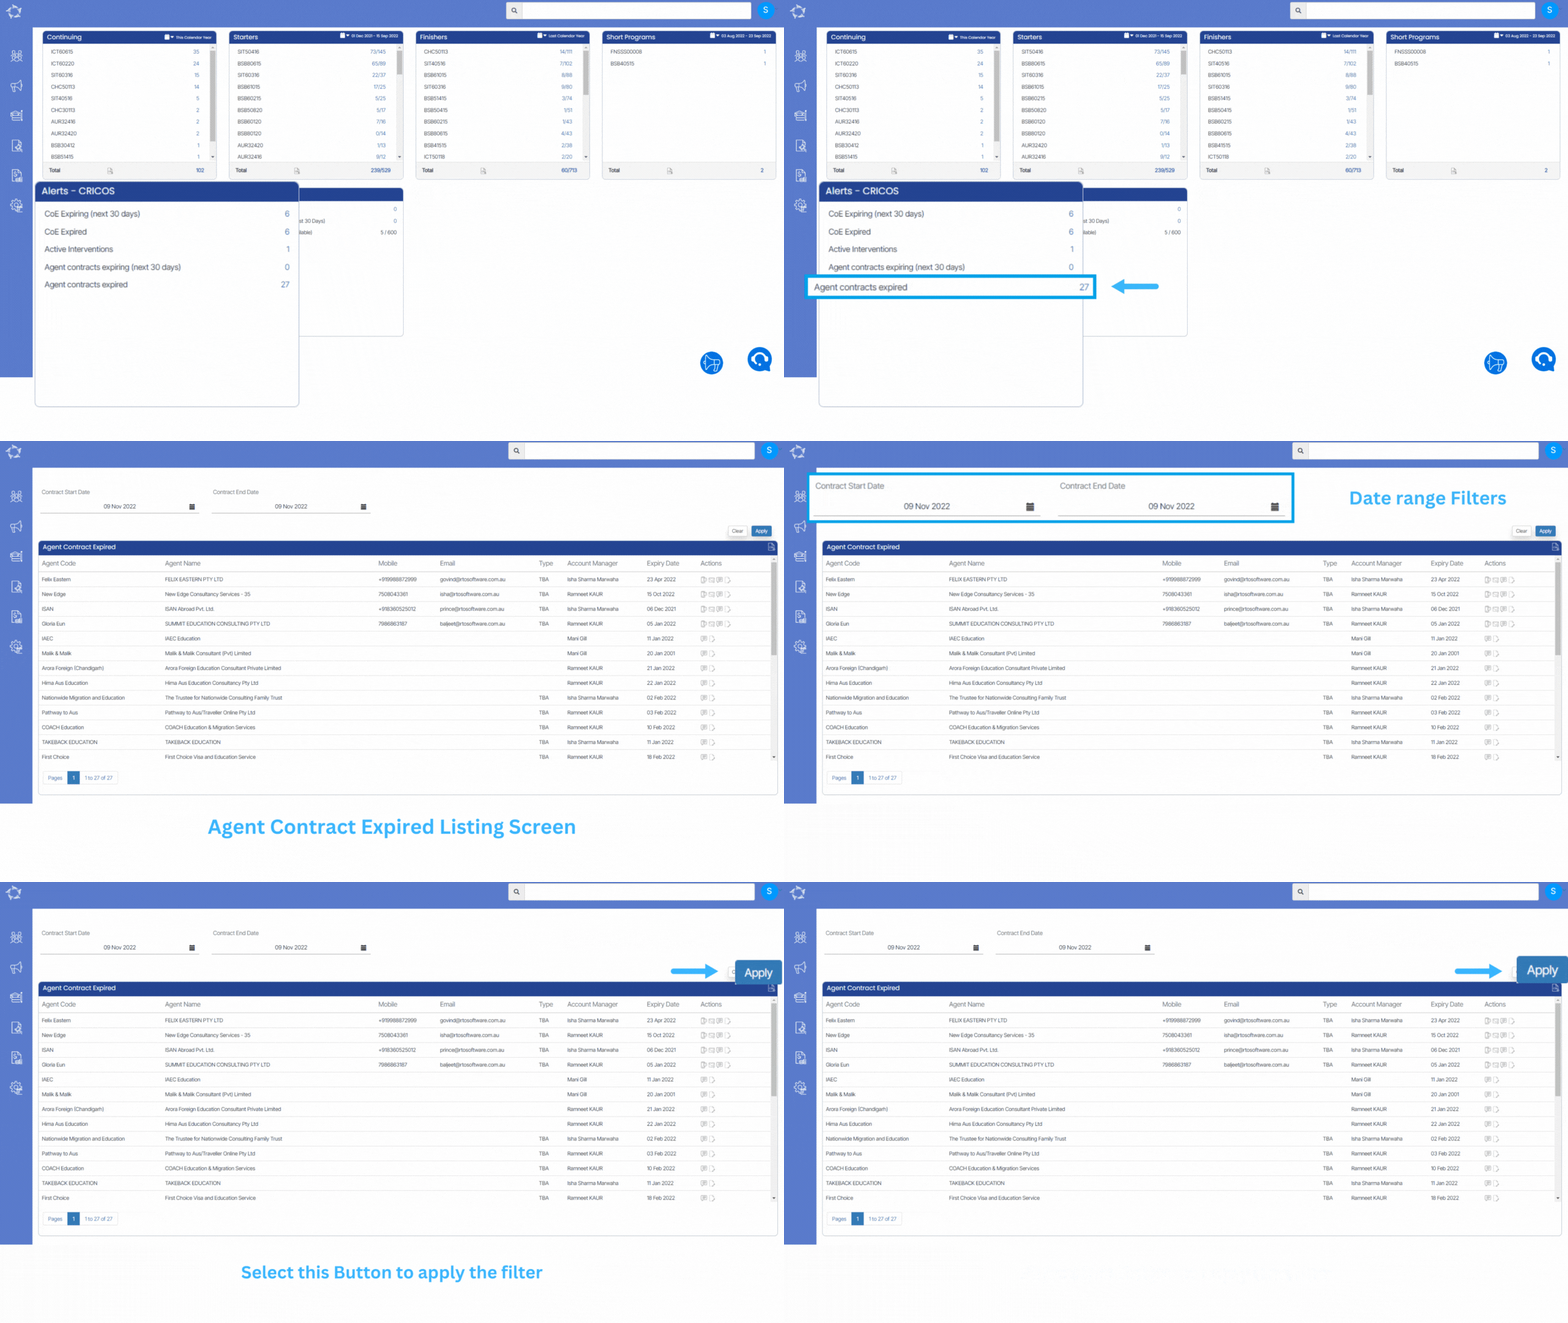
In the Alerts – CRICOS tile, the number listed for Agent Contracts expired, as below, is a link. When you select the number link the system will open the Agent contracts expiring (next 30 days) listing screen.

Filters/Parameters:

This is a very simple list screen that has filters only for the Contract Expiry Start Date and End Date to search on as shown below. The dates the system shows in the list screen are based on the Calendar option that was selected in the tile for this list screen. Once you open the list screen you can change the date range and select the Apply button to search for a new set of agents with a contract expiring.

Actions

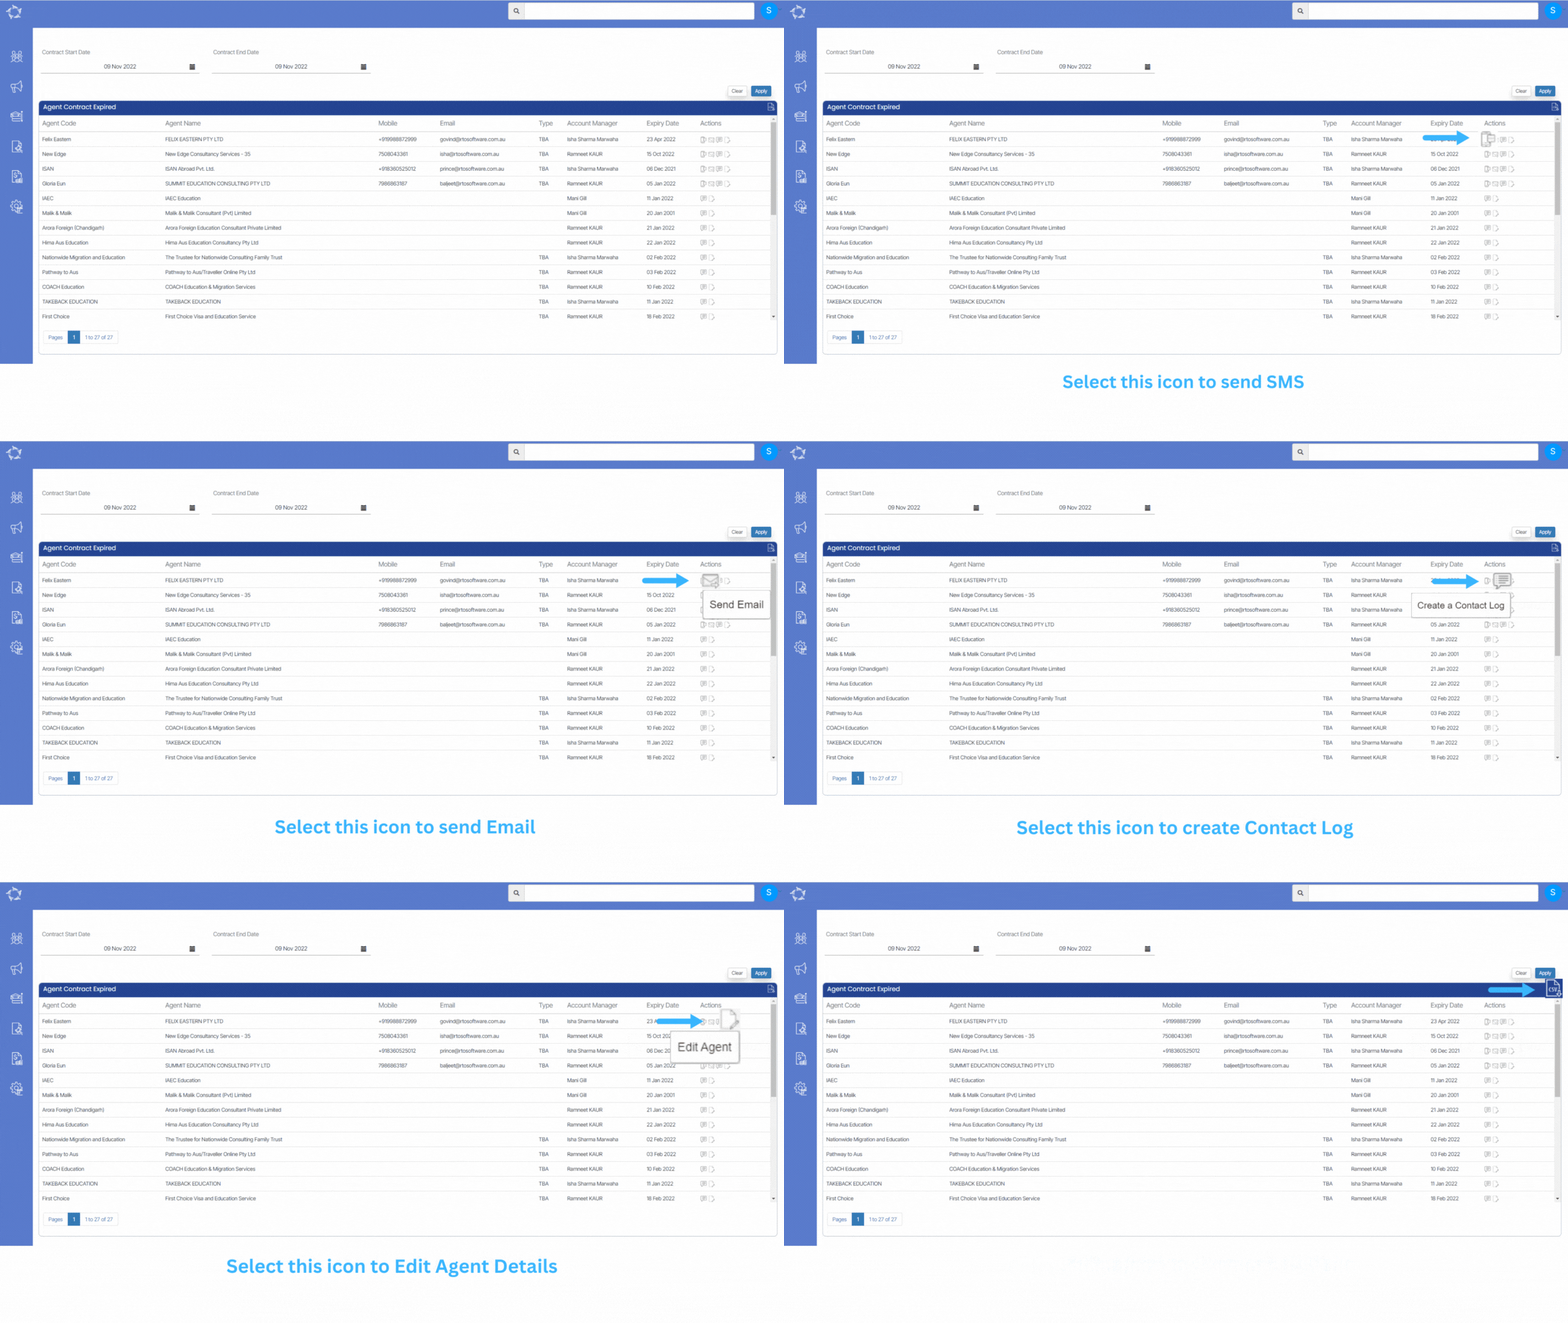
From the Action column, you will be able to do different actions for each agent listed. Please see the TEAMS Icons post for more information on each action and what you can do.

CSV Download

This listing screen also gives you a csv to download with the list of agents displayed in the grid. To do this select the CSV icon in the top right-hand corner of the screen.

AD – Application Tile

Applicant Dashboard > Applications Tile

history of changes

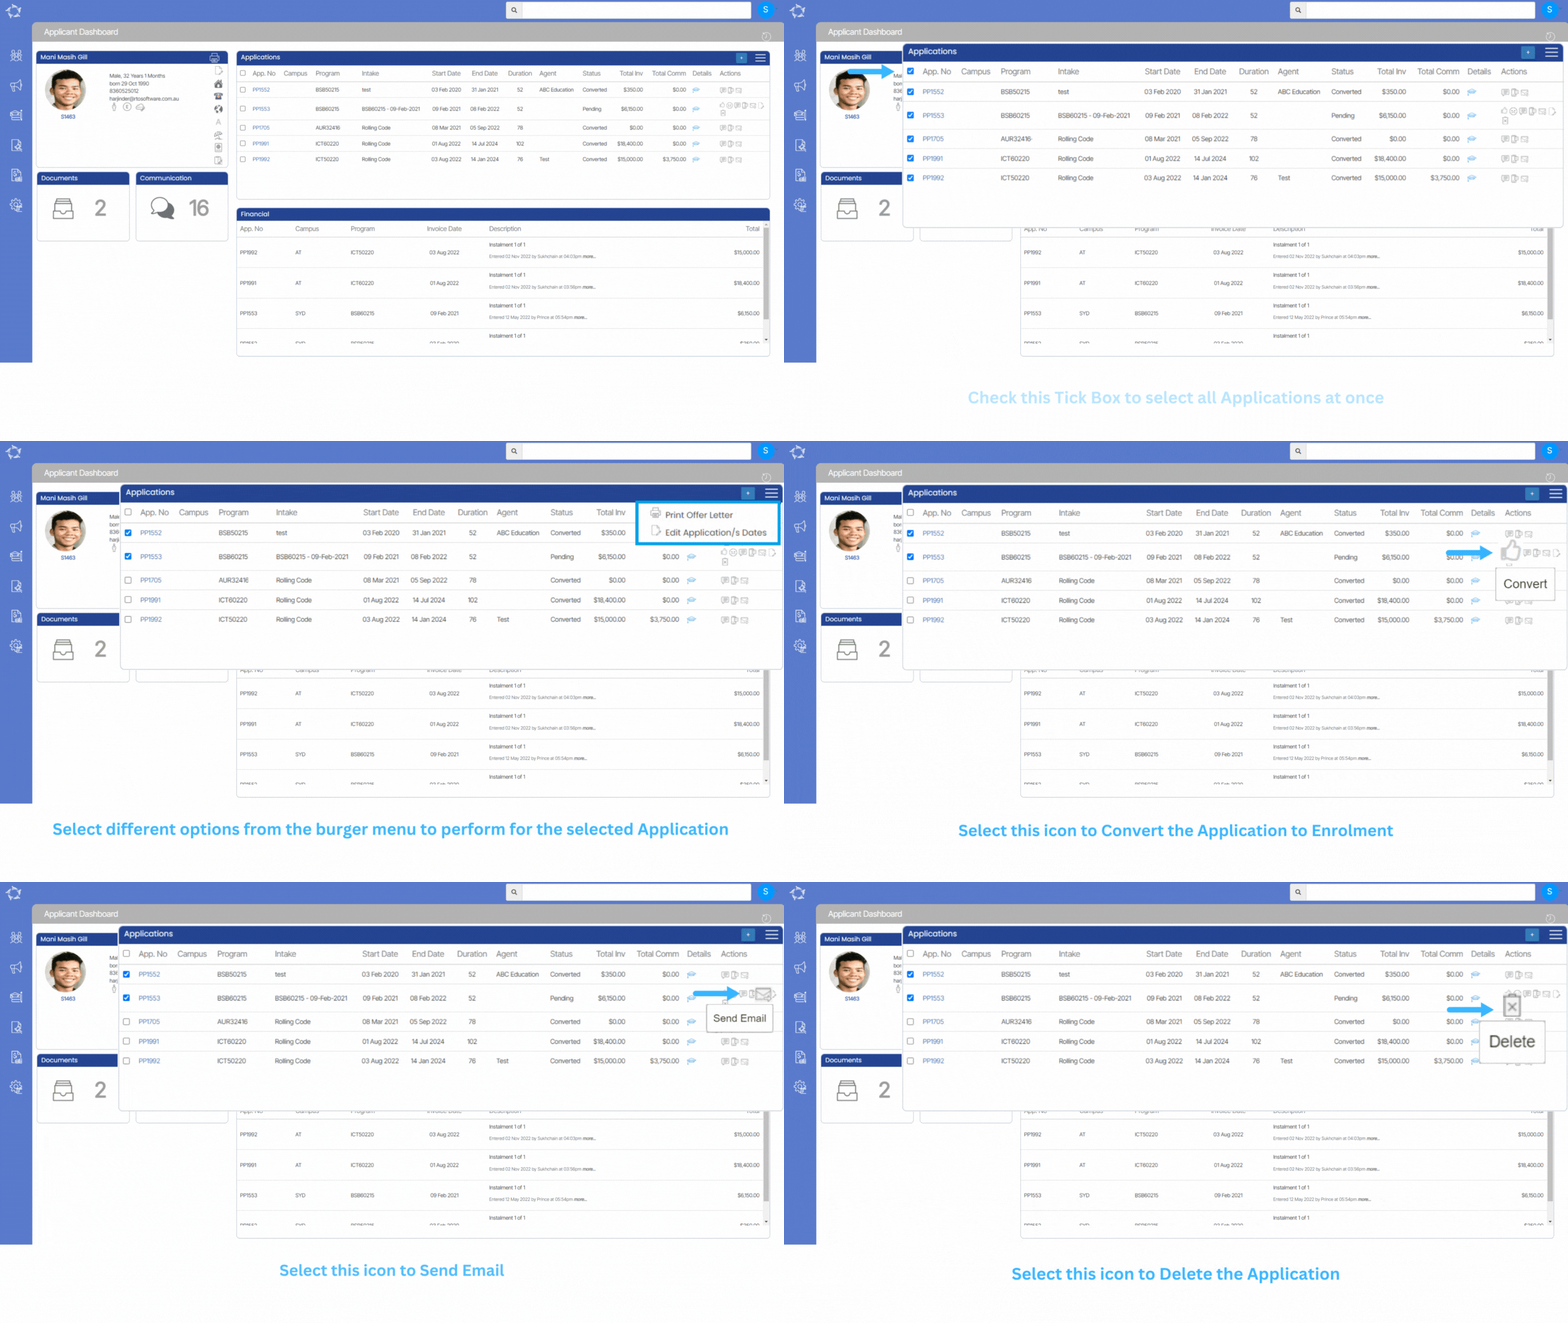
This tile will show you the number of converted and pending applications linked to the applicant. The columns in the tile will show you some basic (Campus, Program, Intake, Start and End Dates of the application, financials, etc.

Select here to know more about the Icons and Burger Menu

Select here to know more about the Print Offer Letter

Applicant Dashboard

history of changes

An applicant is a person who has applied to your college to study one or many programs (courses) and requires an Offer Letter (quote) to be sent to them as to how much it will cost them etc. Some colleges may call applicants potential students or leads.

For CRICOS colleges you would process their application and issue an Offer Letter to the student or their agent. Whereas for a domestic college, you may process the application and send them some form of costing or quote with a Welcome Letter.

The Applicant dashboard is similar to the Student Dashboard in that it is a summary for the applicant. Each tile in the dashboard will give you summary information such as what they have applied for, a financial summary for each application, and where you can access any documentation or communications you have had with the applicant.

Other than the Financial tile, all the other tiles will allow you to navigate to different screens and information linked to the applicant or do transactions directly from the tile for the applicant.

Tiles

You can learn more about each tile by clicking on the image of the tile.

This tile will display a summary of the instalments (invoices at the enrolment level) for each application.

Finishers Listing Screen

Main Dashboard > Finishers Tile > Finishers Listing screen

Overview

In this listing screen, we are showing the list of all the students finishing in the date range selected in the Continuing Tile on the dashboard.

This screen is divided into two sections.
1) Filters/Parameters
2) Listing Grids

Filters/Parameters:

To open this screen, you would have selected the link for a specific program code or at the bottom of the Finishers Tile you would have selected the link for the total number count. Based on what you selected the system will open the screen and populate the information in this section. For example, it will show you the start and end dates that were used in the tile as well as the campus/s and program/s that were displayed or selected in the tile.

Select here to know more about the filters/parameters

Listing Grid

In this grid, we are displaying the list of all finishers. We are showing columns Stud No, Student Name which will display the student-specific information and Enrol No, Enrolment Type, CampusProgram, Intake/dates, Enrol Status and Agent will show enrolment-specific details. All of these columns are self-explanatory.

Select here to know about the Icons under the Actions column and Burger Menu

Note – There is a Page Limit dropdown after the filter’s sections which will allow you to specify the number of students you want to view on a single page.

How to select students?

Use tick boxes to select students if you wish to send email/SMS, create a contact log, print letters and start enrolments in bulk. After selecting the students, pick the option from the burger menu and you are one step away to finish your heap of work in one go.

Or if you wish to select all students at once, use the tick box present right beside the Stud No column.

Previous/Future Program column – This column will show you the student’s previous program and future program with a separator. If a student is enrolled in just a single program then you will not show anything in the column for that student.

New Application

Dashboard > Marketing Menu > New Application

history of changes

This process (wizard) allows you to create applications for new applicants or existing students in the system.

Although this process is called a new application, it does not mean you create one application at a time for each program that an applicant or student wishes to enrol in. You can add one or multiple programs to the application and once you finish the process the system will generate individual applications for the applicant/student. You can then choose to view the information as a summary from the Applicant Dashboard or the individual applications (programs of study) from the Application Dashboard.

When you finish the process and select the FINISH button the system will take you to a step so you can generate the Offer Letter. For domestic based colleges, you may not call it an Offer Letter you may call it an Enrolment Acceptance letter etc. Please see the report explanation for this and the final step in this process for New Application – Offer Letter for more information.

Note: There are different ways to access the New Application process in the system. You can access this process from

Marketing Dashboard > Summary Tile
Applications listing Screen
Applicant Dashboard > Applications Tile
Student Dashboard > Applications Tile

The New Application process has a number of different steps in it. To view this post you can choose to either use the next arrow below and you will be able to walk through each step OR you can select specific links below to go directly to the relevant step.
New Application – Student Selection

New Application – Choose Programs

New Application – Subjects Delivery Dates

New Application – Fee Selection

New Application – Edit Invoices

New Application – Edit Invoices

New Application – Offer Letter

New Application – Student Selection

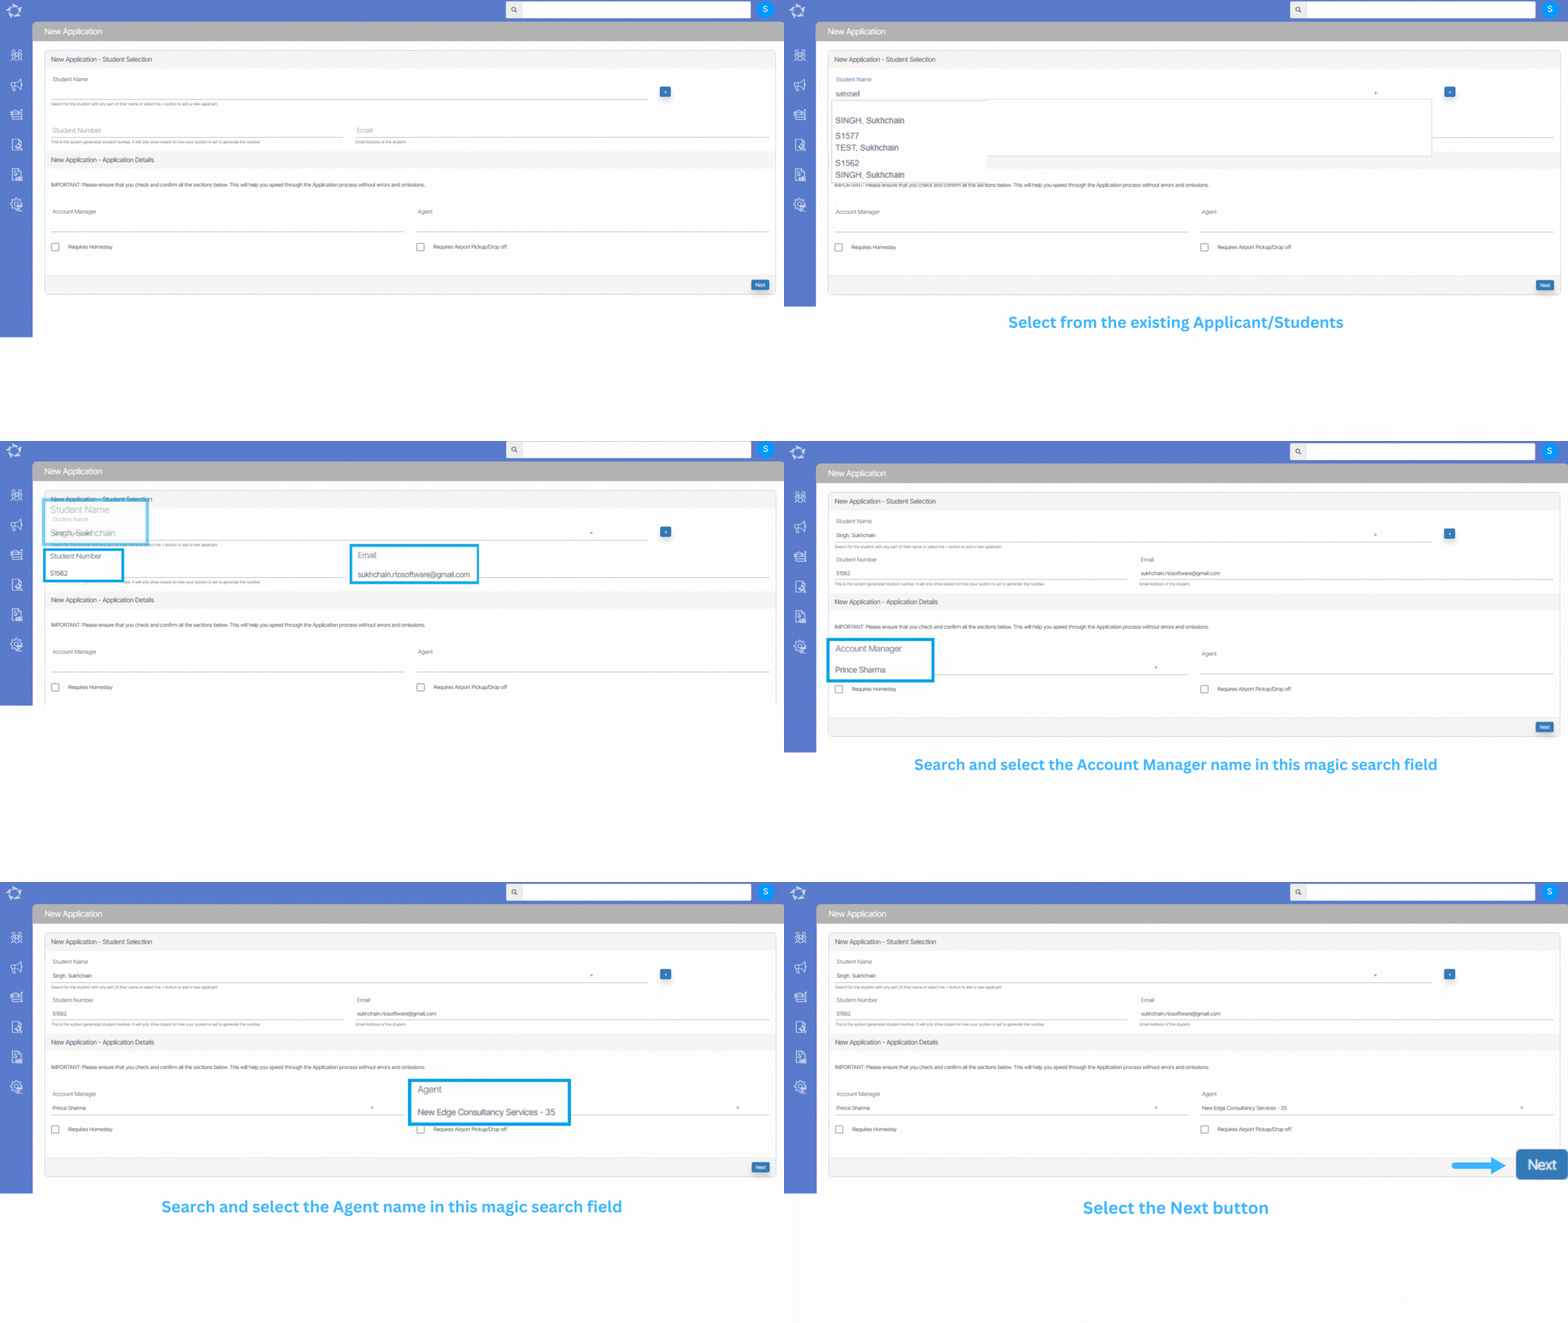
In this step, you either enter a new applicant or search and select an existing applicant or student from your system. Once you have entered or selected the correct applicant/student the system will load their name in the Student Name field below.

Note: DO NOT close your browser while you are walking through the steps of this process, as you will lose what you have entered. When you select the NEXT button in each step of this process the system does not save what you have done to the database. It allows you to go back in the process to change what you have selected, however, it is not until the final step where you select the FINISH button that the system will fully save everything to the database for you.

In the table below we have explained each of the fields/sections in this step.

Student Selection FieldsExplanation
Student NameThe first step is to find out if your applicant has previously studied with you and is already in the system. To do this, enter part of the applicant’s name into this field and if their name shows up select it from the list. If it doesn’t then you will need to select the icon for + to add them as a new applicant in the system.
When you search on an applicant’s name the system looks at enquiry students, applicants and students to see if the name is there and if they are will show you a relevant icon as to whether they are an enquiry, applicant or student.
You can select this button to add a new applicant in the system. You will be taken to the New Applicant entry screen and once you have entered all the required information and select the SAVE button, the system will bring you back to this step in the process again.
Student NumberYou can search based on a student number, however, if you are entering a new applicant this will not show unless your system has been setup to generate a student number at the application stage. It will only generate the number when you FINISH the application.
Typically, most colleges only issue a student number on approval/conversion of applications to enrolments so generating a student number at the application level is not set as a standard.
EmailThe system will load this information once you have selected a student or entered and saved your new applicant.
Account ManagerIf you have setup Account Managers in the system, you can link one to the application. Enter part of the account manager’s name into the field and the system will show you the results and just select one.
AgentIf you have setup Agents in the system, you can link one to the application. Enter part of the agent’s name in the field and the system will show you a list and select one from the list.

Agent contracts expired

Main Dashboard > Alerts – CRICOS Tile > Agent contracts expired

Overview:

The agent contracts expired screen will show the count of those agent contracts whose agent contract expiry date has expired. This screen will only show you the agent contracts expired if the Contract Expiry date has been set up on the agent entry screen.

To check the list of agents whose contracts have expired, you just need to select the count which is a hyperlink to the Agent Contract Expired alert.

As you can see, the screen is divided into two sections:

  1. Filter/Parameters
  2. Agent Contract Expired listing Grid

Filters/Parameters:

To open this screen, you would have selected the count hyperlink for the Agent Contract Expired alert. Based on what you have selected, the system will open the screen and populate the information in this section. It will show the contract start date and contract end date. When you are on this screen you can change the dates and select the Apply button for the system to refresh the list for you.

Listing Grid

The system will show you a summary of information for each Agent whose contracts have expired. The information that displays in the columns for this grid is generally standard information. However, please keep an eye out for any What’s New posts for this screen as this is where we would let you know of any new columns or changes to existing ones that we do.

This listing screen also allows you to download the list of agents in the grid in a CSV format. To do this select the CSV icon in the top right-hand corner of the screen.

Select here to know more about the icons under the Actions Column.

Finishers Tile

IMPORTANT – Staying informed about the latest developments in our software is vital for optimising your experience and maximising the benefits of using our system. To view the latest updates and modifications on the Finishers Tile and Finishers Listing Screen, click on the History icon history of changes, to the right of the breadcrumbs. Upon clicking this icon, you will gain access to a detailed log of all the recent changes made to the software.

Overview

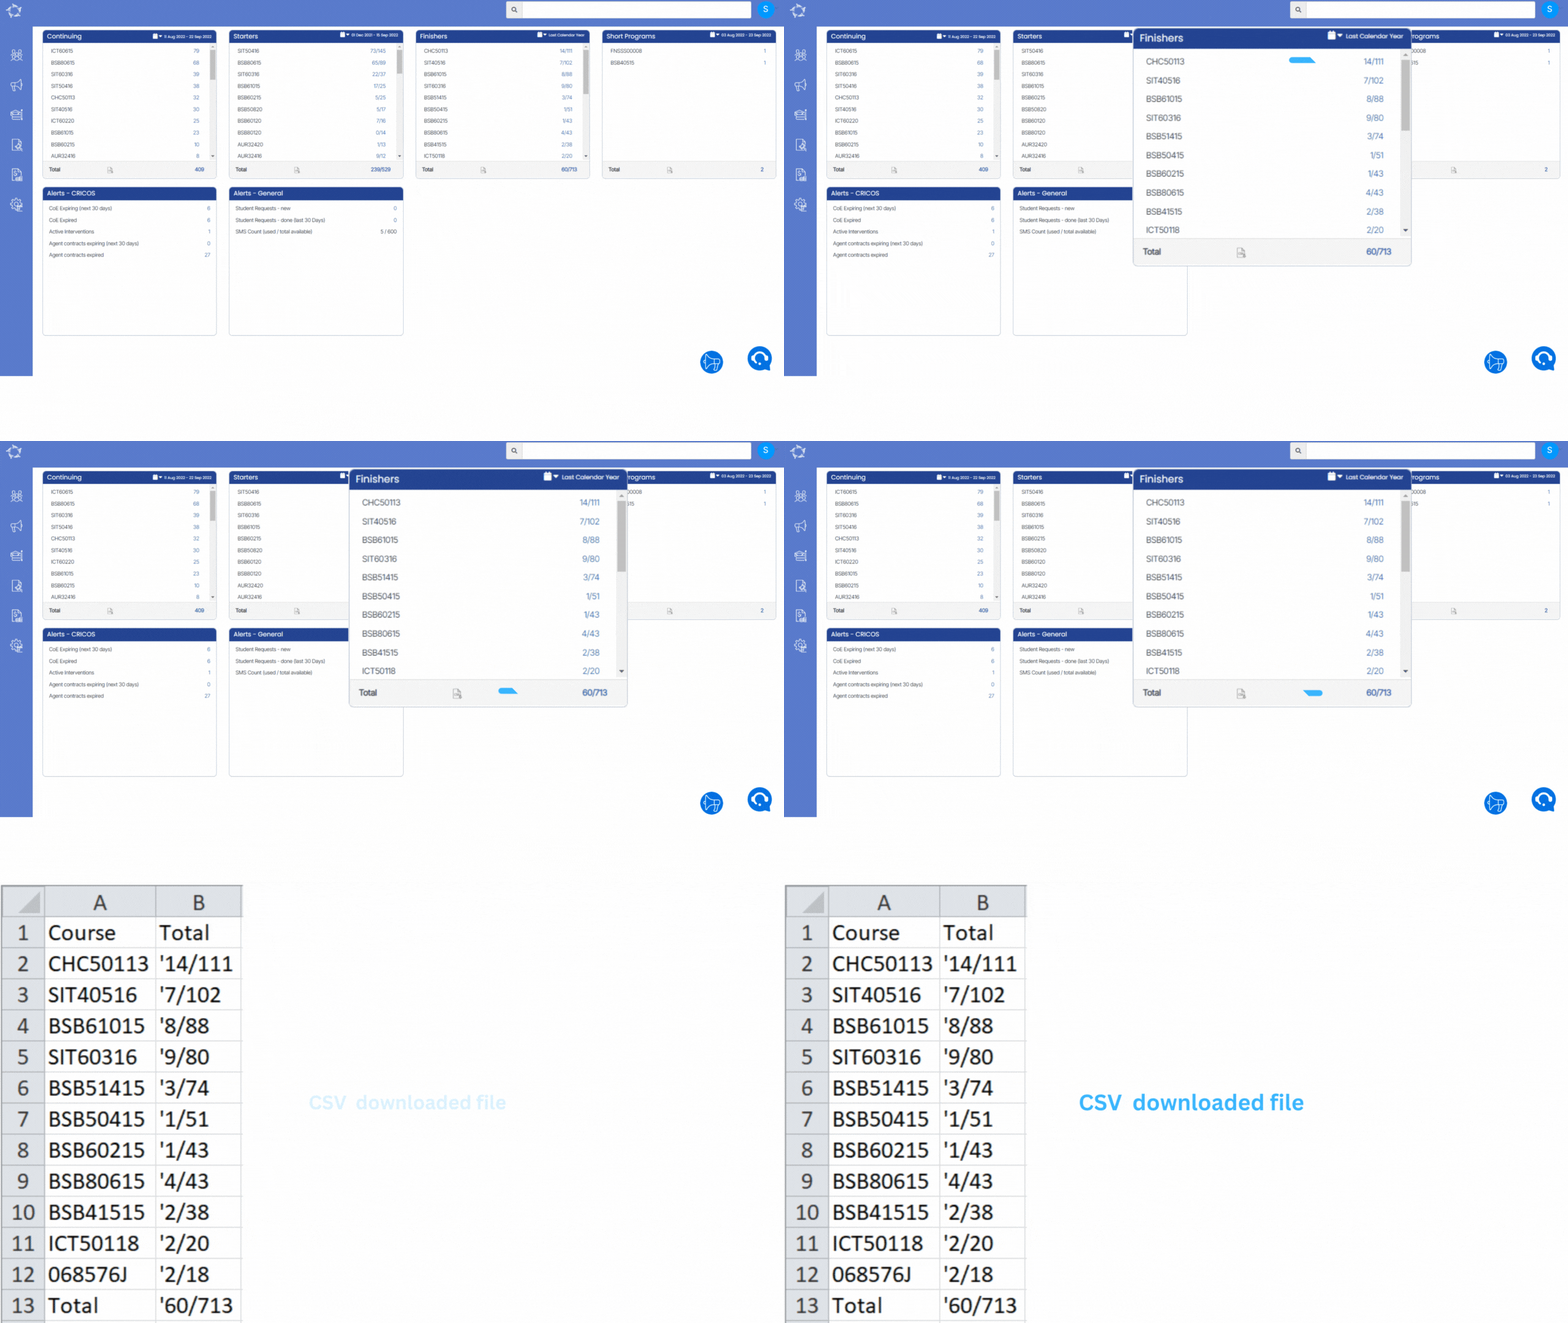
This tile displays all the finished students for each program within the selected date range.

The ‘Finishers Tile’ displays the program codes and their respective student counts against them, separated by a “/” sign.
The number on the left denotes the number of enrolments that have been marked as ‘Finished’.
The number on the right is the number of students whose end dates have passed, but they have not been marked as ‘Finished’

IMPORTANT: These figures may not be accurate due to the failure by staff to flag an enrolment as Finished. To get an accurate report, make sure to aptly mark your student enrolment statuses.

Learn More about the Calendar option

How to use the Finishers Tile:

Every program has its respective student count displayed against the program code. Each count is a hyperlink that will take you to the Finishers listing screen for that specific program.

The total count of all programs is displayed at the bottom of the tile. You can click on the  icon to download the counts in a CSV file.
Starters Listing Screen

This screen displays a list of all your starting students for a particular program within the date range selected in the Starters Tile on the main dashboard.

Filters/Parameters

The top half of the screen lets you filter your search for more targeted and specified results.
When you click on the link for a specific program code or on the total number count at the bottom of the Starters Tile, you will be redirected to the filters/parameters screen. The system will then open a new screen and populate it based on the parameters you select.

Click here to know more about the parameters


Listing Grid

This grid will display:
Student-specific information – under columns: Stud No, Student Name, Employer,
Enrolment-specific information – under columns: Enrol. No, Enrolment Type, Campus, Program, Intake/dates, Enrol. Status, Agent.

Selecting Students

Check the tick-boxes against specific students if you wish to send emails/SMS, create a contact log, print letters, or start enrolments in bulk. After selecting the students, select the required option from the burger menu and you are one step away from finishing a heap of work in one go.

If you wish to select all students at once, check the tick box beside the “Stud No” column.

Send SMS icon not visible!
If the “send SMS” icon does not appear under the Actions column, it means that the Mobile No. is missing for that particular student.

Icons – Click here to learn more about how to use these icons

Burger Menu – Click here to learn more about how to use the burger menu

The Previous/Future Program column

In this column, you can see all past and future enrollments of a student for all possible programs.
Note: If a student only has current enrollments, this column for that student will have no information.