Mandatory details to verify USI

Unique Student Identifier (USI) serves as a lifelong education number for individuals. Not only does it provide a unique identifier, but it also maintains an online record of the vocational education and training (VET) a student has undertaken.

If a student already possesses a USI number, they can simply update it in the Unique Student Identifier field, and then proceed to update all USI-related information before selecting the save button. Upon saving the changes, the screen will refresh, presenting the student with a Verify button and a Use Manually Verified tick box option. This streamlined process ensures that educational records are accurate and easily accessible, benefiting both students and educational institutions alike.

Verify USI – When you select this button, the request gets sent to the https://www.usi.gov.au/providers/verify-student-usi site and you can check the status of the USI from the USI request screen in the system.

Use Manually Verified – You can select this tick box if you already have verified the USI from the https://www.usi.gov.au/providers/verify-student-usi site.

Required information with explanation:

  1. Country of Residence: Here you need to select the country from the dropdown to where the student belongs.
  2. Country of studying in: Here you need to select the country from the dropdown in which the student is studying which is Australia.
  3. Country of Birth: Here you need to select the country of birth of the student from the dropdown.
  4. Town of Birth: Here you need to enter the town of birth of the student.
  5. Default USI contact method: Here you need to select a suitable USI contact method.

Further, you need to select a document from the dropdown to support the USI verification

  1. For instance: If you have selected a Visa (With a Non-Australian Passport) then you must provide the passport number.
  2. You may also select the tickbox “Copy passport no from the overseas screen” if you have updated the correct passport number on that screen.
  3. At last, you need to select the country from the dropdown where the passport is issued.

Note: Select the tickbox “Does this student have one name” if the student has a single name.

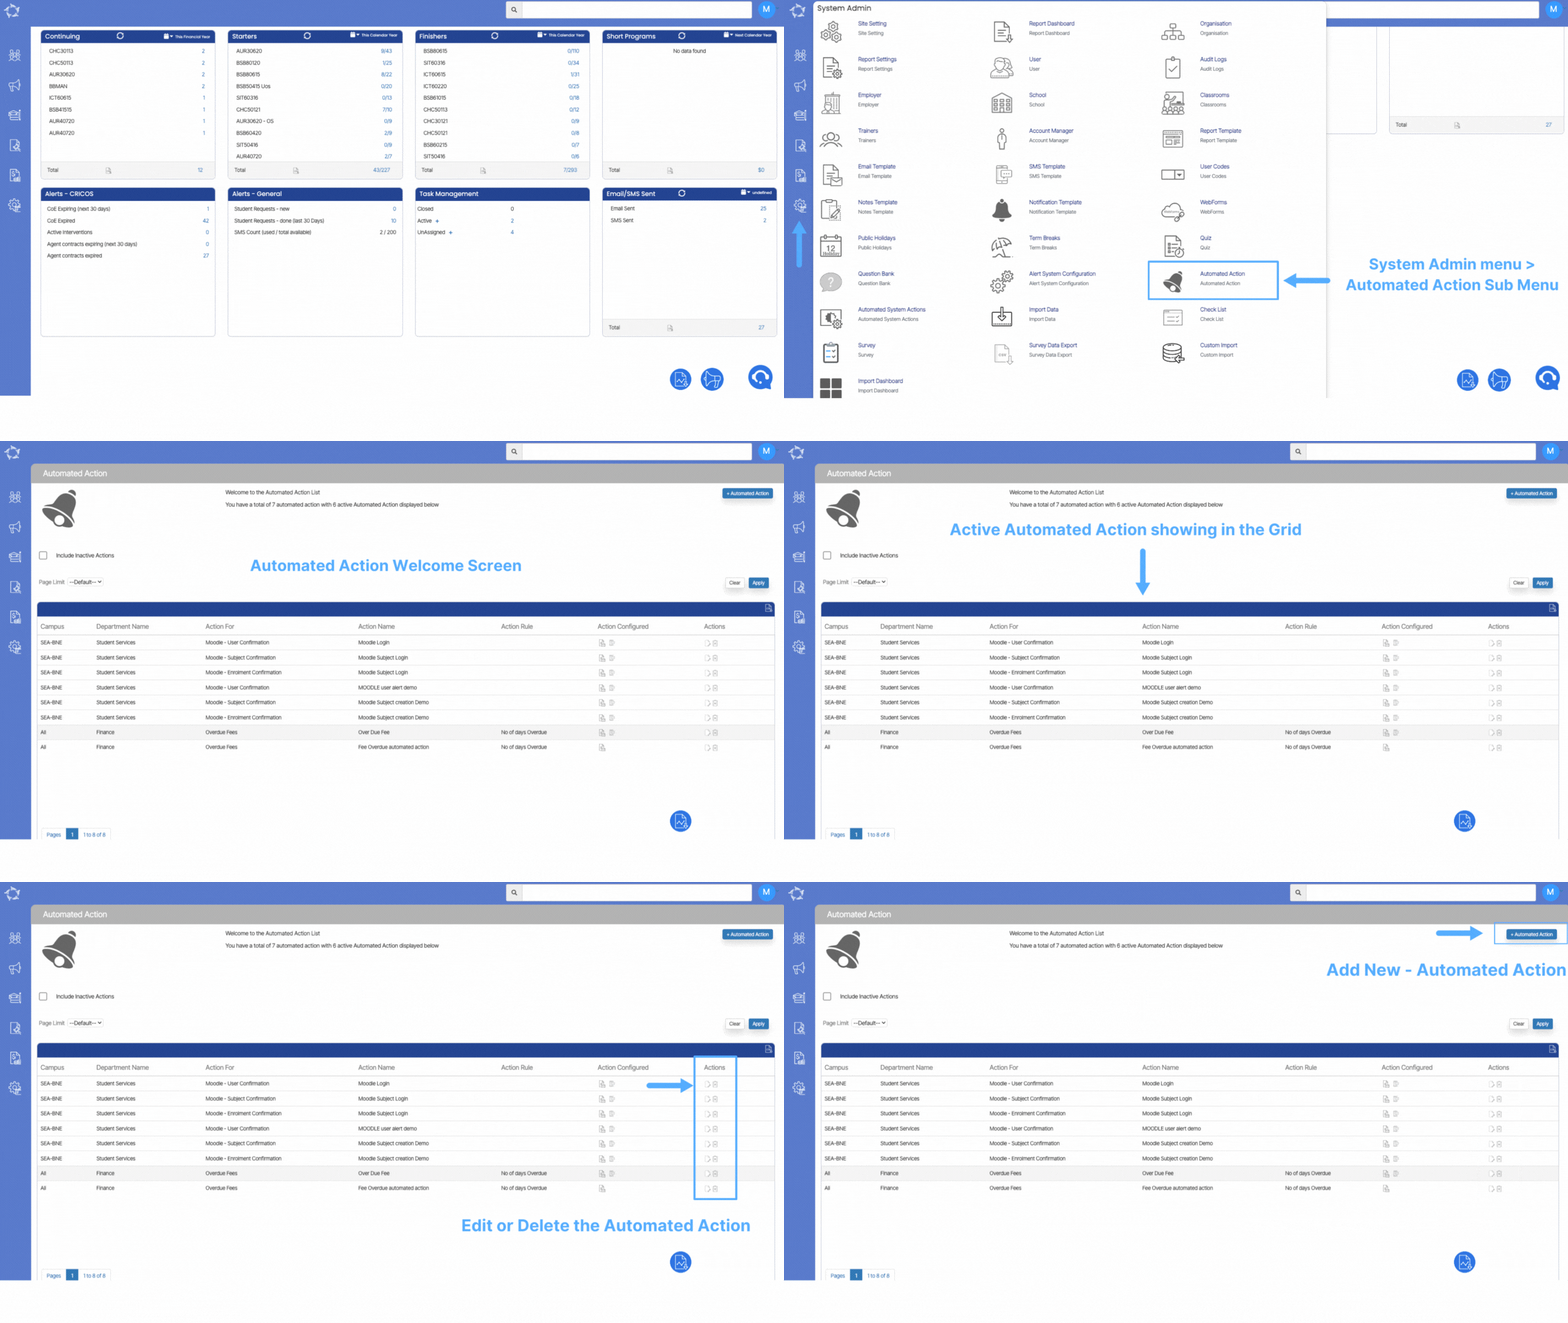
Automated Action Welcome Screen

This screen serves you a platform for both adding new automated actions and editing existing ones. Within this interface, you will find a comprehensive grid displaying all the current automated actions, allowing for efficient management and customisation of these automated processes.

Edit Instalment Plan

Note: Editing an instalment plan will not impact the enrolments that are already linked to it before editing.

Please follow the below steps to edit the instalment plan:

  • Select the edit icon under the actions column, Instalment plan entry screen will open.
  • You can edit all the fields, turn on/off all tick boxes and make multiple selections from the dropdowns available on the Instalment plan entry screen.
  • After making changes as per your requirement you need to select the next button to edit it further.
  • Instalments can be edited one by one by selecting the edit icon against each instalment.
  • Once you click on the edit icon against the first enrolment, the system will head you to the instalment plan step 2 screen where you can make changes to all the available fields as per your requirement. For example – if you want to add material in specific instalments then you can select it from the additional fees dropdown, after editing the instalment select the update button to save the changes.
  • In this way, you can edit all the instalments as per your requirements and select the finish button to save all the changes.

Payments Received Listing History

Student Contact Details Report Data Columns

Below is the table that will explain to you the columns that will get printed in the report.

Data ColumnsExplanations
Student NumberStudent Number generated by TEAMS
Student NameStudent Name
Enrolment TypeThis column will show you the enrolment type selected on the Edit Enrolment screen.
CampusCampus name in which the student is enrolled.
Enrolment NoEnrolment Number generated by TEAMS
CRICOS CodeProgram CRICOS Code
ProgramProgram Name
Enrolment OutcomeThis column will show you the enrolment type selected on the Edit Enrolment screen.
Unsubscribe
AVETMISSThis column will display Yes or No.
Start DateEnrolment Start Date
End DateEnrolment End Date
TimetableTimetable linked to the Enrolment.
WeeksTotal Study of the Program
NationalityStudent’s Nationality.
Mailing AddressStudent’s mailing address
Local AddressStudent’s local address
PhoneStudent’s Phone number
MobileStudent’s mobile number
FaxStudent’s fax number
Work NoStudent’s work number
EmailStudent’s email number
Next of KinStudent’s next of kin name
Next Of Kin MobileStudent’s next of kin mobile number
Total FeesTotal tuition fees of the program
Total PaidTotal tuition fees paid by the student to the college
Email 2Second Email address of the student
Email 3Third Email address of the student
TitleThis column will display Mr, Mrs.
First NameFirst name of the student.
SurnameSurname of the student.
English NameEnglish name of the student.
Building AddressBuilding Address of the student.
Unit NumberUnit Number
Street NumberStreet Number
Street NameStreet Name
CityCity Name
PostcodePostcode
StateState
Visa TypeVisa Type of the student.
COE NumberCOE Number
Passport NumberPassport Number
Date of BirthVisa Type of the Student.
Status

Student Contact Details Report Filters

Below is the table that will give you the explanation about the filters.

Filters Explanations
Enrolment Start DateSelect the start date from the calendar and the system will show you the students falling in the start date range you selected.
Enrolment End DateSelect the end date from the calendar and the system will show you the students falling in the start date range you selected.
Student NumberThis is a magic search field and if you wish to generate the report for a particular student then you can simply search the student with the name or student number in the field.
CampusSelect the Campus from the dropdown by selecting the tick box against the campus name.
ProgramThis field will show you the program based on the Campus you have selected. You can search the program by typing the program code or program name in this field.
TimatableThis dropdown will show you the timetables based on the Program you have selected.
StateType and Search the State in the field.
Include Students without EnrolmentsSelect this tick box if you wish to include the students without their enrolments in this report.
Include This dropdown will show you student as All, Current and Finished. You can select any option as per your requirements.
Group ByPlease see TEAMS Basic.
Sort ByPlease see TEAMS Basic.
Asc/DescPlease see TEAMS Basic.

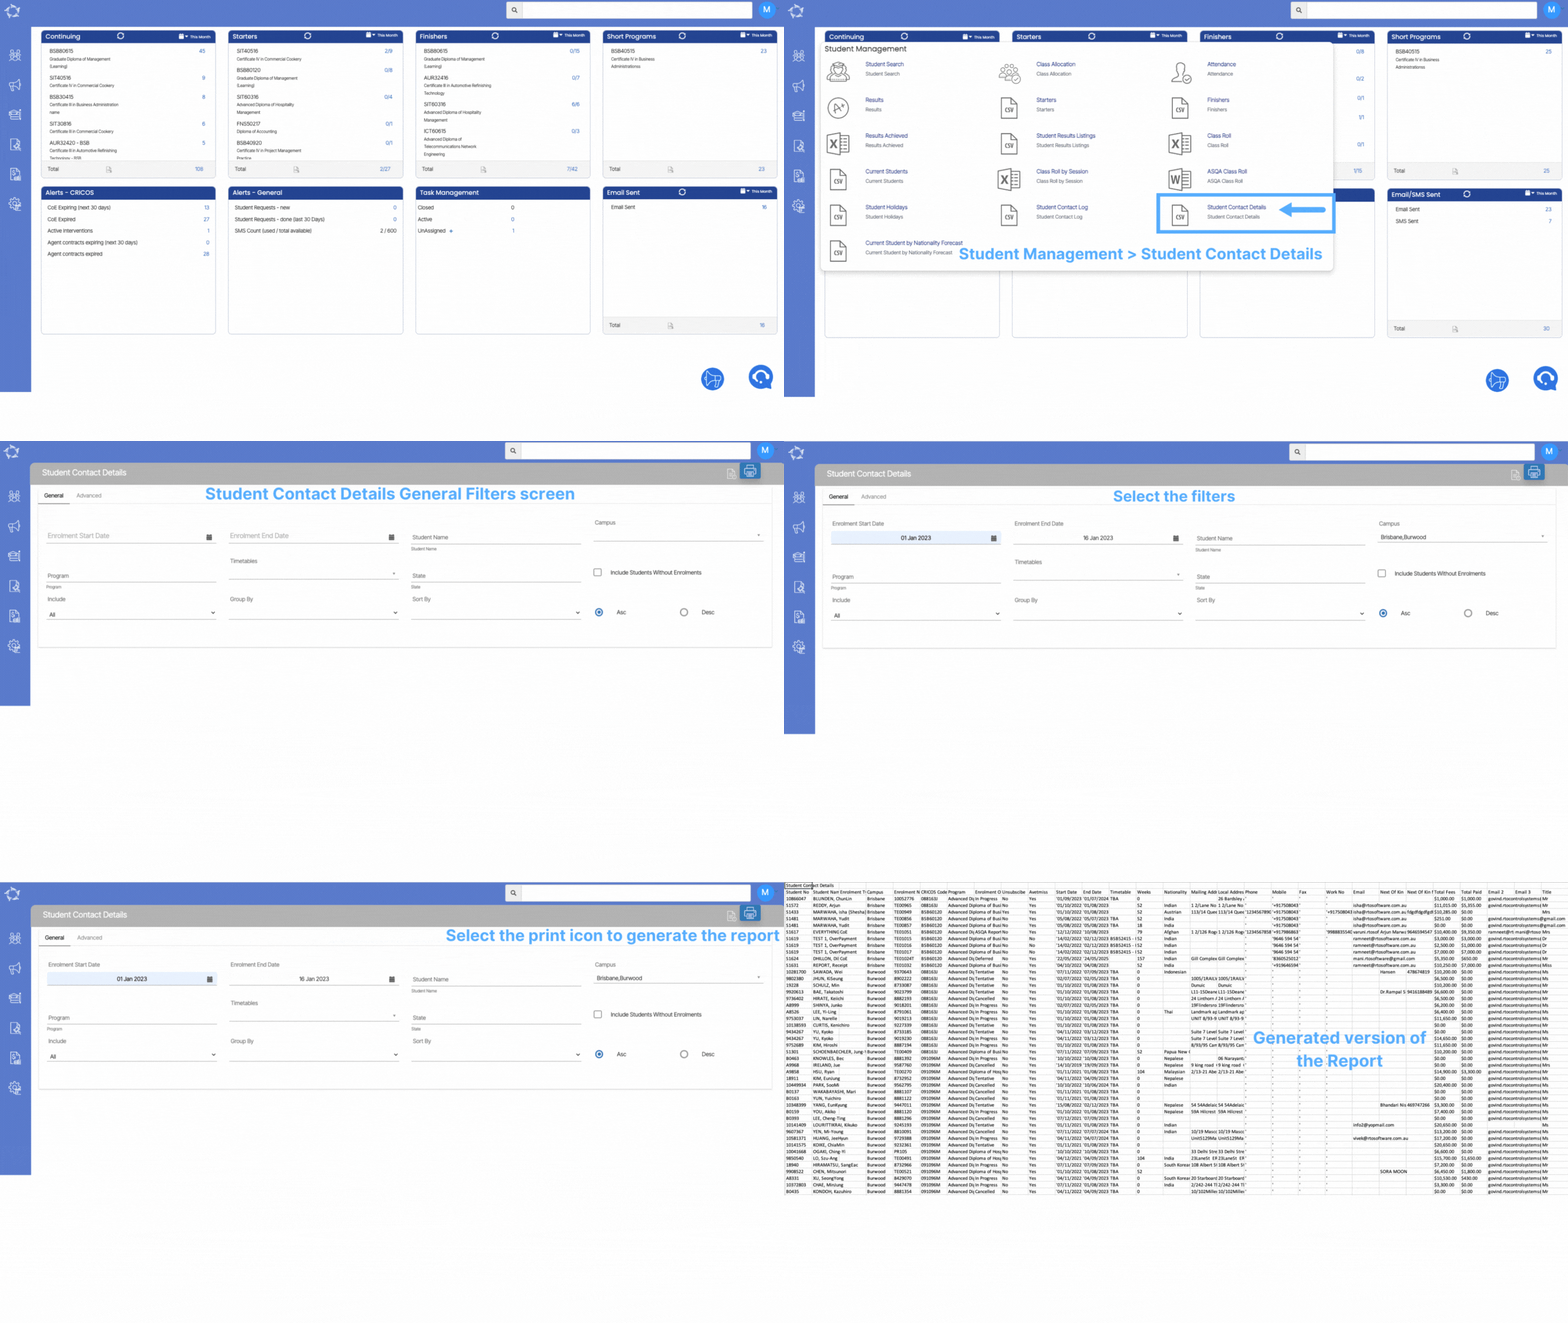
Student Contact Details

Main Dashboard > Student Management > Student Contact Details

A Student Contact Details Report provides a comprehensive list of contact information for students enrolled in your college. This report typically includes essential details about each student, allowing you to maintain the effective communication with students and their families.

The information included in a Student Contact Details Report might encompass Student Information (Student Name, Student Number, Student ID, Enrolment Number, Program Name) Contact Information (Address, Phone Numbers, Email Address, Next of Kin) and more.

Please select the “Filter” and ” Columns” options for more information and explanations.

Student Contact Details Report Filters

Student Contact Details Report Data Columns

Current Student by Nationality Forecast Report Data Columns

The below table will explain about the explanation of the columns that will get printed in the report.

Data ColumnsExplanation
Week Starting When you select the date from the calendar on the filters/parameters screen, the system will print 12 week’s date falling on Monday in different columns.
NationalityThis Column will show you the Nationality Name of the students
EnrolmentThis is the total number of enrolments falling in 12 weeks time from the selected date.
PercentThis is the total percentage of the Nationalities for the enrolments shown in the report.
Enrolments/ProposalsWhen you select the Both Percentage And Enrolments radio button from the filters screen, the system will split the enrolments and proposals data in the report.