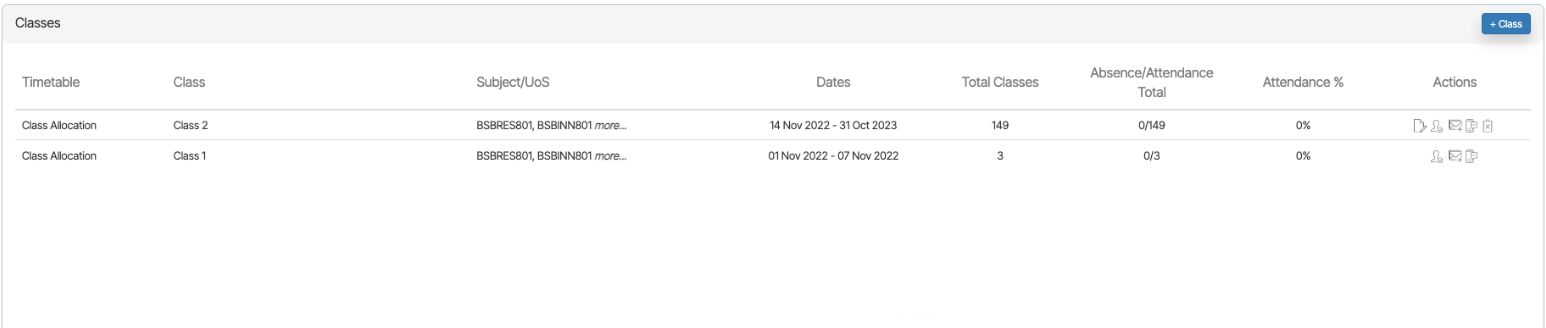
Enrolment Dashboard > Classes and Attendance Tile > Classes icon
This screen will show you the list of all the classes that are linked to enrolment with their basic details.
A classes listing screen refers to a user interface or a webpage that displays a list of available classes linked to the enrolment. The screen typically provides information such as the Timetable, Class, Subjects, Attendance and any additional details. The purpose of the classes listing screen is to allow you to browse through the available classes and make informed decisions about which classes you would like to enrol in.
In addition to the features mentioned earlier, the classes listing screen may also provide an option to add new classes to the enrolment by selecting a +Class button.
Tiles
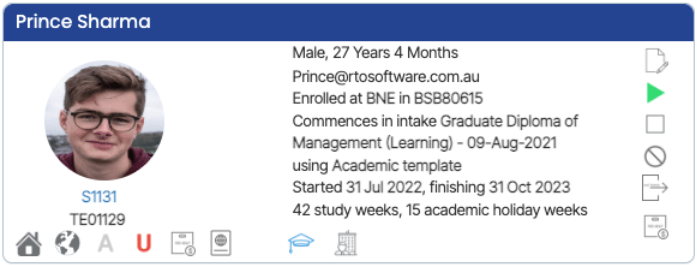
This Tile will show you the basic details of the enrolment and all the icons in this tile are read-only.
This Tile will show you all the classes that are been allocated to the enrolment. You can take other required actions for the classes from the Actions column and add more classes if needed.
Icons under the Actions column
Edit Icon – You can edit the class end date by selecting the edit icon under the actions column and it will open the pop window on the same screen as shown below.
Attendance – When you select this icon, it takes you to the attendance listing screen where you can mark attendance for the student.
Send Email – You can send an email to a student about the classes.
Send SMS – You can send an SMS to a student.
Delete Class – You can delete the class by selecting the delete icon.
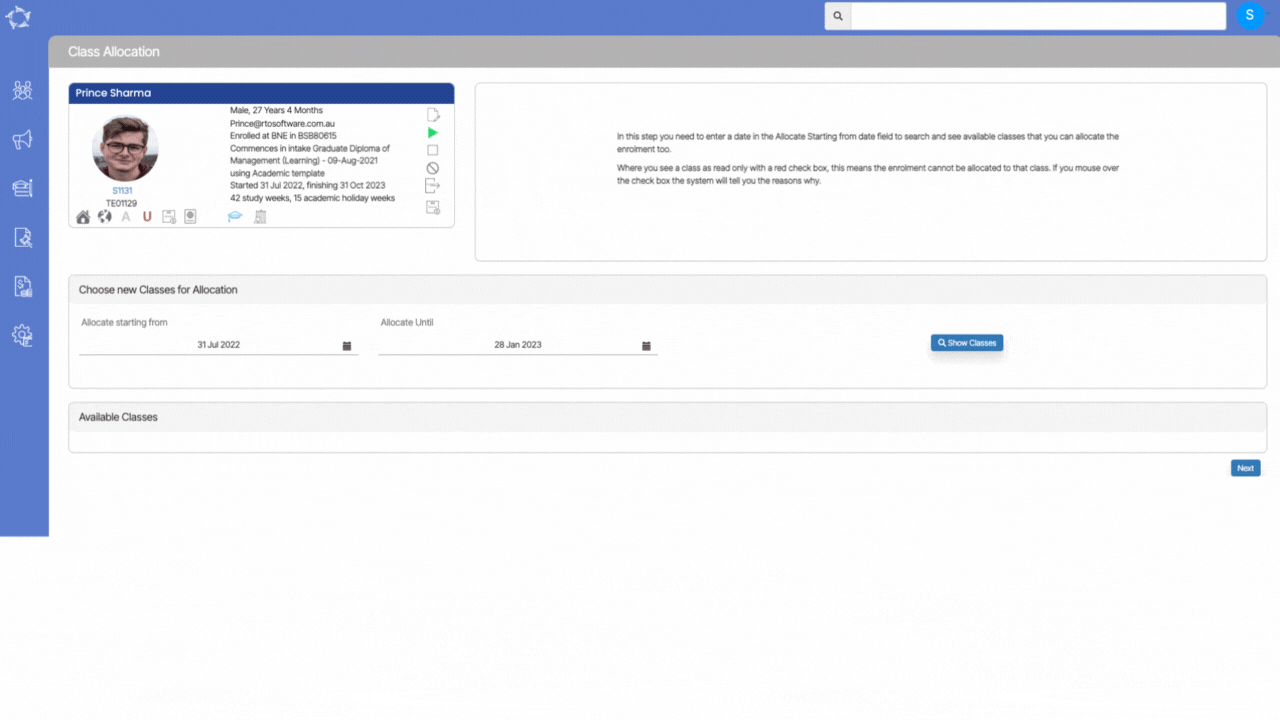
Enrolment Dashboard > Classes and Attendance Tile > Class Allocation icon
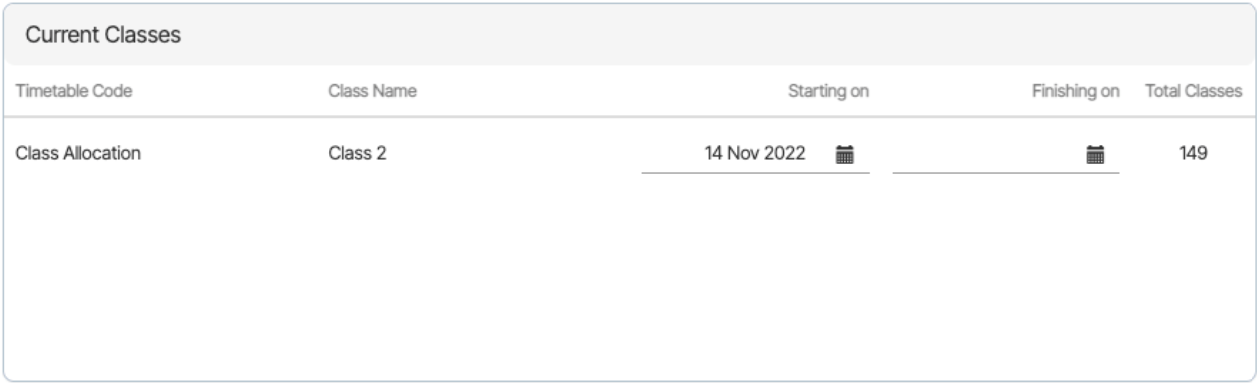
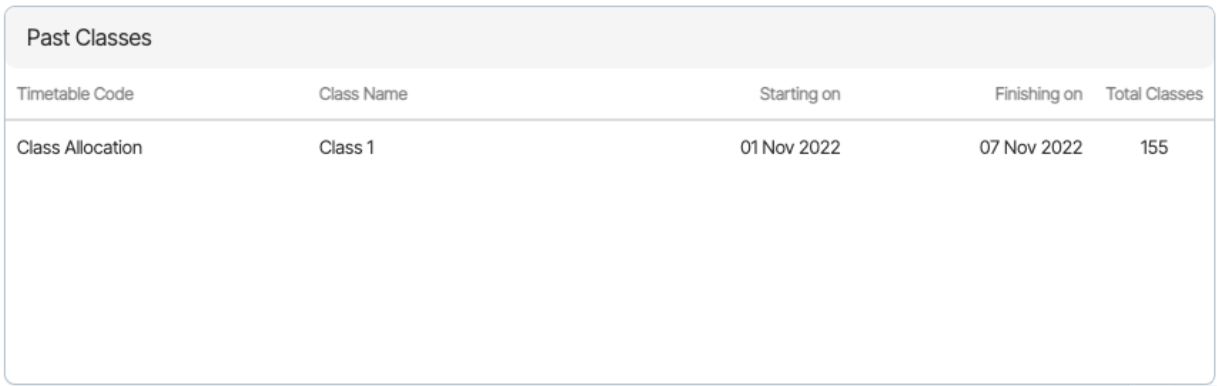
This screen will show you all the Current and Past Classes of an enrolment. You can simply add the finish date of the classes in the current classes tile or you select the Next button to allocate the class to enrolment.
Tiles
This Tille will show you the basic details of the enrolment and all the icons in this tile are read-only.
This Tile will give you an overview of the class allocation screen.
This will show you all the current classes that are linked to an enrolment. By default, the start date will be selected in the tile and you can edit the start date and end date of the class.
This will show you all the past classes
You need to select the Next button and once you select it, it will open the Class Allocation Step 2 screen from where you can allocate the classes to enrolment.
IMPORTANT – We believe that staying informed about the latest developments in our software is vital for optimising your experience and maximising the benefits of using our system. To view the latest updates and modifications on the Edit Enrolment AVETMISS Settings screen, we kindly request you to navigate to the History icon showing above in the top left corner of the screen. By selecting this icon, you will gain access to a detailed log of all the recent changes made to TEAMS.
Overview
The first thing to know is that AVETMISS stands for the Australian Vocational Education and Training Management Information Statistical Standard. It is the national data standard that ensures consistent and accurate capture and reporting of Vocational Education and Training (VET) information about students.
The screen will show you two tabs namely Enrolment AVETMISS Settings and Subject AVETMISS Settings.
The Enrolment AVETMISS Settings tab will allow you to update the AVETMISS settings for the enrolment whereas the Subject AVETMISS Settings will show you subject level AVETMISS settings.
Enrolment AVETMISS Settings Tab
The below table will explain each and every field of Enrolment AVETMISS Settings:
Columns
Explanations
Include in National Export
Tick the box if you want to include enrolment in national export.
Purchasing Contract
You can select the purchasing contract from the dropdown.
State Training Authority
From the dropdown menu you can select State Training Authority.
Fee Exemption
From the dropdown menu, you can select the fee exemption.
Any Disability
By marking this option you can select the disability of the student.
At School
By marking this option you can select the school type and enter the school name.
Proficiency in English
From the dropdown menu you can select the english proficiency of the student.
Study Reason
You can select the study reason from the dropdown menu.
Funding Source National
From the drop down you can select funding source national.
Funding Source – State Training Authority No
You can enter the funding source – state training authority no in this field.
Current Labour Status
You can select the current labour status from the dropdown.
Prior Educational achievements
By marking this option, you can select the educational achievements of the students. When you select the level of prior education, for example, a Bachelor’s degree, etc, you can also select if the level of education is equal to Australian(A), Australian Equivalent(E), and Internation(I).
Special Contract
From the dropdown menu you can select special contract.
Training Location
From the dropdown menu, you can select the training location.
Competency Enrolment
Tick this option if the enrolment is competent.
Student Still At School
Tick this option if the student is still in school.
Full Time Student
Tick this option if student is studying full time.
Training Contract Identifier
You can enter the training contract identifier number in this field.
Overseas Student
Tick this option if student is from overseas.
Date Program Completed
From the calendar, you can select a date when the program is completed.
Smart and Skilled enrolment
For smart and skilled enrolment.
AASN
From the dropdown menu, you can select the student’s Australian Apprenticeship Support Network.
ANP
From the dropdown menu you can select student’s Apprenticeship Network Provider.
Subject AVETMISS Settings Tab
The below table will explain every field of Subject AVETMISS Settings:
Fields
Explanations
Internal Percentage
You can add Internal Percentage in this field.
External Percentage
You can add External Percentage in this field.
Workplace Percentage
You can add Workplace in this field.
Pre-dominant Delivery Mode
It will automatically be filled based on the Internal Percentage.
This icon will allow you to edit Subject AVETMISS Setting.
This tick box will allow you to select subjects in bulk.
This icon is displayed in two sections. In the grid and in the grid header.
If you are excluding a particular subject from AVETMISS then you can select this icon against that single subject and the system will show you a pop message ensuring confirmation as OK to exclude the subject from AVETMISS. If you wish to exclude multiple subjects then you can simply select tick boxes against the subjects and select the icon above the grid in the blue ribbon.
Please note – Once you have excluded the subjects from the Avetmiss submission, then the icon will turn red colour.
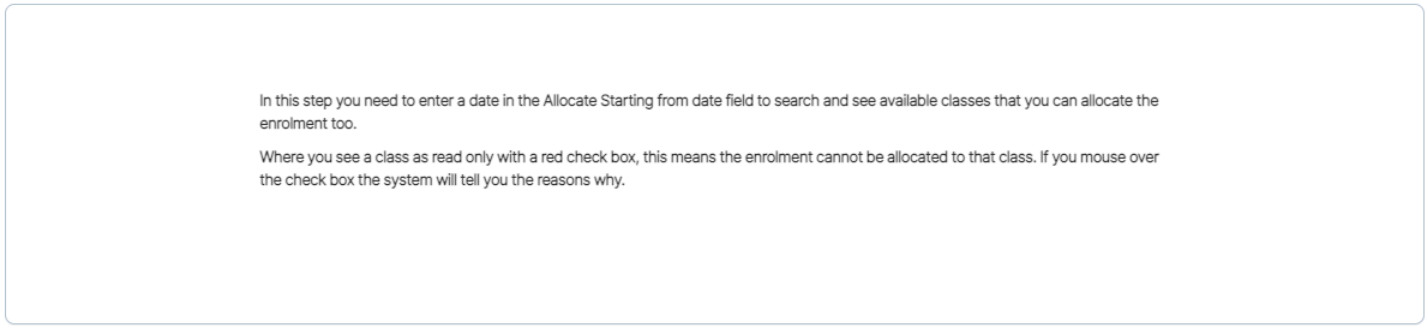
This is the second step of the Class Allocation. This screen will allow you to allocate classes to an enrolment.
Follow the below steps to Allocate Classes:
Search for the class date by selecting the start date and end date from the choose new classes for allocation tile and then select the Show Classes button.
The classes that are available, are the current classes that you can allocate to the enrolment by selecting the tick boxes and then hit the Next button.
You will be taken to the Classes selected for allocation preview screen where you can see the classes that are allocated and the maximum capacity of the classes.
When all the above steps are done, select the Finish button to complete the allocation.
IMPORTANT – There are tick boxes that are frozen and you cannot select the tick boxes for the classes due to the following reasons:
Reason 1 – Classes cannot be selected because subjects are linked to the classes but not to the enrolment. Reason 2 – Classes cannot be selected because the enrolment is already allocated to the Friday class.
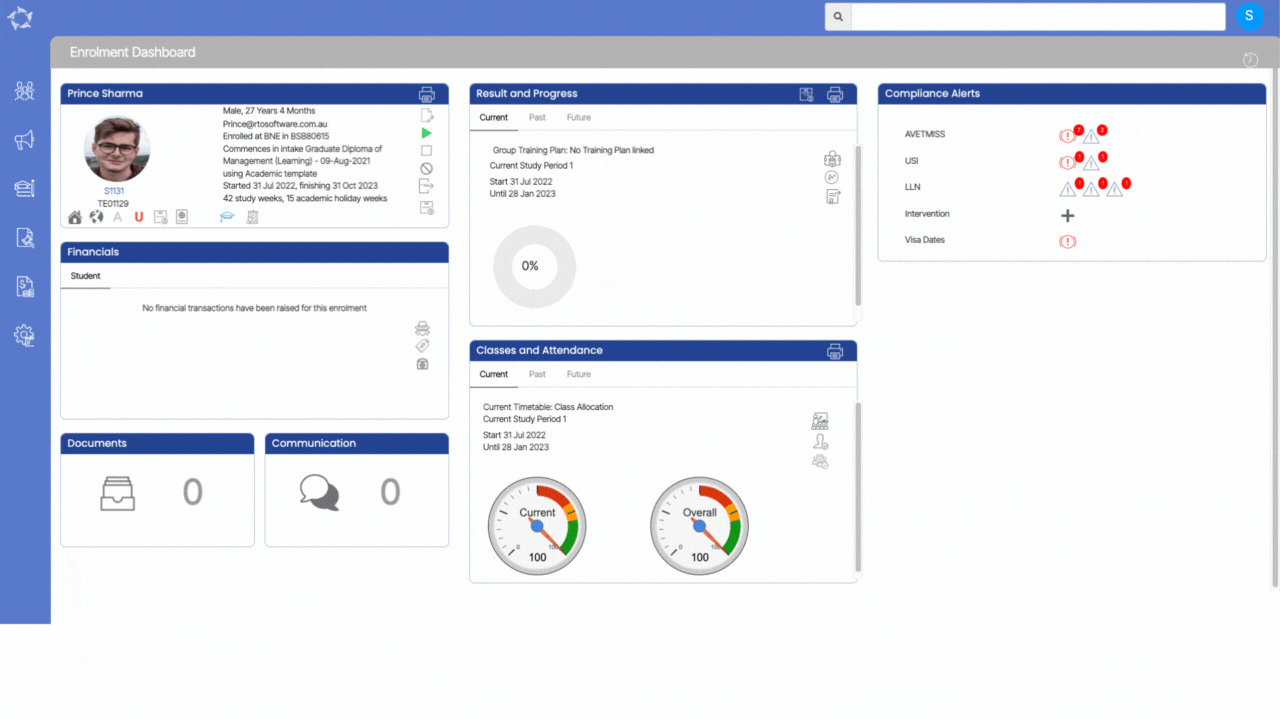
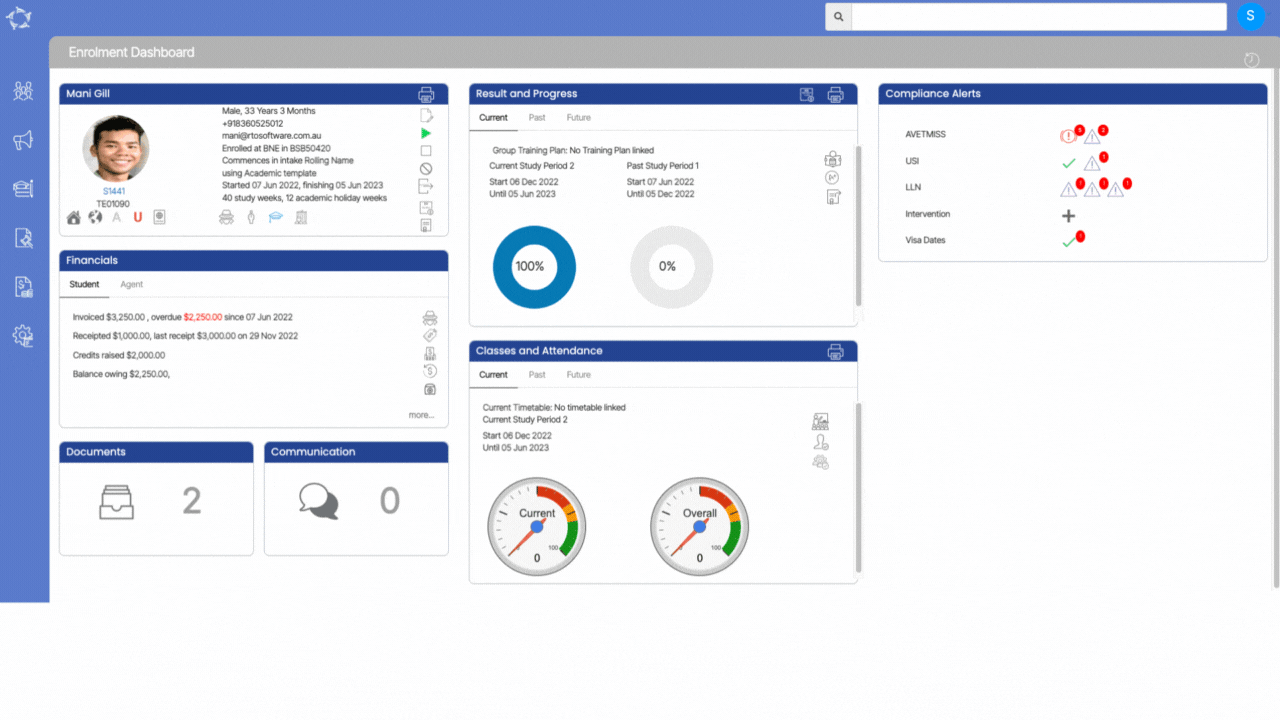
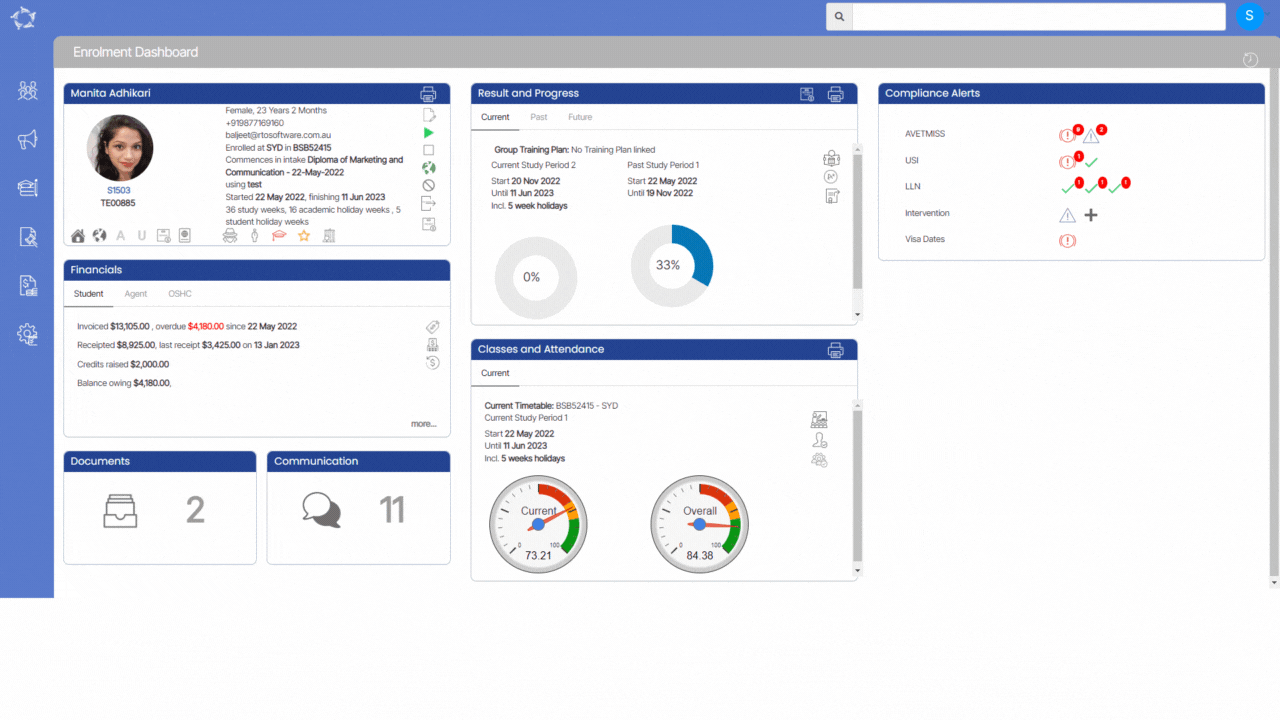
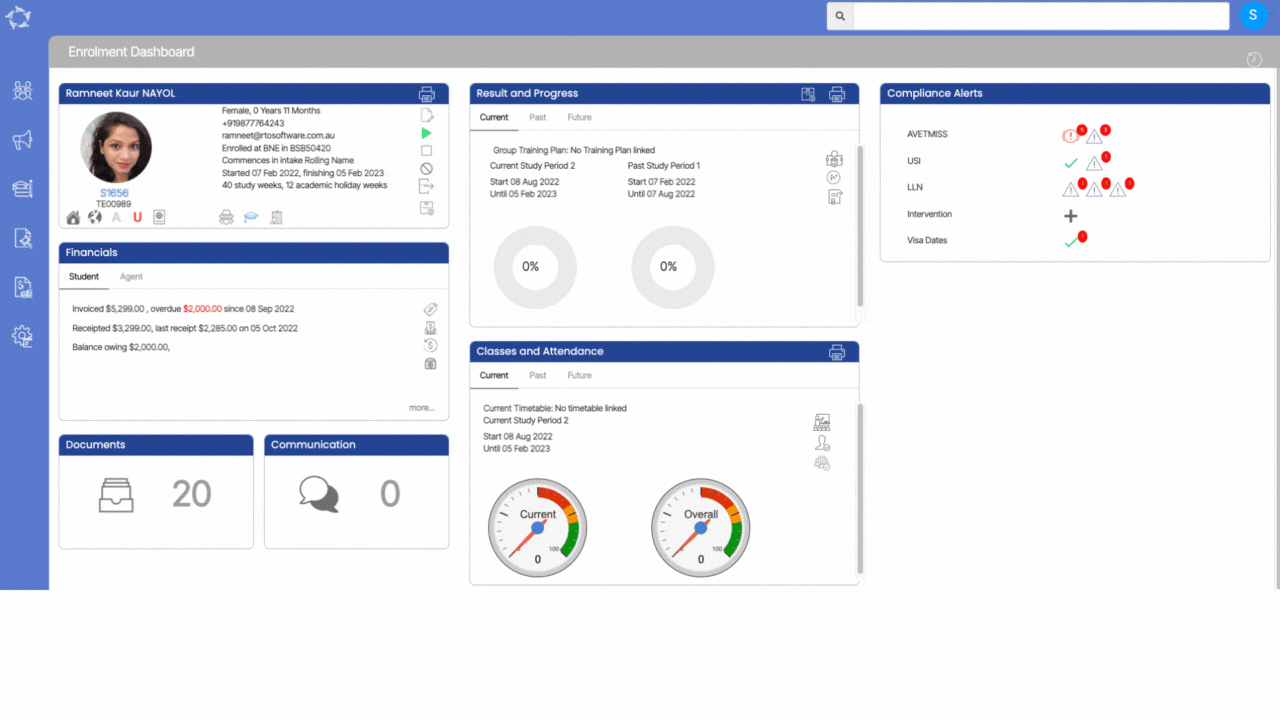
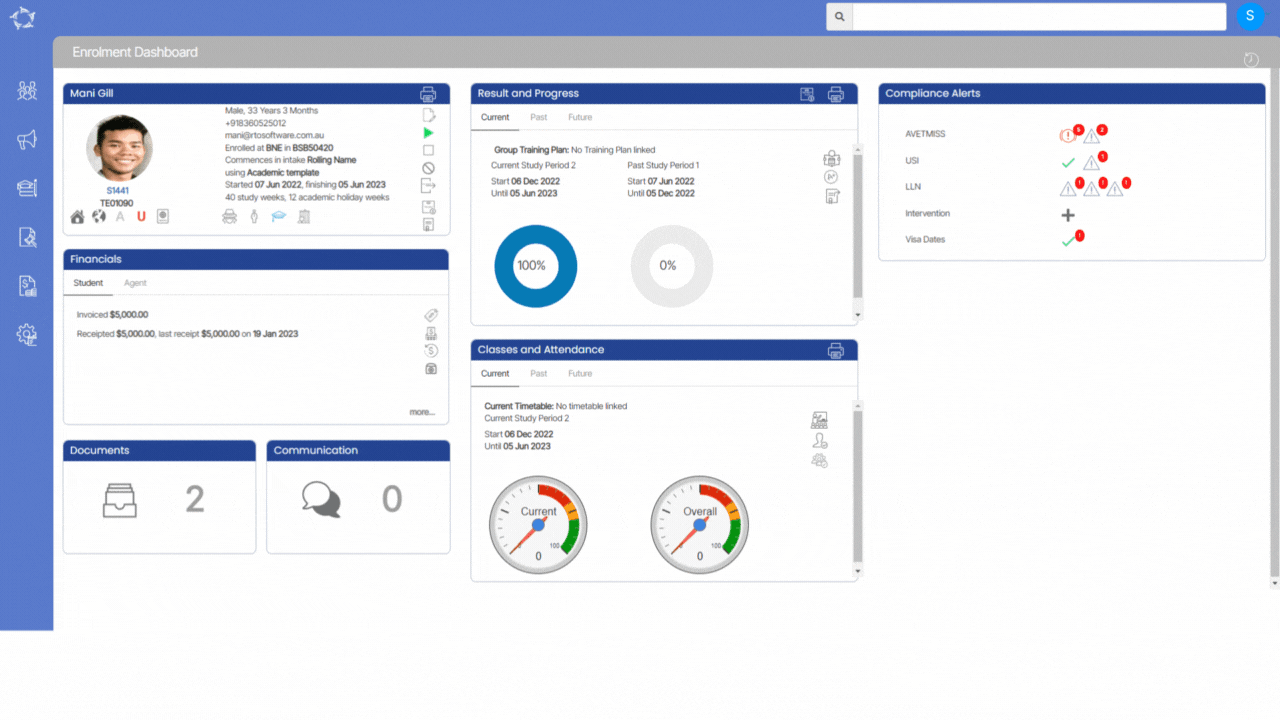
This tile will show you all the Errors and Warnings with their descriptions for enrolment with the red numbers for different objects.
Different icons and their function under the compliance tile are explained below:
This icon will show you the number of errors in red and when you select this error icon, it shows the error descriptions as shown below:
This icon is called the fix icon and when you select this icon, it will take you to the particular screen where you can fix the error according to the description.
This icon will show you the number of warnings in red and when you select this error icon, it shows the warning descriptions as shown below:
Enrolment Dashboard > Result and Progress tile > Test Result icon
In the system, we do have a screen from where you can enter the IELTS, PTE, TOEFL, and (etc) scores. You can find this screen under Enrolment Dashboard > Result and Progress Tile > Test Results icon.
Once you will select the Test Result screen the system will open the screen in a new tab that will show you the test results that you have entered into the system for that enrolment.
To add a new test result, you just need to select the +Add button.
By selecting the +Addbutton the system will open a floating window where you can enter the results.
In the below table all the fields that are on the test result floating window, have been explained:
Fields
Explanation
Test Date
In the Test Date, you can select the date of the test for which you want to enter the scores.
Test Name
The Test name is a dropdown field from where you can select the type of test.
Test Location
The Test location is a dropdown from where you can select the location of the test. This is a User code screen and you can add other locations also in the dropdown.
L: Score
In the L: Score you can enter the score for the listening.
R: Score
In the R: Score you can enter the score for the Reading.
W: Score
In the W: Score you can enter the score for the Writing.
S: Score
In the S: Score you can enter the score for Speaking.
Use of English
Preparation.
G: Score
In the G: Score you can enter the score for the Grammar.
Overall Score
Enter the Overall Score in this field.
CEFR Level
Select CEFR Level from the dropdown.
Other English Level
Enter Other English Level in this field.
Notes
In the Notes, you can enter the notes for the test results.
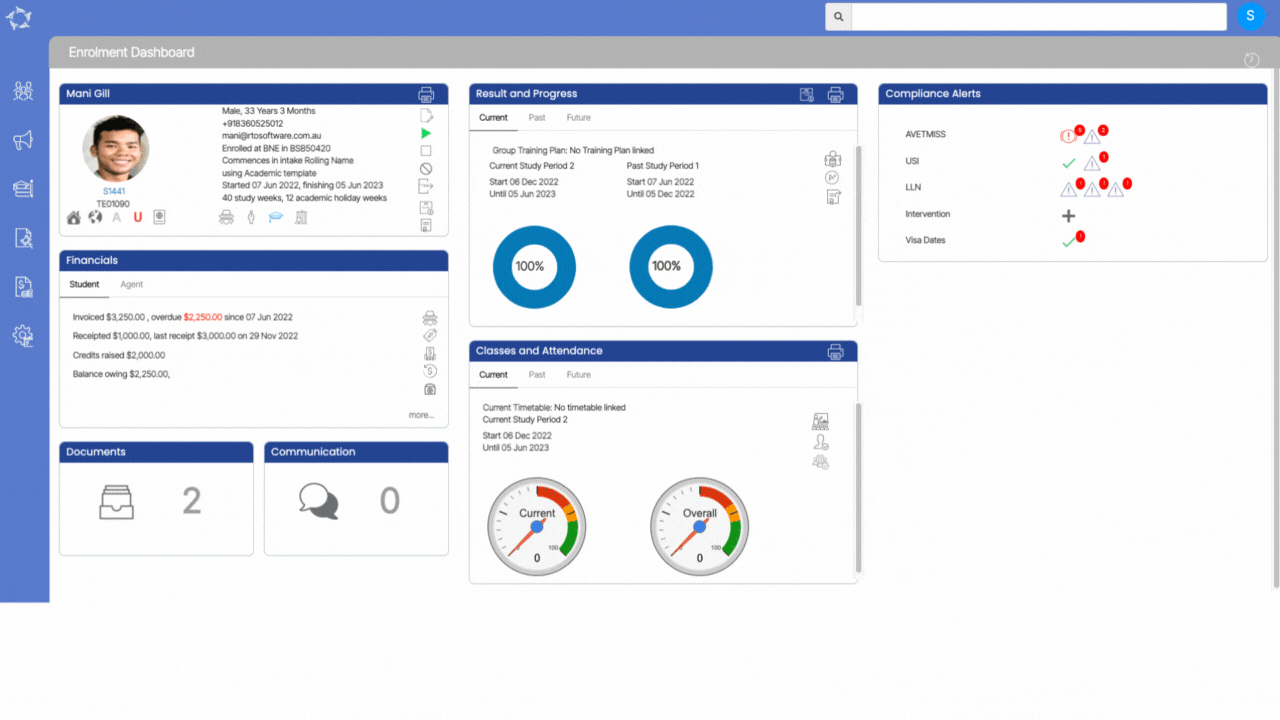
This tile will show you the attendance percentage for the current study period and the average percentage of enrolment. From this tile, you can create classes, mark attendance, and can allocate classes to the students. You can also see Current, Past and Future classes from the tabs.
Tabs
Current – This tab will show you the name of the current timetable, current study period dates, and their current and overall attendance percentage.
Past – This tab will show you the past study period start and end dates and their current and overall attendance percentage.
Future – This tab will show the upcoming study period start and end dates.
Dials
Current Attendance Dial
The current attendance dial shows the percentage of the current study period
Overall Attendance Dial
The overall attendance dial shows the percentage of enrolment from its start date to the end date
The only time you can use the Cancel Enrolment process in TEAMS is when students are meant to start on a specific date, they got their visa and they are expected to show up but don’t show up. And if they don’t show up then the college has to inform the department and in that way, you can cancel the enrolment.
IMPORTANT – If you have set up an enrolment type or an enrolment outcome of cancelled enrolment, please understand that’s a just displayed option and it does nothing in the system. As that is just a text word on a screen for you and your staff to know that the enrolment is cancelled. It doesn’t tell the system to do anything special and it absolutely will not show the canceled in red. Just by selecting, an enrolment outcome, or an enrolment type of cancelled enrolment. That is just the status that you have set up. It does not do anything to the program or the system at all.
Process for withdrawing a student in TEAMS
Scenario 1
If a student commences their study, it doesn’t matter whether they’re CRICOS or domestic FFS, the moment the student commences one subject and attends the class and also commences their assessment online then you have to submit that enrolment and that subject in the NAT files based on the enrolment start date and end date and all the subjects date. Or If they never start a subject, they never show up to a class. They never start an assessment online, they do not study for it whatsoever then that subject does not have to be in the NAT files.
For example – If you have started the enrolment and the student would have started at least one subject then you need to change the subject to continuing enrolment and the rest of the subjects can be Not Yet Started. For let’s say a student wants to move to another course or to a different college then you need to change the end date of the subject to the last date of study with the result from continuing enrolment to Withdrawn has got continuing enrolment.
And for the ones that students never commenced at all that is NYS, you need to change the subject end date to the last date of study and save it. The system will update the result date for those subject end dates for NYS to the result date. Then you will edit the enrolment and set the end date of the enrolment to the last day of study date. Please note – You cannot change the enrolment end date first, you need to update all the result date first so that the results match inside the enrolment.
IMPORTANT – For all the Not Yet Started subjects, you need to go to the Enrolment AVETMISS Settings screen > Subject AVETMISS Settings tab and mark the NYS subjects as DoNot Include in AVETMISS because you don’t have to submit the NYS ones. You only need to submit the Withdrawn to NCVER
Scenario 2
Let’s say the student did the orientation in the first week and then you have flagged the enrolment as started but the student didn’t start their first class or subject until the following week. Then the student comes in the second week and says they want to move to another course as they change their mind and you still have the enrolment flagged as started.
Then, in this case, you don’t have to put Withdrawn or NYS for the subjects because the student never studied and they just did the orientation. Instead of going to Enrolment AVETMISS Settings screen > Subjects AVETMISS Settings tab and marking the subjects as DoNot Include in AVETMISS, you need to go to the Enrolment Edit Screen and change the enrolment end date to the date when they are finishing and select the DoNot Include in AVETMISS tick box and save.
Scenario 3
This is where the first week of the enrolment is an orientation week only and the student will not study and whatever their class is they don’t commence and the student are taking themselves out of that course or moving to another college then you need to change the enrolment end date to whatever their last date is. Then you go to the Training Plan and Result screen and update the result issue as NA for the qualification Information and marked the enrolment as do not include in AVETMISS because you not going to issue anything.
That way you can show that the student did not show up and didn’t commence any study and whatever the reason was there, you can have it in the enrolment outcome. You can also do a contact log to explain why the students have left, so there was no reason to have them in the NAT files.
Scenario 4
When a student initiates their enrolment and enrols in a course consisting of 10 subjects, their progress is closely monitored. In this scenario, let’s assume the student successfully completes 5 out of the 10 subjects. However, circumstances may change, and the student might decide to alter their course of study, discontinue their education at the college, or encounter other reasons for leaving the program or the college cancels the student due to non-payment, low progress etc. In such cases, it is essential that the college takes appropriate action.
To ensure accuracy and proper documentation, if the college issues any Statement of Attainment (SOA) certificate to the student, it is highly recommended to promptly update the Qualification Issue status on the Qualification Screen. By doing so, the college maintains up-to-date records of the student’s academic progress and qualifications obtained.
This tile provides an overview of a student’s progress in their course of study, based on their study periods. This tile offers a variety of functionalities, such as navigation to the training plan and result screen, as well as the ability to transition the enrolment to a new program. Additionally, all certificate reports, training plans, and student performance reports are generated from this tile. This allows for a comprehensive view of the student’s progress and achievements, making it easier to monitor their performance and make informed decisions about their future studies.
Tabs
Current – This tab provides you with students’ current status in their training plan. It displays the name of the group training plan the student is enrolled in, as well as their current and past study period dates. Additionally, the tab shows the student’s course progress percentage, giving a clear indication of how much of the course they have completed so far.
Past – This tab provides information on a student’s completed study periods. It displays the start and end dates of each past study period, allowing for easy reference and tracking of progress over time. Additionally, the tab shows the student’s course progress percentage for each past study period, giving a clear indication of how much of the course they completed during that time frame.
Future – This tab provides information on a student’s upcoming study periods. It displays the start and end dates of each future study period
Course Progress Dial
This dial will display the percentage of the course progress of the particular study periods. For example, if there are 4 subjects falling in the date range of the study period and 4 of them have successful results against them. Then the course progress will be calculated as (4/4)*100 i.e. total successful subjects falling in the study period divided by total subjects multiplied by 100.
Select the Refund icon from any of the screens and the system will open the refund screen.
Select the Refund all Check box to refund the full receipted amount.
For a partial refund, you have to manually enter the amount in the Refund Amount field.
Tiles
This Tile will show you the basic details of the enrolment and all the icons in this tile are read-only.
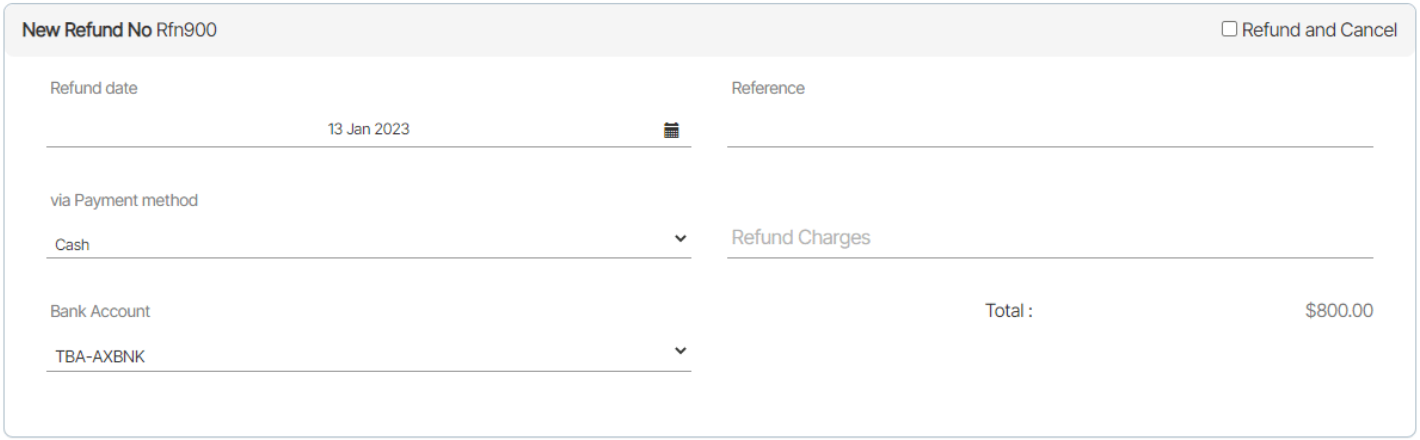
This tile will show you the New Refund No. along with the total refund amount. You can add the Refund date, Reference, Payment method of refund, refund charges, and bank account details in this tile.
This Tile shows you the Receipt details against which the refund can be created. It depends on the total number of refundable receipts according to which the number of tiles will be visible on the refund screen.
After deciding on the refund amount you need to update the details/data in the other fields that I have shown and explained below:
Field Name
Explanation
Refund date
The refund date will be the date on which the refund has been made.
Reference
If you have any reference number against this Receipt then you can update it in this field.
Via payment method
The payment method needs to be selected so that you can get to know how the refund payment method like is it cash, check, or any other method.
Bank Account
You can select the bank if you want to have an entry of refund in the bank.
Refund charges
If you are charging any refund amount then you can update that amount in this field.
Note: Select the Refund and Cancel tick box if you want to cancel that refunded amount from the total invoice amount. For example, if you have an invoice for $5000 and the receipt amount is also $5000. When you do a refund on the receipt amount of $5000, if you select the tick box for Refund and Cancel, then the system will create the refund entry and also cancel the invoice as well. Whereas, the same invoice is for $5000 but there is a receipt for only $3000 and you want to refund that receipted amount. The system will do the refund entry for $3000 and cancel out $3000 from the invoice so the invoice amount will then be only $2000.
After updating the details in the required fields you just need to select the Save button to do the refund.
The system will reload the screen, the system will take you to the enrolment dashboard and you can check the refund by going to the student financial details screen.
 – You can edit the class end date by selecting the edit icon under the actions column and it will open the pop window on the same screen as shown below.
 – When you select this icon, it takes you to the attendance listing screen where you can mark attendance for the student.
 – You can send an email to a student about the classes.
 – You can send an SMS to a student.
 – You can delete the class by selecting the delete icon.