Why can’t I see any GST amount for an Agent Invoice?

If the system has not calculated a GST amount for the agent invoice, it is most likely because the Charge GST option was not set for an Agent. There could also be the scenario where the agent did have a charge GST set and the system did calculate the GST in many of their commission invoices, however, a user has gone and edited the agent and unselected this setting. When you do this, any new commission invoices the system generates, will not have the GST calculated.

IMPORTANT – it is important to understand that at the time you do a transaction in TEAMS, the system uses the settings for that transaction as they are. If you then change the settings afterwards, the system will NOT retrospectively go backwards and update data. For example, you have an Agent that was not set with Apply GST and you raise the invoices for an agent. You then realise this mistake and go and update the Agent with Charge GST turned on. The system will not go backwards and update all the agent invoices with the fee in it where the GST wasn’t calculated, it will only use the new setting for the new invoices you raise.

If you have this scenario where you want to fix agent commission invoices to show the GST and currently isn’t then there are two sections to fix this problem.

Those sections are as follows:

Section 1 – Edit the Agent settings

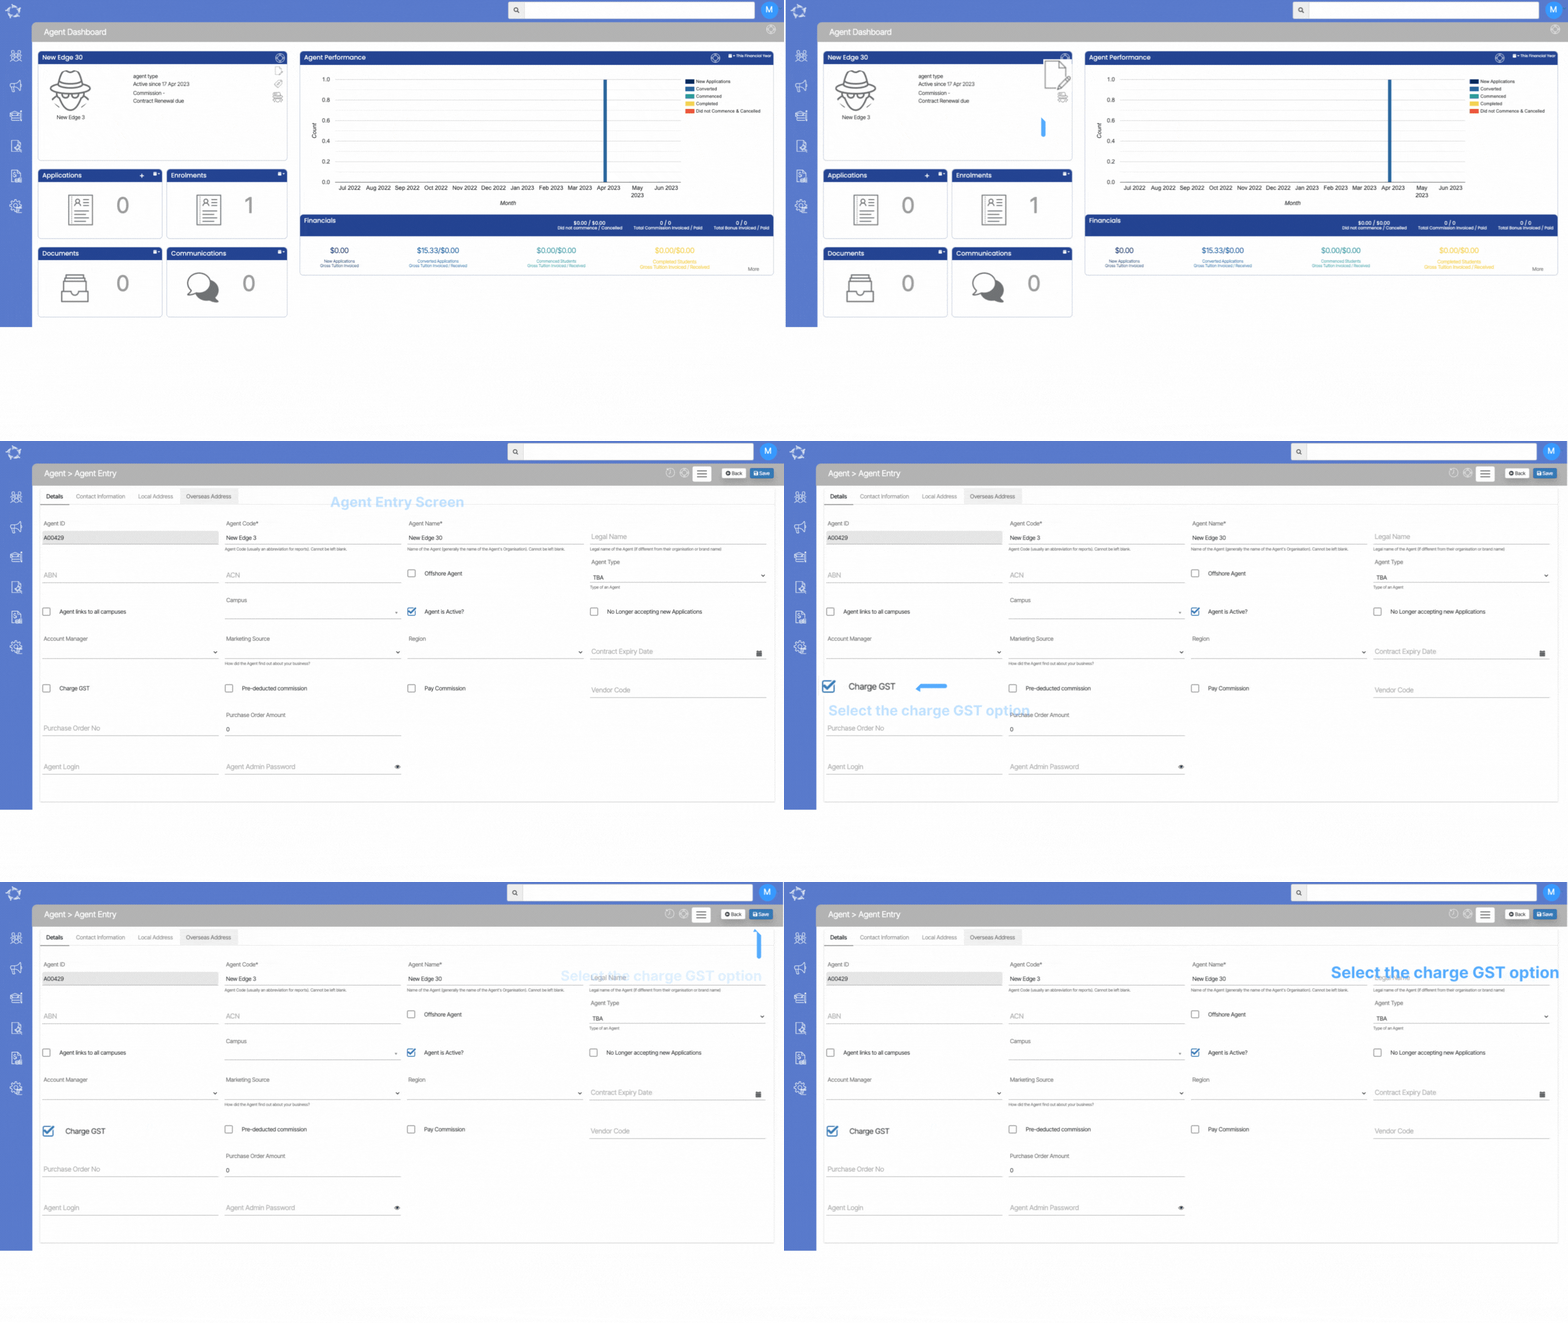
  • Go to Main Dashboard > Marketing Menu > Agent Dashboard Icon
  • When you are on the Agent Dashboard screen, Select the edit icon from the agent profile tile.
  • The system will take you to the Agent Entry Screen.
  • Select the Charge GST tick box and save the screen.
Section 2 – Edit the Agent Commission Invoice/s

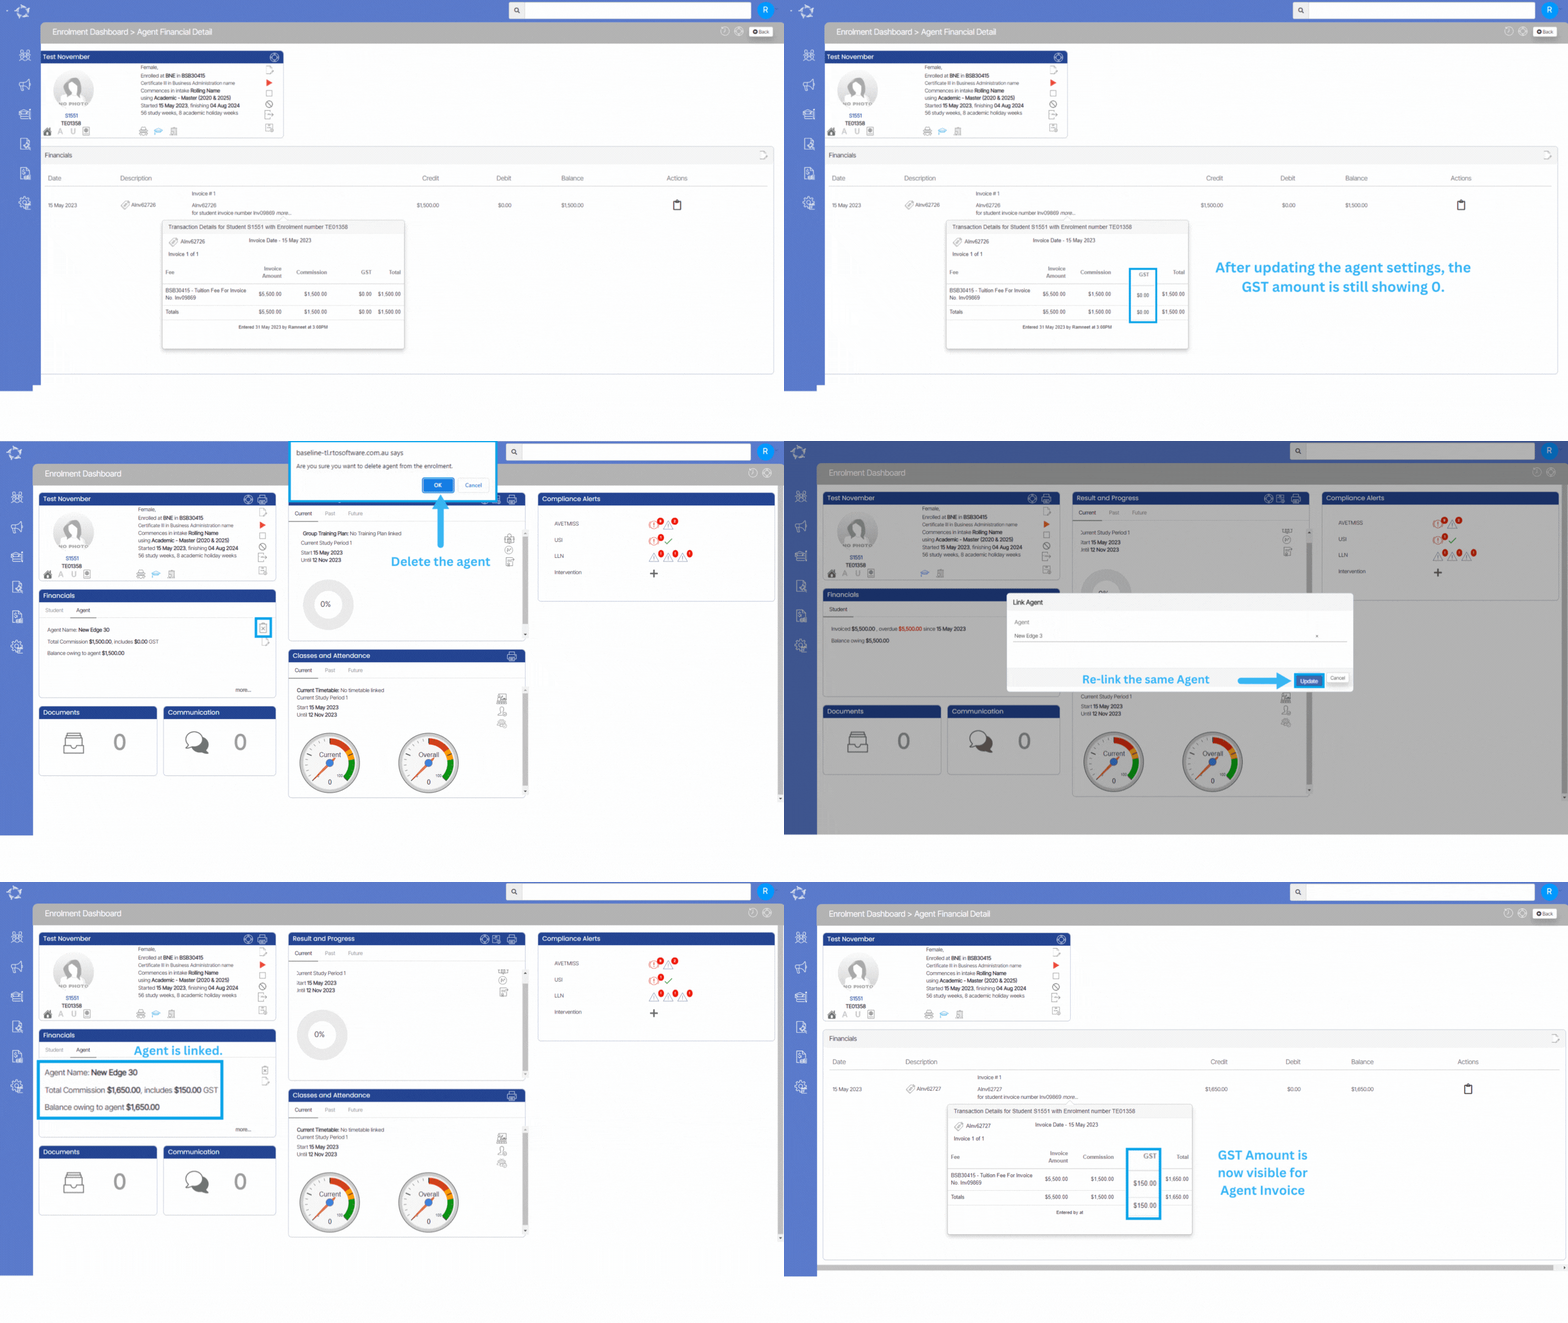
Note – If you haven’t made any payment to the Agent, you have the option to delete the Agent from the enrolment and then relink them. By relinking the Agent, you will establish a new connection that allows you to access and view the GST amount for the Agent’s invoices. This means that once you have successfully relinked the Agent, you will be able to see the specific amount of GST associated with their invoices.

  • In the Finacial Tile, go to the Agent tab and delete the agent from the delete icon. The system will show you a pop on top of the screen (Are you sure, you want to delete Agent), select Ok to continue and or cancel to leave it as it is.
  • Once you have deleted the agent, go back to the student tab in the financial tile and select the Agent Icon.
  • The system will show you a pop on the screen to relink the agent. Select the appropriate agent and update.
  • The system will refresh the screen for you and then you can see the GST amount for the Agent Invoices.
Why can’t I see any GST amount for a fee?

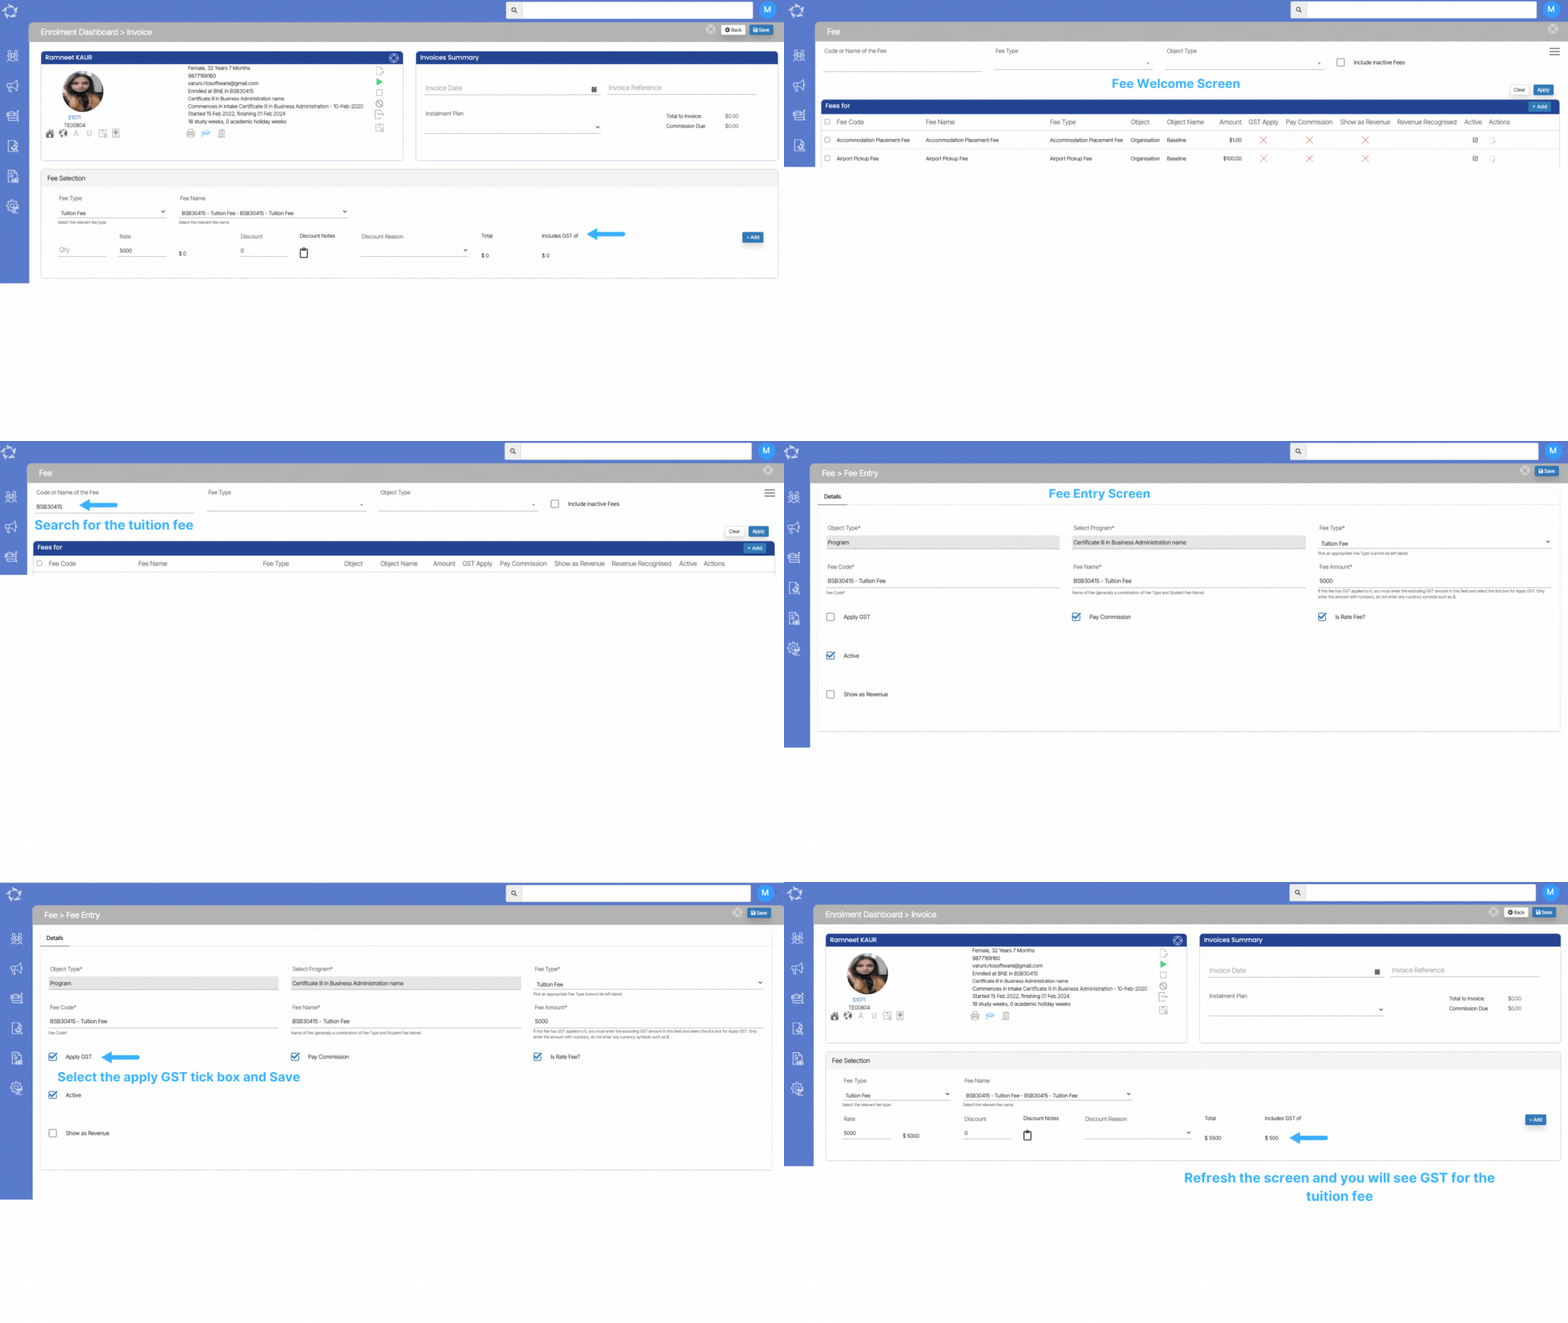
If the system has not calculated a GST amount for a fee, it is most likely because the Charge GST option was not set for the fee at the time it was raised in the invoice.

IMPORTANT: it is important to understand that at the time you do a transaction in TEAMS, the system uses the settings for that transaction as they are. If you then change the settings afterwards, the system will NOT retrospectively go backwards and update data. For example, you have a material fee that was not set with Apply GST and you raise that fee in invoices for students. You then realise this mistake and go and update the fee with Apply GST turned on. The system will not go backwards and update all the invoices with the fee in it where the GST wasn’t calculated, it will only use the new setting for the next invoice you raise with the fee in it.

Follow the steps below to update a fee with the Apply GST turned on

  • Go to Main Dashboard > Finance menu > Fee icon
  • Search the fee with the Fee code on the Fees Welcome Screen and then select the Apply button.
  • After your search, edit the fee from the edit icon under the actions column.
  • On the Fee Entry screen, select the Apply GST tick box and save.

When all the above steps are done, the GST will starts appearing for the fee.

Why do two users see different information for the same student?

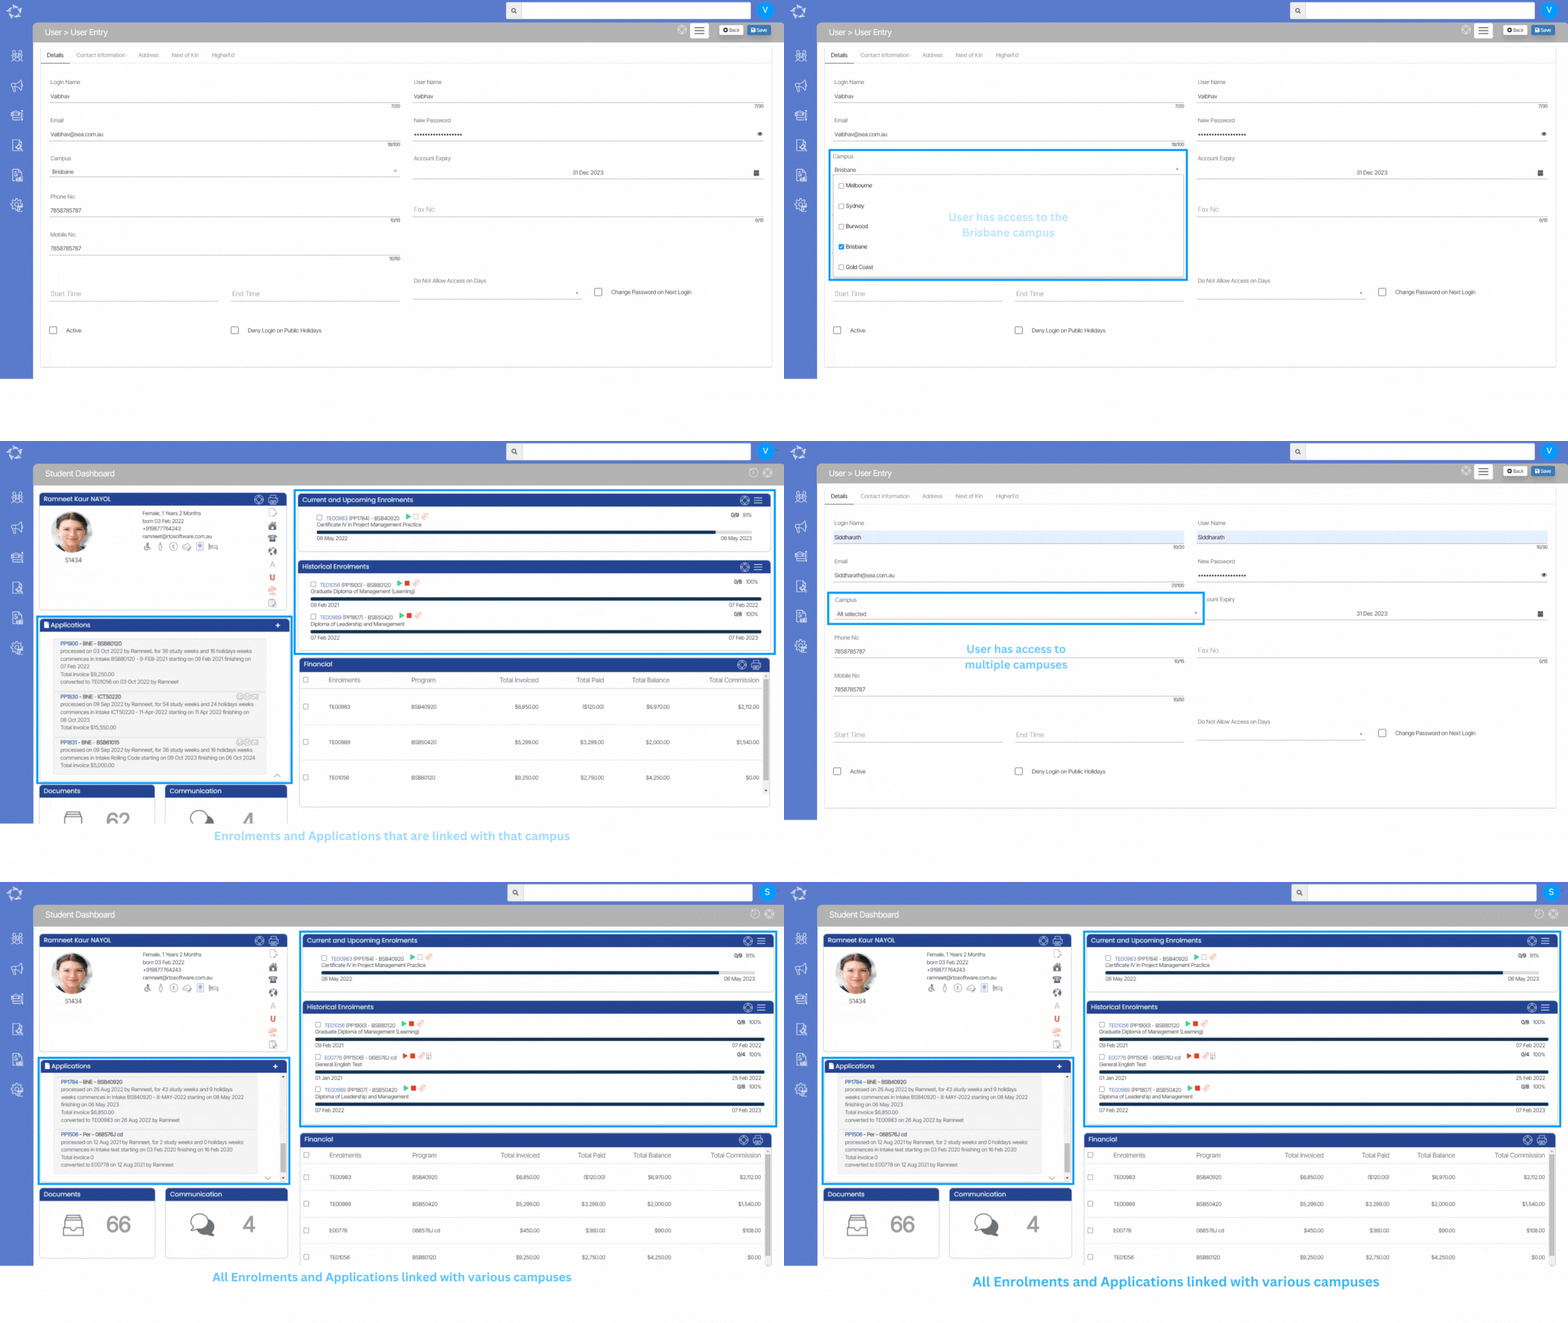
Each user will have different permissions, including what campuses they can see enrolments and other information for.

Based on this, when a user goes to the Student Dashboard or even the Applicant Dashboard, based on the campuses they are linked to and logged in as, will determine what enrolments and/or applications they can see.

For example – In order to view a student’s enrolments in different campuses, the user must have the necessary access permissions for both campuses in TEAMS. If the student is enrolled in two different campuses, such as Campus 1 and Campus 2, the user will only be able to see both enrolments if they have the appropriate permissions for both campuses. Without access to either one of the campuses, the user will not be able to view the corresponding enrolment.

Note – If you are not able to view all enrolments or applications for certain students/applicants then speak to your manager. If you or they need further assistance with this, then please contact our support staff.

Agent Welcome Screen – How to List Primary Contacts?

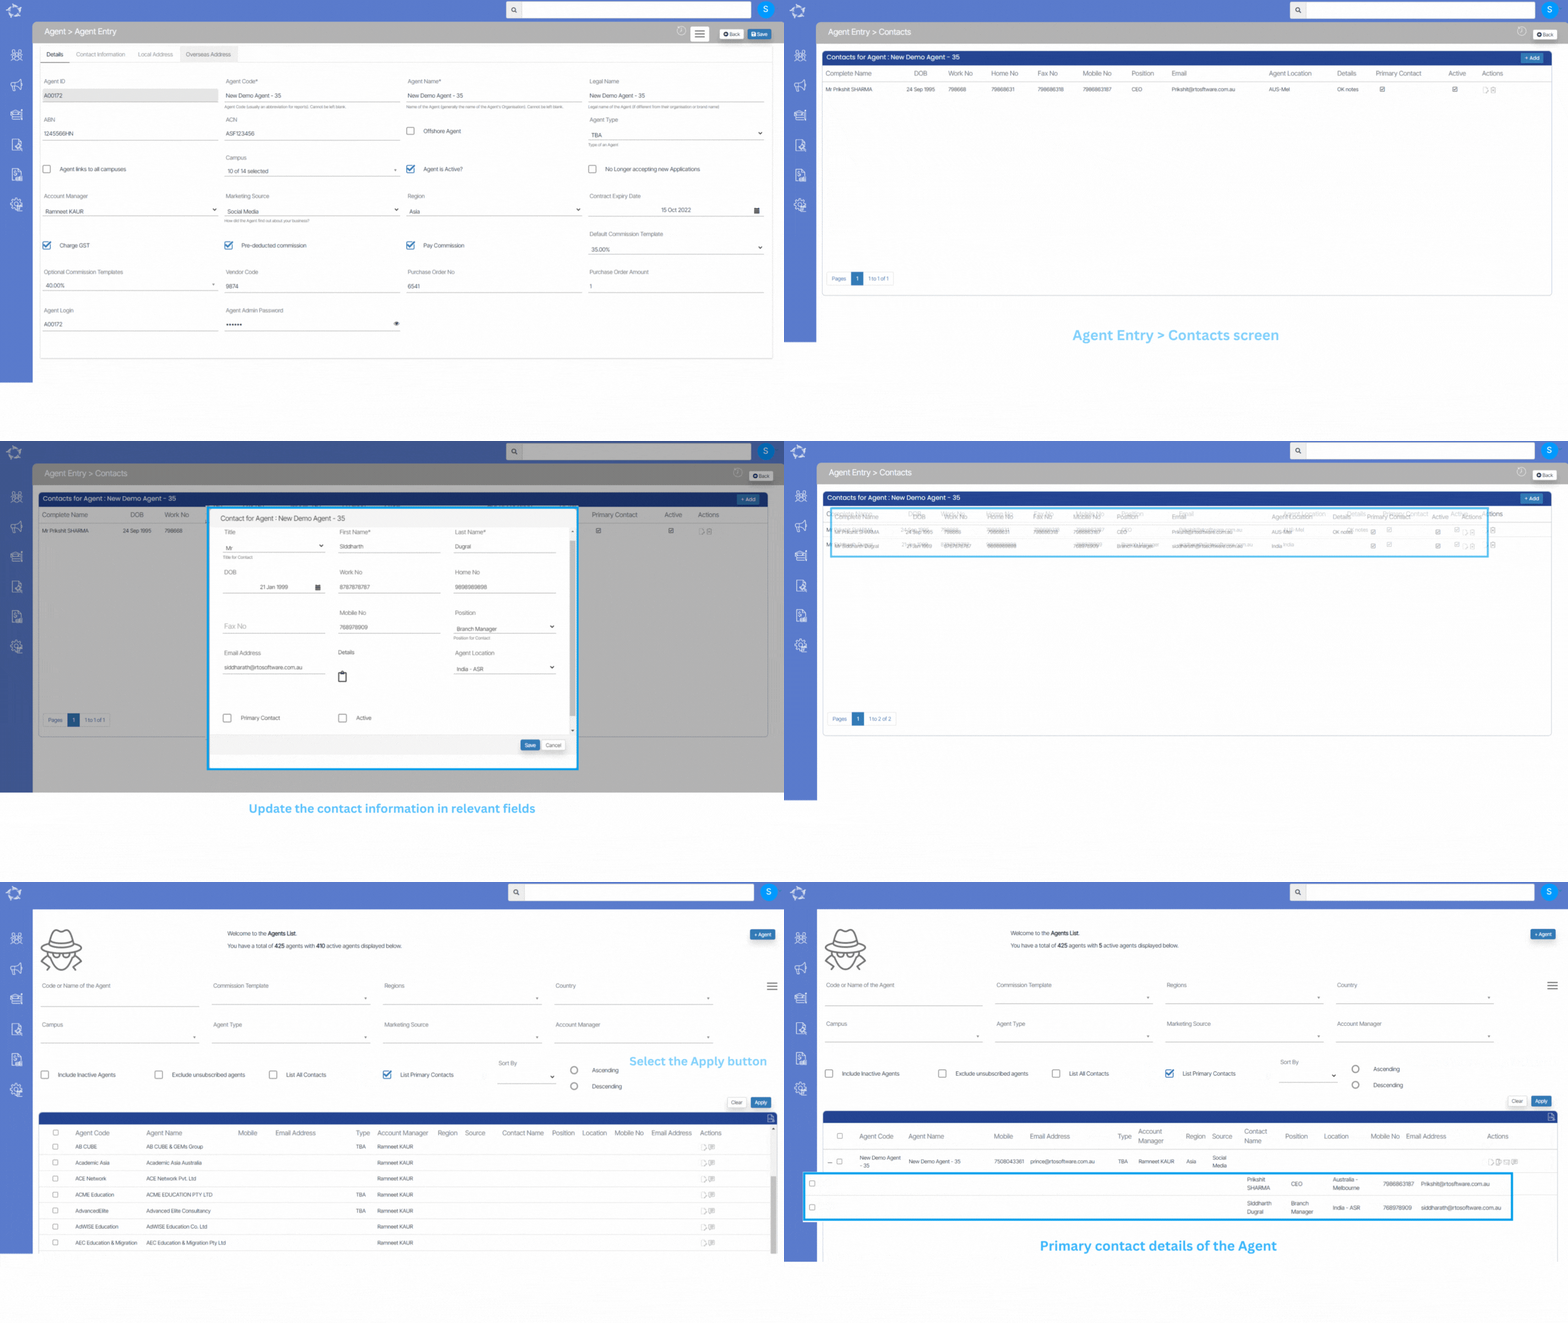
Primary Contacts are those contacts that are linked to the agents with their contact information. Please see the below steps to list the primary contact on the Agent Welcome Screen.

  • The very first step is, you need to update the primary contact information of the person on the Agent Entry Screen > Burger Menu > Contacts Screen.
  • Select the +Add button to link the contact information and once you select it, the system will show you a pop window on the screen.
  • In the pop window, update the contact information as you required and Save.

IMPORTANT – Before saving the contact information on the pop window, If you wish to show the contact as a primary contact then you need to select the Primary Contact tick box for the contact.

  • When you are on the Agent Welcome Screen, you need to do the following steps:
  • Select the parameters as you required (including by selecting the List primary Contact tick box) and then select Apply Button.
  • The system will show the agents in the grid with their primary contact details.

Note – if the agent has a contact and they have a primary contact tick box is ticked for them then that agent entry will have the expand (+) icon against the agent code to see the primary contact.

Enrolment is not appearing in AVETMISS Export

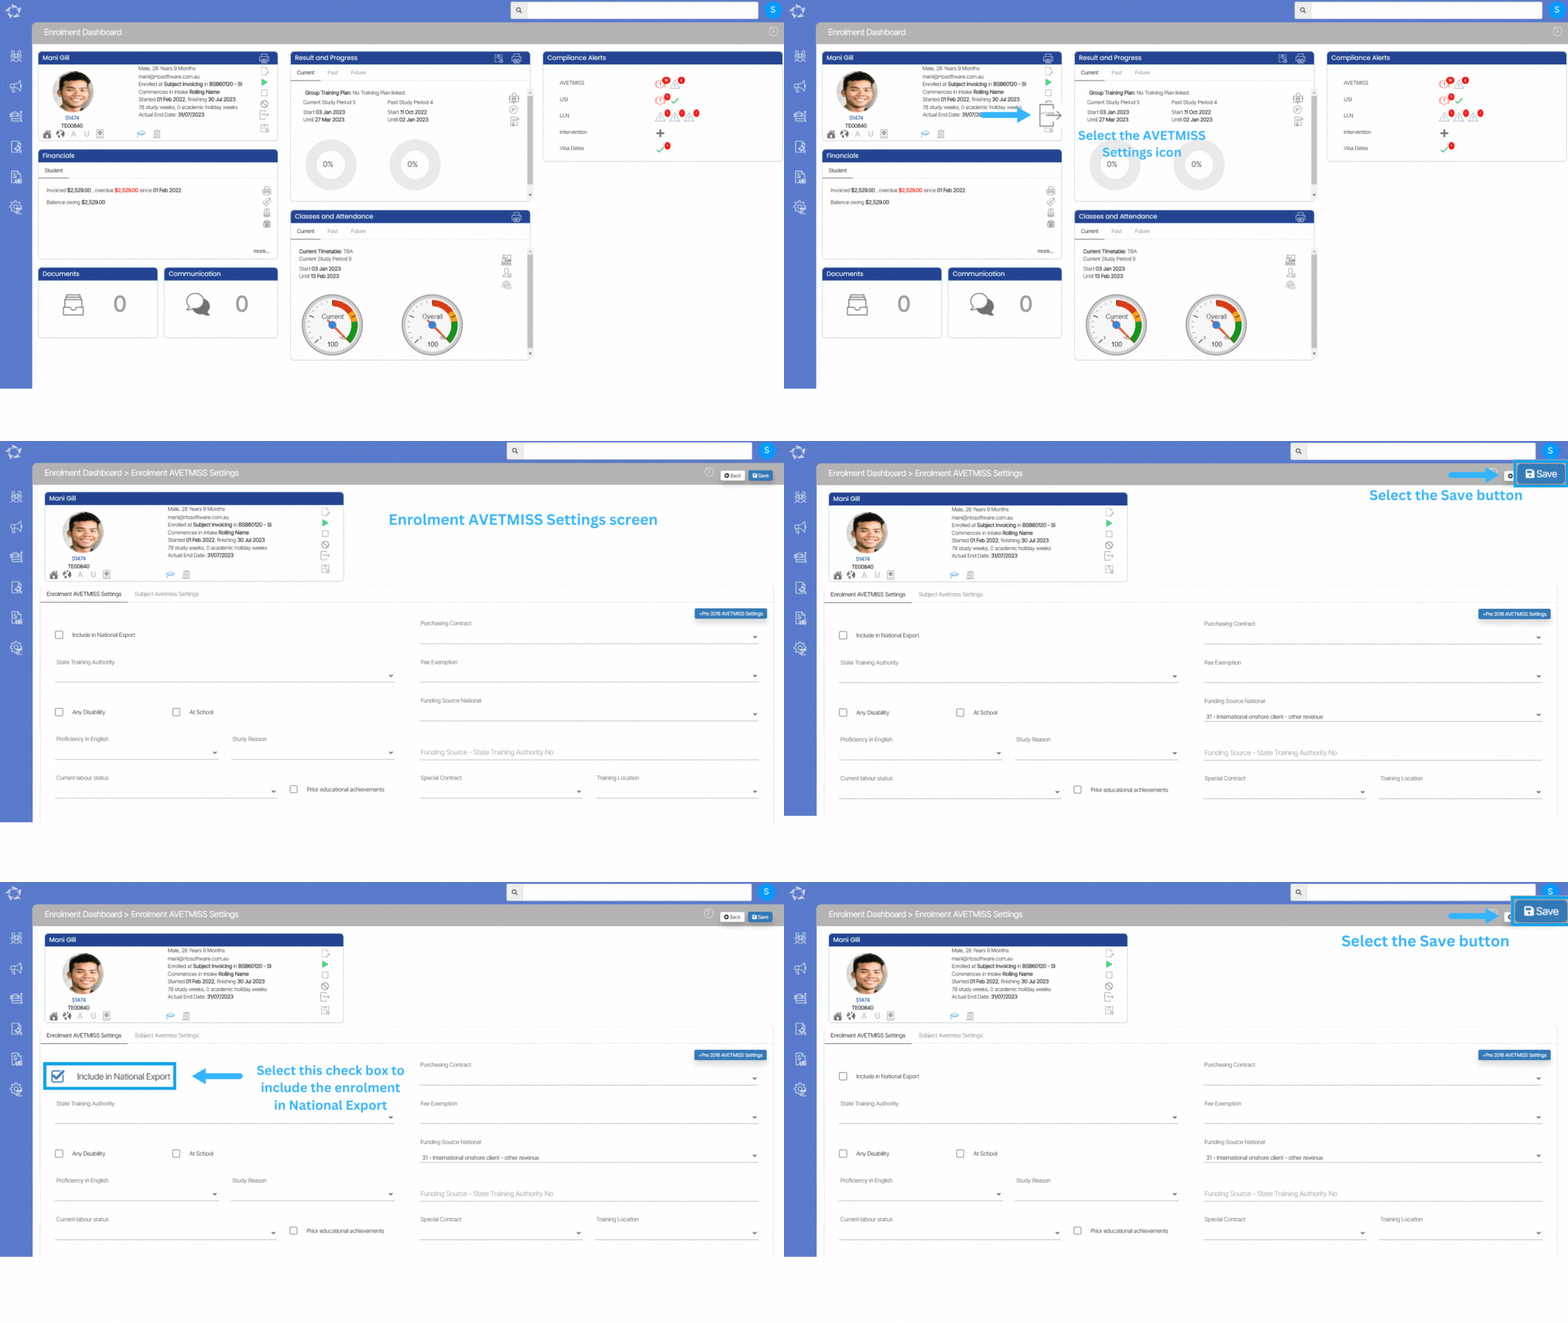
We have recently got asked a question about the enrolment not appearing in the AVETMISS Export. The enrolments don’t show up in AVETMISS export when the Include in National Export is not selected on the Enrolment Dashboard > Edit AVETMISS Screen.

Please see the below steps to select the Include in National Export.

Note – If you have not selected the Funding Source National on this screen then system will not let you select the Include in national Export tick box. Once you have selected and saved the required fields then you need to regenerate the AVETMISS Export to see that enrolment.

Difference between Commencement and Completed Statuses

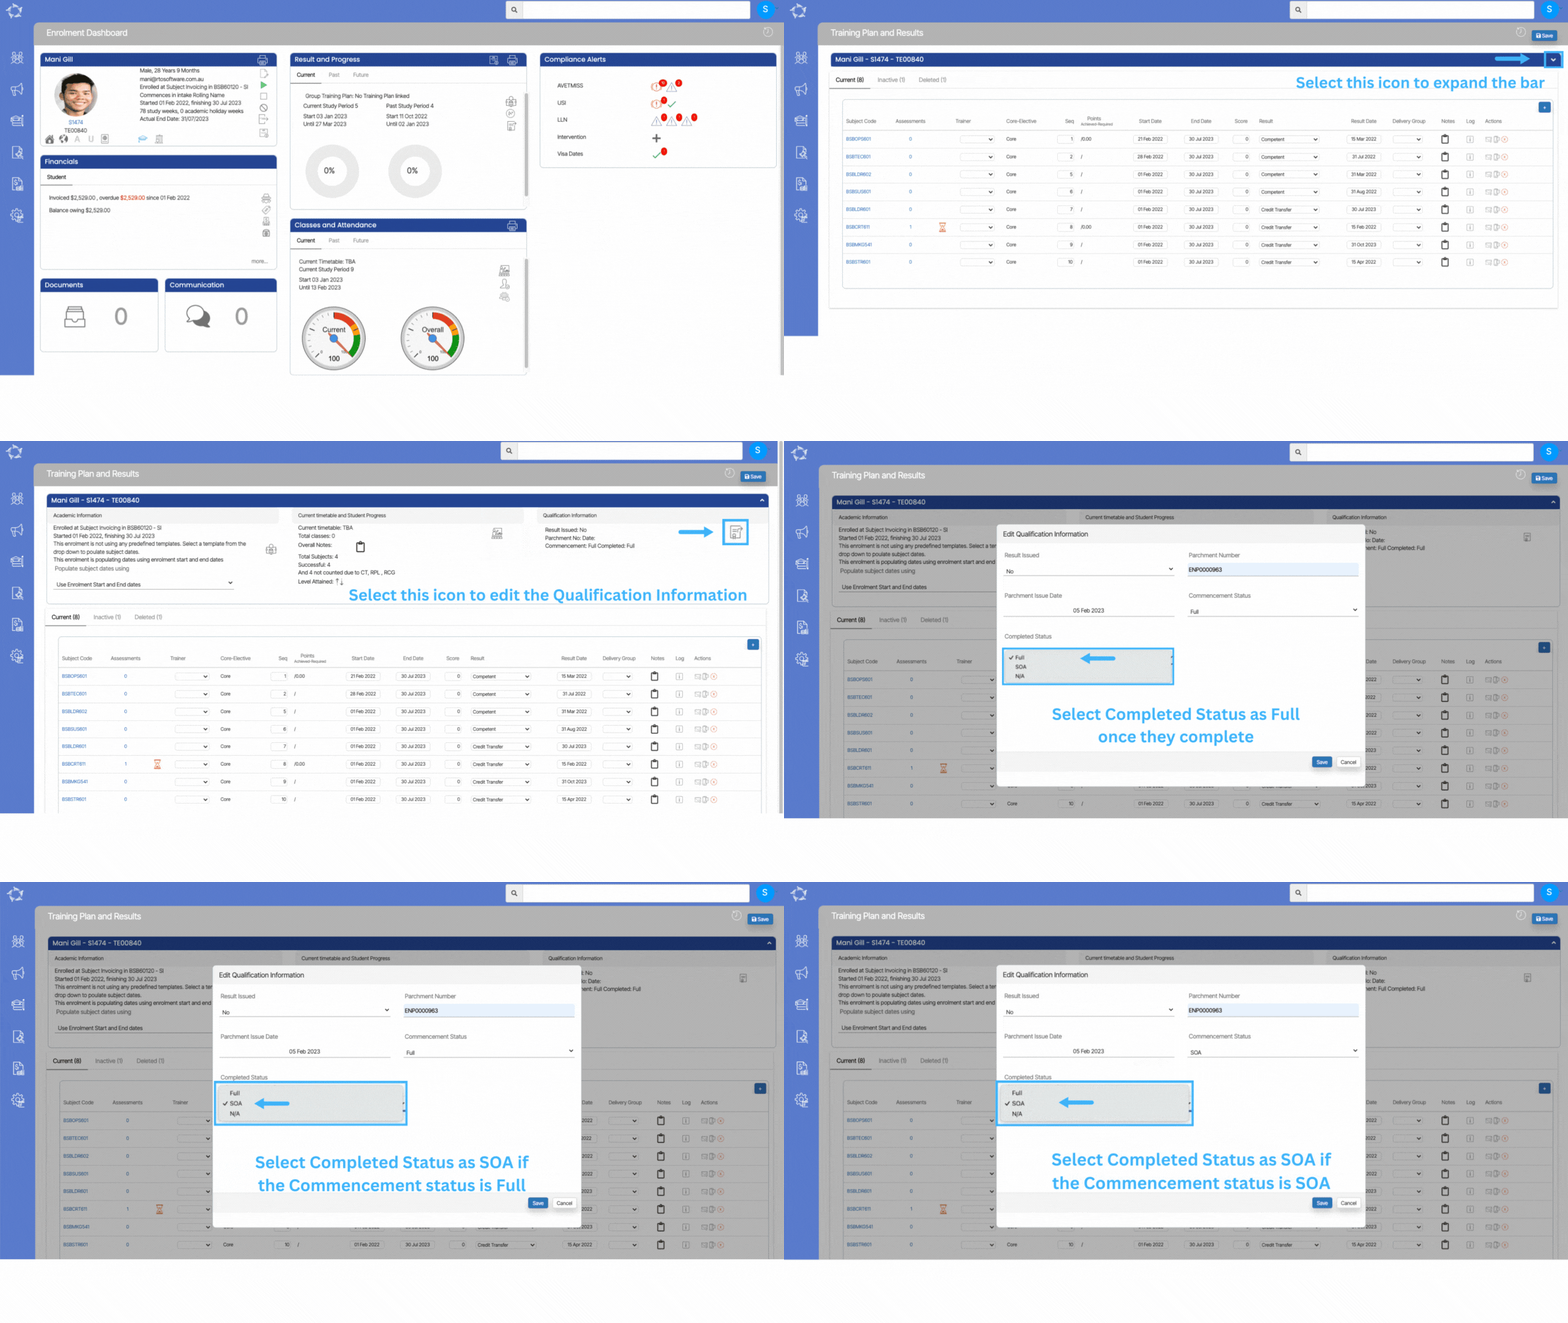
We have recently got asked about the difference between Commencement and Completed statuses of an enrolment. Please see below points to understand the qualification Information process on the Training Plan and Results screen.

Commencement StatusCompleted Status
If you are a CRICOS and the student is on their student visa and their intension is to complete the full qualification.
Then in such cases you need to set the commencement status as Full
Then the completed status should be selected as Full once they complete their qualification
If you are a Domestic and the student is studying a short course or a competency and their intension is to complete full qualification then also you need to set the commencement status as FullThen the completed status should be selected as Full once they complete their qualification
If you have students where they have the intension to commence full qualification and you set their commencement status as Full. They studied 2 or 3 subjects but in between the enrolment period they withdraw or cancel their enrolment then in such cases the commence status will stay as FullAnd you will select the completed status as SOA
There are some cases where you are aware that the student will study only 1 or 2 subjects then in that case you can select the commencement status as SOAWhere the Completed Status will also be SOA

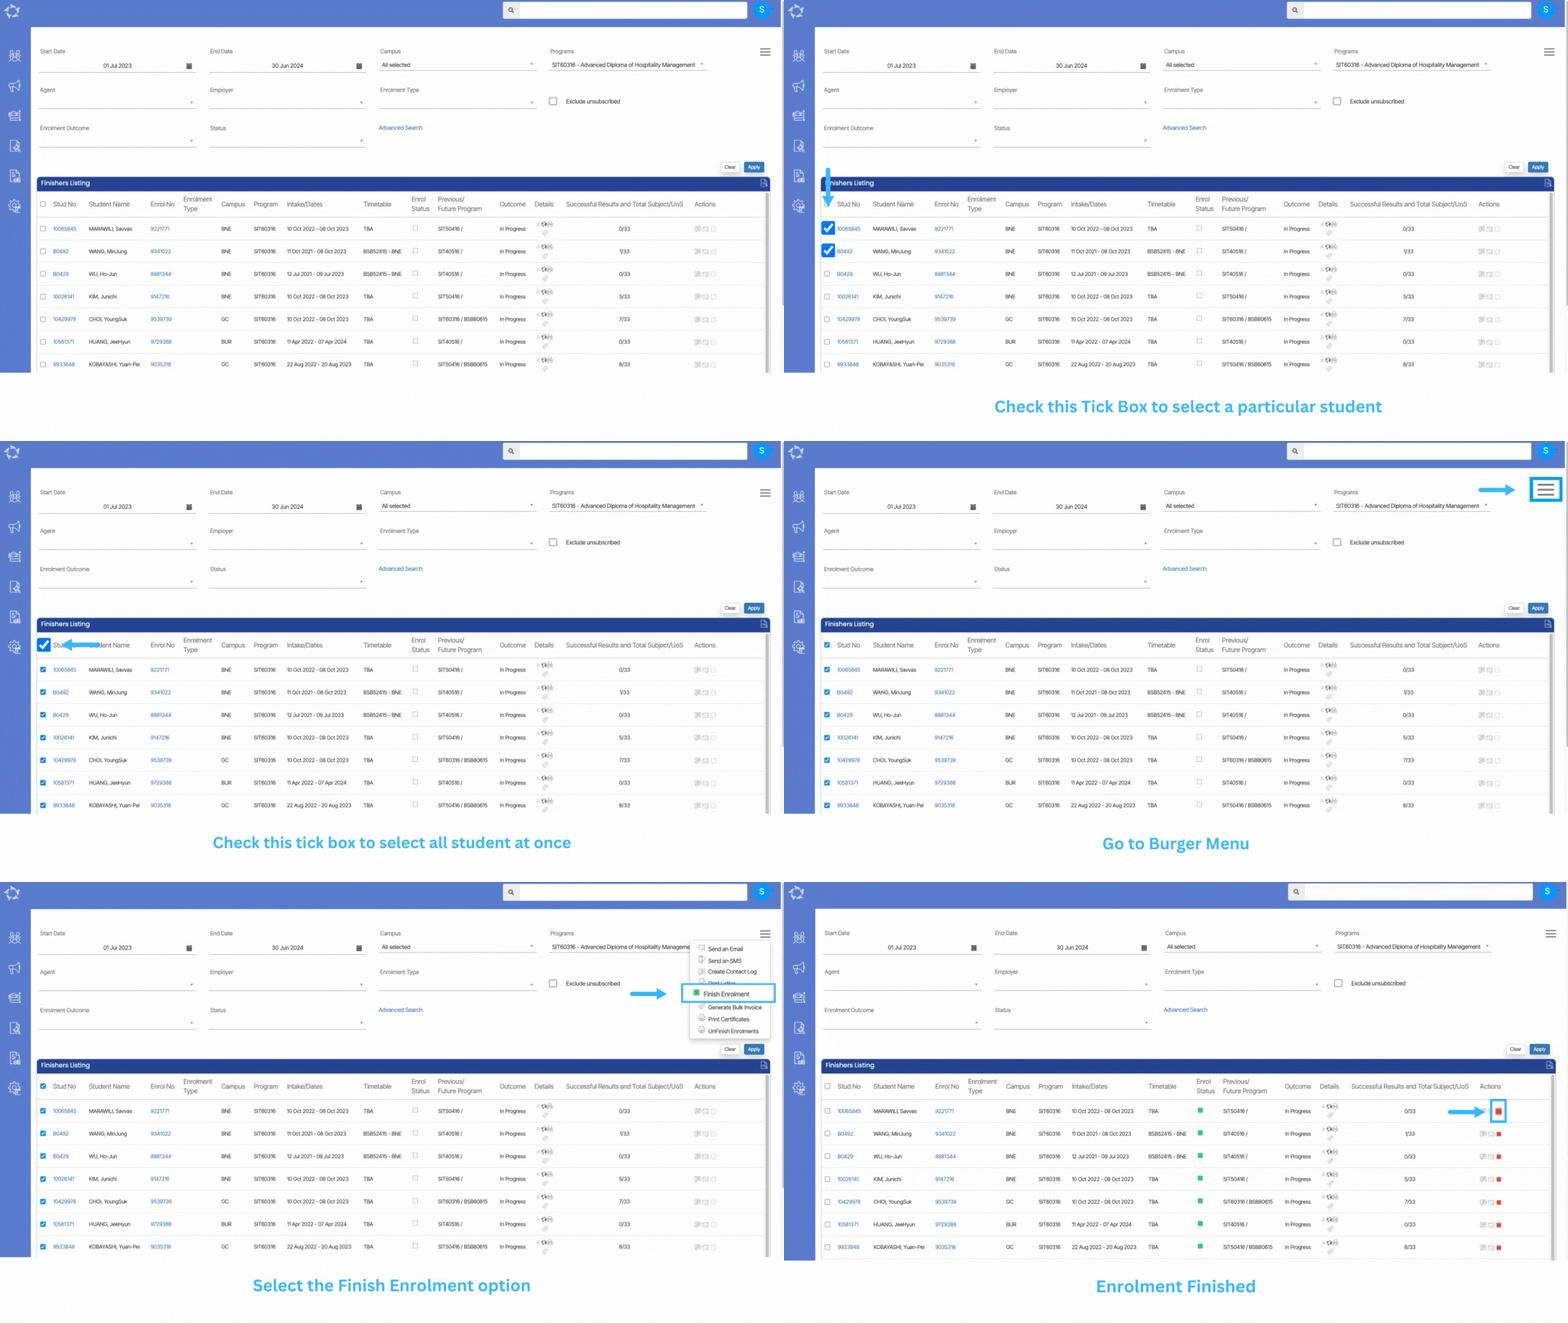
How to Finish Enrolments in Bulk using Finishers Listing Screen

In TEAMS, It’s important that you finish enrolments when the students have completed their studies.

You do not have to manually open each enrolment and finish it, instead, we have the finishers tile > finishers listing screen that you can use to finish the enrolments in bulk. This post will explain to you how to use the finishers listing screen to finish the enrolments all at once.

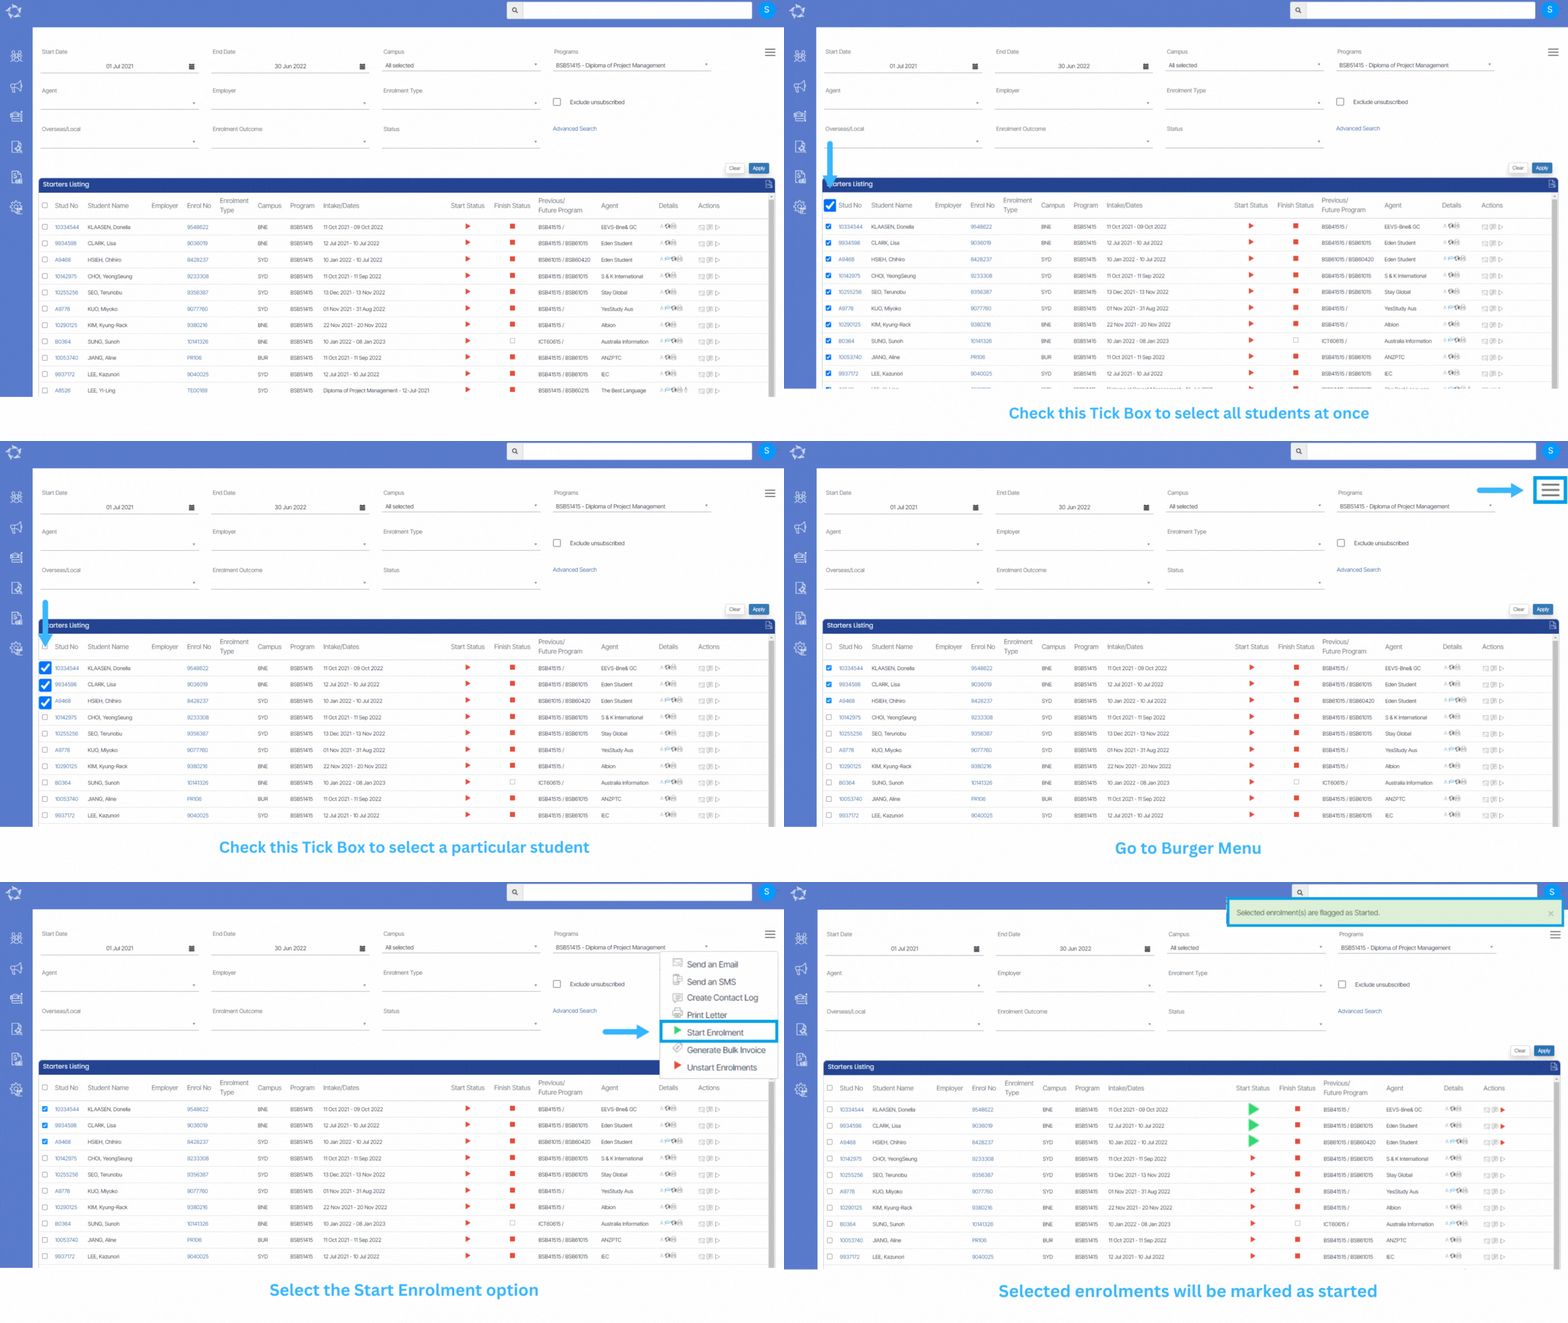
How to Start Enrolments in Bulk using Starters Listing Screen

In TEAMS, It’s important that you start enrolments when the students are going to start studying their program. And in TEAMS, you do not have to manually open each enrolment and start it, instead, we have starters tile > starters listing screen that you can use to start the enrolments in bulk. This post will explain to you how to use the starters listing screen to start the enrolments all at once.

  • Once you are on the starters listing screen, select the enrolments which you wish to start in bulk.
  • Go to the Burger menu and select the Start Enrolment option.
  • The system will mark those selected enrolments as started.

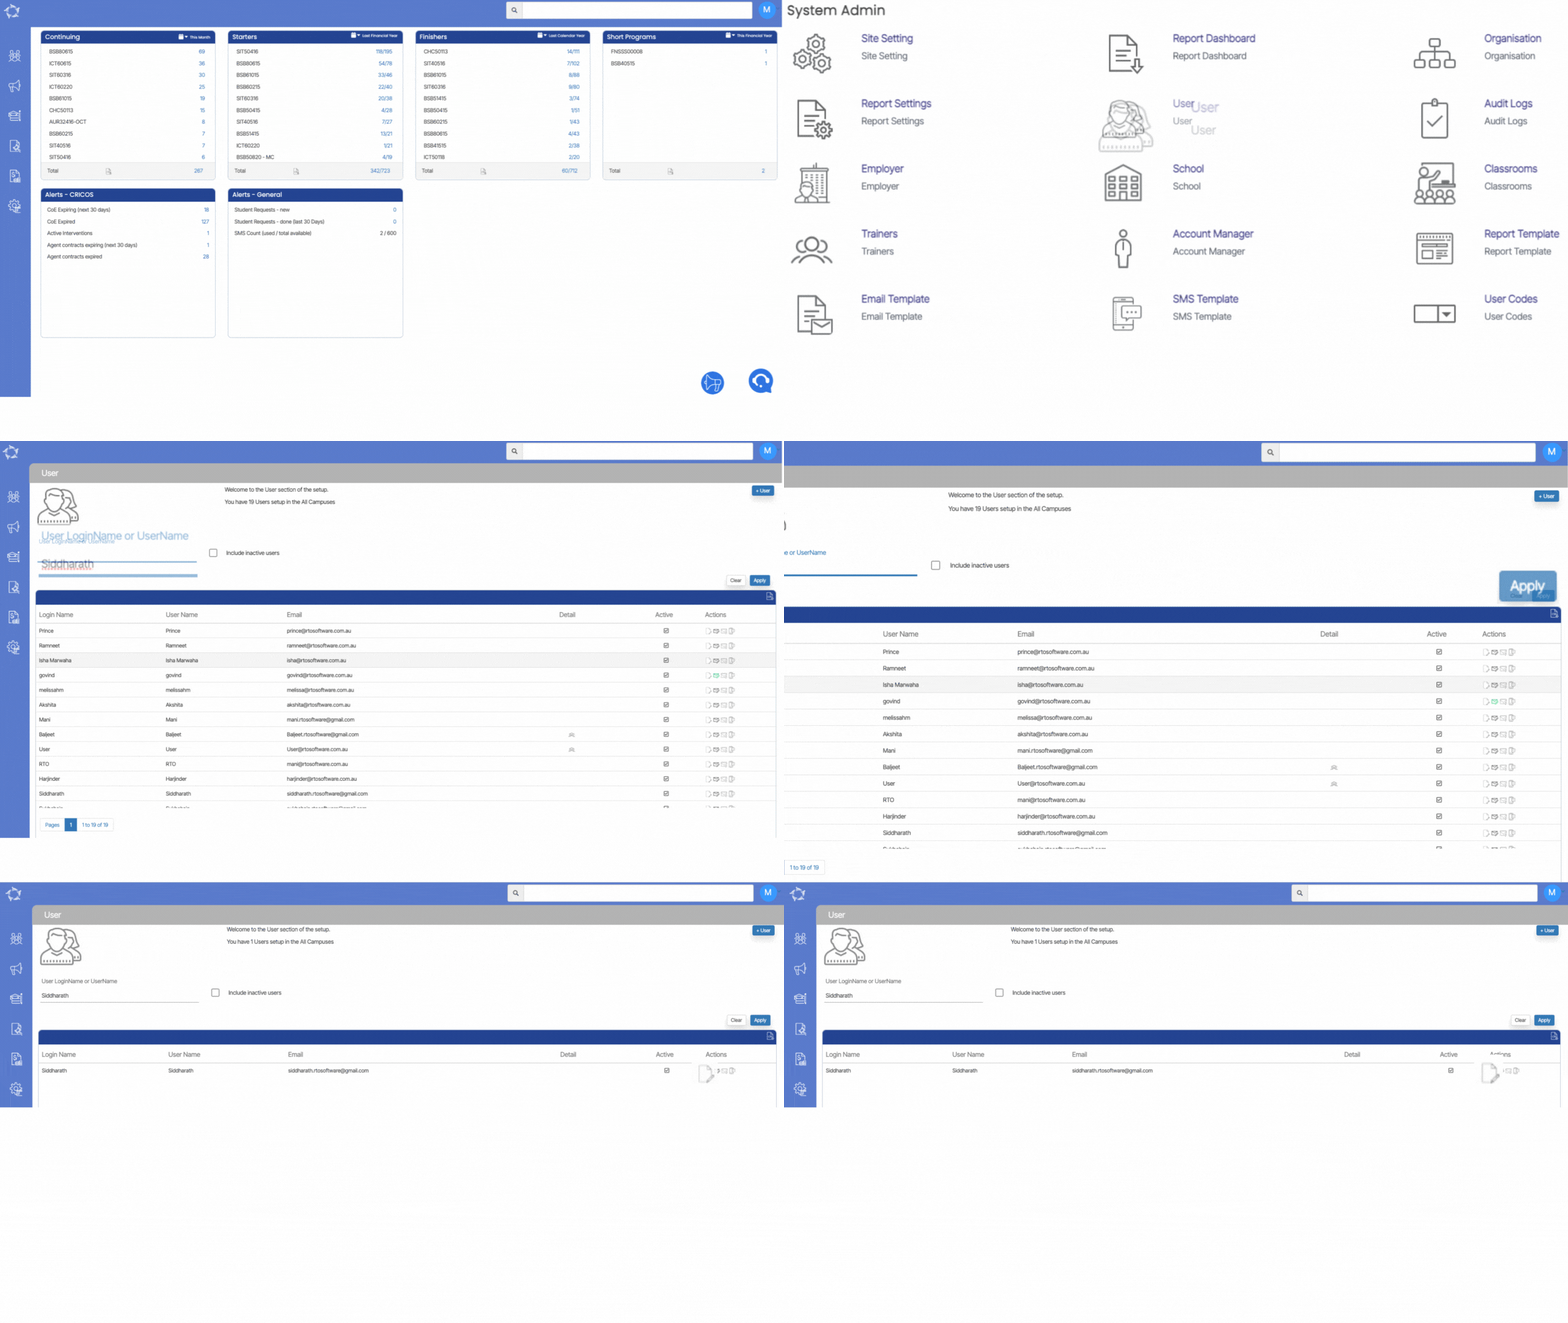
How to Unlock a User’s Account

The user’s account will get locked if they have repeatedly added the incorrect password while logging in.

You can unlock the user’s account from the user entry screen (Main Dashboard > System Admin > User) and once you are on the user welcome screen, you need to search for the user by his/her name and then select the Apply button.

The screen will refresh and will show you the user name in the grid and from there you can select the edit button to unlock the user’s account.

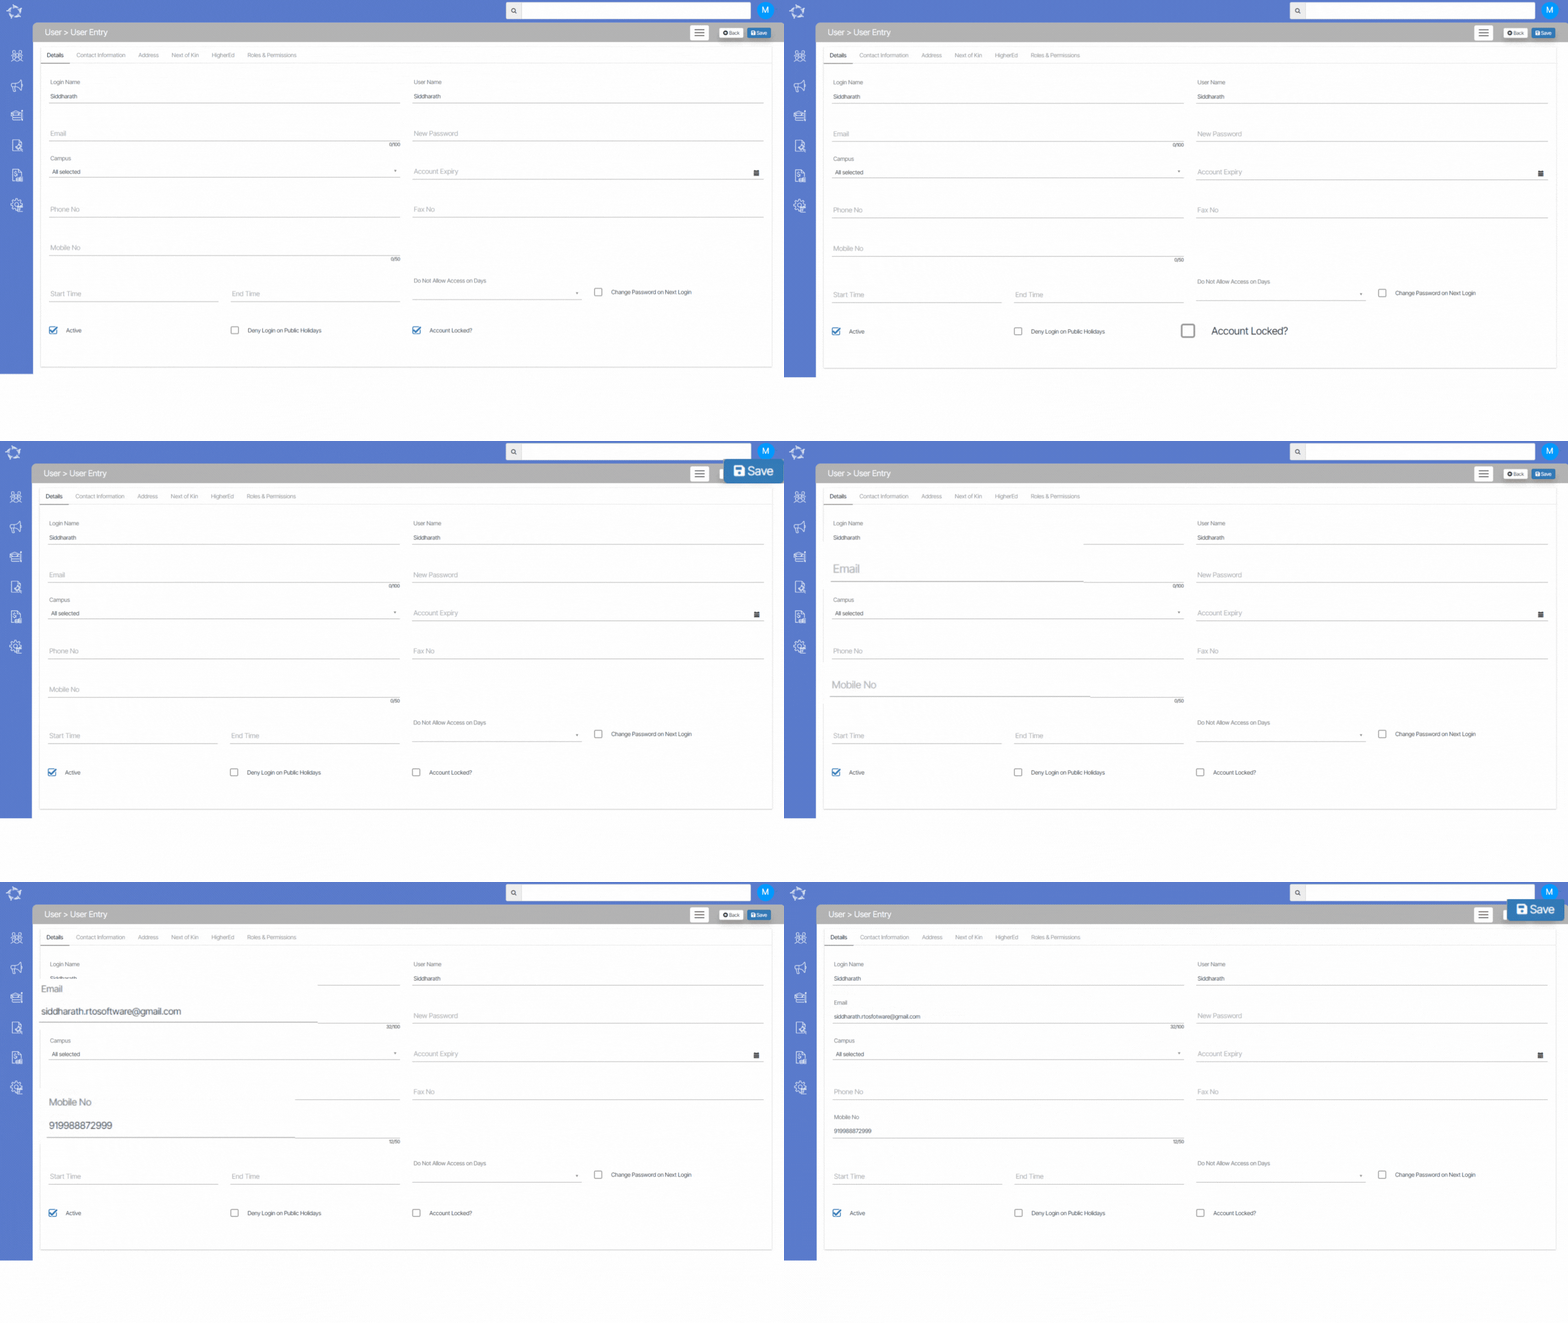
Once you select the Edit button, you will lead to the user entry screen where you can see the ‘Account Locked’ check box is selected. You need to Unselect this check box.

IMPORTANT: If the user’s email address and a mobile number have not been updated on the user entry screen, then the system will not allow you to unlock the user’s account and you will not be able to save the screen. It is important to update the email address and mobile number of the user.