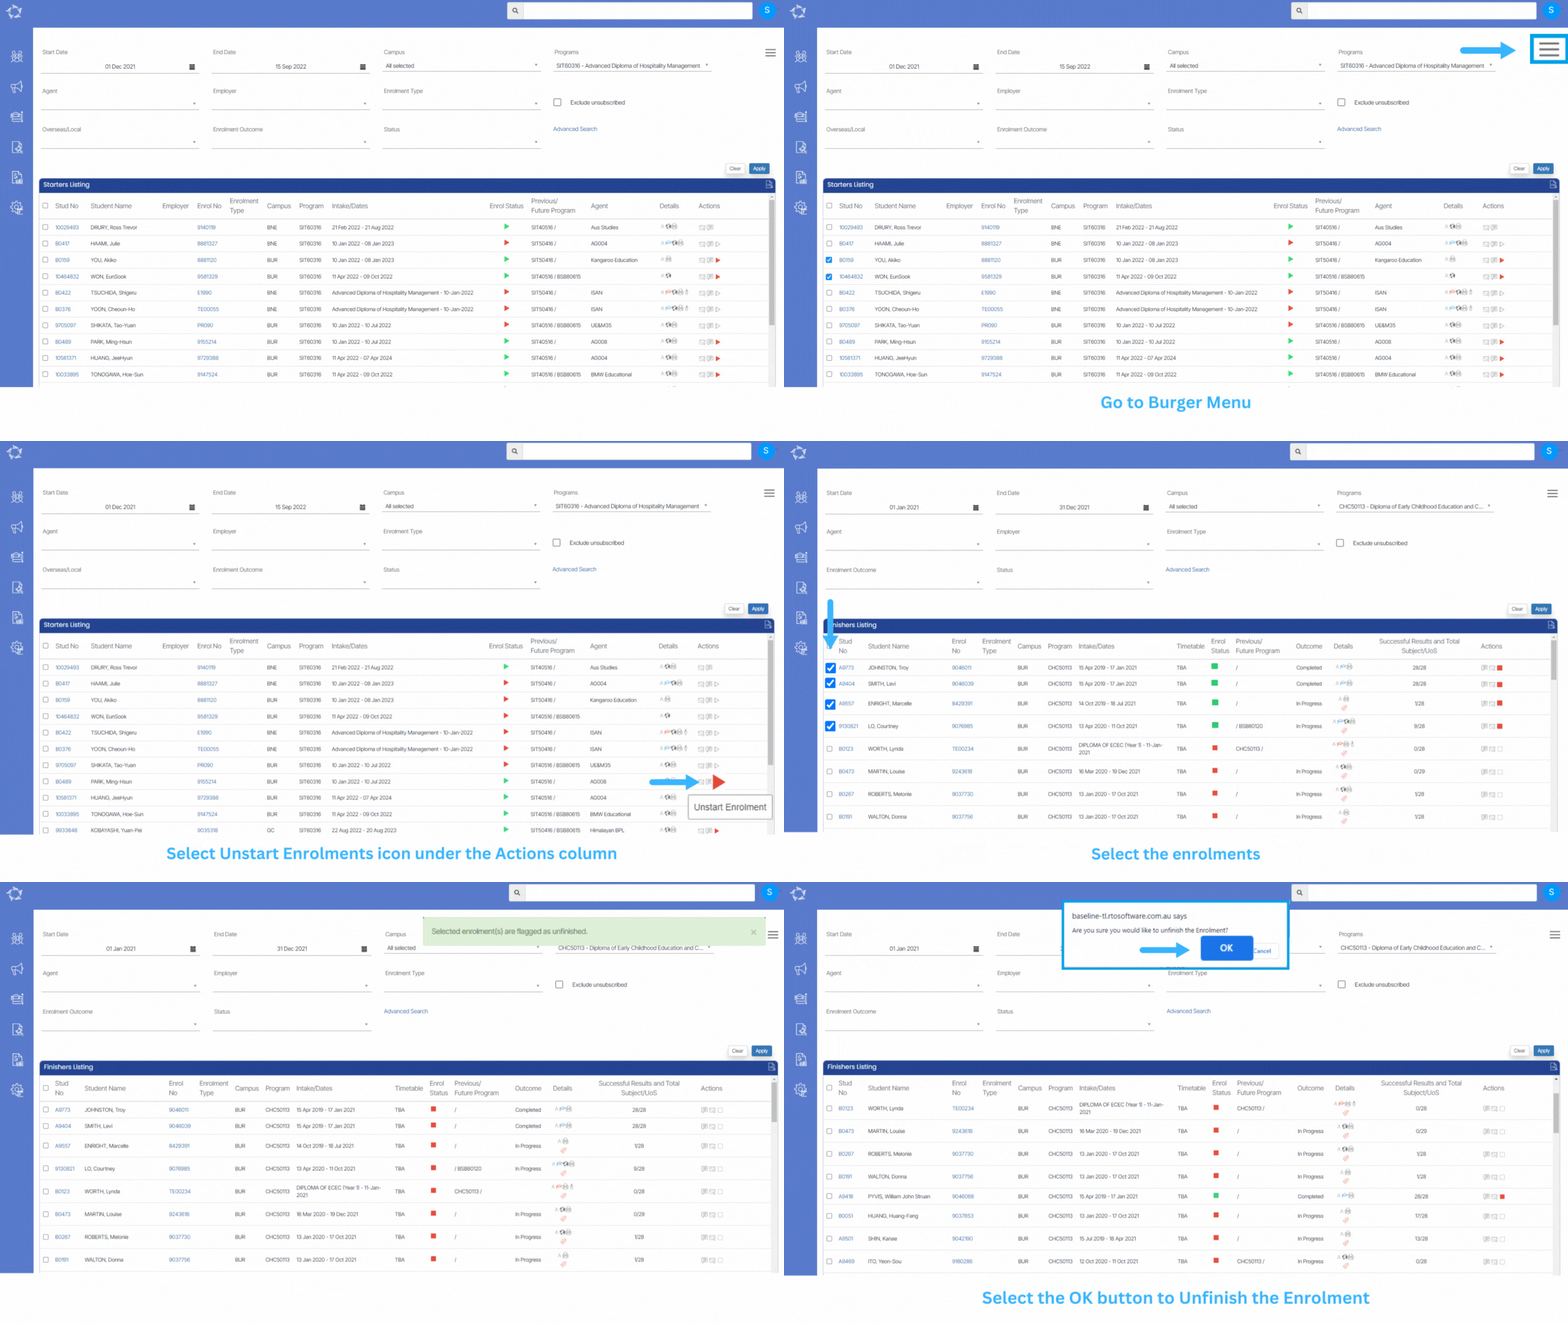
Unstart/Unfinish Enrolments In Bulk

We have introduced a new feature to Unstart/Unfinish enrolments in the system under the Starters and Finishers listing screens.

Unstart Enrolments: This feature is available under the Starters listing screen > Burger Menu > Unstart Enrolments option which allows you to Unstart the enrolments in bulk.

IMPORTANT: – In the burger menu of the Starters Listing screen, you will see an option for Unstart Enrolments. When this is selected, the system will look for the enrolments that are flagged as finished and will not allow the enrolment to be unstarted.

Note:  We have also added the icons to Unstart and Unfinish enrolments under the Actions column on the Starters and finishers listing screen.
1. Red icon will allow you to unstart the enrolments.
2. Red icon will allow you to Unfinish the enrolments.

Unfinish Enrolment: This feature is available under the Finishers listing screen > Burger Menu > Unfinish Enrolment option which allows you to Unfinish the enrolments in bulk.
Bulk generating transcripts – Certificates

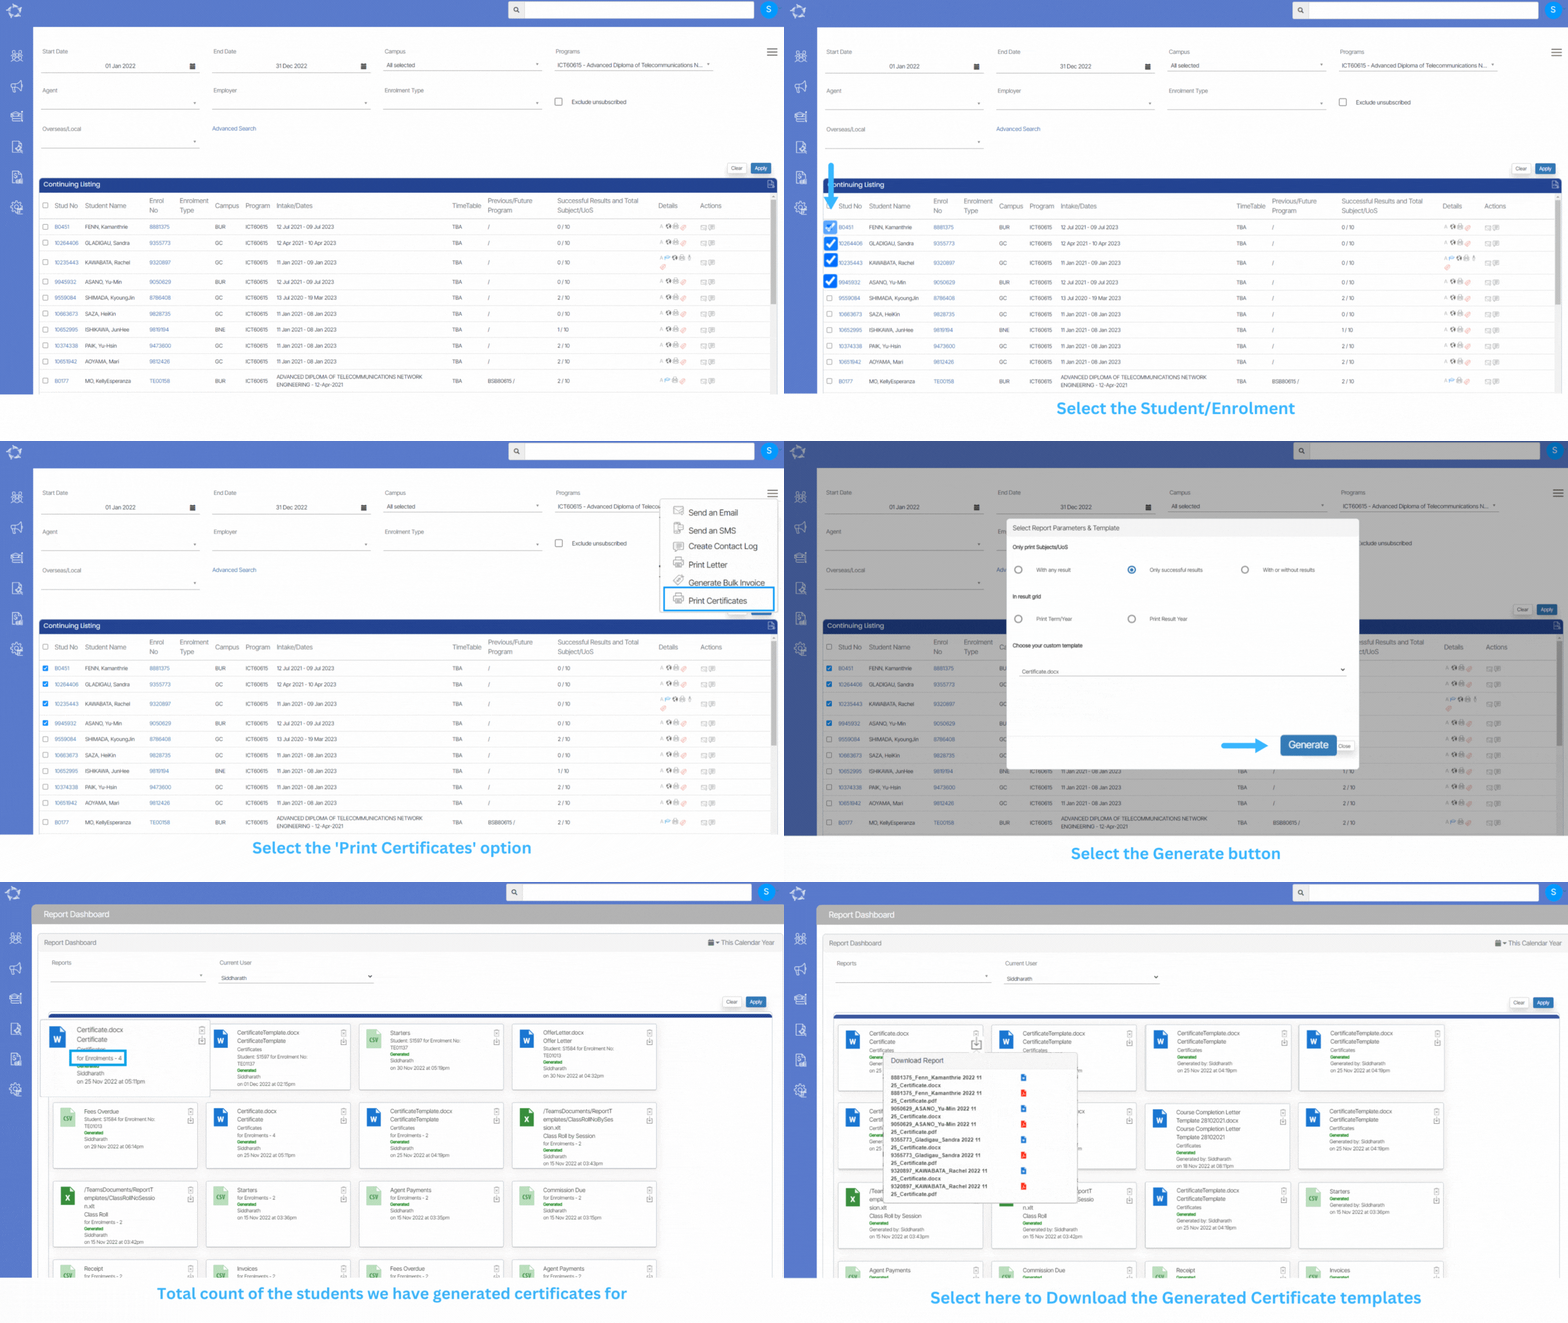
Earlier, the system used to print certificates individually for each enrolment. However, we have introduced a new feature Print Certificates in bulk from the Continuing and Finishers listing screens.

Once you generate the certificates, the system will show you a number of enrolments and generated certificates in the word and pdf versions on the Report Dashboard.

Student Dashboard – Account Manager

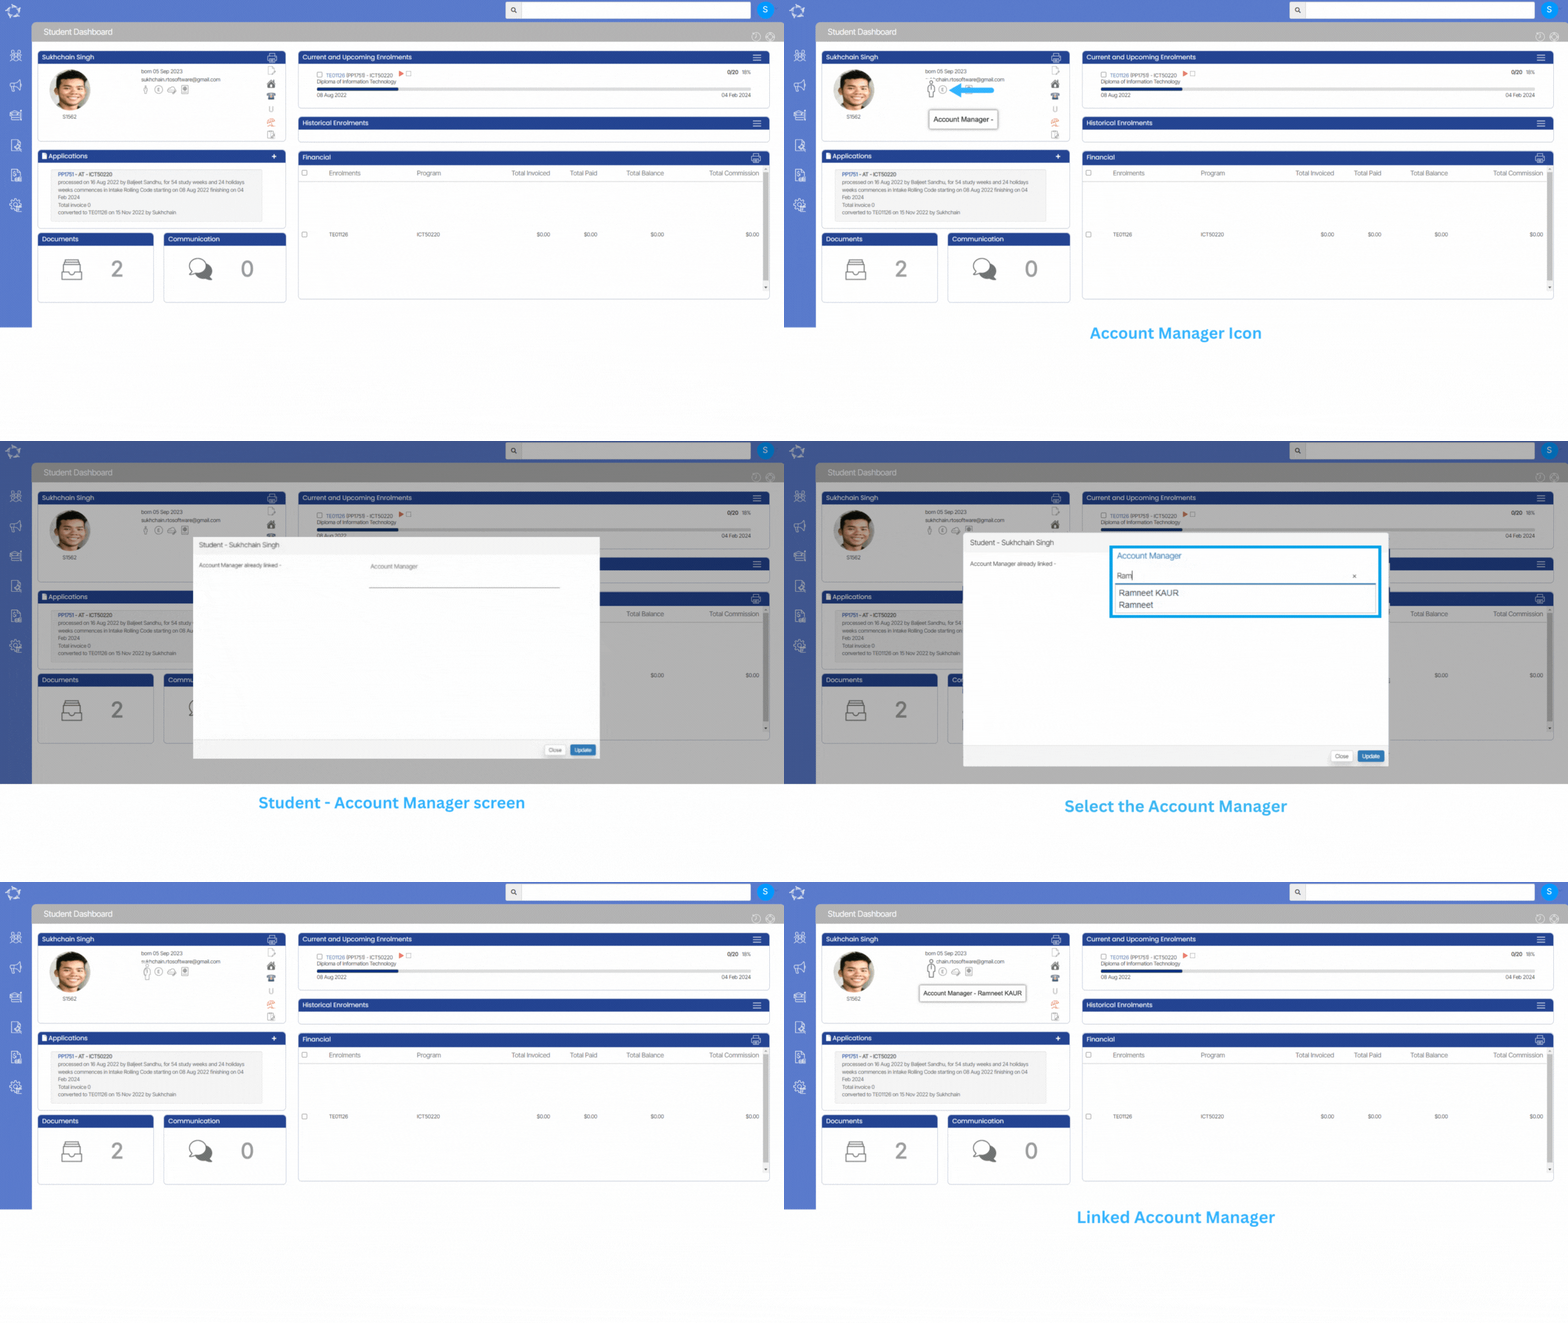
Student Dashboard > Student Profile Tile > Account Manager Icon

This icon will display the name of the account manager. If you want to change the account manager then you can change it by clicking on the icon itself. This will open a popup window where you can enter the first two letters of the account manager and it will display all the account managers starting with those letters. Select the appropriate account manager and select the update button.

Report Dashboard Word Report Changes

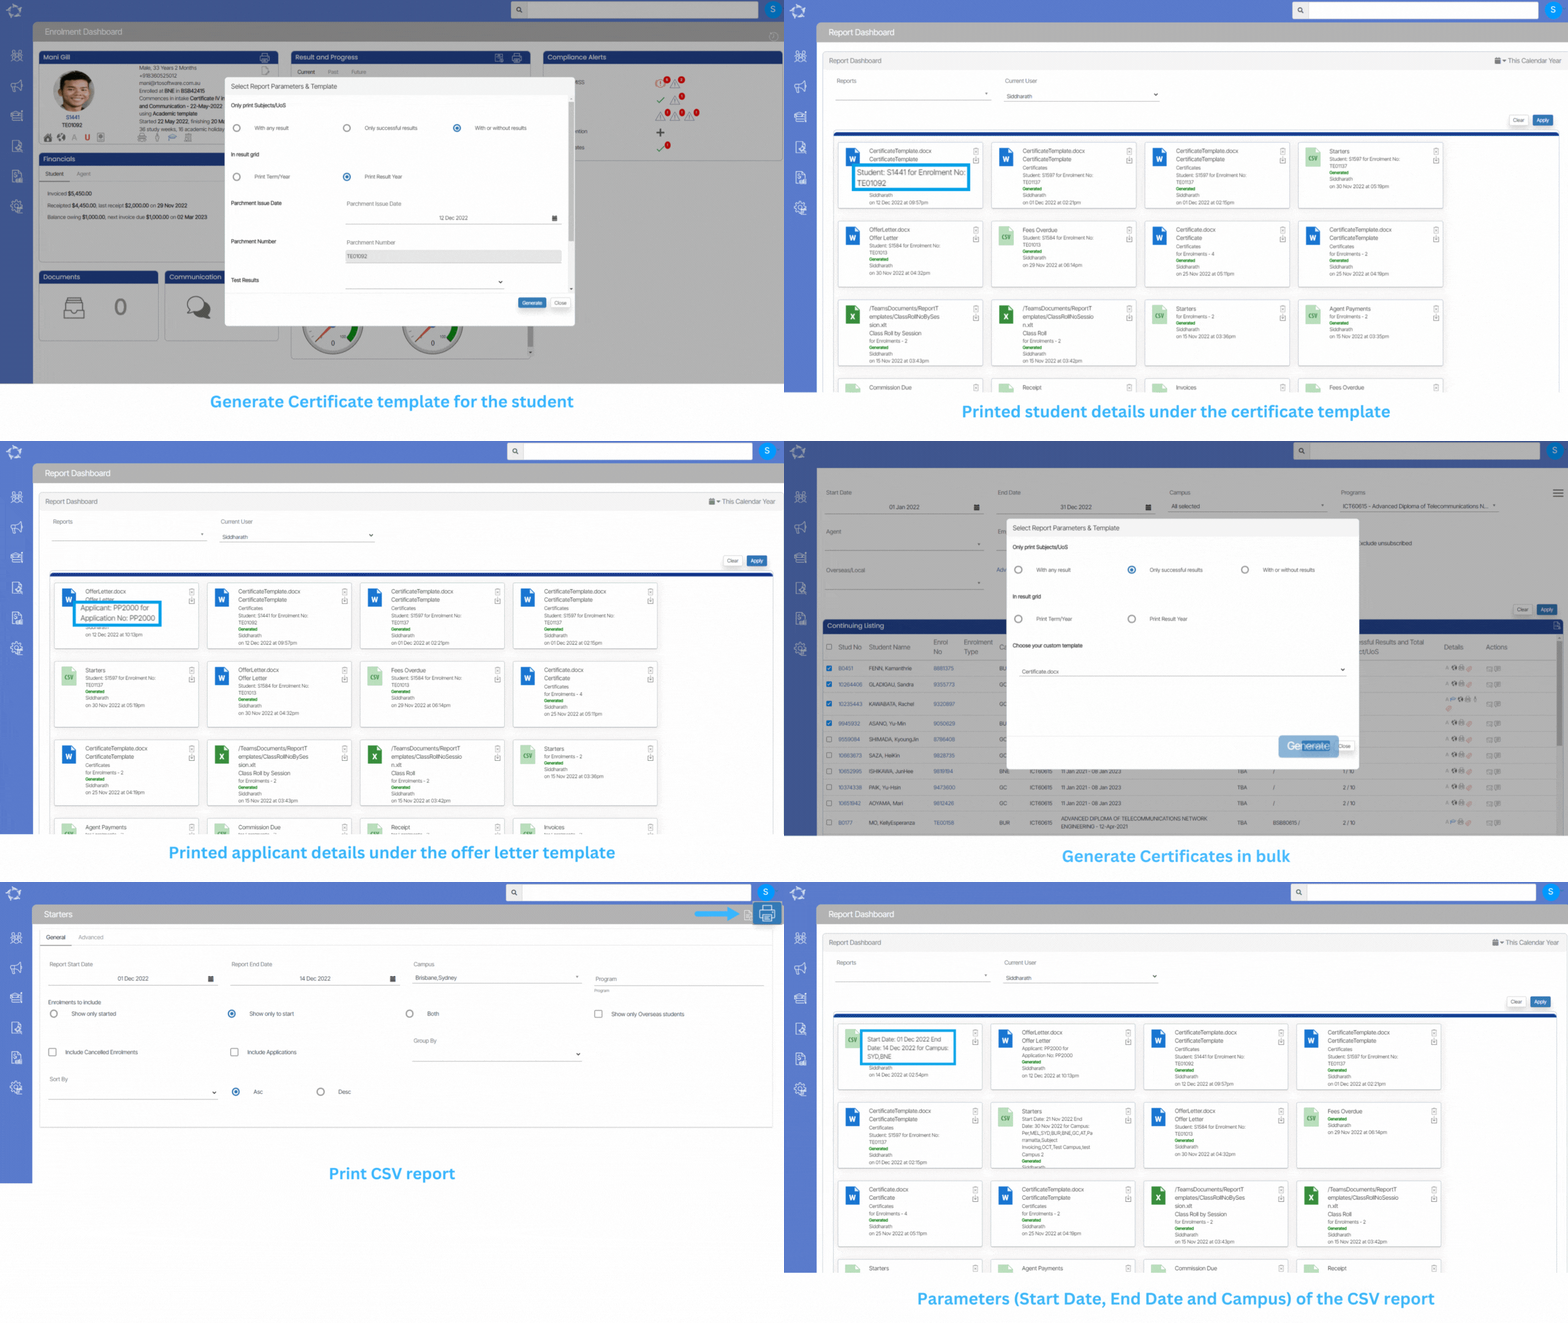
We have made some changes to Report Dashboard in the system. When you generate an offer letter or certificate for a specific student/Applicant, the system will show the student’s information such as Student Number, Enrolment Number and Application Number and if you generate certificates or offers in bulk then you will be able to see the number of applications and enrolments.

Also, for CSV reports such as Starters, Finishers, you will be able to see the parameters (Start Date, End Date and Campus) on the report dashboard.

With USIs Not Verified

Compliance Dashboard > AVETMISS Students Tile > WIth USIs Not Verified

The AVETMISS Students Tile will show you the count of students as a link With USIs Not Verified. To verify the USIs, you need to follow the below steps:

  • Select This Calendar year from the Calendar icon.
  • Select the hyperlink next to the WIth USIs Not Verified.
  • You will be taken to the Students – USIs Not Verified listing screen.
  • Select the student number hyperlink under the Student No column.
  • You will be taken to the Edit Student – USI screen.
  • Update the Student’s USI number and select the Save button.

Note: When you have verified the USI number on the Compliance Dashboard, you need to refresh the screen to see the updated count of the With USIs Not Verified.

Refunds and Transfers – Change

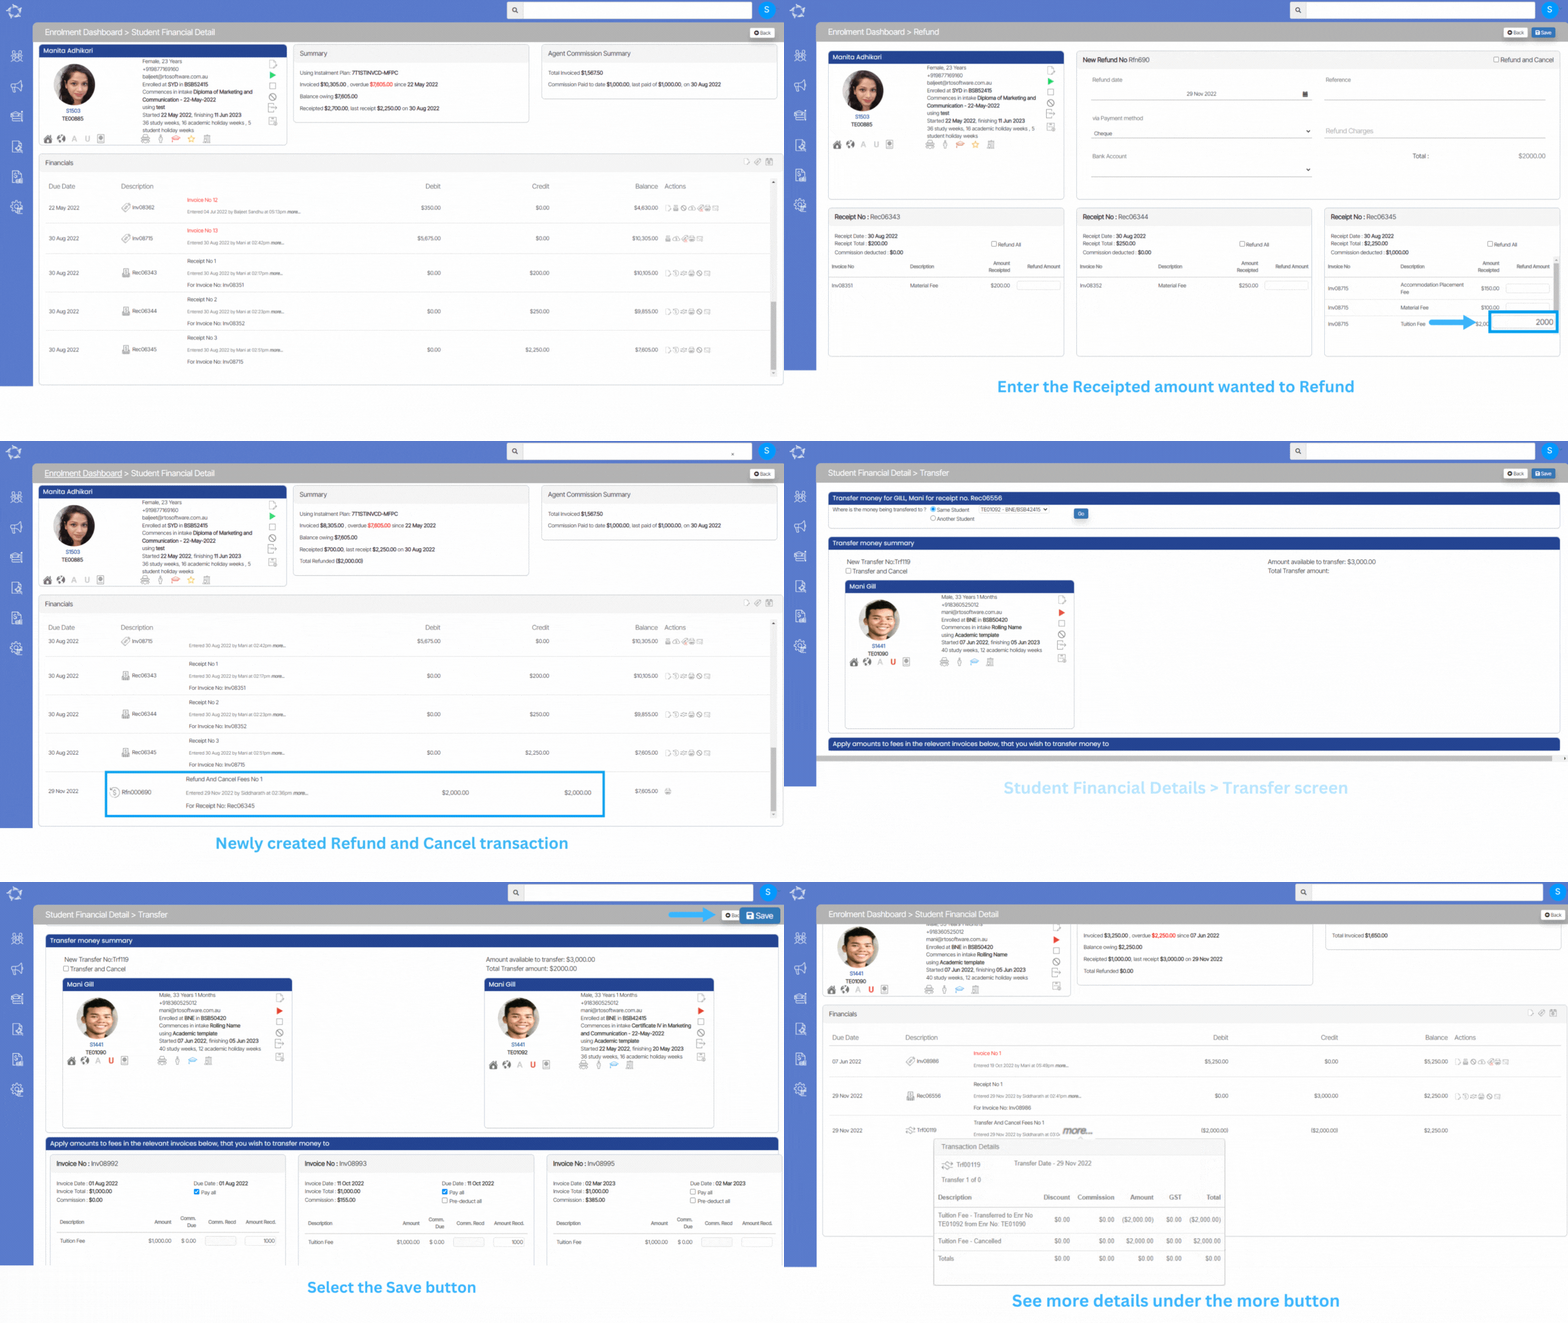
We have added new checkboxes in the Refund and Transfer screens for Refund and Cancel and Transfer and Cancel. Where you select the new tick box, the system will cancel the receipted amount against the relevant invoice. This means it could cancel the entire invoice OR the receipted amount for the fee linked in the invoice.

Refund and Cancel:

This check box has been added under the Refund screen and can be used while refunding the receipted amount. By selecting this tick box, the system will cancel that refunded amount from the total invoice amount. For example, if you have an invoice for $500 and the receipt amount is also $500. When you do a refund on the receipt amount for $500, if you select the tick box for Refund and Cancel, then the system will create the refund entry and also cancel the invoice as well. Whereas, the same invoice for $500 but there is a receipt for only $200 and you want to refund that receipted amount. The system will do the refund entry for $200 and cancel out $200 from the invoice so the invoice amount will then be only $300.

Transfer and Cancel:

This check box has been added under the Transfer screen and can be used while transferring the receipted amount. By selecting this tick box, the system will use the same logic as for Refund and Cancel, for the invoice that the receipted amount is being transferred from.

AVETMISS Students – With No USIs

Compliance Dashboard > AVETMISS Students Tile > WIth No USIs

The AVETMISS Student Tile will show you the count of students with no USI updated in the system by the With No USIs hyperlink. To update the USIs, you need to follow the below steps:

  • Select This Calendar year from the Calendar icon.
  • Select the hyperlink next to the WIth No USIs.
  • You will be taken to the Students – With No USIs listing screen.
  • Select the student number hyperlink under the Student No column.
  • You will be taken to the Edit Student – USI screen.
  • Update the student’s USI number and select the Save button.

Note: When you have updated the student’s USI number then on the Compliance Dashboard, you need to refresh the screen to see the updated count of the WIth No USIs.

AVETMISS Student – Incomplete AVETMISS Address

Compliance Dashboard > AVETMISS Student’s Tile > Incomplete AVETMISS Address

The AVETMISS Student Tile will show you the hyperlink count of students that have an AVETMISS address missing in the system. To update the addresses, you need to follow the below steps.

  • Select the This Calender Year from the Calender Icon.
  • Select the hyperlink next to the Incomplete AVETMISS Address.
  • You will be taken to the Students – Incomplete AVETMISS Address listing screen.
  • Select the student number hyperlink under the Student Number column.
  • You will be taken to the Edit Student – AVETMISS Address screen.
  • Update the Student’s AVETMISS address and select the Save button.

Note: When you have updated the Student’s AVETMISS Address then on the Compliance Dashboard, you need to refresh the screen to see the updated count of students with incomplete AVETMISS addresses.

AVETMISS Student – Survey Status Missing

Compliance Dashboard > AVETMISS – Students Tile > Survey Status Missing

The AVETMISS – Students tile will show you the Survey Status Missing for the students in the system. To update the survey status of the students, you need to follow the below steps:

  • Select This Calendar Year from the Calendar icon
  • Select the total count hyperlink next to the Survey Status Missing
  • You will be taken to the Students – Survey Status Missing Listing Screen
  • Select the tick box against the students for which you wish to update the status or
  • Select the Student Number to update the Status from the Edit Student – AVETMISS Screen
  • Select the Survey Contact Status from the dropdown and then update.

Note: When you have updated the Survey Contact Status in Bulk then on the Compliance Dashboard, you need to refresh the screen to see the count of the Survey Status Missing.

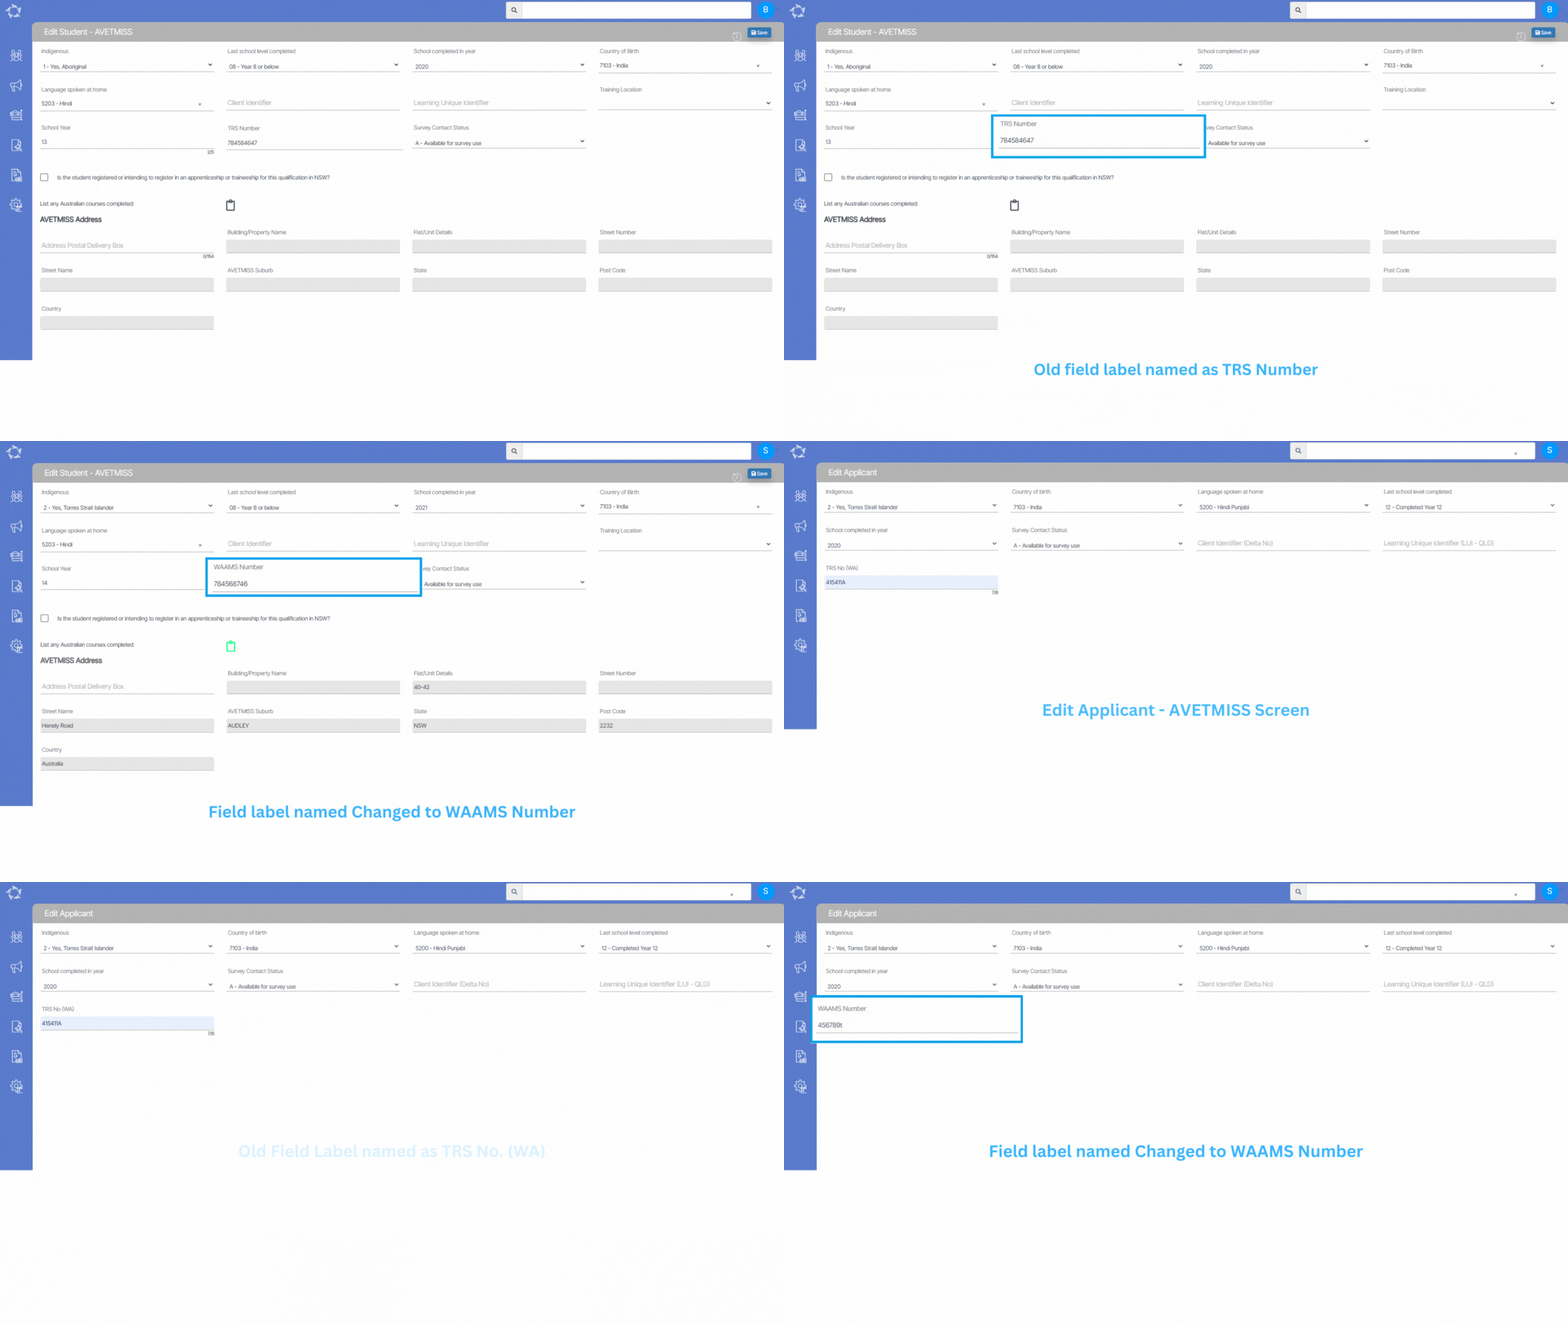
TRS Number Field Label Change

We have changed the label name from TRS Number to WAAMS Number in the system. Now the Field label will display WAAMS Number (Western Australian Apprenticeship Management).

The Change is reflected on the screens

Applicant Dashboard > Edit AVETMISS Screen

Student Dashboard > Edit AVETMISS Screen

The change reflected in the reports and templates

Offer Letter
Applicant Letters and Warnings
Student Letters and Warnings
Certificates Template
Email Template
SMS Template