TEAMS Icons

This table will show you icons that are available under the Details column, Actions column, and Applicant/Student/Enrolment profile tiles.

Details Column Icons – When you move your mouse on any icon under the details column, it will show a tooltip with the icon showing its information.

Actions Column Icons – These icons will allow you to make an entry for any student data on your TEAMS site and will take you to the relevant screens and you will find these icons on many screens within TEAMS.

Applicant/Student/Enrolment Icons – Icons under these sections will allow you to add/edit the student data from each object’s profile tile. Also, you will be able to view the information by moving your cursor to any icon which will show a tooltip on the enrolment profile tile.

Details Column IconTheir Use
This icon indicates that the enrolment is a New Student
This icon shows that the enrolment is a Returning Student
This icon will show you the name of the Account Manager
This icon will show you the overseas information of the student
This will show you the Agent Name
This icon will show you the overdue amount for the Students/Enrolments
This icon will show you the tooltip as orientation required
Actions Column IconsTheir Use
To edit the data. You will see this icon on many screens for editing.
To approve/convert a pending application to enrolment.
To decline a pending application.
To reverse the declined application.
To send out emails
To send out SMS.
To create contact logs.
To delete an entry.
To print reports.
To cancel reports.
To create New Invoice.
To create Invoice Recreation.
To Edit the receipt.
To Transfer receipted money.
To refund the receipted money.
To send a pay request email for invoices.
Subject Mapping
To start an enrolment.
To finish an enrolment.
To Submission Review.
To download the document.
To Commence Subject.
To Uncommence Subject.
Subject Mark as inactive.
Main Menu’sand Sub Menu’sTheir Use
Complicance main menu.
Finance main menu.
Navigate to Student Search sub menu.
Navigate to Class Allocation sub menu.
Navigate to Attendance sub menu.
Navigate to Results sub menu.
To generate CSV report
To generate report in Excel.
To generate report in word.
Navigate to New Enquiry sub menu.
Navigate to New Application sub menu.
Navigate to Marketing Dashboard sub menu.
Navigate to Agent sub menu.
Navigate to Agent Dashboard sub menu.
Navigate to Commission Templates sub menu.
Navigate to Campus sub menu.
Navigate to Programs sub menu.
Navigate to Unit of Studies sub menu.
Navigate to Subjects sub menu.
Navigate to Academic Template sub menu.
Navigate to Group Training Plans sub menu.
Navigate to Timetable sub menu.
Navigate to Allocate Subjects/UoS sub menu.
Navigate to GTP Allocation sub menu.
Navigate to Intakes sub menu.
Navigate to Submission Review sub menu.
Navigate to Assessments sub menu.
Navigate to Subject Dates sub menu.
Navigate to USI Request sub menu.
Navigate to Compliance Dashboard sub menu.
Navigate to Avetmiss Export sub menu.
Navigate to Avetmiss Export History sub menu.
Navigate to Student Progress sub menu.
Navigate to Attendance Monitoring. sub menu.
Navigate to Training Location sub menu.
Navigate to TPS History sub menu
Navigate to Financial Dashboard sub menu.
Navigate to Agent Transactions sub menu.
Navigate to Instalment Plans sub menu.
Navigate to Fee sub menu.
Navigate to Site Setting sub menu.
Navigate to Report Dashboard sub menu.
Navigate to Organisation sub menu.
Navigate to Report Settings sub menu.
Navigate to User sub menu.
Navigate to Audit Logs sub menu.
Navigate to Employer sub menu.
Navigate to School sub menu.
Navigate to Classrom sub menu.
Navigate to Trainers sub menu.
Navigate  to Account Manager sub menu.
Navigate to Report Template sub menu.
Navigate to Email Template sub menu.
Navigate to SMS Template sub menu.
Navigate to User Codes sub menu.
Navigate to Notes Template sub menu.
Navigate to Notification Template sub menu.
Navigate to WebForms sub menu.
Navigate to Public Holidays sub menu.
Navigate to Term Breaks sub menu.
Navigate to Quiz sub menu.
Navigate to Question Bank sub menu.
Navigate to Alert System Configuration
Navigate to Automated Action sub menu.
Navigate to Automated System Actions sub menu.
Student/Enrolment Dashboard IconsTheir Use
To update student’s AVETMISS, Local and Mailing Addresses.
To update student’s next of kin/emergency contact details.
To show you that it’s an AVETMISS student and has a VET enrolment.
To show you that the student has a VET enrolment but you haven’t set the it as AVETMISS student.
To create/update the USI for a student when it is not updated.
To show you that the USI is there in TEAMS for the student but it is not verified
To show you that the USI is verified.
For you to add student’s holidays.
To show you that there are student’s holidays updated.
To add or edit student’s conditions.
To show that the conditions are updated for the student.
To link/edit the account manager.
To update/view student’s english proficiency.
To update/view student’s visa details or CoE details.
To show you that the visa has been expired for the student.
Application DashboardTheir Use
This icon navigate to edit Avetmiss Settings.
This icon navigate to Training Plan and Results.
This icon navigate to Fee Help Setting.
This icon navigate to Employer Tracking.
This icon navigate to Edit Applicant Visa Details.
This icon will show local address of student when you hover mouse on that icon.

Commission Due Report > A New Column

Dashboard > Finance > Commission Due

We have added a new below column in the commission due report. The column is:

Commission Due to be paid

This column will show the commission which is truly due based on how much Tuition Fee a student has paid for that invoice.

Example: If a student’s invoice for tuition fee is $2,000 and the total commission is $600. And the student just paid $1,000 out of $2,000. In such a case, the newly added column will show you the commission due to be paid on $1,000. This way, it will be easy for everyone to see the commission according to how much tuition fee a student paid instead of doing the calculations manually.

Transition Process of an Enrolment

Overview

The transition of enrolment means moving a student’s enrolment from one program to another. There might be a case where a program code has been superseded with a new code. In that case, we give a facility to our users to move that enrolment from the old program code to the new program code easily.

Example: A student who is enrolled in BSB51918 – Diploma of Leadership and Management program with a start date and end date as 03 Aug 2020 to 01 Aug 2021. Now the code BSB51918 got superseded by BSB50420 on the date 18 Oct 2020. Now it’s an RTO’s responsibility to update the new program code for all the students who are currently studying BSB51918 or are enrolled with a future start date. This is where you will be using the Transition feature.

The Transition Process has a number of different steps in it. To view this post you can choose to either use the next arrow below and you will be able to walk through each step OR you can select specific links below to go directly to the relevant step.

Transitioning of old to new subjects

Enrolment Dashboard > Transition Student


The unit’s start and end date should be within the enrolment dates

On the Training plan and Results screen, where you can see all the units’ related and other information for a student’s enrolment, we have some set of business rules that you must follow to avoid certain errors/issues. This post will explain to you all those business rules.

1. The unit’s start and end date should be within the enrolment dates. For instance, if an enrolment’s start and end dates are 11 Jan 2021 and 16 Oct 2022 respectively, then all the units linked with that enrolment should have their start and end dates within these dates. The system itself will not allow you to enter the dates out of enrolment dates. The calendar will strikethrough the dates which are outside of enrolment dates. See the below screenshot:

2. A unit’s end date cannot be lesser than its start date. The system will throw an error if any user by mistake have clicked on the end date which is before its start date. And as a result, the end date will be updated the same as the start date of the unit.

3. A unit’s start date cannot be greater than its end date. If any user by mistake has clicked on the start date which is after its end date, the system will update the end date the same as the new start date.

4. Result date cannot be after the enrolment’s end date. If an enrolment’s end date is 16 Oct 2022, then the result date cannot be after this date. However, the result date can be after the unit’s end date.

5. You cannot delete a unit if it has a final outcome such as Competent, Credit Transfer, Competency not achieved/fail etc. The delete icon will disappear under the Actions column for such units.

6. Always update the final outcome for all the units once a student has completed the course to avoid errors in AVETMISS reporting. For instance, if a unit’s result is Continuing Enrolment and the end date has passed, then there will be an error for that unit in the AVETMISS reporting.

7. In case of a superseded unit, always link the new unit with the enrolment and delete the one that is no longer required to avoid errors/warnings.

8. If you are using TEAMS for assessments as well, make sure the final result is updated for the unit after you have marked the result for that unit’s assessments.

9. Update the Qualification Information section very carefully after a student has completed a course, so that the enrolment can be reported correctly.

10. All the units will display in a seq, based on the seq no. updated at the program > subject screen.

Note: If the seq no. is not updated, then the units will display in the ascending alphabetical order based on the unit code.

If you have any queries, please do not hesitate to contact us on 1300 85 05 85 or email us via support@rtosoftware.com.au

New Report Engine

In TEAMS, we have five word reports as below:

  • Offer Letter
  • Academic Docs
  • Payments
  • Invoices
  • Letters and Warnings

All the above-mentioned reports are used to customise a different set of reports/letters that you generate for students. When you generate any of the word reports in TEAMS, it directs you toward the report dashboard screen where you can see the progress of your reports if it’s generated or under processing. The existing report engine takes a bit more time to generate the reports. Hence why, we have introduced a new report engine. This reporting engine will give you the generated version of the reports in less than a minute.

What reports are on the new report engine?

1) Offer Letter
2) Invoices

We have just moved these reports for now. And in the future, we will move the remaining ones as well.

How to make the new report engine work for you?

Not all our clients using TEAMS are moved to the new report engine. Our new clients that we have onboarded to TEAMS recently are on a new report engine and we have customised their templates as well according to the new method. If you wish to be moved to the new engine as well, please contact support. They will guide you and help you move your TEAMS site to the new report engine from our developers. After your site is moved, we will help you to customise your templates in a new way. We will soon release a video on how to customise report templates in a new way.

Change in the Character Limit for SMS

SMS clients are an integral part of the GSM (Global System for Mobile Communications) network technology. SMS uses standardised communications protocols to allow fixed lines to exchange short text messages. SMS messages can be used to transport almost any kind of data (within the character limit). One of the defining characteristics of SMS messages is the maximum length of 160 characters.

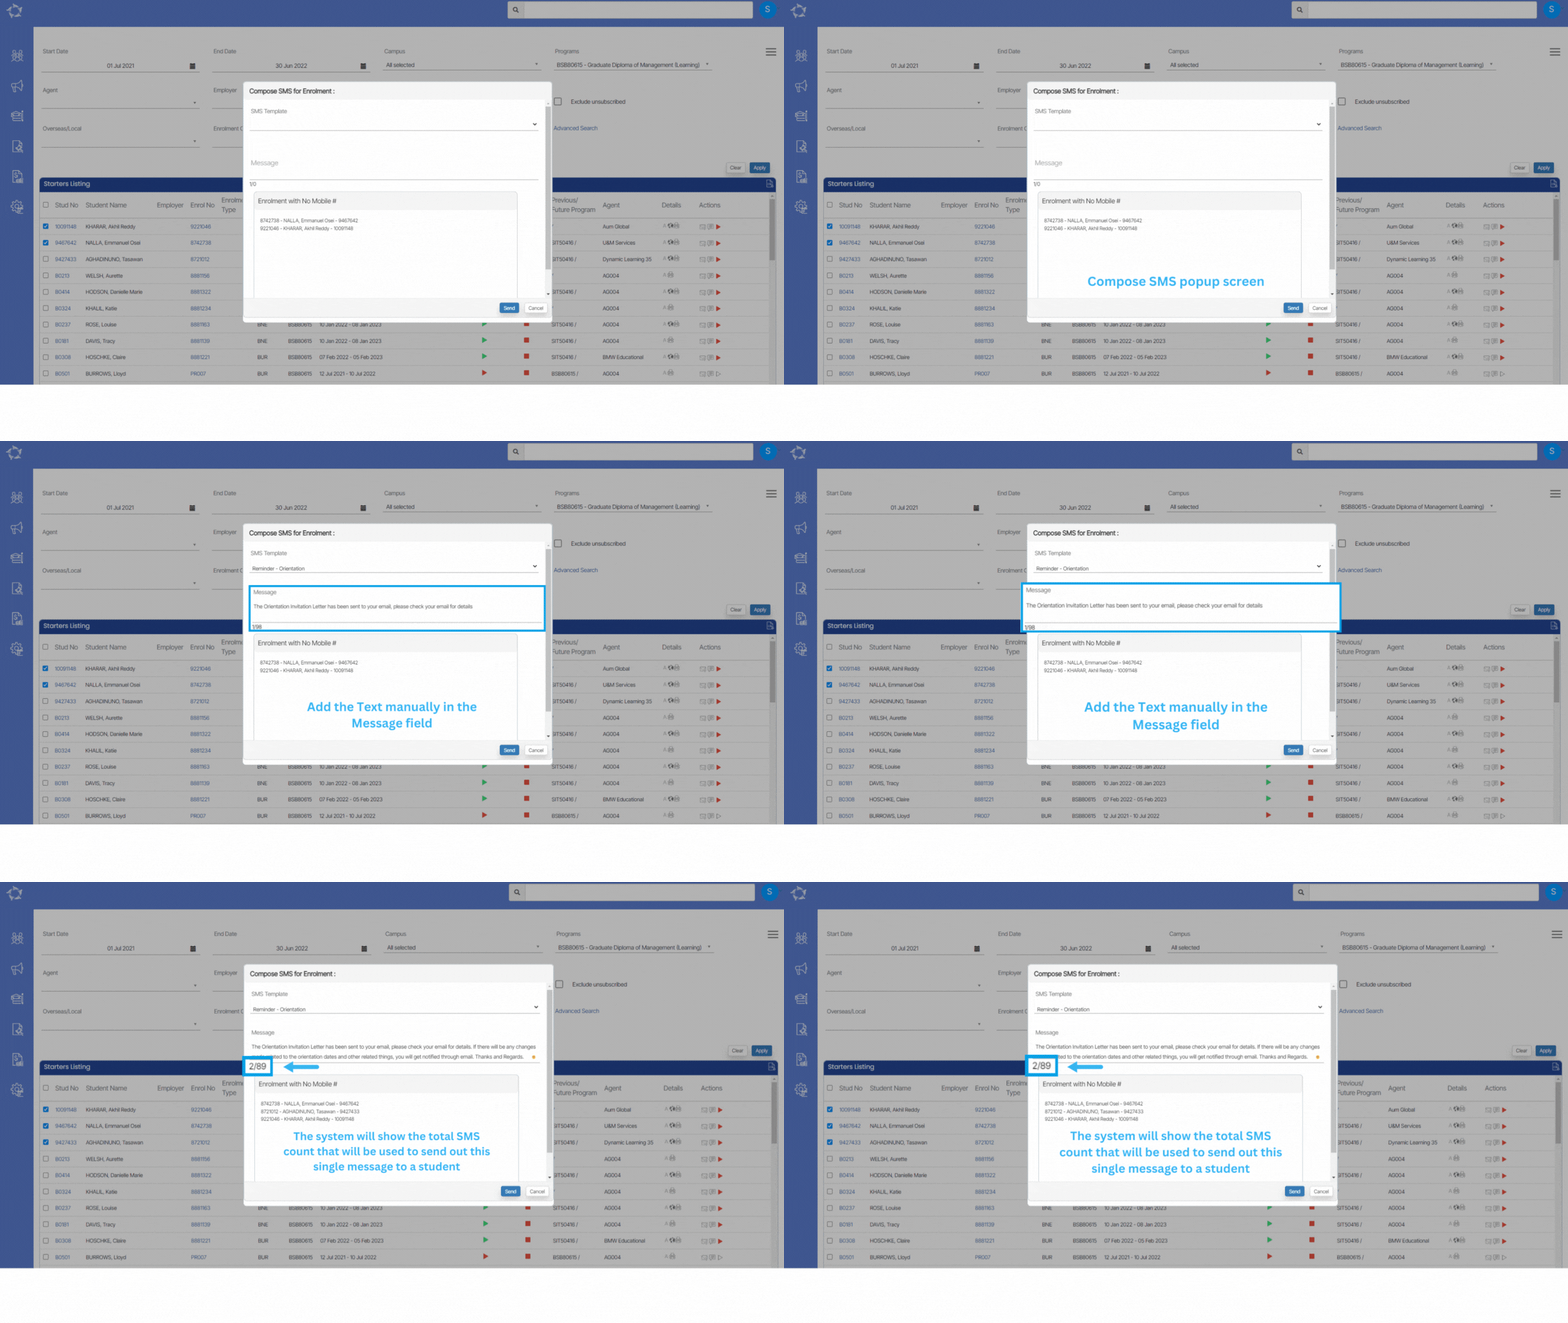
In TEAMS also, we have a limit of just 160 characters for an SMS. A user cannot send out a message which has more than 160 characters. However, we now have changed this. The character limit for a single message still remains 160 characters, but now a user will be able to type in more characters than 160 while sending SMS/s.

One message can contain just 160 characters, so the more characters, you start to type in, the more SMS count will be used. For instance, if for your RTO, the free SMS count per month is 100, and now you are going to send out a message to 2 students that have 170 characters. Your 4 SMS count will be used to send out that message to 2 students. So you will be left with a 96 SMS count for that month.

You can also buy the SMS packages that we have if you have consumed all of the free SMS quota. Kindly contact support to know more about our SMS packages.

Note: This hasn’t been introduced for SMS template screen where you can create templates for the messages. This will be done in the next few updates.

Buttons

In TEAMS, we have many buttons on different screens for you to work effortlessly. This post will explain to you all the buttons that we have and their purpose.

Buttons

Their use

To save a screen or popup window

To cancel/close the screen without saving

To apply the filters

To clear the applied filters

To close a popup window or screen

To generate word reports.

To go back to the previous screen

To go to the next step

To add data in the grid

To add a user from the User screen (System Admin > User) and please note that not every user can add another user in TEAMS. You might have to contact our support team to add new users in TEAMS.

To add an employer in TEAMS from the employer screen (System Admin > Employer). If you cannot see this screen, it means you do not have permission.

To add a school in TEAMS from the school screen (System Admin > School). If you cannot see this screen, it means you do not have permission.

To add a classroom in TEAMS from the classrooms screen (System Admin > Classrooms). If you cannot see this screen, it means you do not have permission.

To add a trainer in TEAMS from the trainers screen (System Admin > Trainers). If you cannot see this screen, it means you do not have permission.

To add an account manager in TEAMS from the account manager screen (System Admin > Account Manager). If you cannot see this screen, it means you do not have permission.

To add an email template in TEAMS from the email template screen (System Admin > Email Template). If you cannot see this screen, it means you do not have permission.

To add an SMS template in TEAMS from the SMS template screen (System Admin > SMS Template). If you cannot see this screen, it means you do not have permission.

To add a user code in TEAMS from the user code screen (System Admin > SMS Template). If you cannot see this screen, it means you do not have permission.

To add a notification template in TEAMS from the notification template screen (System Admin > Notification Template). If you cannot see this screen, it means you do not have permission.

To create a quiz in TEAMS from the quiz screen (System Admin > Quiz). If you cannot see this screen, it means you do not have permission.

To create some automations in TEAMS from the automated action screen (System Admin > Automated Action). If you cannot see this screen, it means you do not have permission.

To create other automations in TEAMS from the automated system actions screen (System Admin > Automated System Actions). If you cannot see this screen, it means you do not have permission.

To create instalment plans in TEAMS from the instalment plan screen (Finance > Instalment Plan). If you cannot see this screen, it means you do not have permission.

To add a new campus in TEAMS from the campus screen (Academic > Campus). If you cannot see this screen, it means you do not have permission.

To add a new program in TEAMS from the program screen (Academic > Program). If you cannot see this screen, it means you do not have permission.

To add a new UoS in TEAMS from the unit of studies screen (Academic > Unit of Studies). If you cannot see this screen, it means you do not have permission.

To add a new subject in TEAMS from the subject screen (Academic > Subjects). If you cannot see this screen, it means you do not have permission.

To add academic calendar in TEAMS from the academic template screen (Academic > Academic Template). If you cannot see this screen, it means you do not have permission.

To add a GTP in TEAMS from the group training plan screen (Academic > Group Training Plan). If you cannot see this screen, it means you do not have permission.

To add a timetable in TEAMS from the timetable screen (Academic > Timetable). If you cannot see this screen, it means you do not have permission.

To create a class for a timetable from the timetable step 2 screen.

To finish a process in TEAMS. For instance, class allocation process, timetable creation process etc.

To delete a class for a timetable.

To delete the current and onwards classes for a timetable.

To add an intake in TEAMS from the intake screen (Academic > Intake). If you cannot see this screen, it means you do not have permission.

To have a list of all the enrolments after updating the filters on screens like Subject Dates (Academic > Subject Dates), Results (Student Management > Results) etc. and these screens are permission based.

To create a new application.

To attach documents from TEAMS's document log while sending email/s.

To attach documents from your computer/network while sending email/s.

To send emails/SMS from TEAMS.

To add a new enquiry in TEAMS.

To add a new agent in TEAMS from the agent welcome screen (Marketing > Agent). If you cannot see this screen, it means you do not have permission.

To open another screen for financial items depending upon the screen you are on.

To add a new pending commission payment for an agent. This is based on the system setting for your RTO. If you cannot see this, it means, the system setting is not turned on for your RTO. This is accessible from Marketing > Agent Dashboard > Profile section.

To create a new commission rate template for an agent from Commission Templates screen (Marketing > Commission Templates). If you cannot see this screen, it means you do not have permission.

To have the list of classes for a timetable from the attendance step 1 screen if there is more than one class for a timetable. This is also used to have a list of enrolments to mark the attendance after updating the date range on the Attendance & Results screen. This is visible from Student Management > Attendance.

This is to load classes for the selected timetables on the filters/parameters screen for ASQA class roll report (Student Management > ASQA Class Roll).

To add holidays for a student.

To create a USI for a student.

To verify a USI for a student.

To cancel an enrolment.

To update some of the mandatory AVETMISS settings in bulk for students, enrolments, subjects and programs.

To see/view old AVETMISS fileds settings that are no longer used from Enrolment Dashboard > AVETMISS settings.

To load subjects while transitioning a student's enrolment from one program to another program.

To allocate a student into a class from Enrolment Dashboard.

To load classes to allocate for a student's enrolment within the selected date range from Enrolment Dashboard > Class Allocation Screen.

Grids

In the system, where you need to view multiple rows of similar data it will be displayed in grids. There are two types of grids that you will see in the system that are as follows:

Type 1: Read only Grids

Read only grids allow you to view data and do transactions but you cannot directly edit the entry from the grid. You will find these types of grids in our listing screens such as the one below for the Continuing Listing screen that shows you a list of your current students at the college.

Type 2: Editable Grids

This type of grid allows you to edit the data directly from the rows in the grid or select the Edit Icon in the action column for the row and the system will display a popup screen for you to edit the information and save the changes.

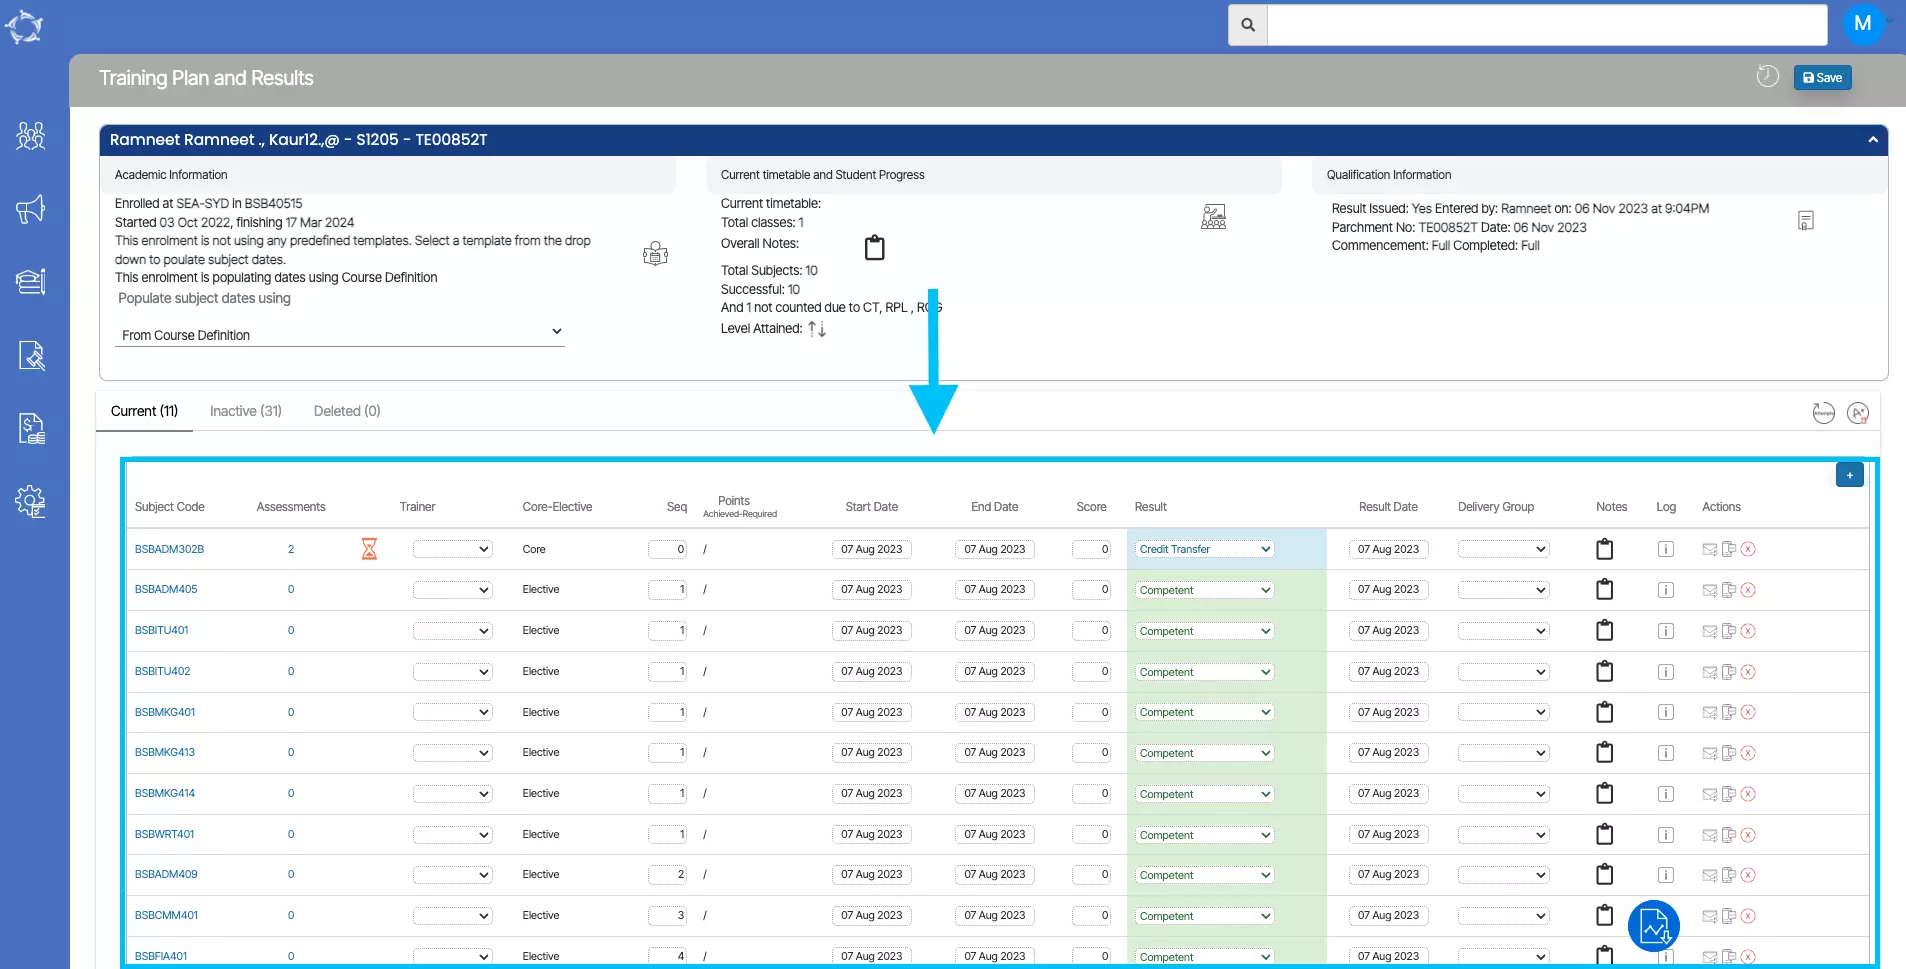
Below is a screenshot of the grid in the Training Plan and Results screen. This grid allows you to edit the data in the grid itself, however, you must remember to select the Save button at the top of the screen once you have finished editing the data in the grid.

Below is an example of the editable grid where you edit the row and the system displays a popup window as shown in the example screenshot below for the Intervention Process screen.

For both grid types, there will be specific columns in them based on what screen and type of data you are looking at. The columns are Details and Actions.

Details Column in grids

This column will generally be seen in List screens such as the Starters Listing screen where you will see a list of students and their enrolments as shown below.

Student Dashboard – Bulk Generate Academic Docs

In TEAMS, academic docs consist of students’ certificates, transcripts, record of results, statement of attainment, completion letter and any summary document for a student’s units. You were only be able to generate the academic docs from Enrolment Dashboard only. However, now you will be able to generate the academic docs in bulk from the Student Dashboard as well.

The option is available on the student dashboard > Burger Menu > Academic Docs

This new option is available under both the tiles – Current and Upcoming Enrolments and Historical Enrolments

To use this option, select your enrolments for which you wish to generate the Academic Doc in bulk.

Important to Consider before using this option: This option can only be used if you are going to generate the academic doc for the same program. Let’s take an example, a student who started studying SIT30816 in Jan intake and in between the studies, he wanted to have a break for let’s say 2-3 months due to some personal reason. In that case, some RTO keep the same enrolment and apply student’s personal holidays with that enrolment. However, that’s not the case with every RTO. Some RTO terminate that enrolment and create a new enrolment into the same course for remaining units which student hasn’t completed in the previous enrolment. They create it when student arrives after his holidays. Hence why, in such cases, there will be more than 1 enrolment for that student into the same course.

After student finishes both the enrolments and asks for a certificate or transcript etc, it becomes difficult for an RTO to issue such documents. They manually have to edit it to have all units in one transcript because some results are marked in one enrolment and some in another enrolment.

To make it easy for such RTOs, we have introduced this feature, where they can generate the academic docs in bulk for these cases.

After you have selected your enrolments, go to the Burger Menu > Academic Docs.

The system will direct you towards another screen as below:

More Details about the screen: This screen will show you some basic details for the enrolments that you have selected to generate academic doc. It will also show you the results for the enrolments for each unit.

To demonstrate, a student has two enrolments in the same course SIT30816 and there are total of 25 units for SIT30816 each enrolment. The 1st enrolment, in which the student completed some of the units, has a final outcome and 2nd enrolment has final outcome for remaining units. This screen will show you 50 units in total – 25 each enrolment. It will show you what the result and result date are for each unit. However, it will print only 25 units in the academic doc that you are going to print. It will not populate the units from the 2nd enrolment if it already has a final outcome in the 1st enrolment. Logically, a transcript will have just 25 unique units for SIT30816 that student has completed with your RTO.

Select your parameters/filters that you usually use to generate the academic docs. Update Parchment Issue date and Parchment number as well. Select your template.

After you have updated your parameters/filters, hit the Print icon.

The system will direct you towards the report dashboard screen from where, you can download the generated report.

This is how you can generate the academic docs in bulk from the Student Dashboard.

Report/Screen Filters

Filters, or parameters, can be used to narrow down the data displayed on the screen, or in the reports you generate. While this may sound like grouping, filtering is different because it allows you to qualify data and display only the data that matches the parameters you select.

Filter Name

Report/Screen

Location

Description

Campus

Both

Student Search

Class Allocation

Attendance & Results

Results

Starters

Finishers

Results Achieved

Student Results Listings

Class Roll

Current Students

Class Roll by Session

ASQA Class Roll

Agents List

Agent Entry

Applications Processed

Application Status

Agent Performance

Campus Welcome Screen

Unit of Study Welcome Screen

Timetable Welcome Screen

Allocate Subjects/UoS

GTP Allocation

Submission Review

USI Request History Screen

Qualifications Issued Register Screen

AVETMISS Export – State Format

AVETMISS Export – National Format

Student Performance

Student Progress Matrix

Campus is different  branches at different location of an training organisation

Student Number

Student Search

Submission Review

Unique Numbrer given to each student as identification

First Name

Student Search

First name of the student

Last name

Student Search

Last name of the student

Preferred Name

Student Search

Name that is preferred by student

DOB

Student Search

Date of Birth of the student

Mobile Number

Student Search

Mobile number of the student

Email Address

Student Search

Email address of the student

Programs

Both

Class Allocation

Results

Starters

Finishers

Results Achieved

Current Students

Applications Processed

Program Welcome Screen

Group Training Plan Welcome Screen

Allocate Subjects/UoS

GTP Allocation

Submission Review

Qualifications Issued Register Screen

AVETMISS Export – State Format

AVETMISS Export – National Format

Student Performance

Student Progress Matrix

Programs are diiferent cousrses that are provided by training organisations

Subjects

Both

Class Allocation

Results

Results Achieved

Student Results Listings

Subjects Welcome Screen

Timetable Welcome Screen

Allocate Subjects/UoS

Submission Review

Subjects are units that student has to complete in particular program

Unit of Studies

UoS Welcome Screen

Timetable Welcome Screen

Allocate Subjects/UoS

Submission Review

Unit of study means subject that a student undertakes as a part of a course of study

Intake

Screen

Class Allocation

Results

Timetable Welcome Screen

Allocate Subjects/UoS

GTP Allocation

USI Request History Screen

Qualifications Issued Register Screen

Student Progress Matrix

Intakes can be be defined as program start date for an international student.

Group Training Plan

Both

Class Allocation

Results

Group Training Plan Welcome Screen

GTP Allocation

The Group Training Plan is used to define the unit’s date in the system

Enrolments to include

Screen

Class Allocation

Starters

Finishers

Student Results Listings

Current Students

Student Holidays Report

Applications Processed

Agent Performance

GTP Allocation

Student Performance

Student Progress Matrix

It let us choose current enrolments or enrolments that are yet to be started

Enrolment Type

Both

Class Allocation

Starters

Finishers

Student Results Listings

Current Students

GTP Allocation

Qualifications Issued Register Screen

AVETMISS Export – State Format

AVETMISS Export – National Format

Student Performance

Enrolment type means tyoe of enrolment for eg: test enrolment

Attendance Start Date

Both

Attendance & Results

Attendance start date is a date from which you want to mark attendance

Attendance End Date

Both

Attendance & Results

Attendance end date is a date till which you want to mark attendance

Select Timetable

Both

Attendance & Results

Results

Starters

Finishers

Results Achieved

Student Results Listings

Class Roll

Current Students

Class Roll by Session

ASQA Class Roll

Timetable Welcome Screen

Allocate Subjects/UoS

GTP Allocation

Student Performance

Timetable shows when a particular class will start its end date, trainer who will teach and etc

Trainers

Both

Attendance & Results

Results Achieved

Timetable Welcome Screen

Trainers are persons who trains students particular modules or programs

Classes

Both

Results

Student Results Listings

GTP Allocation

Student Performance

Different classes are allocated to stundents as per their program classes consist of modules that trainer will teach in particular time period

Enrolment Between

Screen

Results

Enrolment between means date range in which enrolmennt lie


Result/Outcome

Both

Results

Starters

Finishers

Current Students

Qualifications Issued Register Screen

Student Performance

Result/ outcome means outcome wheather student has completed a particular program or not 

Result Date

Both

Results

Result date is a date when student receives results

Report Start Date

Screen

Starters

Finishers

Results Achieved

Student Results Listings

Current Students

Student Holidays Report

Applications Processed

Application Status

Agent Performance

Student Performance

Student Progress Matrix

Report Start Date is a date from which we want our Report to start

Report end date

Screen

Starters

Finishers

Results Achieved

Student Results Listings

Current Students

Student Holidays Report

Applications Processed

Application Status

Agent Performance

Student Performance

Student Progress Matrix

Report End Date is a date from till when we want our Report to end

Show only Overseas students

Both

Starters

If we select that tick box we will get only overseas students in our report

Inclue Cancelled Enrolments

Screen

Starters

Finishers

If we tick that box we will also get cancelled students in our report

Include Applications

Both

Starters

If we tick this box we will get application number in our report

Group By

Screen

Starters

Finishers

Results Achieved

Student Results Listings

Current Students

Applications Processed

Application Status

Agent Performance

Student Performance

Group by is used to group students in report according to ticked results in Group by for e.g - DOB, County and agent etc

Sort By

Screen

Starters

Finishers

Results Achieved

Student Results Listings

Class Roll

Current Students

Class Roll by Session

ASQA Class Roll

Student Holidays Report

Applications Processed

Application Status

Agent Performance

Student Performance

Sort by is used to group students in report according to ticked results in Sort by for e.g - DOB, County, student No & Enrolmemt No etc

Visa Type

Both

Starters

Finishers

Student Holidays Report

Visa type is filter that we can use incase we want to search student with particular visa types

Agent

Both

Starters

Finishers

Current Students

Application Status

Employer

Both

Starters

Finishers

Student Results Listings

Current Students

Application Status

Qualifications Issued Register Screen

Account Manager

Both

Starters

Finishers

Current Students

Agents List

Application Status

Agent Performance

Student Performance

Country

Both

Starters

Finishers

Current Students

Agents List

Nationality

Both

Starters

Current Students

Application Status

Marketing Source

Both

Starters

Current Students

Agents List

Agent Entry

Application Status

Level of Student

Both

Starters

Result Date

Both

Results

Results Achieved

Subject End date

Both

Results Achieved

Show Types

Screen

Results Achieved

Show inactive subjects and unit of studies

Student Performance

Inculde Finished Enrolments

Enrolments with Selected Module/but No results

Enrolment Dates

Result Entry Date

Print Modules: All 

Print Modules: With results

Print Modules: With Unsuccessful results

Print Modules: With no results

Print Attempt Records

Show Enrolments type of: Active

Show Enrolments type of: Inactive

Show Enrolments type of: Both

Enrolment No

Both

Student Results Listings

Week Starting Date

Both

Class Roll

Class Roll by Session

ASQA Class Roll

Students to Include: All Students

Screen

Class Roll

Class Roll by Session

Students to Include: Only Started Students

Class Roll by Session

Show only Smart and Skilled enrolments

Current Students

Include students on holiday

Current Students

Week End Date

Sreen

ASQA Class Roll

Session

Screen

ASQA Class Roll

Print

Screen

ASQA Class Roll

Report Includes: Holidays Active Between

Report Includes: Starting Between

Report Includes: Either Starting Or Ending Between

Print Timetable Sessions

Student

Student Holidays Report

Holiday Type

Student Holidays Report

Academic Schedule

Student Holidays Report

Commission Template

Screen

Agents List

Regions

Both

Agents List

Agent Performance

Agent Type

Screen

1. Agents Welcome  List

2. Agent Entry

Agent Name

Both

Agent Entry

Agent Performance

Commission Template Name

Screen

Commission Templates

Date based on

Screen

Application Status

Overseas/Local Student Status

Both

Application Status

Include Inactive Campuses

Campus Welcome Screen

Include Inactive Programs

Program Welcome Screen

Include Inactive UoS

UoS Welcome Screen

Include Inactive Subjects

Subjects Welcome Screen

Academic Template Code or Name

Academic Template Welcome Screen

Include Inactive academic template

Academic Template Welcome Screen

Include inactive Group Training Plans

Group Training Plan Welcome Screen

Classroom

Timetable Welcome Screen

Include inactive Timetables

Timetable Welcome Screen

Start Date

Allocate Subjects/UoS

GTP Allocation

AVETMISS Export – State Format

End Date

Allocate Subjects/UoS

GTP Allocation

AVETMISS Export – State Format

Look at Enrolment Start date only

GTP Allocation

Intake Code

Intake Welcome Screen

Assessment

Submission Review

Assessment Welcome Screen

Submission Review: Status

Submission Review

Name of the Student 

Submission Review

Qualifications Issued Register Screen

Object Type

Assessment Welcome Screen

USI

Qualifications Issued Register Screen

Completed Status

Qualifications Issued Register Screen

Which format do you wish to use: State

AVETMISS Export

Which format do you wish to use: State: National

AVETMISS Export

State

AVETMISS Export – State Format

Export Special Contract Only

AVETMISS Export – State Format

Select enrolments to export

AVETMISS Export – State Format

AVETMISS Export – National Format

Purchasing Contracts

AVETMISS Export – State Format

Calender Year

AVETMISS Export – National Format

Report based on: Subjects

Student Performance

Report based on: Unit of Study

Student Performance

Date based on: Enrolment Dates

Student Performance

Date based on: Subjects/UoS start and end dates

Student Performance

Show only VET enrolments

Student Performance