XERO Integration

TEAMS can be integrated with XERO for your students and agents financials. To start the integration, an initial setup is required with the assistance of our technical team. Below are our requirements to start the integration:

  • You need to provide us with a list of your charts of accounts from XERO.
  • We will provide you with a list of mapped TEAMS fees along with your chart of account codes.

NOTE – Your approval is a crucial step in this process. This is because any incorrectly mapped fees with an inaccurate chart of accounts codes will be pushed to XERO with the incorrect code. To prevent such issues, it is essential to carefully review and approve the provided list. Nevertheless, we are happy to offer you the list of all TEAMS fees, giving you the option to conduct the mapping independently.

  • You need to provide us with your bank account details.
  • A XERO login for us with some admin permissions.

Our technical team will update the XERO chart of accounts codes with each fee entry in TEAMS along with the bank accounts.

What can you expect from this integration?

  1. Students’ contacts will be created in XERO.
  2. Your students’ invoices will be pushed to XERO out of TEAMS.
  3. Any payment entered in TEAMS for the student’s invoice will be pushed to XERO.
  4. Your agents’ commission invoices will be pushed to XERO out of TEAMS.
  5. Your agents’ pre-deducted and post-paid commissions payments entered in TEAMS will be pushed to XERO.
  6. Any modifications made to an invoice within TEAMS will automatically reflect in XERO. This includes changes to the due date or invoice amount, ensuring consistent updates in both systems.

When will a contact and their invoices be pushed to XERO?

Once you start a student’s enrolment in TEAMS, the XERO API will create the contact for that student in XERO along with the student’s invoices.

Click here to learn on how to start a student’s enrolment into TEAMS.

To start enrolments in bulk, follow this post.

Even without starting a student’s enrolment if you record a receipt in TEAMS, it will then be pushed to XERO automatically. This is for those students who are future starters and have paid their first initial deposit.

Click here to learn on how to record a receipt into TEAMS.

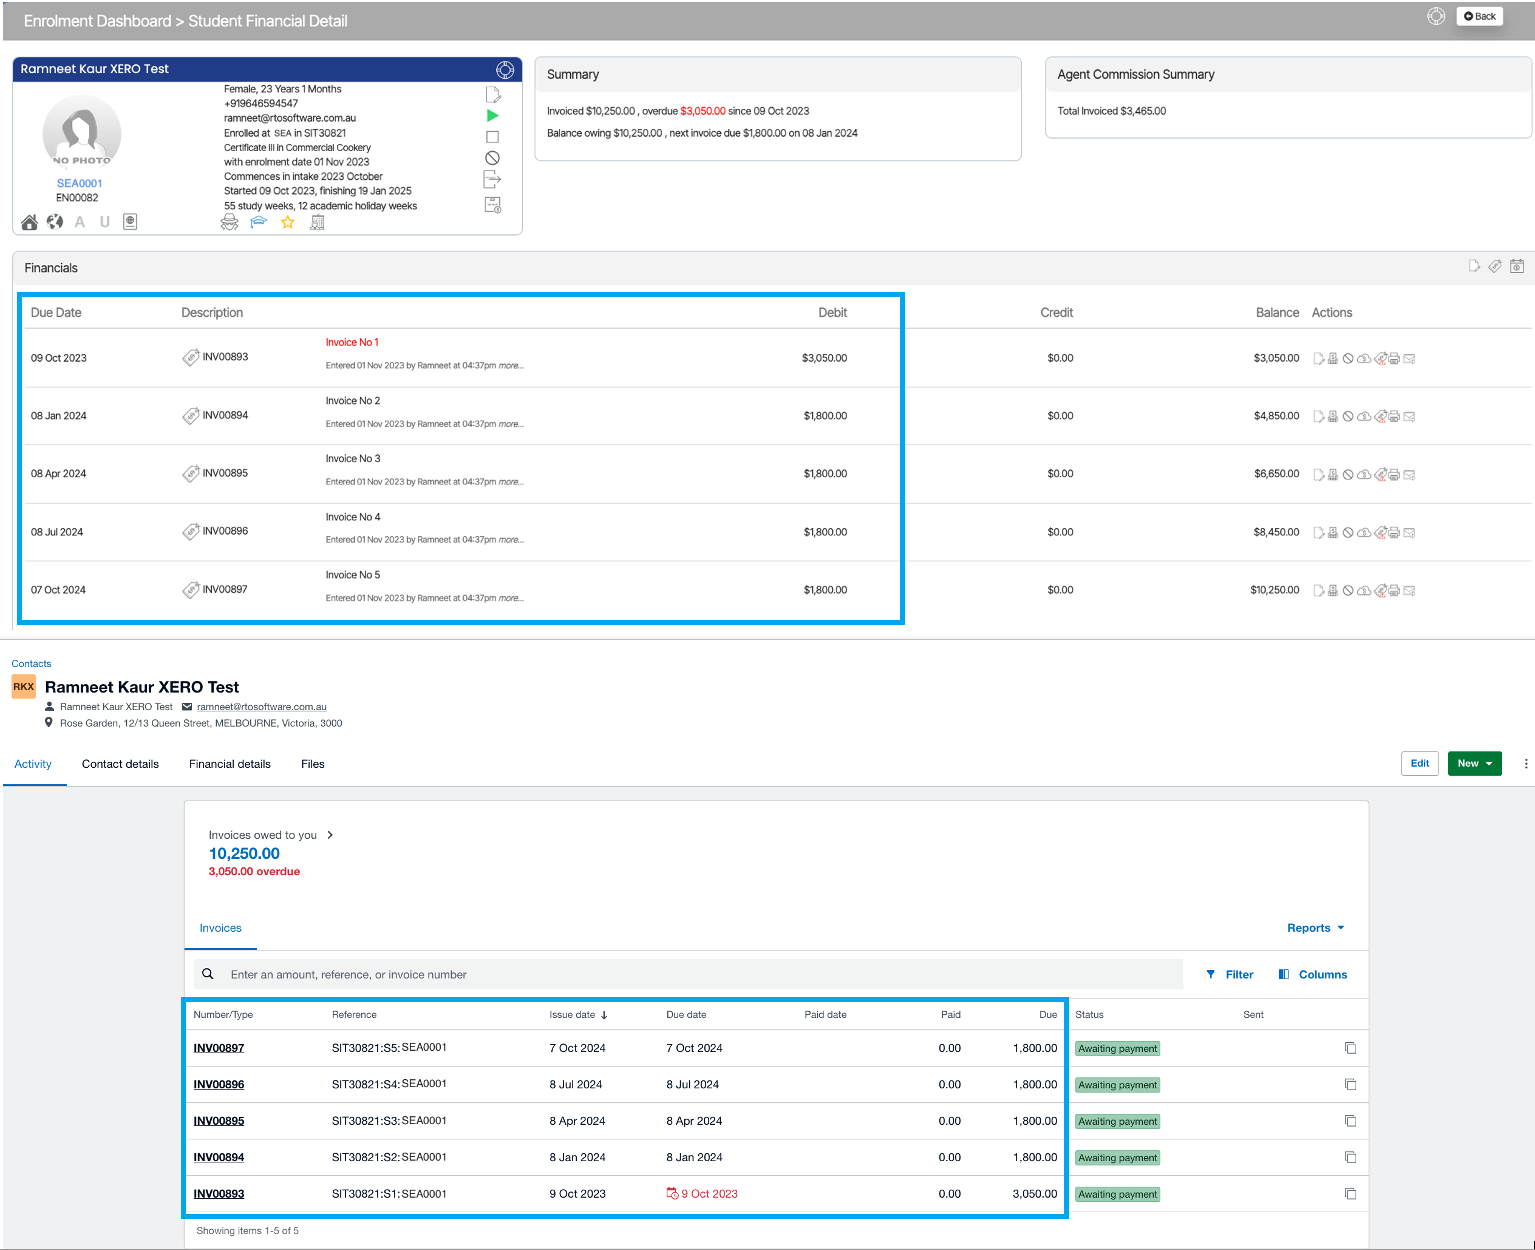
To see a contact, you can use any of the below highlighted paths in XERO:

How will a contact with TEAMS Invoices look in XERO?

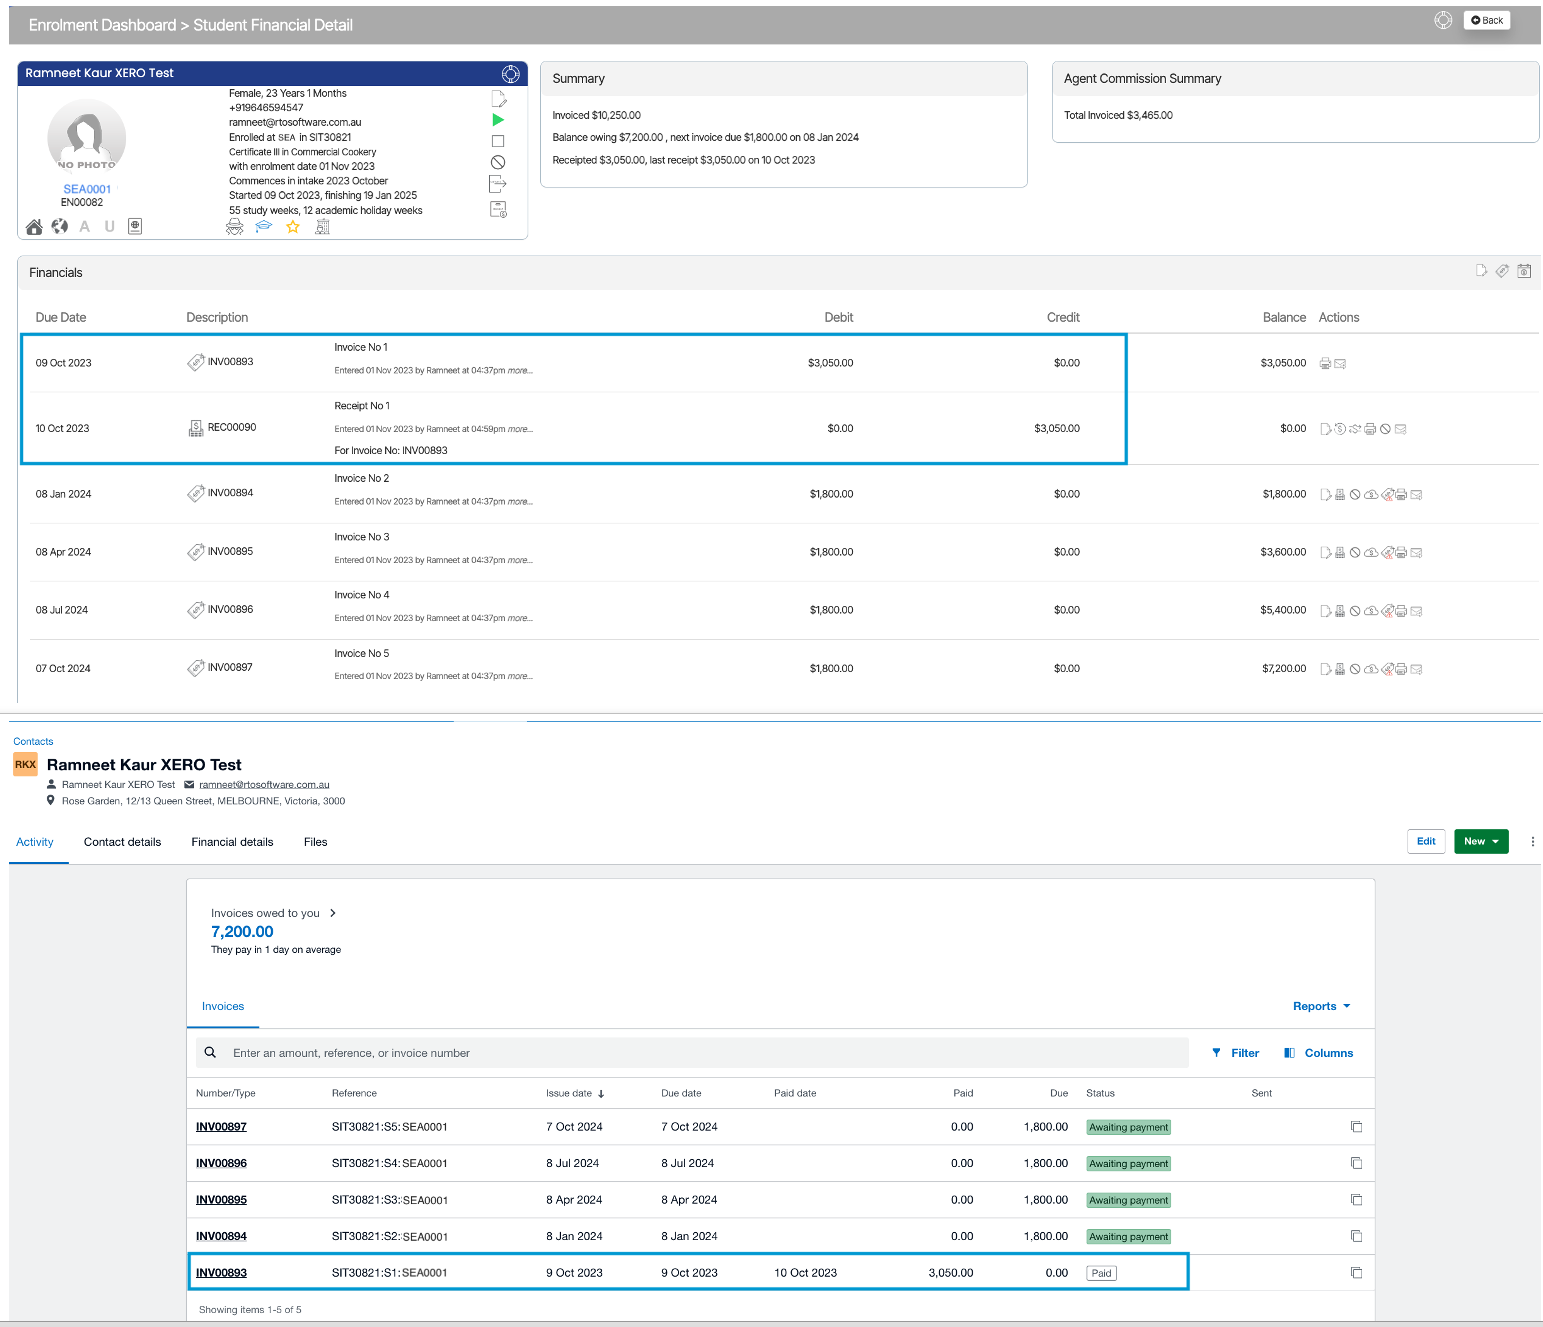
In the above TEAMS and XERO’s screenshot, you can see that all of your TEAMS invoices will be there in XERO. Once you start recording payments for the student in TEAMS, it will start pushing those payments into XERO too, and you can see that under the Paid Date and Paid column.

The reference column shows the program code, instalment number, and student number.

So this is how your individual invoice will look, and if the payment has been recorded in TEAMS, it will also show you the payment.
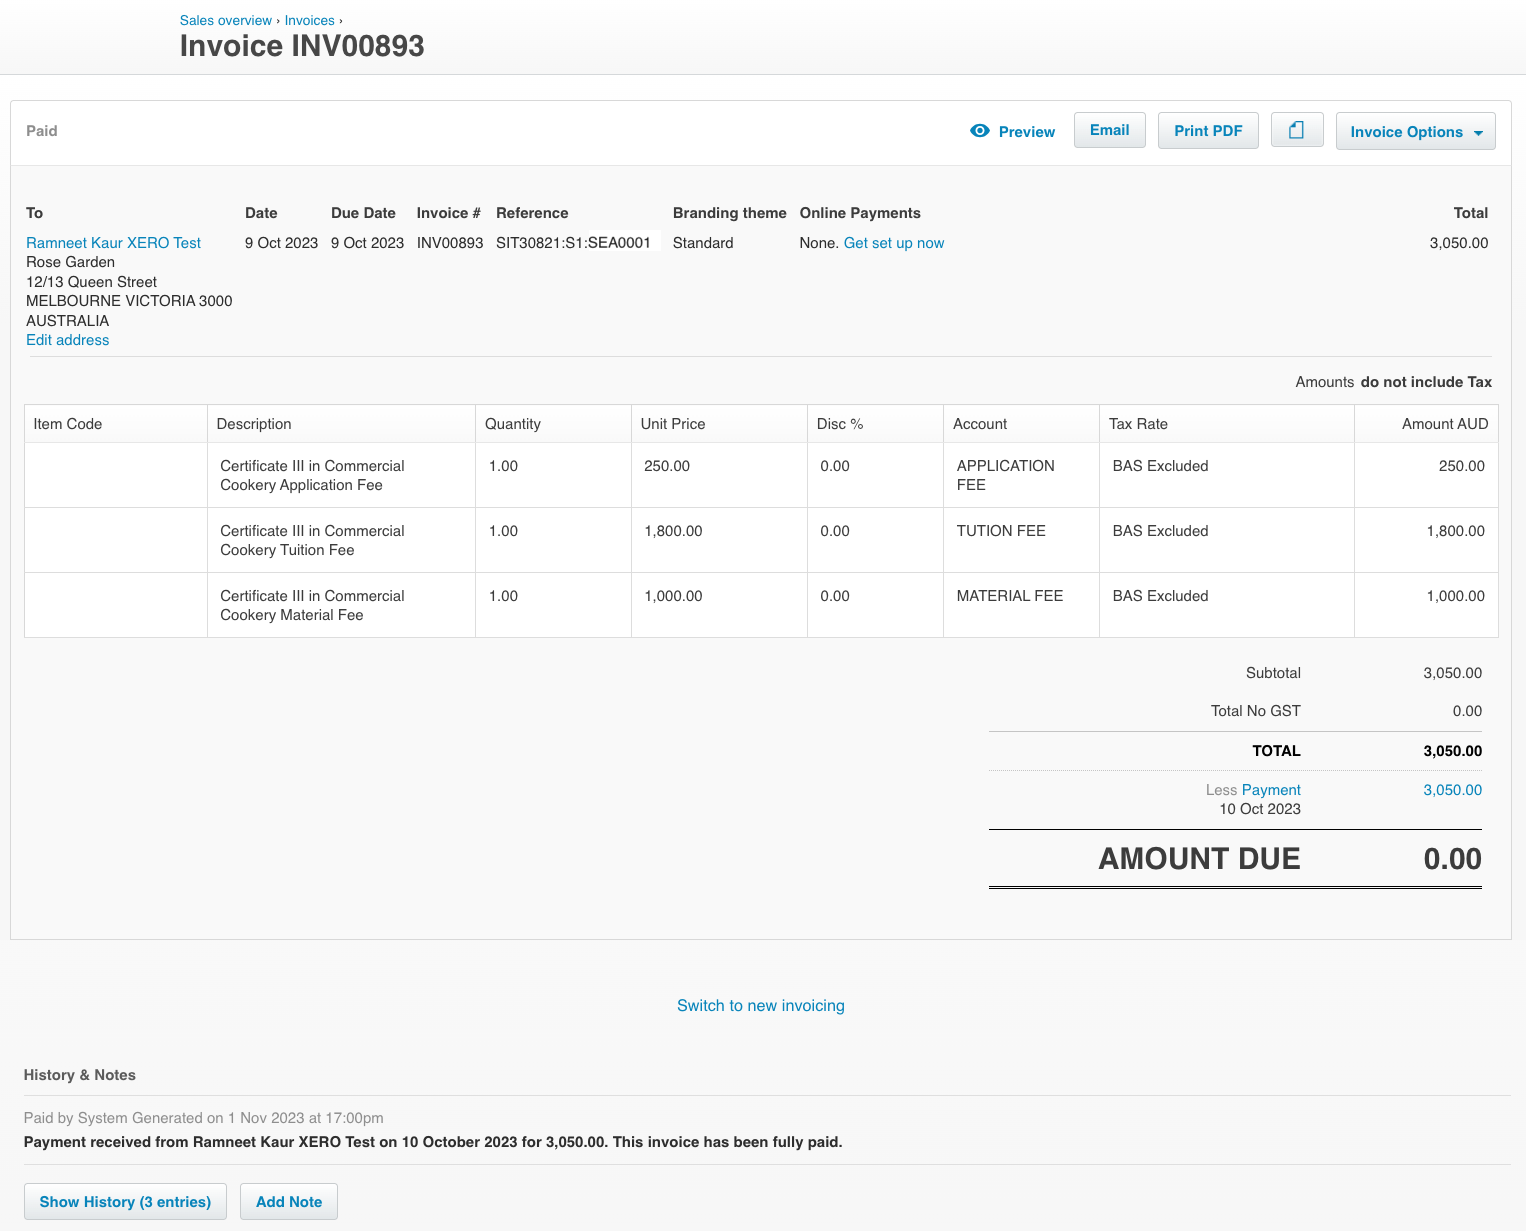
Upon clicking on the payment’s link, you will notice the unreconcile label because this integration can only push the payments for you; however, you manually have to reconcile them.
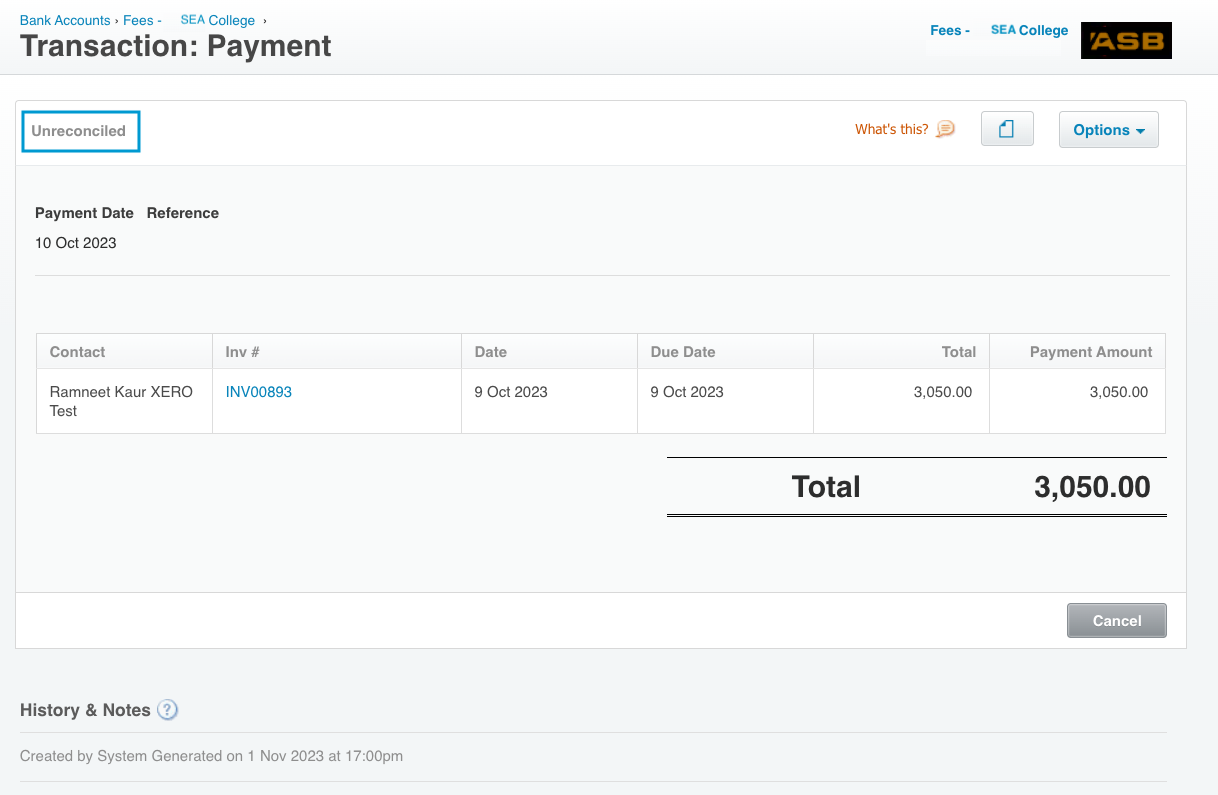
For reconciliation, the bank account panel on your dashboard shows how many bank statement lines have been imported and need to be reconciled. If there is no number to display, it indicates there are no bank statement lines to reconcile.
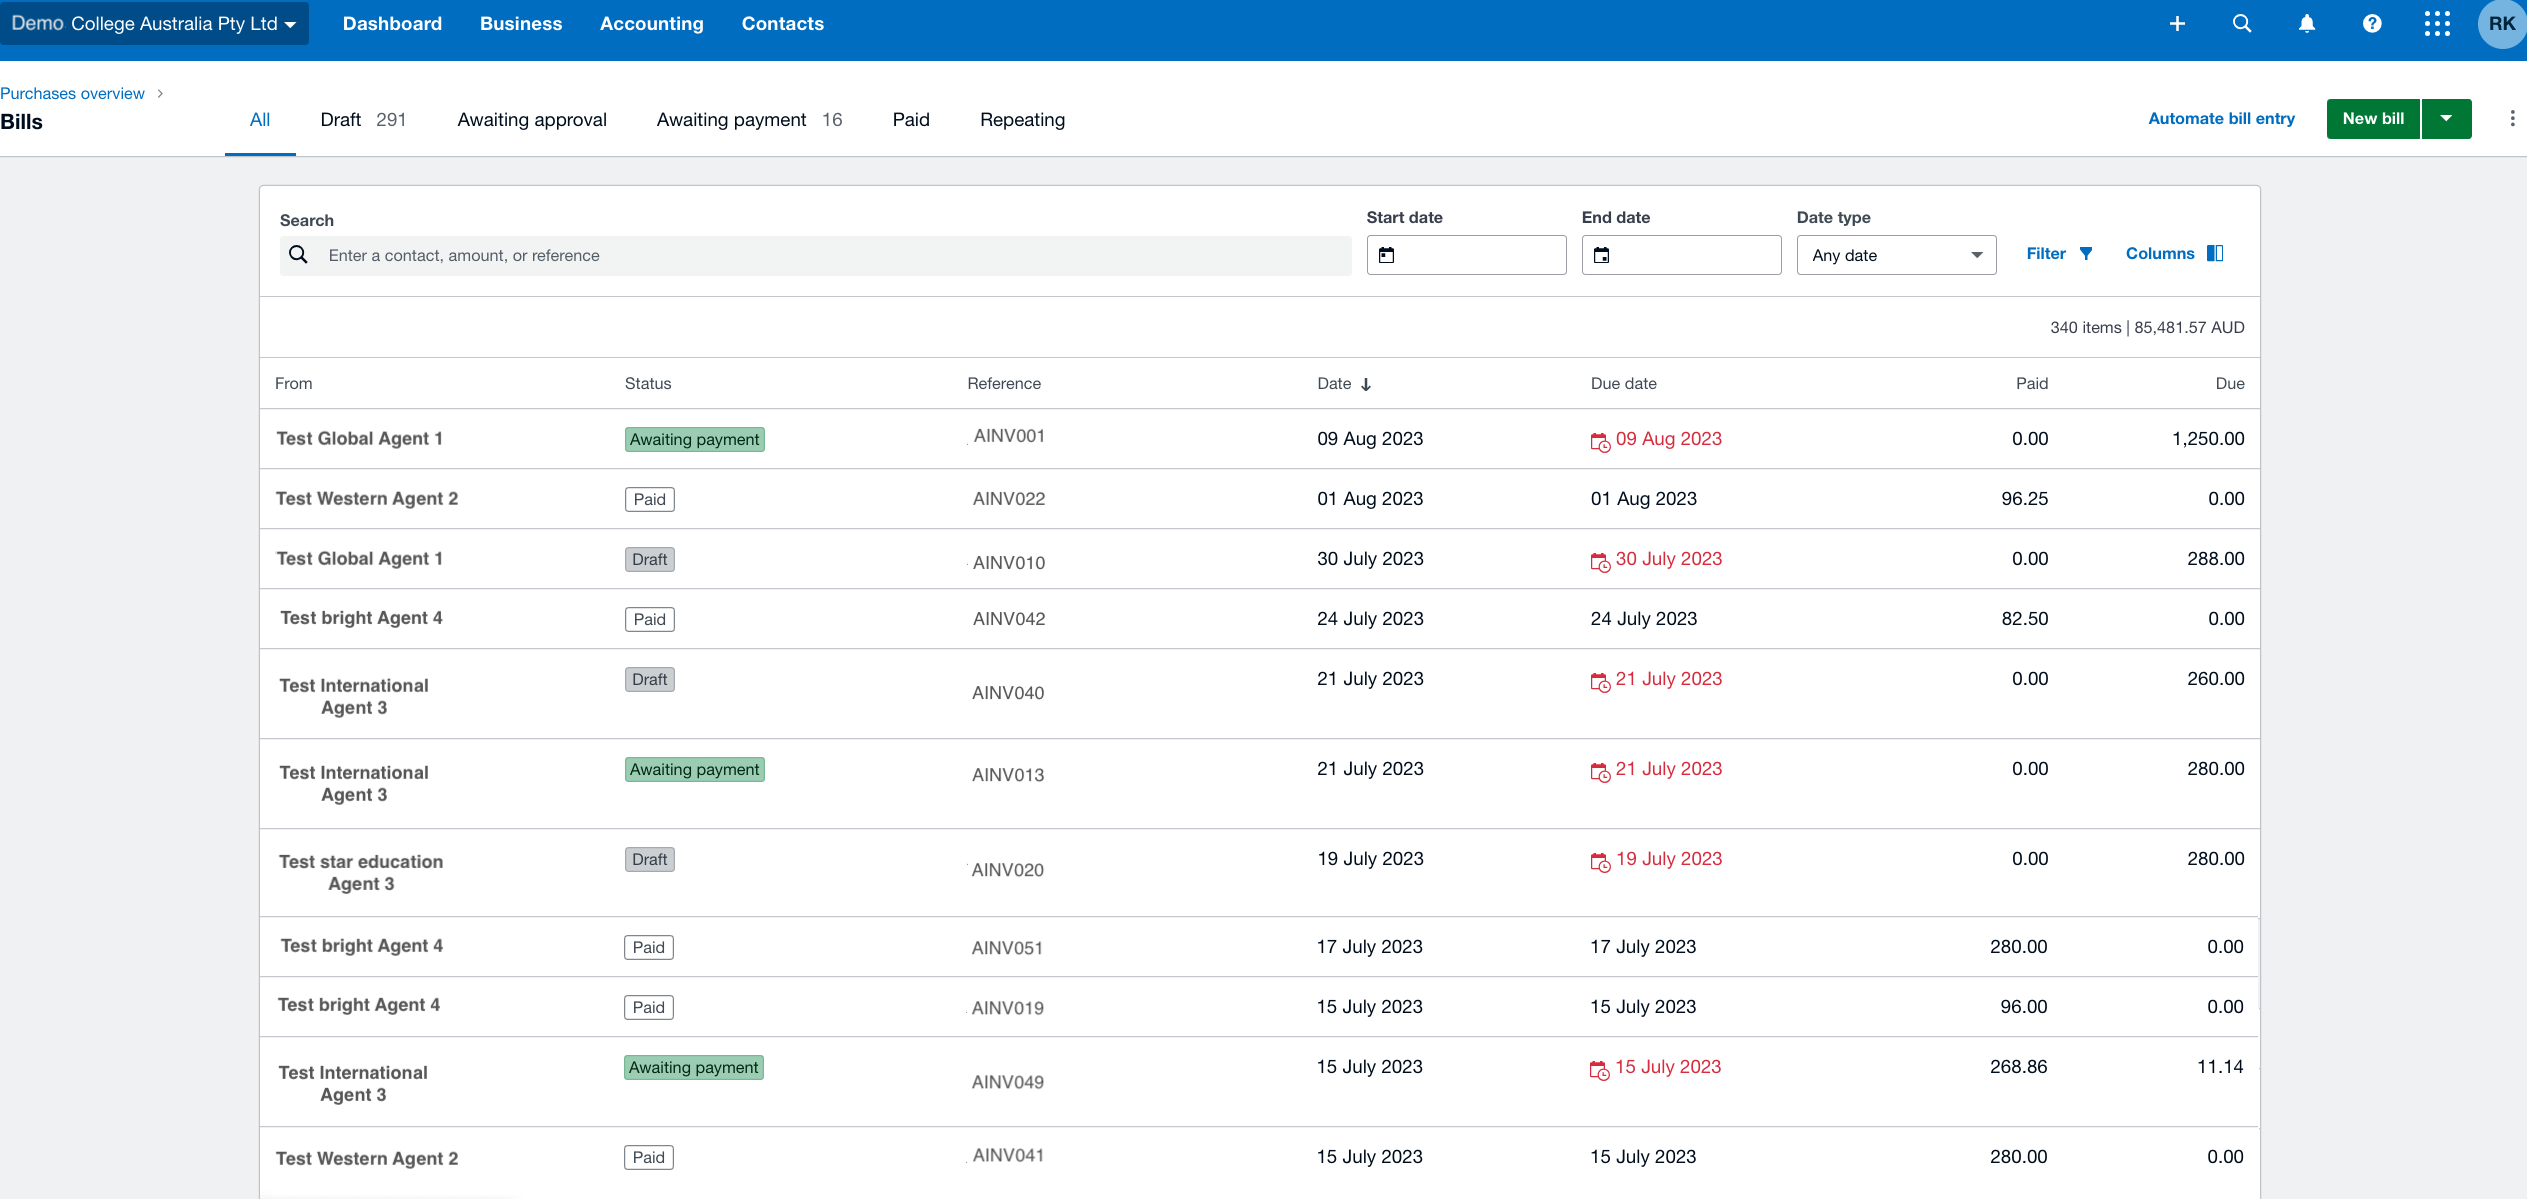
You can simply click on the count and then reconcile all of your payments. Similarly, your agent commission invoices will also be pushed to XERO along with their payments and you can check them by going to Business > Bills to Pay.

Your Bills to Pay will be considered drafts, and once you record any commission in TEAMS, it will then be approved and paid in XERO for you.

Here’s how our system seamlessly integrates with XERO: It automates transactions, eliminating the need for you to manually enter the same data on both platforms

Coming soon

  1. Canceled invoices in TEAMS will be voided in XERO automatically. Right now, you have to do it on both platforms.
  2. Negative invoices i.e. credit notes entered in TEAMS will automatically be pushed to XERO. Right now, you have to do it on both platforms.

Audit Log

Main Dashboard > System Admin Menu > Audit Logs

An audit log is an essential feature of our software that requires the maintenance of a detailed record of all new entries or changes made. This screen provides a way to track all activities that you perform on a screen, including modifications, additions, and deletions. Audit logs can be critical for a wide range of purposes, such as security, compliance, and troubleshooting.

Where can I see the Audit Log?

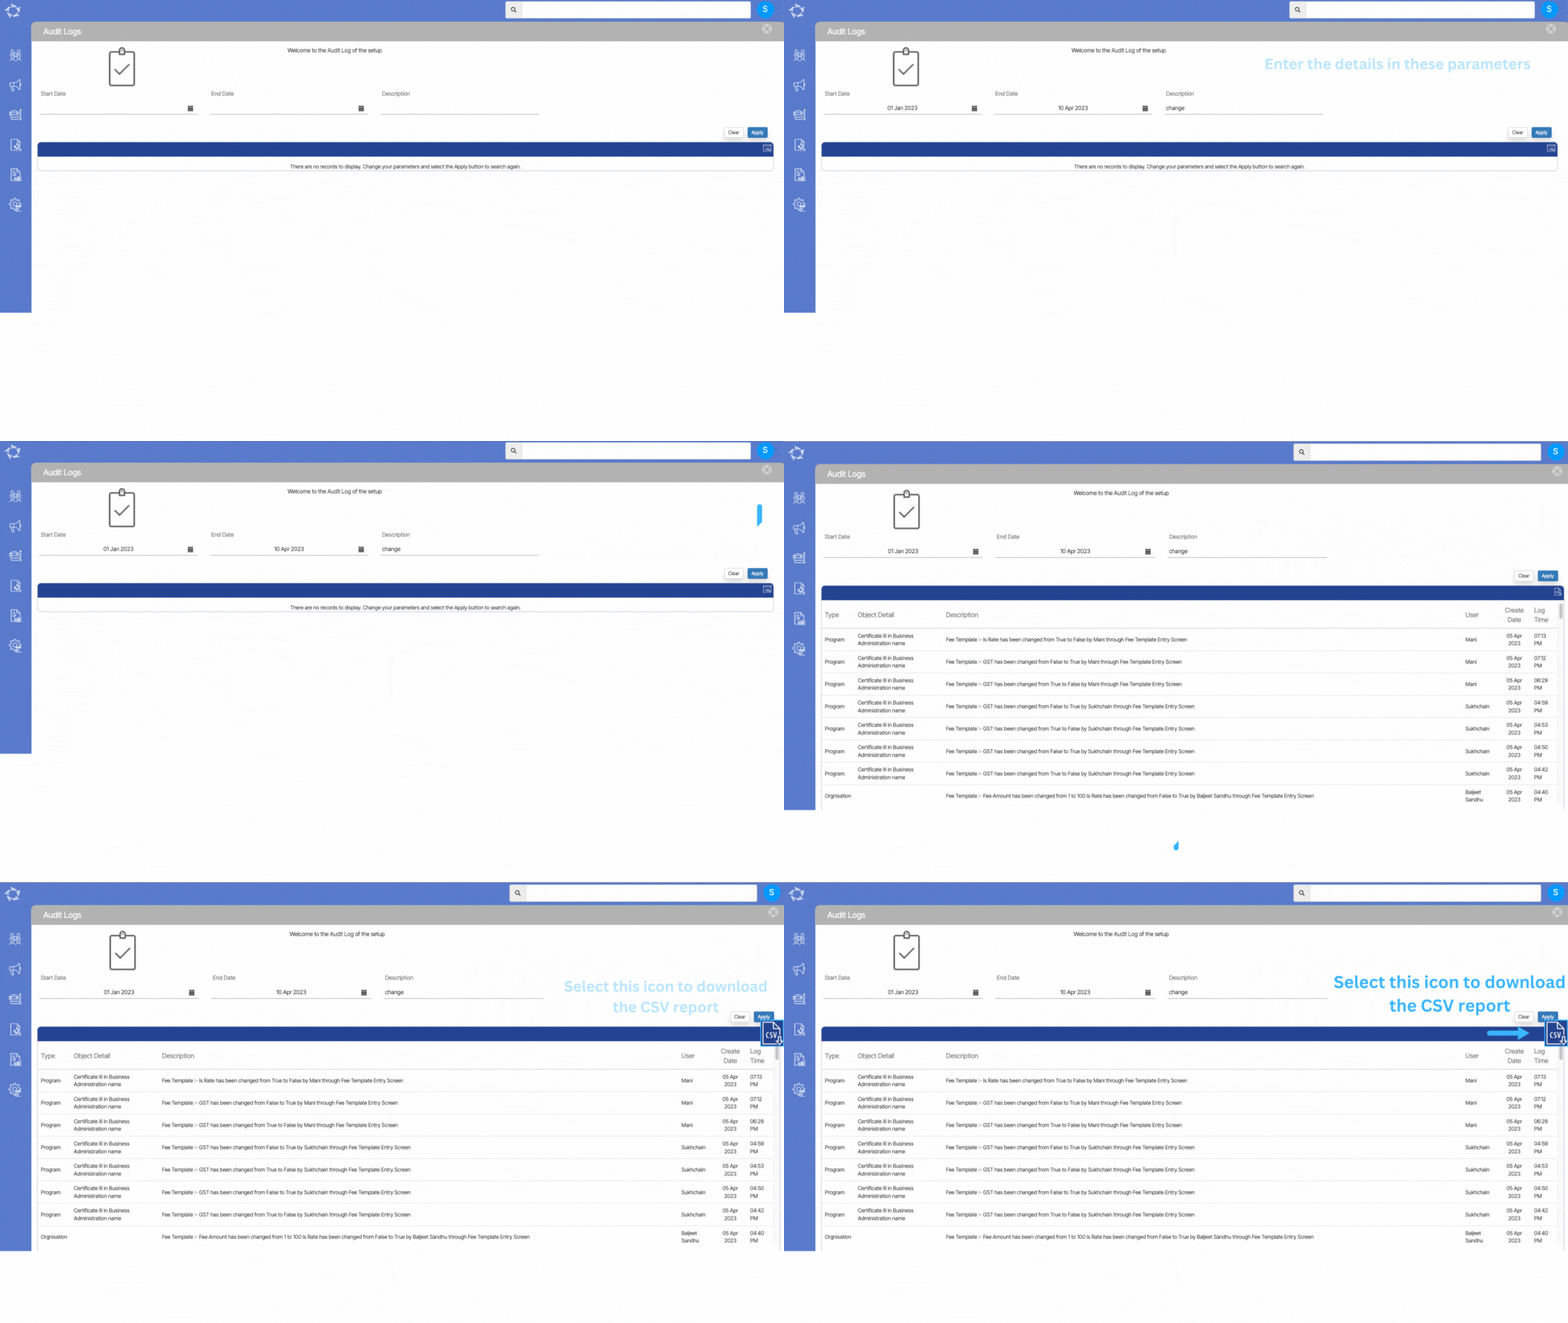
The Audit log screen is available on all entry screens of TEAMS where you can enter or modify data. This log can be accessed by selecting the icon located on the top right side of each screen. Once selected, you are directed to the Audit log screen where you can view all the new entries or changes made by yourself. This screen is helpful for tracking all user activity within a system, including additions, modifications, and deletions. You can easily see which user made specific changes, the date the changes were made, and the exact time the changes occurred.

Filters on the screen

There are three filters on the screen.

The Audit log screen provides filters that allow you to search for specific data based on various criteria such as start and end dates and descriptions. The screen is helpful in situations where you need to quickly locate a particular entry or modification made within the system. To use the filters, you simply need to select the desired search criteria and select the Apply button. The system will then display only the data that meet the specified search criteria.

TPS History Screen

Dashboard > Compliance > TPS History

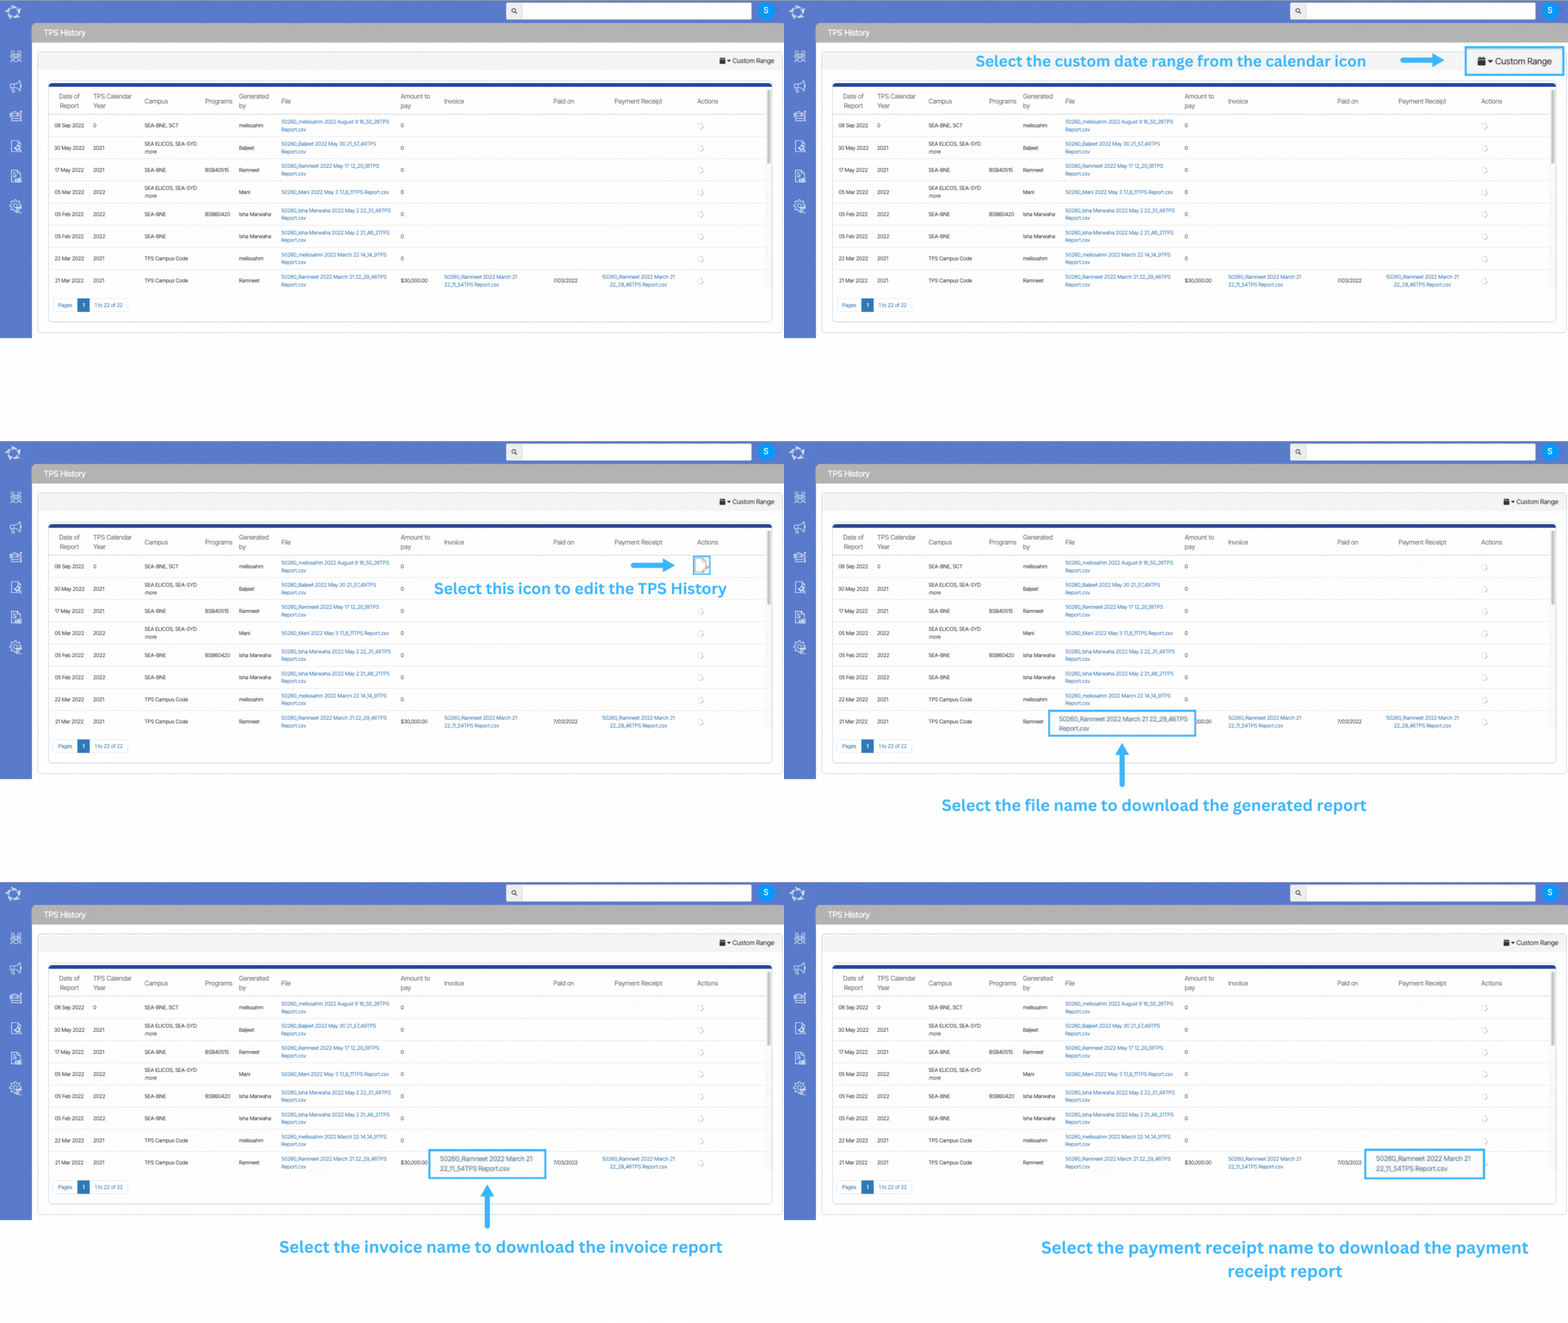
This screen is designed to display a comprehensive list of all TPS reports generated within a selected calendar year. It also allows for the updating of payment information, and uploading of invoices, and payment receipts. Upon loading the screen, all TPS reports generated during the selected date range will be visible.

Once a report has been submitted to the government, an invoice can be generated and uploaded via this screen along with payment details. Additionally, once the invoice has been paid, the receipt can also be uploaded by clicking on the edit icon under the actions column.

For ease of access, the generated report, uploaded invoice, and payment receipt can be downloaded by clicking on the file name under their respective columns (File, Invoice, and Payment Receipt).

TPS Report Data Columns

The generated report will contain a table with several columns and their corresponding explanations. This table provides a summary of the data or information presented in the report in a structured and organised manner. Each column is labeled with a title that describes the type of information contained within it.

ColumnsExplanations
TPS Calendar YearThe year selected to generate the report
CRICOS Provider CodeThe system will show this code from the Campus Entry Screen
Institution NameThis comes from the campus entry screen
InstitutionTradingNameThis again comes from the campus entry screen. If the CRICOS provider code, Institution name/Trading name is blank on the campus entry screen.
Kindly add them. If you are unsure of what to enter there, kindly check training.gov.a
Campus CodePopulates the code setup for the campus on the Academics > Campus entry screen
Campus NamePopulates the name of the campus
Student NoStudent Number generated by TEAMS
Complete NameStudent (First name )(Middle name)( Last name)
Enrolment NoEnrolment number generated by TEAMS
CRICOS Program CodeThis is the CRICOS code for the program and will be populated from the Academics > Program entry screen
Program Descriptive CodeThe descriptive code of the program is saved on the program entry screen
Program Descriptive NameThe descriptive name of the program is saved on the program entry screen.
Enrolment TypeIt will show the application type saved for the enrolment on the Edit Enrolment Detail screen
Enrolment OutcomeIt will show the enrolment outcome saved for the enrolment at the Edit Enrolment Detail screen
Enrolment StatusIt will show the current status of the enrolment. For example – Started, Not Started, Finished, and Cancelled.
Enrolment DatesStart date and End date of the enrolment
Enrolment Duration WeeksThis will be the total weeks of the enrolment which includes total study weeks, total academic holiday weeks, and the student personal holiday weeks.
For example, If enrolment has study weeks = 40, academic holiday weeks = 12, and student personal holiday weeks = 2. Then the total enrolment duration will be 40+12+2=54 weeks
Enrolment Duration DaysThe system will show the total of study days, academic holidays, and student personal holidays.
Total Tuition to payThis is the total invoiced amount of the Tuition Fee for enrolment
Overall Total PaidThis is the total receipted amount of the Tuition Fee for enrolment
Daily Payment AmountThe total tuition to be paid is divided by the total enrolment duration in days.
Total No. of Days PaidTotal receipted divided by the daily payment amount
Total Paid for TPS Calendar YearTotal receipts within the TPS calendar year for the enrolment
ESOS LengthDuration of the enrolment within the TPS calendar year
ESOS DaysDuration of the enrolment within the TPS calendar year in days
ESOS AmountDaily Payment Amount * ESOS days

TPS Report Filters

The General Filters tab on the TPS Report screen provides a list of filters that can be used to refine the data displayed in the report. Below is a table that shows the filters and their explanations: Using these filters, you can customise the report to show only the information that is relevant to your needs, making it easier to analyse and take action based on the report data.

General FiltersExplanation
Calendar Year for ReportIt means that the data included in the report covers the entire period from January 1st to December 31st of a particular year.
CampusSelect a specific campus or select multiple campuses for your RTO if you are submitting this report for multiple campuses.
ProgramThis is a multi select Program field that allows you to select multiple programs from a list of options. If you do not select any programs in this field, the system will automatically select all the programs that are linked with the campuses that the user has selected.

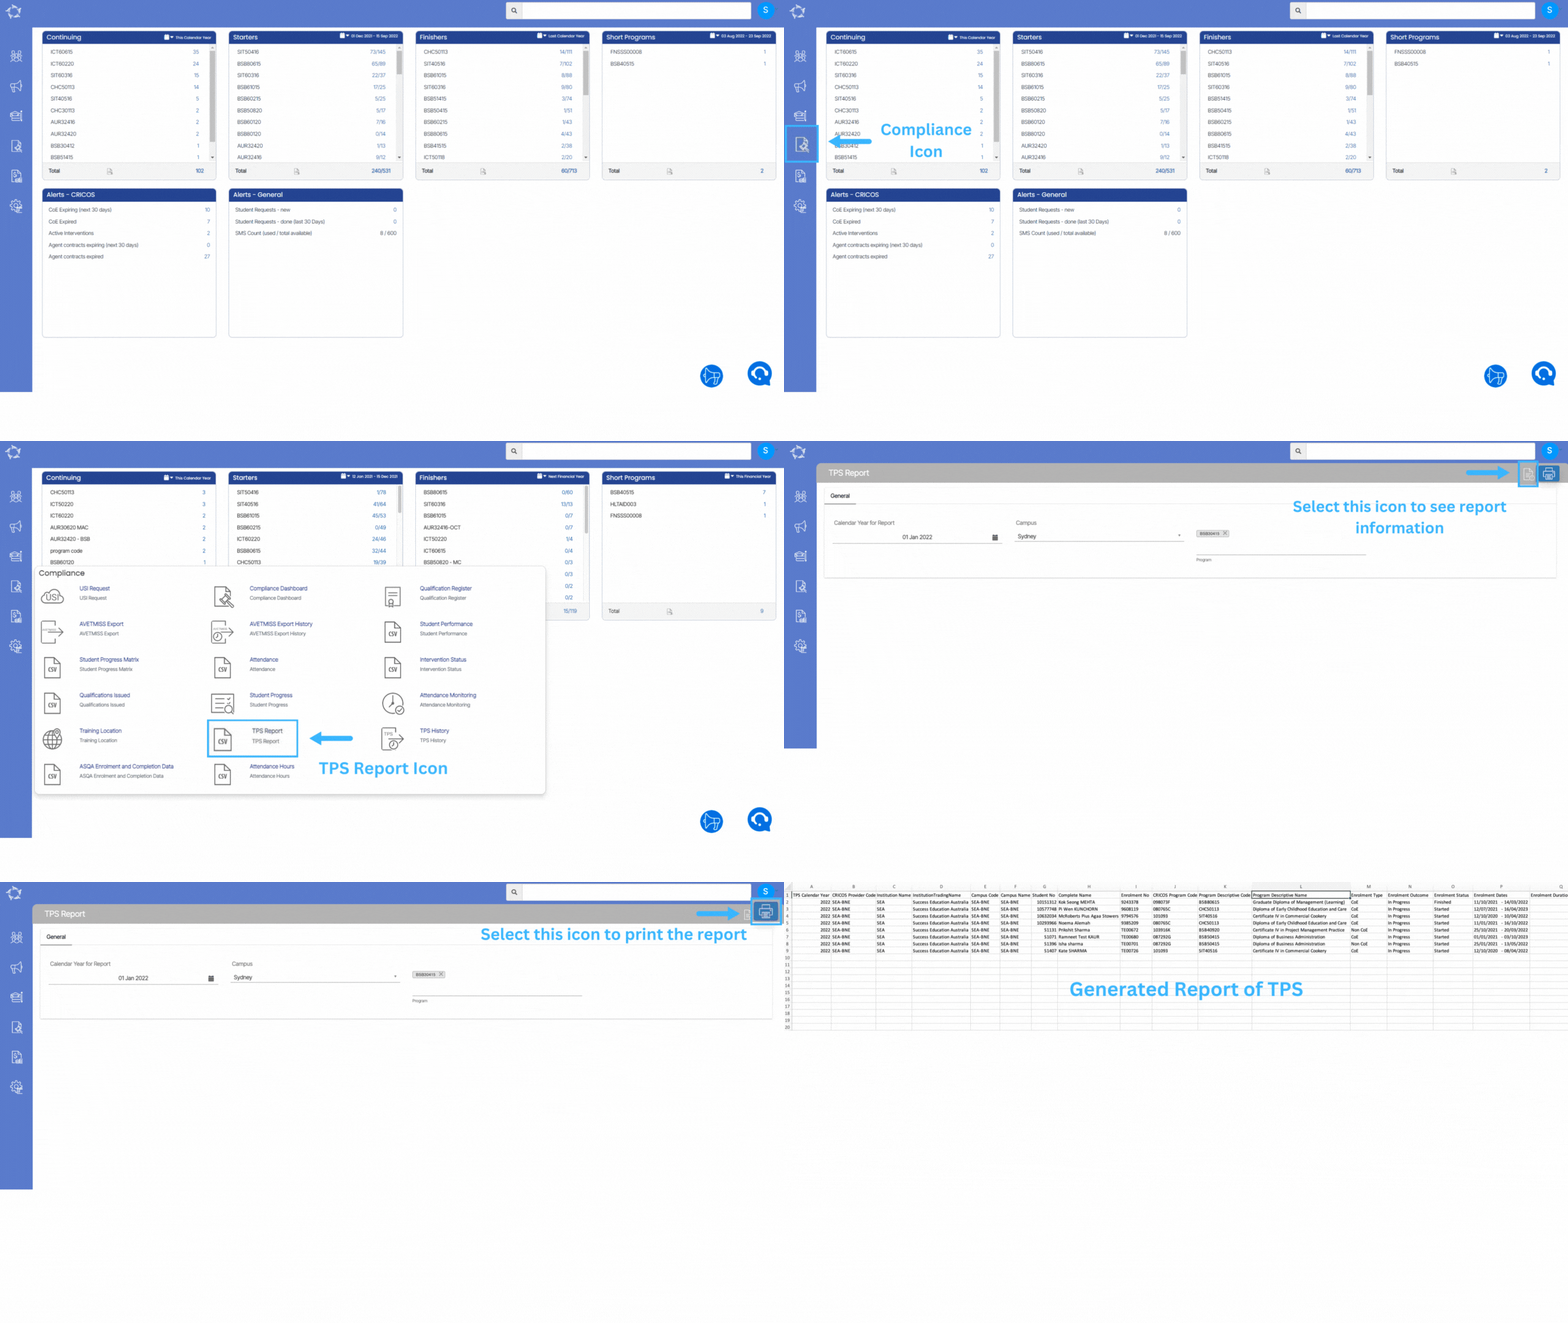
Click on the “Print” Icon to generate the report. After clicking on it, the system will direct you to the report dashboard screen. You can see the report status over there if it’s generated or not. Once it’s generated, download the report.

TPS Report

Main Dashboard > Compliance > TPS Report

Overview

This report pertains to the total amount of tuition fees paid or outstanding for a specific calendar year and is a mandatory requirement for all CRICOS (Commonwealth Register of Institutions and Courses for Overseas Students) colleges. Such colleges must submit this report to the government every year. The purpose of this report is to provide the government with accurate and up-to-date information on the total tuition fees received or expected to be received from overseas students studying at these institutions.

To know more about the Filter and columns and their explanations, please select the below links.

TPS Report Filters

TPS Report Data Columns

Pending Payment Welcome – Commission Payment Step 2

Agent Dashboard > Agent Profile Tile > Pending Payment > +New Payment

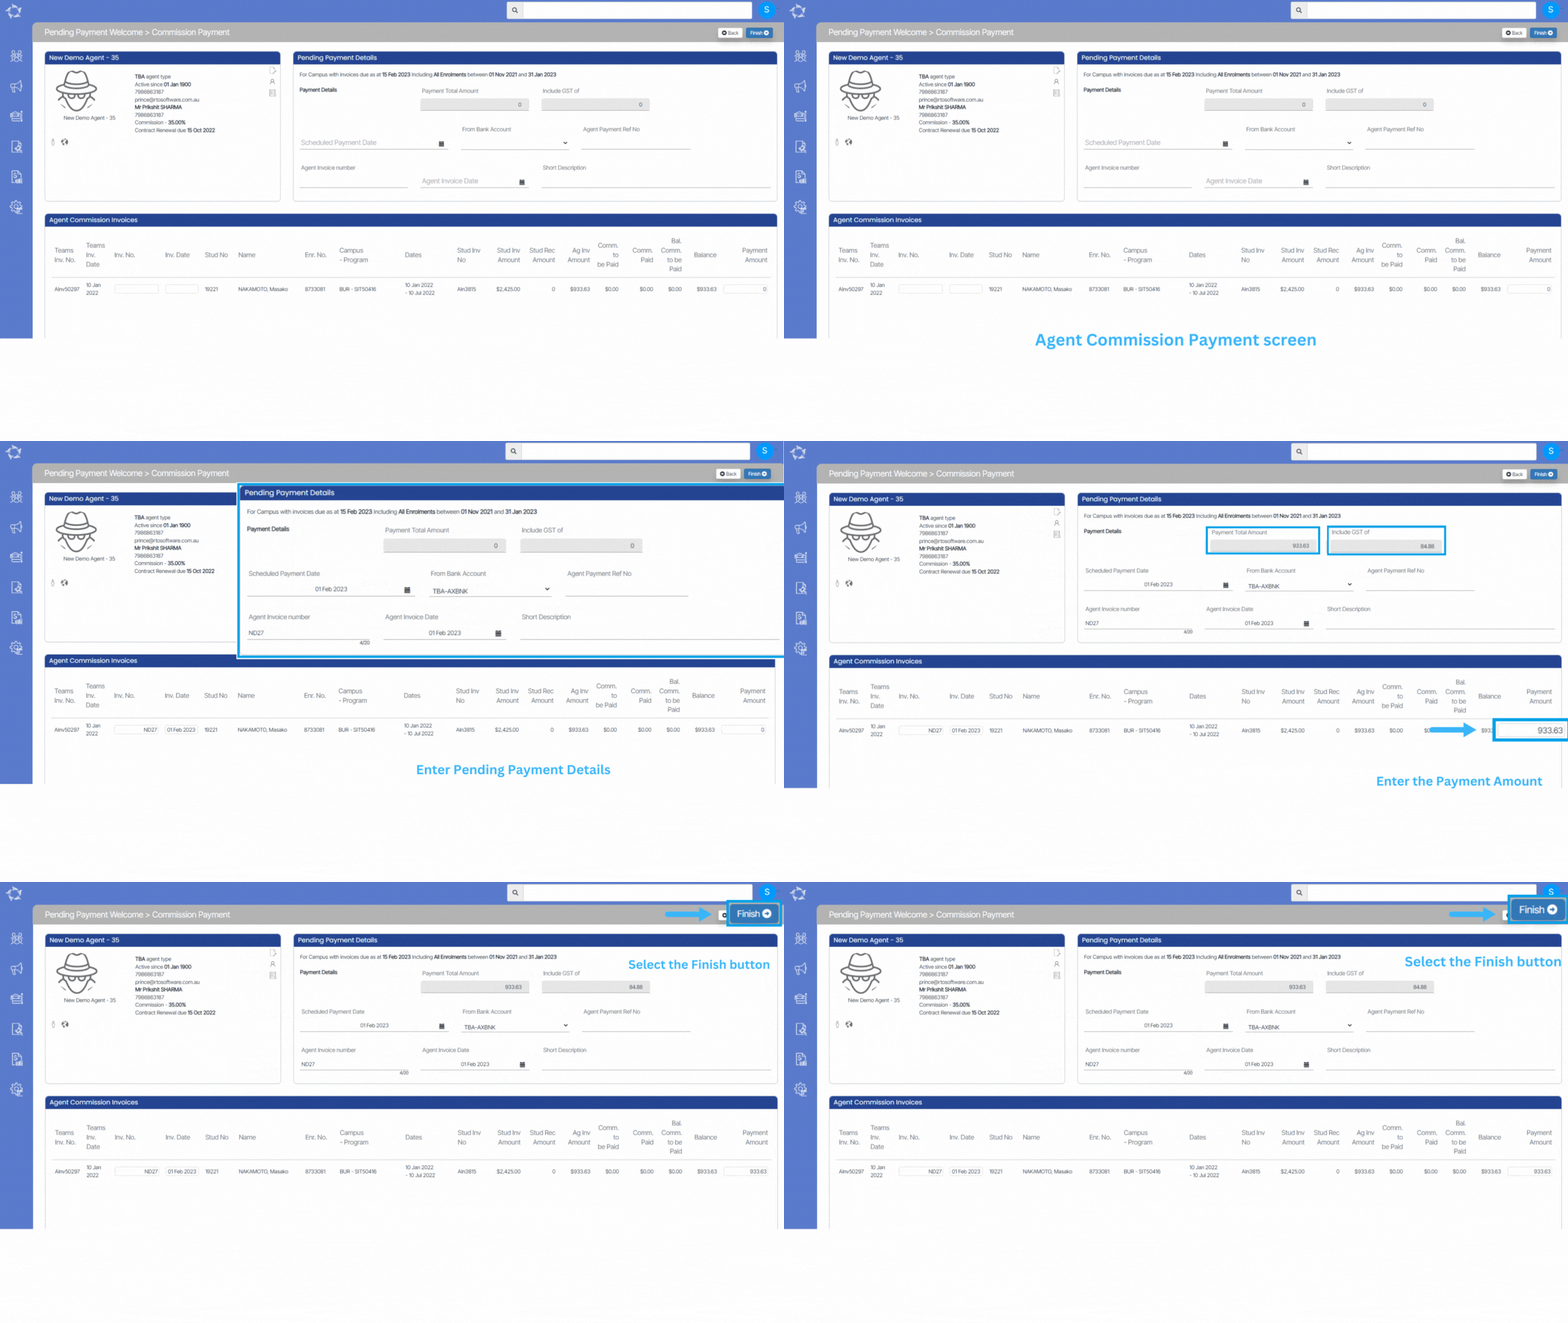
On the Agent Pending Payment Step 2 screen, the grid will display all the commission invoices that were selected in step 1. The Pending Payment Details section will replace the filter section on this screen. In the Pending Payment Details section, you must enter the payment details for the selected invoices. This includes information such as the payment date, payment method, and payment reference number. Once this information is entered, you can review the pending payment invoice before finalizing it. The Pending Payment Details section on the Agent Pending Payment Step 2 screen is where you can enter the necessary payment details to create a pending payment invoice.

Note: You are required to enter the Agent Invoice number and Agent Invoice Date for the selected commission invoices in the Pending Payment Details section. Once these details are entered, the system will automatically populate the values in the Inv. No. and Inv. Date columns in the grid for each selected invoice. This automation ensures that the correct information is recorded for each commission invoice, making it easier for you to keep track of payment details. By entering the Agent Invoice number and Agent Invoice Date, users can ensure that the correct information is associated with each commission invoice in the grid.

IMPORTANT – If an agent has not sent any invoice yet, you can leave the Agent Invoice number and Agent Invoice Date fields empty when creating a pending payment invoice on the Agent Pending Payment Step 2 screen. These fields can be edited in the future once the agent provides the necessary information.

The Scheduled Payment Date is the only mandatory field that must be filled in to save the pending payment batch. This field specifies the date on which the payment for the selected commission invoices is scheduled to be made. By leaving the Agent Invoice number and Agent Invoice Date fields empty for agents who have not yet provided this information, you can create pending payment invoices for those agents without delay. Once the agent provides the necessary information, these fields can be updated to ensure that the correct information is recorded for each commission invoice.

Once all the necessary information has been entered in the Pending Payment Details section of the Agent Pending Payment, you can select the Finish button located at the top of the screen and will finalise the pending payment invoice for the selected commission invoices. Before selecting the Finish button, you should review the information entered in the Pending Payment Details section to ensure that it is accurate and complete.

Student Dashboard – Edit Enrolment/s Dates

Student Dashboard > Burger Menu > Edit Enrolment/s Dates

This screen allows you to modify the intake date for a student’s enrolment, even after their application has been processed and they have become a student. This can be helpful in cases where the student needs to defer their enrollment due to a visa delay or personal reasons. To simplify the process and save time, you can now modify the intake dates for multiple enrolments of the same student at once.

IMPORTANT – When using this screen, ensure that all necessary changes to enrolment dates are made before marking the enrolment as started. If changes need to be made after the enrollment has been marked as started, you may need to contact our support team for assistance.

The below steps will explain to you how you can change the intake date:

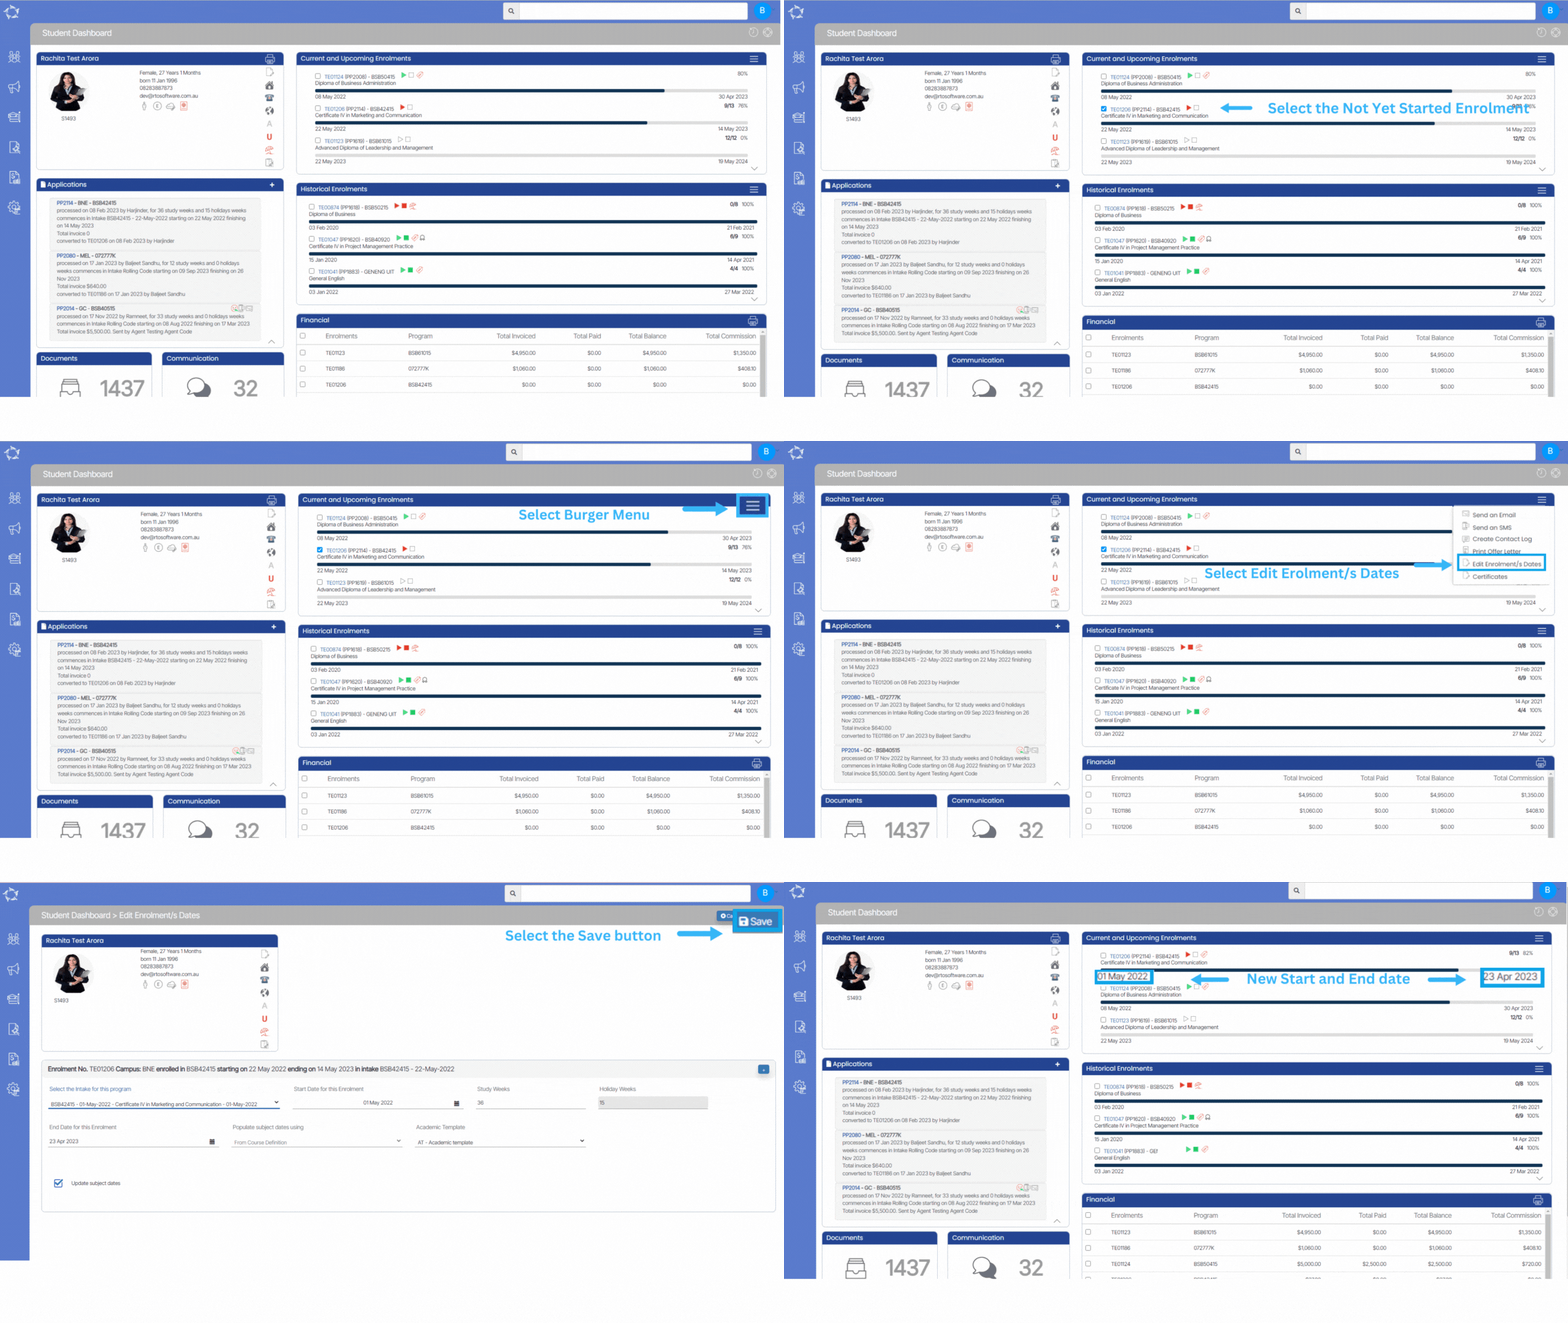
  • To utilise this option, you need to select the specific enrolments for which you want to modify the intake dates.
  • Select the Burger menu icon on the Current and Upcoming enrolments where you manage student enrolment information. The Burger menu icon typically looks like three horizontal lines stacked on top of each other.
  • Look for the option titled “Edit Enrolment/s Dates” and select it.
  • The screen will then take you to the Edit Enrolment/s Dates screen where you can modify the intake dates for one or more enrolments.
  • By default, the system will show the section for 1st enrolment and you can expand other enrolment sections by selecting the expand (+) button.
  • To enrol the student in a new intake, you must select the desired intake from a dropdown menu. Once an intake is selected, the system will automatically populate other fields such as the start date, study weeks, holiday weeks, and end date.

IMPORTANT – When changing the intake for enrolment, it may be necessary to update various dates associated with that enrolment, including invoice dates, invoice due dates, and subject dates.
To make this process easier and more efficient, the system appears to have a checkbox labeled “Update subject dates“. By selecting this checkbox, the system will automatically update the relevant dates associated with the enrolment to match the new intake. It is recommended that users always check this box to avoid the need for manual updates on a case-by-case basis.

Once all the above steps are done, select the save button, the system should update the enrolment dates as per the changes you have made. It is recommended that you double-check all dates and information to ensure that everything is correct before proceeding.

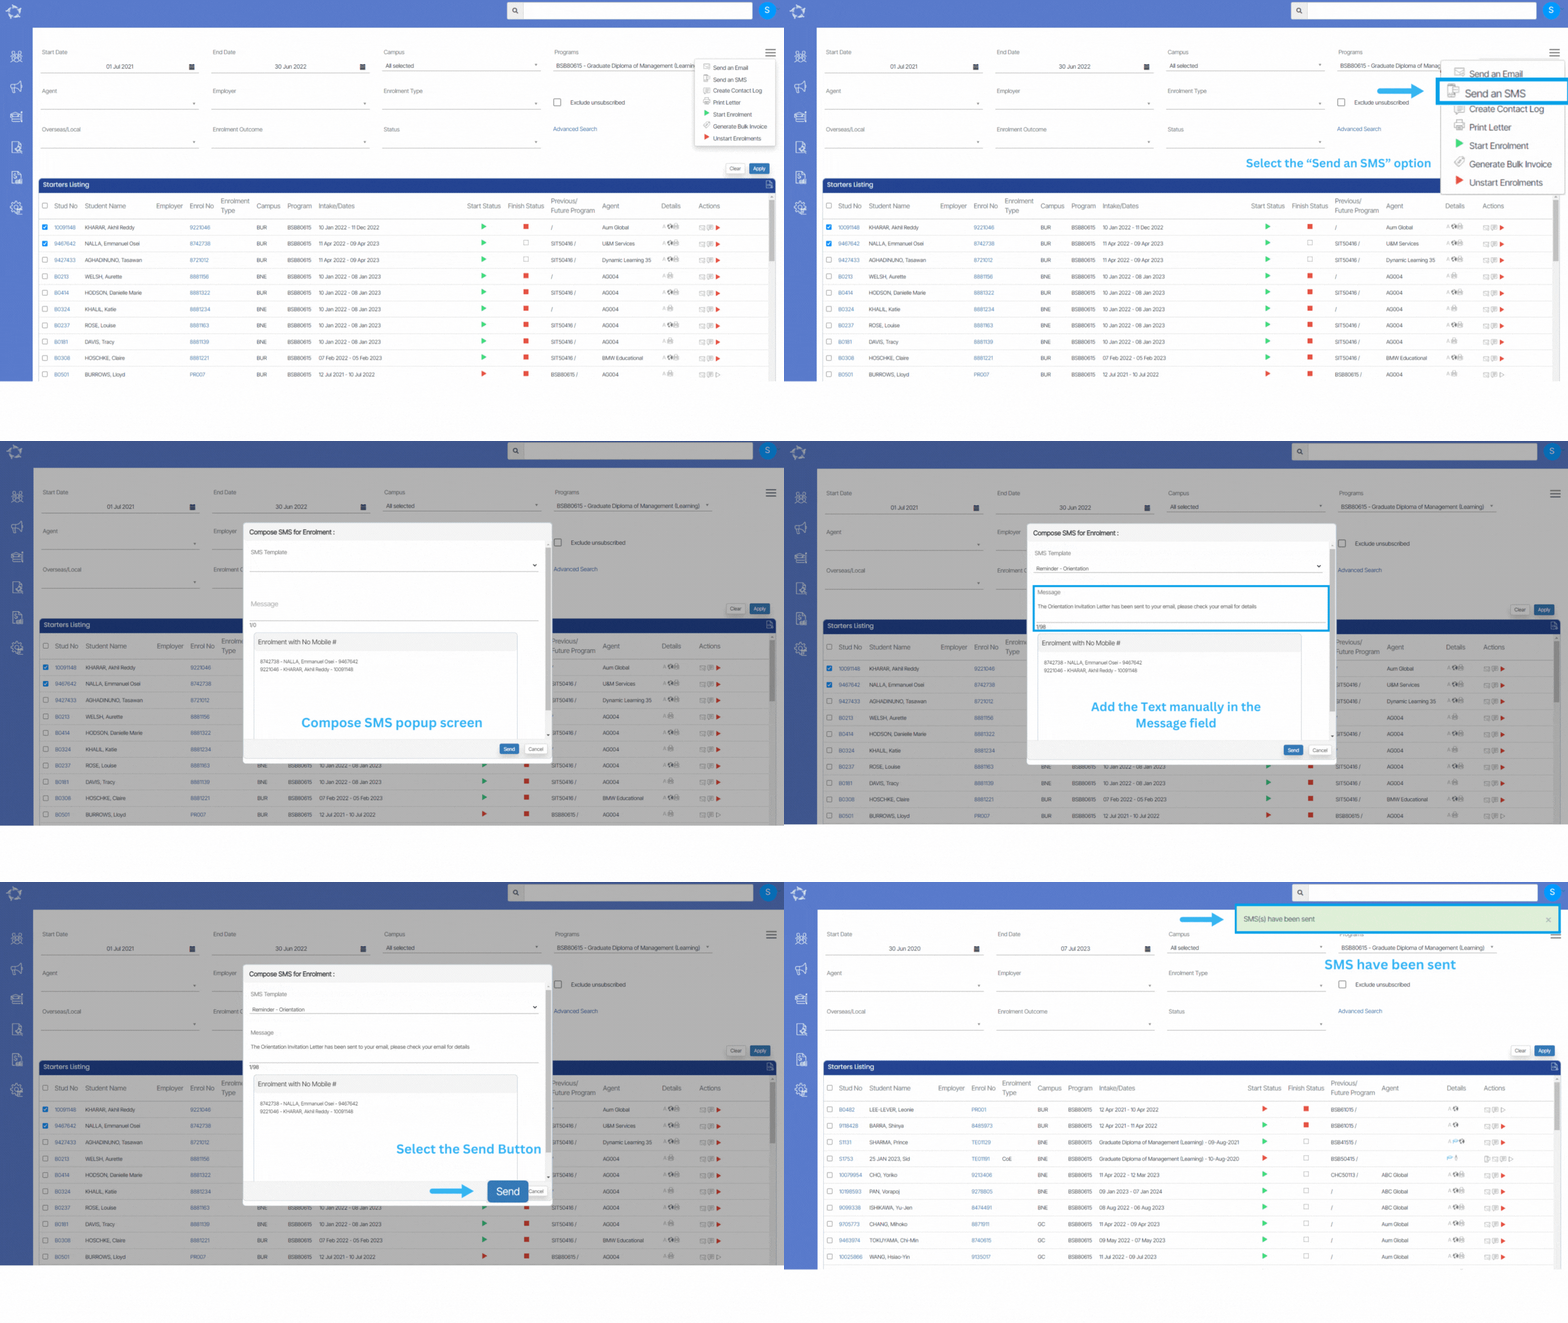
Send an SMS

history of changes

TEAMS gives you the functionality to send out SMS/s to students, employers, and agents. You will see this option on all the listing screens and in the communication tile. You either can send the SMS/s in Bulk by using the listing screens or you can send individual SMS by using the communication tile on different dashboards that we have such Applicant Dashboard, Student Dashboard, Application Dashboard, Enrolment Dashboard, Agent Dashboard, etc. No matter what screen you choose to send out the SMS/s, the steps to use this functionality are the same everywhere. This post will explain to you how you can use the “Send an SMS” option.

  • Select the “Send an SMS” option.
  • This will open a popup window.
  • Select your SMS template if you already have added to TEAMS, so that you do not have to manually type in your message. However, this is not a mandatory field to select, if you do not have an SMS template, you can leave it blank.
  • If you have selected the SMS template, the text message will be automatically updated in the message area. However, if you haven’t selected any SMS template, you can type in your text message manually.
  • Select the “Send” button to send out the SMS.

AGD – Agent Performance Bar Graph

Main Dashboard > Marketing > Agent Dashboard > Agent Performance Tile

Each CRICOS RTO that has collaboration with agents, needs to monitor the agent performance in order to make up their mind in taking certain decisions. On the Agent Dashboard, we have a bar graph that can give you a vast amount of information to keep a check on the agent performance.

This bar graph will display the agent performance for the current financial year. On the right top side of the bar graph, you can see the calendar option. From there, you can change the date range as per your requirement.

Click here to learn about the calendar option

Bar Graph

The horizontal line of the bar graph will display the months based on what calendar option you select. The vertical line of the bar graph will display the count and that count again varies depending upon the calendar option. The vertical colourful bars in the bar graph will present the data with a tooltip. Once you will move your cursor over the bar, you can see a tooltip based on which colour bar you have moved your cursor to. Each colour represents a different purpose. You can see the colour classification on the right side of the bar graph.

As you can below, the tooltip says Converted Applications 17 for the month of Oct 2022. It means for October month, there are just 12 applications to process for that agent, hence the height of the bar is till count 17.0. So from these colourful bars, you can easily read how many total applications linked with the agent, how many converted, commenced, completed, and did not commence & canceled.

Financials

Just below the bar graph, we have the financials area for that agent. This is easily readable from the labels just below the figures. This gives you the Tuition Fee’s data based on the calendar option you select.

Moreover, there is a more button in this section that will directs you toward the Agent Financial Transaction screen.