Address Merge Fields

In the system, there are address fields for each object such as Applicant/Student, Agent, Employer and Schools. There is also address information at the user and campus etc.

For each of these objects there will be one or many types of addresses that you can enter as follows:

Applicant/Student – Local Address (Australian address), Mailing Address (Australian address), AVETMISS Address (specifically for AVETMISS exports & submissions), International Address and Next of Kin address.

Agent – Local Address (Australian address), Mailing Address (Australian address) and International Address.

Employer – Local Address (Australian address), Mailing Address (Australian address) and International Address.

School – Local Address (Australian address) and Mailing Address (Australian address).

User – Local Address (Australian address), Mailing Address (Australian address) and Next of Kin address.

When you look at the standard address fields they will look similar to this:

Whereas the AVETMISS address will look like this:

Each of the fields for addresses then becomes a merge field in our MS Word report templates. For example, for a Applicant/Student the merge fields for the standard address fields are as follows:

Note: merge fields are also used in the Email and SMS Templates as well and will follow the same format as you see above.

For any of the objects that have a standard address, then in our MS Word report templates there will be a matching merge field for it. They will follow a standard format as above and the first word in the name of the merge field identifies the object, such as Student Local Address Line 1. If you were looking at the Agent standard address merge fields you would see one for Agent Local Address Line 1.

IMPORTANT: there are two very important things to remember when using merge fields in your customised templates. They are:

1. Always insert the merge field with the {} brackets, do NOT change them to any other style of bracket such as (), the system looks for the {} ones and will not work if you use any other style of brackets.
2. Always use as many of the Address Line 1, 2 & 3 merge fields in your templates that you are using to enter information into the system. For example, a students address may be as follows:

If you have entered the address for the student as above on the left, then in your templates you should use all the relevant merge fields for Address Line 1, 2 & 3. If you don’t add the Address Line 3 merge field but have entered the address above then the system will not print the information of 1234 The Esplanade in the report you have customised. So never do this in your templates:

Note: when you are customising your templates, MS Word and email especially; we do not recommend using address merge fields in SMS templates and messages, always consider using a two column table to have one column (left hand side) for a label (hard coded text) such as Residential Address and then in the second column for the same row in the table have all the merge fields for the address so it looks similar to this:

Do not use commas or enter (shift + enter) for each Address Line merge field, just have the Address Line 1, 2 and 3 together with a space between them. If you do it this way, MS Word will not leave an empty space where Address Line 2 or 3 have no data. It will just insert the next merge fields which typically would be Suburb, State, Post Code and country. Even if you reduce the size of the column, MS Word will not leave an empty space. It is only if you put a merge field per row or you do a shift + enter in the same column/cell that it would then leave an empty space.

If you have any queries, please do not hesitate to contact us on 1300 85 05 85 or email us via support@rtosoftware.com.au

UPDATE – Thursday, 1st September 2022

IMPORTANT: A new TEAMS update is scheduled.

Your TEAMS site will be updated on

Thursday, 1st of September, 2022

This is an important preview email
of what’s coming on your site soon

As you know, we have been continually improving and adding new features to TEAMS. We strongly believe in making software that helps our clients gain better efficiencies and improve their operations.

Note: You may need to alert other team members within your college as the changes may affect their role or department. 

Please spend a few minutes going through our What’s New and Newsletter emails. It will not only help you maximise the time and cost savings, it may be absolutely vital for your College’s Compliance with the latest regulations.

We strongly recommend that you take your time and read this (and future update email/s)

You may need to discuss new upcoming features with the relevant decision makers or team members. Each of the changes outlined also have hyperlinks that you can click to take you to our help website for further detailed explanation.

With all that in mind, please review some of the key points outlining the list of changes below –

Major Process Changes

Report Related Changes

General / Small Improvements

  • Login Security
    More security added for the password.
  • User Screen
    Easy to view the inactive users for your RTO on the user welcome screen.
  • Report Menus
    A few reports’ have been relocated to different menus.
  • Student Financial Screen
    Label name for Date column has been changed to read as Due Date on the student financial details screen.

Please review the changes and if something doesn’t make sense of you would like further clarification after reviewing it, please feel free to contact our Support team.

There are a number of new initiatives and changes in the pipeline for the next update (due 22nd September).

Remember, we are always open for feedback and a big thank you to so many of you who have been actively participating in helping us bring these new improvements to life. Your input and engagement are key in helping us improve and we really appreciate it.

Any questions, please feel free to reach out to us and we look forward to serving you to the best of our ability.

All the best from all of us here at RTO Software.

Follow us on facebook and instagram

If you have any further questions,
please feel free to contact our support staff on
1300 85 05 85 or support@rtosoftware.com.au
Remember – these changes go live on Thursday, 1st September 2022. 


Have a great day!

Intervention Process

If you wish to manage your Intervention Strategy in TEAMS for your students and their enrolments, you can access this from the Enrolment Dashboard > Compliance Alerts tile.

Before using this screen you would need to setup your Intervention Statuses and Outcomes in the User Codes section of the system. Once you have completed the setup, you can then use this process from the Enrolment Dashboard as below.

Note: although intervention is a CRICOS specific compliance requirement, many of our clients that have domestic students want to use this process and it is available to those student enrolments as well.

How to create an Intervention?

To add an intervention to the enrolment, Select the + icon as shown.

This will open up a popup window for adding intervention. You can add the necessary details and save the screen. This will add a new intervention to the enrolment.

  1. Start Date of Intervention – by default, the system will today’s date, however you can change it. You cannot leave this empty as it is a mandatory field.
  2. Intervention Status – select the level of intervention you are placing the student on from this dropdown. This initiates the intervention in the system and until you add an Intervention outcome against it, the system will show the enrolment as having a current intervention in place. This is also a mandatory field, so it cannot be left empty.
  3. Last Appeal Date – this is only used if you need to keep a record of this date, generally only CRICOS colleges would use this.
  4. User Name – by default the system will load your name, if you have logged into TEAMS and are doing this entry.

IMPORTANT: Whenever there is an active Intervention for an enrolment the system will show the compliance warning icon . Only when you complete an intervention will this icon be removed from the Compliance Alerts tile of the Enrolment Dashboard. You can select this icon to open the intervention listing screen. This is where you can see a history of all the intervention/s, current and completed, that the student has for the specific enrolment.

Intervention Listing Screen

This is where you will see all interventions for the enrolment. This will include both current/active and completed (historical) entries. You can edit or delete any entry in the grid by selecting the relevant icon in the Actions column.

As mentioned above, once you have completed an active intervention by adding the intervention outcome to it, the system will remove the compliance warning icon. It will be replaced with the view icon which you can select to open the Intervention listing screen.

Enrolment Financials – Edit Multiple Invoices

For ease of use, we have now introduced a new screen “Edit Invoices” on Student Financial Detail Screen.

In the past, to edit the invoice dates or their amounts we were editing each invoice individually. But now with this new screen, we can edit multiple invoices at once. Isn’t that easy? Yes, it is and will save a lot of time.

To edit multiple invoices, Just click on the edit icon on the student financial detail screen.

This will open the Edit Invoices screen as shown below. From this screen, we can edit the invoice date, invoice due date, amount, and GST for all the invoices (highlighted in green color). We can also delete any fee line item by ticking the tick box in front of all the line items for each invoice.

Business Rules

A – The system will only update the student invoices from this screen, it will not regenerate the agent commission invoices. So, if needed you have to change them manually from Agent commission screen.

B – If there is any negative invoice, the system will not allow you to edit it. It will show you the negative invoice in red font color as a line item.

C – If there is any financial transaction against any of the invoice, then the system will not allow you to edit that invoice. It will show you the invoice line items but in a read only mode i.e. non editable.

D – If there is only one line item in any invoice then it will make delete tick box as read only because the system will not allow to delete the whole invoice.

E – By ticking the tick box, the system will delete that fee line item after saving the screen.

After editing all the invoices, you can click on the save button to save the changes.

Change – Added BCC in the compose email screen

Enrolment Dashboard > Communication Tile > Communication Log Burger Menu > Email Log

We have added a new field in the compose email screen i.e. BCC. Now you can BCC the email to the preferred email address while sending an email to any agent, applicant, student and enrolment.

Important Links

Transitioning of old to new subjects

It’s important that you understand the data that the system is showing you. The data is actually divided into two parts. The 1st 4 columns are showing the units’ information from the old program code in which the student is currently enrolled into. It will show you units, their descriptions, what the result is for each unit and result dates.

The 2nd part (the last 4 columns) will show you units from the new program code in which you are going to move the student’s enrolment.


The column Action Taken which is placed in between these two parts will give you the data in three ways:

  • Same – when there is no change in the unit i.e unit in the old program code and in the new program code remains the same.
  • Superseded – when the unit is superseded i.e the unit linked with old program is also superseded. However, the description is the same for the unit. Learn how to make a unit superseded in TEAMS, so that the system can map the units.
  • Newly Added – when the unit isn’t linked with old program code and is now linked with new program code.

From this screen, you can update the result for all the units that are linked with the new program code.

Important

1) If a unit has a successful, unsuccessful or progressive result in the old program code, then the system will automatically update the same result and result date in the new program code for those units. This can include all the units that are same in both the program codes or are superseded. However, you are still given the facility to update the result if there is any need.

2) If the units are newly added, then you can update the result and result date manually.

After you are done selecting the result and result dates, you need to hit the Save button, so that the system can transit a student’s enrolment from the old program code to the new program code.

After you hit the Save button, the system will change the icon color to green and will give you a tooltip upon moving your mouse cursor over the icon. It will also show you the transition date in the profile section.

This is how you can move a student’s enrolment from the old program code to the new program code.

On the training plan and results screen, the system will show all the current units from the new program code in the current tab and inactive units from the old program code will appear in the inactive tab.

Alert System Configuration

Main Dashboard > System Admin > Alert System Configuration

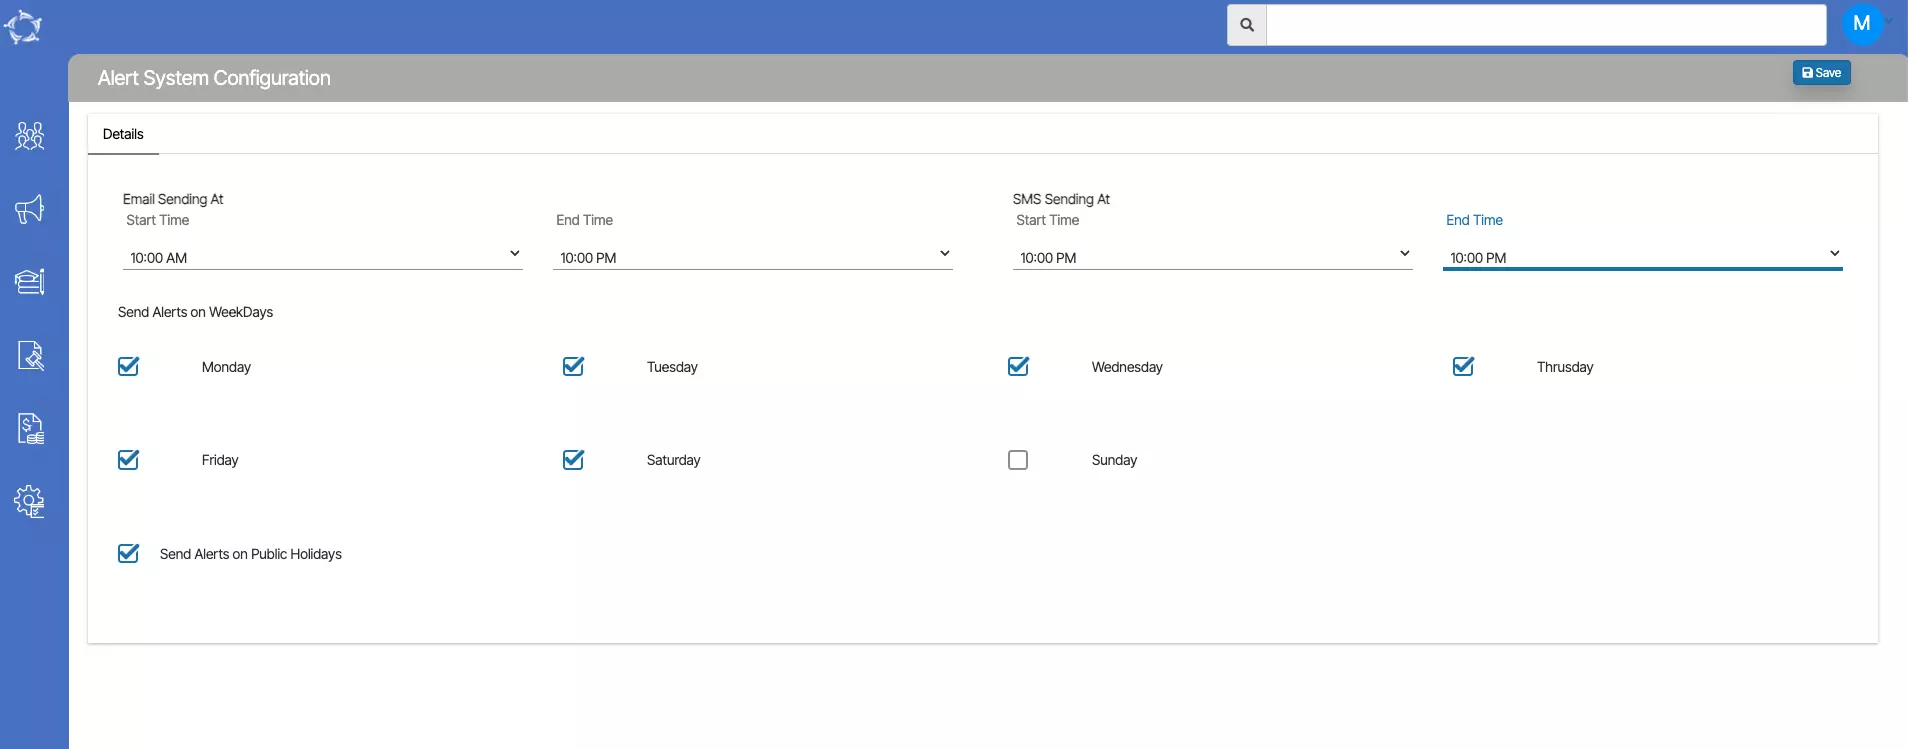
This screen allows you to configure the initiation and conclusion times for sending emails and SMS through TEAMS. Additionally, you have the option to establish particular days for the system to send reminders or alerts.

FieldsExplanations
Email Sending AtStart Time – Specify the commencement time for enabling the sending of emails to agents, students, and users for all alerts and actions.

End Time – Input the conclusion time until which you desire all alerts and actions to have the capability to send emails to agents, students, and users.
SMS Sending AtStart Time – Specify the commencement time for enabling all alerts and actions to send SMS to agents, students, and users.

End Time – Input the conclusion time until which you desire all alerts and actions to have the capability to send SMS to agents, students, and users.
Send Alerts on WeekdaysYou have the option to choose the days (Monday to Sunday) for sending both Emails and SMS.

Additionally, you can choose to enable the Send Alerts on Public Holidays checkbox if you want alerts to be sent on public holidays.

How to setup Fee Reminder actions and alerts in TEAMS

Overview

Fee Reminders are generally sent to students on a regular basis depending upon their Invoice due date. Some colleges send only overdue reminders to the students and some also send upcoming invoices.

Note: To set up actions and alerts, please contact the support team as it also has to be activated from the backend to work.

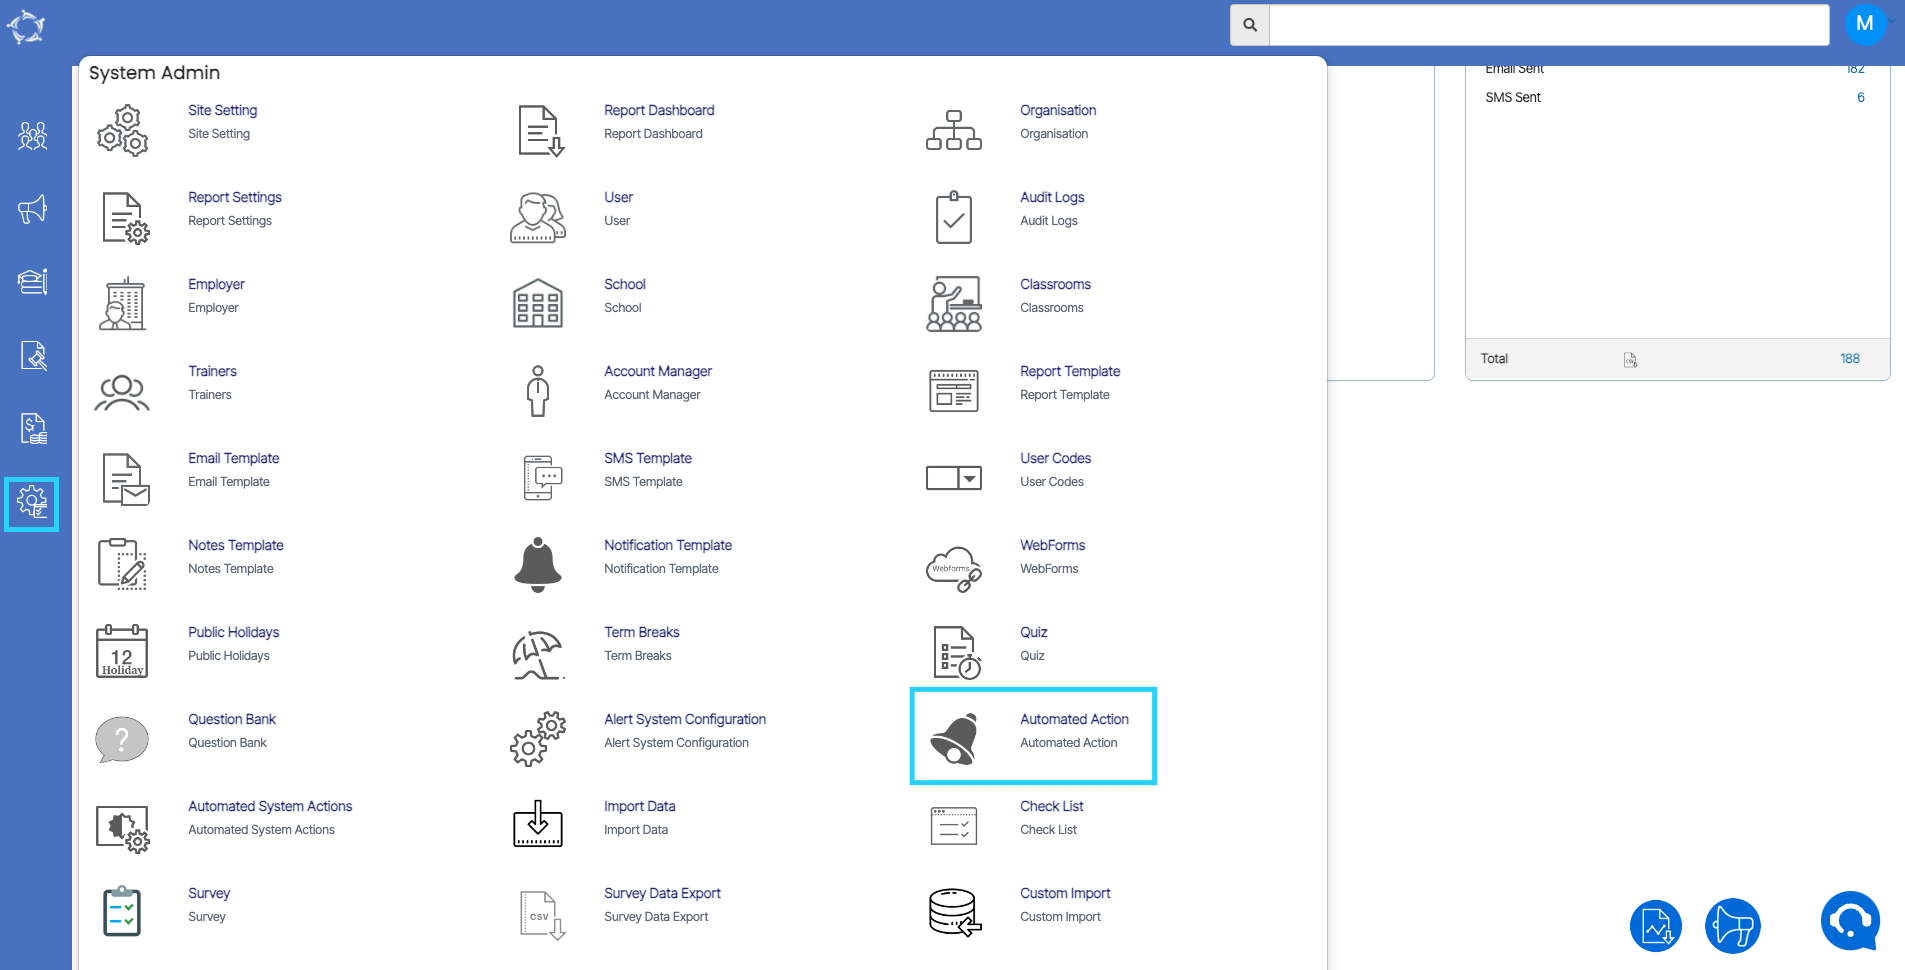
From the Main Dashboard, you need to select the System Admin Menu and then select the Automated Action sub menu.

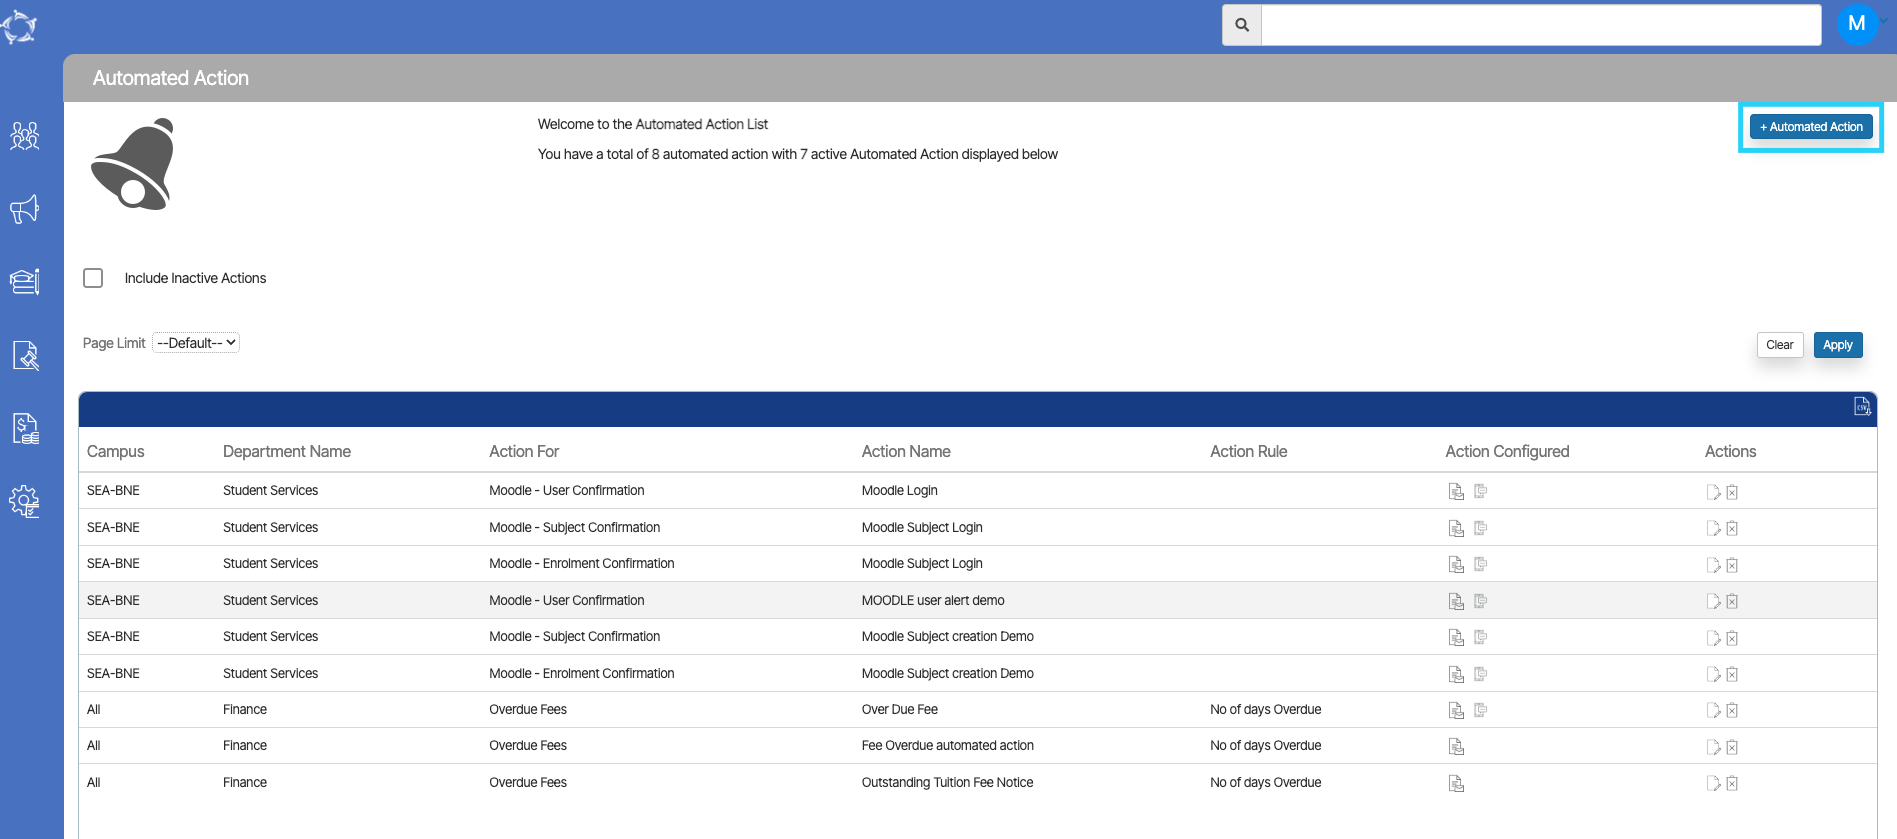
This will open the Automated Action Welcome Screen. To create fee reminder alerts for upcoming and overdue invoices, select the +Automated Action button on the top right corner of the screen.

IMPORTANT – Please make sure that you have done the setup on the Alert System Configuration screen for sending emails and SMS.

Also, the Business Rule of the reminders is that, it will be sent to Started and Current Students only.

Steps to setup Fee Reminder Actions and Alerts

NOTE – Please note that the dropdown on this is user code and one can create them from the User Code Screen in the System.

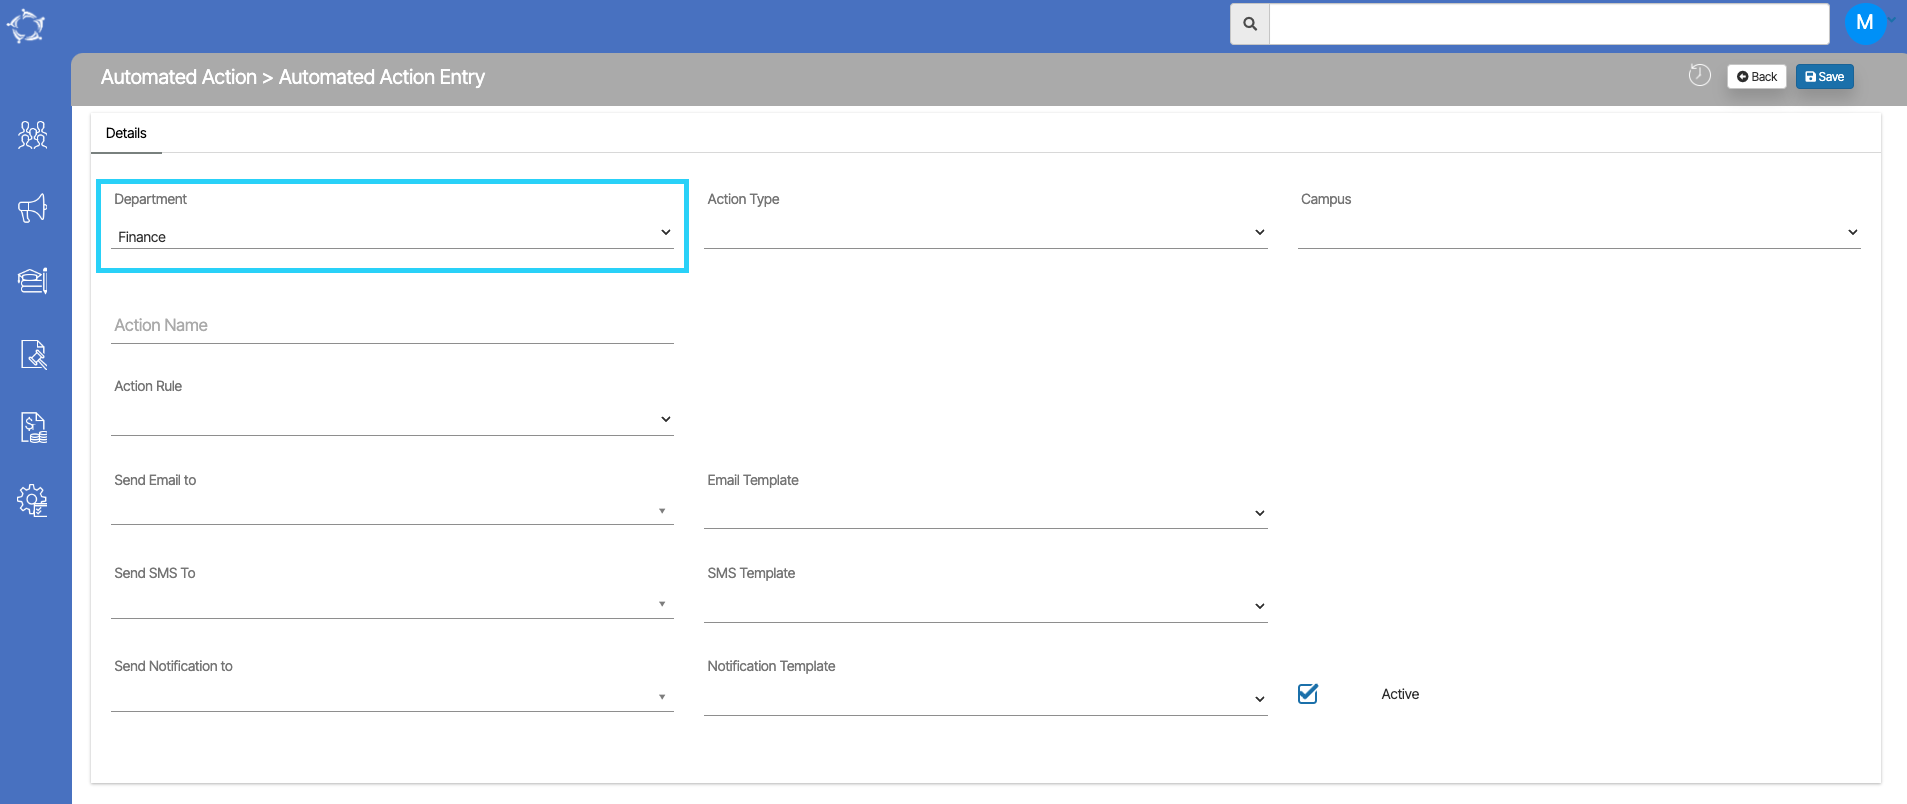
Upon selecting the Automated Action button it will open the Automated Action Entry screen.

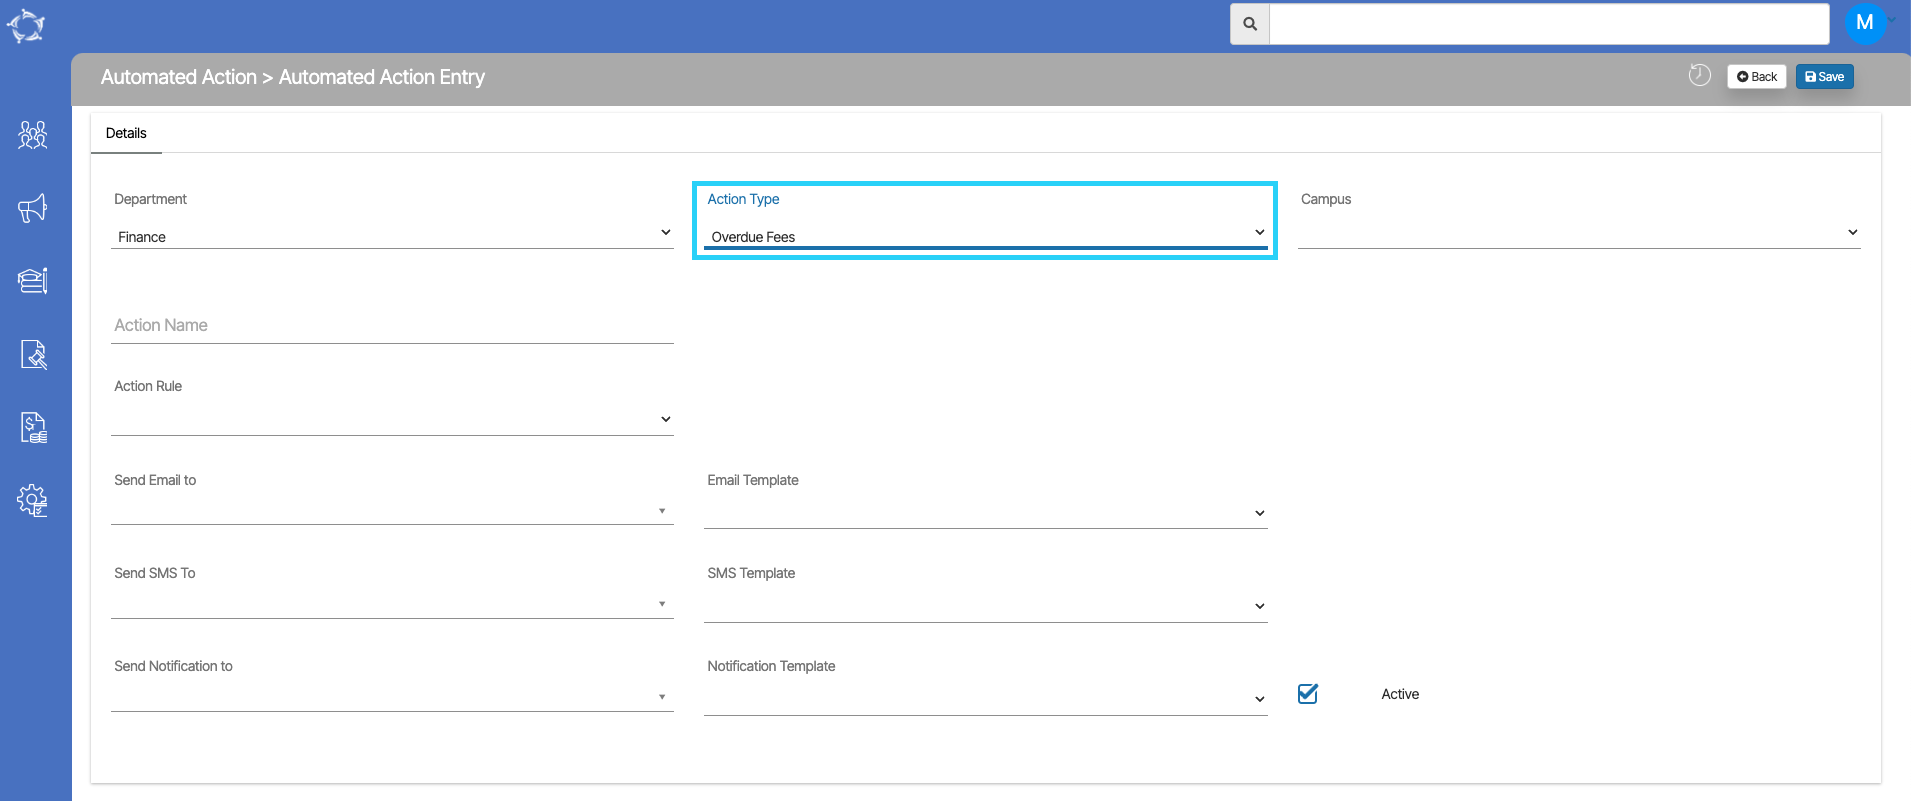
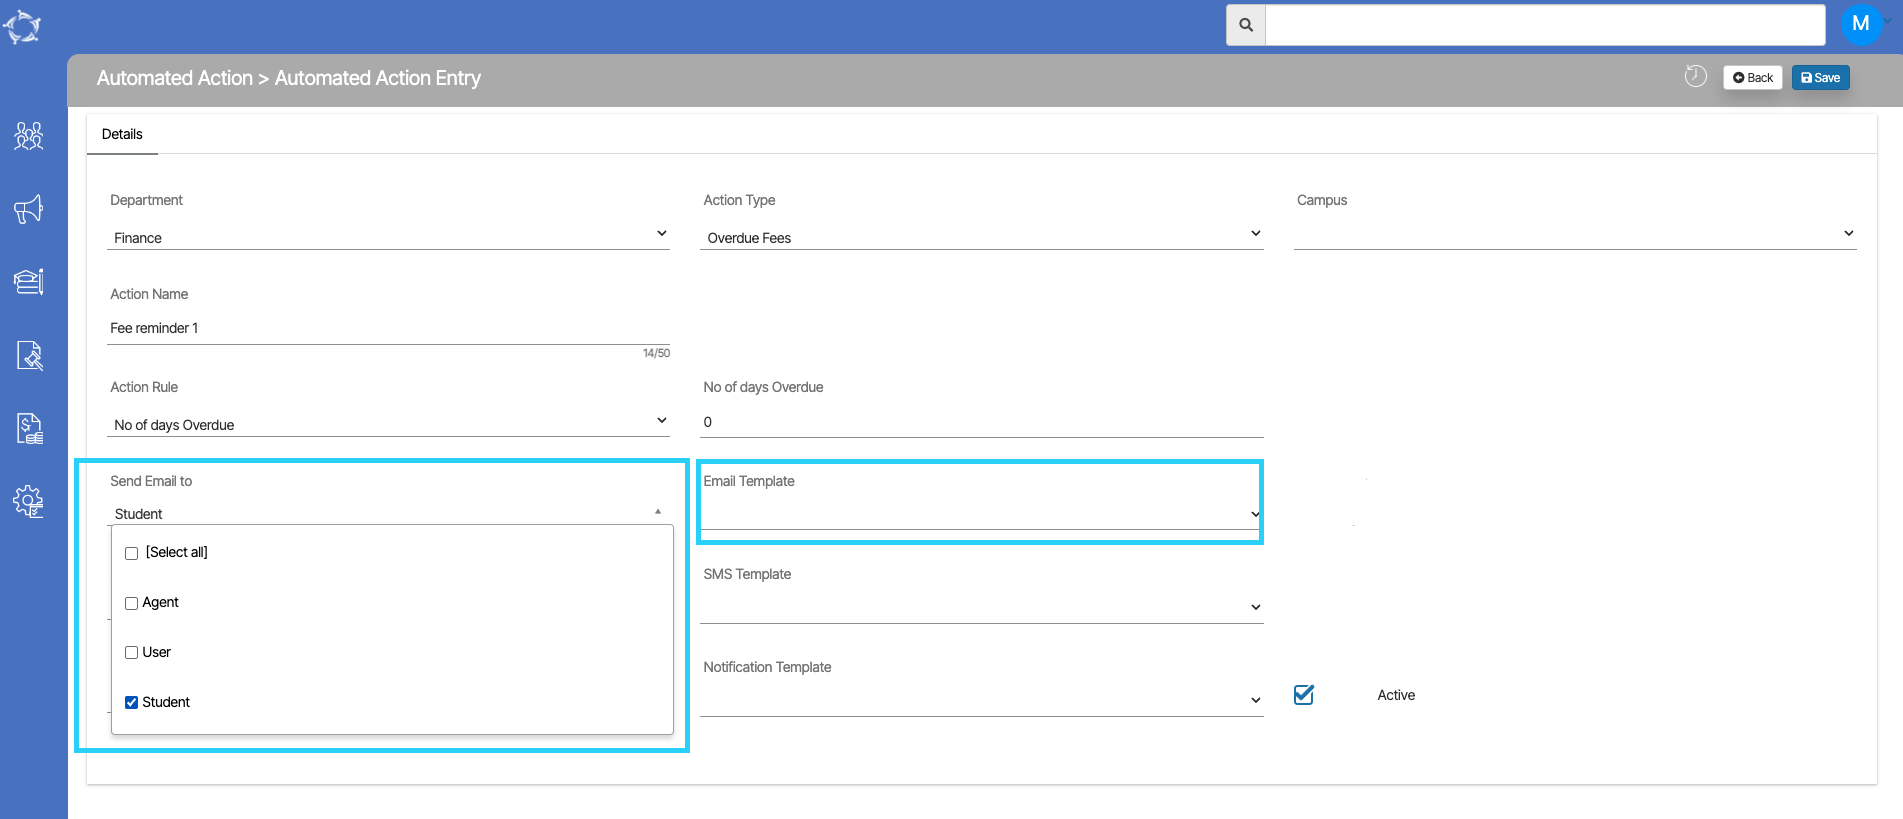
  • Select the Finance option from the Department dropdown.
  • Once you have selected the finance department, the system will load the Action Type dropdown. Based on the action type created in TEAMS, it will appear under the dropdown. for example – The Overdue Fees option has been selected.
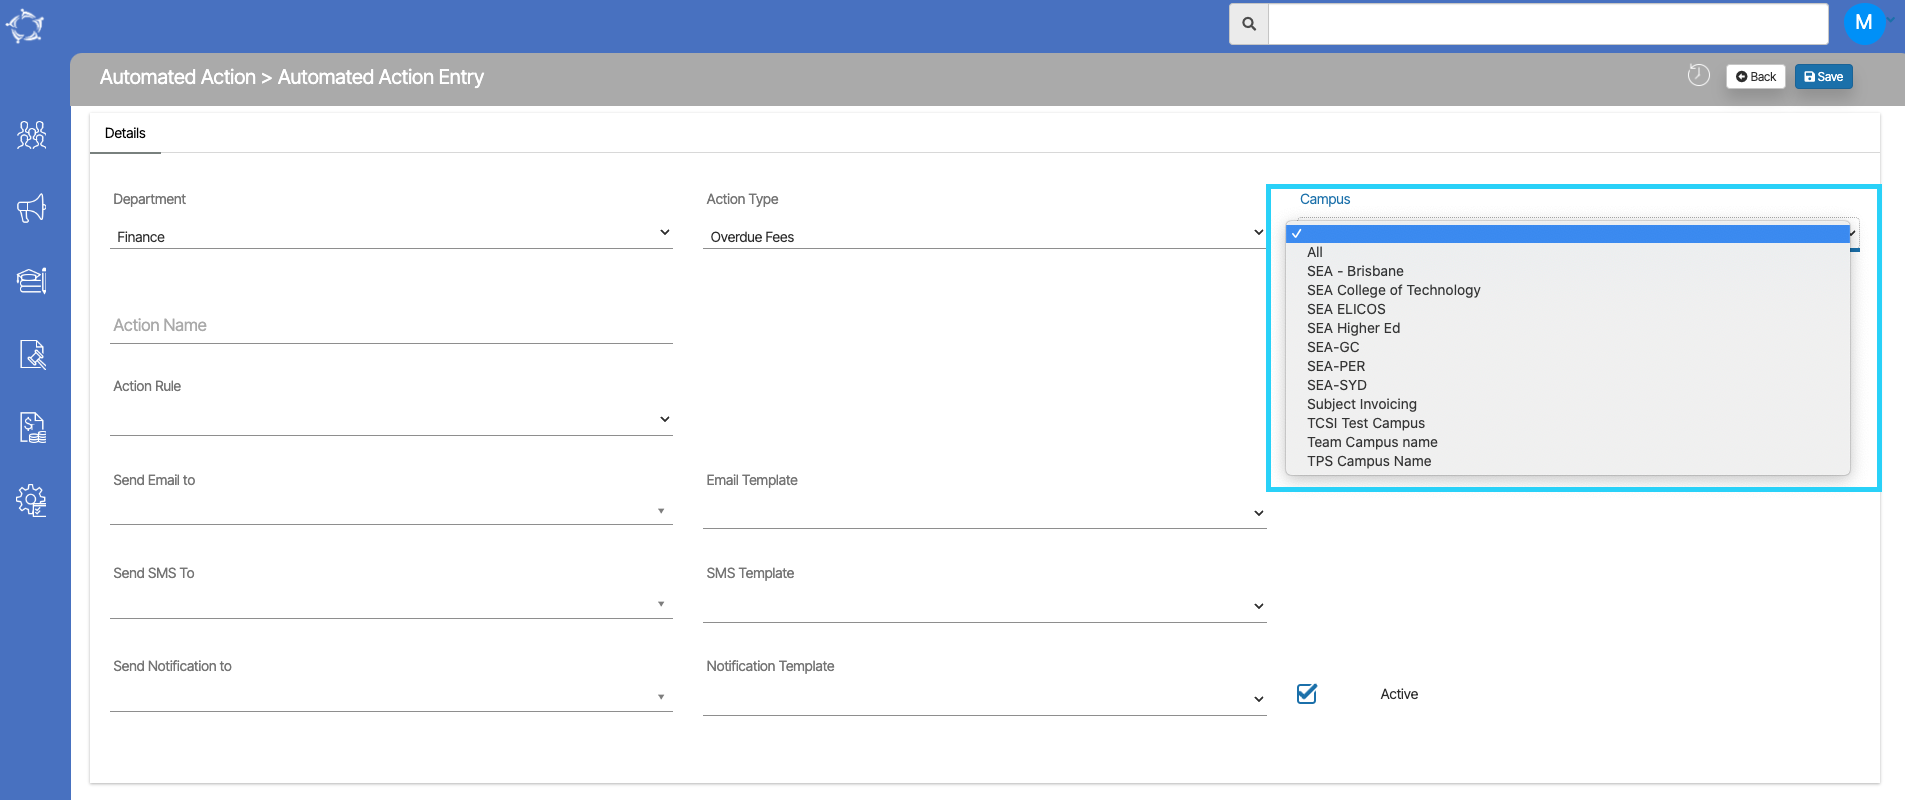
  • After selecting the action types, select the campus for which you wish to create the alert. If you have multiple campuses and you wish to create this alert for all the campuses then you can select the All option.
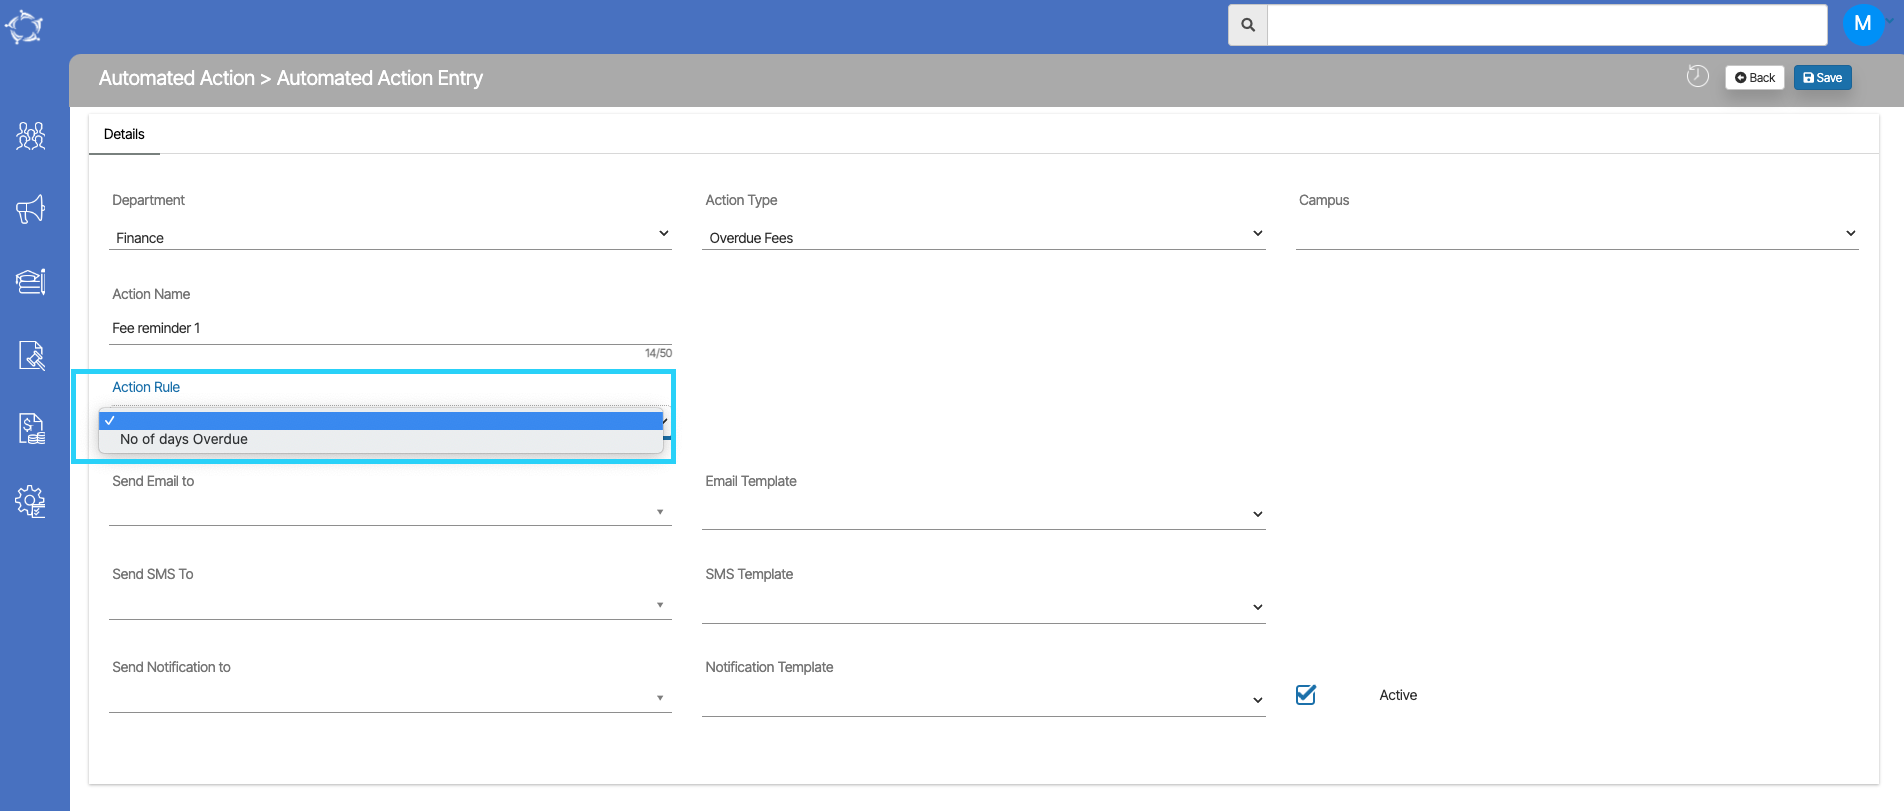
  • Enter the name of the Action in the Action Name field. After that select the Action Rule from the drop-down. If you have selected Overdue Fees in the action type then in the action rule it will show No of days Overdue.
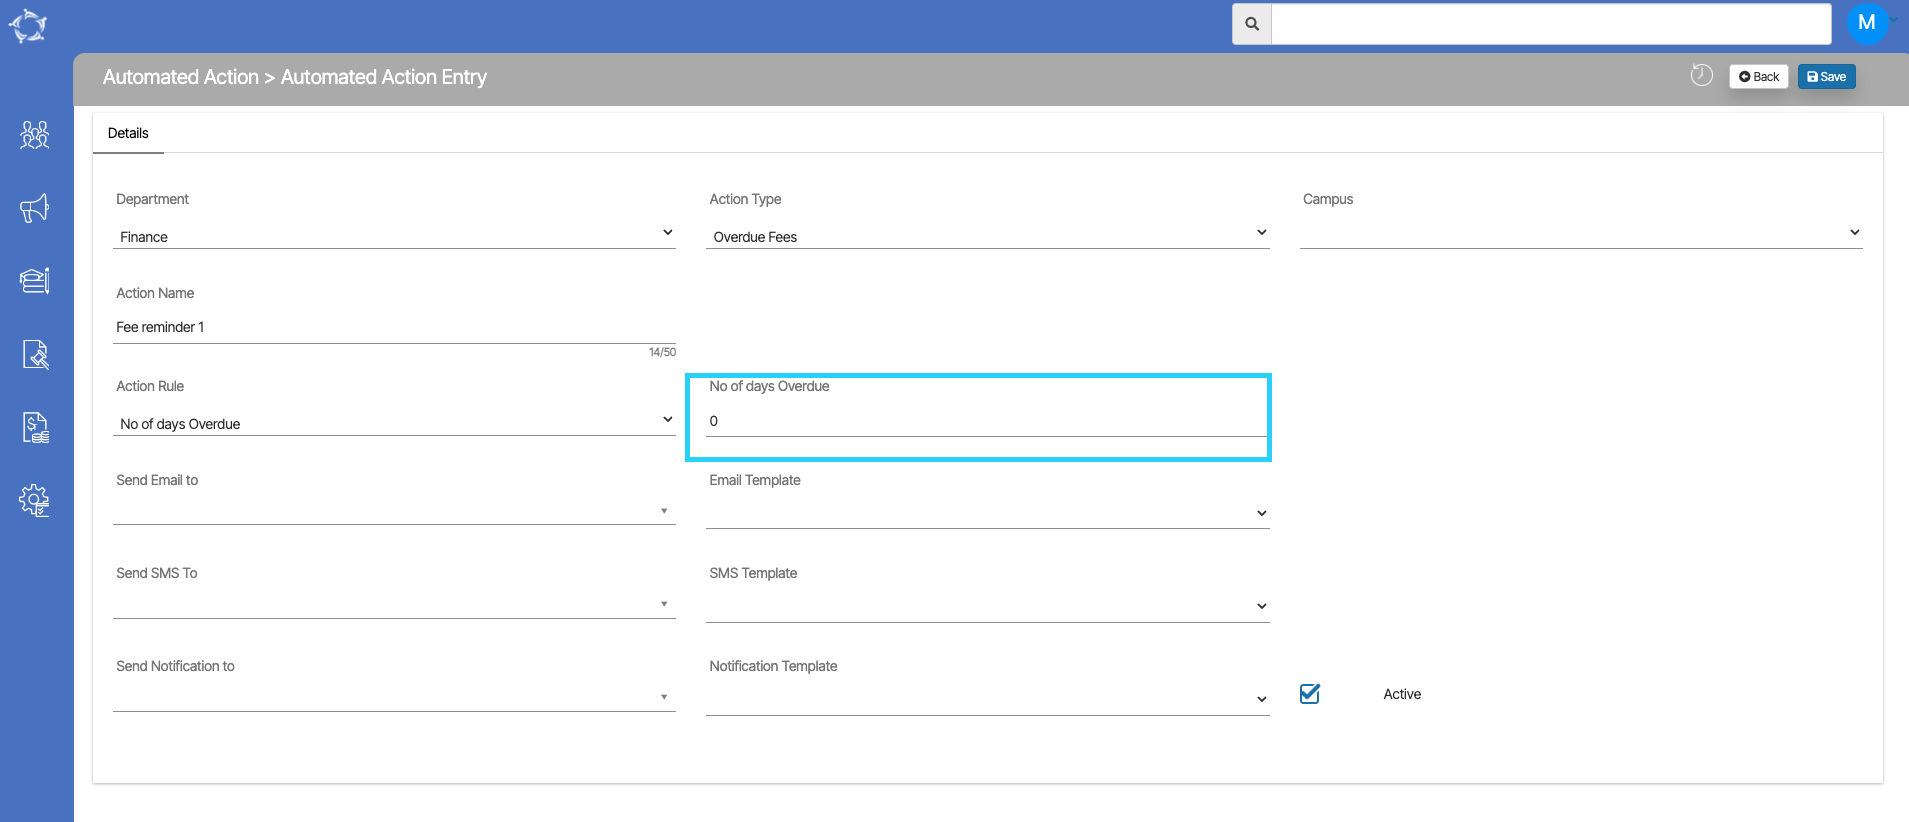
  • If you have selected the No of Days Overdue in the Action Rule then you need to enter the number value in the number of days overdue field to send reminders to the students after their Invoice due date has passed. For example, if you set it to 6, the system will send reminders to the invoices whose due date was 6 days ago. So if the current date is 12 June 2023, the system will generate alerts and send reminders for the invoice due date of 06 June 2023.
  • When you select the Send Email to dropdown, you will see different options (User, Student, Agent etc). Select the student option from here. Once you select the send email to, the Email Template dropdown will appear.

NOTE: The dropdown will show all the enrolment level email templates. The template will be visible as the tick boxes. Select the tick box against the template and hit the save button to save the action.

  • In the same manner, you can send reminder SMS as well. Select the enrolment in the Send SMS to dropdown and select the SMS Template you want to use to send reminders. Save the action and you are ready to go.

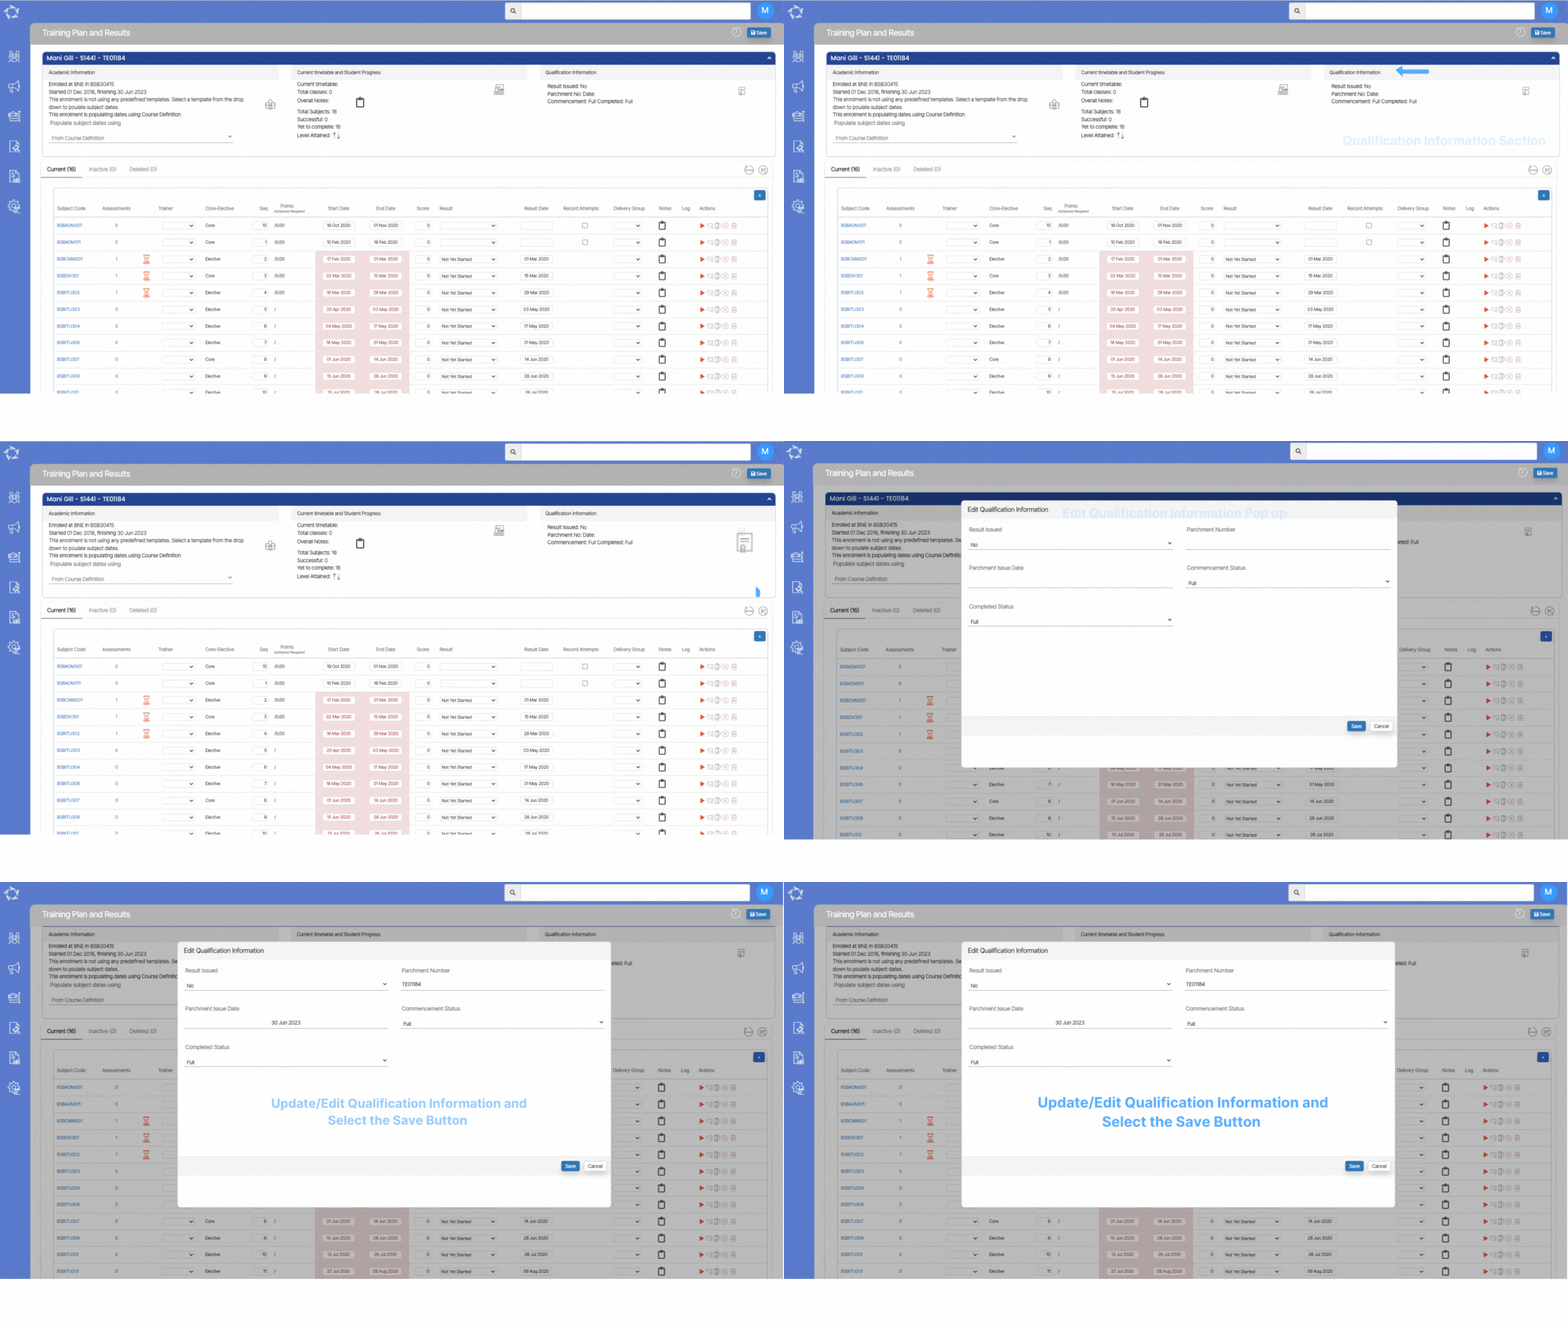
Qualification Information

The tile displays important information regarding the parchment number and parchment date, as well as the result status, commencement status, and completion status.

To update or edit the qualification information, you can easily make changes by selecting the designated icon. . Once you select the icon, it will open the pop window where you can edit the information and save it.
Current Timetable and Student Progress

This section will display the information related to the current timetable, and total classes. Also, the total subjects, successful, are yet to complete and not counted due to CT, RPL, and RCG. Other than you can select Level Attained by selecting the icon next to the text.

This tile also navigates you to the class listing screen. Select the icon and you can see the list of all classes allocated to it. To know more, click here.