New Application – Edit Invoices Preview

history of changes

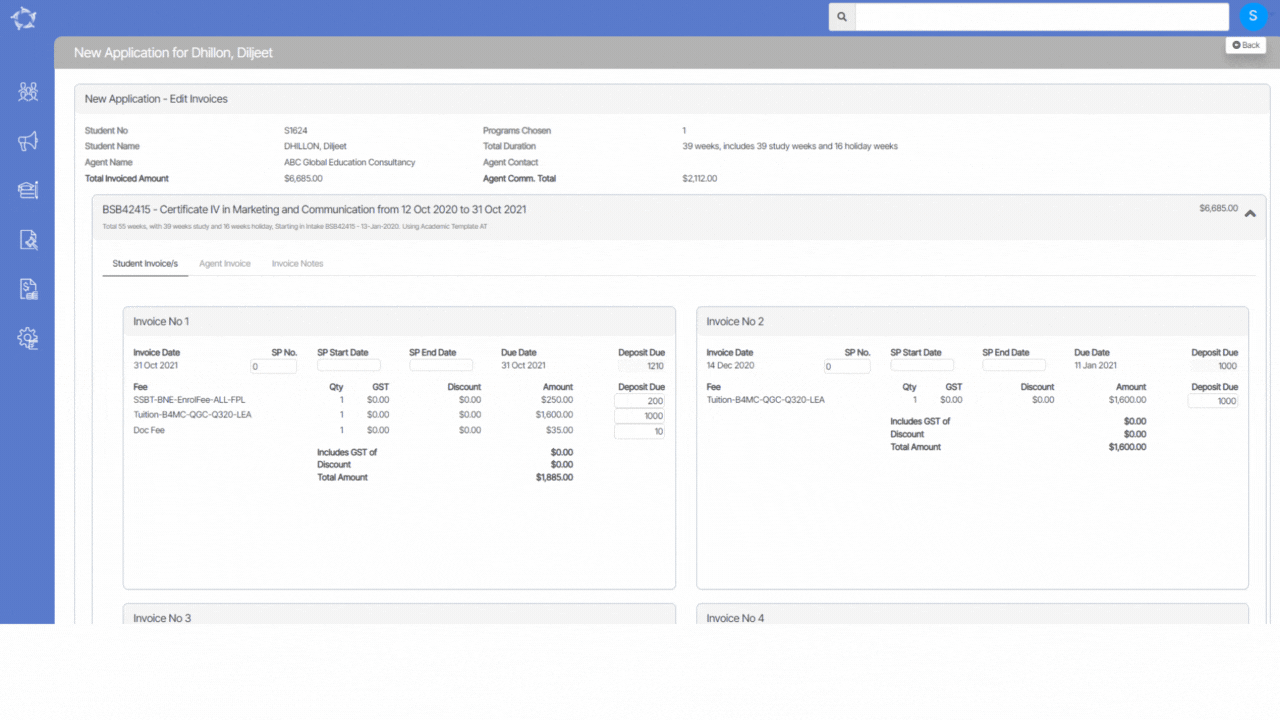
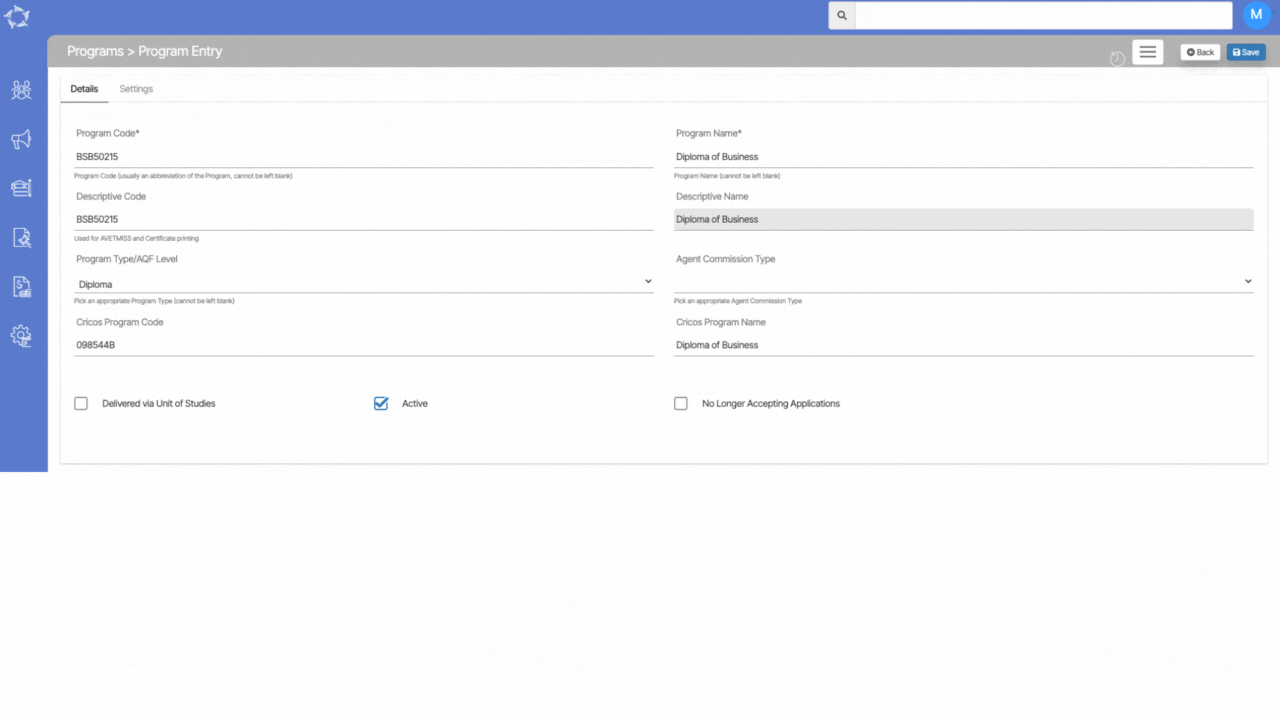
This is the Application Invoice Preview screen where you can view all the student invoices and agent invoices details including invoice notes. You can also add the bonus to the agent from this screen.
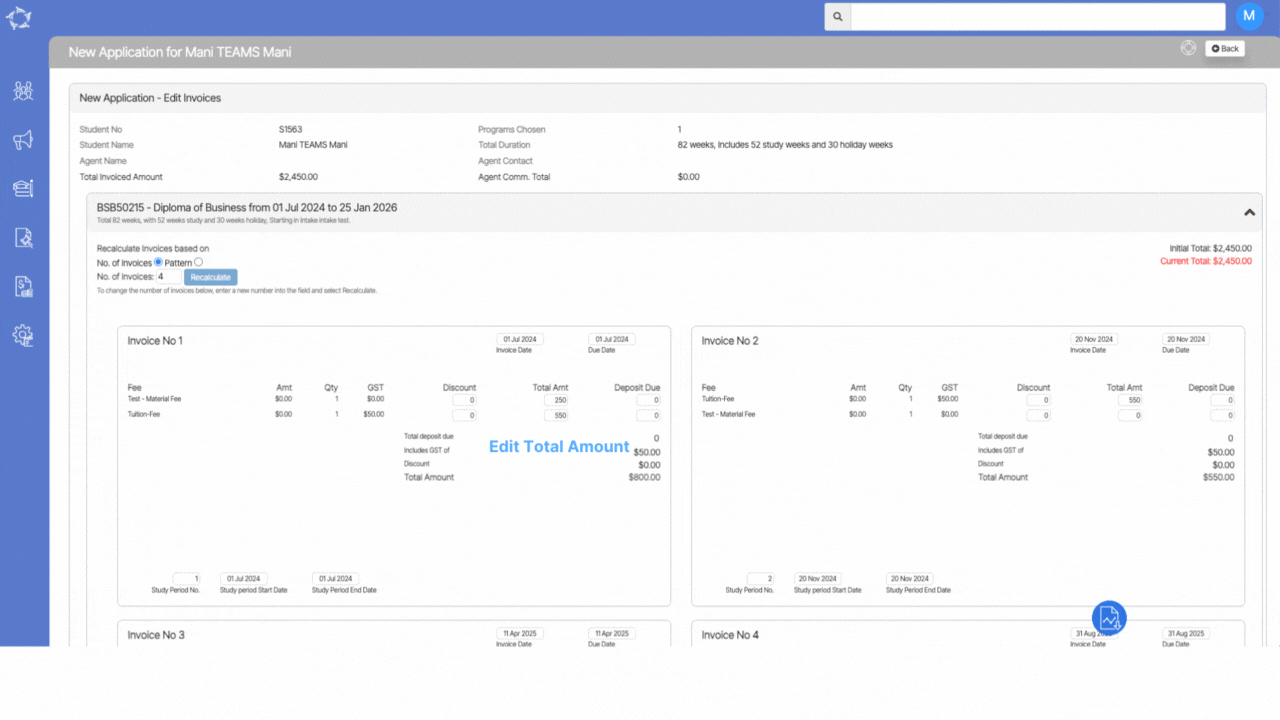
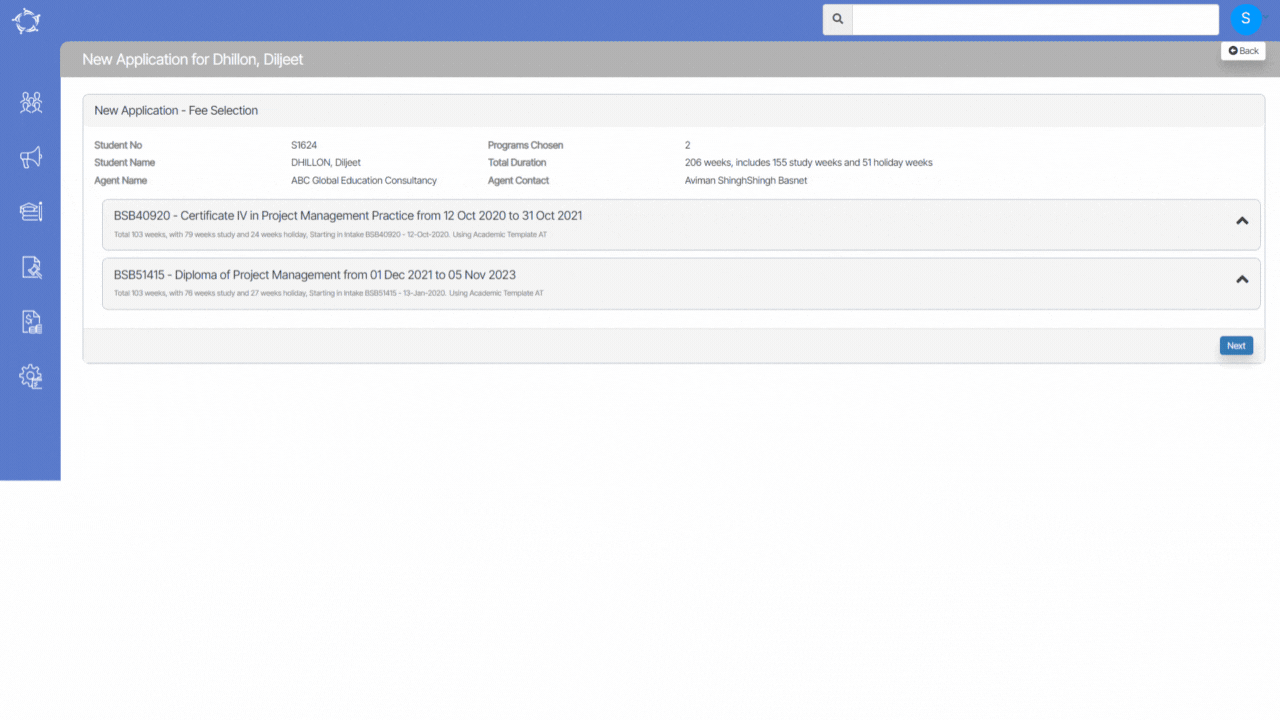
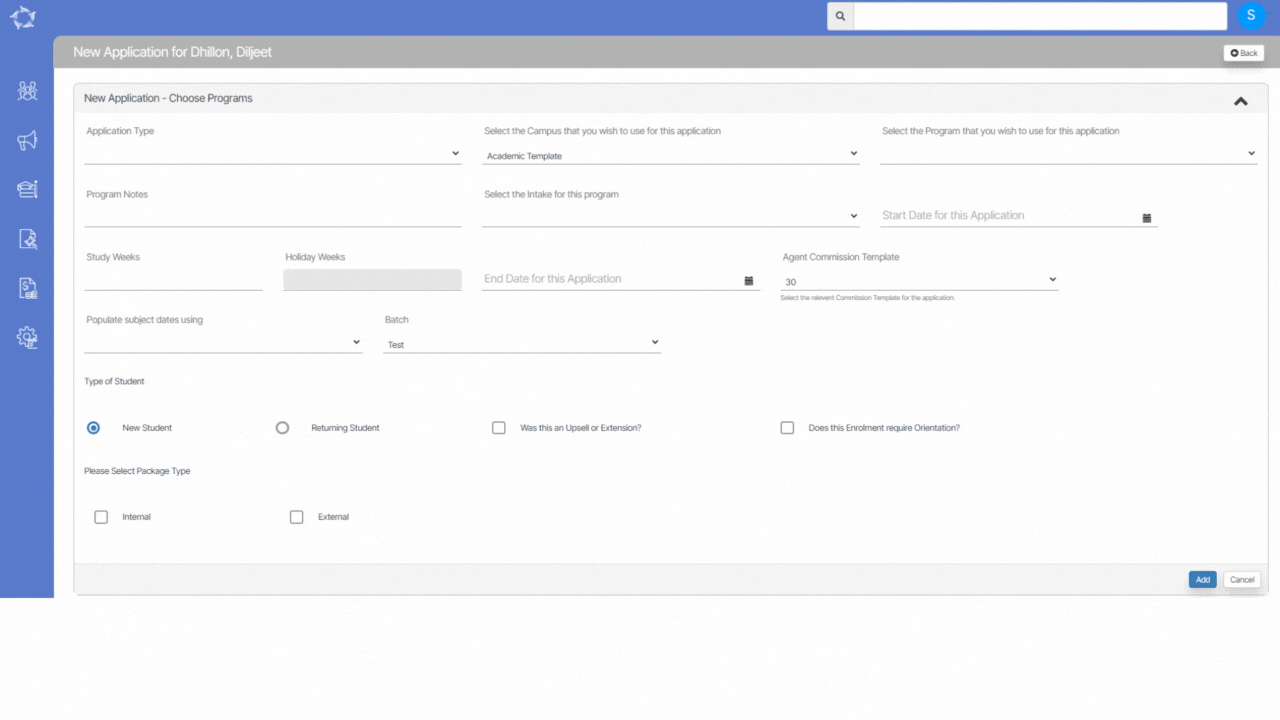
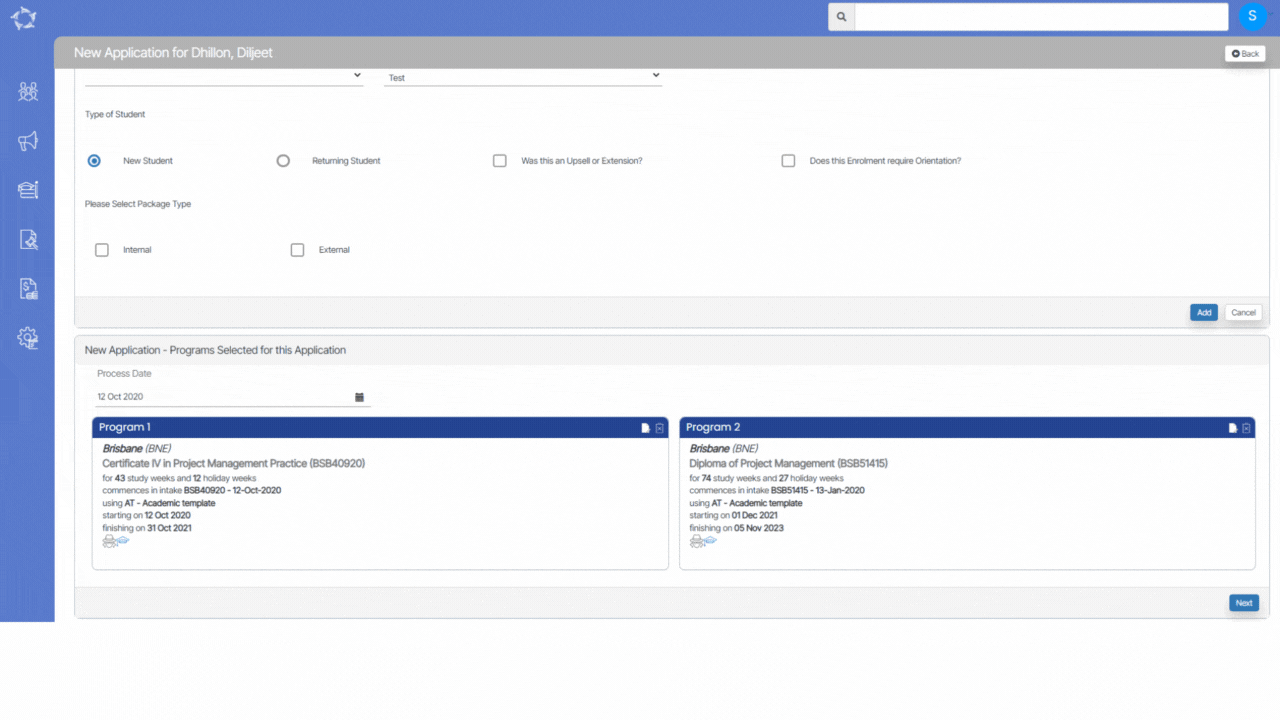
Note DO NOT close your browser while you are walking through the steps of this process, as you will lose what you have entered. When you select the NEXT button in each step of this process the system does not save what you have done to the database. It allows you to go back in the process to change what you have selected, however, it is not until the final step where you select the FINISH button that the system will fully save everything to the database for you.

IMPORTANT – In the Agent details screen, there is a tick box for Apply GST. Whether this is selected or not, when an agent is linked to an application, you will have the option to either select or unselect the Apply GST tick box against all or individual agent commission invoices that the system will raise for you.

Also, there is a difference between raising an agent bonus invoice from the Agent Dashboard to raising it in the new application process. From the Agent Dashboard you DO NOT have to link the bonus invoice to one or many enrolments, however from the new application process, the system will automatically link it to the application program that you link the bonus invoice to.

Once you are happy with all the data entered on this screen, you need to select the Finish button to complete the application process.

New Application – Edit Invoices screen

history of changes

This screen will allow you to edit invoices and you can (change invoice date, and due date, fee amount, study periods and recalculate the number of invoices.

NoteDO NOT close your browser while you are walking through the steps of this process, as you will lose what you have entered. When you select the NEXT button in each step of this process the system does not save what you have done to the database. It allows you to go back in the process to change what you have selected, however, it is not until the final step where you select the FINISH button that the system will fully save everything to the database for you.

IMPORTANT – If you want to change the number of invoices then you need to add the desired number in the box and then select the Recalculate button, the system will recalculate the invoices into the desired number.

For example, as you can see below, the No. of invoices was 4 and there were 4 invoices generated for the application and then the no. of invoices is selected as 5 and the system generated 5 invoices accordingly.

IMPORTANT – If you have selected any instalment plan while the fee selection process and you wish to edit the number of invoices and recalculate then the instalment plan will be ignored and new invoices will be created. New dates and amounts will be distributed proportionally and the initial instalment plan will be lost.

Once you are happy with the above requirements, you can then make changes to the fee amount, can add the deposit due, and select the number of study periods including their SD and ED which will show you the initial total and current total on right hand side of the screen. You then need to select the Next button complete the application process.

New Application – Fee Selection

This screen will allow you to select the fees for the application including (Tuition Fee, Application Fee, Material Fee, etc.) The first section of the screen will show you the basic information about the applicant, and then you select the drag down button to expand, which will show you the fee section.

NOTEDO NOT close your browser while you are walking through the steps of this process, as you will lose what you have entered. When you select the NEXT button in each step of this process the system does not save what you have done to the database. It allows you to go back in the process to change what you have selected, however, it is not until the final step where you select the FINISH button that the system will fully save everything to the database for you.

IMPORTANT – if you have set up the Tuition fee and any other fees in the system, then only you will be able to see and select the fees from the dropdown.

Also, if you have selected the agent’s commission for the tuition fee of the program, then the Pay Commission tick box will be automatically ticked while selecting the tuition fee otherwise and if it is not selected at the fee level then you can select the Pay commission tick box for the tuition fee.

Once you have selected the required fees for the application you need to select the Next button to complete the further actions.

Note – When selecting the  Rate Based Tuition fee and inputting the quantity on the New Application Fee Selection Screen, selecting the next button will show you the Amount column, and Quantity column. You can easily view the amount based on the quantity you have selected for the rate based tuition fee.

New Application – Choose Programs

This screen allows you to choose the programs for the application and you can select multiple programs for the application as shown below:

NoteDO NOT close your browser while you are walking through the steps of this process, as you will lose what you have entered. When you select the NEXT button in each step of this process the system does not save what you have done to the database. It allows you to go back in the process to change what you have selected, however, it is not until the final step where you select the FINISH button that the system will fully save everything to the database for you.

When you select the Add button it will show you the total number of Programs in the New Application – Programs selected for the application grid. The tiles will show you basic information about the program. If you wish to make the changes in the selected programs then you can select the edit icon from the program tile or you can delete the program by selecting the delete icon.

Once you are happy with what you have selected for the application, you then need to select the Next button for further actions to complete the application.

Explanation of Fields :

FieldsExplanation
Application TypesThis is a user code and you can create any application type as you required.
Select the Campus that you wish to use for this applicationIf you have multiple campuses then this dropdown will show you all the campuses where you can select a specific campus for the application.
Select the Program that you wish to use for this applicationIt will show you the list of Programs linked to the campus selected.
Program NotesYou can add the Program notes
Select the Intakes for this programThis will show you the intakes that are linked to the program.
Start Date for this ApplicationIf you have selected the intake then the system will populate the start date for the application and if you are using the rolling intake then you select the date from the calendar icon for your rolling intake.
Study WeeksThis will show the total study weeks of the application.
Holiday WeeksTotal holiday weeks.
End Date for this ApplicationThe system will populate the end date for the application when the Program and Intake get selected.
Agent Commission Template
This will show you the agent’s commission for the selected agent in the first step of the application.
Populate subject dates usingThis dropdown will show you the fields that how you want to show the subject dates for this application.
Batch
Type of studentNew Student or Returning Student
Was this an Upsell or Extension?Select the tick box
Does this Enrolment require Orientation?Once you select the tick box, it will show you induction/Orientation field to select the date.
Please Select Package TypeInternal or External

Continuing Tile – Rules

The system uses the following rules to give you the counts in this Tile.

Rules
1. Look for any enrolment that is continuing enrolment within the calendar date option selected.
2. Do not count any enrolment that has been flagged as cancelled. This means you should see the word Cancelled in red against the enrolment NOT that the Enrolment Outcome is set to Cancelled only.
3. Look at programs set to inactive and see if any enrolment in the program is continuing enrolment within the calendar date option and if yes count them and display them.

Enrolment dates – can’t be longer than five years

We have added a new check in the application process on the New program – Choose Programs screen where the system will not allow you to add the program to the application if the program’s start date and end date are selected is more than five years.

Also, when you are on the Enrolment Dashboard – Edit Enrolment Screen, you will not be allowed to edit the enrolment dates for more than five years.

IMPORTANT: If Program/s is selected as VET on the program entry screen > settings tab or the subject type for the subject/s is selected as Unit of Competency (UoC) – Nationally Accredited then you are not allowed to add the application dates of more than 5 years. BUT, if the User Choice Tick box is selected on the Program entry screen for them then you will be allowed to add the application dates of more than five years.

Training Plan & Results – Subjects and Assessment Result New Check

As you all know, students can have multiple enrolments with multiple subjects in the system. However, you may not be aware that for each subject linked to an enrolment you can also have Assessments and mark results at that level instead. This new rule impacts anyone using assessments in the system.

Using the student and enrolment examples above there are two scenarios that will help to explain how the new check works.

Scenario 1

As you can see in the above image, Subject 1 has three assessments and their results have been marked as Successful with result dates for each assessment result. Based on the last assessment result you enter and its result date, the system will take that assessment result date and at the Subject level automatically update the Subject result to Competent and it uses the last assessment result date as the Subject result date. In the example above, you can see that for Assessment 3 its result date has been marked as 02/08/2022 and the system has updated Subject 1 with the final result of Competent and the result date as 02/08/2022.

Scenario 2

Another scenario for the same could be that one of the assessments has a result of Unsuccessful, as you can see with Assessment 3 above. Based on all assessment having a result the system has then update Subject 1 with a result of Not Yet Competent and again used the Assessment 3 result date of the 01/09/2022 as the Subject result date.

New Check Explanation

Using either of the above scenarios, it doesn’t matter what the final result is (successful or unsuccessful) if a user goes to the Subject level and tries to change the result so that it clashes with the assessment level results it will stop you from changing the Subject Result.

For example, using Scenario 1 above, if a user went to the Training Plan & Results screen and tried to change the Subject 1 result from Competent to Not Yet Competent or any other result the system would stop you and you would see this message below:

To change the Subject Result you must go to the Enrolment Assessment Results screen and change the relevant assessment result and save and then the system will re-calculate and update the correct result against the Subject.

Visa/CoE Information – Student Dashboard

Student Dashboard > Student Profile Tile > Visa and/or CoE Information Icon

history of changes

This screen will allow you to add/edit Visa/CoE details from the student dashboard. Student Dashboard is the only location to make changes to the student’s Visa/CoE details.

Below are the steps to add the Visa/CoE details of the Student

  • When you select the icon 
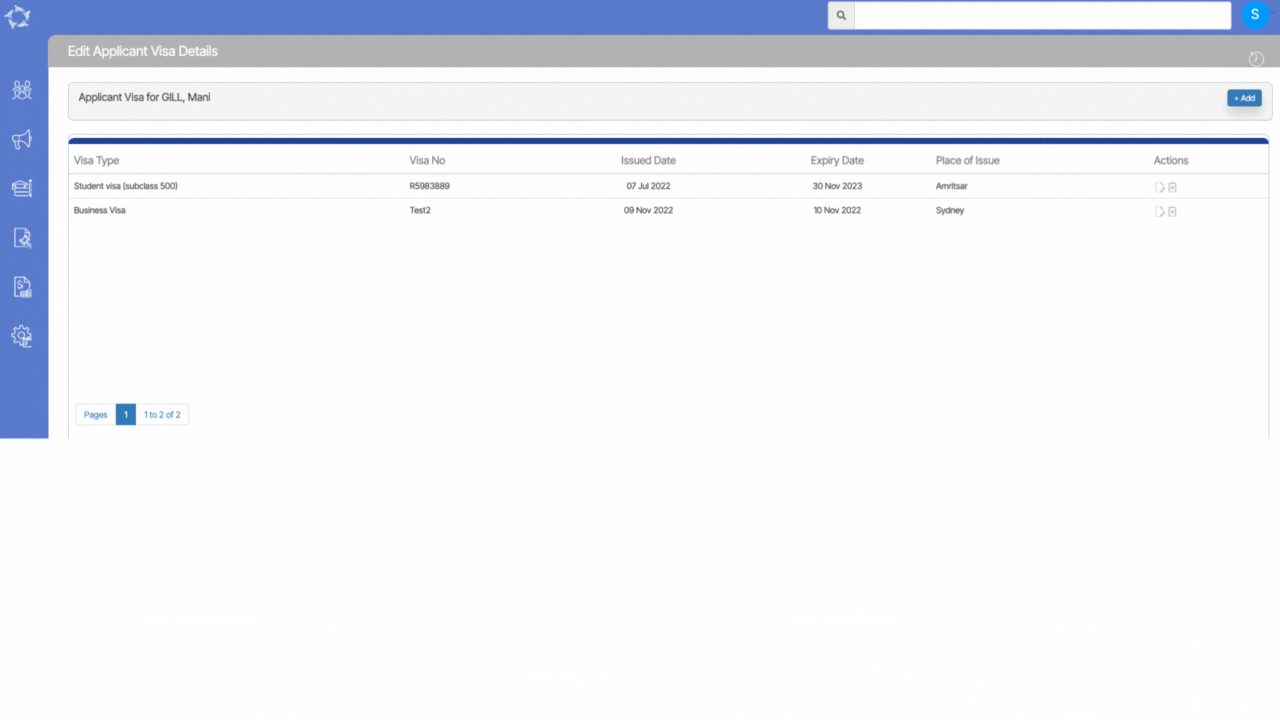
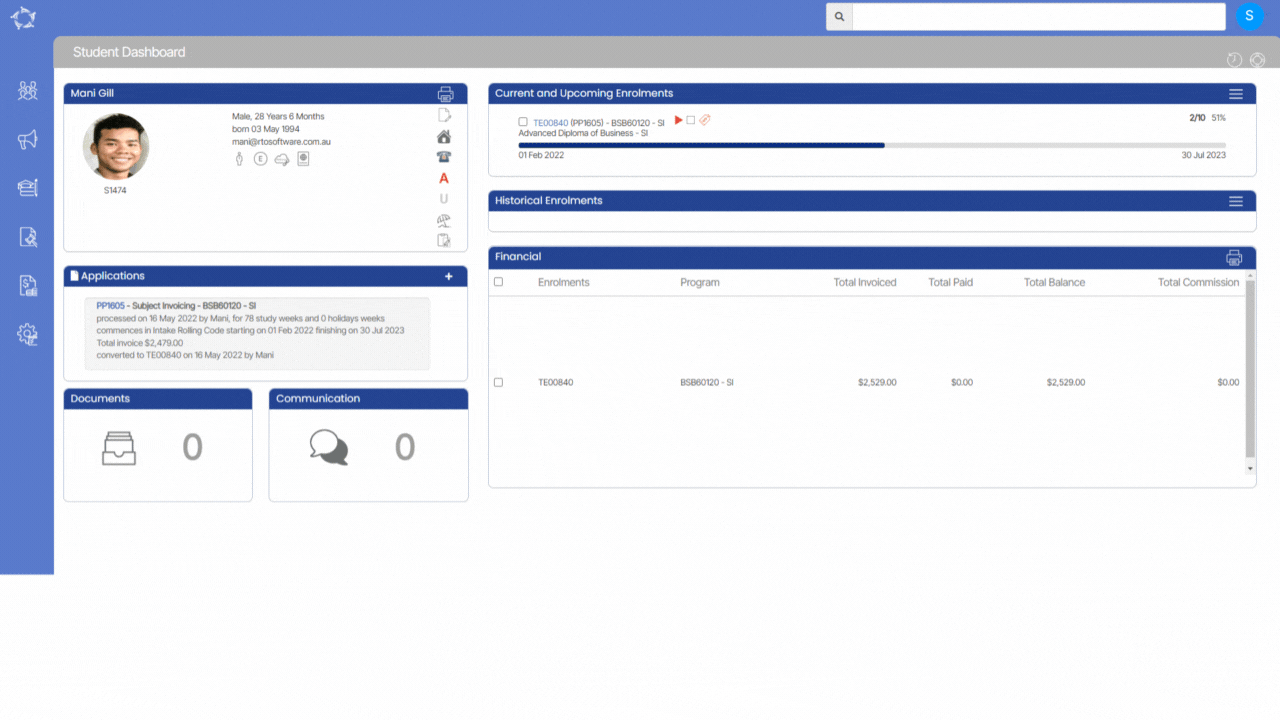
on the Student Dashboard, it will take you to the edit Visa/CoE details screen where you can select the button to add the Visa/CoE details of the student.
  • Upon selecting the add button, a popup window will open where you can add the visa/coe information for the student and enrolment.
  • Once you select the Add button, it will appear in the grid.

Visa Information – Application Dashboard

Application Dashboard > Application Profile Tile > Visa Information Icon

history of changes


This screen provides a comprehensive view of the visa details for an applicant, which are updated at the applicant level. However, please note that you will not have the ability to add or edit any visa details directly from the Application Dashboard.

To access the visa information, simply select the visa icon on the Application Dashboard. This action will redirect you to the view visa details screen, where you can review all the relevant visa information associated with the application. This feature ensures easy access and visibility of visa details while maintaining the necessary restrictions on editing and adding new information directly from the Application Dashboard.