NCVER AVETMISS Student Data Submissions – RTO TEAMS Step 6

Programs Data

The Program data is exported into NAT00030 NAT File. This will list all the Programs that are listed in the NAT00120 for the students studying in 2022.

IMPORTANT – This is where you can get hundreds, sometimes thousands of errors (based on the number of enrolments in a Programs that are listed in the NAT00120) when you do not setup your programs in TEAMS with the correct AVETMISS settings. For each student listed in the NAT00120 with a specific program (where there is a setting that is wrong/missing) that is how many times you will get the same error. So once you fix/add the correct setting for the programs in TEAMS those specific errors will disappear for those hundreds or thousands of rows in your next export and submission. The logic is fix in one spot and it will fix many rows of data in the NAT00120. 

For example – you have program 1 that has 3 different errors as it is missing 3 different AVETMISS settings in TEAMS. For that program in the NAT00120 you have 400 students listed, this means each setting is a different error so you will have 400 rows of errors for one setting and for all 3 settings you will have 1200 rows of errors. BUT once you go to that program in TEAMS and add those 3 settings and do your next export and submission all 1200 rows of errors will not be there. This is a general rule but is NOT always the case.

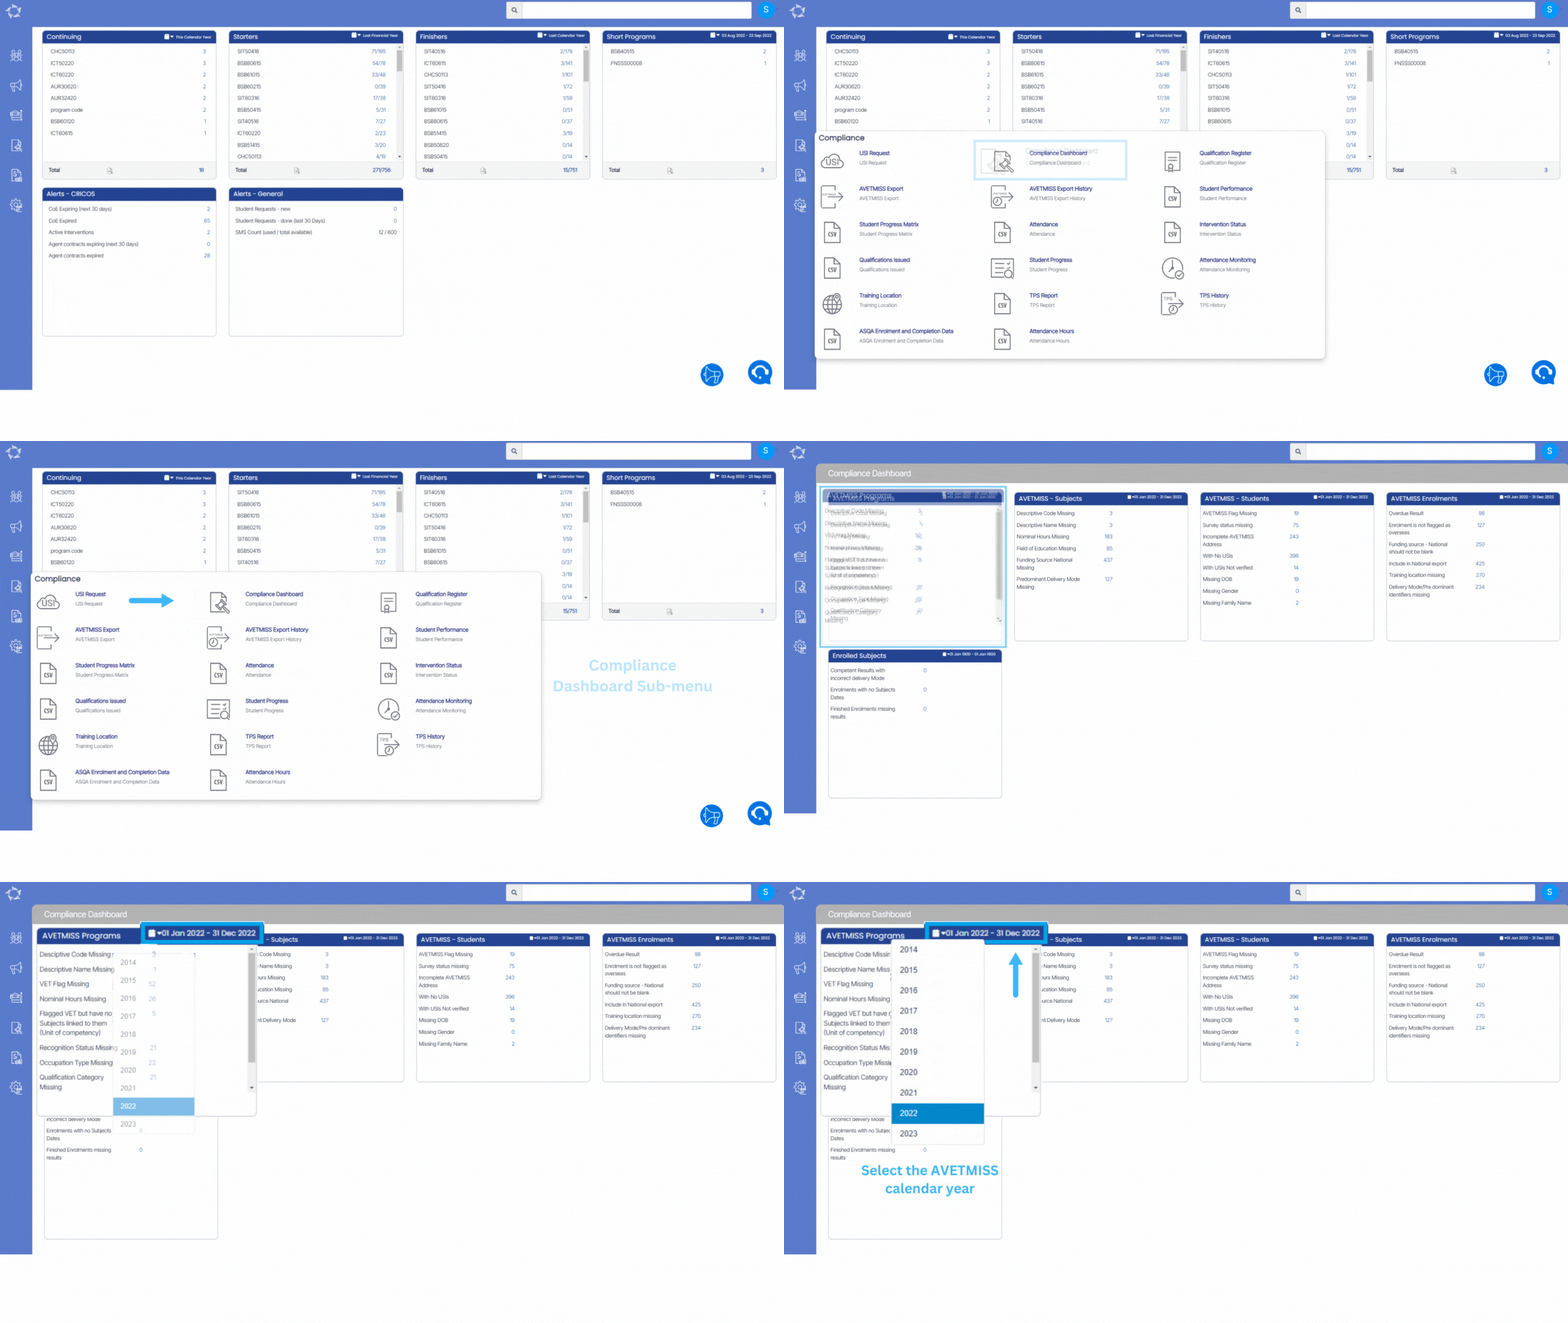
To review and clean up any data for Programs you need to go to the Main Dashboard > Compliance Menu > Compliance Dashboard.

To Know more about the AVETMISS Program data, select the below links.

Programs Descriptive Code Missing

Programs Descriptive Name Missing

Note – The other errors such as VET Flag Missing, Nominal Hours Missing, Flagged VET but have no Subjects linked to them (Unit of competency), Recognition Status Missing, Occupation Type Missing, Qualification Category Missing, Qualification Field Of Education Missing are non mandatory error for National submission. If you are doing a submission for State level then you need to focus on these errors in TEAMS.

Finishers Report Filters

The Finishers Report filters have two tabs General and Advance and the below table will show you the Filters with their explanation.

General FiltersExplanation
Report Start &End DatesThe system considers only the enrolment end dates to find enrolments within the specified date range.
CampusReport End Date is a date from till when we want our Report to end
ProgramThis is a Magic search Field from where you can select any Program from the Drop down
Enrolments to IncludeThis field has three radio buttons and you can select any of them one at a time. For example:
Show only Started – If you select this, it will only show you Finished students.
Show only to Start – It will show you students that are about to Finish.
Both – by selecting both the report will print Finished and about to Finish students.
Include Cancelled EnrolmentsThe system will only search for enrolments with end dates within the specified report period that have been canceled using the cancel enrolment function. It will not include enrolment outcomes marked as canceled for this purpose.
Group By and Sort ByPlease see TEAMS Basics
Advance FiltersExplanation
Timetable and ClassesThis is magic search field and you can search and select multiple timetables.
Print class names for enrolments in a report?To include class names linked to enrolments in the report, select the tick box. Please note that generating the report may take longer due to the possibility of one enrolment being associated with multiple classes, and the system will list all allocated class names.
Enrolment TypesThis is a user code in TEAMS and one can create the user code in TEAMS as you required. You can select multiple enrolment type from the dropdown.
Enrolment OutcomeIf you have setup the enrolment outcome on the User Code screen then it will appear under this dropdown.
Visa TypesSelect the Visa type from the dropdown.
AgentSearch and select multiple Agents in this field.
EmployerSearch and select multiple Employer in this field.
Account ManagerSelect multiple Account Manager from the dropdown.
CountrySelect multiple Campus from the dropdown.

Click on the “Print” Icon to generate the report. After clicking on it, the system will direct you towards the report dashboard screen. You can see the report status over there if it’s generated or not. Once it’s generated, download the report.

Class Roll by Session Filters

Dashboard > Student Management > Class Roll by Session

Class Roll by Session Report screen has General Filters tab and the below table will show you Filters with their Explanation.

General FiltersExplanation
Week Starting Date This Field shows you the starting date of the Week.
Campus NameThis Field has a magic search option from which you can select any college.
TimetablesTimetable Field shows you active and Inactive timetables,
Student to includeThis label has two radio buttons:
Only Started Student – Select this radio button to to print the report for the started students.
All Students – Select this radio button to print the report for All the students.
Sort ByPlease see TEAMS Basics
Asc or DescPlease see TEAMS Basics

Click on the “Print” Icon to generate the report. After clicking on it, the system will direct you towards the report dashboard screen. You can see the report status over there if it’s generated or not. Once it’s generated, download the report.

Class Roll by Session Data Columns

The below table will show you the explanation of the data columns that will get printed in the report.

ColumnsExplanation
Student NoStudent Number generated by TEAMS
Student NameStudent (First name)(Middle name)(Last name)
GenderStudent’s gender selected at the application or student levels
DOBStudent’s date of birth selected at the application or Student levels
NationalityNationality of the student
Visa TypeIt will show the Visa type selected at the Student and Enrolment level
Enrolment NoEnrolment Number generated by TEAMS
Enrolment TypeThe system will print the enrolment type from Edit Enrolment Details screen
Student TypeNew student or Returning Student selected on Edit Enrolment Detail screen
AgentIt will show the agent name linked with an enrolment
IntakeIntake name selected while processing the application
DatesEnrolment’s Start date and End date
Week NoThis is the number of weeks (if the enrolment has a total duration of 52 weeks and the class session is in week 12 then the system will show you the week no = 12/52

Click on the “Print” Icon  to generate the report. After clicking on it, the system will direct you towards the report dashboard screen. You can see the report status over there if it’s generated or not. Once it’s generated, download the report.

Agent Dashboard

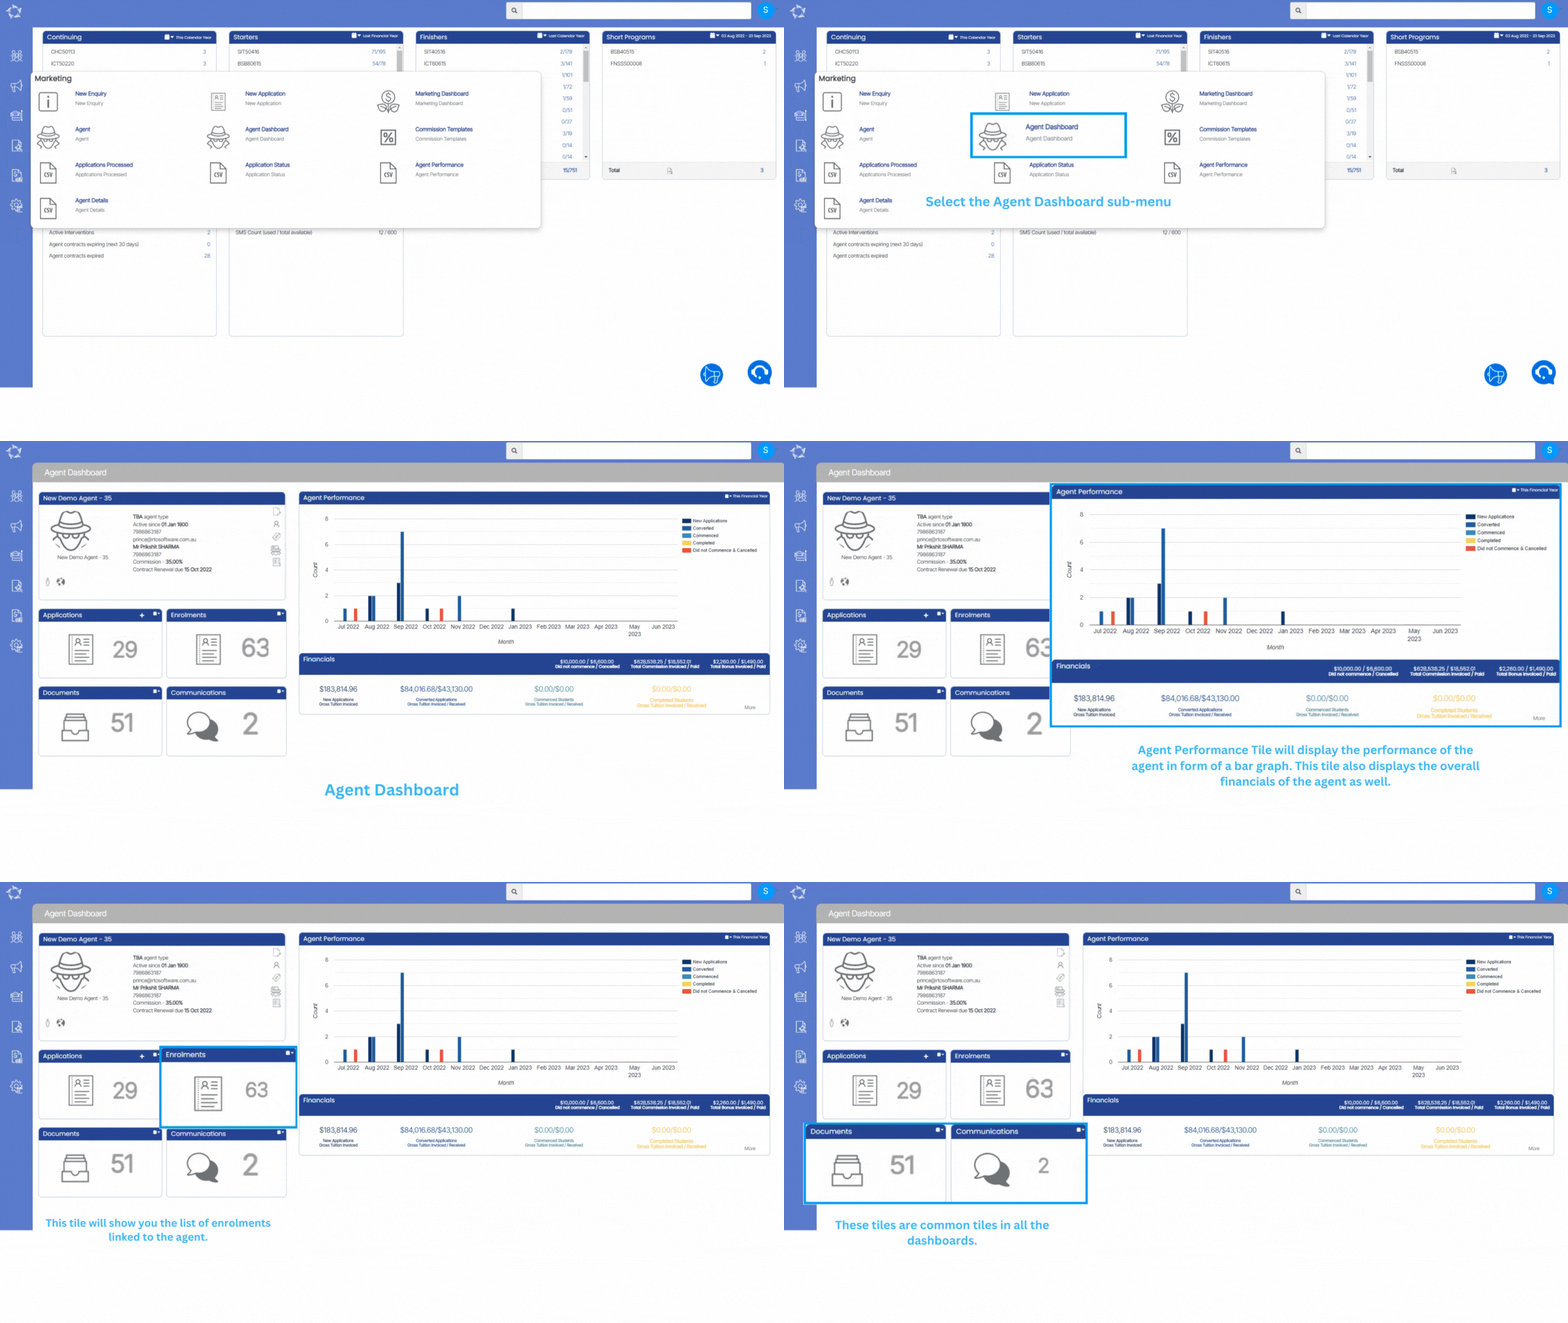
Main Dashboard > Marketing Menu > Agent Dashboard

The Agent Dashboard screen will give you a history of the Agent with your college. It is comprised of a number of different tiles that will allow you to navigate to different screens and information linked to the Agent.

To Search Agent, please select Agent Search.

Tiles


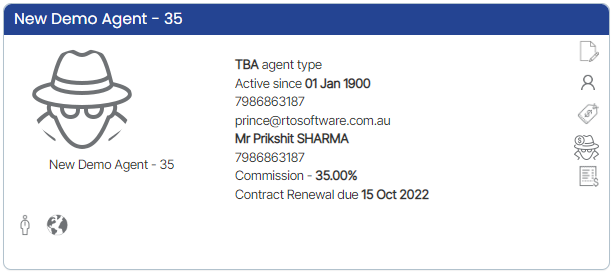
The Agent profile tile will give you an overview of the agent’s basic information. A user can upload the Agent picture, edit the details, create bonus invoices, and view pending payments
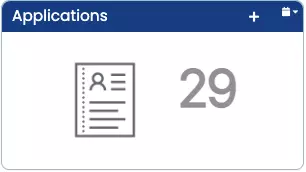
This is the pending application’s tile and you can convert them from its listing screen
This tile will show you the list of enrolments linked to the agent.

These tiles are common tiles in all the dashboards.

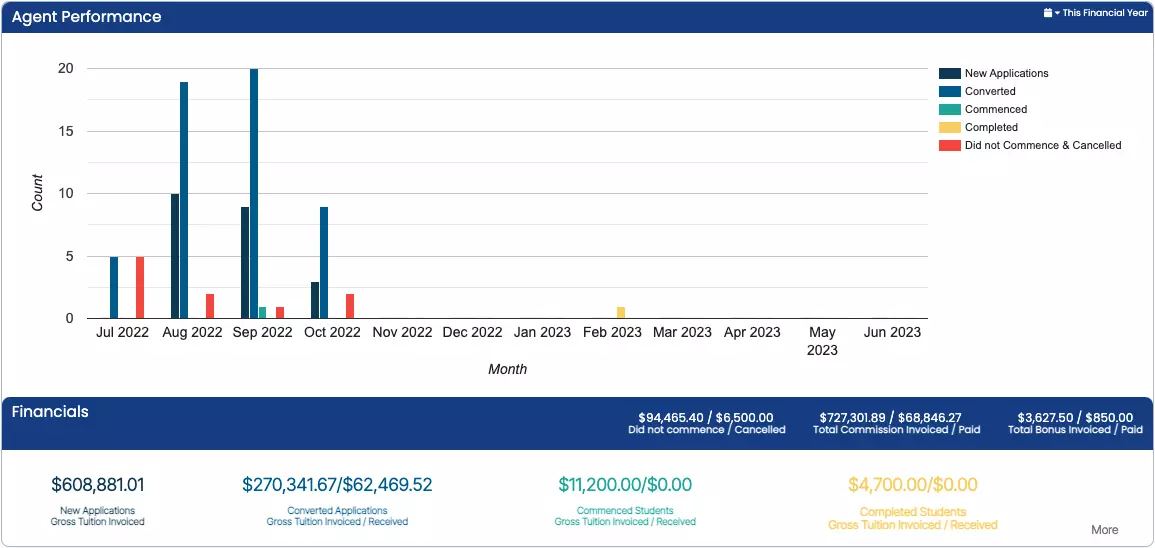
On the Agent Dashboard, we have a bar graph that can give you vast amount of information to keep a check on agent performance.

Group Training Plan

Main Dashboard > Academic menu > Group Training Plan

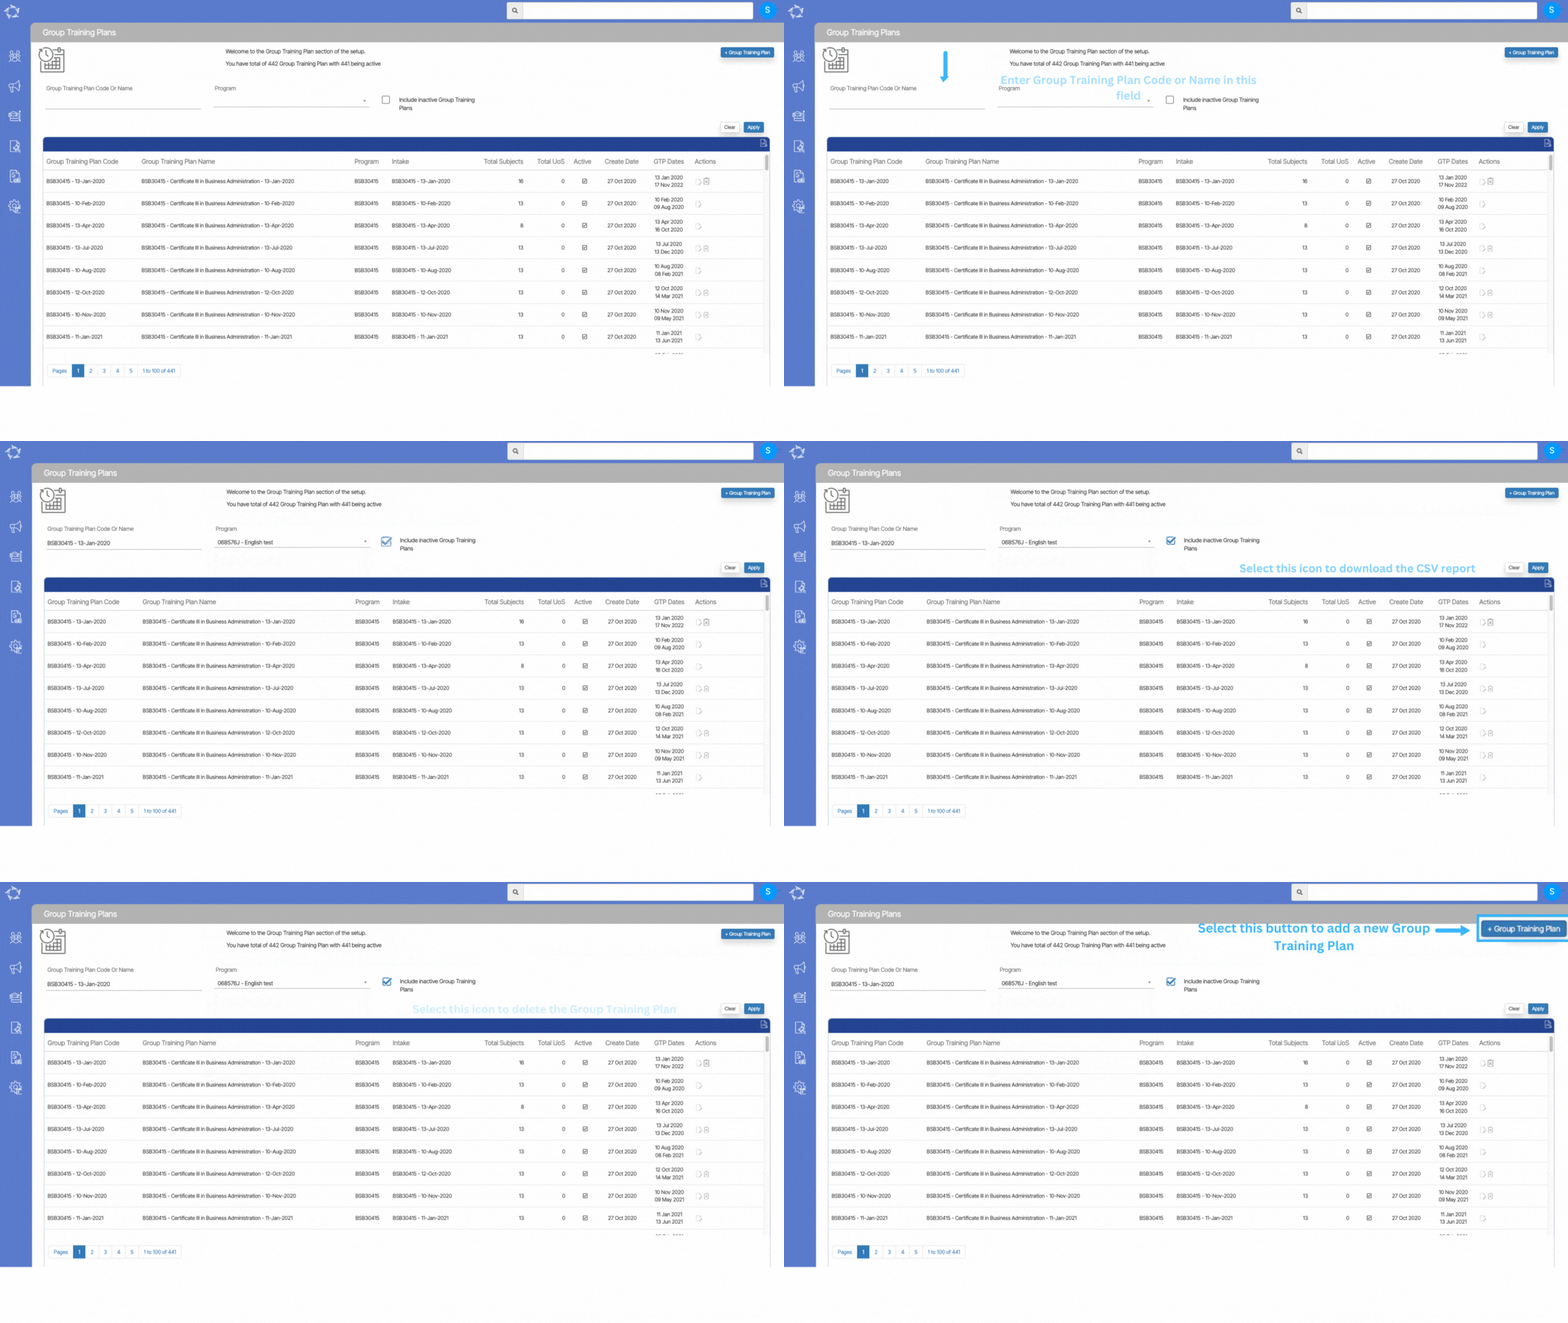
The Group Training Plan is used to define the Subjects/unit’s date in the system. The Group Training Plan welcome screen will give you the basic information regarding the GTP’s created in the system and will allow you to search, add and edit group training plans from this screen.

Select here to know more about the icons under the actions column. You will also be able to download the csv file from the csv Icon

Subjects

Main Dashboard > Academics menu > Subjects

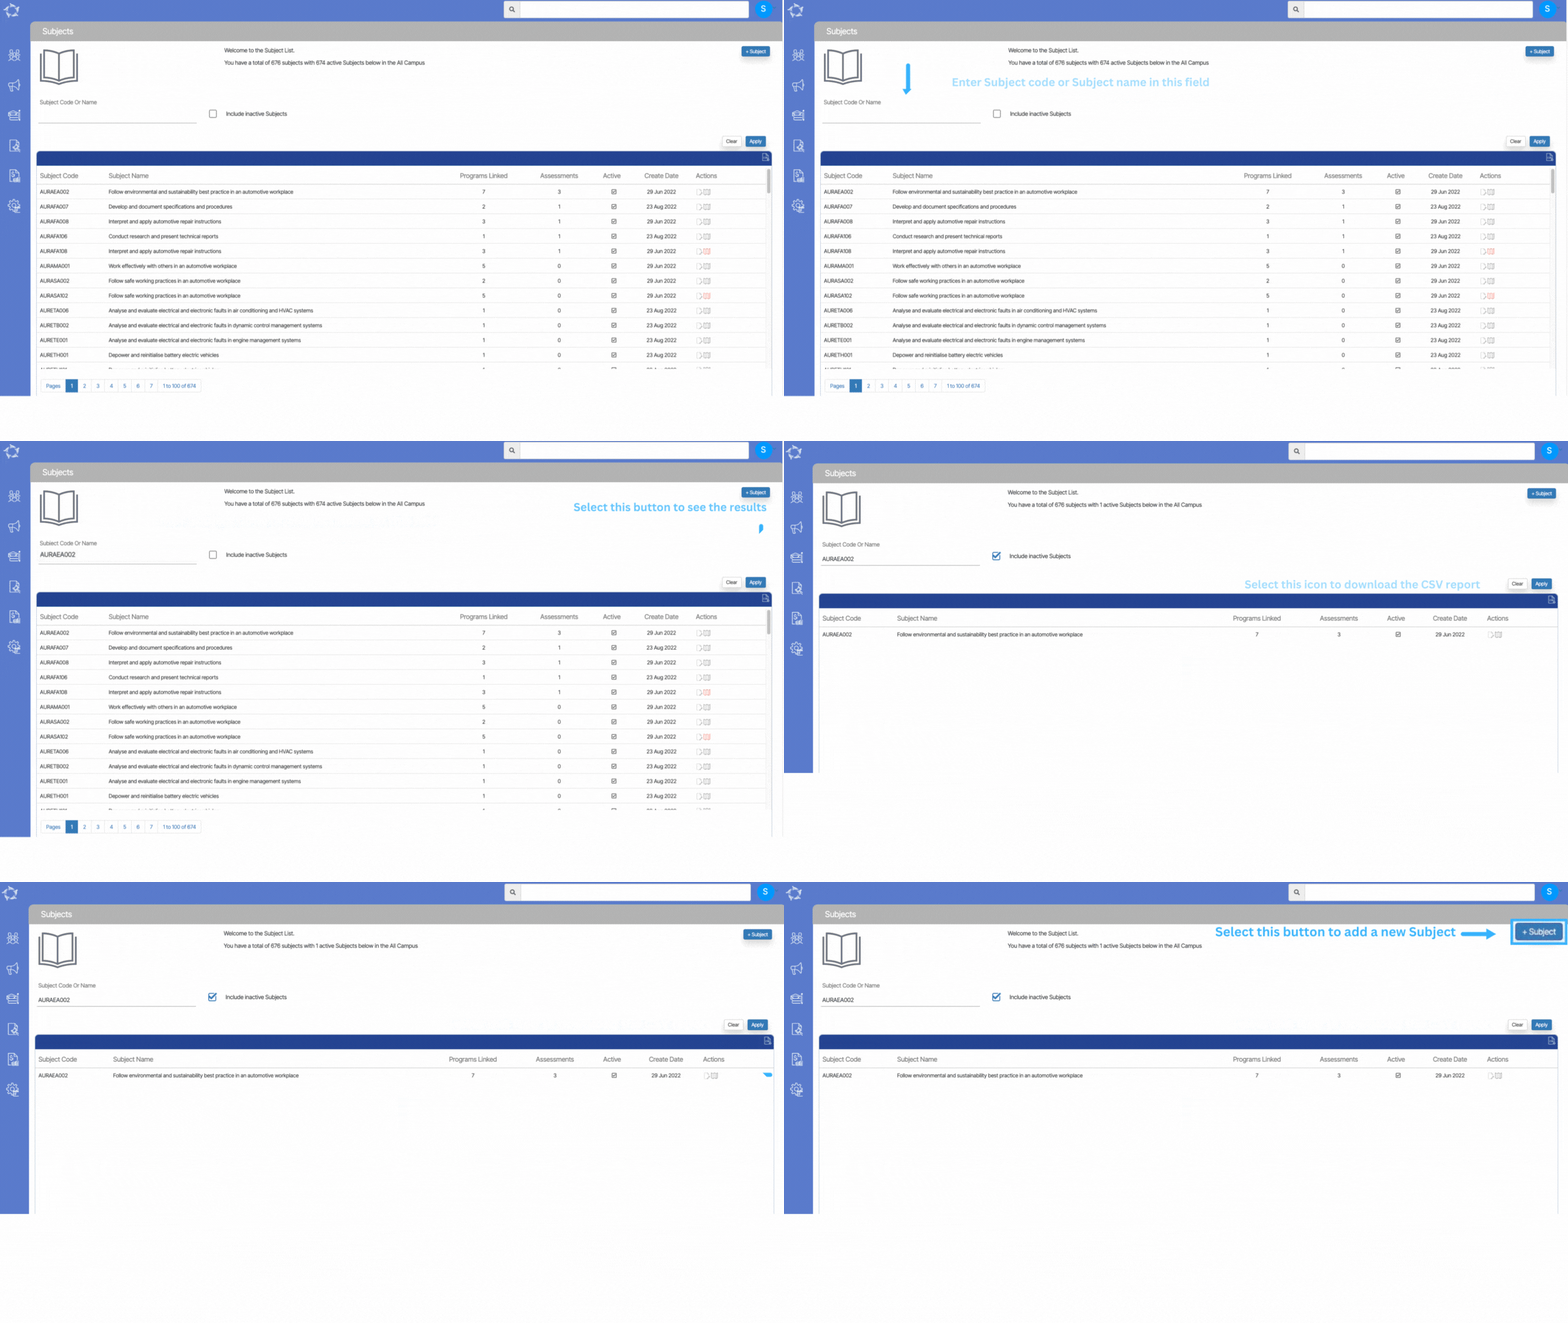
The Subjects welcome screen will show you the total number of subjects with the total number of active subjects for all the campuses.

To find a particular subject, you can search for it using either its code or name. If you want to see subjects that are no longer active, you can choose to include them in your search results by ticking a box and clicking the apply button. This can be useful when you need to manage both active and inactive subjects.

IMPORTANT – It is recommended that when creating any new subject, you need to check whether the subject is already in the system and it is superseding with the new subject code.

To do this, you need to search the subject by the subject name in the search field. If the subject name is already in the system with the old subject code then you need to create the subject with the New Subject Code and Name from the Subject Entry Screen.

Once you have created the Subject, you need to come back to the subject welcome screen, search the subject with the subject name, the system will show you both the old and new subject in the grid. There you need to go to the old subject’s supersede icon , the system will show you a pop window where you can search and add new subject and save. This will supersedes the subject with the new subject.
Once you have done this, you will be presented with new supersede icon which will show you that this subject has supersedes the old subject (with the old subject code).

NOTE – For your upcoming students/enrolments, you will be using the new subject for the program and it recommended to untick the compulsory tick box if it is linked with the Program from the Program Entry Screen.

Icons under the Actions column

Edit Icon – If you want to make any changes to the subject then you can simply select this icon to edit the desired subject.
Supersede Subject Icon – This icon is used to supersede the subject and when you select the icon, the screen will open the pop window where you add the new subject code and select save.

Subject Supersede Icon – When the subject gets superseded, the grey icon will turn red and you can select the icon and the screen will open the pop window where you can see the superseded subject.

Current Student Report Filters

Below is the table that will show you General and Advanced filters on the Current Student Report Parameters Screen.

General FiltersExplanation
Report Start & End datesSelect the report start and end dates from the calendar icon.
CampusYou can select campus from the dropdown.
ProgramSearch the Program by typing the program code or Name
Enrolments to includeSelect (Current, To Start or Finished) enrolments from the dropdown
Include cancelled enrolmentsWhen the cancel enrolment function is used, selecting this option will include any cancelled enrolments that meet the other selected parameters in the report. However, if only the enrolment outcome is marked as cancelled without using the cancel function, the system is unaware of their cancellation status and will only include them if they meet all other report parameters.
Show only Smart and Skilled enrolmentsSelect this tick box to Show only Smart and Skilled enrolments
Include students on holidaySelect this tick box to Include students on holiday
Group byPlease see TEAMS Basic
Sort byPlease See TEAMS Basic
Advance FiltersExplanation
Timetable and ClassesThis is magic search field and you can select multiple timetables.
Enrolment TypeThis is user code in TEAMS, select the enrolment time updated in TEAMS
Enrolment OutcomeSelect multiple enrolment outcomes (completed, in progress etc.) from the dropdown
AgentSelect multiple agents from the dropdown.
EmployerSelect employers from the dropdown.
Account ManagerSelect Account managers
Marketing SourceSelect Marketing Sources
NationalitySelect Nationalities
CountrySelect Countries

Select the the “Print” Icon to generate the report. After clicking on it, the system will direct you towards the report dashboard screen. You can see the report status over there if it’s generated or not. Once it’s generated, download the report.

Current Students Report Data Columns

The below table will explain about the explanation of the columns that will get printed in the report.

ColumnsExplanation
Student NoStudent Number generated by TEAMS
Student Name Student first name, middle name, last name
First NameStudent’s First Name
Family NameStudent’s Last Name
DOBStudent’s date of birth
MobileStudent’s mobile number
PhoneStudent’s phone number
Work PhoneStudent’s work phone number
Campus NameName of the campus linked to the enrolment
Enrolment NoEnrolment Number generated by TEAMS
Enrolment TypeThis is a user code and the system will print the enrolment type from the Enrolment Dashboard > Edit enrolment details screen
Visa TypeIt will show the Visa type selected at the Student and Enrolment level
CRICOS CodeThis is the CRICOS code of the Program updated on the Program Entry Screen
ProgramProgram Name updated on the Program entry screen
Start DateEnrolment’s Start Date
End DateEnrolment’s End Date
Duration in WeeksThe system will show you the total number of the Enrolment’s week i.e. sum of study and academic holiday weeks
AgentName of the agent linked to the enrolment
Employer NameEmployer name linked to the enrolment
Employer Email AddressEmployer’s email address
Employer PhoneEmployer’s phone number
NationalityNationality of the student
CountryCountry of the student
Account ManagerDisplays Account Manager’s name linked to enrolment
TimetableTimetable name linked to the enrolment
Marketing SourceThe system will print the marketing source selected while processing the application
Last Class Attended onThis is the date of the last class attended by student
AVETMISS StudentThis will show Yes if the student is selected as AVETMISS
Client IDThis will show the client Identifier entered at Student Dashboard > Edit AVETMISS information screen
Training Contract IdentifierThis will show the training contract Identifier entered at Enrolment Dashboard > AVETMISS Settings screen
Ecoe Start DateStart date of the CoE
Ecoe End DateEnd date of the CoE
SexGender of the student (Male, Female and other)
Recommencement Enrolment
StatusStatus of the enrolment as Started, Not Started etc.
AAC Details
Program CodeProgram code updated on the Program entry screen
NotesProgram Notes
Payment Type
Enrolment OutcomeThe outcome of enrolment selected on the Enrolment Dashboard > enrolment details screen
User
Total InvoiceTotal Invoiced amount of the enrolment
Total ReceiptTotal receipted amount of the enrolment
Purchasing ContractThis is the Purchasing Contract number updated on the Enrolment’s AVETMISS settings screen
Funding Source – StateFunding source – state selected on the enrolment edit avetmiss screen
Level of StudentLevel of student updated on the edit student details screen
OverseasThis is a tick box selected on the enrolment AVETMISS settings screen
VSNThis is the VSN number selected at the student entry screen
VSN EligibleThis relates to the VSN tick box and once you have selected the system will ask you for the VSN number on the student entry screen
Enrolment StartedThe system will show you the status of the enrolment as Yes or No
AVETMISS StateAVETMISS state selected on the enrolment’s AVETMISS settings screen
Program Delivery Schedule
Total Tuition FeeThis is the total invoiced amount of the tuition fee
Special NeedsThis is a tick box selected on the student entry screen
Special Needs NotesThis relates to the special needs tick box and once you have selected the tick box, the system will ask you for the special needs notes.
Has DisabilityThis will show Yes if the disability tick box is ticked on the Enrolments AVETMISS screen
DisabilityThis relates to the Disability tick box and once you have selected the tickbox, the system will ask you for the disability.
Language SpokenStudent’s language spoken at home
Field of Study
Skype NameSkype ID of the student
CoE NoThis is the number updated on the CoE details screen from the enrolment dashboard
TrainerTrainer’s Name
Completed QualIt will show the commencement status from the Training Plan and Results screen > Qualification Information tile.
Student Payment No
USIStudent’s USI number
USI VerifiedIt will show Yes if the USI is verified and No if not verified
Total No. of UnitsTotal number of subjects linked with enrolments
Last Date of Result
No. of Units Successfully CompletedTotal number of subjects completed
School Name
Email Address 1Student’s primary email address
Email Address 2Student’s secondary email address
Email Address 3Student’s additional email address
Program NotesProgram Notes
Future ProgramsStudent’s upcoming enrolments
Study End DateEnrolment’s end date
Enrolment NotesEnrolment Notes
Enrolment DateProcessed date of the enrolment
Application NoEnrolment’s application number

NCVER AVETMISS Student Data Submissions – Classic TEAMS Step 5

Subject Data

The Subject data is exported into NAT00060 file. this lists all the competencies/modules that are listed in the NAT00120 for the students and what their results are etc in 2022.

IMPORTANT – this is where you can get hundreds, sometimes thousands of errors (based on the number of enrolments in a competency/module that are listed in the NAT00120) when you do not setup your qualifications/courses in TEAMS with the correct AVETMISS settings. For each student listed in the NAT00120 with a specific competency/module (where there is a setting that is wrong/missing) that is how many times you will get the same error. So once you fix/add the correct setting for the competency/module in TEAMS those specific errors will disappear for those hundreds or thousands of rows in your next export and submission. The logic is fix in one spot and it will fix many rows of data in the NAT00120.

For example – you have module 10 that has 2 different errors as it is missing 2 different AVETMISS settings in TEAMS. For that module in the NAT00120 you have 700 students listed, this means each setting is a different error so you will have 700 rows of errors for one setting and for the 2 settings you will have 1400 rows of errors. BUT once you go to that module in TEAMS and add those 2 settings and do your next export and submission all 1400 rows of errors will not be there. This is a general rule but is NOT always the case.

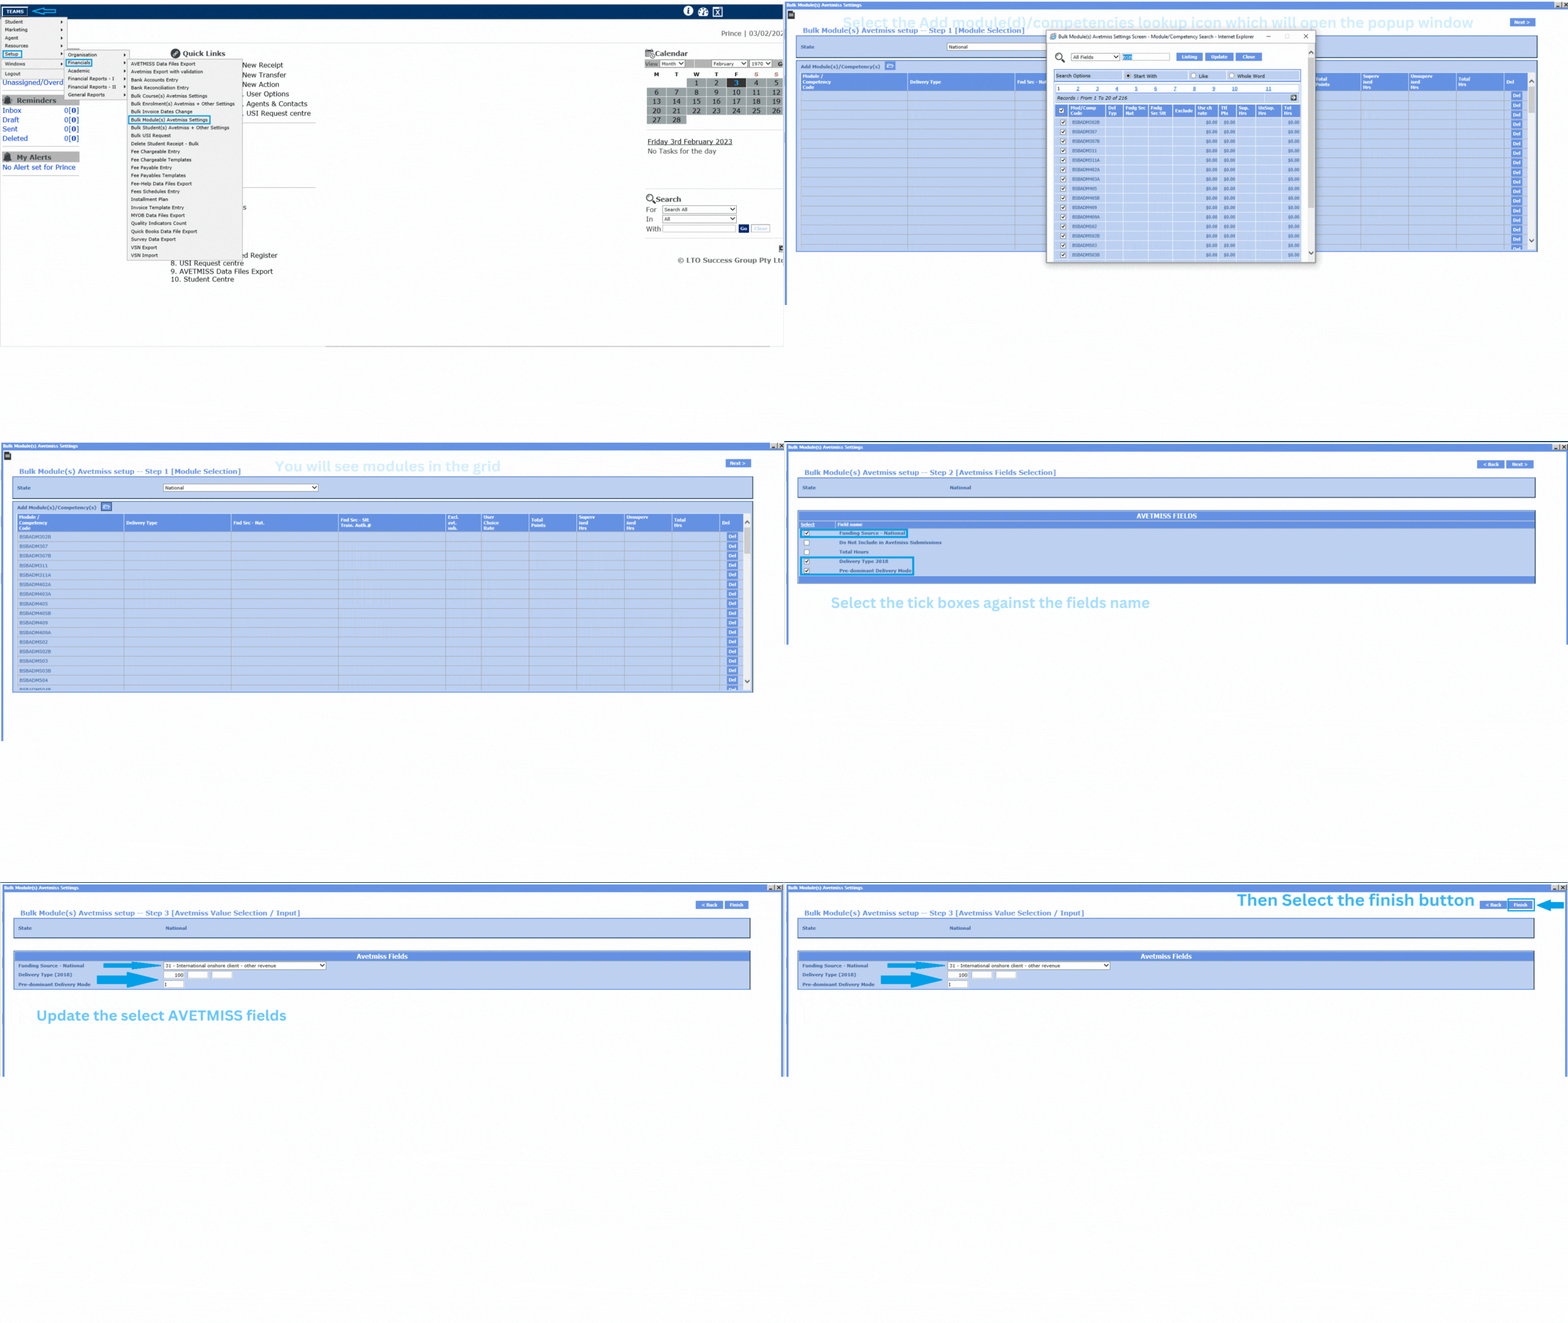
To review and clean up any data for Subjects/module/competencies you need to go TEAMS > Setup > Financials > Bulk Module(s) AVETMISS Screen to updated the AVETMISS settings for the module in bulk.

Note – To update the Descriptive Code and Descriptive Name for the Module, you need to go to TEAMS > Setup > Academic > Module ( On this screen you need to search for the module and update the correct module descriptive code and name) and to update the Nominal hours for modules in TEAMS, you need to go to TEAMS > Setup > Academic > Module. On this screen you need to search for the module and then go to AVETMISS tab to update the Nominal hours.

The Module Descriptive Code and Module Descriptive Name is a mandatory field in TEAMS and you can update the correct descriptive code and Name from the TGA site (training.gov.au) and that’s what will print in a record of results. For the Subject Name field on the subject screen, you can have whatever you want as they are internal.