Results History – New Screen

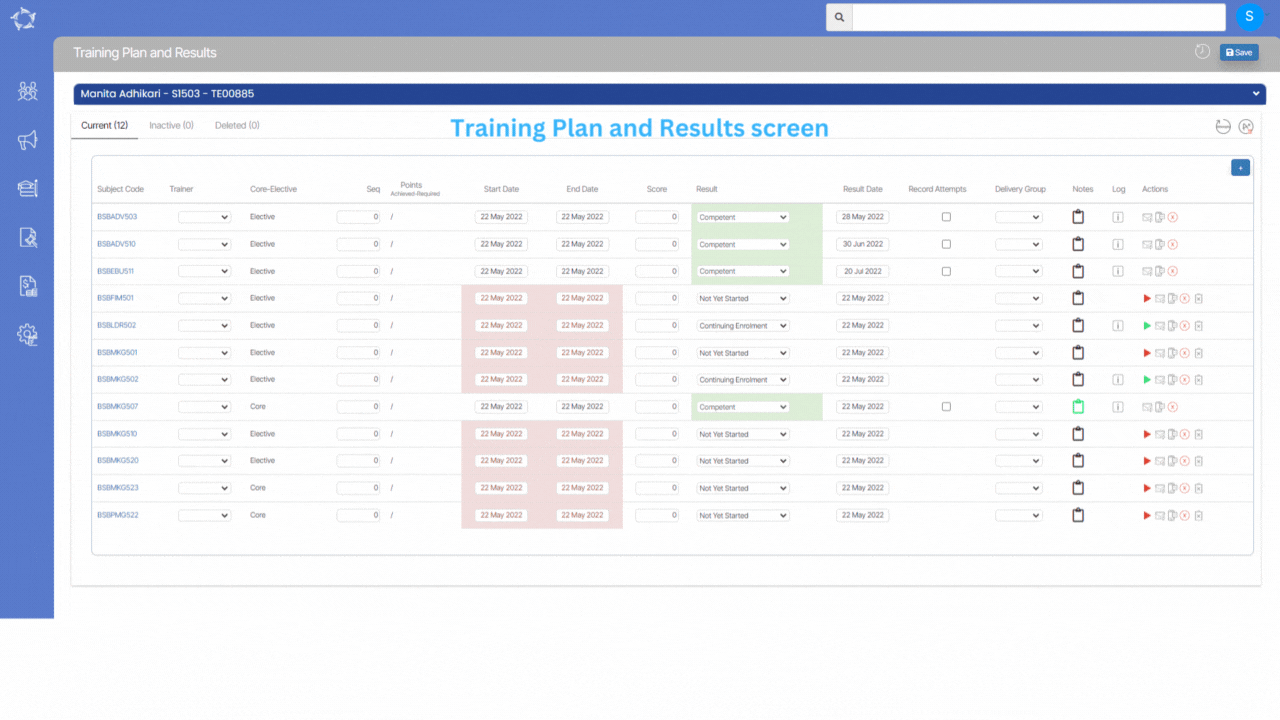
The Result History screen provides a complete record of all past results and their respective dates for specific subjects. You will be able to access this screen from the Training Plan & Results screen > Results History icon.

This screen is divided into two sections:

Enrolment Profile Tile

The Enrolment Profile Tile provides an overview of basic details related to an enrolment. This tile displays various icons that are associated with enrolment information, however, it is important to note that these icons are read-only, meaning that it is not possible to make any changes to enrolment details through this screen.

Result History Listing Grid

The grid displays a comprehensive list of past records for the subject’s results. Each column in the grid provides specific information about the corresponding result record.

  • Subject Code – This refers to the subject code linked to the enrolment.
  • Subject Name – This refers to the subject name linked to the enrolment.
  • Pre. Score – column displays the score obtained by the student in the previous attempt.
  • Pre. Result – This column shows the result obtained by the student in the previous attempt.
  • Pre. Result Date – It displays the date when the previous attempt was made.
  • Date Changed – It shows the date when any changes were made to the result record.
  • User Changed – This column displays the name of the user who made changes to the result record.
  • Notes – This column shows any additional notes added to the result record.
  • Attempt – This column indicates the attempt number for the result record.

Certificate Report – New parameters for Result Types

The Enrolment Dashboard now includes new parameters for result types in the Certificates Pop up window. Specifically, you can select from three options: Final Results, Progressive Results, or Both.

Note – We have implemented this for Non-AQTF results (Grading Based), but in upcoming updates, we will implement it on all other result types which includes AQTF results as well.

When printing certificates, it’s important to consider whether to include only progressive results, final results, or both. To do this, you can select the appropriate radio button depending on your preference. If you only want to include progressive results, select the Progressive Result radio button. Conversely, if you only want to include final results, select the Final Result radio button. Finally, if you want to include both types of results, select the Both radio button.

Application Process – New OSHC and AVETMISS Settings Buttons

A new feature has been implemented on the Application Finished screen that includes additional buttons called +Add OSHC Provider Details and +Add AVETMISS Settings.

Upon selecting the OSHC Provider Details button, a pop-up window will appear on the screen, which will allow you to enter and save the OSHC (Overseas Student Health Cover) details for the application. This new functionality will provide you with a more convenient way to add and manage OSHC information within the application process. Or you can also add their OSHC details for the application from the Applicant Profile by clicking on the Overseas icon.

Upon Selecting the AVETMISS Settings Button, this will take you to the Application Dashboard > Application AVETMISS Settings screen, where you can update both the application level AVETMISS settings and the subject level AVETMISS settings. This page allows you to customize the settings that determine how your application handles AVETMISS data, which is essential for managing and reporting on vocational education and training in Australia.

Business Rules: When a program is linked to a subject and the subject type is set to Unit of Competency, an option to add AVETMISS settings will appear on the Application Finished process. This allows you to configure the AVETMISS settings for that particular subject, which is important for accurate tracking and reporting of vocational education and training in Australia.

Application Process – Instalment Plan Changes

Recently, we have added a new option namely Patter on the New Application – Edit Invoice Screen. This option allows users to recalculate invoices based on their selection. With the Patter option, users can quickly and easily update their invoices without having to manually adjust each item

To calculate the total number of weeks for the enrolment period, the system takes into account the enrolment start and end dates. You can input the total number of weeks in the text box labelled Invoicing Frequency (weeks) by entering an integer value. In addition, need to enter the invoice date and invoice due date to recalculate the invoices based on the selected invoicing frequency. By entering these details, the system will automatically calculate the amount due for each invoice based on the enrolment period and invoicing frequency.

Note – When calculating the invoicing frequency for your enrolment, the system will take the total number of weeks in your enrolment period and divide it by the number of invoicing frequencies that you have entered. For example, if your enrolment period is 52 weeks and you have chosen to invoice every 4 weeks, the system will divide 51 by 4 to give you 13 invoicing periods. This means that you will receive 13 invoices over the course of your enrolment, each covering a 4-week period.

Also, If the quotient obtained by dividing the total weeks of enrolment by the number of invoicing frequencies results in a decimal value, the system will round off the value to the nearest whole number. For example, if the result is 4.3, the system will round it off to 4 and create 4 invoices. Similarly, if the result is 5.7, the system will round it off to 6 and generate 6 invoices.

Enrolment AVETMISS Settings > +Pre2018 AVETMISS settings button changes

We have made some changes to the +Pre2018 AVETMISS settings button on the Enrolment Avetmiss Settings screen.

The button will now only be visible under specific conditions. Specifically, it will only be displayed if the enrolment start date is earlier or equal to 01/01/2019. On the other hand, if the enrolment start date is after 01/01/2019, the button will not be visible, and it will remain hidden.

IMPORTANT – Our general recommendation is to utilise this button when importing historical data. If you are being able to see this button, we encourage you to contact our support team for assistance.

Application Process – edit/add Discount

In the past, the system used to automatically split discounts among each invoice while doing the application. However, now we have added the ability in the system that allows you to add and edit discounts for each invoice individually.

This feature is available on the New Application – Edit Invoices screen, providing more flexibility and control over the discounting process. By allowing you to apply discounts on a per-invoice basis, it can make it easier to manage and track discounts and ensure that they are accurately applied to each invoice.

Training Plan & Results – Results Colour Coding

Results colour coding will display different colours for each updated result, allowing you to quickly identify the type of result without having to read through each one individually. Please see the below examples that will explain to you how the colour coding works for results.

We have different result types in the system and when you select any result from the dropdown on the Training plan and results screen you will see the result section will get highlighted in its colour.

Please see below how the colour coding will appear.

ResultsColour CodingsResults with Colour Coding
CompetentGreen
Competency not achieved/FailPink
RCC Not GrantedPink
RPL Not GrantedPink
Credit Transfer Blue
RCC GrantedBlue
Gap TrainingBrown
Superseded SubjectBrown
WithdrawnYellow
Recognition of Prior LearningGrey
Did Not StartGrey
Result not available (reported under state requirements)Grey
Interim-Partially Completed CEGrey
Interim-Partially Completed RNAGrey

Training Plan & Results – Subject Dates Colour Coding

This is a new check on the Training Plan and result screen, if the start date and end date of a subject have already passed and there is final outcome for those subjects then subject dates will be displayed in red/pink Colour. This will help you quickly identify subjects that may require attention.

The start date of subjects is showing as 03/06/2022 and the end date as 24/07/2022, but there is no final outcome or result mentioned. Both of these dates are highlighted in a red/pink colour for those subjects.

Training Plan & Results Screen – Colour Codings

A new feature has been introduced on the Training Plan and Results Screen, which involves colour coding for both Results and Subject dates. Please select the below links to know more about the new rules.

Results Colour Coding

The results colour coding has been implemented to make it easier for users to differentiate between different types of updated results. This will display different colours for each updated result, allowing users to quickly identify the type of result without having to read through each one individually.

To know more, select here – Training Plan & Results – Result Colour Coding

Subject Dates colour Coding

This is a new check on the Training Plan and result screen, if the start date and end date of a subject have already passed, but the result is still updated for it, the subject dates will be displayed in red/pink colour. This will help you quickly identify subjects that may require attention.

To know more, select here – Training Plan & Results – Subject Dates Colour Coding

Training Plan & Results – Rules

The Training Plan and Results screen has several rules that are designed to help users better understand how to use the screen effectively.