Task Entry > Set Recurrence Button

When you select the Task Recurrence button, a pop-up window will appear on your screen, providing several options for configuring the task recurrence:

Schedule Type:

Within the pop-up window, you will find three radio buttons—Daily, Weekly, and Monthly. By selecting one of these options, the system will schedule the task according to your choice.

If you choose Daily Radio Button, you can specify the task recurrence on the daily basis. The system will show you the below fields as shown in the table.

Fields Explanation
Range of RecurrenceThis field allows you to define the date range for the recurring task. You can set a start date to determine when the recurrence should begin and end.
End AfterIf you select this radio button, you can specify the number of occurrences after which the task will automatically end. For instance, if you set it to 10, the system will repeat the task 9 times because the system will include the task that you have created the recurrences for.
End ByAlternatively, if you choose this radio button, you can select a specific end date for the task recurrence using the calendar icon. The task will continue repeating until the specified end date is reached.
Every daysThis is a mandatory field. If you are choosing, the End After radio button for the specified occurrences then you must select the number of days for this field so that the system will look and create the task accordingly. For example – If you have entered the number 2 then the system will create a recurrence every second day.

Same as if you select the End By radio button and update the end date the system will look and create the task accordingly.

If you choose Weekly Radio Button, you can specify on which day of the week and for how long the task should recur. The system will show you the below fields as shown in the table.

Fields Explanation
Range of RecurrenceThis field allows you to define the date range for the recurring task. You can set a start date to determine when the recurrence should begin and end.
End AfterIf you select this radio button, you can specify the number of occurrences after which the task will automatically end. For instance, if you set it to 10, the system will repeat the task 9 times because the system will include the task that you have created the recurrences for.
End ByAlternatively, if you choose this radio button, you can select a specific end date for the task recurrence using the calendar icon. The task will continue repeating until the specified end date is reached.
Every WeeksThis is a mandatory field. If you are selecting, the End After radio button for the specified occurrences then you must select the number for every week, so that the system will look and create the task accordingly. For example – If you have entered the number 2 then the system will create a recurrence every 2 weeks.

Same as if you select the End By radio button and update the end date the system will look and create the task accordingly.

Please Note – You will also see tick boxes for the days of week (Sunday, Monday, Tuesday, Wednesday, Thursday, Friday and Saturday). When you select the days the system will create the recurrence every 2 weeks on the same days.

If you choose Monthly Radio Button, you can specify on which day of the month and for how long the task should recur. The system will show you the below fields as shown in the table.

Fields Explanation
Range of RecurrenceThis field allows you to define the date range for the recurring task. You can set a start date to determine when the recurrence should begin and end.
End AfterIf you select this radio button, you can specify the number of occurrences after which the task will automatically end. For instance, if you set it to 10, the system will repeat the task 9 times because the system will include the task that you have created the recurrences for.
End ByAlternatively, if you choose this radio button, you can select a specific end date for the task recurrence using the calendar icon. The task will continue repeating until the specified end date is reached.
Day of MonthThis is a mandatory field. If you are selecting, End After radio button for the specified occurrences then you must select the day of the month, so that the system will look and create the task accordingly. For example – If you have entered number as 2 then the system will create the recurrence on every second day of the month.

Same as if you select the End By radio button and update the end date the system will look and create the task accordingly.
Every MonthThis is a mandatory field. If you are selecting, the day of the month then you must mention the number for every month field. For example – If you have entered the number as for the day of the month and selected the number as 2 in every month field then the system will create the recurrence on the second month.

Same as if you select the End By radio button and update the end date the system will look and create the task accordingly.

After, selecting the above desired radio buttons, select the save button.

Group Training Plans Entry Screen Optimisation

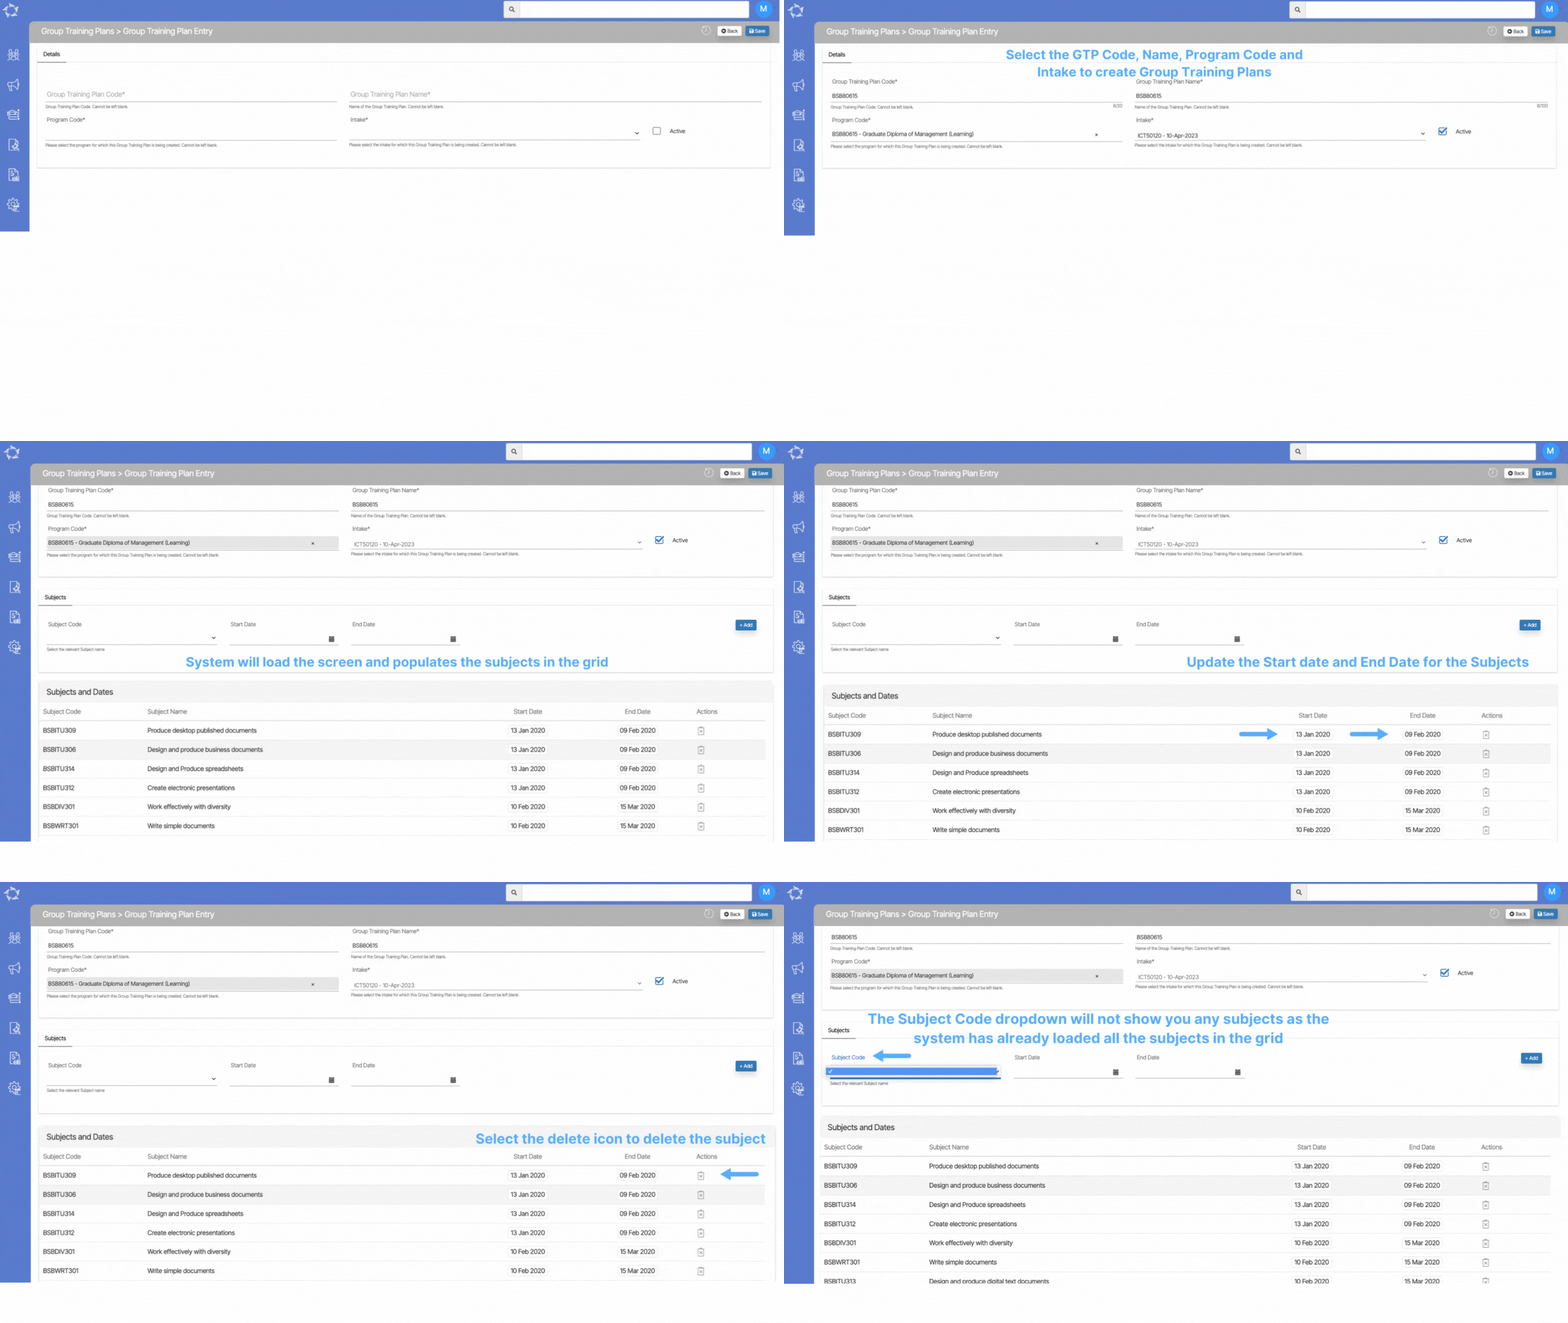
We have implemented significant optimisations and enhancements to the Group Training Plans entry screen. Previously, you had to manually input the subject, start date, and end date for each group training plan in the grid. However, we have introduced a new feature that simplifies the process.

Now, when you create a new group training plan, it automatically generates its own definition based on the program it is linked to, including the program code and name. It is important to note that certain fields, such as Group Training Plans code and name, Program Code, and Intake, are mandatory and must be filled in. Leaving these fields blank is not allowed.

Once the mandatory fields are saved and the Group Training Plan is created, it will automatically populate all the compulsory subjects from the selected program into the group training plan. You can then remove any subjects that are not required, eliminating the need for manual selection and addition of subjects to the grid.

In the grid, you have the flexibility to edit the dates of the subjects directly from the Start date and End date columns. Additionally, you can delete subjects using the delete icon located in the actions column.

Previously, you had to add subject dates one by one, but with this new enhancement, you can now edit the dates of multiple subjects simultaneously, by saving your valuable time and effort.

These improvements streamline the process of creating and managing group training plans, ensuring a more efficient and user friendly experience. We are committed to continuously enhancing our software to meet the evolving needs of our users and provide them with tools that improve productivity and ease of use.

NOTE – the Subjects tile, comprising the Subject Code dropdown, start date, and end date fields, will not display any subjects or their respective dates. Instead, the grid will show all the subjects linked to the program.

In the event that you delete a subject from the grid, it will reappear in the dropdown, allowing you to re-link it to the training plan at a later time. To do so, simply select the subject from the dropdown, specify the desired start and end dates, and add it back to the grid.

This functionality provides flexibility and ensures that subjects can be easily managed within the group training plan. It allows you to make changes to the plan’s composition and adjust subject dates as needed, providing a dynamic and customisable approach to training program creation and maintenance.

Financial Dashboard – New Refresh Icon on Financial Tiles

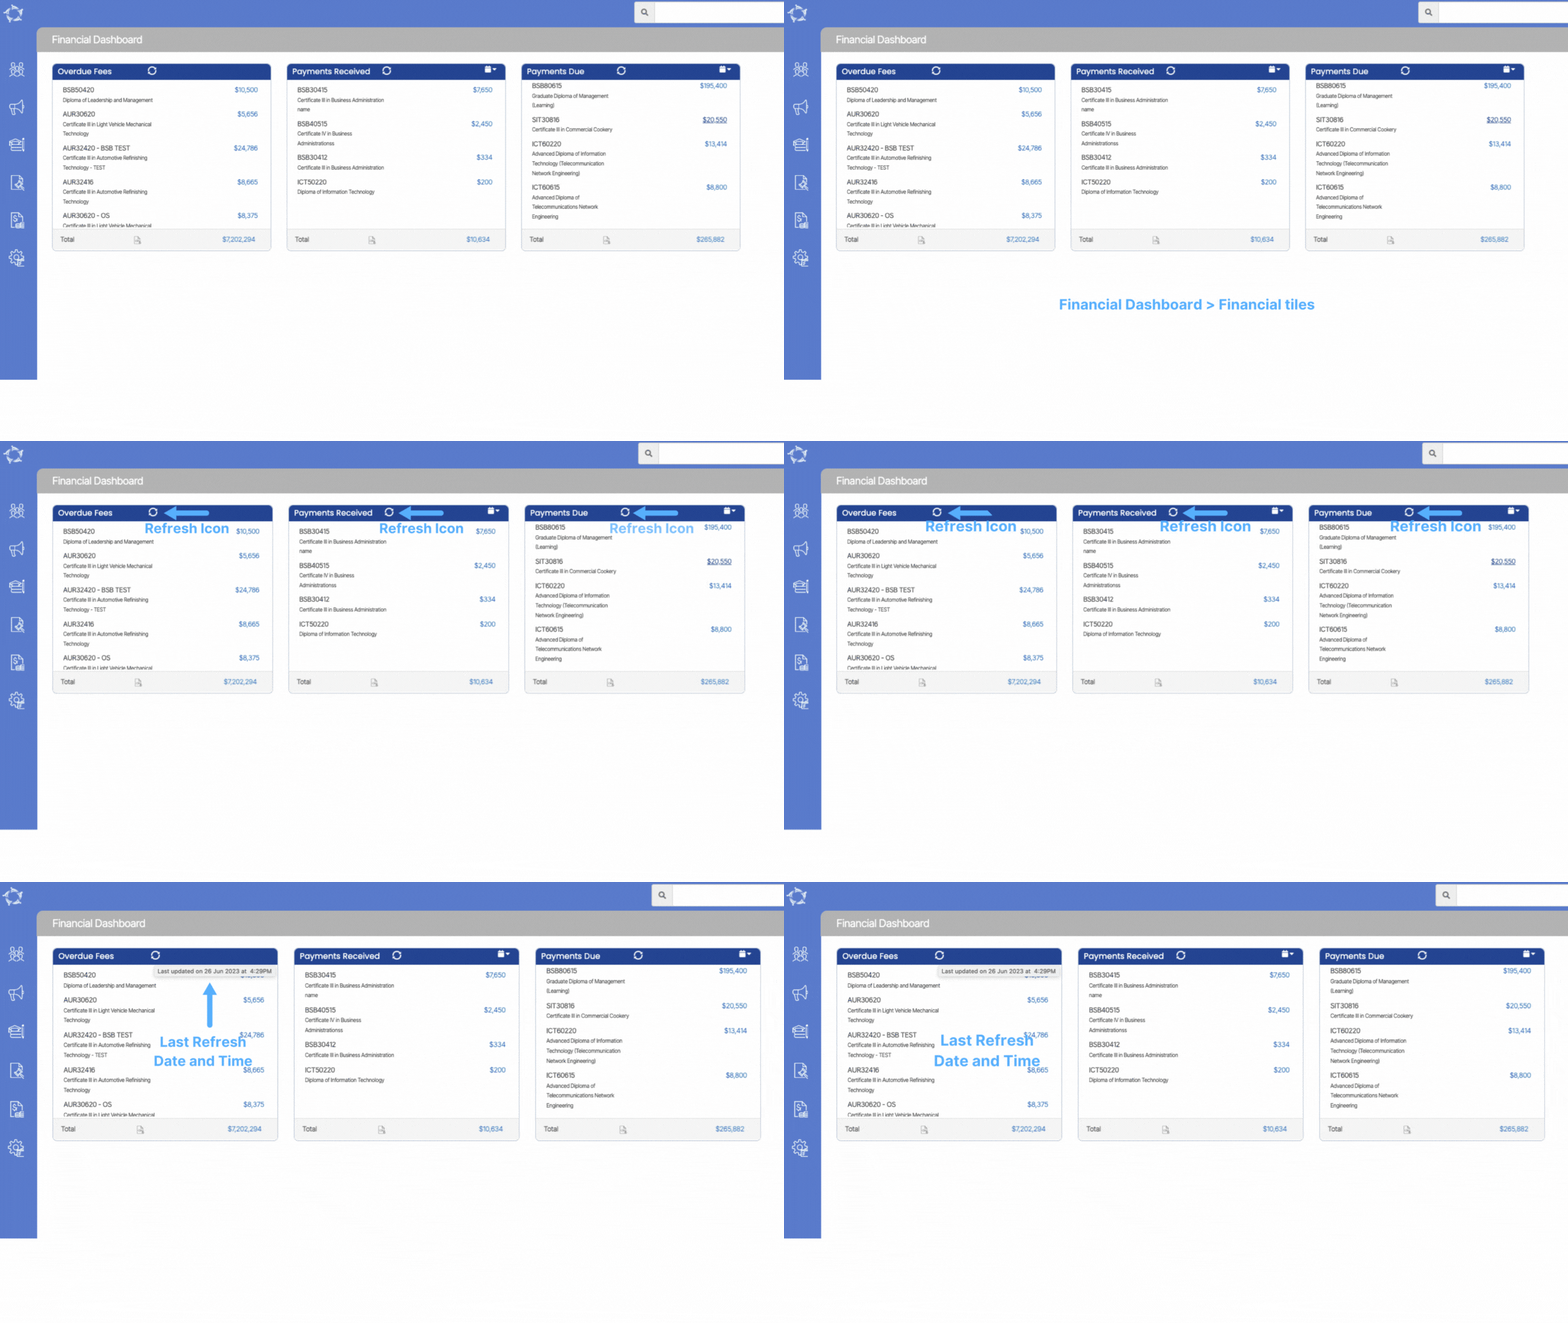
A new feature has been added to the Financial Dashboard that will make managing your finances even easier. You will now notice a new refresh icon accompanying the financial tiles, specifically the Overdue Fees, Payments Received, and Payments Due. With the new refresh icon, you can easily update and retrieve the most recent data related to overdue fees, received payments, and upcoming payments.

NOTE – We have addressed the issue regarding the extended loading time for financial tiles on the Financial Dashboard, which had been causing frustration and delays for our clients. Recognising the importance of quick and reliable access to financial data, we have made significant improvements to enhance usability and overall satisfaction.

Our dedicated development team has optimised the performance of the Financial Dashboard and its corresponding tiles. As a result, when you access the Financial Dashboard now, you will experience a remarkable reduction in loading time for the financial tiles. They will appear within a matter of seconds, allowing you to quickly access the last rendered data without having to wait for the screen to load repeatedly.

Additionally, if you have made any recent updates to fees and payments, you can easily view the latest data by using the new refresh icon. This feature enables you to load the most up to date information without any hassle.

These improvements highlight our commitment to providing a seamless and efficient experience. We understand the significance of accessing financial data promptly, and we are constantly striving to meet and exceed our clients’ expectations.

IMPORTANT – An important addition to our recent updates is the tooltip feature associated with the refresh icon. When you hover your cursor over the refresh icon, a tooltip will be displayed, providing you with the date and time of the last refresh. This tooltip serves as a valuable reminder of when the data was last updated, ensuring that you have access to the most recent information.

By incorporating this tooltip functionality, we aim to enhance the user experience by providing transparency and clarity regarding the freshness of the data. We want to ensure that you have all the tools and information necessary to make informed decisions based on the latest financial insights.

What’s New 29th June 2023 – Q&A

Here are some recent questions that have been asked, along with their corresponding answers. Our answers aim to offer clear and concise explanations, step-by-step instructions, and valuable insights. Whether you’re looking for guidance on a specific task or seeking to expand your knowledge in various fields, these questions and answers are here to provide you with useful and reliable information.

QuestionsAnswers
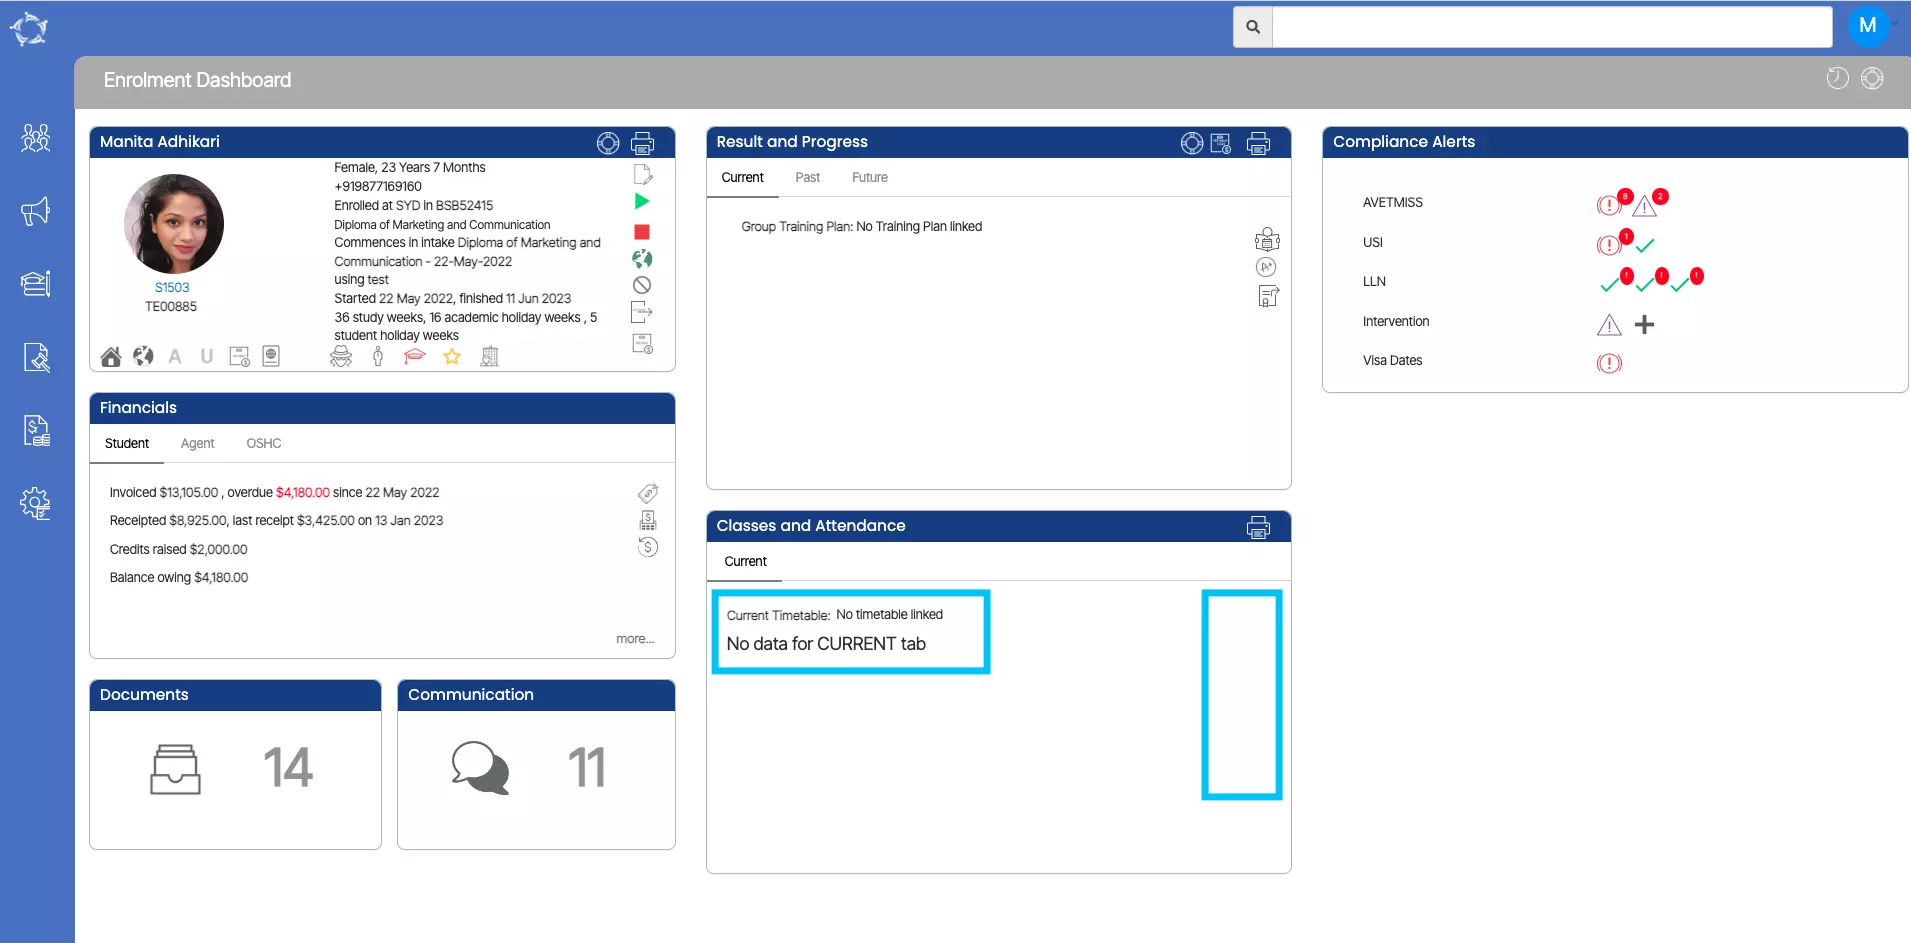
Unable to see the icons on the Classes and Attendance tilePlease select the read more link to know the answer.

Unable to see the icons on the Classes and Attendance tile?

When the icons on the Enrolment Dashboard’s > Classes and Attendance tile are not visible, it is likely due to a holiday that has been linked to the enrolment. This holiday is scheduled to begin exactly on the enrolment’s start date. Consequently, the system does not display any study periods or icons on that tile. This issue is specific to students who start their enrolment on the same day as the holiday. Those who do not have a holiday scheduled for that day will not encounter this problem.

Site Setting

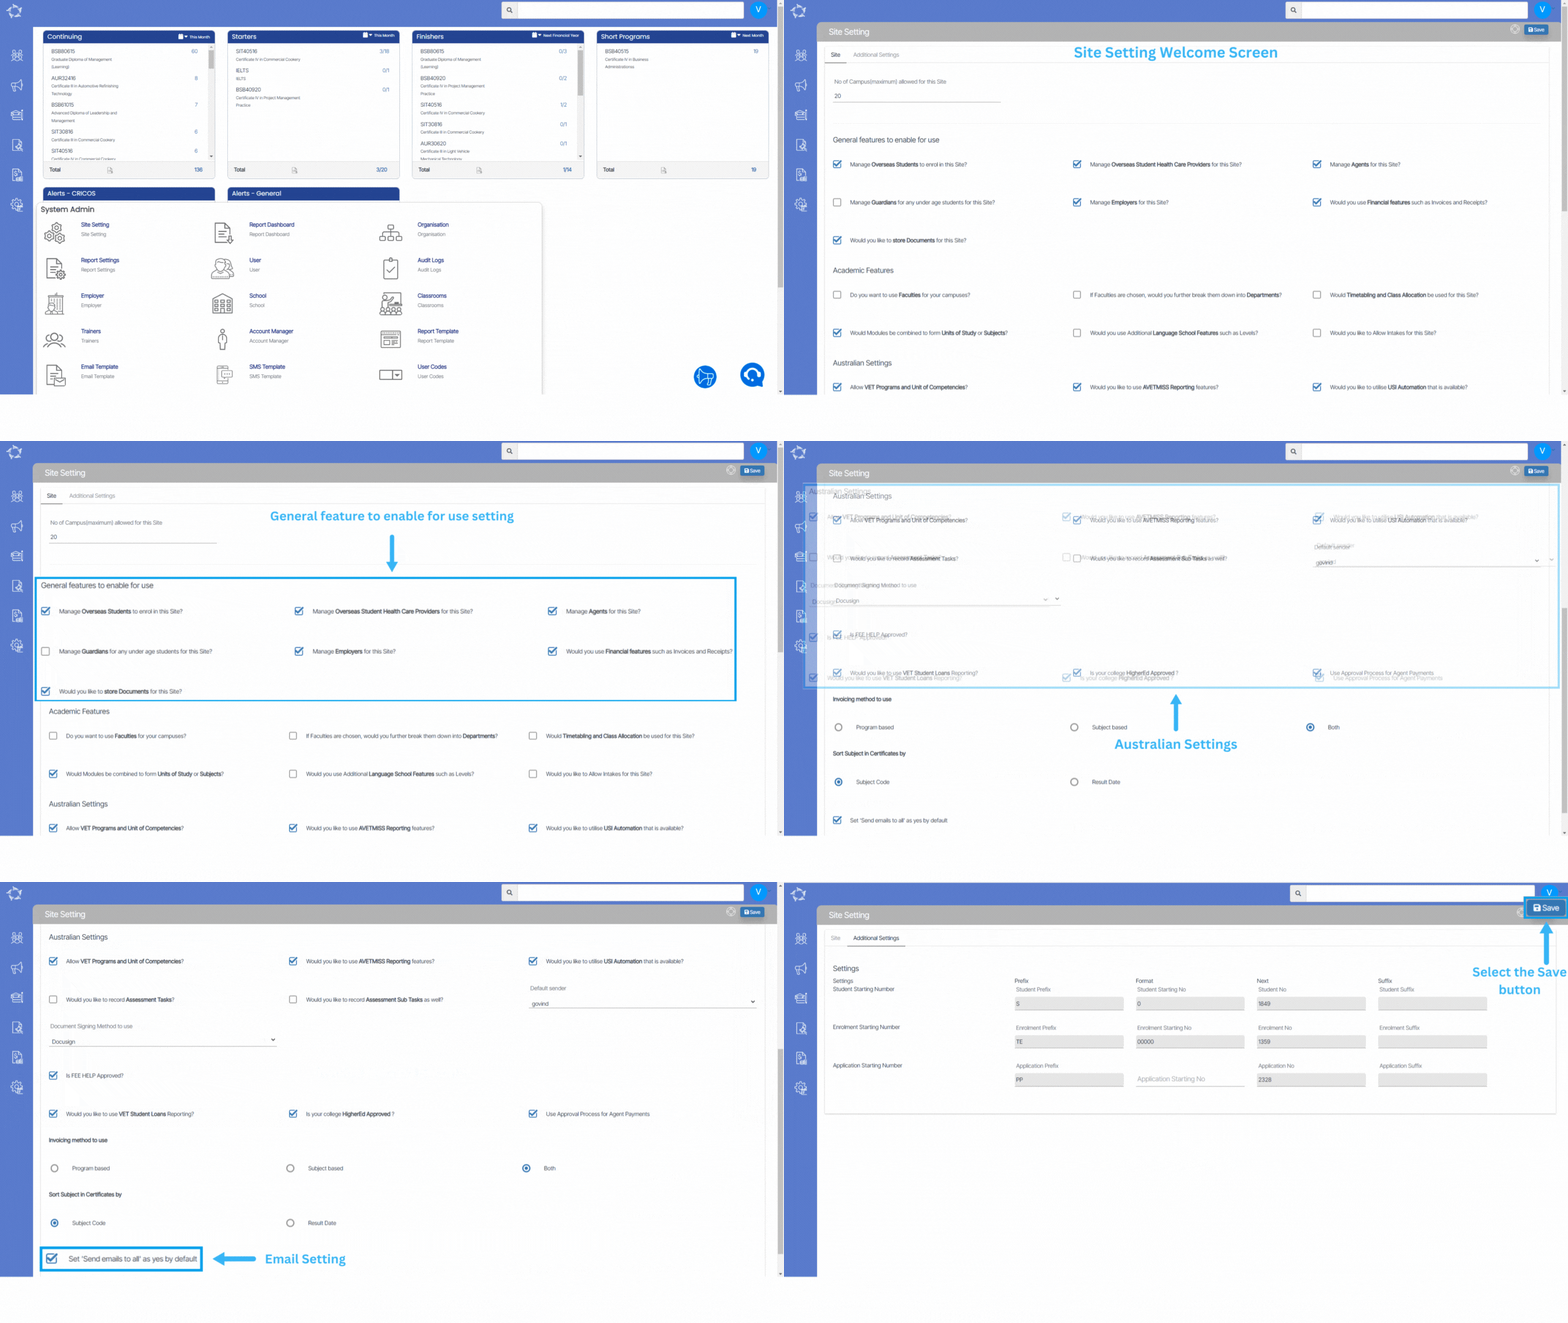
You can access the site setting screen through two methods:

  1. Go to System Admin > Site Setting
  2. Navigate to System Admin > Organisation > System Setting Button

The site setting screen allows you to configure and customise various settings for you RTO. It provides a centralised place where administrators can define and modify parameters related to the functionality, appearance of a specific screen.

Below is the explanation of Site tab fields

FieldsExplanation
No of Campus (maximum) allowed for this siteSpecifies the maximum number of campuses that can be associated with this particular site.
General features to enable for use FieldsExplanations
Manage Overseas Students to enrol in this Site?Select this checkbox if you want to manage overseas students enrolling at this site.
Manager Overseas Student Health Care Providers for this site?Select this checkbox if you want to manage overseas student healthcare providers for this site.
Manage Agents for this Site?Select this checkbox for managing agents associated with this site.
Manage Guardians for any under age students for this site?By selecting this checkbox, you grant permission to manage the guardians or parents of underage students attending this site.
Manage Employers for this site?Select this checkbox to manage the employers associated with this site.
Would you use Financial features such as Invoices and Receipts?Select this checkbox if you intend to utilize financial features such as invoices and receipts.
Would you like to store documents for this site?Select this checkbox if you want to store documents for this site.
Academic Features FieldsExplanations
Do you want to use Faculties for your campuses?Select this checkbox to enable the use of faculties for your campuses.
If Faculties are chosen, would you further break them down into Departments?Select this checkbox to enable the breakdown of faculties into departments if chosen.
Would Timetabling and Class Allocation be used for this Site?Select this checkbox to indicate whether timetabling and class allocation will be used for this site.
Would Modules be combined to form Units of Study or Subjects?Select this checkbox to determine whether modules will be combined to form units of study or subjects.
Would you use Additional Language School Features such as Levels?Select this checkbox to indicate whether additional language school features, such as levels, will be used.
Would you like to Allow Intakes for this Site?Select this checkbox to specify whether intakes will be allowed for this site.
Australian Settings FieldsExplanations
Allow VET Programs and Unit of Competencies?Select this checkbox to enable the inclusion of VET programs and units of competencies.
Would you like to use AVETMISS Reporting features?Select this checkbox to indicate whether AVETMISS reporting features will be utilized.
Would you like to utilise USI Automation that is available?Select this box if you want to utilize USI Automation functionality.
Would you like to record Assessment Tasks?Select this box if you want to record assessment tasks.
Would you like to record Assessment Sub Tasks as well?Select this box if you want to record assessment sub tasks.
Default senderSelect the default sender user from the dropdown for communication.
Document signing method to useSelect the preferred method from the dropdown for document signing.
Is FEE HELP Approved?Select this box if FEE HELP is approved.
Would you like to use VET Student Loans Reporting?Enable VET Student Loans reporting by selecting this box.
Is your college HigherEd Approved ?Select this box if your college is HigherEd approved.
Use Approval Process for Agent PaymentsEnable approval process for agent payments by checking this box.
Invoicing method to useThis is a radio button field where you can select the preferred invoicing method: Program Based, Subject Based, or Both.
Sort Subject in Certificates bySelect the sorting criteria for subjects in certificates: Subject Code or Result Date.
Set ‘Send emails to all’ as yes by defaultSelect this box to set ‘Send emails to all’ as the default option.

Below is the explanation of the Additional tab fields

Additional Settings FieldsPrefixFormatNext Suffix
Student Starting NumberEnter the desired prefix to be used for student numbers.Define the format for student numbers to be used.Enter the next number to be used for student numbers.Enter the desired suffix to be used for student numbers.
Enrolment Starting NumberEnter the desired prefix to be used for enrolment numbers.Define the format for enrolment numbers to be used.Enter the next number to be used for Enrolment numbers.Enter the desired suffix to be used for enrolment numbers.
Application Starting NumberEnter the desired prefix to be used for application numbers.Define the format for application numbers to be used.Enter the next number to be used for application numbers.Enter the desired suffix to be used for application numbers.

Task Management -Actions Details

Tasks Details > Action Information > Preview Icon > Action Details Screen

history of changes

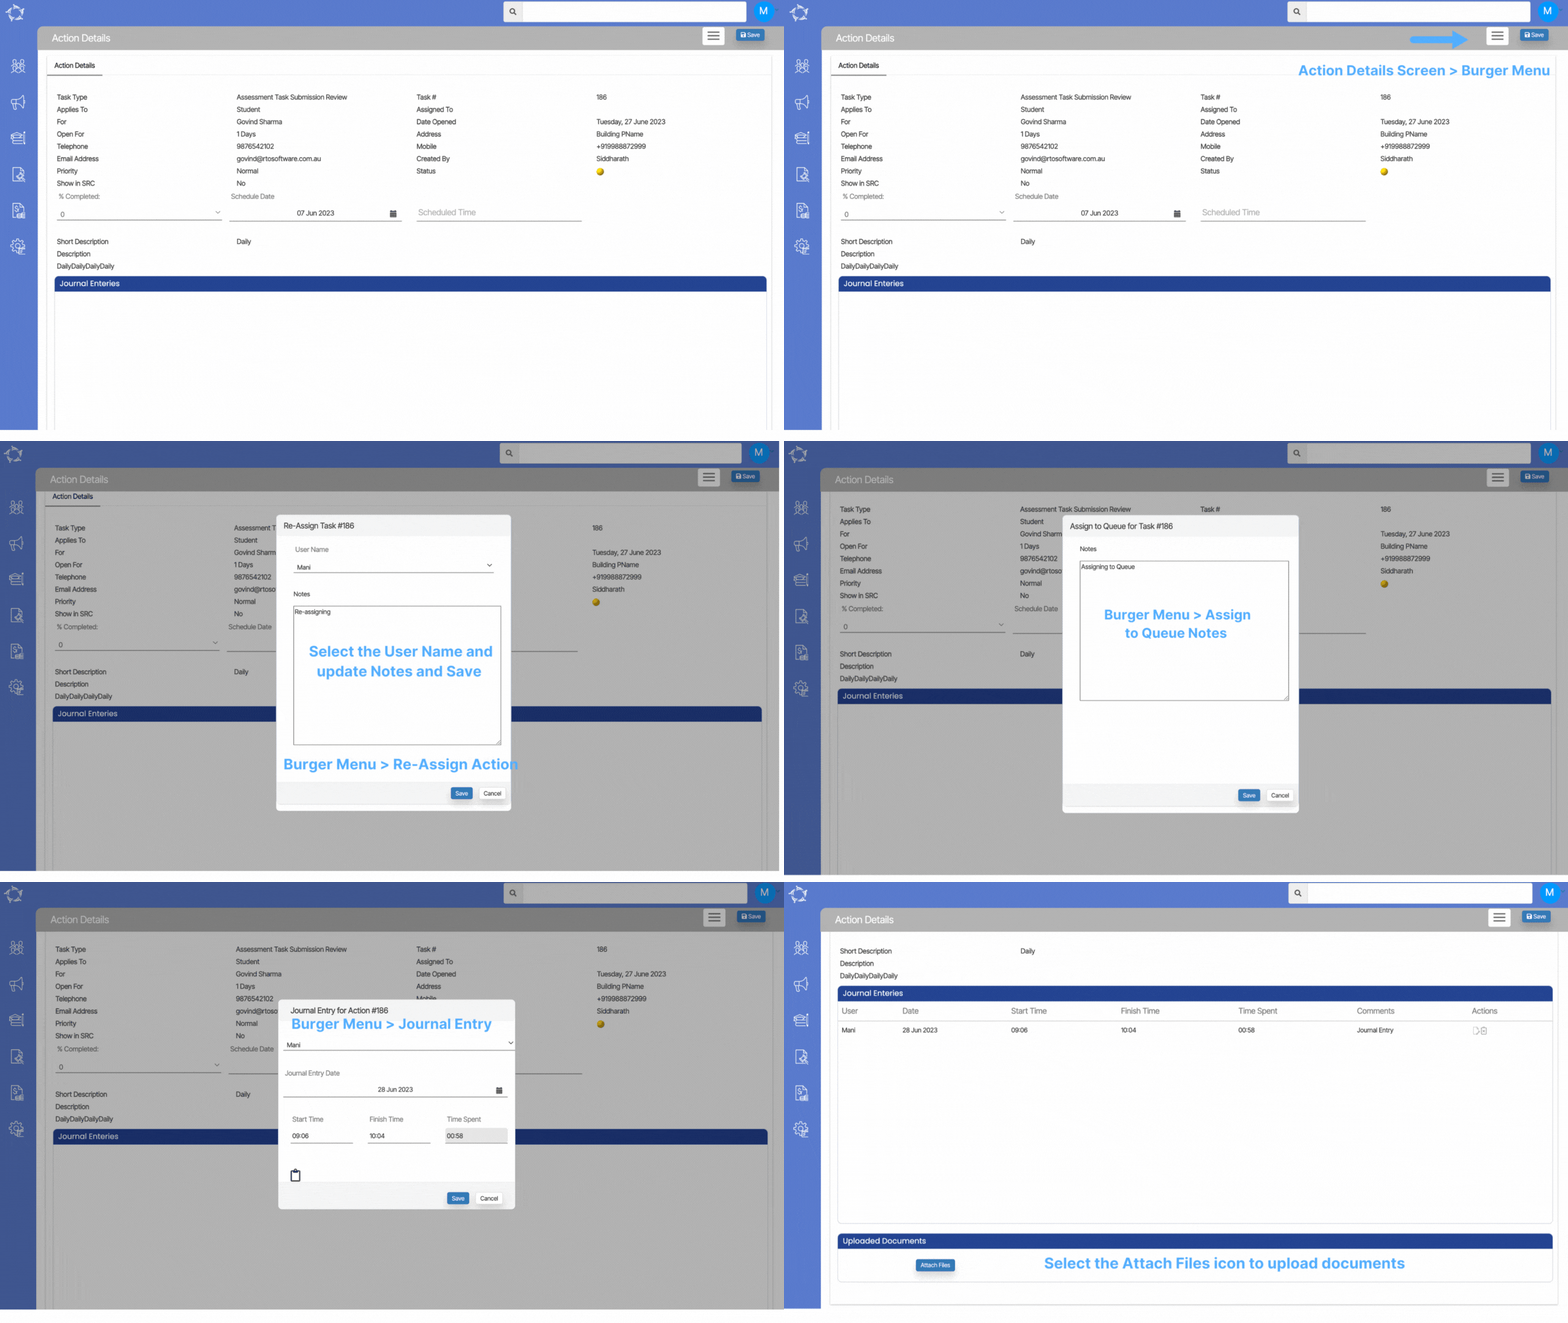
When you select the Preview Icon within the Action Information pop-up on the Task Details screen, you will be directed to the Actions Details Screen. This screen provides a comprehensive view of all the details associated with the task created from the Task Entry Screen. Additionally, you have the option to attach documents to the task directly from this screen, facilitating efficient documentation and reference.

Furthermore, you will notice a Burger Menu icon positioned on the right-hand side of the screen. This menu offers various options to manage the task effectively. Within this menu, you can choose to re-assign the action to a different person, edit the action details if necessary, mark the action as complete to indicate its fulfilment, assign the action to a queue for further processing, or cancel the action if it is no longer needed. The flexibility provided by this menu empowers users to make necessary adjustments and updates to the task based on changing requirements. In addition, through the burger menu, you can also add a Journal Entry, which allows you to include any relevant information or notes pertaining to the task.

Overall, the Actions Details Screen, accompanied by the Burger Menu functionality, offers a comprehensive platform for managing tasks efficiently. You can access task specific information, attach documents, and utilise the menu options to make necessary updates, track progress, and maintain accurate records of their actions.

How do the Burger Menu options work?

  • Re-Assign Action – When you select this option from the Burger Menu, a pop-up window will appear, allowing you to re-assign the action to a different person.
  • Edit Action – Upon selecting the edit action, the system will take you to the Action Entry/Task Entry Screen where you can make the necessary changes to the task.
  • Mark Complete – When you choose this option, a pop-up message will appear at the top of the screen, prompting you to select OK to complete the task or Cancel to leave it as it is.
  • Assign to Queue – Selecting this option triggers a pop-up message with Yes and No options. You can indicate whether you want to assign the action to a queue or not. If you select Yes, the system will display another pop-up window where you can add notes related to the action and save them.
  • Cancel – Upon selecting this option, a message will appear at the top of the screen asking, Do you want to cancel the Action? You can choose Yes or No based on your preference.
  • Journal Entry – When you choose this option, a pop-up window will appear. Within this window, you can update the Journal entry date, and start and finish time (the system will calculate the total time and update it in the “Time Spent” field). If you wish to add any notes, you can do so by selecting the Notes Icon and saving them. After saving the Journal Entry, the screen will refresh, and the journal entry will appear in the Journal Entries Grid on the Action Details screen. You will have the flexibility to edit and delete the Journal Entry from the grid using the edit and delete icons available in the Actions column.

New Applicant – AVETMISS Field Related Changes

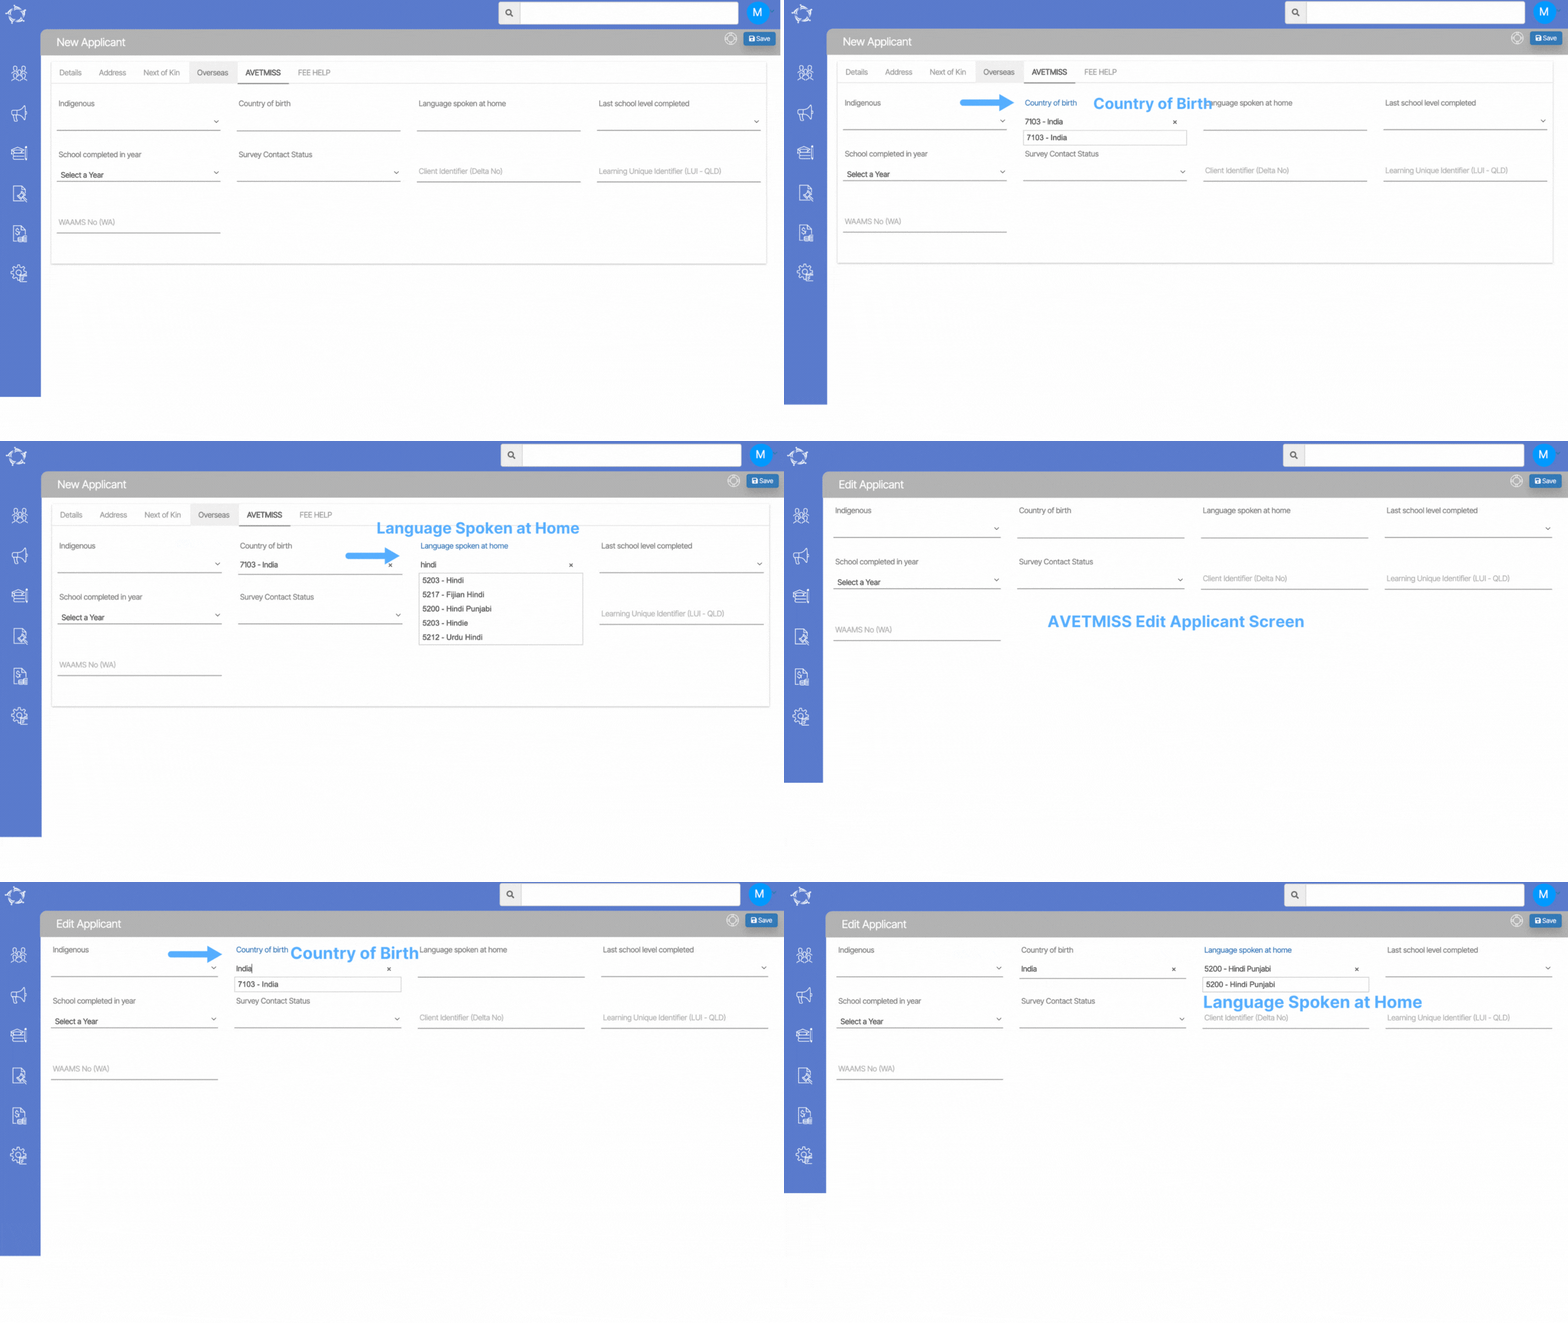
In the past, when accessing the AVETMISS tab on the New Applicant/Edit Applicant screen, you would be presented with an extensive list of options for Country of Birth and Language Spoken at Home. We have since made significant improvements in these fields, which are now equipped with a convenient magic search feature that enhances your experience.

Instead of scrolling through a long list of options, you can simply begin typing the name of the desired country or language and the system will give you relevant suggestions that match your input. This streamlined approach makes it quicker and easier to accurately select the appropriate Country of Birth and Language Spoken at Home for each applicant.

Task Management

Main Dashboard > Task Management Tile

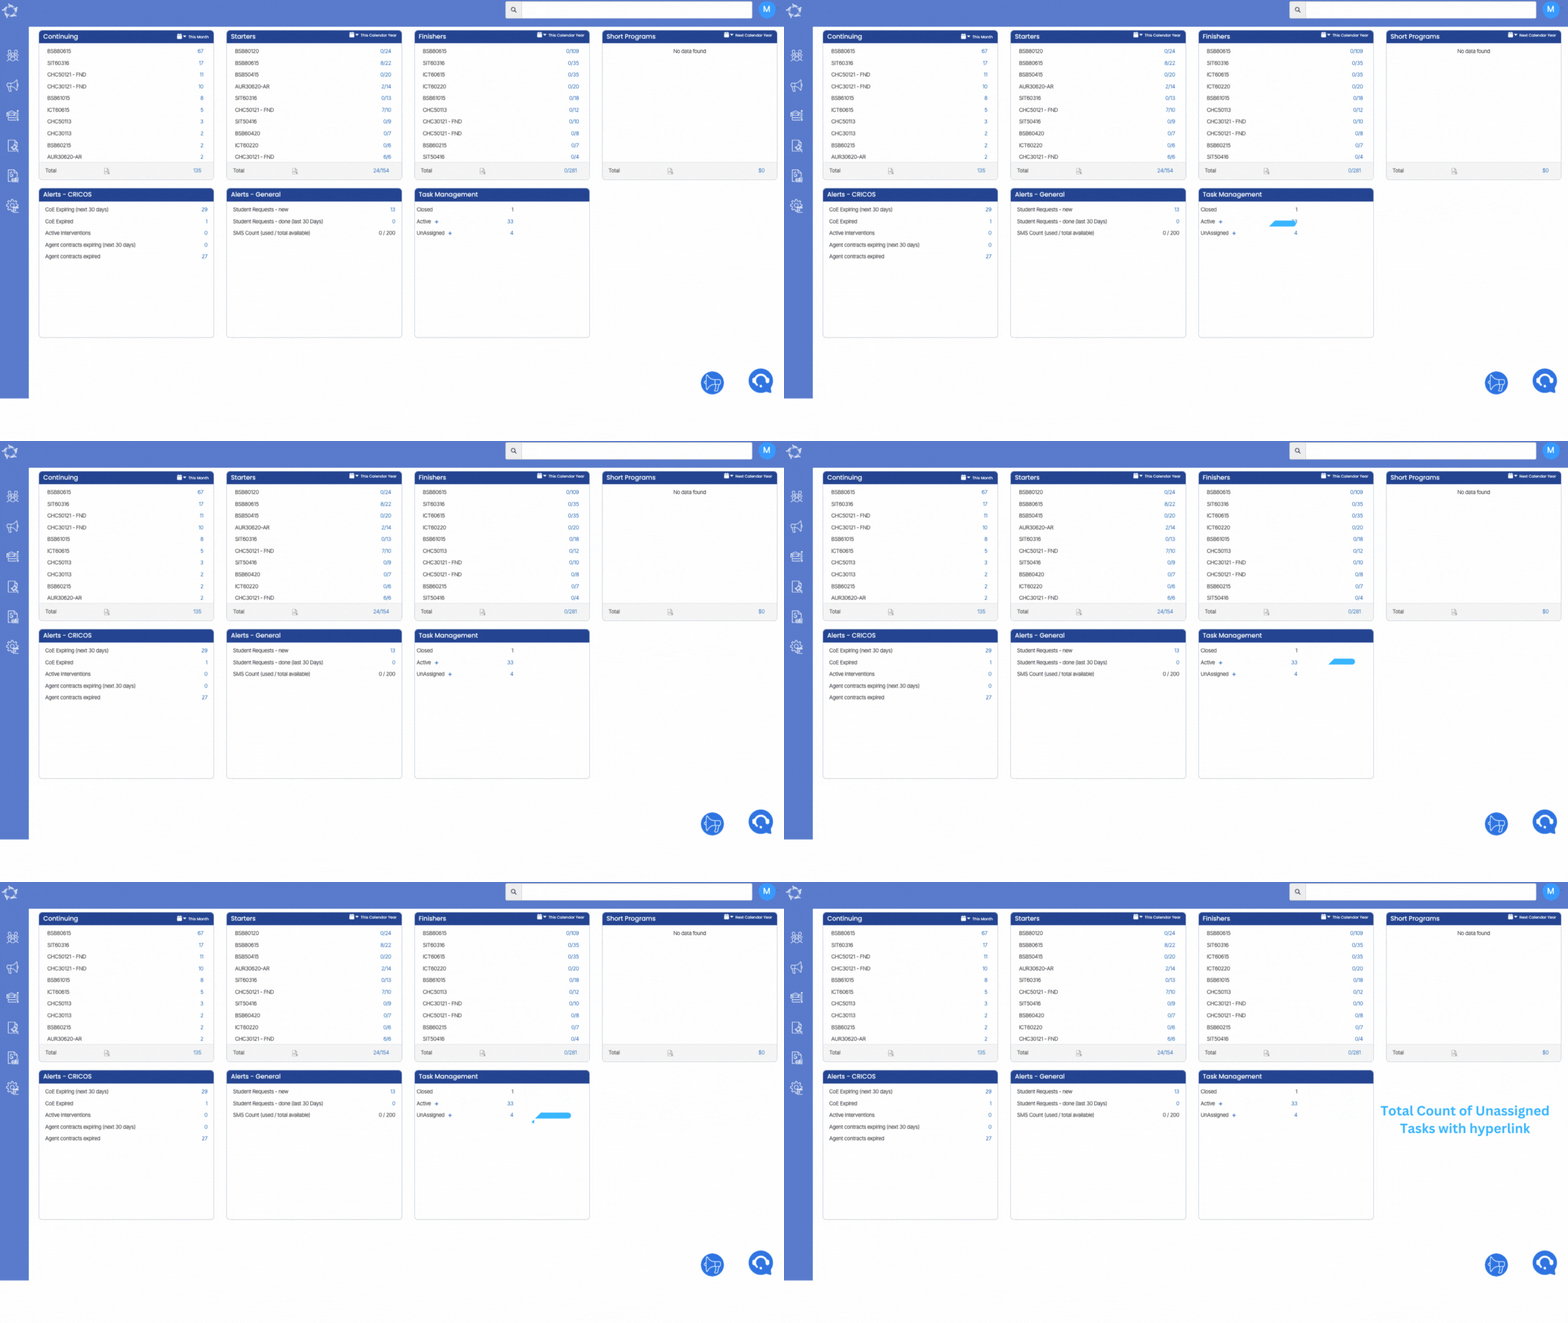
A new feature: Task Management, has been introduced in the system for you to efficiently manage and organise tasks related to various objects in TEAMS; Students, Enrolments, Agents, Employers, and more. The Task Management tile provides an overview of different task categories, including Closed tasks, Active tasks and Unassigned tasks. Each of these sections has dedicated screens that let you perform specific actions on tasks.

IMPORTANT – It is of utmost importance to note that Task Management is a system setting that exists within the system. Should you desire to enable this setting for your RTO, it is imperative that you contact our support team, who will then provide you with the guidance and support required to proceed with the subsequent actions involved in enabling this setting.

The Task Management tile will show you:

  • Closed Tasks – When a task is completed, it is moved to the closed tasks section. This allows users to have a clear record of tasks that have been successfully completed, providing a realistic overview of progress and helping with performance analysis.
  • Active Tasks – You will be able to add new tasks and view the existing ones from this section. Click on the Task Details screen link to know more about its subsequent actions.
  • Unassigned/Overdue Tasks – When you select this option, the system will direct to you to the Task Details screen, where you will be able to see the unassigned and overdue tasks..