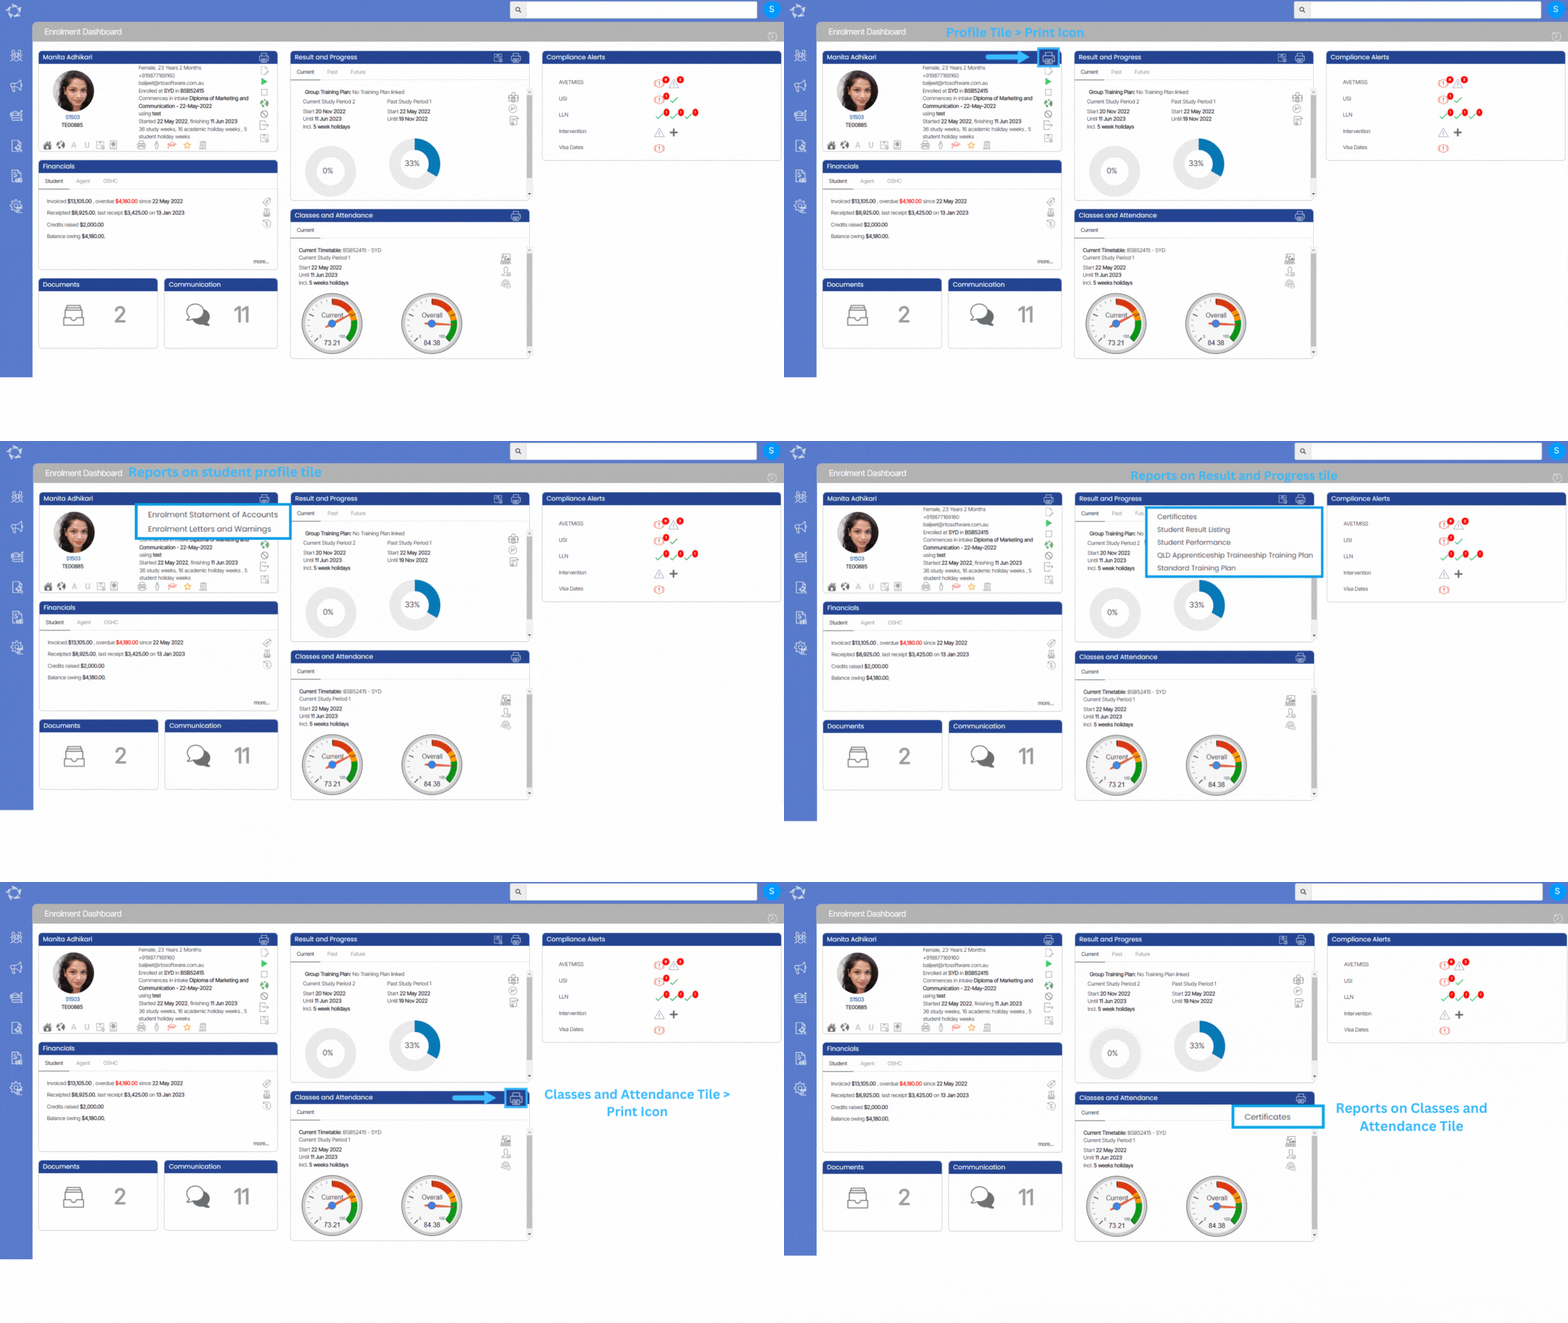
Enrolment Dashboard Reports

Different reports are available on different tiles under the Enrolment Dashboard. You can see these reports under the print icon

Reports on Student profile tile:

Each report listed below is a link to a post where you can understand the report and its parameters and view an example of the report.

Reports on result and progress tile:

Each report listed below is a link to a post where you can understand the report and its parameters and view an example of the report.

Reports on classes and attendance tile:

Each report listed below is a link to a post where you can understand the report and its parameters and view an example of the report.

Program – FEE HELP

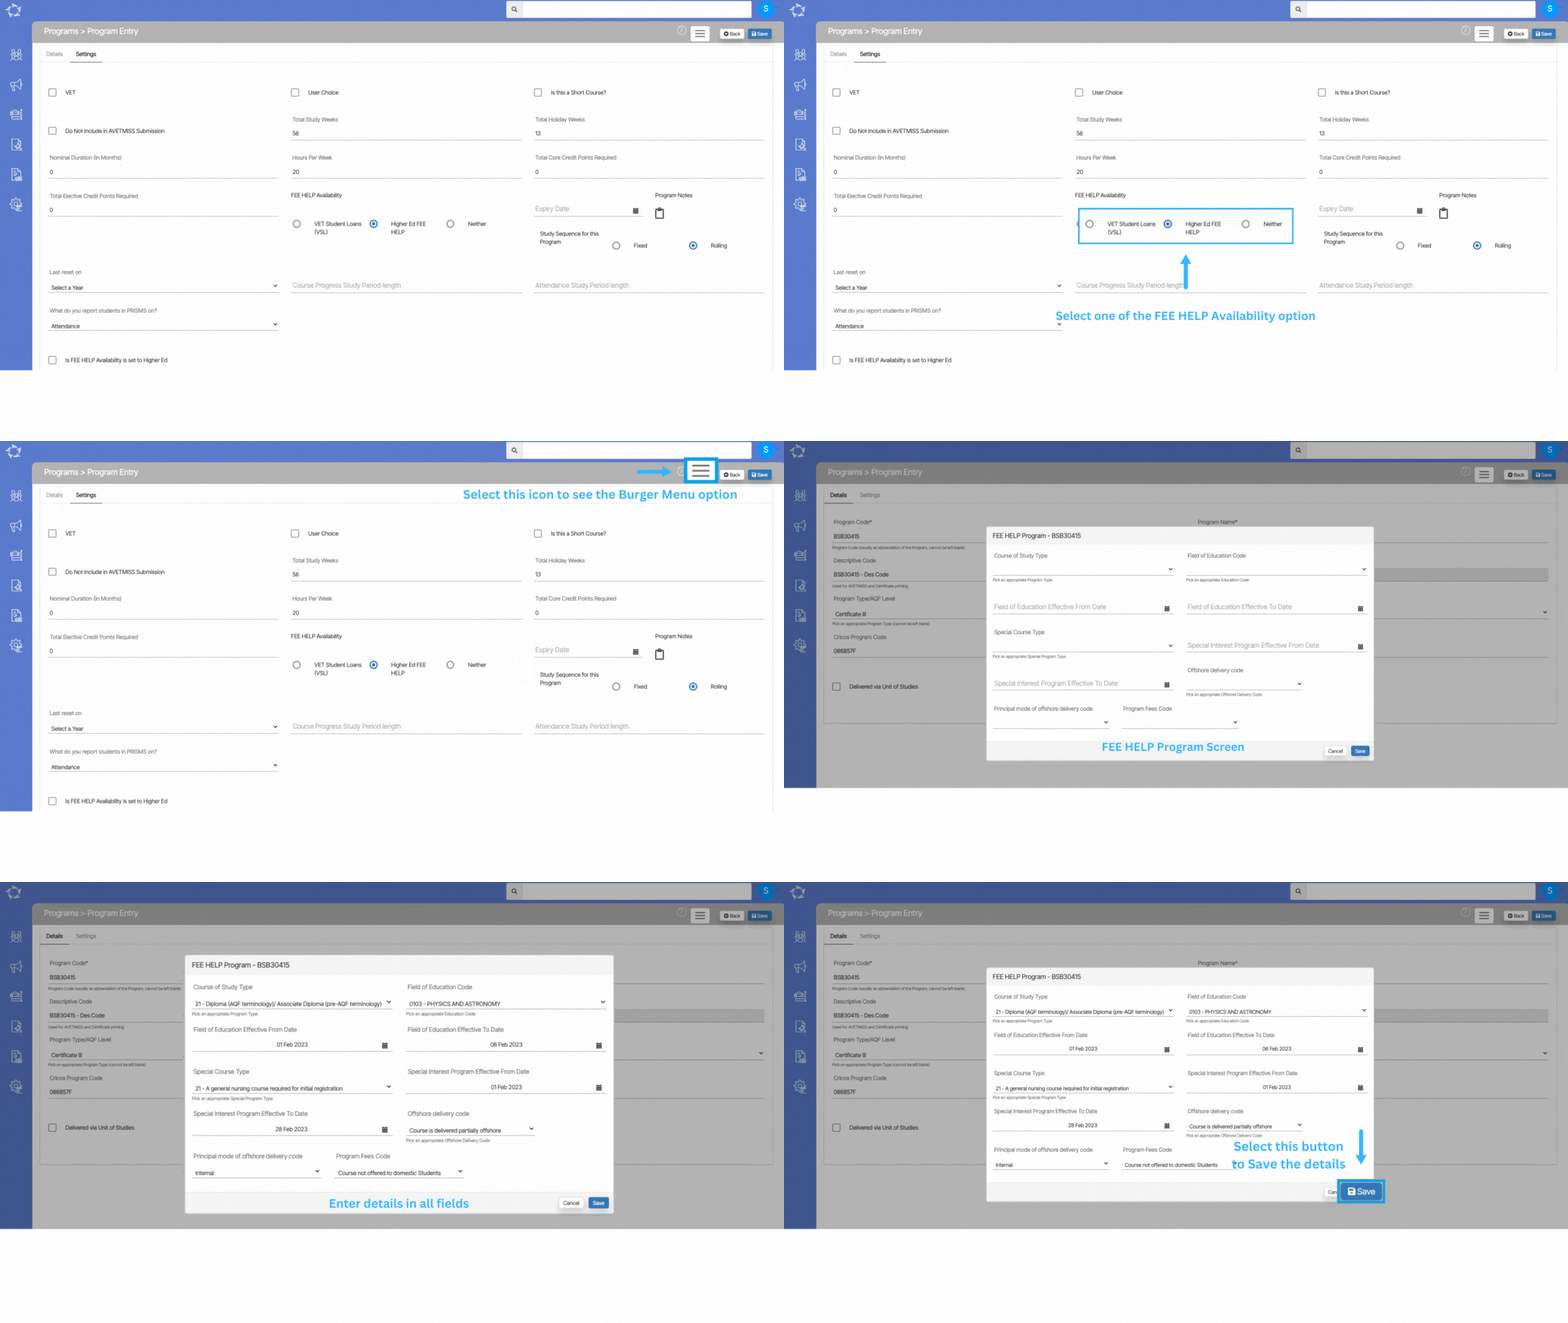
Program > Program Entry Burger Menu > FEE HELP Setting

When you select the FEE-HELP option, the program FEE-HELP popup screen will open, where you can add FEE-HELP details for a program. In the Settings tab, there will be a field for FEE HELP Availability and there are radio buttons for:

  • VET Student loan (VSL)
  • Higher Ed FEE HELP
  • Neither

IMPORTANT – The FEE HELP option will show you the settings as per the Fee HELP availability radio buttons (VSL or Hed) selected on the program entry screen. A program can only be one of the FEE HELP options it cannot be both.

By default, the option of neither will be selected, select the option that you want and then SAVE the change.

When any of the FEE HELP availability radio buttons is selected then you can update the FEE HELP for a Program accordingly. Once you select the FEE HELP option, the popup window will open on the screen.

Explanation of the Fields below:

FieldsExplanation
Course of Study TypeSelect an appropriate Course of Study type.
Field of Education CodeSelect an appropriate Field of Education code.
Field of Education Effective From DateFrom the calendar, you can select the date from when the field of education is effective.
Field of Education Effective To DateFrom the calendar, you can select the date when the field of education should be effective.
Special Course TypeFrom the dropdown, you can select the special course type.
Special Interest Program Effective From DateFrom the calendar, you can select the date from when the special interest program is effective.
Special Interest Program Effective To DateFrom the calendar, you can select the date when the special interest program should be effective.
Offshore Delivery CodeFrom the dropdown, you can select whether the course is partially delivered offshore or fully offshore.
Principal Interest of Offshore Delivery CodeFrom the dropdown, you can select the principal delivery mode of the course.
Program Fees CodeFrom the dropdown, you can select the program fee code.
Combined Program of Study IndicatorTick this box if FEE-HELP is for the combined program and then select the supplementary education code from the magic search field.
Indicative Student Contribution CSPHere you can add indicative student contributions.

Subject – Funding Fee Setup

Subjects > Subject Entry Burger Menu > Funding Fee Setup

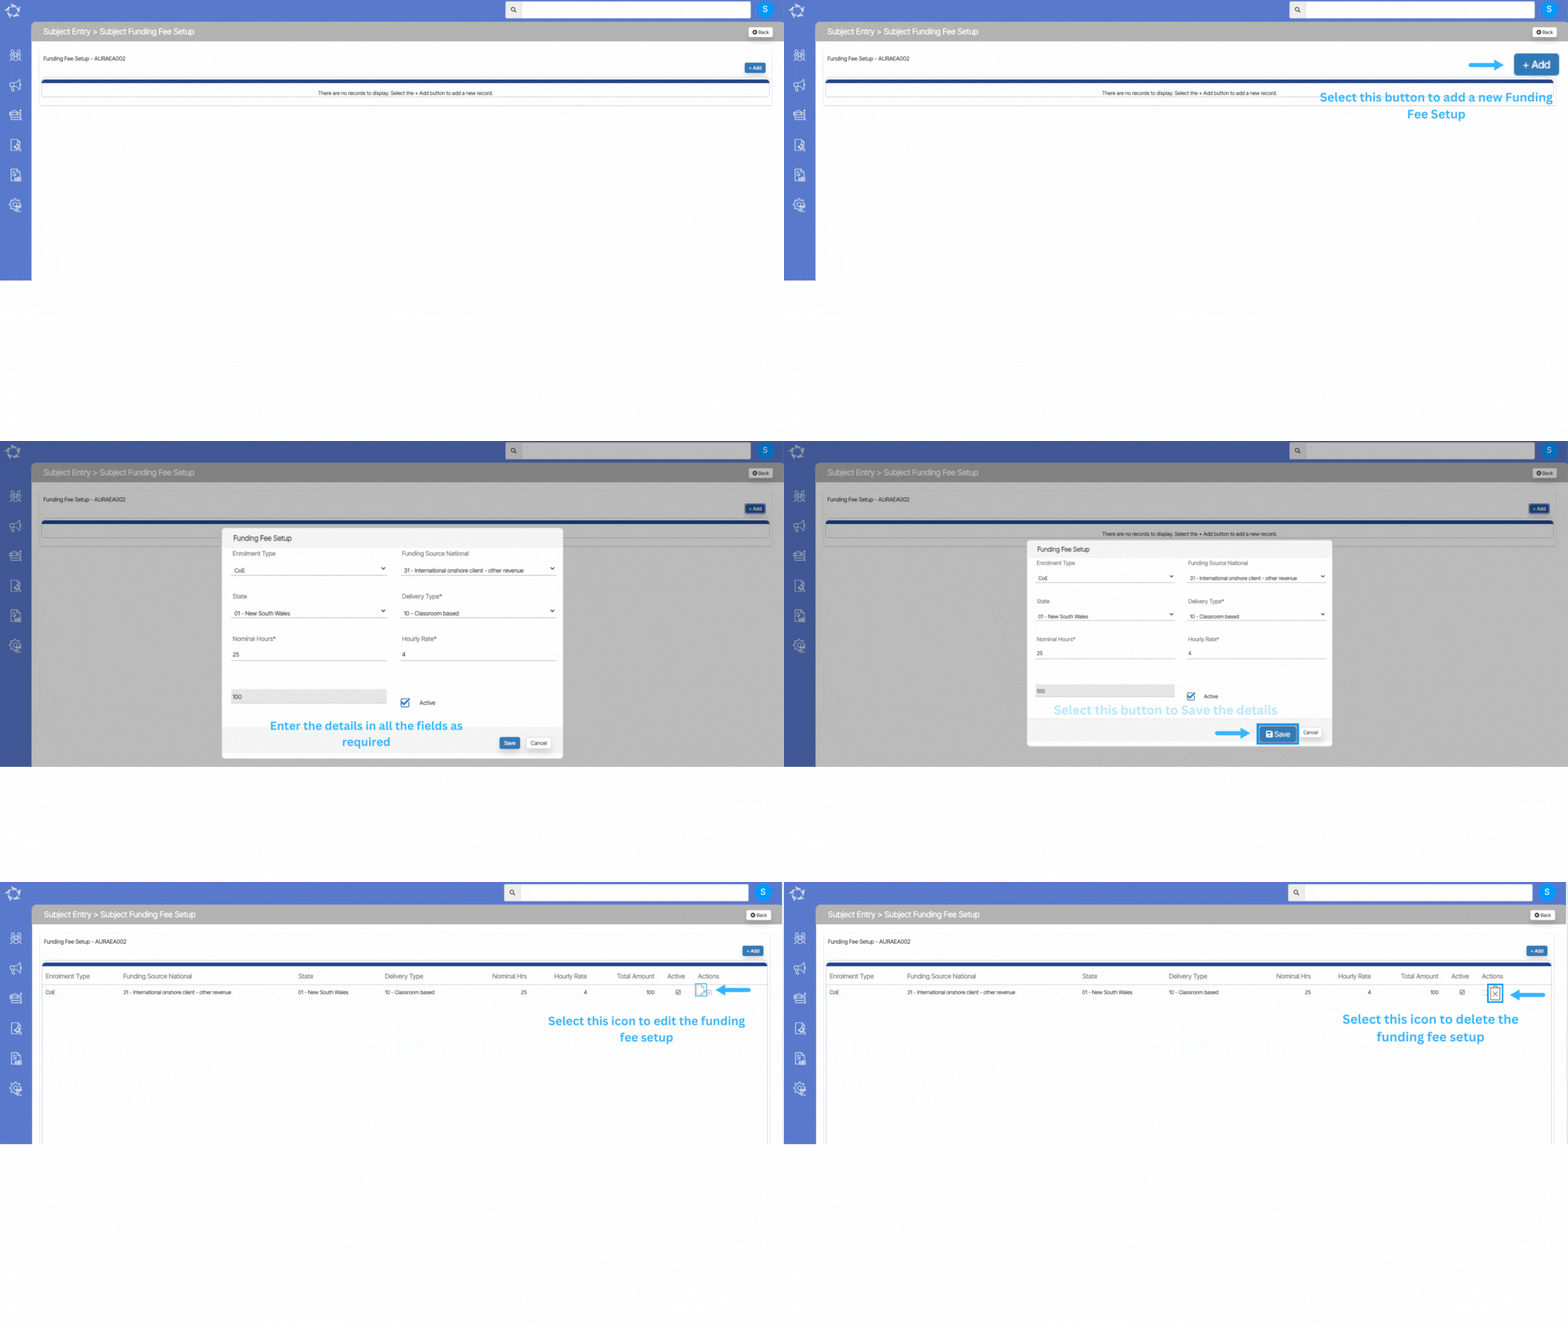
The funding of subjects or courses is primarily handled through government funding for the students. To update the FEE HELP settings of the subjects, navigate to the Funding Fee Setup option in the menu and select the burger menu, then choose the Funding Fee Setup option.

On the Funding Fee Setup screen, locate the +Add button and click on it. This action will open a funding fee setup pop-up window on your screen. In this window, carefully select the required fields as per your preferences and requirements.

Explanation of the fields below:

FieldsExplanation
Enrolment TypeThis is User Code and based on the user code created in TEAMS, you can select the enrolment type from the dropdown.
Funding Source NationalSelect the funding source national from the dropdown.
StateSelect the state from the dropdown.
Delivery TypeHere you can select the delivery type of the subject from the dropdown.
Nominal HoursHere you can add the nationally agreed nominal hours of the subject.
Hourly RateHere you can add the hourly rate of the subject and just below the nominal hour field, the total amount of the subject will be populated as it is a multiply of nominal hours with an hourly rate.
ActiveSelect this box to make the funding fee setup active.

Subject – AVETMISS Settings

Subjects > Subjects Entry Burger Menu > AVETMISS Settings

Colleges set up AVETMISS (Australian Vocational Education and Training Management Information Statistical Standard) settings for subjects to ensure compliance with the national data reporting requirements for vocational education and training in Australia. AVETMISS is a standard framework that governs the collection, reporting, and analysis of data related to vocational education and training activities.

By setting up AVETMISS settings for subjects, you can accurately capture and report data on student enrolments, completions, qualifications, and other relevant information.

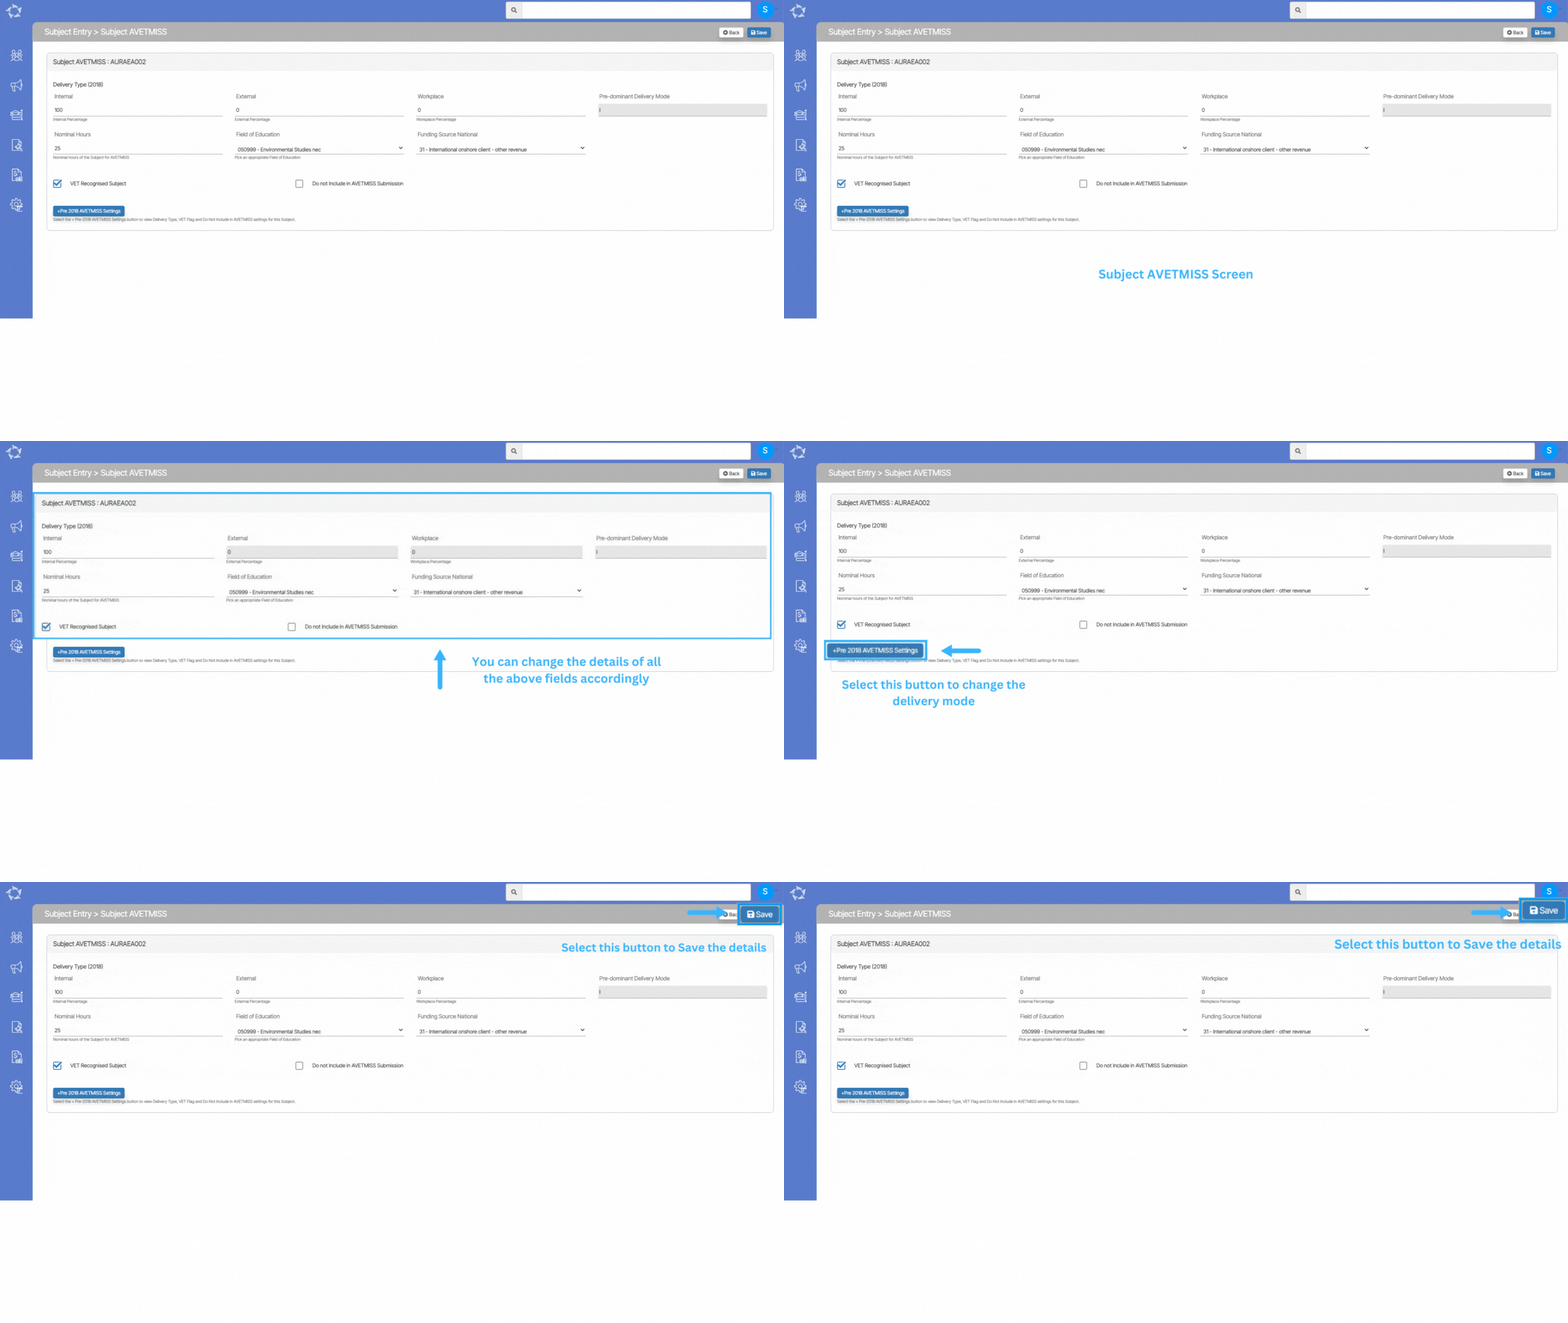
When you access the AVETMISS Settings option, it will open the Subject AVETMISS screen. This screen allows you to input and manage the AVETMISS details for the subjects. Within the Subject AVETMISS screen, you can add the necessary AVETMISS information for each subject individually.

IMPORTANT – It is crucial to update the AVETMISS settings for subjects before conducting an AVETMISS export. Failure to update these settings in the system can result in errors during the AVETMISS submission process. The AVETMISS data, including subject details, is exported into the NAT00060 file format, which is used for reporting vocational education and training data.

Explanation of the fields below:

FieldsExplanations
InternalWrite the value as 100 if the subject is taught onshore only. The other two fields automatically have a 0 value.
ExternalWrite the value as 100 if the subject is taught offshore only. Then the internal and workplace field automatically have a 0 value.
WorkplaceWrite the value as 100 if the subject is taught at the workplace level only. Then the internal and external fields automatically have a 0 value.
Pre-Dominant Delivery ModeIt is a read-only auto-populated field that changes according to the delivery type method selected.
Nominal HoursHere you can add the nationally agreed nominal hours of the subject.
Field of EducationYou can select the field of education from the dropdown.
Funding Source NationalIf you are 100% CRICOS for your VET subject you would select the funding source national as overseas 31 (International onshore client – other revenue). However, if you deliver offshore for student then you would change it from an Enrolment subject AVETMISS level.
VET Recognised SubjectSelect this box to make the subject VET recognised.
Do not include in AVETMISS SubmissionSelect this tick box if you do not want to include the subject in the AVETMISS submission.

Add/Edit Agent

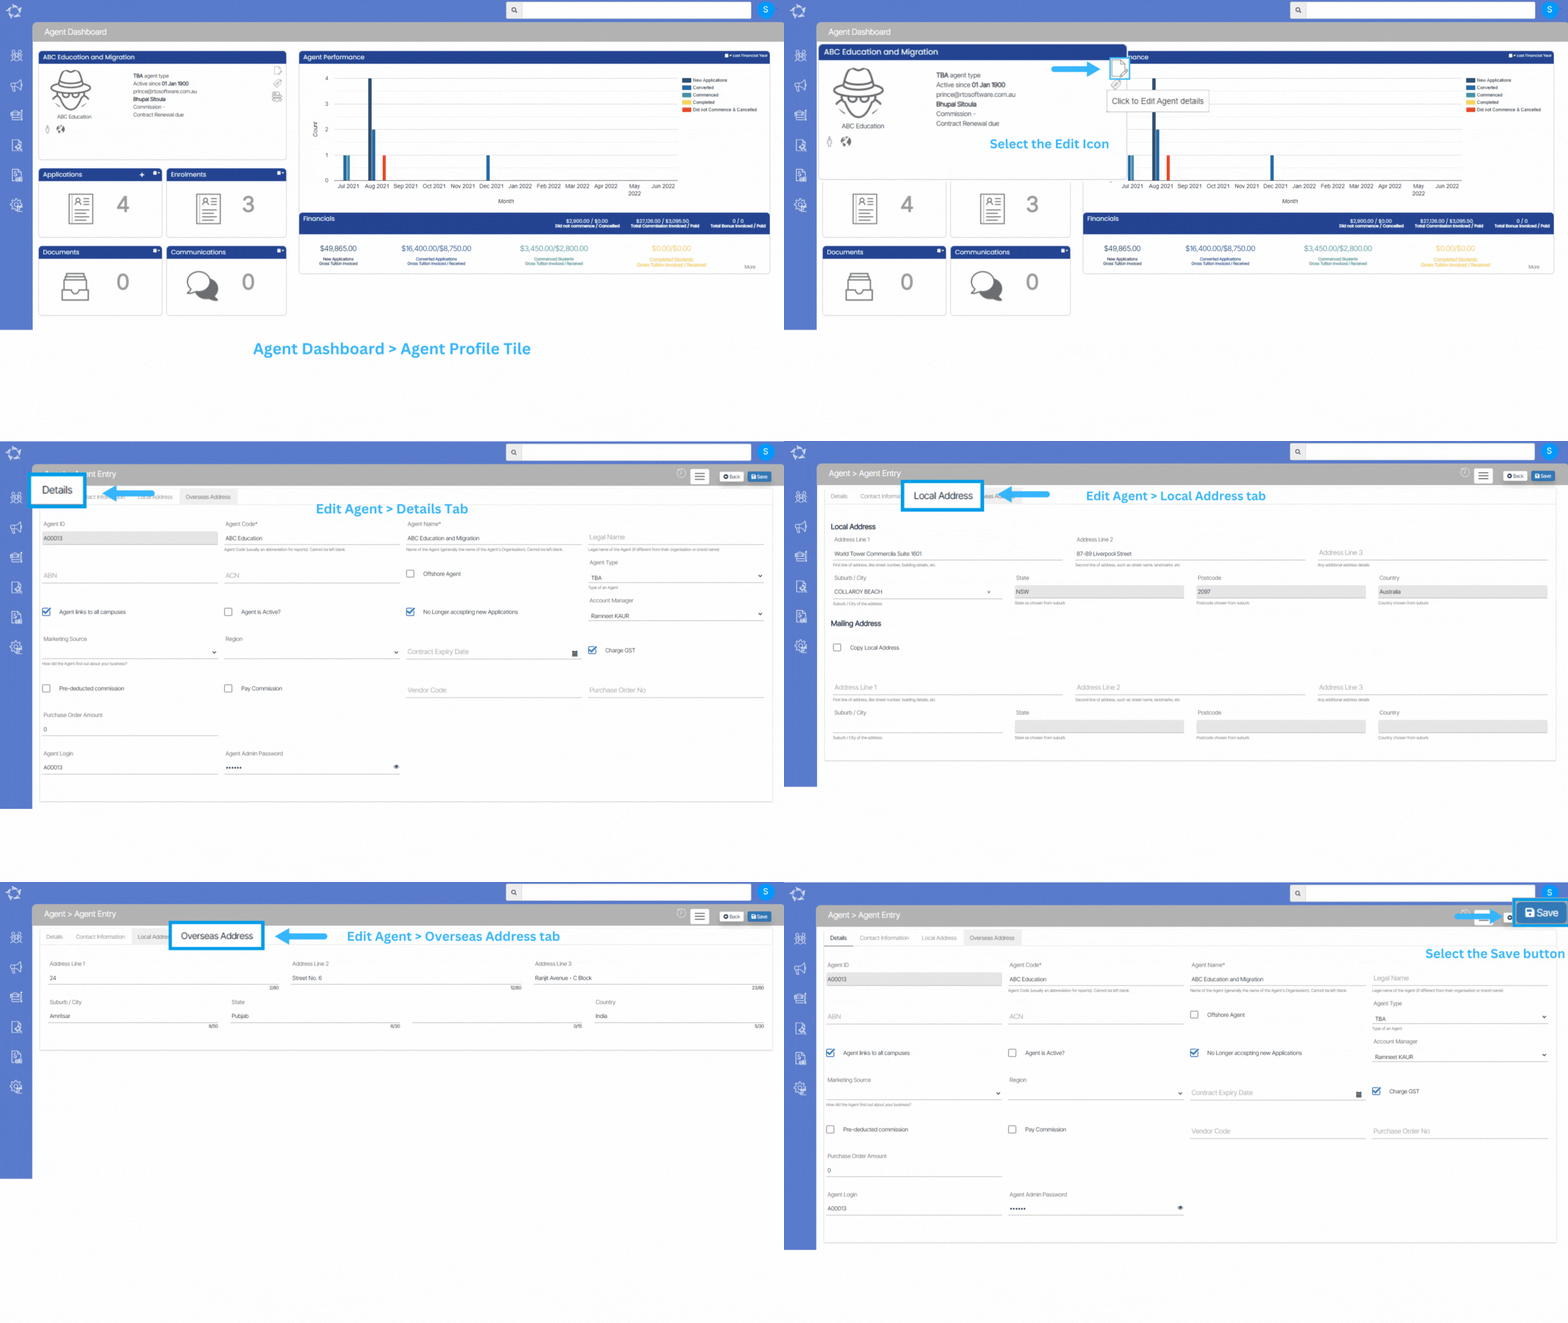
These screens will allow you to add/edit the information about the Agent. You can find these screens under:

Agent Dashboard > Agent Profile Tile > Edit Agent Details Icon

Marketing Menu > Agent Listing screen > +Agent Button

Note – When you select the Offshore Agent tick box, the Overseas address tab will get visible and you won’t be able to select the Local Address tab.

Note – Below tables will give you an explanation of details tab and other tabs(contact information, local address and overseas) are self explanatory tab where you add contact information and agent’s address

Details Tab

FieldExplanation
Agent IDIt is a read-only system-generated field that will automatically populate Agent’s ID.
Agent CodeAgent Code (usually an abbreviation for reports). Cannot be left blank.
Agent NameName of the Agent (generally the name of the Agent’s Organisation). Cannot be left blank.
Legal NameThe legal name of the Agent (if different from their organisation or brand name).
ABNYou can enter the Australian Business Number in this field.
ACNYou can enter the Australian Company Number in this field.
Offshore AgentSelect this tick box if the agent is offshore (overseas).
Agent TypeThis is user code and based on the user code created in TEAMS, you can select the agent type from dropdown.
Agent Links to all CampusesIf your RTO has multiple campuses then you can select this tick box.
CampusYou can select the specific campus from the dropdown field. This field will be visible if the Agent Links to all campuses check box is un-tick.
Agent is Active?If you do not select this tick then the agent will not appear on the required screens.
No Longer accepting new ApplicationsBy select this tick box, the agent will not appear for the new applications.
Account ManagerThis is user code and based on the user code created in TEAMS, you can select the account manager from dropdown.
Marketing SourceThis is user code and based on the user code created in TEAMS, you can select the marketing source from dropdown.
RegionThis is user code and based on the user code created in TEAMS, you can select the region from dropdown.
Contract Expiry DateAgent’s contract expiry date.
Charge GSTSelect this tick box to charge GST on the agent’s commission.
Pre-deducted commissionSelect this tick box if you wish to pre deduct the commission while creating the receipts for the students.
Pay CommissionIf you select this tick box, the system will show different fields related to pay the commission
Commission Template – This will be the default commission set for the agent
Optional Commission templates – This will show you commission’s list from which you can select any optional commission.
Optional Commission TemplateYou can select optional commission template from the dropdown field
Vendor CodeEnter the Vendor code of the agent in this field
Purchase Order NoEnter the Purchase order number of the agent in this field
Purchase Order AmountYou can enter the Purchase order amount in this field
Agent LoginYou can enter the Agent Login ID in this field
Agent Admin PasswordYou can enter the Agent Admin password in this field

Unit of Studies

Dashboard > Academics menu > Unit of Studies

The Unit of Study is where the students enrolled in a unit to undertake the required study and to complete the assigned assessment pieces as per the unit outline.

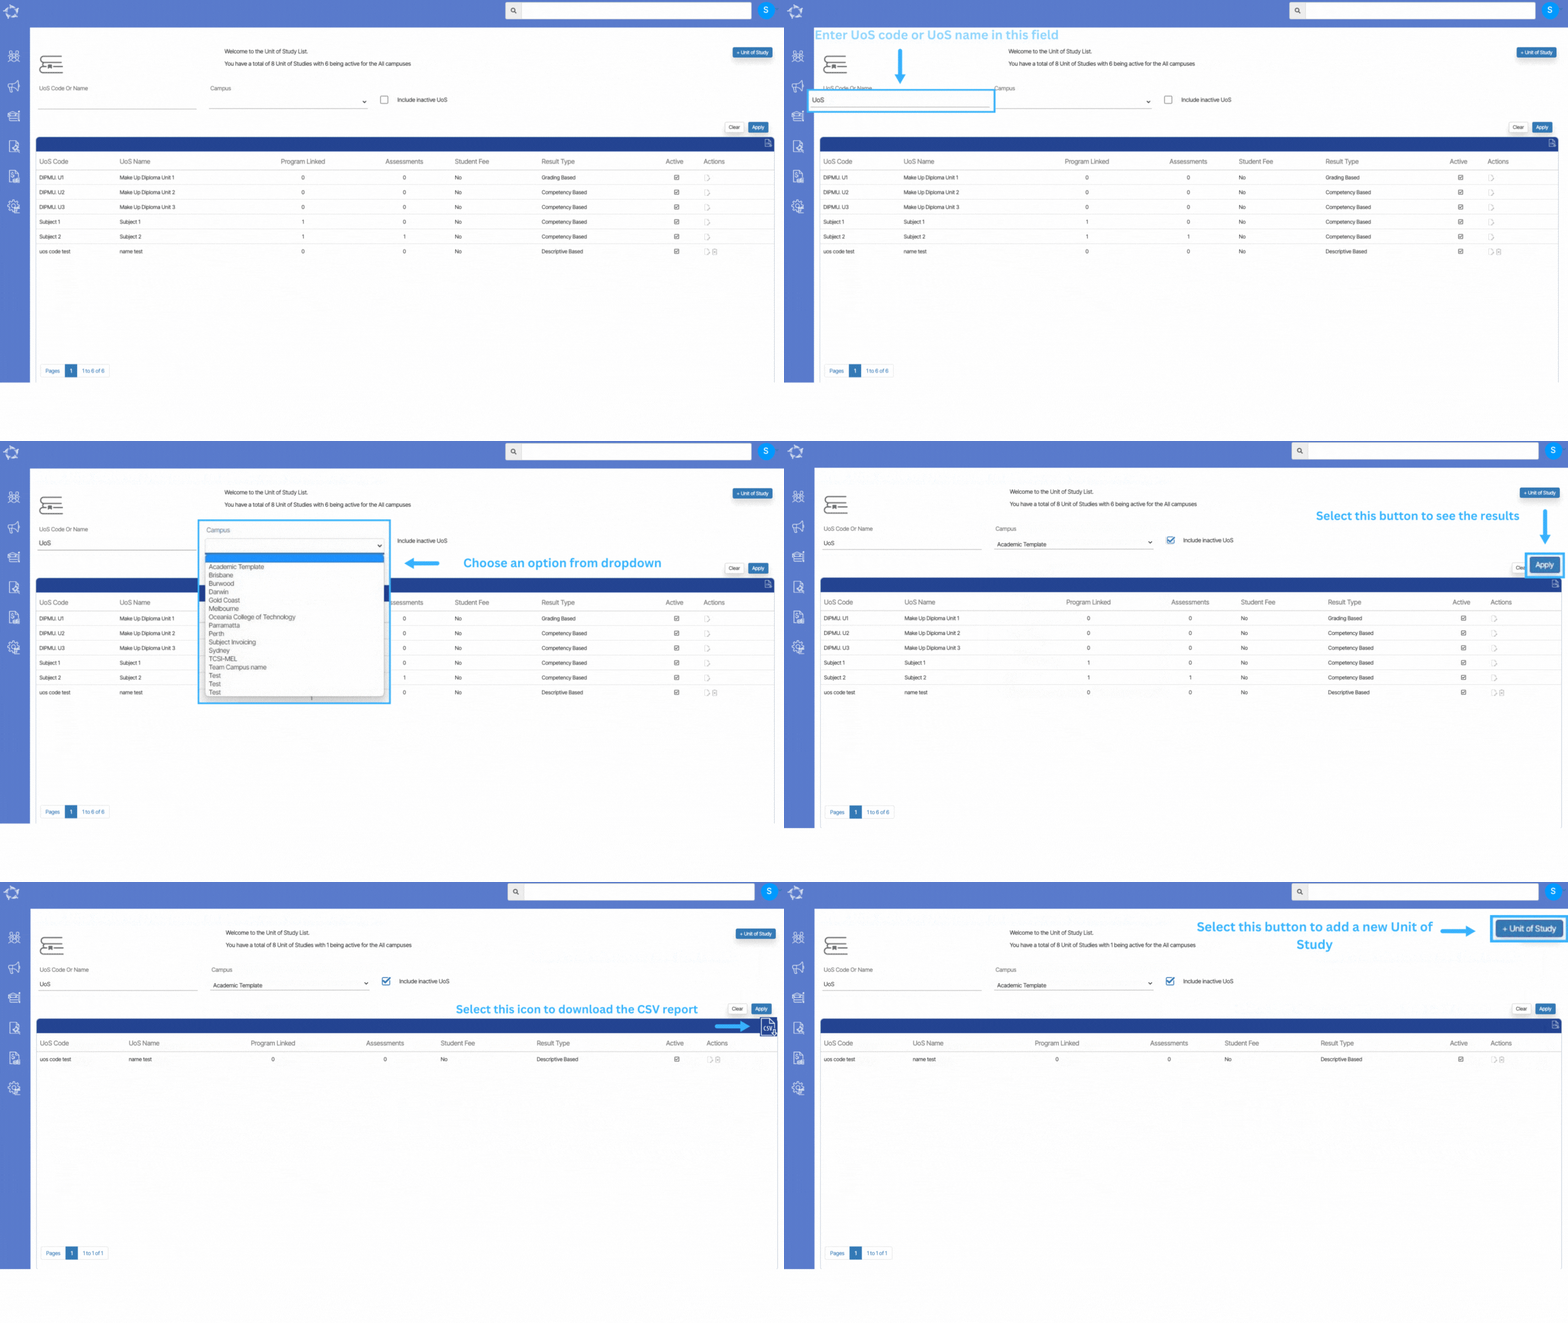
When you are on the UoS welcome screen, you will be able to search, edit and view UoS that are already in your database and you can also add a new +Unit of Study in the system.

Explanation of the fields on the Unit of Study Screen is below:

FieldsExplanation
UoS CodeThis search field will allow you to search for the specific UoS with their Code and Name.
CampusYou can select the Campus from the Dropdown.
Include inactive UoSIf you select this tick box, then it will show all the inactive UoS.
Apply buttonOnce you applied the filters, you can select the Apply button to see your desired search or simply select the enter key.
+ Unit of StudyYou can select this button if you want to add a new UoS in the system

Program – Timetables

Main Dashboard > Academics > Program > Program Entry Burger Menu > Timetables

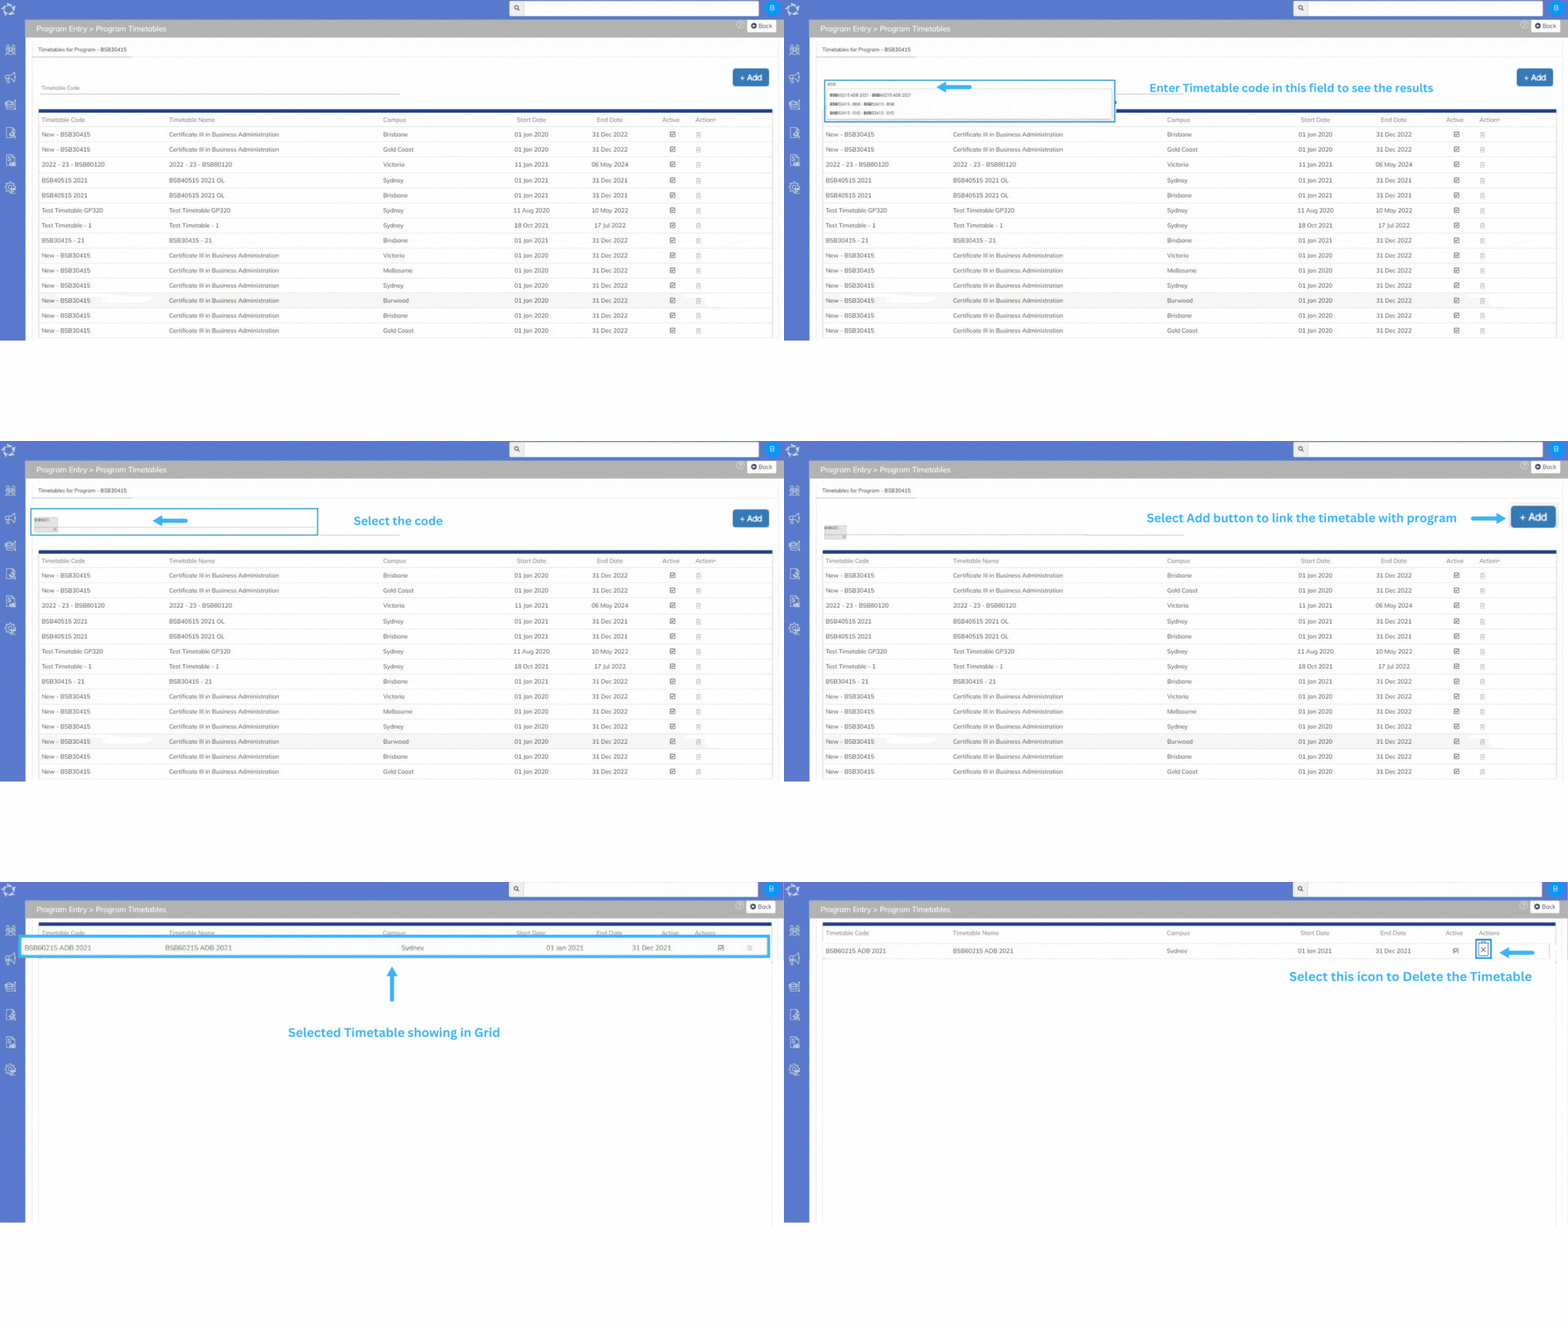
This screen will show you the timetables in the grid that are allocated to the Program. You can add the timetable from the add button or delete the timetable for the delete icon under the actions column.

To link the timetable to a program, you need to type in the timetable code in the magic search field and once you type in the first three initials of the timetable code or name, it will show you suggestions to select the timetable.

When you select the desired timetable from the suggestions, you then need to select the +Add button and once you hit the add button, the selected timetable will get linked to a program as shown below:

Subject – Document

Subjects > Subjects Entry Burger Menu > Documents

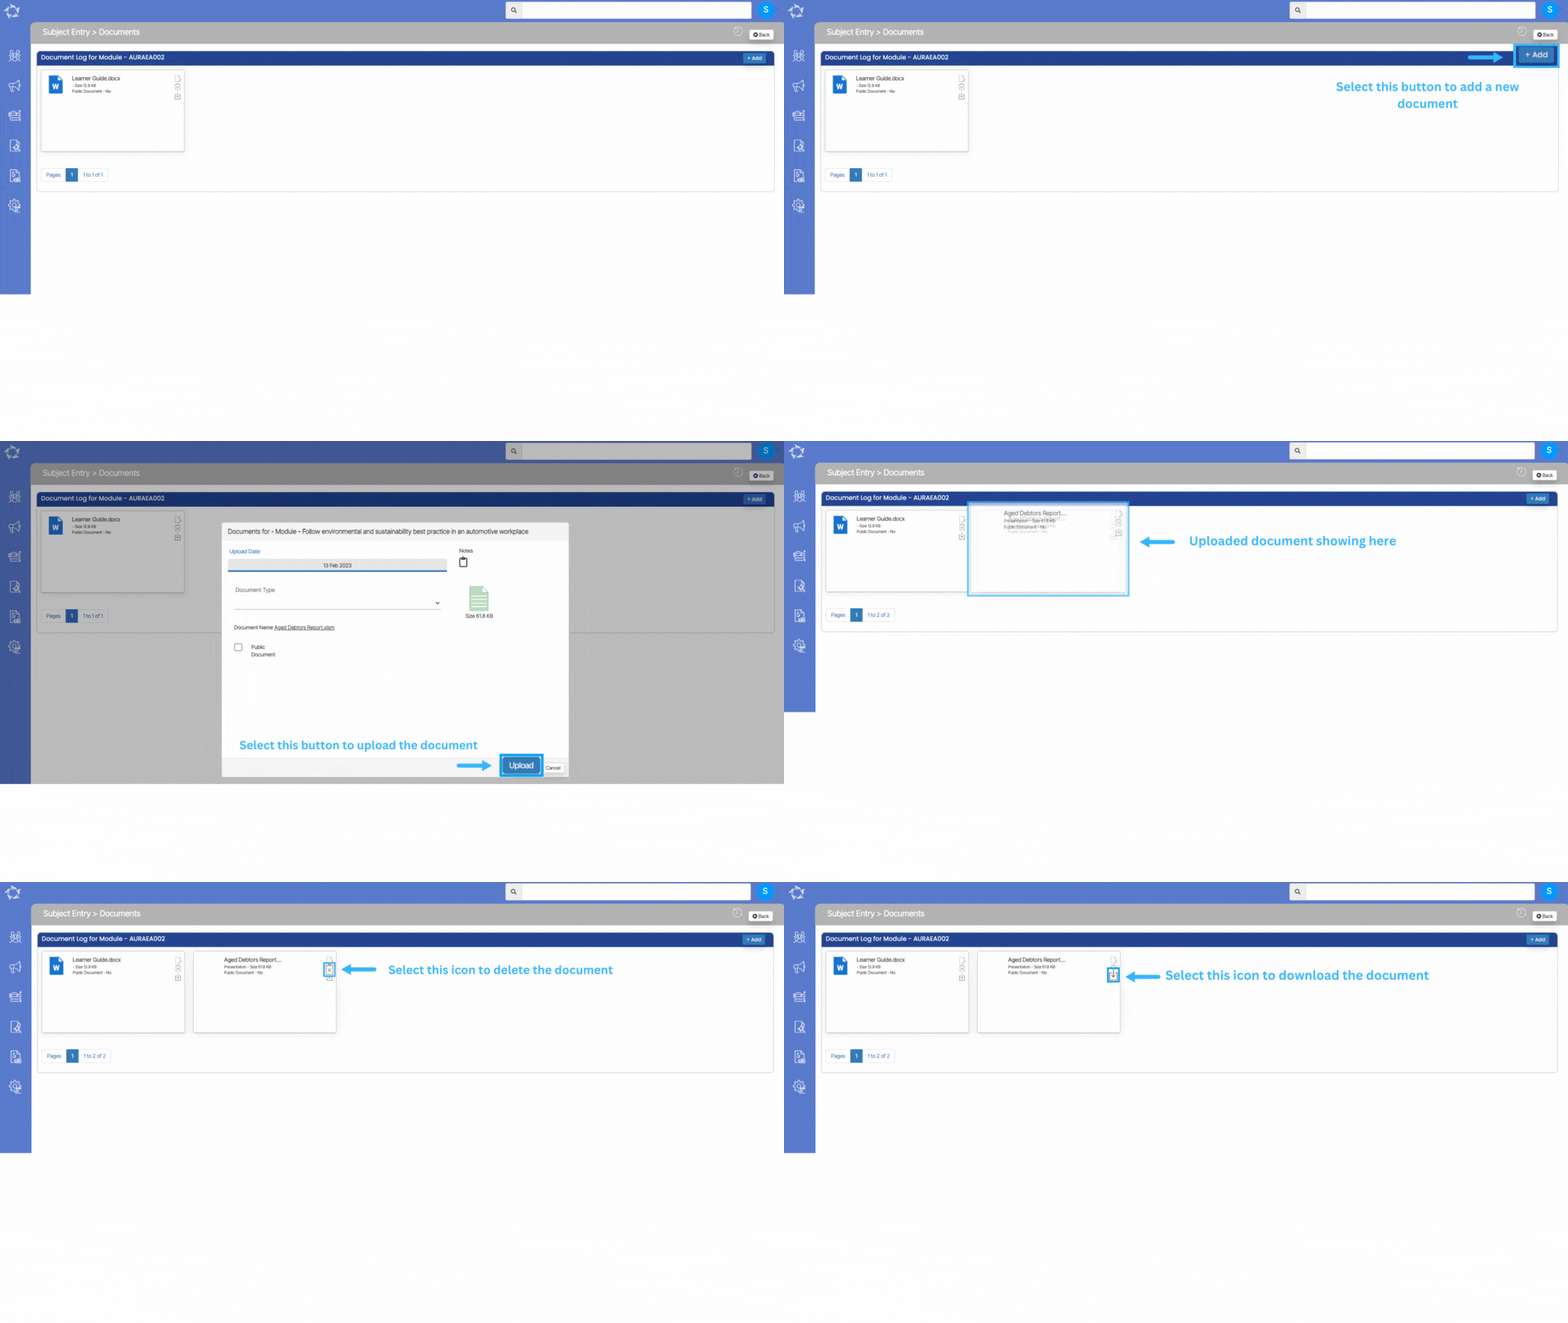
When you select the documents option, you will taken to the subject document scree. You will see documents in the grid that are already linked with the Subjects. You can add documents for the subject by selecting the +Add button.

When to select the +Add button, a popup window will appear where you can select the document from your local system to upload save.

Explanation of the fields below:

FieldsExplanation
Upload DateThis will show you today’s days which will be auto populated.
NotesYou can write notes for your own reference by selecting the notes icon.
DocumentsTick this box if you want to make the document public on the student portal.

Campus – Documents

Campus > Edit Campus > Campus Entry Burger Menu > Documents

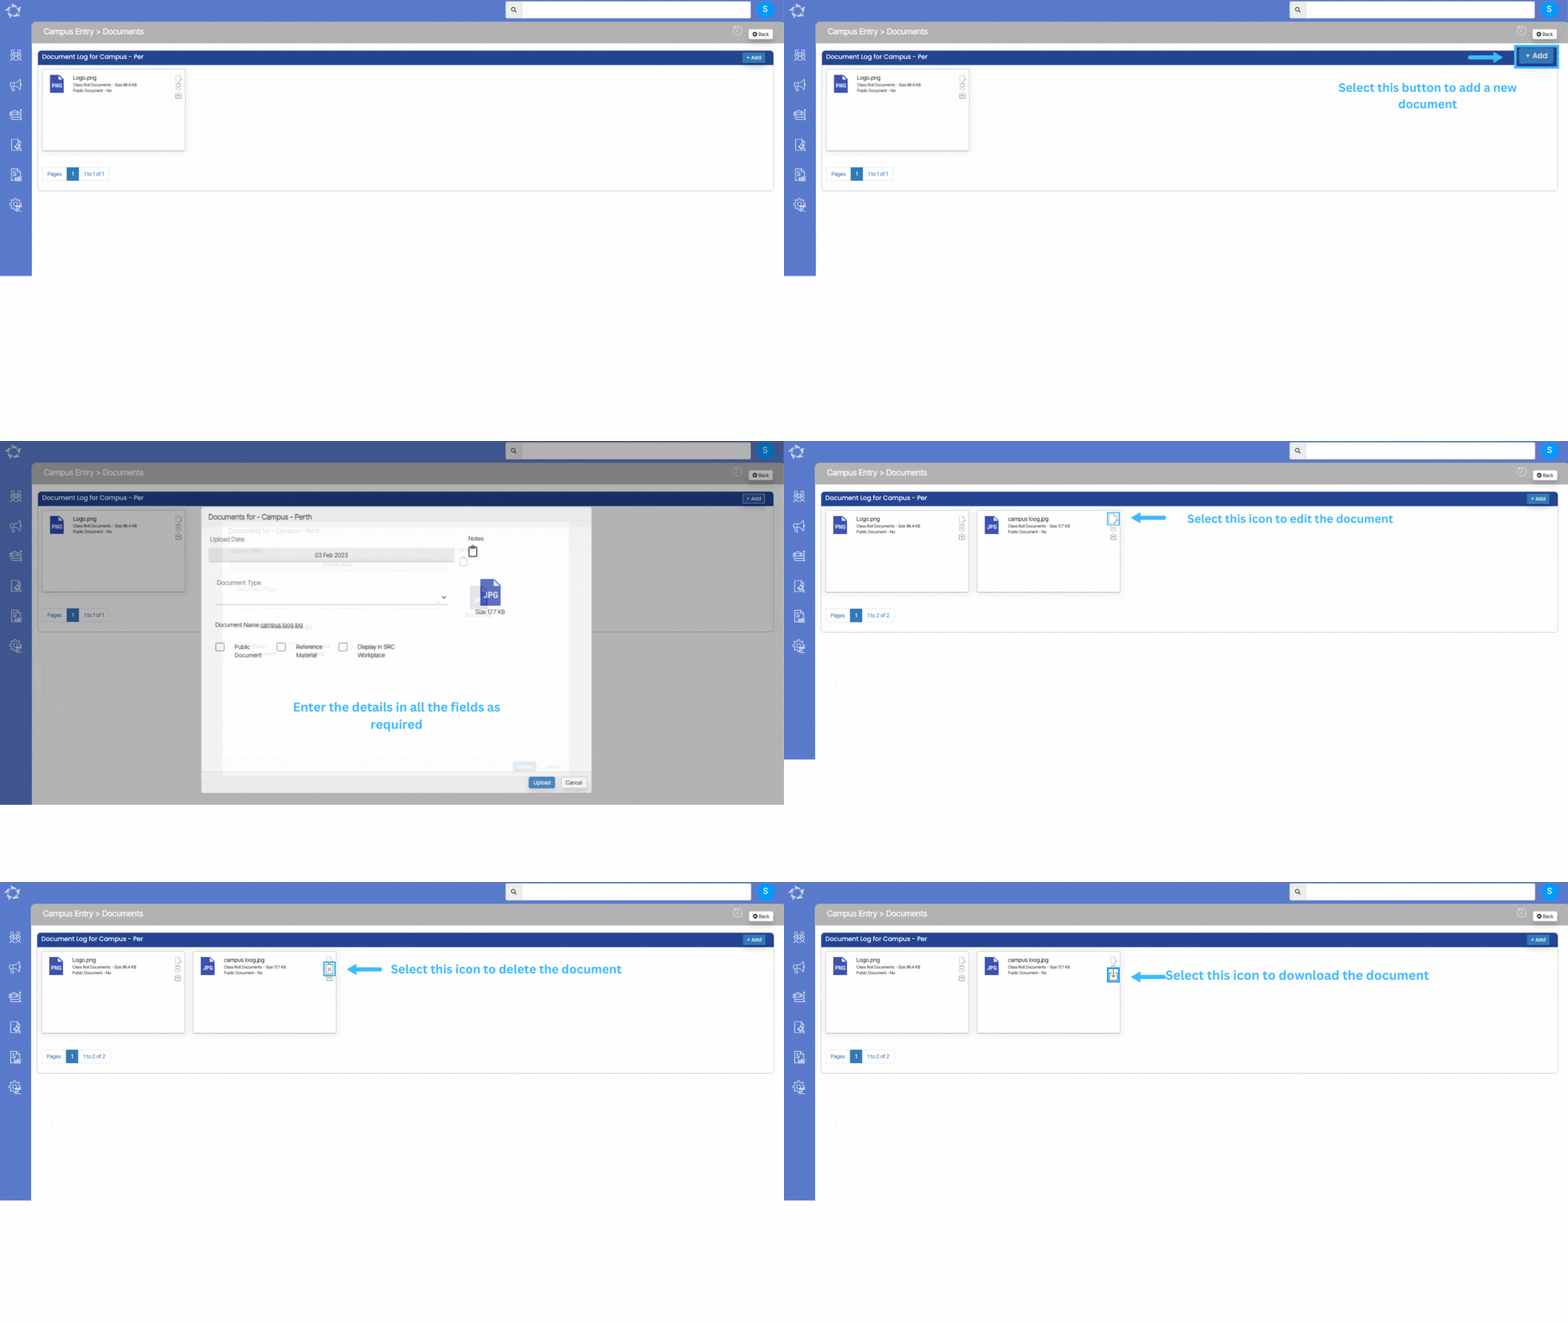
When you select the documents option from the burger menu, a document screen will open where you can add documents for the campus by selecting the +Add button.

Upon selecting the +Add button, a popup window will open on the screen from where you can select the document which you want to upload for the campus.

Explanation of the fields

FieldsExplanations
Upload DateIt will be today’s date and will get auto-populated in the field
NotesYou can write any notes for your own reference.
Document TypeThis is a user code in TEAMS and based on the User Code created in TEAMS, you can select the document type.
Document NameIt will show the name of the document which you have selected.
Public DocumentTick this box if you want to make the document public.
Reference MaterialIf the document is for reference then you can tick this box. Also, you can write the title of the material.
Display in SRC WorkplaceTick this box if you want to display the document in SRC Workplace.

Program – Documents

Program Entry Burger Menu > Documents

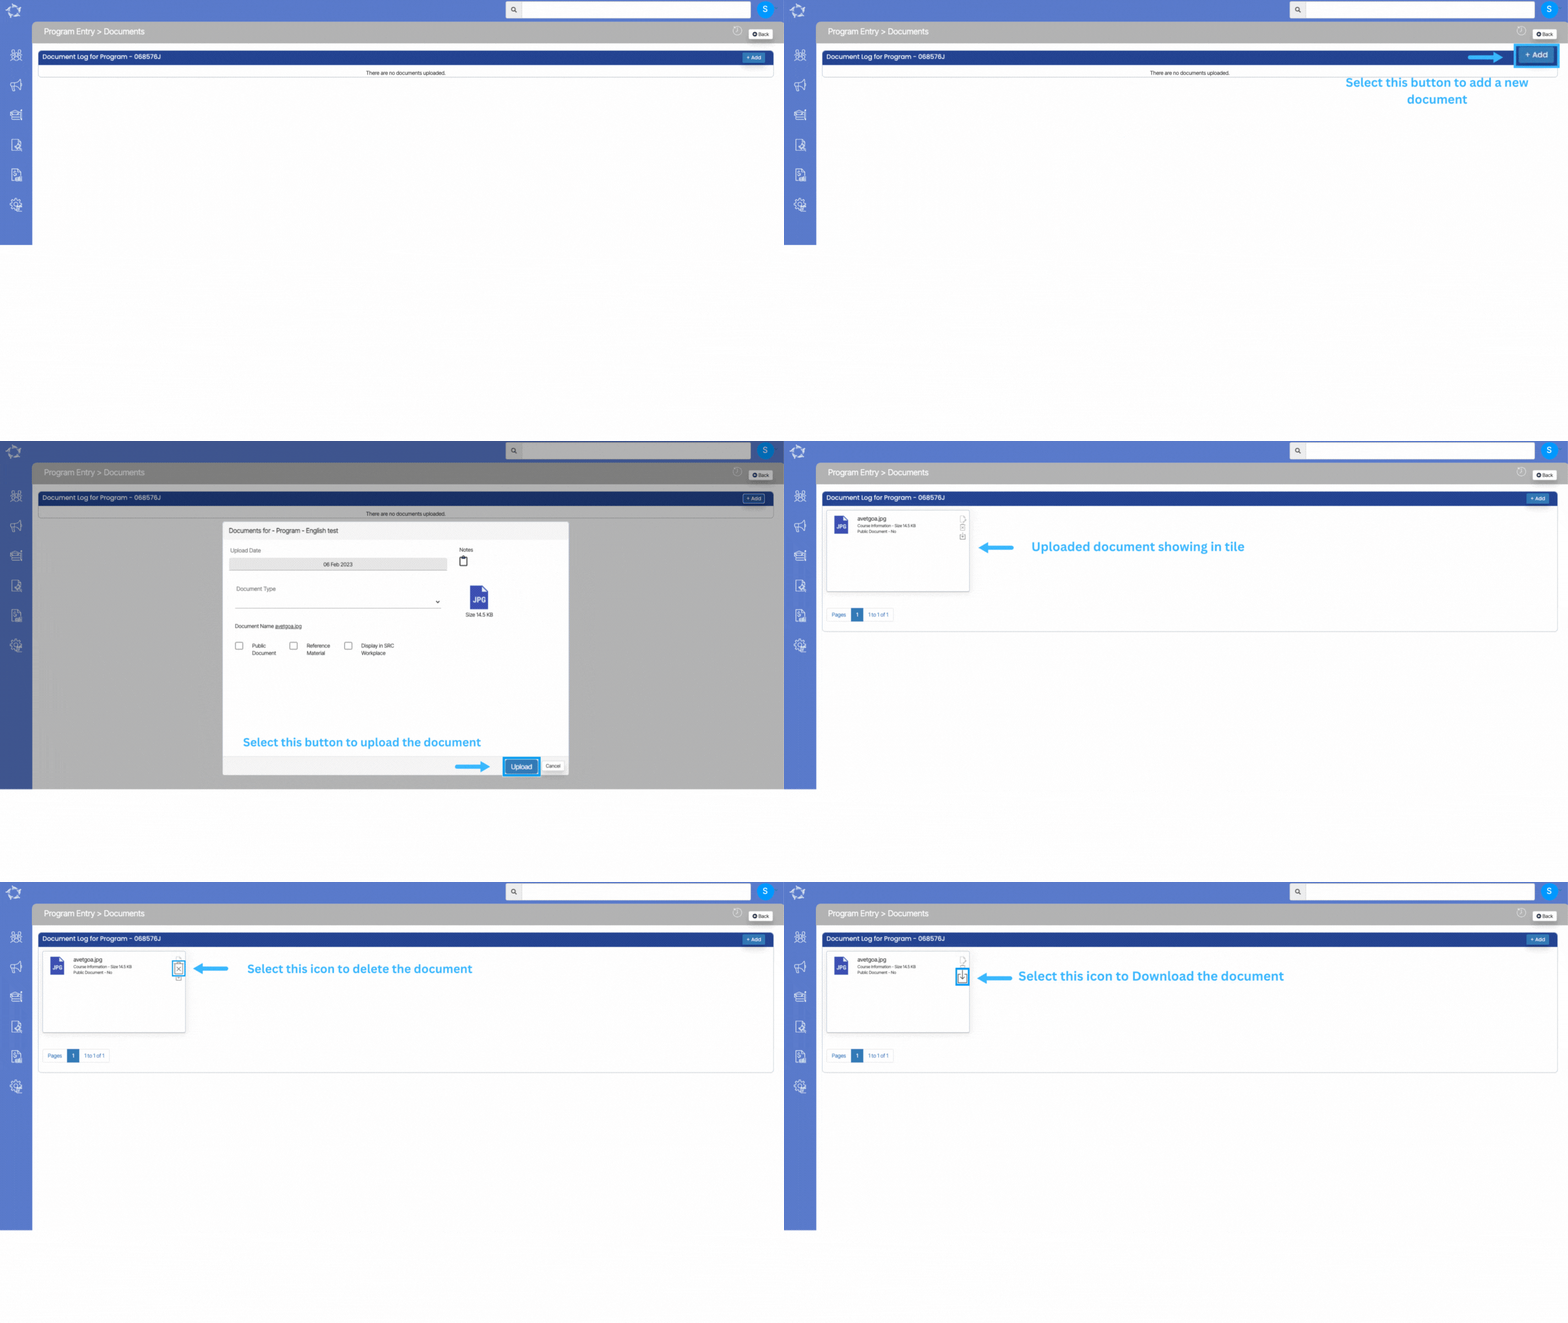
When you select the Documents option, you will be taken to the Program Entry > Documents screen. If you have already uploaded documents for the program, it will show you in the grid.

You can also +Add documents by selecting the Add button in the right hand corner of the screen.

Explanation of the fields below:

FieldsExplantations
Upload DateThis will show the date, the day you upload the document
NotesYou can write notes for your own reference by selecting the notes icon.
Document TypeThis is a user code in TEAMS and based on the user, you ca
Document NameIt will show the name of the document which you have selected.
Public DocumentSelect this box if you want to make the document public on the student portal.
Reference MaterialSelect this box if the document is for reference. Also, add the reference title.
Display in SRC WorkplaceTick this box if you want to display the document in SRC Workplace.