Account Manager

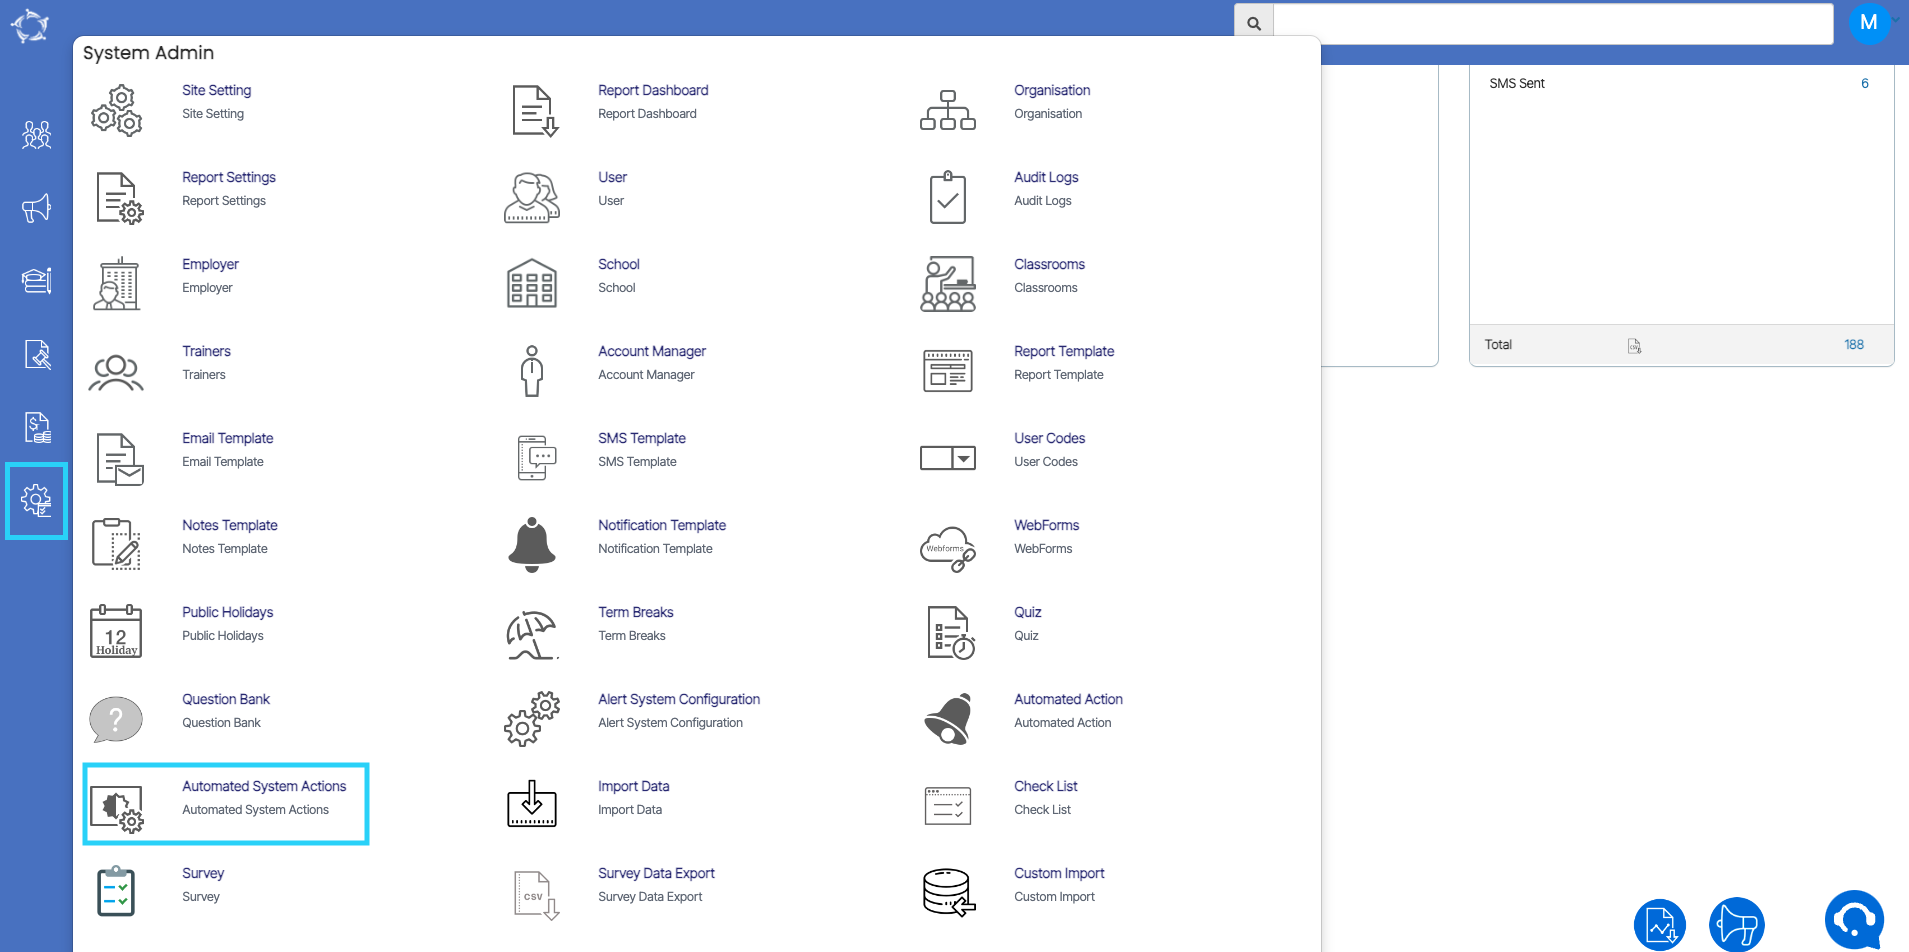
Main Dashboard > System Admin > Account Manager

history of changes

Overview

An account Manager typically refers to a professional who is responsible for managing relationships with accounts within your educational institution or organization. Their primary role is to serve the institution, ensuring that their needs are met and that they receive excellent service.

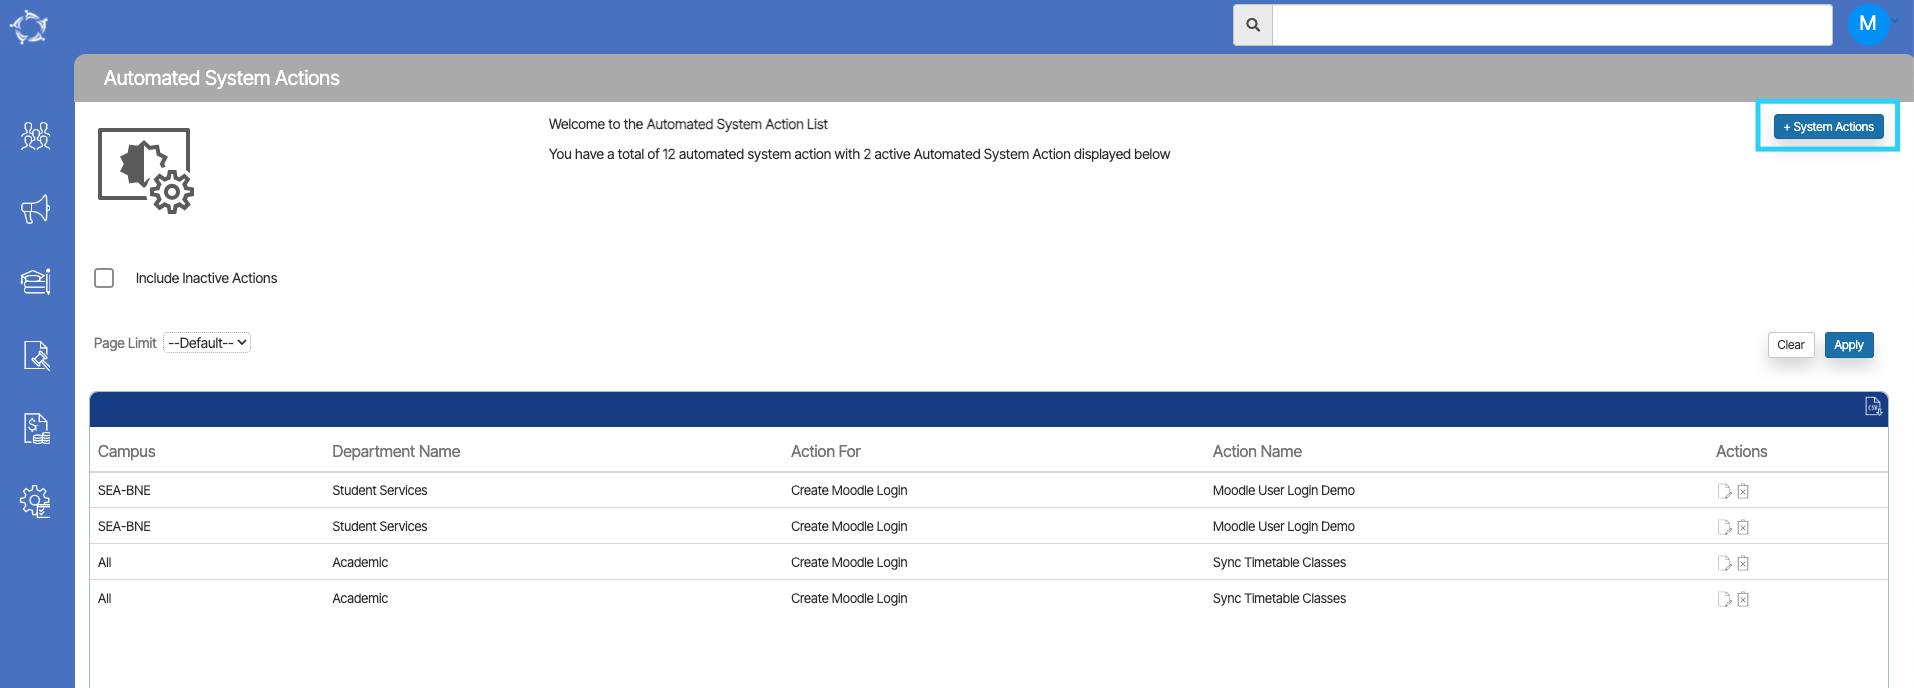
The Account Manager Welcome screen will show you the welcome message (the total number of active account managers with total active account managers) The screen shows you the list of Account Managers in the grid that are Active in your system.

This screen is divided into two sections:

  • Filters/Parameters
  • Listing Grid

Filters/Parameters

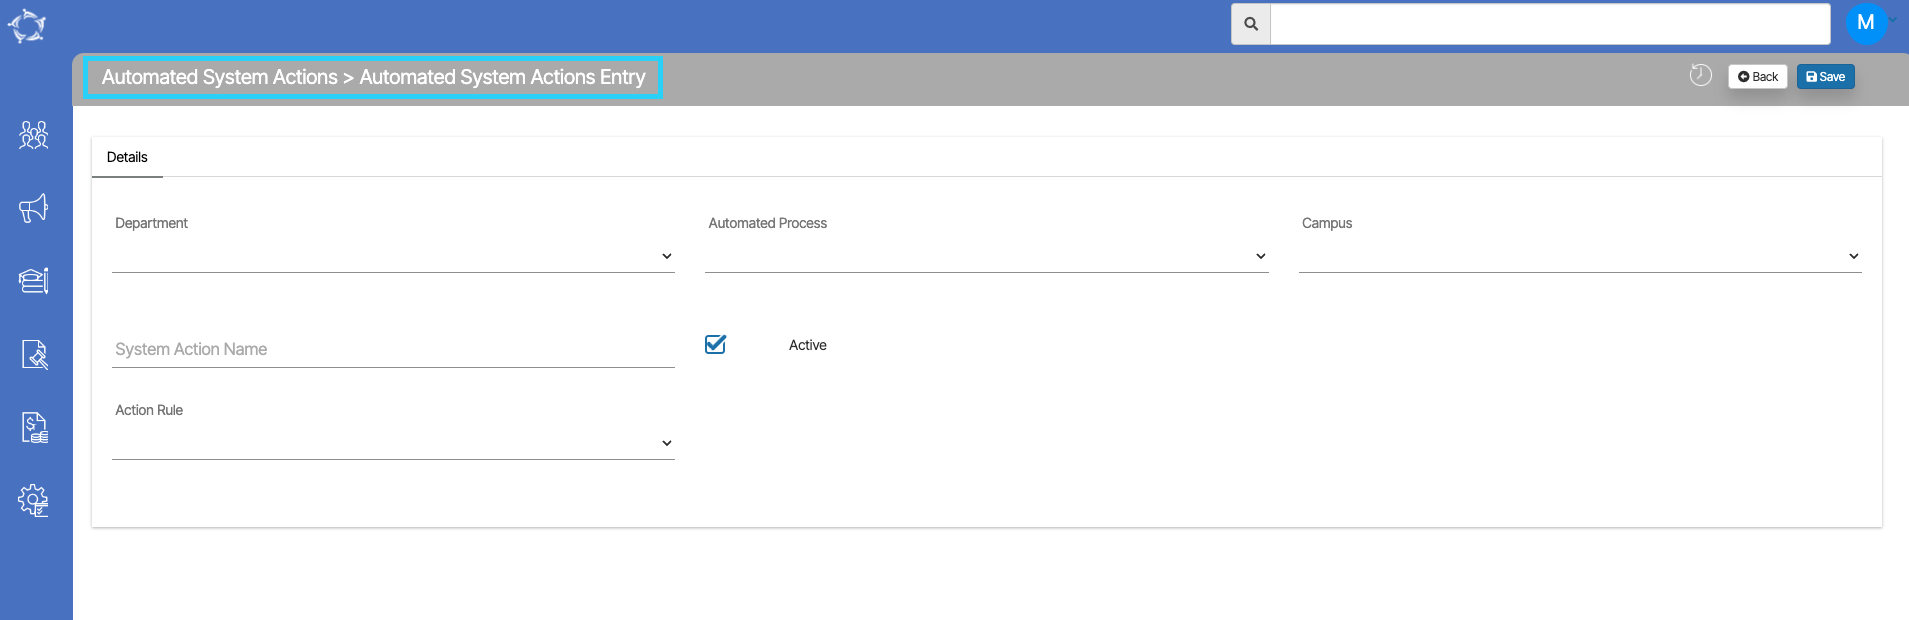
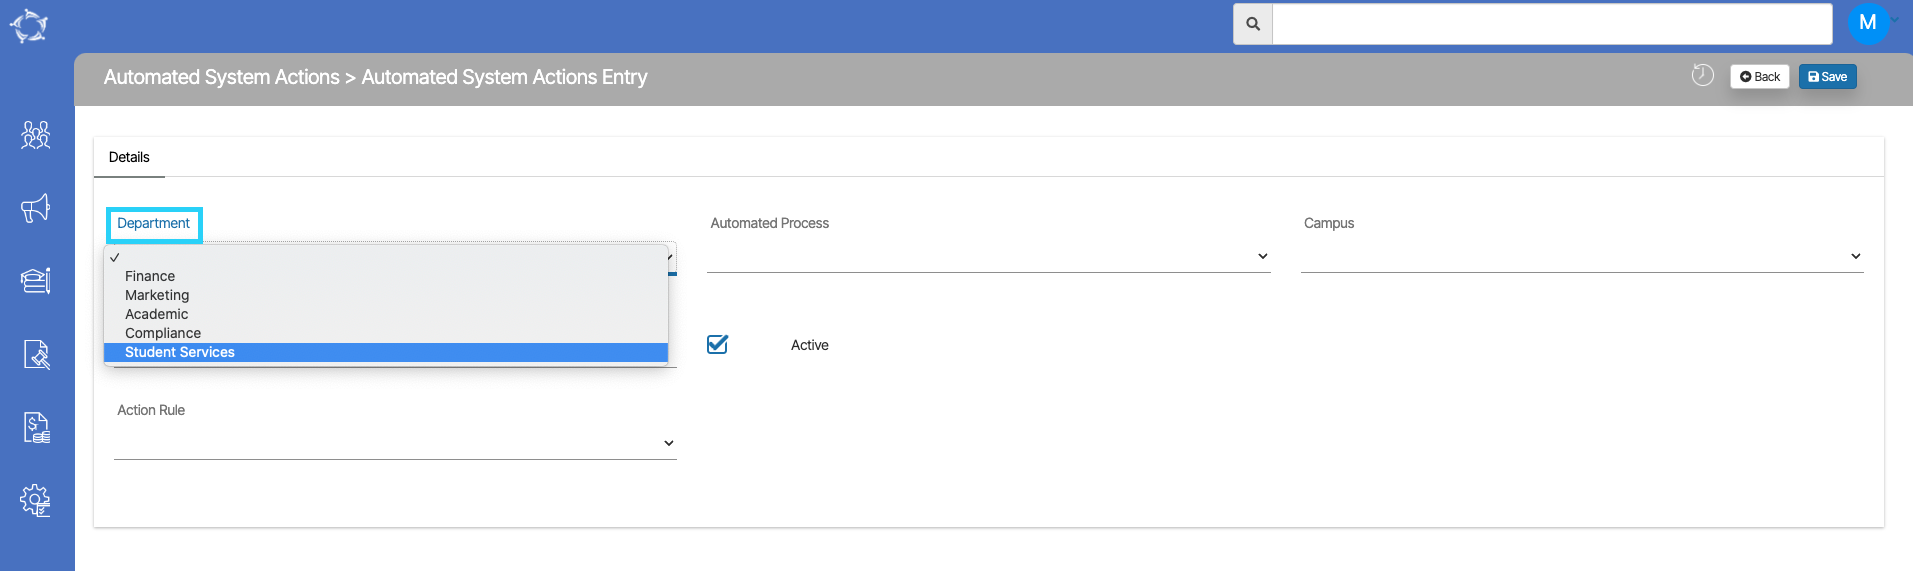
The filters will show you different fields where you can select the data as per your need then select the Apply button and based on your selection the system will load the list of Account Managers in the grid. You can also see the Total count and the Active count of the Account Managers. You can select the +Account Manager button to add a new Account Manager to the system.

Listing Grid

In this grid, you can see the list of all Account Managers. You will see columns such as Account Manager Code, Account Manager Name, Campus, Total enrolments, Total Applications (Pending/Cold), Total agents, Active and Actions. All of the columns are self-explanatory.

Select here to know more about the Burger Menu

Select here to know more about the Action Column

Employer

Main Dashboard > System Admin menu > Employer

The Employer screen displays a grid showing all the employers that have been created in the system. You can search for a specific employer by name or code, campus, marketing source, or account manager, and then select apply button to view the relevant results.

Additionally, there is an option to add a new employer by selecting the “+Employer” button. This functionality allows users to easily manage and search for existing employers, as well as add new employers to the system.

Public Holidays

Main Dashboard > System Admin menu > Public Holidays

history of changes

The Public Holidays screen provides you with a comprehensive view of all the existing public holidays on your TEAMS site. It is displayed in a grid format, highlighting the relevant details of each holiday. In order to add new public holidays, you can locate the Add button situated at the top right corner of the screen.

Within this screen, you will find icons for editing and deleting holidays. The edit icon allows you to modify the details of a specific holiday, such as changing the name or date. By clicking on the delete icon, you can permanently remove a holiday from the system. These icons provide convenient options for managing and maintaining an up-to-date list of public holidays.

Below is the explanation of the fields

FieldsExplanation
Holiday NameEnter the desired name for the Holiday Name field.
Holiday DatePlease select the date for the holiday.
NationalWhen you select the radio button as a National holiday, it will display National in the State column on the holidays screen
StateWhen you select the radio button for State, the system will show you a dropdown next to the State radio button and you can select states manually by selecting the tick boxes. Once you select and save, you will be able to see those selected states in the grid on the public holidays screen.
SaveSelect the “Save” button to add the holiday.
CancelUse the “Cancel” button to abort the process of adding a holiday.

Term Breaks

Main Dashboard > System Admin menu > Term Breaks

The Term Breaks screen allows you to manage and view information about term breaks. On this screen, there is a grid that displays the existing term breaks. Each term break is represented by a row in the grid.

To find specific term breaks, you can search by the name of the term break, the start and end dates of the break, and also filter by campus if applicable. Once the desired search criteria are entered, you can select the Apply button to filter the term break. This will update the grid to display only the term breaks that match the specified search criteria.

On the top right corner of the screen, Add button. By selecting this button, a popup window will appear. This popup window provides a set of fields where you can enter information to create a new term break.

Once all the necessary information is entered into the popup form, you can save the new term break by selecting the save button within the popup window. This action will add the new term break to the existing list in the grid on the Term Breaks screen.

Alert System Configuration

Main Dashboard > System Admin > Alert System Configuration

This screen allows you to configure the initiation and conclusion times for sending emails and SMS through TEAMS. Additionally, you have the option to establish particular days for the system to send reminders or alerts.

FieldsExplanations
Email Sending AtStart Time – Specify the commencement time for enabling the sending of emails to agents, students, and users for all alerts and actions.

End Time – Input the conclusion time until which you desire all alerts and actions to have the capability to send emails to agents, students, and users.
SMS Sending AtStart Time – Specify the commencement time for enabling all alerts and actions to send SMS to agents, students, and users.

End Time – Input the conclusion time until which you desire all alerts and actions to have the capability to send SMS to agents, students, and users.
Send Alerts on WeekdaysYou have the option to choose the days (Monday to Sunday) for sending both Emails and SMS.

Additionally, you can choose to enable the Send Alerts on Public Holidays checkbox if you want alerts to be sent on public holidays.

How to setup Fee Reminder actions and alerts in TEAMS

Overview

Fee Reminders are generally sent to students on a regular basis depending upon their Invoice due date. Some colleges send only overdue reminders to the students and some also send upcoming invoices.

Note: To set up actions and alerts, please contact the support team as it also has to be activated from the backend to work.

From the Main Dashboard, you need to select the System Admin Menu and then select the Automated Action sub menu.

This will open the Automated Action Welcome Screen. To create fee reminder alerts for upcoming and overdue invoices, select the +Automated Action button on the top right corner of the screen.

IMPORTANT – Please make sure that you have done the setup on the Alert System Configuration screen for sending emails and SMS.

Also, the Business Rule of the reminders is that, it will be sent to Started and Current Students only.

Steps to setup Fee Reminder Actions and Alerts

NOTE – Please note that the dropdown on this is user code and one can create them from the User Code Screen in the System.

Upon selecting the Automated Action button it will open the Automated Action Entry screen.

  • Select the Finance option from the Department dropdown.
  • Once you have selected the finance department, the system will load the Action Type dropdown. Based on the action type created in TEAMS, it will appear under the dropdown. for example – The Overdue Fees option has been selected.
  • After selecting the action types, select the campus for which you wish to create the alert. If you have multiple campuses and you wish to create this alert for all the campuses then you can select the All option.
  • Enter the name of the Action in the Action Name field. After that select the Action Rule from the drop-down. If you have selected Overdue Fees in the action type then in the action rule it will show No of days Overdue.
  • If you have selected the No of Days Overdue in the Action Rule then you need to enter the number value in the number of days overdue field to send reminders to the students after their Invoice due date has passed. For example, if you set it to 6, the system will send reminders to the invoices whose due date was 6 days ago. So if the current date is 12 June 2023, the system will generate alerts and send reminders for the invoice due date of 06 June 2023.
  • When you select the Send Email to dropdown, you will see different options (User, Student, Agent etc). Select the student option from here. Once you select the send email to, the Email Template dropdown will appear.

NOTE: The dropdown will show all the enrolment level email templates. The template will be visible as the tick boxes. Select the tick box against the template and hit the save button to save the action.

  • In the same manner, you can send reminder SMS as well. Select the enrolment in the Send SMS to dropdown and select the SMS Template you want to use to send reminders. Save the action and you are ready to go.

New change in Term-Breaks

Dashboard>System Admin>Term breaks

Overview

Earlier for Term Breaks, there was a limitation to select only 1 campus. With this new change, you can select multiple campuses when applying the Term Breaks.

Click on the Term Breaks Icon from the System Admin tile.

You can select multiple campuses from the dropdown as shown below.

Select and click on Save.

Moodle Actions and Alerts

Overview

What is Moodle?

Moodle is a learning platform designed to provide educators, administrators and learners with a single robust, secure and integrated system to create personalized learning environments.

How to setup Moodle actions and alerts in TEAMS?

In TEAMS, we are mapping 3 processes:

  • Moodle Login creation of new user – TEAMS will create a username and password for students to log in to Moodle.
  • Enrolling Students into Subjects – For each subject in an enrolment, Moodle will create a course for students. e.g. 10 Subject -> 10 Courses will be created by Moodle. (Course is another word for the subject in the Moodle)
  • Updating final results from Moodle to TEAMS – In this section, Results competent, and not yet competent are updated in TEAMS from Moodle.

How To Setup Moodle Actions:

  • From the Main Dashboard, you need to go to the System Admin menu > Automated System Actions.
  • Now select the +System Actions Button on the right hand side of the welcome screen.
  • Below is the Automated System Actions Entry screen which appears when you select the +System Actions button. Here you can create actions.

Steps To Create Moodle Actions

  • Select the Department from the drop-down(Now Moodle Action is a part of student service, so you must select the “Student Services” option from the drop-down).
  • Select the Automated Process from the dropdown as we are creating the Moodle Alert, we are selecting the Create Moodle Login option). As an example, we have shown some processes below:
    1. Create Student Portal Login
    2. Create Moodle Login
    3. Create Moodle Course(Subject) Enrolment.
    4. Moodle UnEnrolment
    5. Sync Timetable Classes with Moodle Groups
  • Select the Campus from dropdown.
  • Give the Appropriate System Action Name in the given field.
  • Now select the Action Rule from the dropdown. Here we have two types of Action Rules:
    1. No. of days before Start Date(Enrolment Start Date)
    2. Upon Enrolment Creation
  • If you selected the first type (No. of Days before Start Date) then, you need to enter the number value in the given field.

Now After filling in all the above details, select the save button in the right top corner. It will save the records for current Action. You can see all the saved records on the Automated System Actions Welcome Screen. From there you can edit or delete the records as per the requirements easily.

Steps to Create Moodle Alerts

Moodle Alerts will send SMS and Emails to the students to those who created the Moodle login.

  • From the Main Dashboard, select the System Admin icon and then the Automated Action menu. You will be taken to the Automated Action welcome screen Select the +Automated Action button on the right hand of the screen.
  • Upon selecting the Automated Action Button, you will be presented with the Automated Action Entry screen.
  • From the Department drop-down select Student Services as Moodle Alerts is a part of student service.
  • Select the Action Type from the drop-down. Here, you can select different types of Moodle actions based on actions you have created in TEAMS.
  • Select the Campus from the dropdown.
  • Give the proper Action Name for the current Alert. Please note that the Action Name should be written with 50 words as the character limit is set to 50 words.
  • After giving the name, you need to select the Action Rule from the dropdown. Here for the Orientation Action type, only three options are available:
    1. No of days before orientation date
    2. No if days after orientation date
    3. On orientation date
  • On Selection of the Action Rule, a new field On Orientation date appears on the screen. Type in the Orientation date.
  • Now select the option (user or student) from the dropdown to send an Email to. Once you select the send email to, the Email Template field will appear and this field will show you student level email template.
  •  If you are creating the action to send via SMS then you need to select the option (user or student) from the Send SMS to dropdown. Once you select the send SMS to, the SMS Template field will appear and this field will show you student level SMS template.

Once you have completed all the above steps, you need to select the save button on the right top corner of the page. This will save your record, and you can see this record on the Automated Action Welcome Screen. Also, you can edit or delete these entries easily from this screen.

You can also watch the below video to understand the complete process: