Report Dashboard

Main Dashboard > System Admin > Report Dashboard

history of changes

The Report Dashboard is a centralised location where you can access all the reports you have generated. Whenever you generate a report, such as an Excel or Word report, from any relevant screen within the system, the system will redirect you to the report dashboard screen, where you can view and access all the generated reports.

A novel addition to the system is the introduction of a process icon, which effectively indicates the ongoing processing of the report. This dynamic icon persists until the report generation is complete. Subsequently, you are presented with a download icon for the generated report.

The report dashboard typically displays a list of all the reports generated by you along with relevant details such as the report name, report template name, and date and time of creation. You can also filter and search for specific reports, as well as sort the list by selecting the user’s name.

Email Template Screen – New Merge Fields

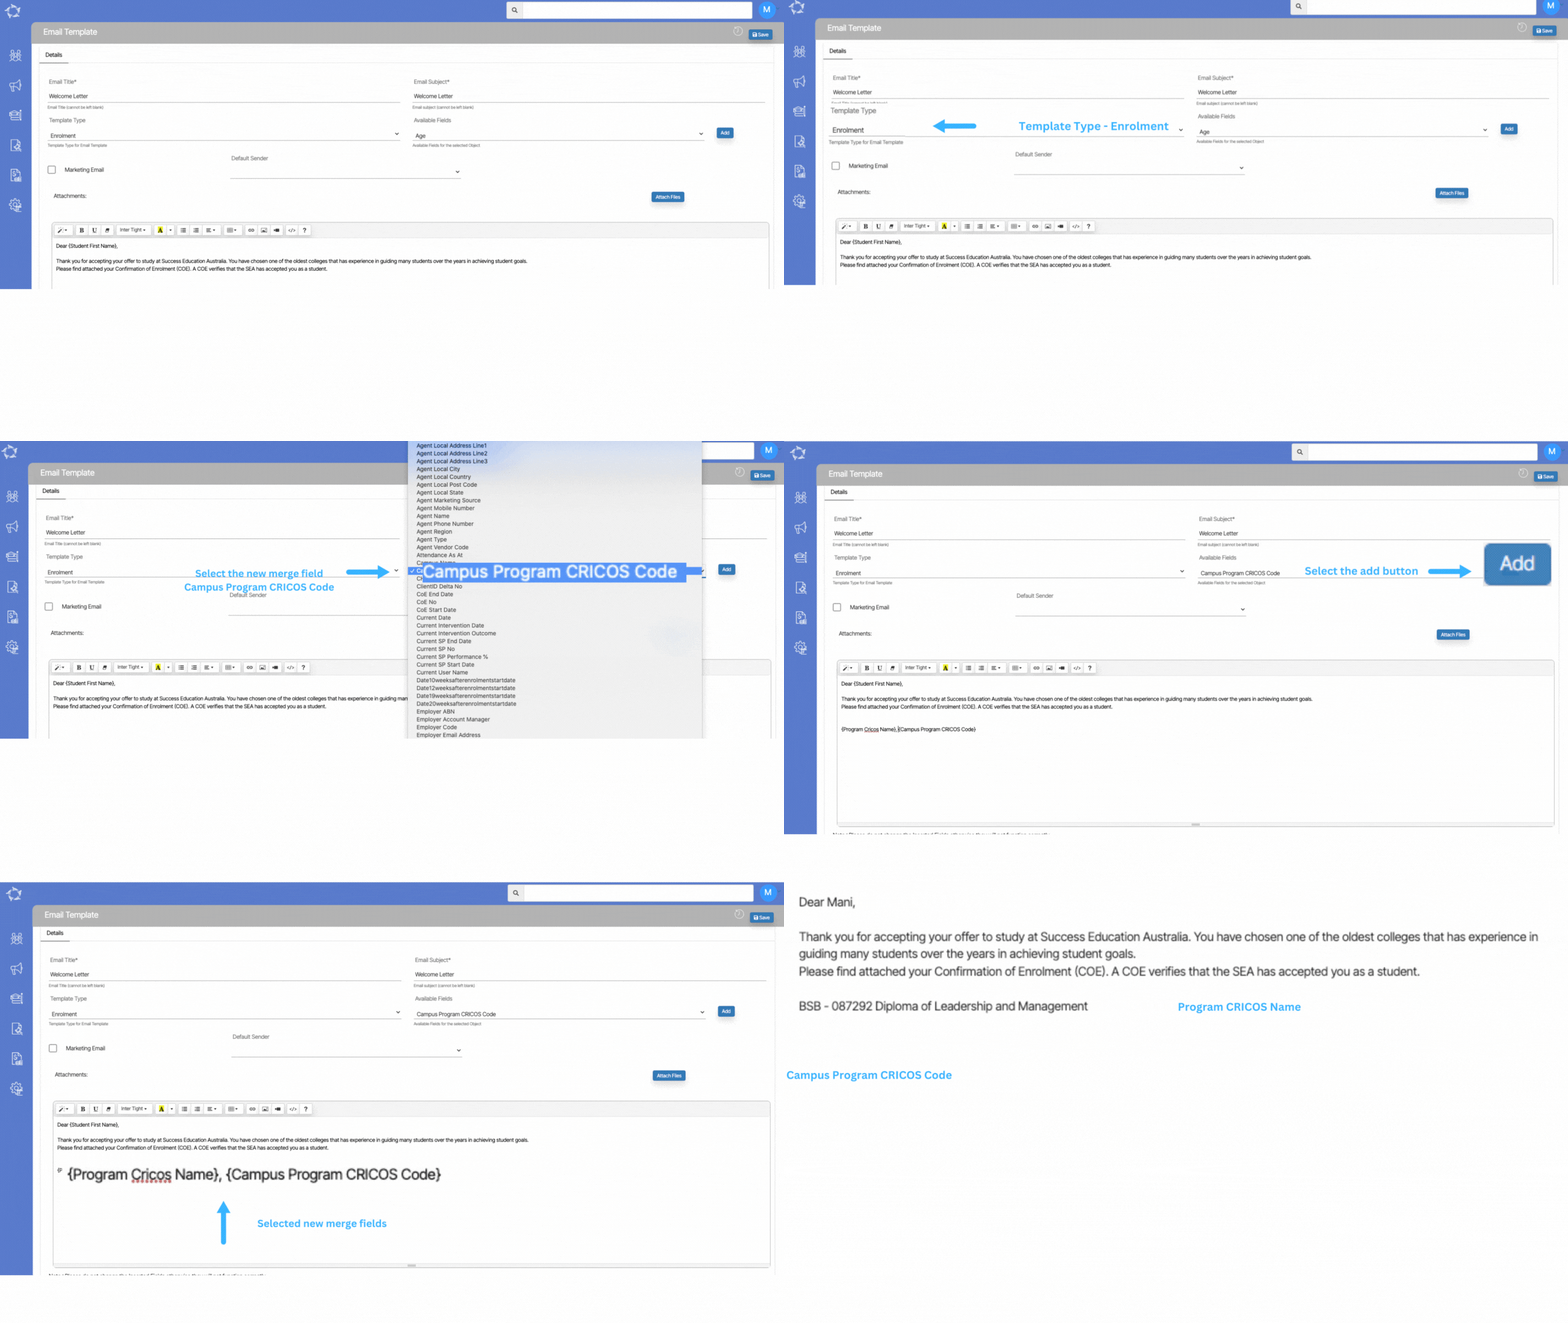
We have added new merge fields for Campus Program CRICOS code and Program CRICOS Name for customising the enrolments Email Template.
When you’re creating an email template for enrolments, you can now use these merge fields to automatically fill in the Program CRICOS code and campus program CRICOS code into the email.
Note – If the CRICOS code for the campus program is not updated on the “Campus > Linked Program” screen and the CRICOS name for the program is not updated on the “Program Entry” screen, then the information will not be printed in the merge fields when sending emails.

System Admin

Main Dashboard > System Admin Menu

When accessing the System Admin section from the main menu, you will be presented with a list of icons that grant you access to various screens associated with the setup and configuration of templates, users, employers, account managers, and other system-level functions. This section is specifically designed to facilitate the management and customisation of the system according to your specific requirements.

By selecting the appropriate icons, you can navigate to the respective screens where you can perform tasks such as creating and modifying templates, managing user accounts and permissions, configuring employer settings, assigning account managers, and leveraging automation features. These icons include:

Notification Template

WebForms

Quiz

Question Bank

Automated Action

Automated System Actions

Trainers Welcome Screen – New Icons and columns

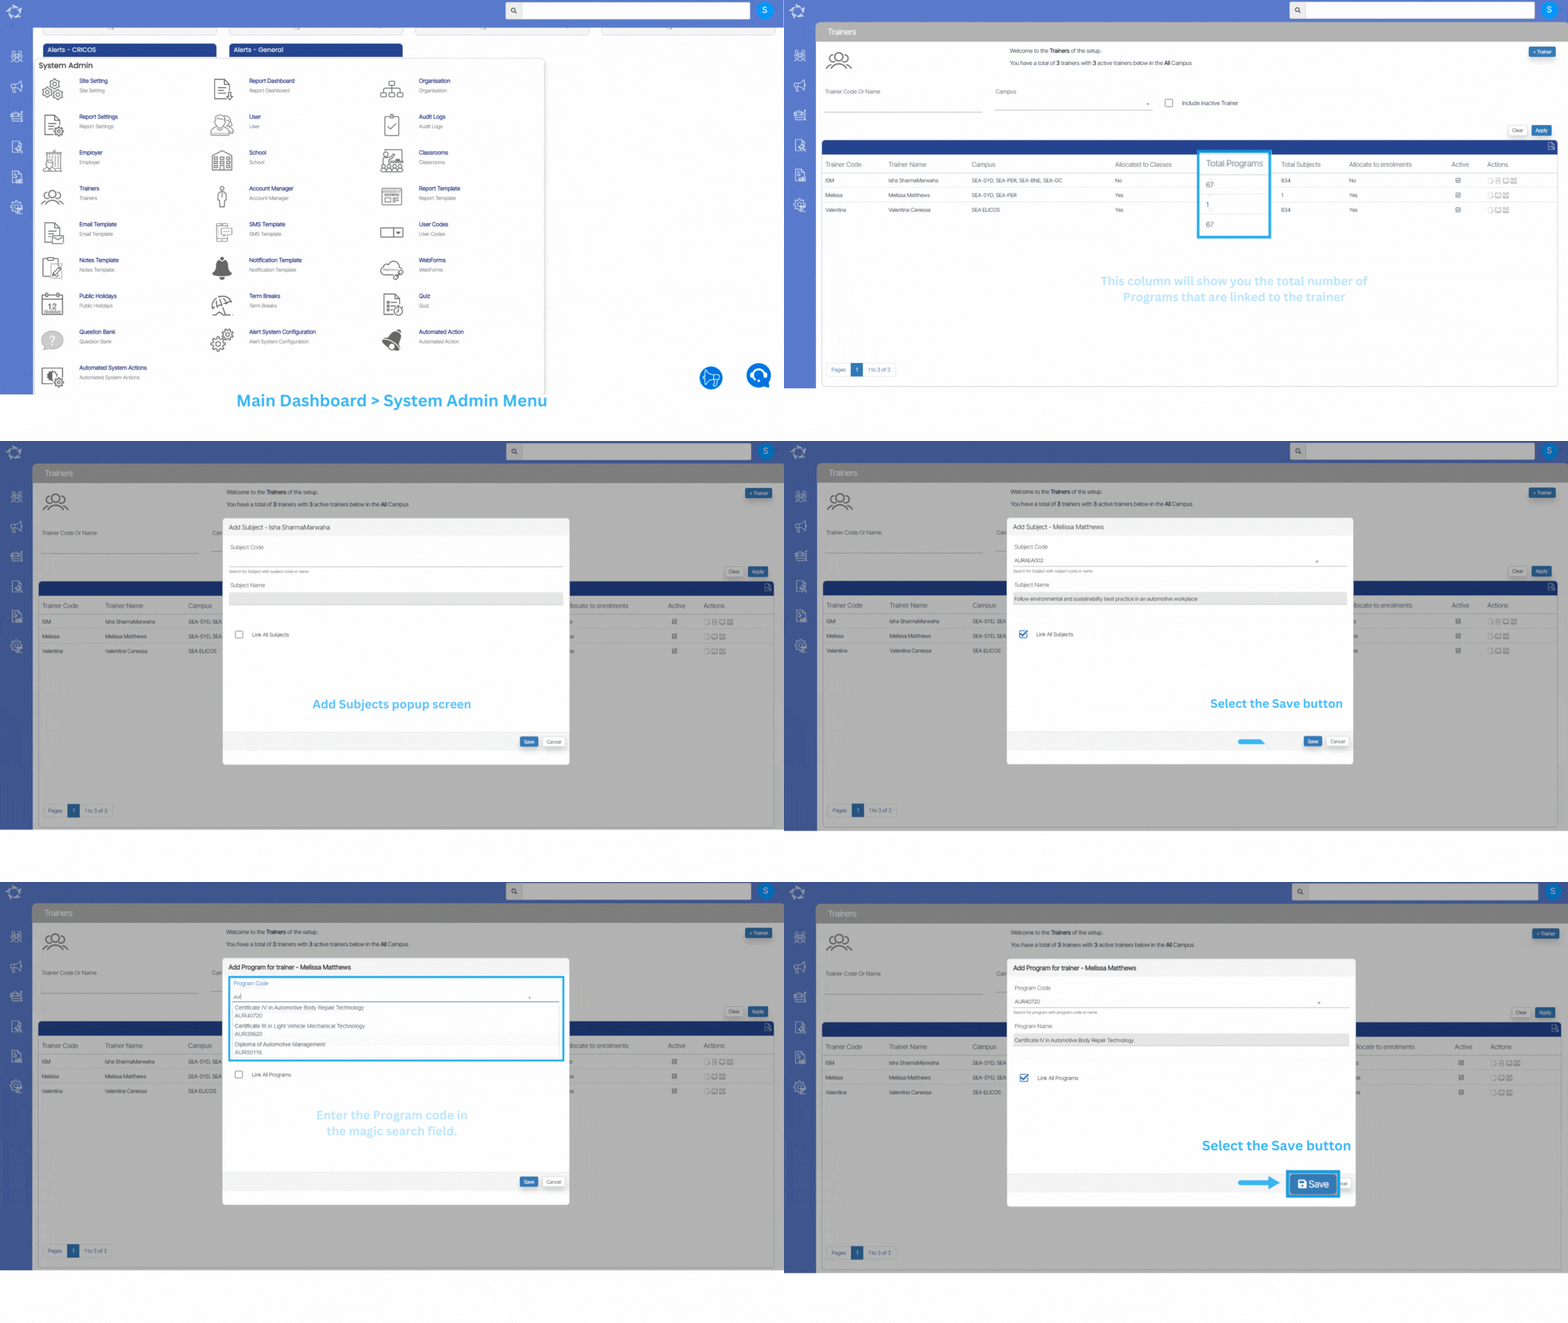
We have added new icons Link Subjects and Link programs under the actions column on the Trainer Welcome Screen. You will also be able to new columns Total Programs and Total Subjects in the grid.

Business Rules:

You will only be able to link programs and subjects to the trainers which are linked to a specific Campus where the trainer is linked to it. Also, on the Timetable entry screen, you will only see those trainers which are linked to the selected campus and program.

Icons work

  • Link Subjects – When you select this icon, it will open the Add subject pop window on the screen. You can simply link the subjects to the trainer by searching the subject code manually or you can select the Link All Subjects tick box to link all the subjects that are active in the system.
  • Link Programs – When you select this icon, it will open the Add Programs for trainer pop window on the screen. You can simply link the Program to the trainer by searching the program code manually or you can select the Link All Programs tick box to link all the Programs that are active in the system.

Columns

  • Total Programs – This column will show you the total number of Programs that are linked to the trainer.
  • Total Subjects – This column will show you the total number of Subjects that are linked to the trainer.

Public Holidays – New Radio Buttons (National or State)

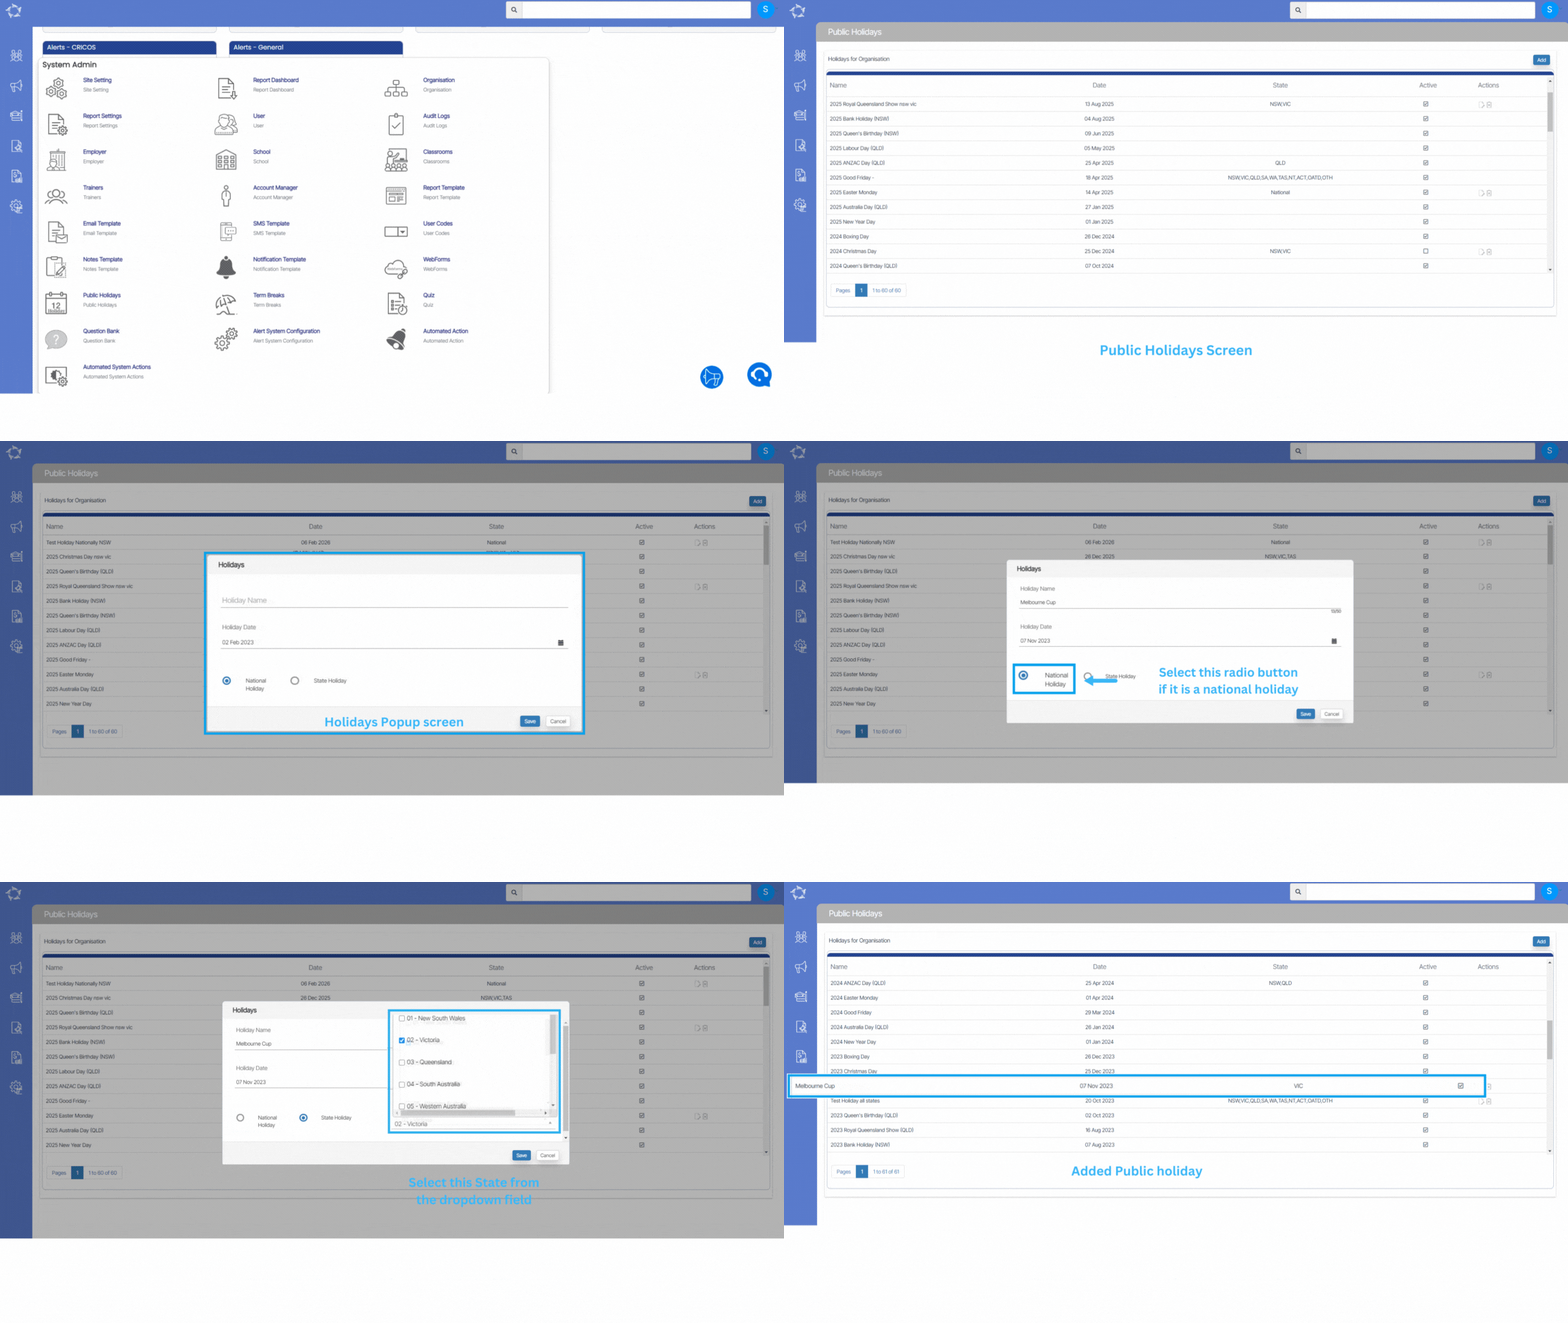
We have added two new radio buttons (National and State) on a Public Holidays Screen in the system. By using these radio buttons, you can manage the National level and State level holidays for your RTO.

State Holidays

  • When you select the radio button for State, the system will show you a dropdown next to the State radio button and you can select states manually by selecting the tick boxes. Once you select and save, you will be able to see those selected states in the grid on the public holidays screen.

National Holidays

  • When you select the radio button as National holiday , it will display National in the State column on the holidays screen.

Webform – Edit Applicant/Student

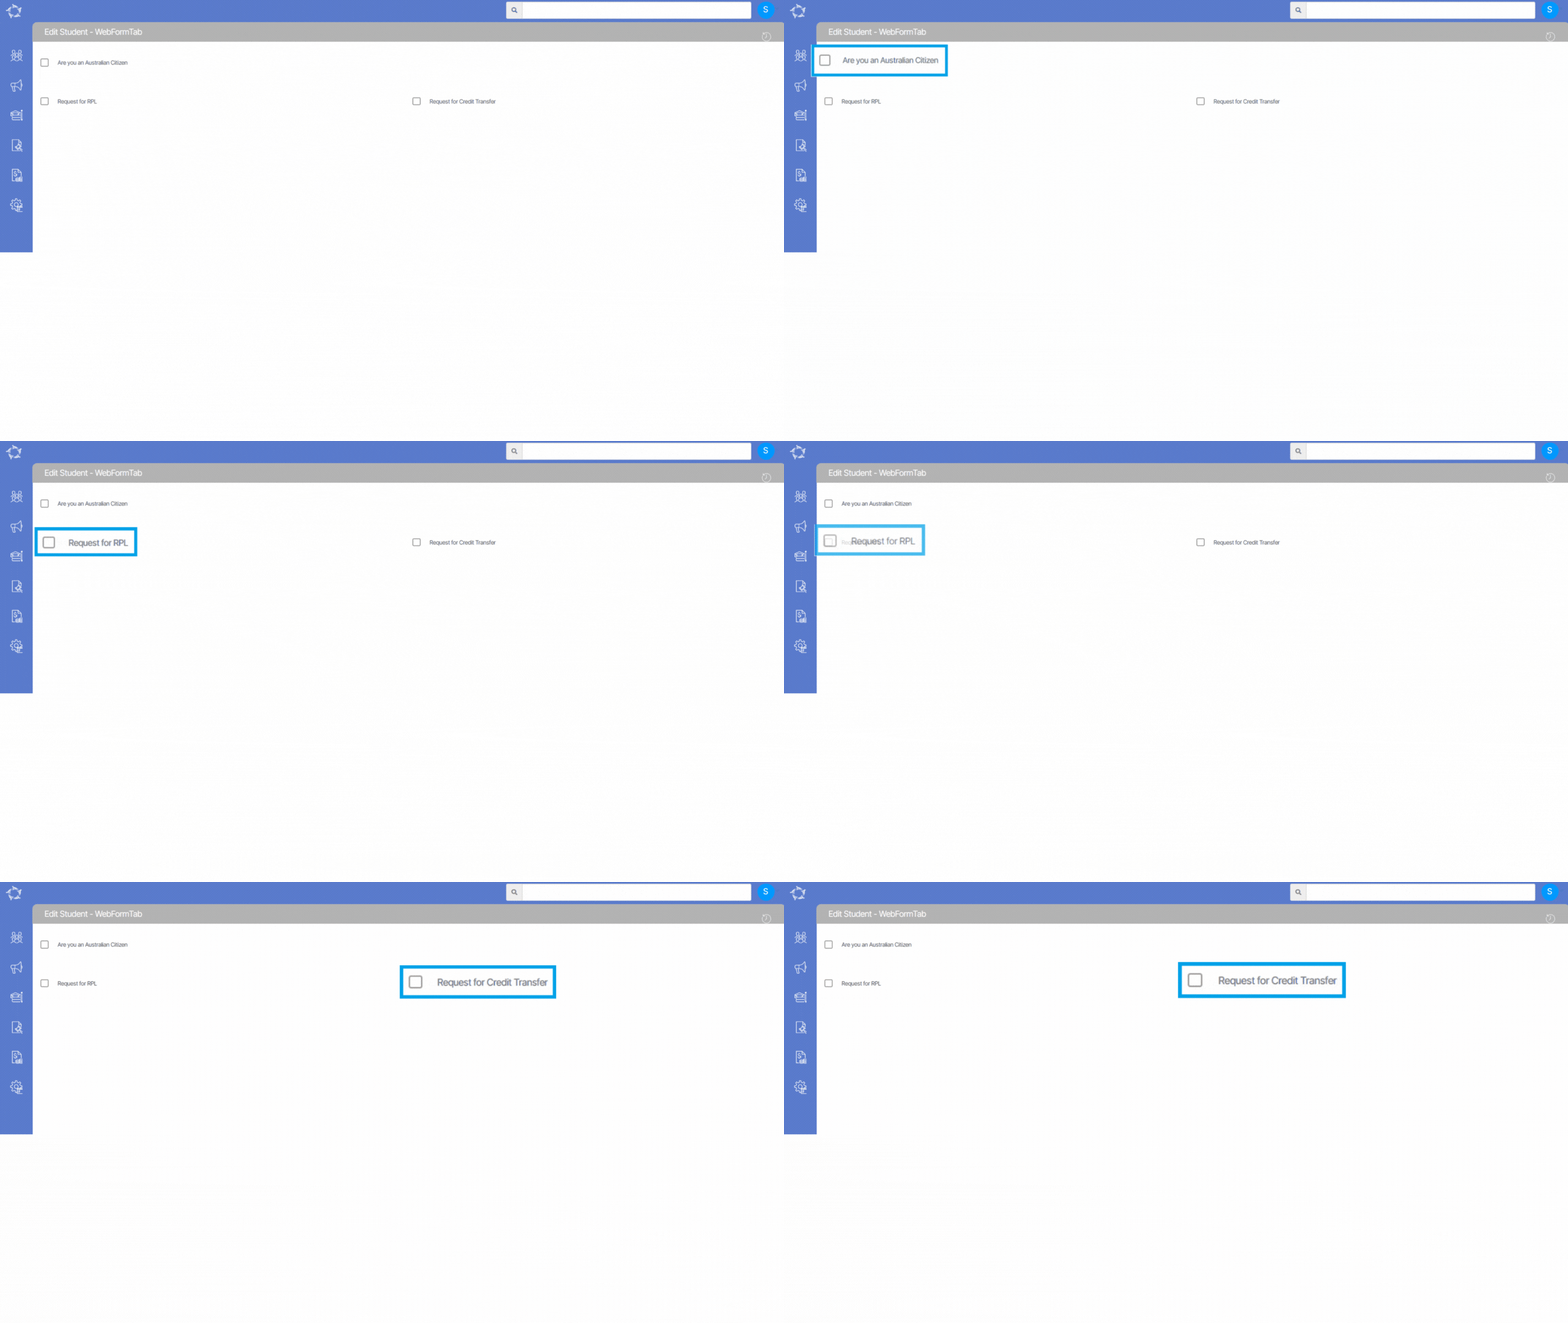
This screen will show you all the fields being displayed in the student web form. If you are using any student webforms on your site, then the icon will show you the summary of all the fields that are selected in the webform on the Applicant and Student profile tiles

How to Unlock a User’s Account

The user’s account will get locked if they have repeatedly added the incorrect password while logging in.

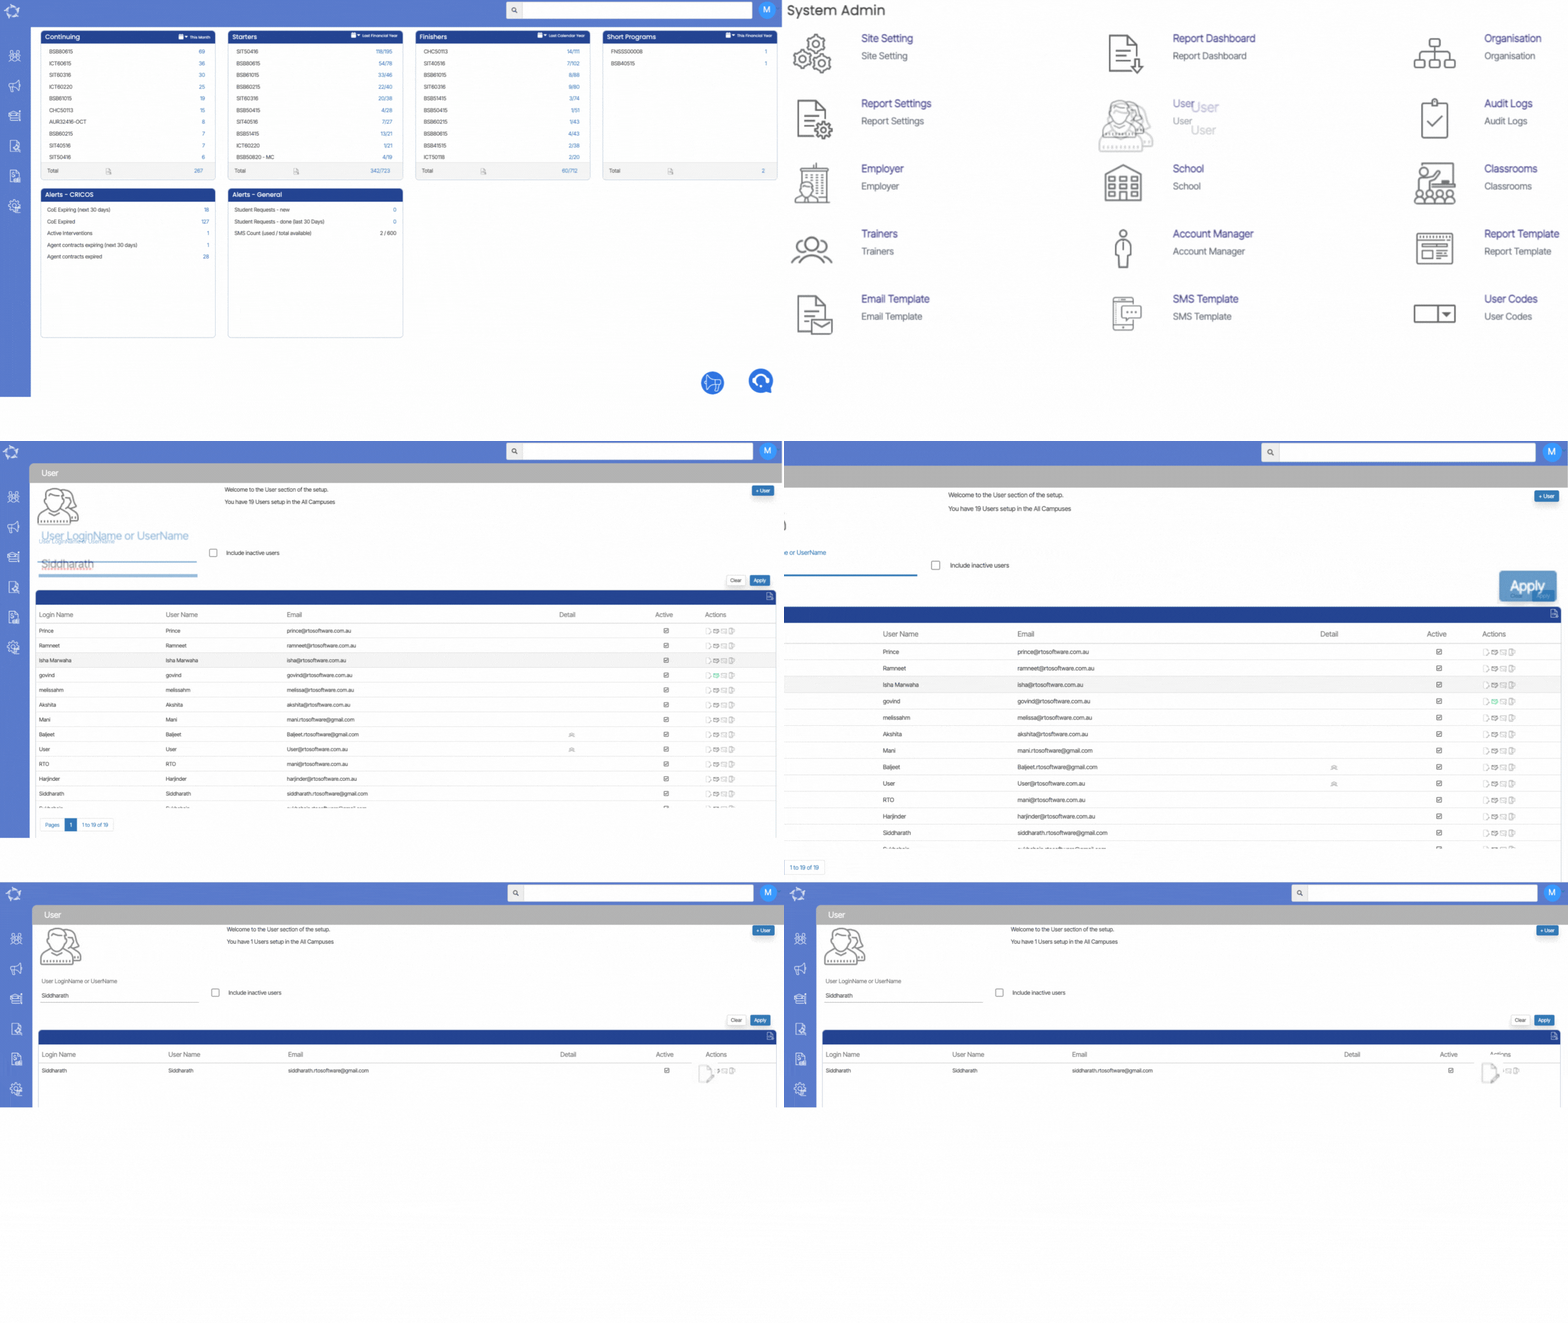
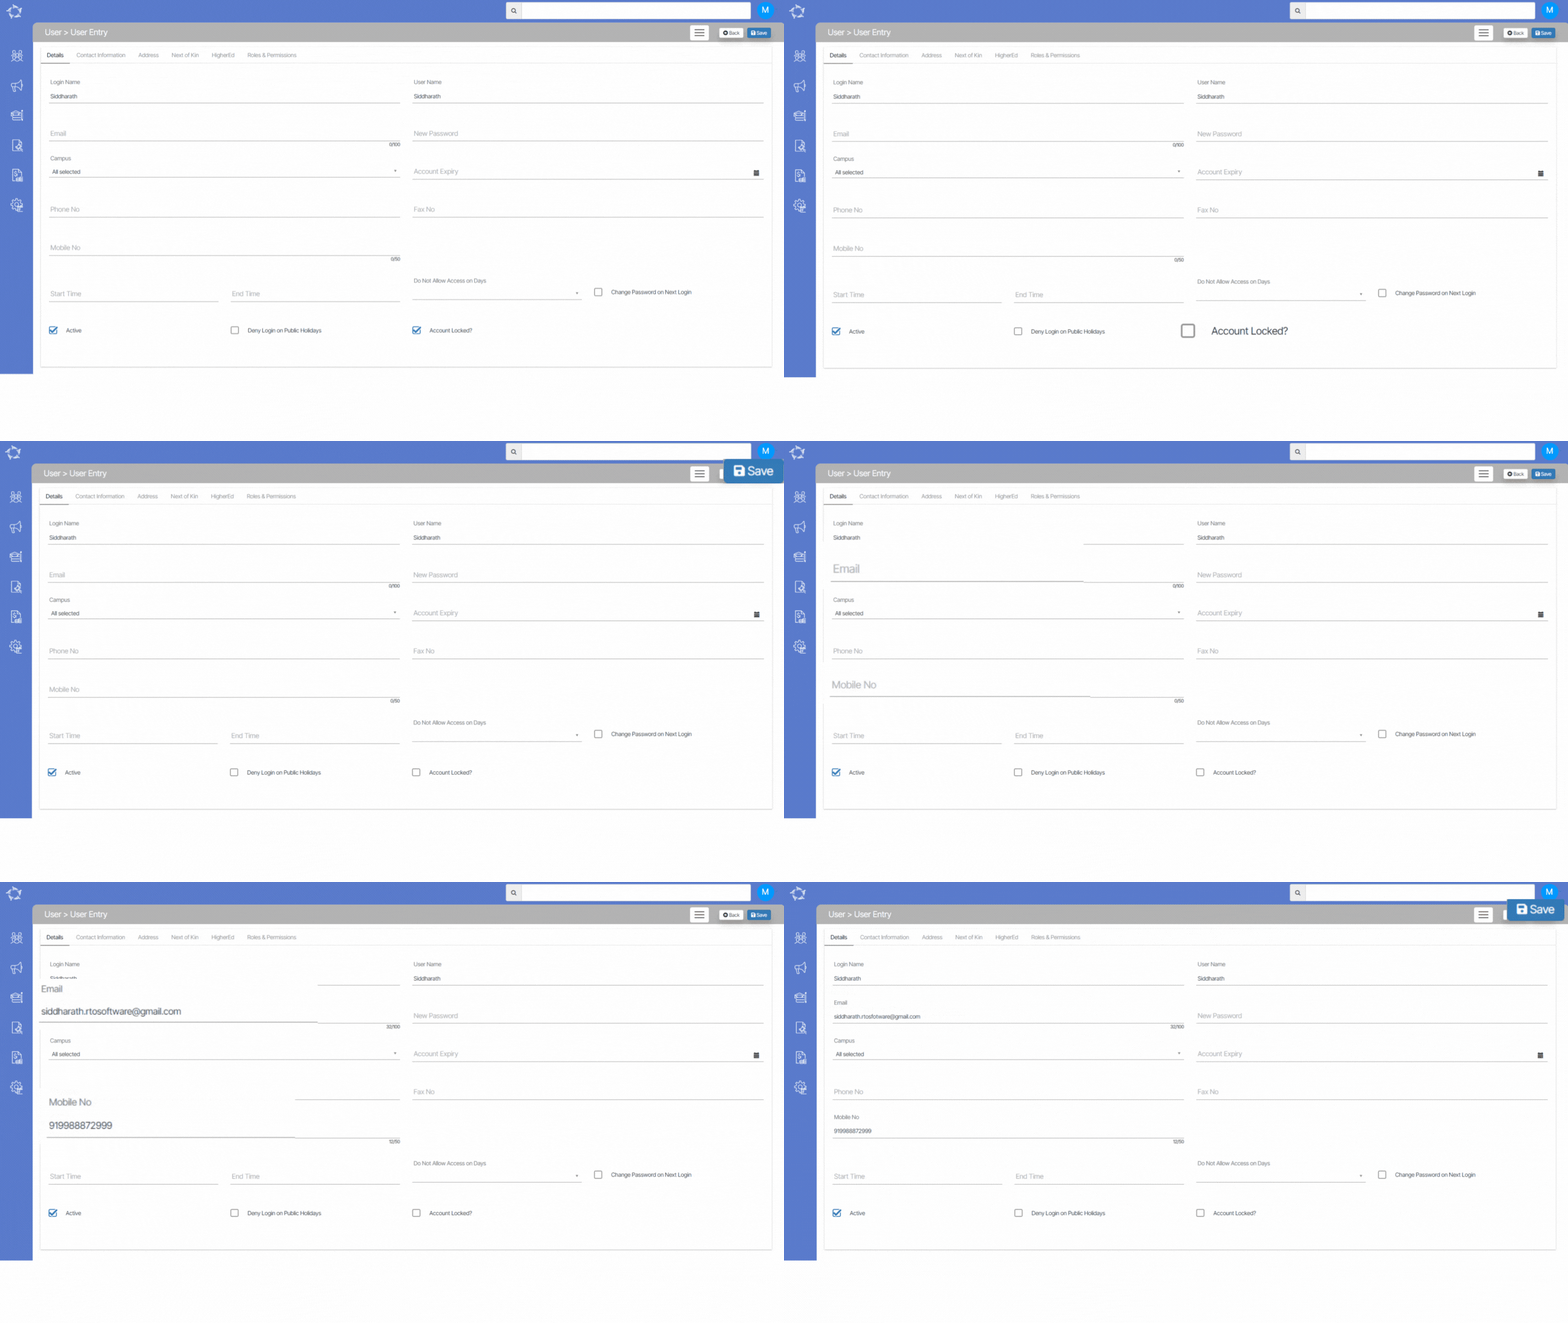
You can unlock the user’s account from the user entry screen (Main Dashboard > System Admin > User) and once you are on the user welcome screen, you need to search for the user by his/her name and then select the Apply button.

The screen will refresh and will show you the user name in the grid and from there you can select the edit button to unlock the user’s account.

Once you select the Edit button, you will lead to the user entry screen where you can see the ‘Account Locked’ check box is selected. You need to Unselect this check box.

IMPORTANT: If the user’s email address and a mobile number have not been updated on the user entry screen, then the system will not allow you to unlock the user’s account and you will not be able to save the screen. It is important to update the email address and mobile number of the user.

Report Template

Main Dashboard > System Admin menu > Report Template

The Report Template screen in TEAMS offers users a valuable tool for generating various types of reports with ease. It serves as a comprehensive guide that enables the customisation of report formats, including essential documents such as offer letters, academic documents, invoices, receipts, and letters of warning. By providing a structured framework, the Report Template screen ensures that information is organised logically and presented in a clear and consistent manner across different reports.

This feature streamlines the report creation process, saving time and effort while maintaining professional standards. Whether it’s crafting official communication or documenting financial transactions, TEAMS’ Report Template screen empowers you to generate high-quality reports efficiently.

Select the below links, which will help you to understand the process of Report Template in TEAMS

How to Customise Report Template in TEAMS

How to Upload Custom Report Template in TEAMS

User Codes

Main Dashboard > System Admin > User Codes

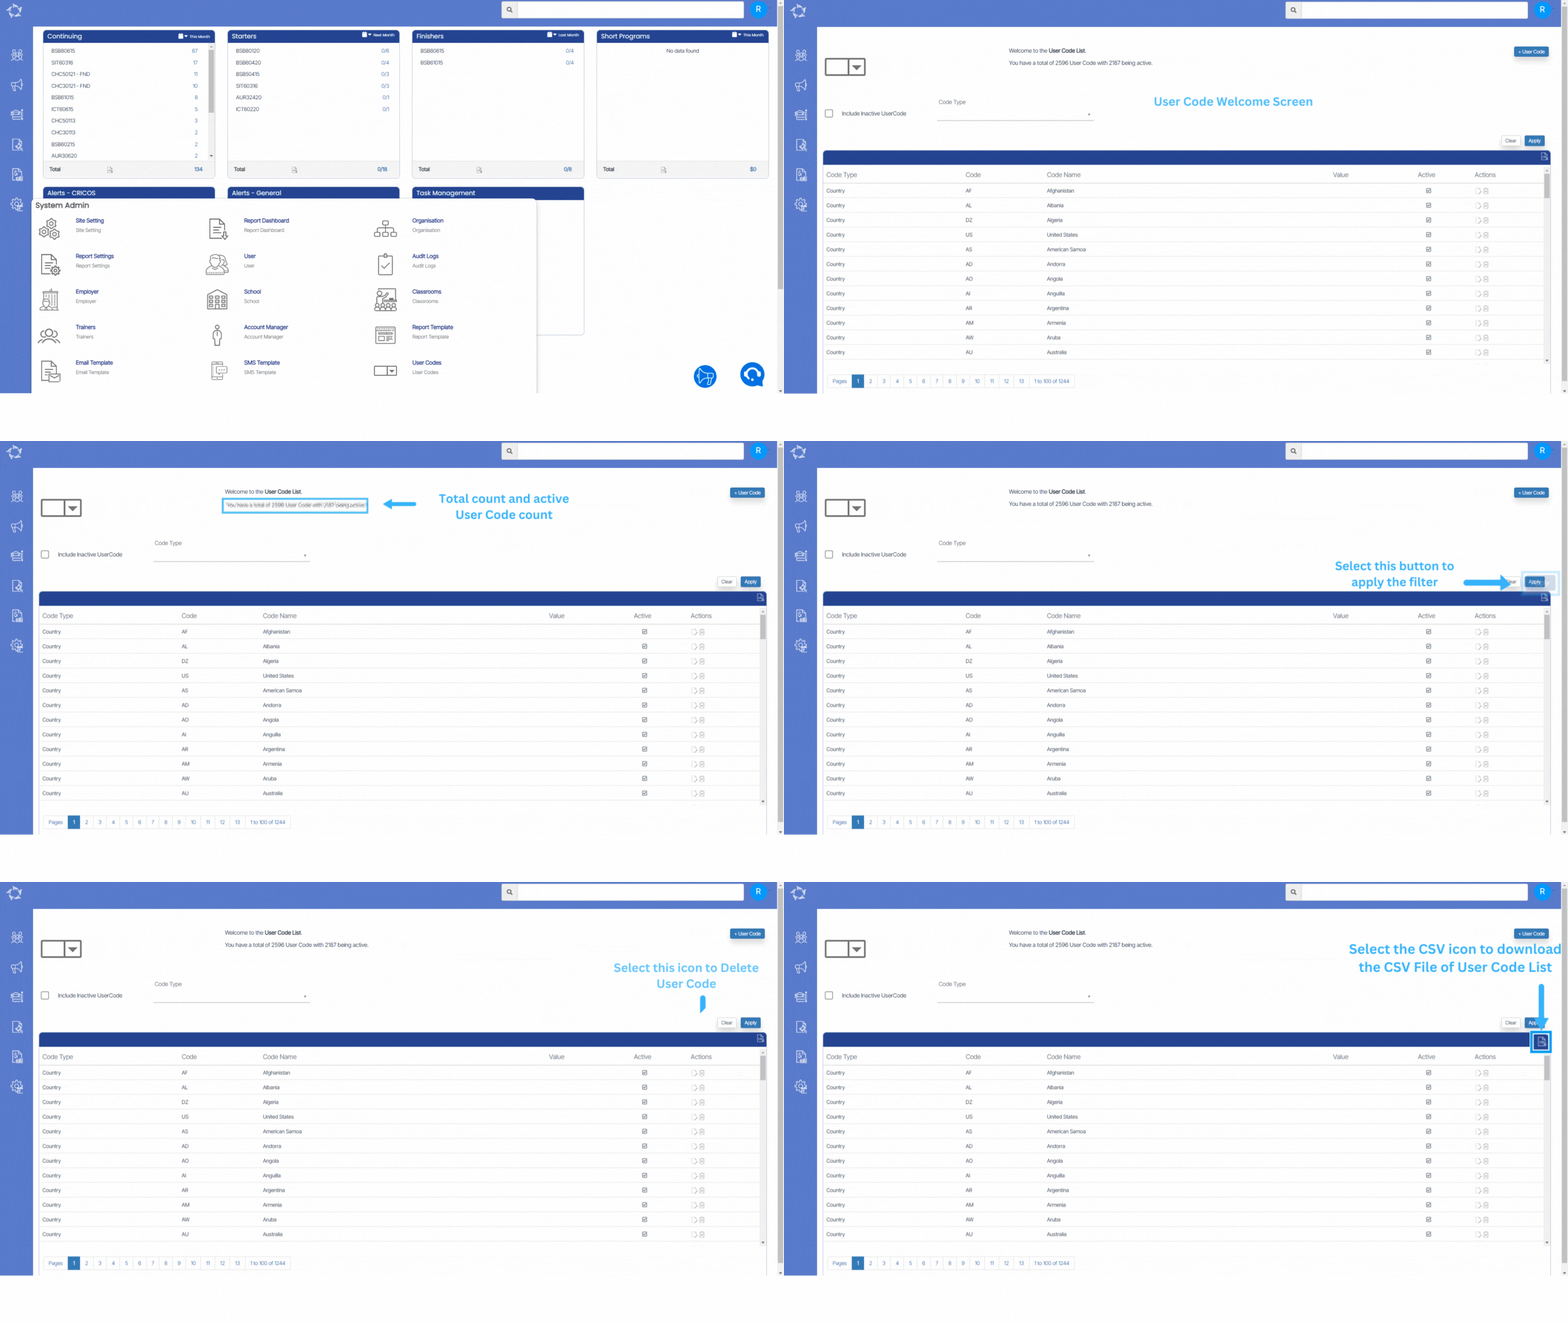
Many of the dropdown menus you see contain a selection of User Codes in the system. These User Codes are only visible within the dropdown if you have personally generated them. By creating user codes for specific objects or groups, you can find the available options in the dropdown to meet your specific needs.

The user Code Welcome screen offers a comprehensive overview of user codes in the system. It allows you to efficiently manage and track user codes, add new ones, search for specific codes using the code Type dropdown, and perform necessary actions like editing or deleting codes directly from the grid.

For example, below are some user codes that outline the type of dropdowns in TEAMS

Gender – the options in the dropdown are standardised (hard coded) and you can’t add to them.

Marketing Source – the options in this dropdown you can customise using this screen.

Account Manager – when you set up Account Managers in the system then that is the list that will show in this dropdown.

Trainer Entry Screen

Main Dashboard > System Admin menu > Trainers Entry

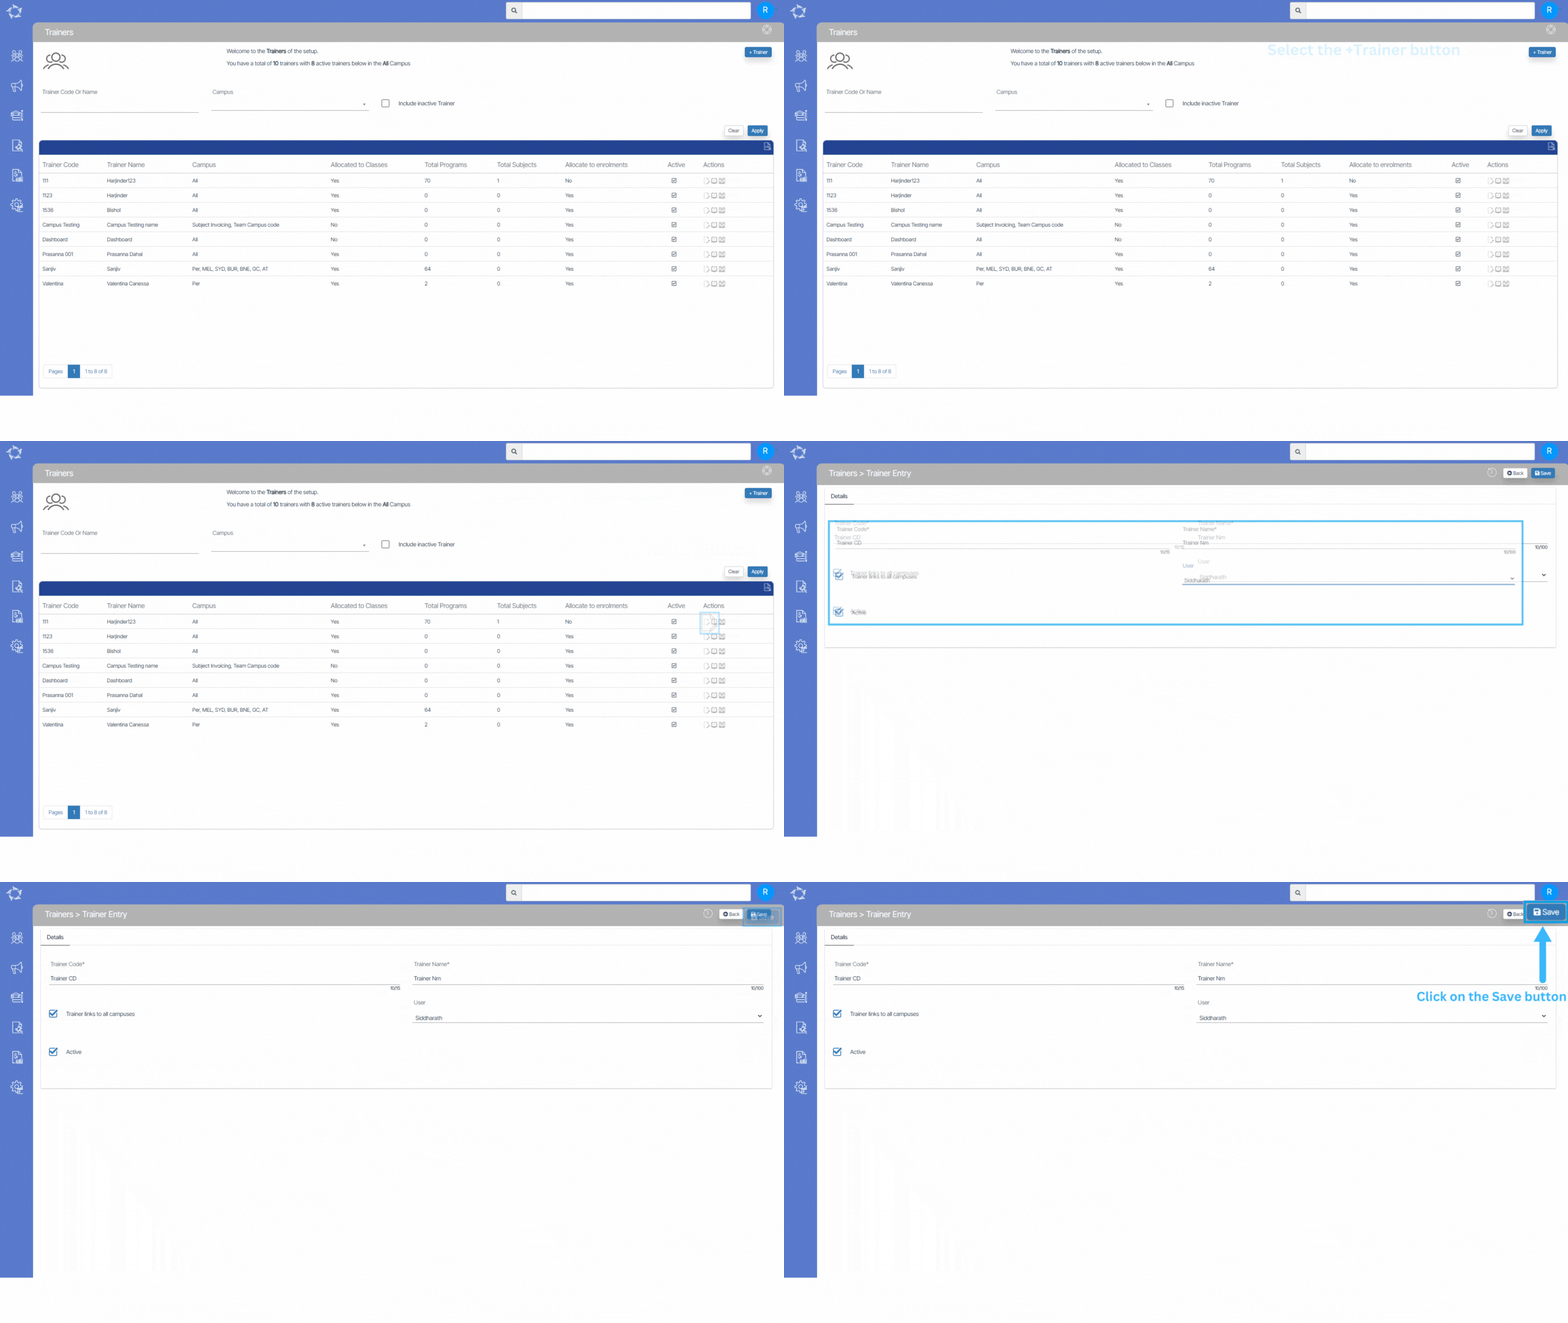
To create a new trainer, you need to click on the +Trainer button. This will take you to the Trainer Entry Screen, where you will be required to select the appropriate trainer code and name, along with other relevant details that need to be filled in. It is essential to ensure that you enter the correct trainer code and name to avoid any confusion later on.

Click on the ‘Save‘ button after filling in the details of the Trainer.

Below is the Explanation of the fields.

Field NameExplanation
Trainer CodeYou can add the Trainer Code here
Trainer NameYou can add the Trainer Name here
Trainer Links to all CampusesTick this option to select this Trainer for all campuses
CampusYou can select specific Campus for the Trainer here
UserSelect the User from the dropdown list.
ActiveTick this box to make the Trainer active.