Employer Entry – Contacts


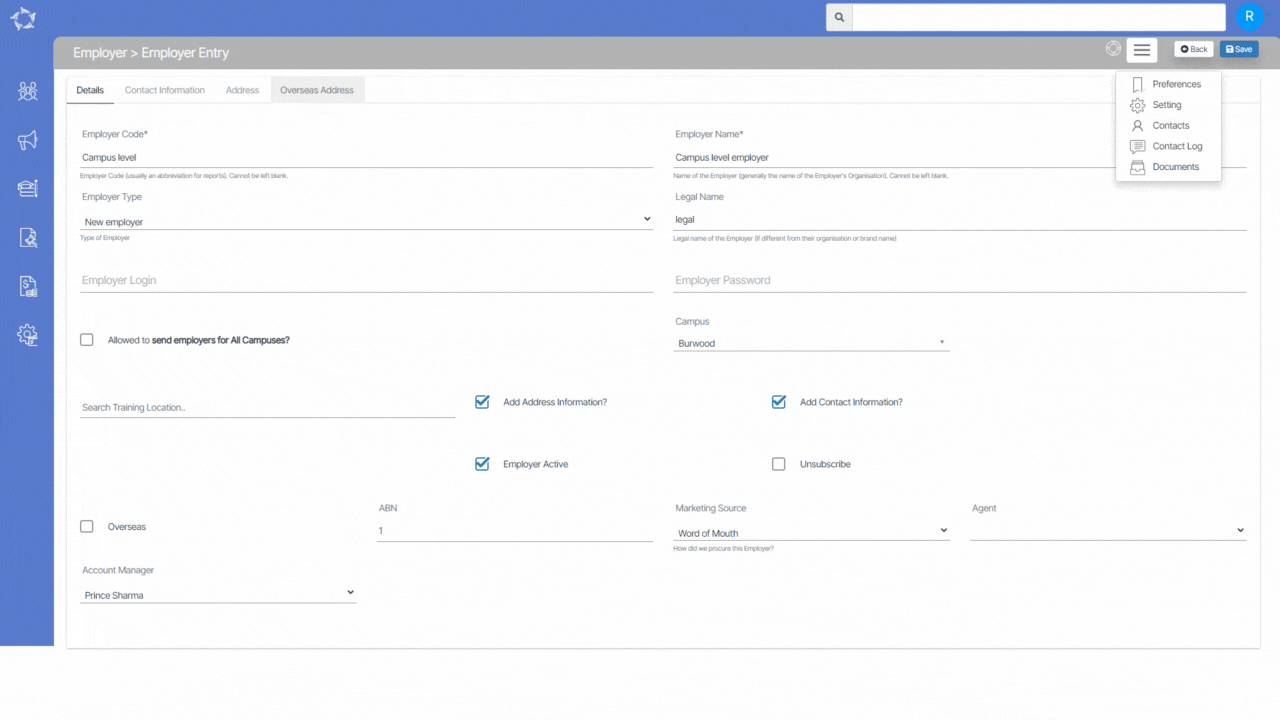
Contact screens offer you a quick and easy way to manage an Employer’s contact details. You can efficiently add, edit, or delete contact information as needed.

This screen enables you to input and manage the primary contact for an employer. You can add new contacts or edit and delete existing ones using the grid view provided. The grid view will display the current contacts associated with the employer and allow you to modify them as necessary.

To edit or add contact details for an employer, simply select the  Edit icon or the Add button on the Employer’s Welcome screen. From there, access the Burger Menu and choose contacts to view and manage the Employer’s contact information.

Trainer

Main Dashboard > System Admin > Trainer

history of changes

Overview

This is the Trainer Welcome screen which will show you the list of Trainers in the grid that are Active in your system.

This screen is divided into two sections:

  • Filters/Parameters
  • Listing Grid

Filters/Parameters

The filters will show you different fields where you can select the data as per your need then select the Apply button and based on your selection the system will load the list of trainers in the grid. You can also see the Total count and the Active count of the Trainers.

Listing Grid

In this grid, you can see the list of all Trainers. You will see columns such as Trainer Code, Trainer Name, Campus, Allocated to Classes, Allocate to enrolments, Active and Actions. All of the columns are self-explanatory.

You can select the +Trainer button to add a new Trainer to the system.

Select here to know more about the Burger Menu

Select here to know more about the Action Column

School Entry – Contacts

This screen is designed to enable you to input and manage the primary contact for a school. You can add new contacts or edit and delete existing ones using the grid view provided. The grid view will display the current contacts associated with the school and allow you to modify them as necessary. This is an efficient way for you to manage your contacts within the system and ensure that the information is up-to-date and accurate.

To edit or add contact details for a school, simply select the  Edit icon or the Add button on the School’s Welcome screen. From there, access the Burger Menu and choose Contacts to view and manage the school’s contact information.

Contact screens offer you a quick and easy way to manage a School’s contact details. By providing multiple access points to this screen, you can efficiently add, edit, or delete contact information as needed.

School – Documents

School Entry > Burger Menu > Documents

When you select the Documents option, you will be taken to the School Entry > Documents screen. If you have already uploaded documents for the school, it will show you in the grid.

You can also add the document by selecting the “+Add” button, a pop-up window will appear on the screen where you can choose the document you want to upload for the school.

The field’s name and explanations are given below:

FieldsExplanations
Upload DateThis will show the date, the day you upload the document
NotesYou can write notes for your own reference by selecting the notes icon.
Document TypeThis is a user code in TEAMS and based on the user, you can select the document type.
Document NameIt will show the name of the document which you have selected.
Public DocumentSelect this box if you want to make the document public on the student portal.

School Entry – Contact Log

This screen lets you enter the contact logs for the school. You will be able to view the school’s current contact logs in the grid and make edits or deletions as necessary.

You will also be able to add a new contact log for a school from the +Add button.

The field’s name and explanations are given below:

FieldExplanation
Contact DateYou can enter the contact date in this field.
User NameSelect the user name from the dropdown field
Log TypeYou can select the log type from the dropdown field.
NotesYou can add notes related to the contact log.

School Entry Screen

The School Entry Screen provides the functionality to add a new school to the system. When accessing this screen, you will notice three distinct tabs, each serving a specific purpose.

The first tab allows you to input and update the school’s details, such as its name, type, and other relevant information.

The second tab is dedicated to capturing the school’s contact information, including phone numbers, email addresses, and relevant personnel details.

Lastly, the third tab focuses on entering the school’s address details, such as street name, city, state, and postal code.

FieldsExplanation
School CodeThis is a mandatory field and it cannot be left blank
School NameThis is a mandatory field and it cannot be left blank
Allowed to send students for All Campuses?If you wish to allow all students for all campus links to this school then tick this checkbox
CampusYou can select the specific campus from the dropdown field. This field will be visible if the allowed to send students for all campuses check box is un-tick
Marketing SourceYou can select the marketing source from the dropdown
Account ManagerSelect the Account Manager from the dropdown
Legal NameLegal Name of the School
ACNYou can add the Australian Corporation Number in this field.
ActiveTo make the school active this tick box should be ticked

School

Main Dashboard > System Admin > School

Overview

This is the School Welcome screen which will show you the list of Schools in the grid that are Active in your system.

This screen is divided into two sections:

  • Filters/Parameters
  • Listing Grid

Filters/Parameters

The filters will show you different fields where you can select the data as per your need then select the Apply button and based on your selection the system will load the list of schools in the grid. You can also see the Total count and the Active count of the Schools.

Listing Grid

In this grid, you can see the list of all Schools. You will see columns such as School Code, School Name, Campus, Marketing Source, Account Manager, Create Date, Active, and Actions. All of the columns are self-explanatory.

You can select the +School button to add a new School to the system.

Select here to know more about the Burger Menu

Select here to know more about the Action Column

Account Manager – User based restricted login

We have introduced a new feature namely the Account Manager User Login in the system. This feature offers enhanced access and tailored functionality for account managers.

With the Account Manager User Login, account managers will have a dedicated login that provides access to specific information relevant to their assigned responsibilities. On the Main Dashboard, the tiles and the listing screens throughout the system will only display details exclusively related to that account manager.

Furthermore, the Account Manager User has been granted the ability to add enquiries or applications for students, which will automatically be linked to their assigned accounts. This allows for efficient management and tracking of new enquiries or applications linked with each account manager. When accessing the Student and Applicant Dashboard screens, account managers will have the ability to view student and applicant details only. Similarly, on the Application and Enrolment Dashboard screens, account managers will only see applications and enrolments linked to their assigned accounts.

Note: The user has been given the right to upload documents from the document log screens from various platforms.

Employer Entry Screen

Main Dashboard > System Admin menu > Employer Entry


To create a new employer, simply select the +Employer button, which will direct you to the Employer Entry Screen. This screen allows you to input and enter the information and details of the employer. The screen includes fields and tabs for employers to provide their legal name, contact information, address and other relevant data.

The Details tab allows you to input and update employers’ details, including the Employer Code, Employer Name, Legal Name, type, and other pertinent information. Please note that the Employer Code and Employer Name cannot be left blank when entering the employer in TEAMS as these two fields are mandatory.

The Contact Information tab allows you to enter the employer’s contact information, including phone numbers and email addresses.

The Address tab focuses on entering the employer’s address details, such as street name, city, state, and postal code.

Lastly, the Overseas tab will only allow you to add the overseas details, if you have selected the overseas tick box on the details tab. 

Select the ‘Save‘ button after filling in the details of the Employer.