Enhanced Trainer’s User-Related Restrictions

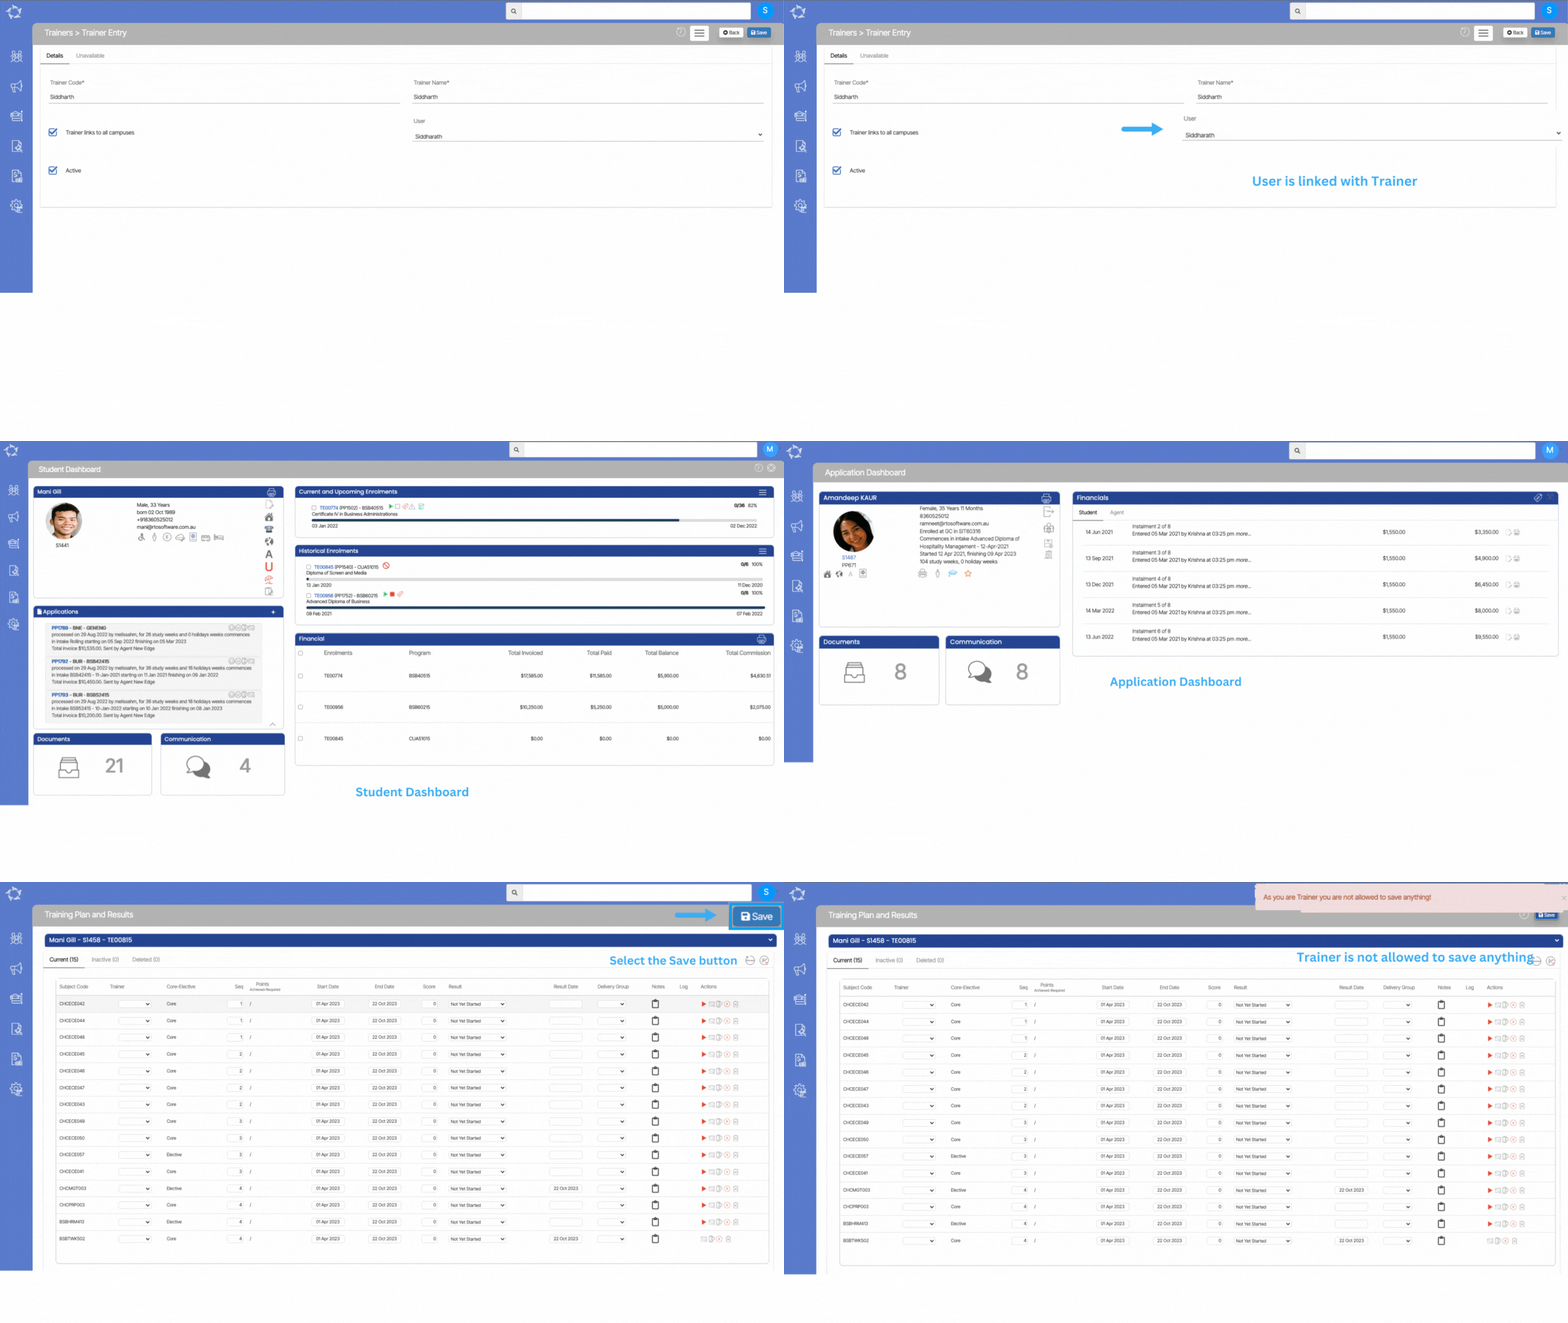
We have recently implemented user related restrictions to enhance the efficiency of our training process. As part of these changes, users who are linked to trainers will now experience restricted access to certain Dashboards and screens within the system.

With these restrictions in place, users linked to trainers will no longer have the ability to make changes to various Dashboards, including the Student Dashboard, Enrolment Dashboard, Applicant Dashboard, and Application Dashboard. Furthermore, they will be unable to edit or mark results on the Training Plan or Results screen for any enrolment. By granting trainers sole authority over these areas, we ensure the integrity and consistency of Training Plans and Results, while enabling trainers to provide personalised guidance and support to their assigned students.

This will empower trainers in overseeing the students’ progress effectively, while maintaining a structured and reliable framework for the training process. We believe that these enhancements will contribute to an improved training experience and foster an environment of personalised mentorship and support.

Certificate Report – Student Passport Number New Merge Field

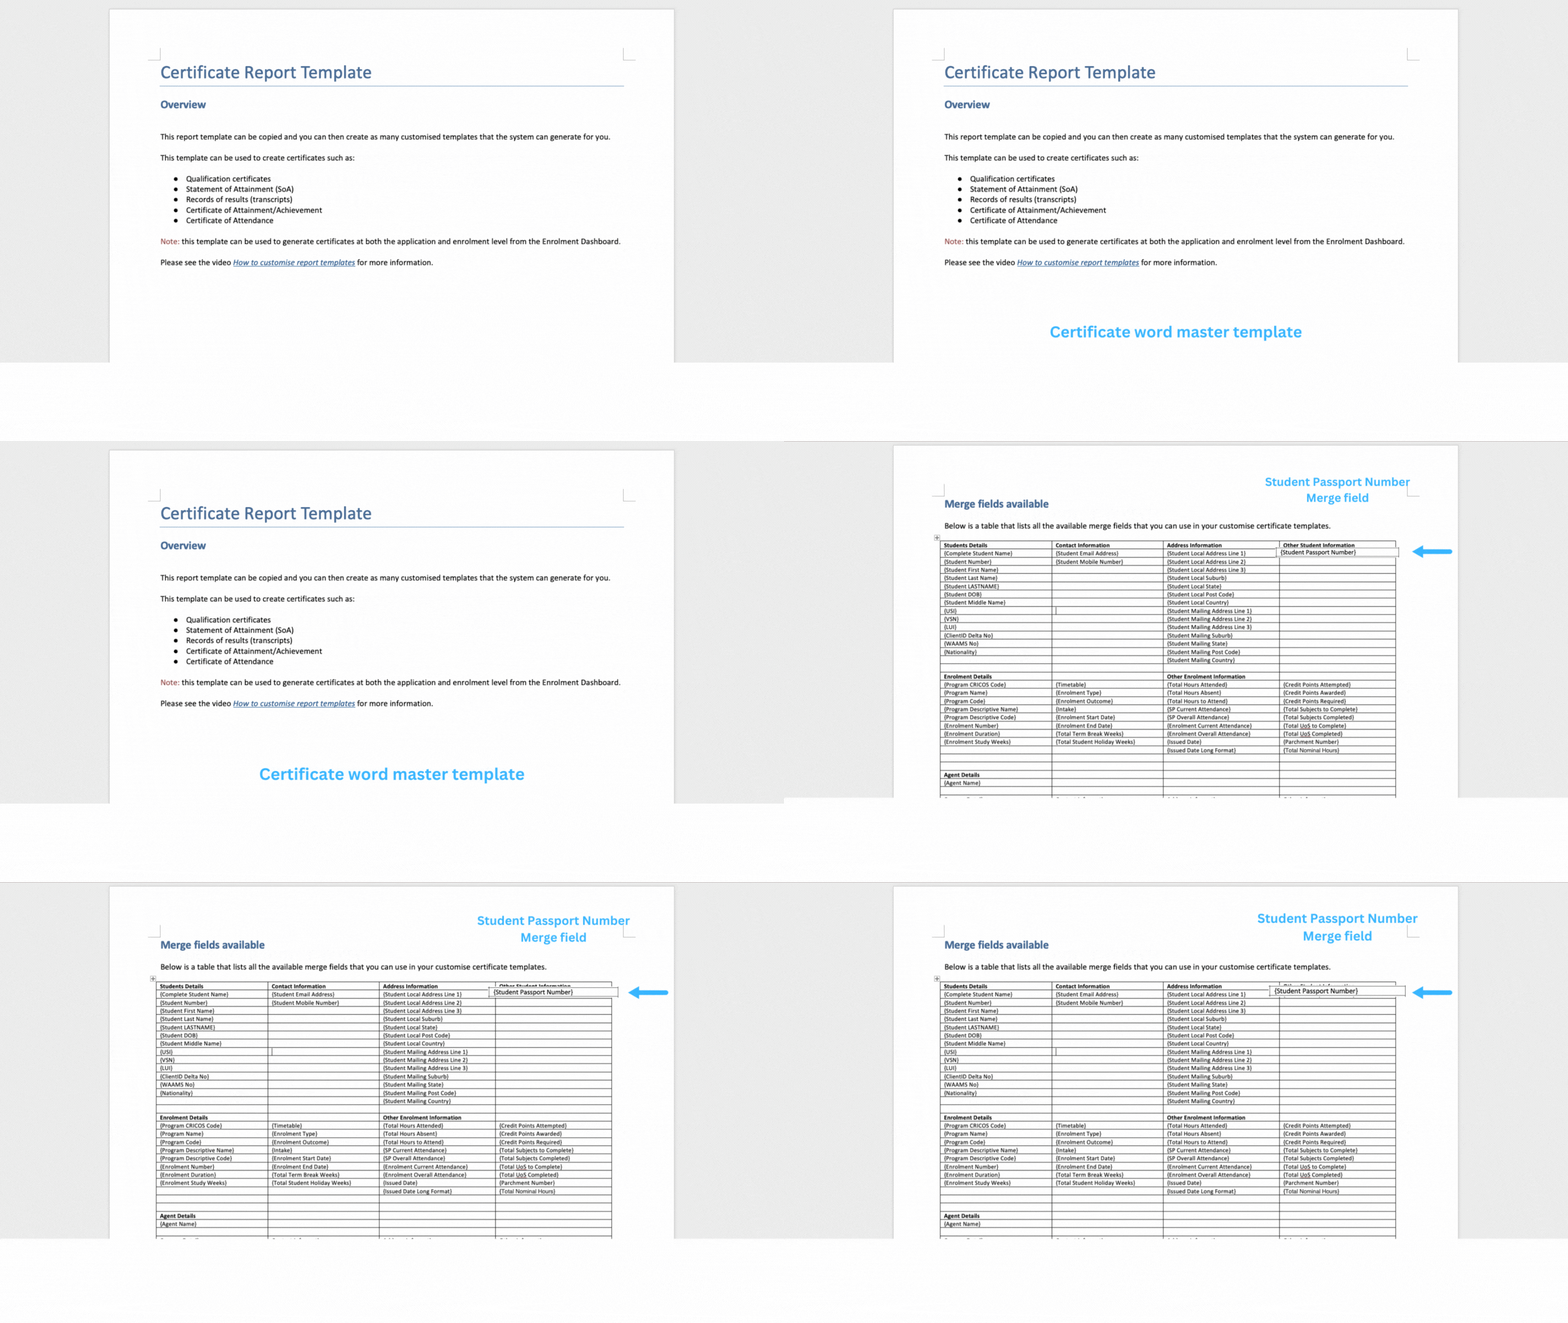
We have recently added a new merge field called Student passport number to the Certificate report word master template. This merge field is designed to incorporate and print the student’s passport number on the certificate.

To utilise this new feature, you can simply copy and paste the Student Passport Number merge field from the TEAMS Certificate Master template into your custom certificate word template. This will enable you to effortlessly include the student’s passport-related details on the certificates you generate through our system.

Completed Qualification – Default Setting

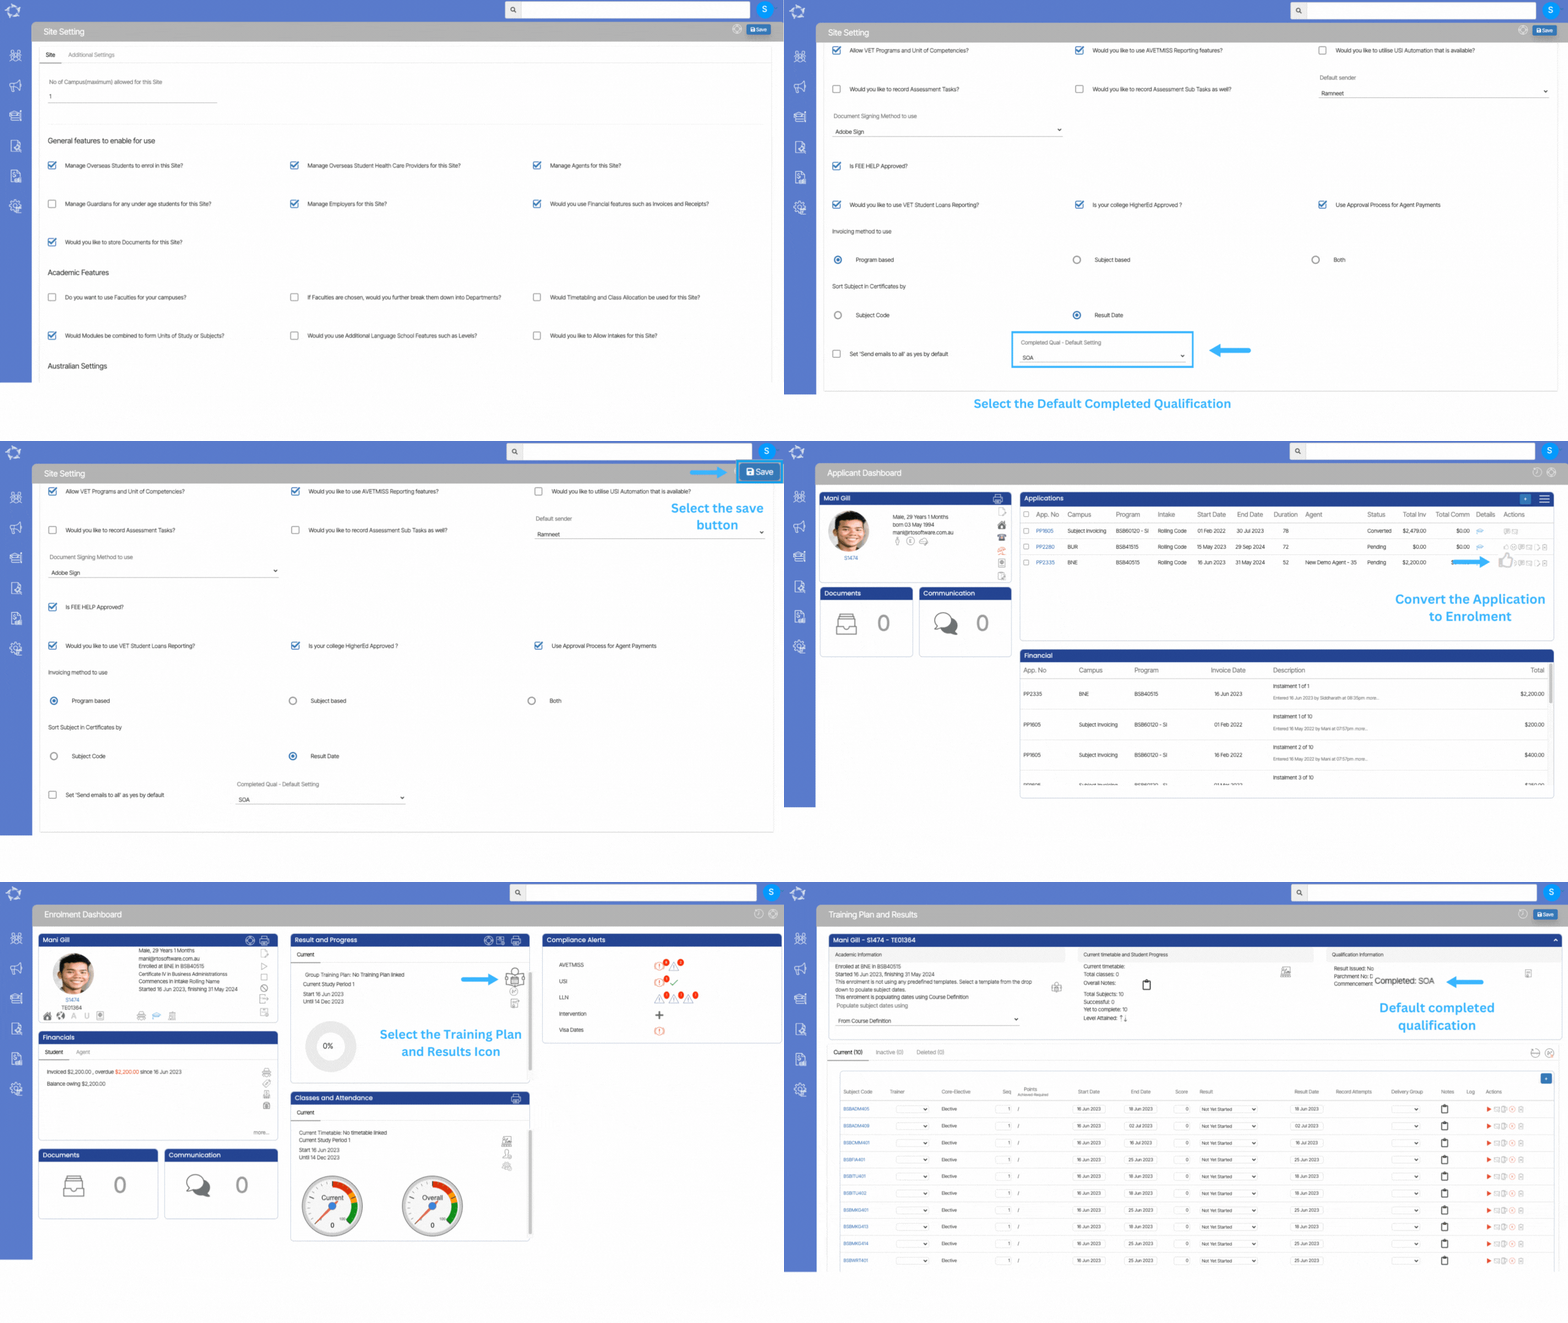
We have introduced a new system setting that aims to simplify the process of managing qualification information for your students. This system setting is added under the System Admin > Site Setting menu.

With this addition, you now have the ability to set a default Completed Qualification status for your students. Once a student’s application for enrolment is approved, the system will automatically select and assign the completed qualification status to the respective qualification information in the Training Plan and Results screen.

Enrolment – Student Resulting Report

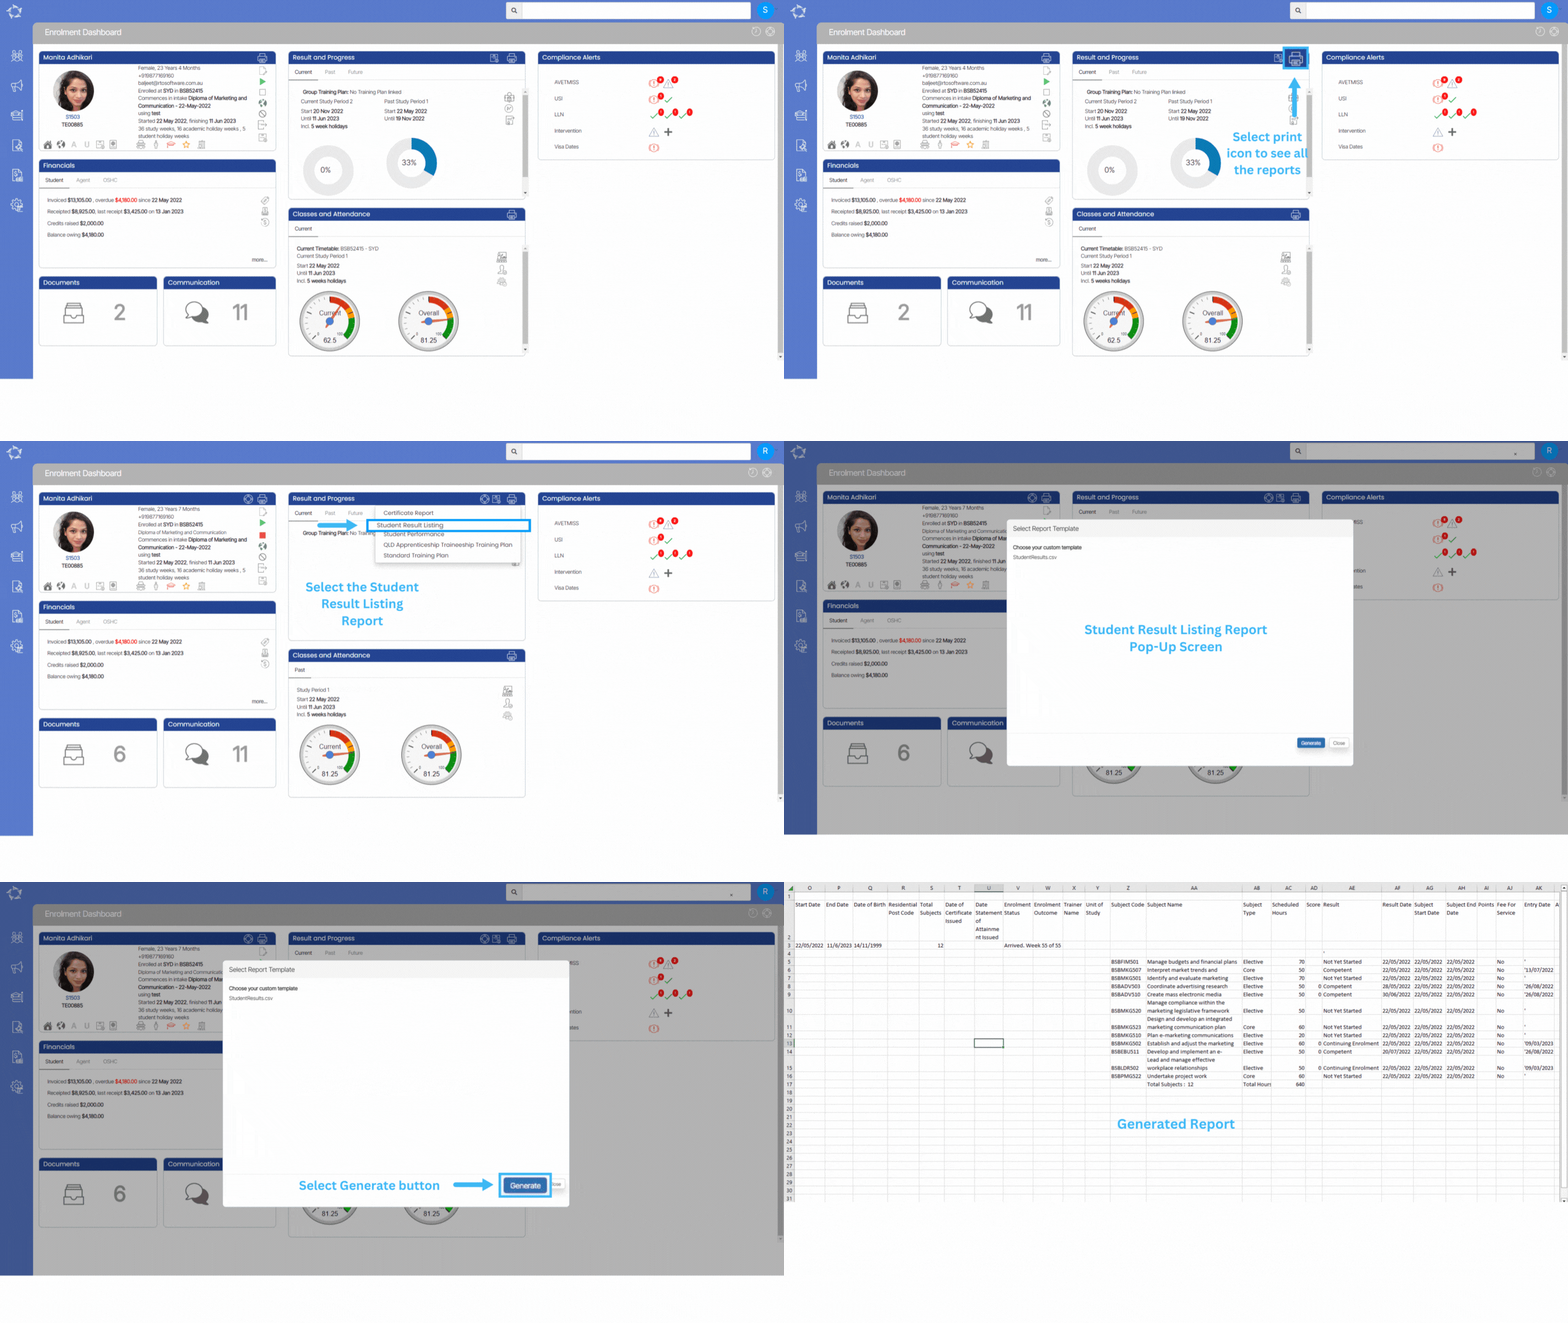
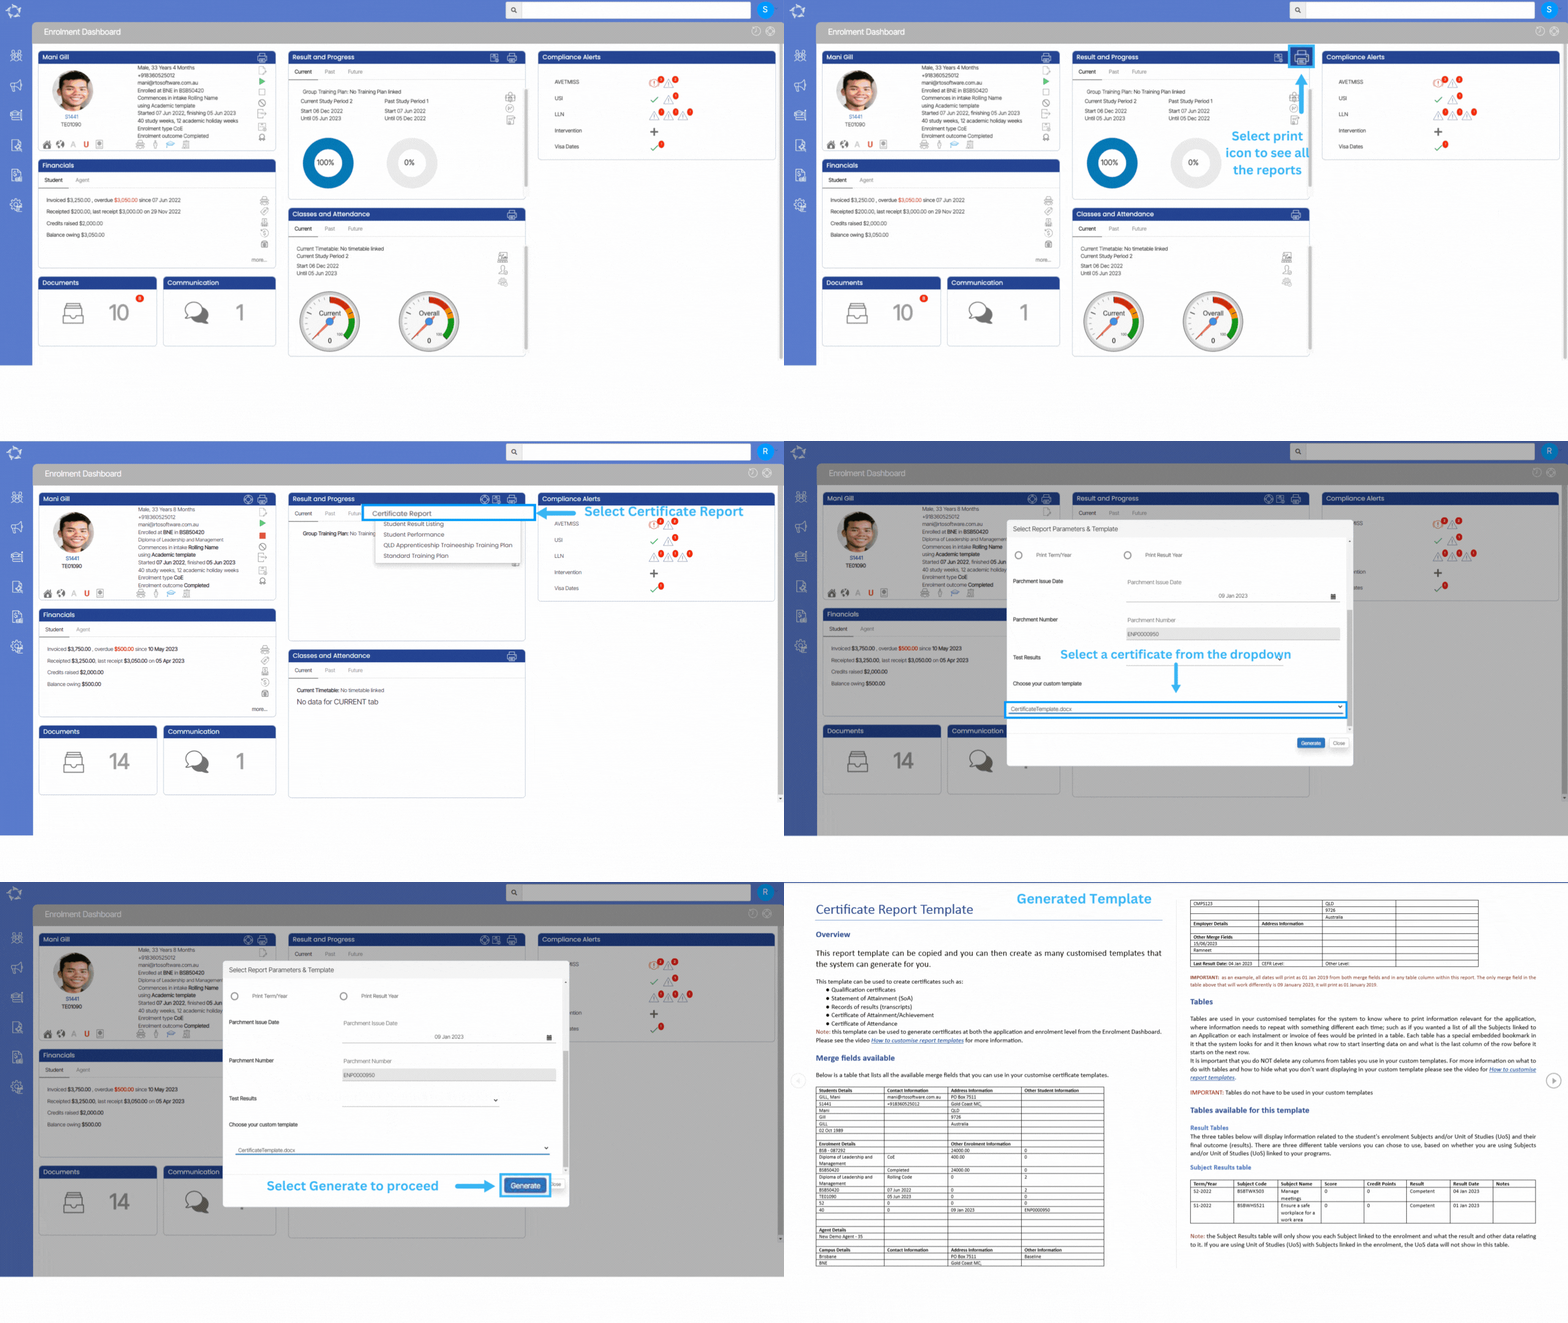
Enrolment Dashboard > Result and Progress Tile > Print Icon

The student Result report file provides comprehensive information about student’s academic performance, including their Results, Results dates and other relevant details. By generating student result files, you can efficiently track and analyse student progress over time. The purpose of generating these result files is to provide a detailed record of a student’s academic achievements. In addition, student result reports may also include other relevant details such as the student’s name, enrolment details, timetable and any additional remarks or comments regarding their performance.

To access the generated result report file, you can select the generate button provided. Once the report is successfully generated, a download option is made available to obtain the file. Typically, the result report file is in CSV (Comma-Separated Values) format, which allows for easy import and analysis using spreadsheet software.

Enrolment – Certificate Report

Enrolment Dashboard > Result and Progress Tile > Print Icon

history of changes

IMPORTANT – We believe that staying informed about the latest developments in our software is vital for optimising your experience and maximising the benefits of using our system. To view the latest updates and modifications for the Certificate Report, we kindly request you to navigate to the History icon history of changes showing above in the top right of the breadcrumbs. By selecting this icon, you will gain access to a detailed log of all the recent changes made to the software.

The certificate report template provided here is designed for easy copying and customisation to meet your specific needs. Once copied, you can create numerous customised templates that the system can generate for you.

This template is particularly suitable for generating various types of certificates, including:

  • Qualification certificates
  • Statement of Attainment (SoA)
  • Records of results (transcripts)
  • Certificate of Attainment/Achievement
  • Certificate of Attendance

These certificates can be utilised to recognise and acknowledge different levels of achievement, completion, or participation.

IMPORTANT – It is important to note that this template can be utilised for generating certificates at both the application and enrolment levels through the Enrolment Dashboard. To receive further guidance on customising the report templates according to your requirements, we recommend referring to the instructional post titled Report Templates. This post provides step-by-step instructions on modifying the templates to match your desired format and content.

How do the filters work?

FiltersExplanations
Only print Subjects /UoSWith any result – This radio button will print subjects with any result but does not print subjects if no result is marked. If you select this radio button then the system will allow you to print the final result or progressive results or both.

Only successful results – It prints subjects with successful results only.

With or without results – This radio button will print all subjects whether a result is marked or not. If you select this radio button then the system will allow you to print the final result or progressive results or both.
Sort Subjects based onSubject Code – This will help you to sort the subjects based on subject codes.

Result Date – This radio button will print all subjects whether a result is marked or not. If you select this radio button then the system will allow you to print the final result or progressive results or both.
Only print result types ofFinal Result – If you want to print only the final results (competent, not yet competent and so on) in the certificate report then you may select this radio button.

Progressive Result – To print only the progressive results (continuing enrolment and not yet started) in the certificate report you may select this radio button.

Both – If you want to print both final and progressive results in the certificate report then you may select this radio button.
in result gridPrint Term/Year – If you want to print term/year in the result grid then you may select this radio button.

Print Result Year – If you want to print only the result year in the result grid then you may select this radio button.

Parchment Issue Date – This radio button will print all subjects whether a result is marked or not. If you select this radio button then the system will allow you to print the final result or progressive results or both.

Parchment Number – The parchment number updated on the training plan and result screen will be visible here but can’t be changed on this screen.

Test Results – You can select the test results to get printed in the certificate report from this dropdown.

Choose your custom template – Choose your customised template.

Site Setting

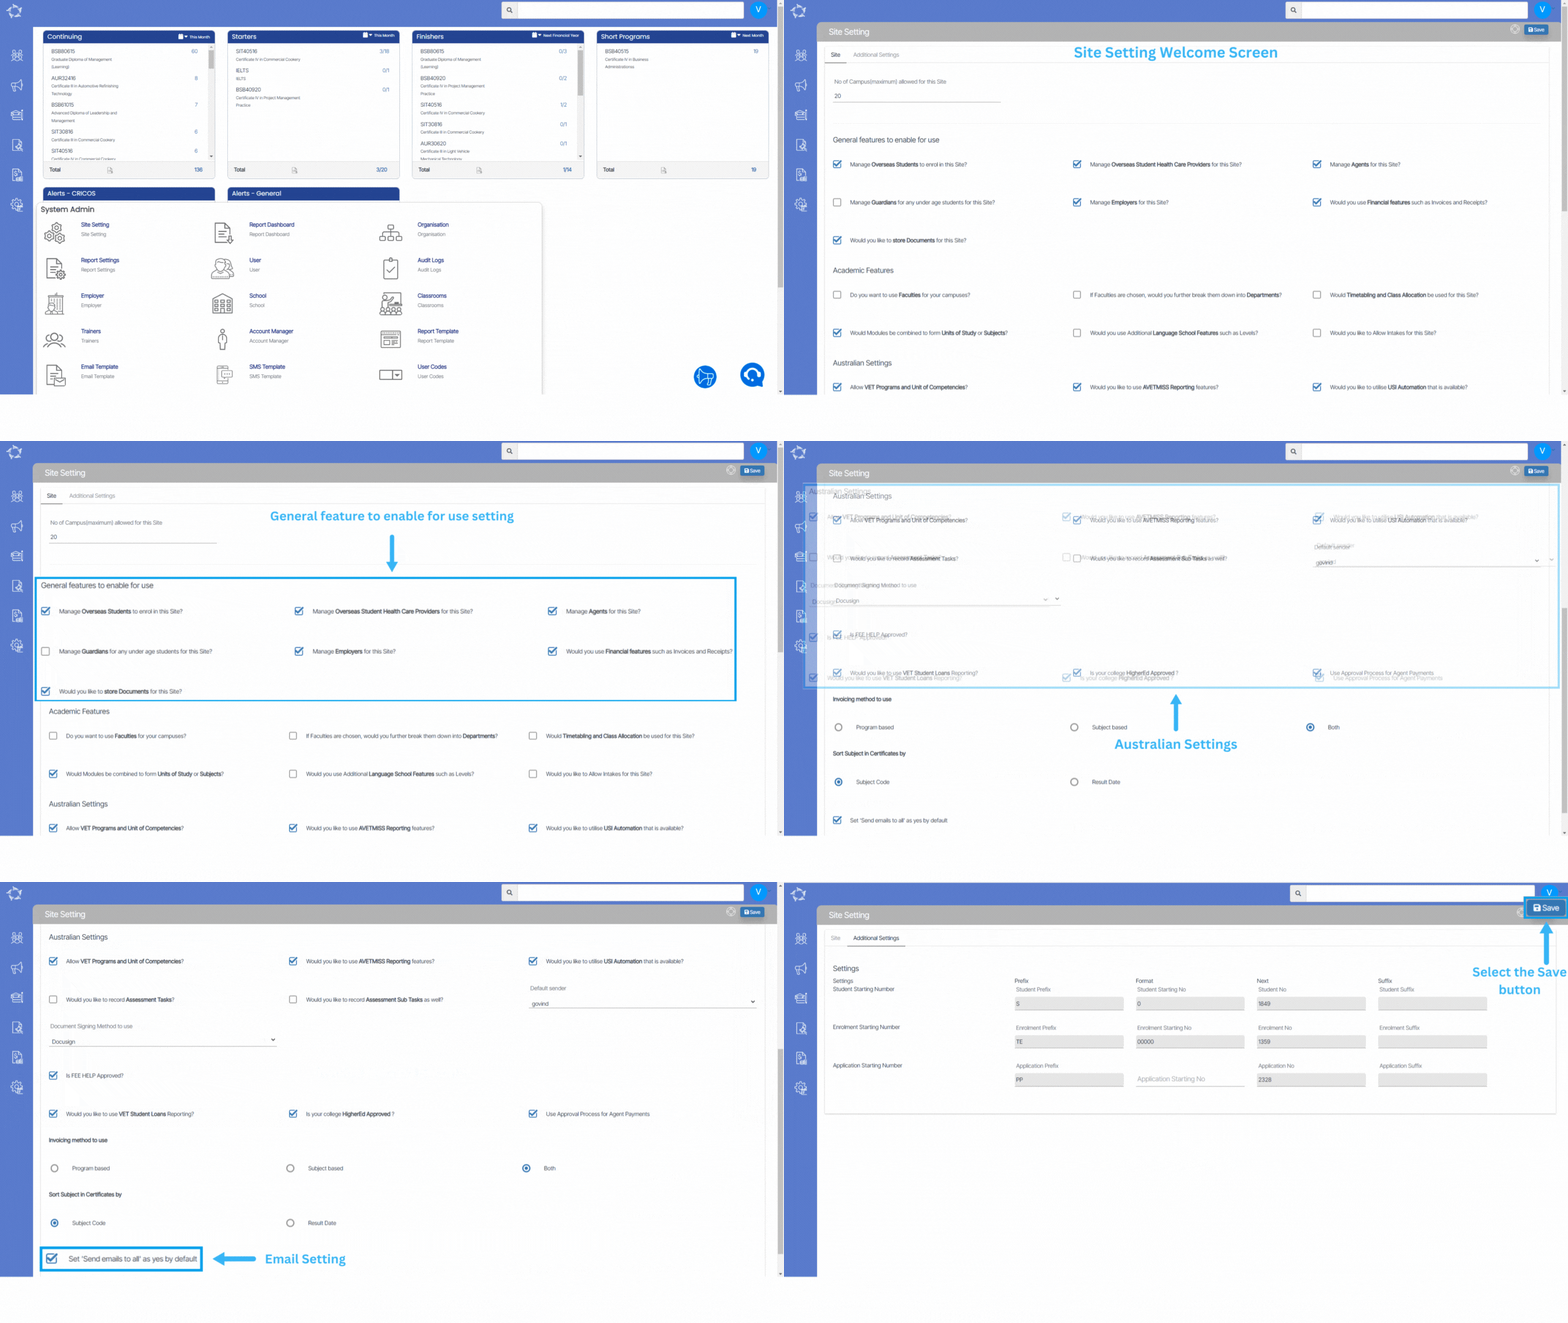
You can access the site setting screen through two methods:

  1. Go to System Admin > Site Setting
  2. Navigate to System Admin > Organisation > System Setting Button

The site setting screen allows you to configure and customise various settings for you RTO. It provides a centralised place where administrators can define and modify parameters related to the functionality, appearance of a specific screen.

Below is the explanation of Site tab fields

FieldsExplanation
No of Campus (maximum) allowed for this siteSpecifies the maximum number of campuses that can be associated with this particular site.
General features to enable for use FieldsExplanations
Manage Overseas Students to enrol in this Site?Select this checkbox if you want to manage overseas students enrolling at this site.
Manager Overseas Student Health Care Providers for this site?Select this checkbox if you want to manage overseas student healthcare providers for this site.
Manage Agents for this Site?Select this checkbox for managing agents associated with this site.
Manage Guardians for any under age students for this site?By selecting this checkbox, you grant permission to manage the guardians or parents of underage students attending this site.
Manage Employers for this site?Select this checkbox to manage the employers associated with this site.
Would you use Financial features such as Invoices and Receipts?Select this checkbox if you intend to utilize financial features such as invoices and receipts.
Would you like to store documents for this site?Select this checkbox if you want to store documents for this site.
Academic Features FieldsExplanations
Do you want to use Faculties for your campuses?Select this checkbox to enable the use of faculties for your campuses.
If Faculties are chosen, would you further break them down into Departments?Select this checkbox to enable the breakdown of faculties into departments if chosen.
Would Timetabling and Class Allocation be used for this Site?Select this checkbox to indicate whether timetabling and class allocation will be used for this site.
Would Modules be combined to form Units of Study or Subjects?Select this checkbox to determine whether modules will be combined to form units of study or subjects.
Would you use Additional Language School Features such as Levels?Select this checkbox to indicate whether additional language school features, such as levels, will be used.
Would you like to Allow Intakes for this Site?Select this checkbox to specify whether intakes will be allowed for this site.
Australian Settings FieldsExplanations
Allow VET Programs and Unit of Competencies?Select this checkbox to enable the inclusion of VET programs and units of competencies.
Would you like to use AVETMISS Reporting features?Select this checkbox to indicate whether AVETMISS reporting features will be utilized.
Would you like to utilise USI Automation that is available?Select this box if you want to utilize USI Automation functionality.
Would you like to record Assessment Tasks?Select this box if you want to record assessment tasks.
Would you like to record Assessment Sub Tasks as well?Select this box if you want to record assessment sub tasks.
Default senderSelect the default sender user from the dropdown for communication.
Document signing method to useSelect the preferred method from the dropdown for document signing.
Is FEE HELP Approved?Select this box if FEE HELP is approved.
Would you like to use VET Student Loans Reporting?Enable VET Student Loans reporting by selecting this box.
Is your college HigherEd Approved ?Select this box if your college is HigherEd approved.
Use Approval Process for Agent PaymentsEnable approval process for agent payments by checking this box.
Invoicing method to useThis is a radio button field where you can select the preferred invoicing method: Program Based, Subject Based, or Both.
Sort Subject in Certificates bySelect the sorting criteria for subjects in certificates: Subject Code or Result Date.
Set ‘Send emails to all’ as yes by defaultSelect this box to set ‘Send emails to all’ as the default option.

Below is the explanation of the Additional tab fields

Additional Settings FieldsPrefixFormatNext Suffix
Student Starting NumberEnter the desired prefix to be used for student numbers.Define the format for student numbers to be used.Enter the next number to be used for student numbers.Enter the desired suffix to be used for student numbers.
Enrolment Starting NumberEnter the desired prefix to be used for enrolment numbers.Define the format for enrolment numbers to be used.Enter the next number to be used for Enrolment numbers.Enter the desired suffix to be used for enrolment numbers.
Application Starting NumberEnter the desired prefix to be used for application numbers.Define the format for application numbers to be used.Enter the next number to be used for application numbers.Enter the desired suffix to be used for application numbers.

Organisation

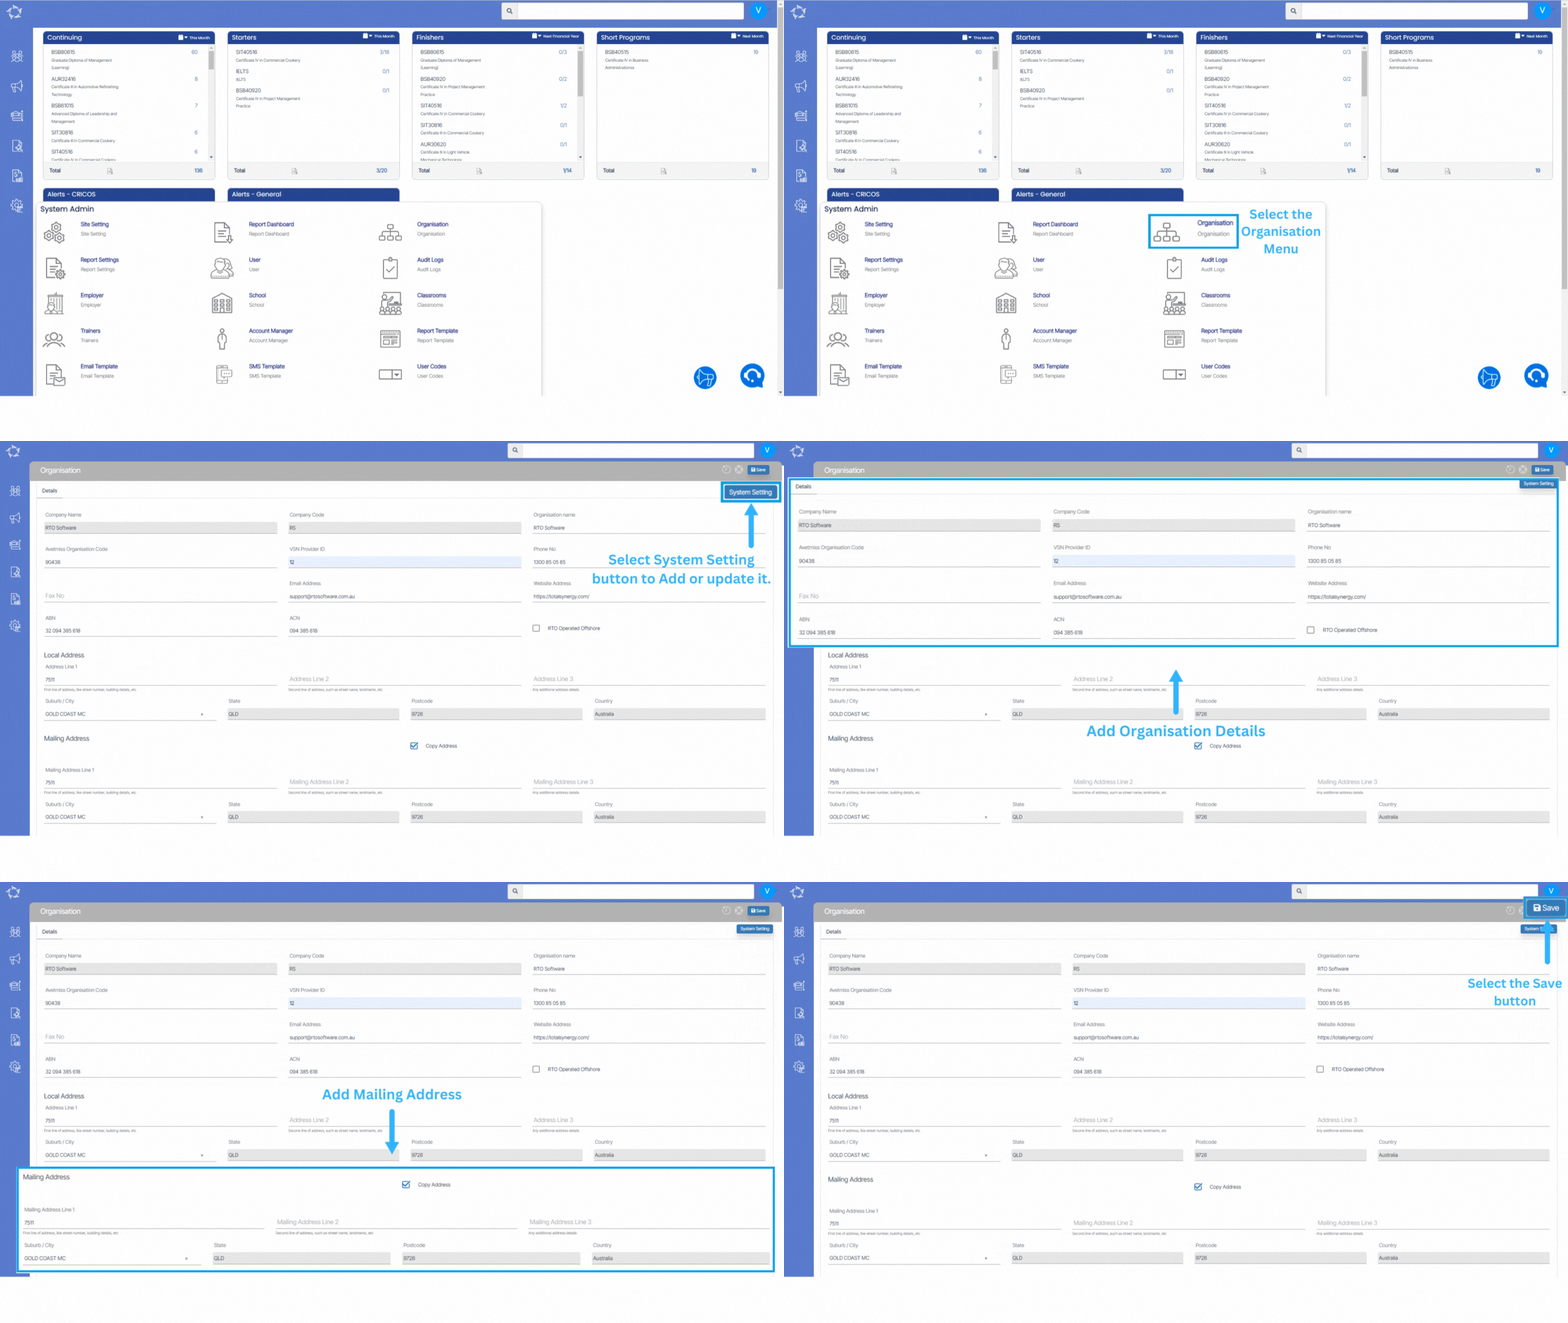
Main Dashboard > System Admin > Organisation

The organisation screen refers to a section or interface that allows you to configure and customise various settings specific to your organisation or company.

  • Company Details: This section allows you to input and update information about your company. It typically includes fields such as the Company Name, Code, Website, Contact information, and other relevant details that help identify and represent the organisation.
  • Local Address: You can enter the local address of their company in this section. It includes details such as address lines 1,2,3, suburb/city, state, postcode, and country. This information is used to identify the physical location of the company’s primary office. All the fields are self-explanatory.
  • Mailing Address: If the mailing address for the company is different from the local address, this section allows you to provide the mailing address. If the local address and mailing address are the same, then you can select the checkbox labelled Copy Address. This option can be used for correspondence purposes or as an alternative address for receiving mail or packages. Each field in this section is self-explanatory.
  • Save: Selecting the Save button applies and saves any modifications made to the company details, local address, or mailing address. It ensures that the entered information is stored and used for future reference.
  • Site Setting: The Site Setting button typically leads to a separate screen. By selecting this button, you can access and modify settings related to the invoicing method to use, student number, enrolment number, academic features and other site-specific settings.

Below is the explanation of the fields

FieldsExplanation
Company NameType the Company Name in this field.
Company CodeType the Company Code in this field.
Organisation NameIn this field, you can type the Organisation Name
Avetmiss Organisation CodeIn this field, you can type the Avetmiss Organisation Code
VSN Provider IDYou can add the Victorian Student Number (VSN) Provider ID in this field.
Phone NoIn this field, you can add the contact details of the organisation.
Fax NoFax number can be added in this field.
Email AddressHere you can add the official email address of the organisation.
Website AddressHere you can web address of the organisation.
ABNYou can add Australian Business Number in this field.
ACNYou can add the Australian Corporation Number in this field.
RTO Operated OffshoreSelect this checkbox if the Registered Training Organization (RTO) operates outside of its home country or jurisdiction.

Report Setting

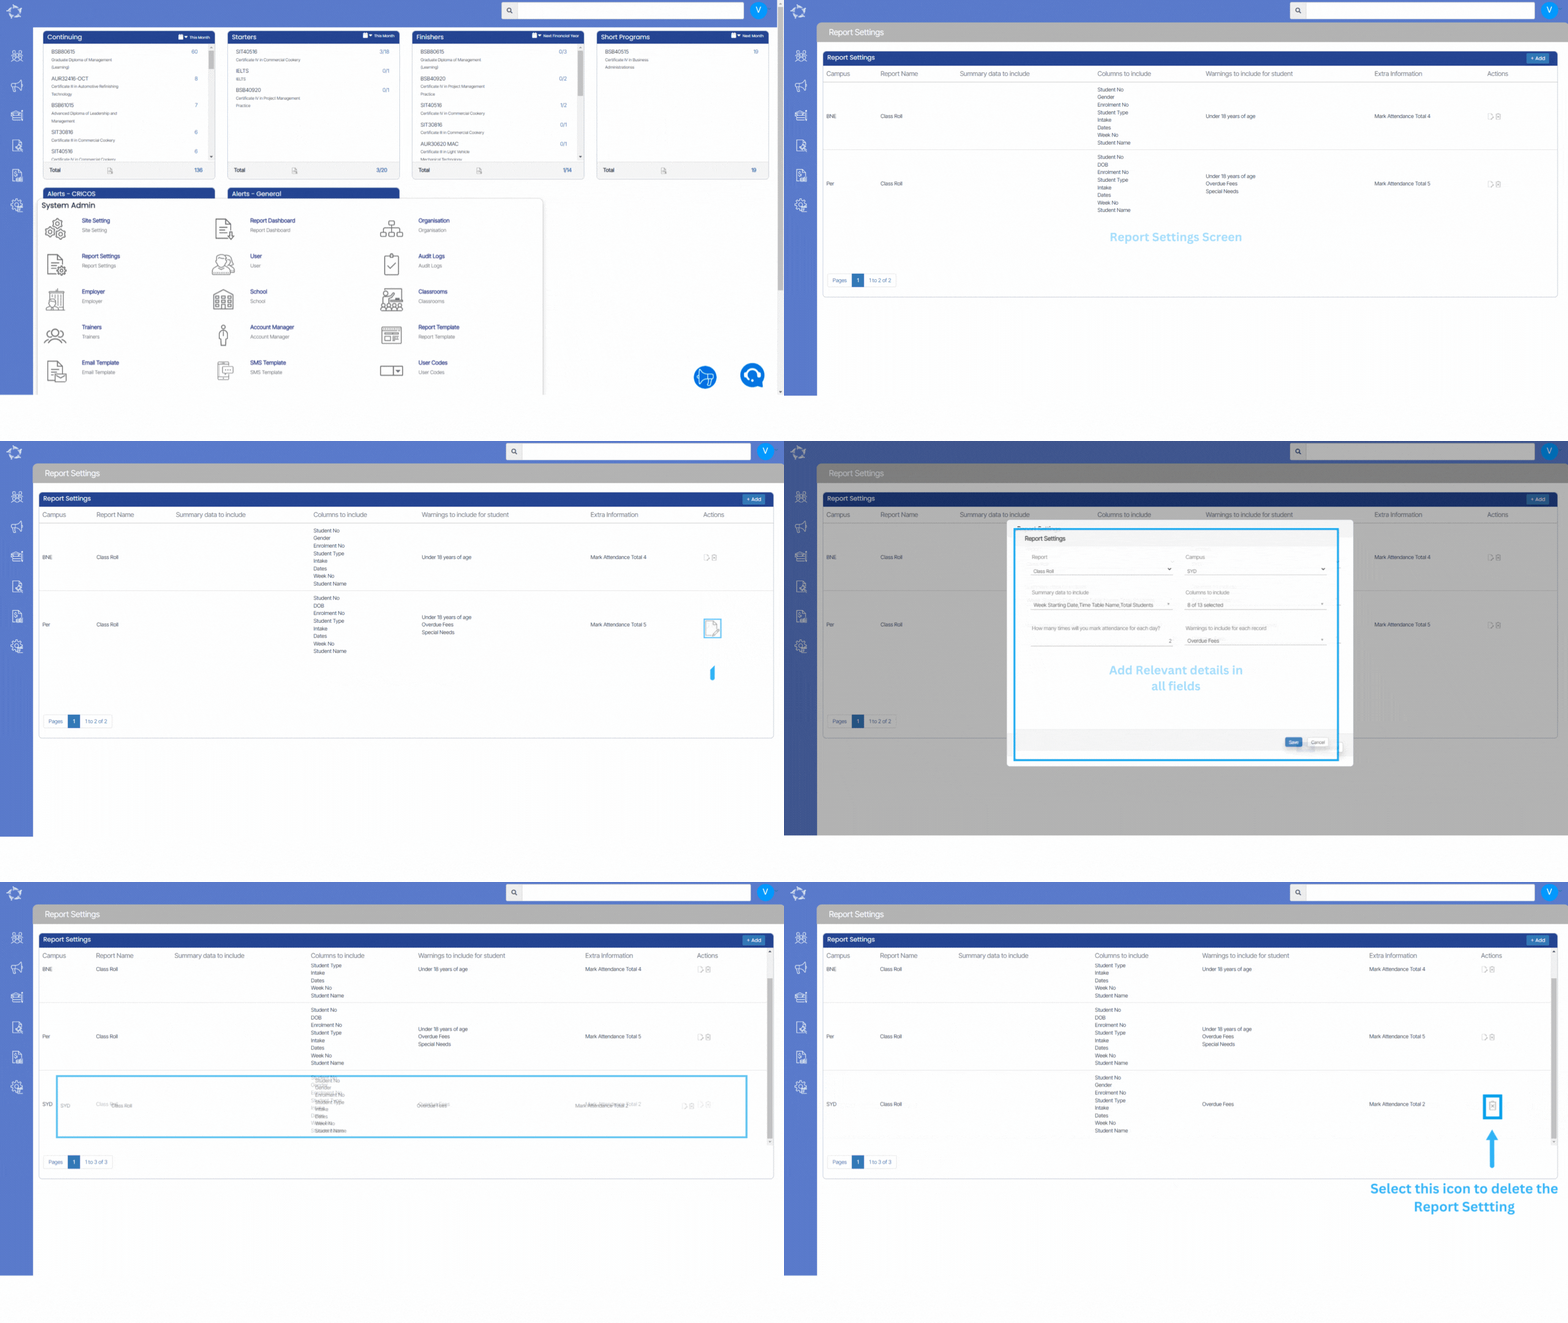
Dashboard > System Admin > Report Setting

The report settings screen provides you with the ability to manage and customise the report configurations. You can add new report settings, edit existing settings, or delete outdated ones. This ensures that the generated reports meet their specific needs and provide relevant and accurate information.

If you wish to add another report setting to the campus, you can select the +Add button.

Once you select the +Add button, a popup window will open on the screen. Fill in the required information in the provided fields. Ensure the accuracy of the details entered to avoid any transactional issues. Double-check the information before proceeding to the next step. Once all the necessary fields have been completed, select the save button to finalise the process.

You can also edit or remove existing report settings by selecting the respective icons next to each account.

Below is the explanation of the fields

FieldsExplanation
ReportSelect the desired report from the available options in the dropdown menu.
CampusYou can select specific Campus for the report setting here
Summary data to includeYou can select what types of summarised information should be included in the report at the end.
Columns to includeSelect the desired data fields or columns from the dropdown for inclusion in the report.
How many times will you mark attendance for each day?You can determine the frequency of attendance marking for each day.
Warnings to include for each recordYou can select the specific warnings to be included for each record in the report.

Academic Template Entry – Setup

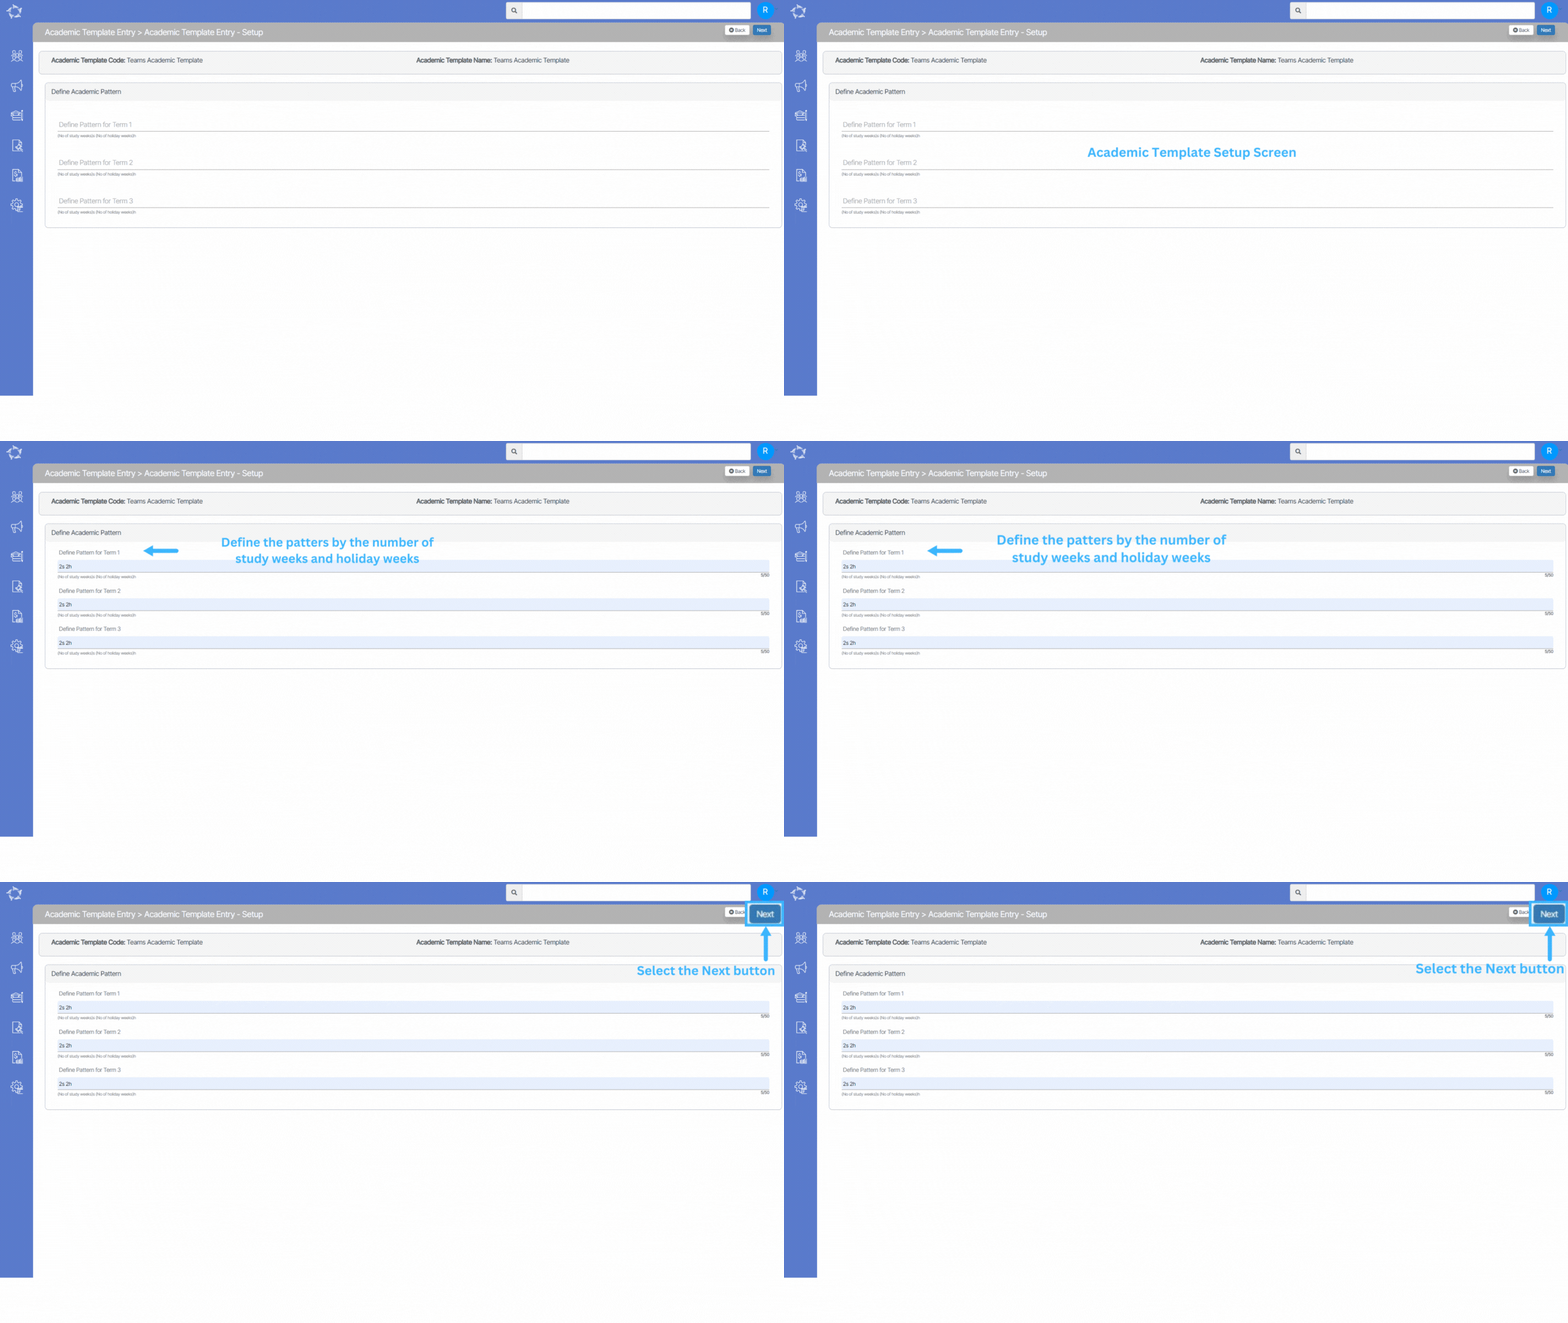
The Academic Template Entry screen provides a convenient way to select the number of semesters or terms for a particular academic program. Based on the chosen number of semesters/terms, the screen dynamically displays the corresponding academic patterns. Each pattern represents a specific arrangement of study weeks and holiday weeks within a semester/term.

To ensure accurate scheduling, it is necessary to update the number of study weeks in each pattern by taking into account the total number of holiday weeks. This adjustment ensures that the academic schedule accurately reflects the available time for studying and taking breaks throughout the academic year.

When accessing the Academic Template Entry Setup screen, you will be presented with two tiles. The first tile displays the Academic Template code and name, providing a quick reference to identify the specific template being utilised. The second tile on the screen is dedicated to the Define Academic Pattern functionality. Here, you can explore and configure the academic patterns associated with the selected template. These patterns represent different arrangements of study weeks and holiday weeks within a semester or term.

Import Summary Screen

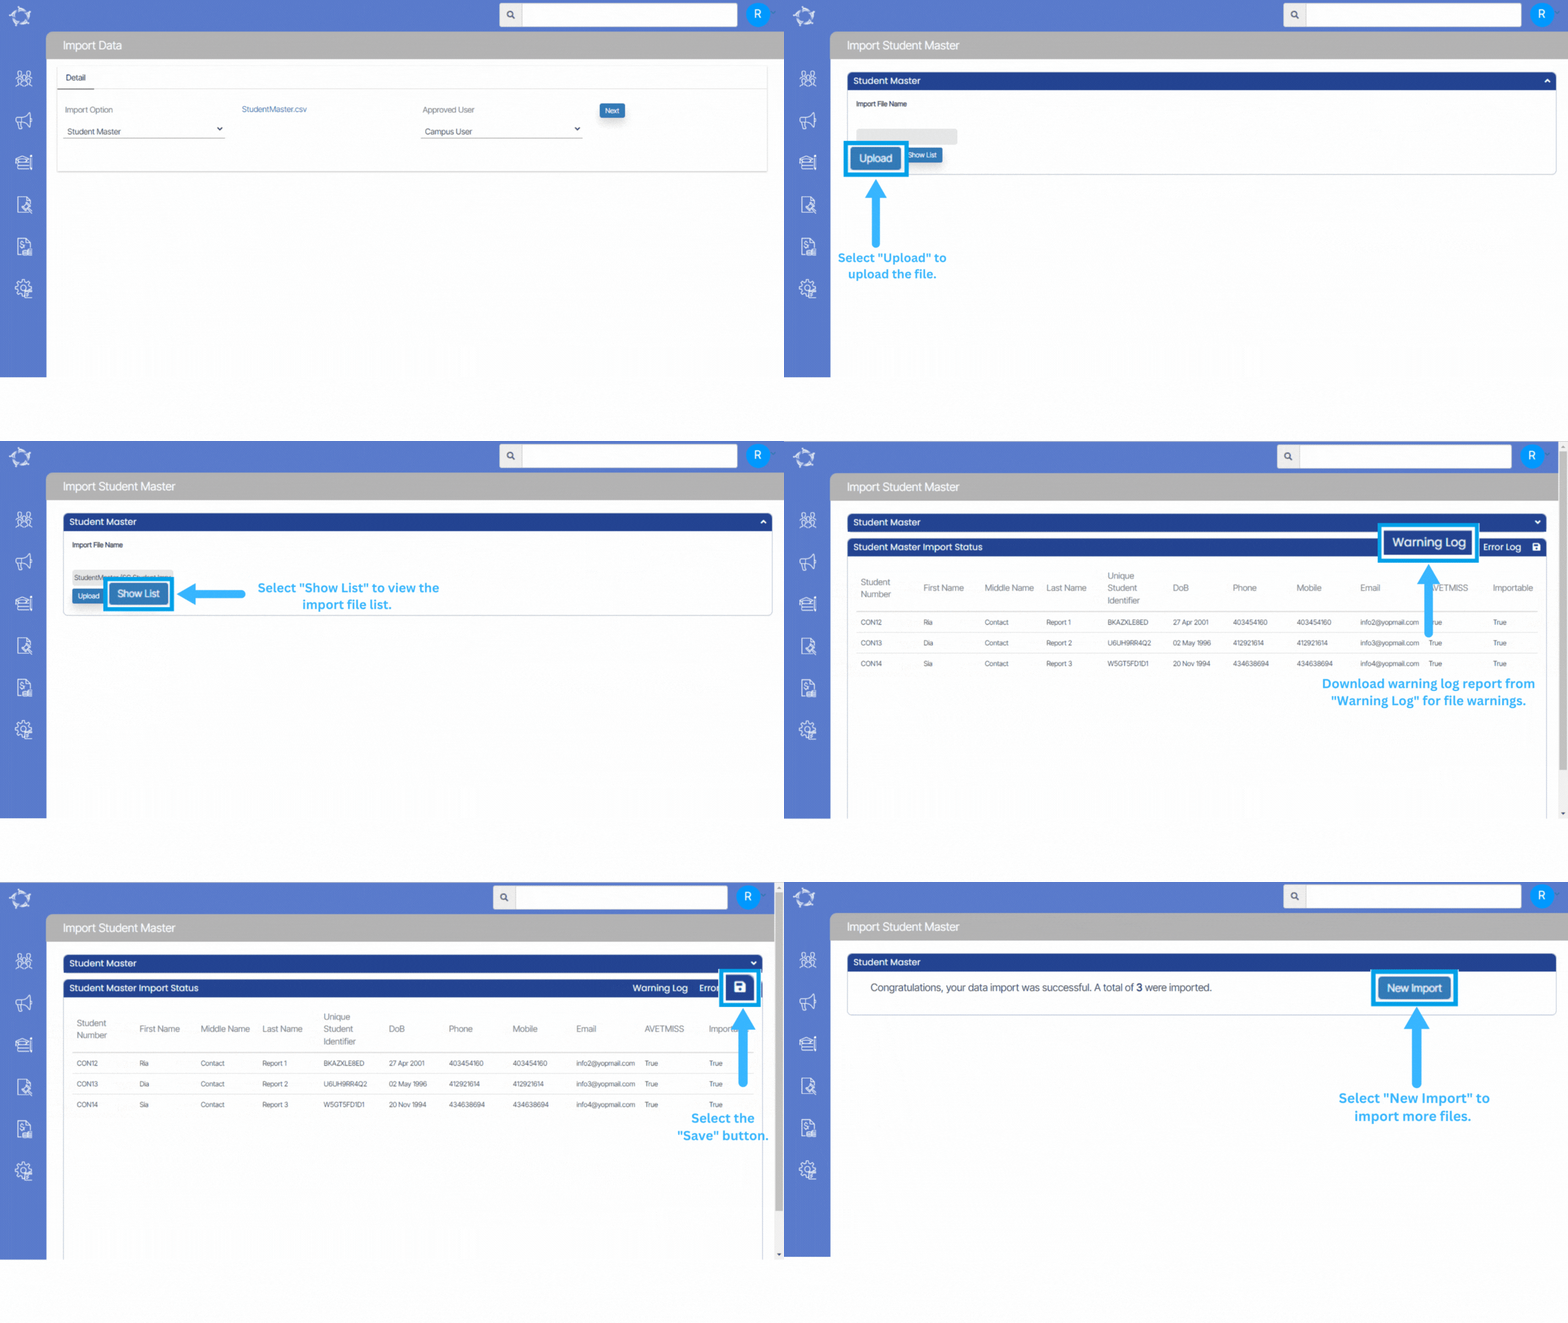
The Import File Step 2 screen provides you with the necessary functionalities to manage your imported files. It offers the following features:

  • Upload- It allows you to select and upload files from your local device or a designated location. This step initiates the data import process.
  • Show List– Selecting the Show List button presents a comprehensive dropdown view of the imported data, enabling you to thoroughly review, analyse, and evaluate the records along with the associated information.
  • Warning Log– The Warning Log highlights any warnings or potential issues that occurred during the import. It allows you to take appropriate action or investigate further if needed.
  • Error Log– Similarly, the Error Log section provides a log or list of any errors encountered during the import process. It helps you identify and address any issues that prevented certain records from being imported successfully.
  • Grid– The Grid represents the tabular representation of the imported data, displaying the various fields and values for each record. You can analyse and manipulate the data within the grid as necessary. Importable Status indicates the import status of each record as true or false.
  • Save– Lastly, the Save button allows you to save the changes or updates made during the import process. This ensures that any modifications or corrections are applied and stored in the system

Once you selected the Save button, you will be directed towards the import success screen which will allow you to import another import file to the system and once you select the New Import button, the system will take you to the Import Summary screen.