Once you select the +User button, it will open the User Entry Screen where you will find various fields to fill out the user’s basic details and other contact-related information.
There are different tabs on this screen, and you can navigate to the next tab by clicking on the particular tab name.
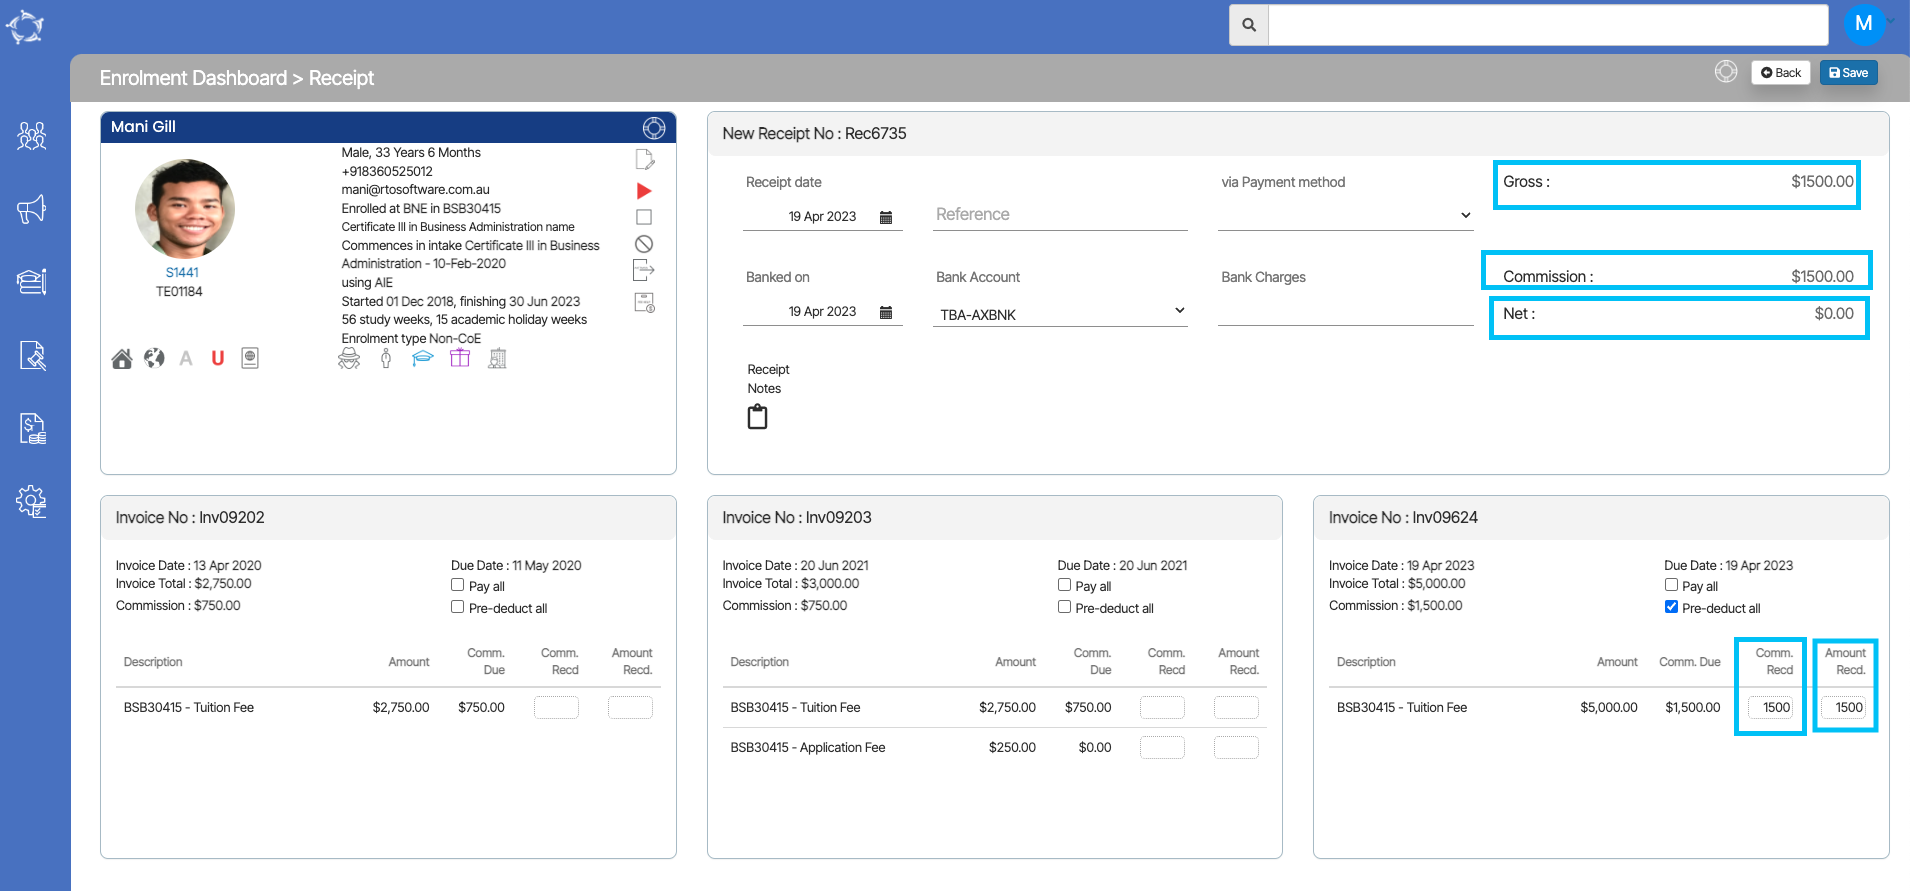
Here’s the scenario that we’re going to answer for you. A student has an invoice worth $5,000 in tuition and the commission on that is $1200. The student gives the agent, the $1200 to pay towards their invoice. But the agent keeps that money that’s full $1200. To pay for their commission amount.
Remember– The student is paying the agent the $1500 to pay to the college. The system knows the gross amount that the student paid $1500 and it knows by the Net amount is $0.00 that the agent kept that money. So it is important for you to d the transaction in TEAMS as shown below.
This is how you would do that. The receipt for the student in teams.
Look for the Invoice and update the commission Received and the Amount Received and the system will tick the pre-deduct tick box for that commission. In the above tile for the receipt, the system will show the gross amount as $1500, the Commission amount as $1500 and the Net amount as $0.00 that college will receive as you can see below in the screenshot.
If the system has not calculated a GST amount for the agent invoice, it is most likely because the Charge GST option was not set for an Agent. There could also be the scenario where the agent did have a charge GST set and the system did calculate the GST in many of their commission invoices, however, a user has gone and edited the agent and unselected this setting. When you do this, any new commission invoices the system generates, will not have the GST calculated.
IMPORTANT – it is important to understand that at the time you do a transaction in TEAMS, the system uses the settings for that transaction as they are. If you then change the settings afterwards, the system will NOT retrospectively go backwards and update data. For example, you have an Agent that was not set with Apply GST and you raise the invoices for an agent. You then realise this mistake and go and update the Agent with Charge GST turned on. The system will not go backwards and update all the agent invoices with the fee in it where the GST wasn’t calculated, it will only use the new setting for the new invoices you raise.
If you have this scenario where you want to fix agent commission invoices to show the GST and currently isn’t then there are two sections to fix this problem.
Those sections are as follows:
Section 1 – Edit the Agent settings
Go to Main Dashboard > Marketing Menu > Agent Dashboard Icon
When you are on the Agent Dashboard screen, Select the edit icon from the agent profile tile.
The system will take you to the Agent Entry Screen.
Select the Charge GST tick box and save the screen.
Section 2 – Edit the Agent Commission Invoice/s
When all the steps are done, go back to the Enrolment Dashboard for the student.
Note – If you haven’t made any payment to the Agent, you have the option to delete the Agent from the enrolment and then relink them. By relinking the Agent, you will establish a new connection that allows you to access and view the GST amount for the Agent’s invoices. This means that once you have successfully relinked the Agent, you will be able to see the specific amount of GST associated with their invoices.
In the Finacial Tile, go to the Agent tab and delete the agent from the delete icon. The system will show you a pop on top of the screen (Are you sure, you want to delete Agent), select Ok to continue and or cancel to leave it as it is.
Once you have deleted the agent, go back to the student tab in the financial tile and select the Agent Icon.
The system will show you a pop on the screen to relink the agent. Select the appropriate agent and update.
The system will refresh the screen for you and then you can see the GST amount for the Agent Invoices.
An audit log is an essential feature of our software that requires the maintenance of a detailed record of all new entries or changes made. This screen provides a way to track all activities that you perform on a screen, including modifications, additions, and deletions. Audit logs can be critical for a wide range of purposes, such as security, compliance, and troubleshooting.
Where can I see the Audit Log?
The Audit log screen is available on all entry screens of TEAMS where you can enter or modify data. This log can be accessed by selecting the icon located on the top right side of each screen. Once selected, you are directed to the Audit log screen where you can view all the new entries or changes made by yourself. This screen is helpful for tracking all user activity within a system, including additions, modifications, and deletions. You can easily see which user made specific changes, the date the changes were made, and the exact time the changes occurred.
Filters on the screen
There are three filters on the screen.
The Audit log screen provides filters that allow you to search for specific data based on various criteria such as start and end dates and descriptions. The screen is helpful in situations where you need to quickly locate a particular entry or modification made within the system. To use the filters, you simply need to select the desired search criteria and select the Apply button. The system will then display only the data that meet the specified search criteria.
Creating a timetable from scratch can be a time-consuming and a tedious task, especially if the same pattern of classes and schedule repeats after a certain period of time. However, there is a more efficient way to create a new timetable with the same pattern, and that is by using the copy timetable functionality.
This feature allows you to duplicate an existing timetable and make necessary changes as required. By doing so, you can save time and effort in creating a new timetable from scratch while ensuring that the schedule and class pattern remains consistent with the previous timetable.
How to create a copy of the Timetable?
From the Timetable Welcome screen, you can see a copy timetable icon under the Actions column for each timetable entry in the grid. Select this icon to create a copy of the existing timetable.
Please select the below steps to make changes to the copied timetable.
Main Dashboard > System Admin Menu > SMS Template Screen > + SMS Template Button
An SMS template entry screen allows users to create or edit templates for sending SMS (Short Message Service) messages. It typically provides a text Message input field where you can compose the content of the message template. The screen also enables you to save commonly used or frequently sent messages as templates for quick and easy access.
This screen is accessible from the SMS Template Welcome screen and once you select the +SMS Template button, it will take you to the Email Template entry screen.
Below is the Explanation of the fields on the Email template screen
Fields
Explanation
SMS Title
This is a mandatory field and this field will be visible in the sent SMS
Template Type
This field will allow you to decide as to where you want to apply this template i.e students, enrolments, agents etc.
Available Fields
Depending upon the Template Type parameter, this field will show you merge fields accordingly. If you select student as the template type then it will show you the student’s merge fields only.
Marketing SMS
Select this Option to mark this SMS template as a Marketing SMS template
Default Sender
You can select the default sender of this SMS template here
If the system has not calculated a GST amount for a fee, it is most likely because the Charge GST option was not set for the fee at the time it was raised in the invoice.
IMPORTANT: it is important to understand that at the time you do a transaction in TEAMS, the system uses the settings for that transaction as they are. If you then change the settings afterwards, the system will NOT retrospectively go backwards and update data. For example, you have a material fee that was not set with Apply GST and you raise that fee in invoices for students. You then realise this mistake and go and update the fee with Apply GST turned on. The system will not go backwards and update all the invoices with the fee in it where the GST wasn’t calculated, it will only use the new setting for the next invoice you raise with the fee in it.
Follow the steps below to update a fee with the Apply GST turned on
Go to Main Dashboard > Finance menu > Fee icon
Search the fee with the Fee code on the Fees Welcome Screen and then select the Apply button.
After your search, edit the fee from the edit icon under the actions column.
On the Fee Entry screen, select the Apply GST tick box and save.
When all the above steps are done, the GST will starts appearing for the fee.
Recently, we have made some changes to the Refund report. Two new elements have been added to it, namely the Refund Number merge field and the Quantity Column.
The Refund Number merge field is designed to display the specific refund number associated with a particular student’s refund. On the other hand, the Quantity Column is used for the rate-based fee which will show you the quantity of refunded rate based fees.
Main Dashboard > System Admin menu > Classrooms > +Classroom Button
To create a new classroom, you need to select the +Classroom button. This will take you to the Classroom Entry Screen, where you will be required to select the appropriate classroom code and name, along with other relevant details that need to be filled in. It is essential to ensure that you enter the correct classroom code and name to avoid any confusion later on.
Below is the table that will explain the fields on the classroom entry screen:
Fields
Explanations
Classroom Code
This is a mandatory field and cannot be left blank
Classroom Name
This is a mandatory field and cannot be left blank
Classroom links to all campuses
If you have multiple campuses then you can select this tick box to link classes to all the campuses