APD – Financial Tile

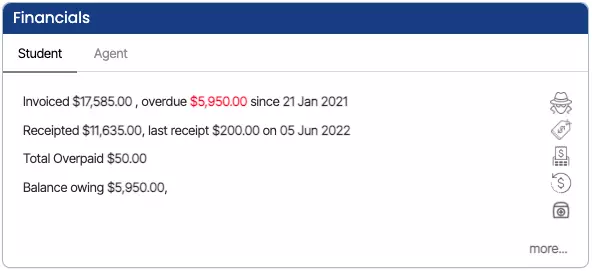
This tile will show you all the application’s financial details under the Student and Agent tabs. You can edit the invoice from the edit icon and you can also print the invoices.

IMPORTANT – You are only allowed to make the changes from this tile if the application is not converted otherwise you can make changes from the Enrolment Dashboard.

Student Tab

On the Student tab, only student-related financials will be visible and you will be able to see the Invoice date, description of the invoice, Total amount and Balance amount also there will be an action column that includes edit, online payment, and print the invoice.

ColumnsExplanations
Invoice DateThis column will show you the invoice dates.
Description This column will show you the number of instalments for the application. You can also select more… to view the invoice details.
TotalThis column displays the total amount of a particular invoice.
BalanceIt will show you the balance amount if any deposit due is updated while creating the application after subtracting the deposit due.
ActionsUnder the action column, there are 2 actions listed for each invoice the Edit icon and the print icon.

Agent tab

The agent tab will show you the invoice amount related to the agent.

On the agent tab, the system will show you the agent invoice date, description, invoice amount and balance amount.

Edit

This icon will allow you to edit the invoice

Print

This icon will allow you to print application invoice

This icon will allow you to create a new invoice for the application

Invoice Recreation

This icon will allow you to recreate the invoice for the application

Conditions – Applicant and Student

Applicant/Student conditions are the prerequisite conditions where a student has to full fill the requirements before continuing their study. The conditions can be applied at the applicant level from the Applicant Dashboard > Applicant Profile Tile and student level from the Student Dashboard > Student Profile Tile

For example – An IELTS score of 6.0 or equivalent is required for entry into this program. The document(s) must be provided within the X number of days from the date of the offer letter to make this offer valid.

Note: Student condition is a user code and if you want to add student conditions to the system then you need to go to the user codes screen in TEAMS.

IMPORTANT – Once the application is converted to a student then you won’t be able to add/edit any details at the applicant level. However, you can do the changes from the edit student screen.

How to Add Conditions

  • You can add conditions by selecting the Applicant/Student conditions icon from the Applicant/Student profile tiles as shown below:
  • Once you selected the icon, the screen will show a popup window and you can select the conditions from the dropdown and select the +Add button.
  • Upon selecting the +Add button, the condition will show up in the grid on the same window and also you will see a pop message in green on top of the screen (condition is added successfully).

After adding the conditions, the conditions icon will turn in red which will show you a tooltip saying view applicant conditions on the applicant Applicant Profile Tile and view student conditions on the Student Profile Tile.

Added Reference in the Refund

Now we are also displaying the reference in the refund transaction details on the student financial screen.

Note – You will be able to see the reference value entered while creating the refund and also you can print the reference value in the refund report as well.

How to Finish Enrolments in Bulk using Finishers Listing Screen

In TEAMS, It’s important that you finish enrolments when the students have completed their studies.

You do not have to manually open each enrolment and finish it, instead, we have the finishers tile > finishers listing screen that you can use to finish the enrolments in bulk. This post will explain to you how to use the finishers listing screen to finish the enrolments all at once.

How to Start Enrolments in Bulk using Starters Listing Screen

In TEAMS, It’s important that you start enrolments when the students are going to start studying their program. And in TEAMS, you do not have to manually open each enrolment and start it, instead, we have starters tile > starters listing screen that you can use to start the enrolments in bulk. This post will explain to you how to use the starters listing screen to start the enrolments all at once.

  • Once you are on the starters listing screen, select the enrolments which you wish to start in bulk.
  • Go to the Burger menu and select the Start Enrolment option.
  • The system will mark those selected enrolments as started.

Visa/CoE Information – Enrolment Dashboard

Enrolment Dashboard > Enrolment Profile Tile > Visa and/or CoE Information Icon

history of changes

This Screen will allow you to view the Visa/CoE information of the student and enrolment. If you wish to link the enrolment to the student visa information then you need to go to the Student Dashboard > Visa/CoE information screen.

Note: You won’t be able to edit/add Visa/CoE at the enrolment level.

When you select this icon on the Enrolment Dashboard, it will take you to the View Visa/CoE details screen where you can view the Visa and/or CoE information for the enrolment.

How to start an enrolment

Enrolment Dashboard > Enrolment Profile Tile > Start Icon

On the Enrolment Dashboard, Under the Student Profile Tile 2nd vertical icon allows you to start the enrolment. It has three different colors – white, red and green- indicating whether enrolment is yet to start, not yet started or started. You can start the enrolment by clicking on this icon.

  • The white icon indicates the enrolment is yet to start i.e. enrolment start date is in the future.
  • The red icon indicates that the enrolment’s start date was in the past and it is not yet started.
  • The green icon indicates that the enrolment is started.

Enrolment Dashboard

history of changes

This will give you an overview of a student’s study for a particular program that they are currently or have previously studied with you. Like all dashboards, it is comprised of a number of different tiles that will allow you to navigate to different screens and information linked to the enrolment.

Tiles

Here are all the tiles present on the enrolment dashboard. You can learn more about each tile by clicking on the image of the tile.

These tiles are common tiles in all the dashboards.

Progress Dials on Enrolment Dashboard

Each RTO has to monitor their students be it based on attendance or course progress. To make it easy for you to read and understand a student’s progress, we have dials on the Enrolment Dashboard to provide you with information about a student’s progress in a program. These dials are called Progress Dials.

You will see Progress Dials under the below tiles on Enrolment Dashboard:

  • Result and Progress
  • Classes and Attendance

Result and Progress Dial

For the subjects which lie within the current study period week and have results marked, the system will do a calculation and provide you with the progress percentage for the current study period. For instance, there are 5 subjects that have start and end dates within the current study period week, and out of those 5 subjects, 3 subjects have final results marked be it Competent, Not Yet Competent or Credit Transfer. The system will divide the successful results with the total number of subjects for that specific study period i.e. Successful Results/Total Subjects * 100. So if there are three successful results out of 5, the system will show the progress percentage as 60% (3/5*100). This progress dial gives you a tooltip too to see the results for subjects that belong to the current study period. Click on the dial and you will see a tooltip.

Classes and Attendance Progress Dials

If you have marked the attendance for the student, the system will display the attendance percentages in the dials. One dial represents the current attendance percentage and another dial represents the overall attendance percentage. The current dial will calculate the attendance as of today’s date i.e. from the start date of the current study period till today’s date and the Overall dial will calculate the attendance for the whole current study period i.e. from the start date of the current study period till the end date of the current study period.

Important points to note about Progress Dials

  • You will not see any attendance calculation in the dials under the Classes and Attendance tile if the enrolment is not started, even if you have marked attendance for the student. Moreover, If the timetable is not allocated to the enrolment, then also, you will not see any attendance calculation. The dials will show you 0% by default.
  • For the enrolment with a future start date, you will not see these dials at all.
  • You will only see the progress percentage in the Results and Progress dial if the results are marked for the subjects for the current study period.
  • For the progress percentage in the Results and Progress dial, the system will only count Competent as a successful result. Other results such as Credit Transfer, Recognition of Prior Learning granted, and Recognition of Current Competency granted will not be counted as successful results.
  • You will only see the attendance percentages in the Classes and Attendance dials if there is attendance marked for the current study period. Otherwise, the system will display 100% as attendance in both dials.