Receipt

Enrolment dashboard > Financial tile > Receipt Icon

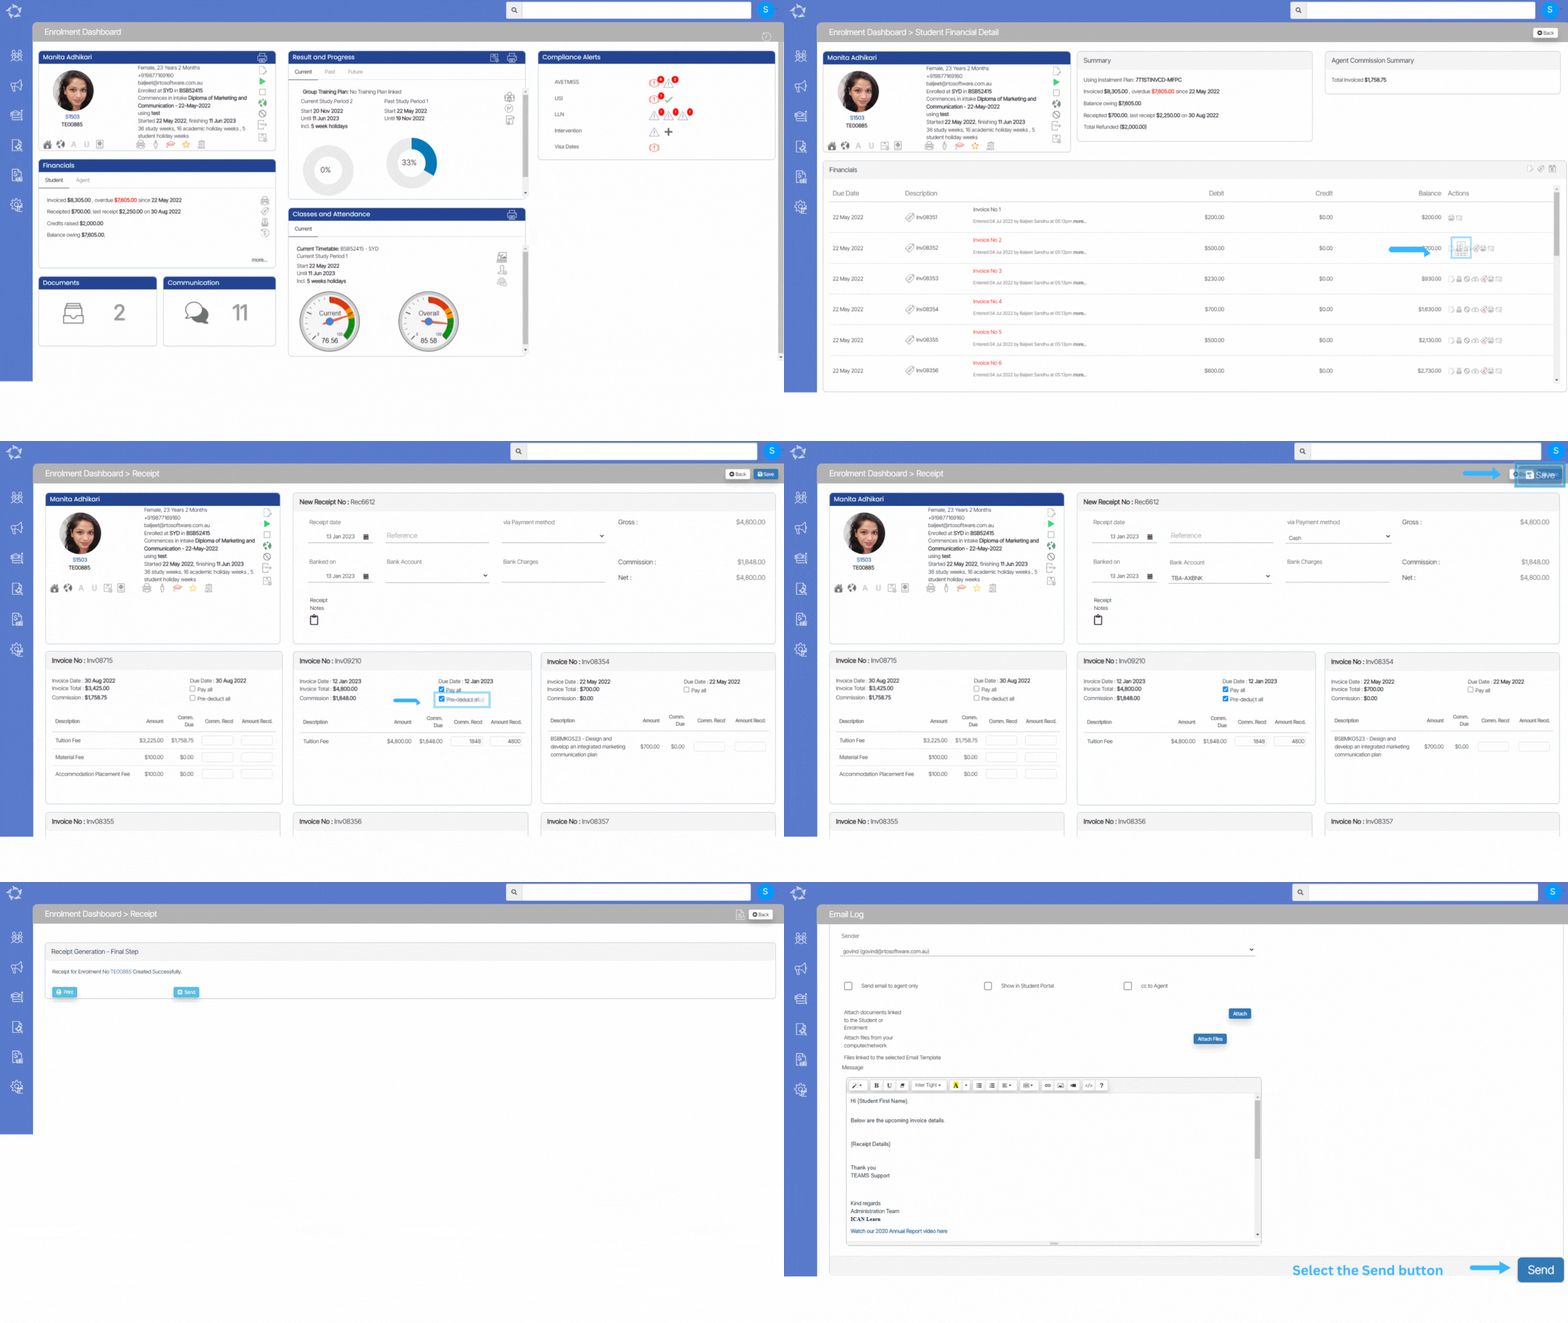
A receipt is a written/printed acknowledgment that shows the total amount of the invoice that has been paid by the student. You can do the receipt in the system from the two screens that I have shown below:

Follow the below steps to enter the receipt:

  • Select the Invoice against which you wanted to create the receipt.
  • Select the Pay all check box if you want to pay all the invoiced amount and the system will automatically update the amount received field.
  • Select the Pre-deduct all check box if you want to pre-deduct all the agent commission amount and the system will automatically update the commission received field.
  • If you want to pay the partial amount then you can manually type the amount in the commission received and the amount received fields.

Tiles
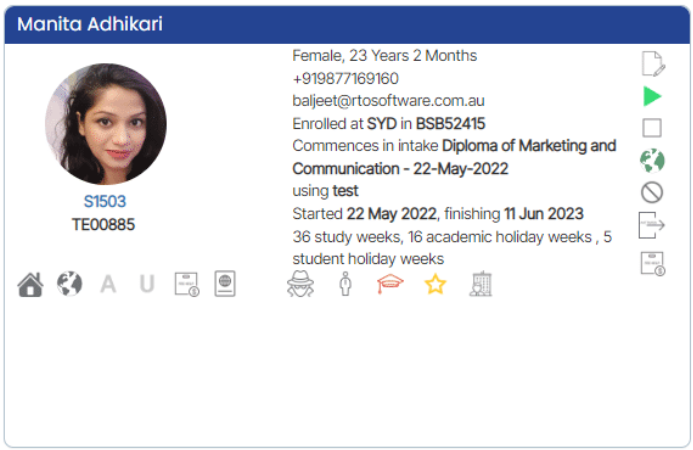
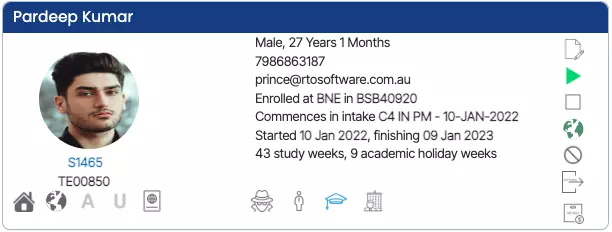
This Tille will show you the basic details of the enrolment and all the icons in this tile are read-only.

This tile will show you the Receipt number along with a preview of the Gross receipted amount, Commission amount, and Net receipted amount. You can add the Receipt date, Reference, Payment method and other Bank related details in this tile.
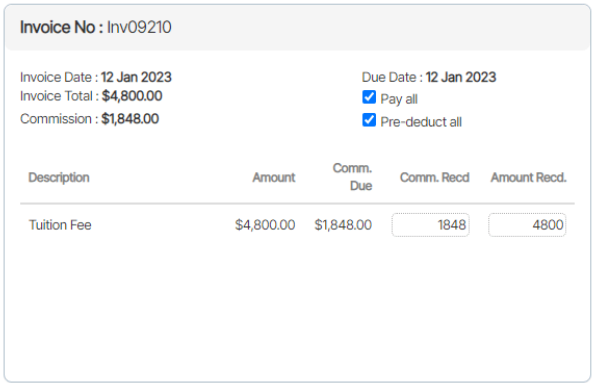
This Tile shows you the invoice details against which the receipt can be created. It depends on the instalment plans of the invoices according to which the number of tiles will be visible on the receipt screen.

After deciding on the receipt amount you need to update the data in the fields that are explained below:

Field NameExplanation
Receipt dateThe receipt date will be the creation date of the receipt. Today’s date will be automatically selected by default.
ReferenceIf you have any reference number against this Receipt then you can update it in this field.
Via Payment methodThe payment method needs to be selected when you create the receipt, you can select the multiple payment methods from the payment method dropdown.
Banked onIf you want to update the date for the bank then you can update the date in this field.
Bank accountIf you want to add the bank name on the receipt then you can select the bank from the dropdown, only the bank which you have added to the system will be visible in the dropdown.
Receipt NotesIf you want to update any notes for the receipt then you can click on the notepad icon to add the notes. After updating the notes again click on the notepad icon to save the notes.
Bank chargesIf the bank is changing any amount on the receipt, you can also update the charged amount in the field.

After entering the details you just need to select the Save button and the system will create the receipt and show you the final step of the screen.

From the final screen, you will be able to see the system is saying that the receipt for enrolment no (TE00885) was created successfully, also there are two buttons on the screen, which I have explained below:

Print Button:

By selecting the Print button you will be able to generate the receipt, Once you select the button, floating window will appear on the screen, you can choose the template from the dropdown and select the generate button to generate the receipt.

Send Button:

By selecting the Send button you will be able to send the created receipt via email to the student. Once you will select the send button the system will take you to the compose email screen. You can choose your email template and select the send button to send the email.

Note: Whatever template you will select the receipt merge field needs to be added to the template, only then the system will print the receipt in the email.
Transition Student Screen – History

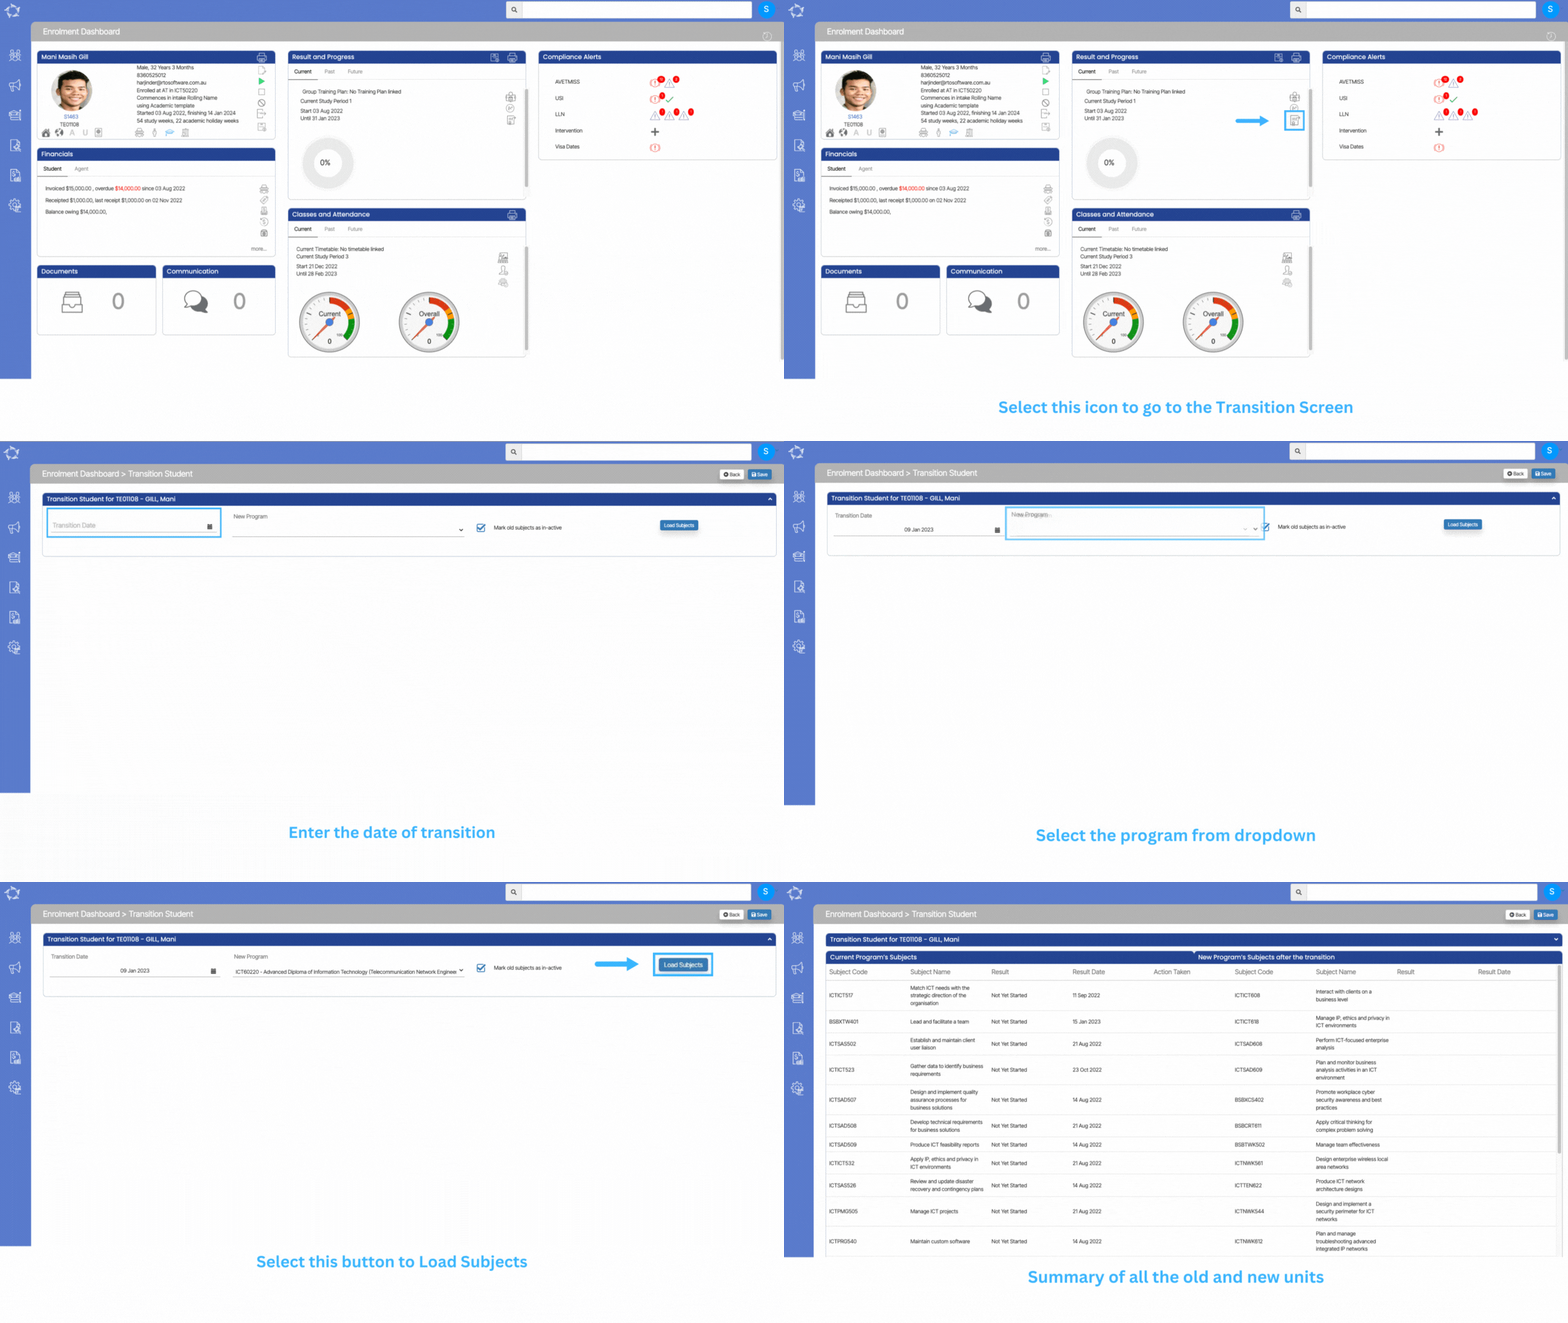
We have made some of the latest changes in the Transition Student Screen. This screen can be found under Enrolment Dashboard > Result and Progress Tile > Transition Enrolment icon.

Below are the steps that you need to follow when you do a Transition.

  • Enter the date of transition. Basically when the transition took place. It can or cannot be the same as the current date.
  • Select the program in which you are going to transit the student’s enrolment.
  • By default, the tick box for Mark old subjects as in-active will be selected. It’s vital that you do not untick this tick box so that the system can link the correct subjects with the enrolment according to the new program code in which you are going to move the student’s enrolment.
  • Select the button for Load Subjects.
  • Upon selecting the button, the system will refresh the screen and give you a summary of all the old and new units.

IMPORTANT – If the transition date for a student is 01 July 2022 and today is 11 July 2022, then update 01 July 2022 as the transition date.

Student Financial Details

Enrolment Dashboard > Financial Tile > More…

history of changes

When you are on the Enrolment Dashboard > Financials Tile, you will see the word more… in the right bottom corner of the tile and when you select it, the system will open the Enrolment Dashboard > Student Financials Detail screen, where you will be able to see all the financial details (Invoices, Receipts, Refunds, Transfers, etc) for the enrolment.

Tiles

This tile will show you the basic details of the enrolment and all the icons in this tile are read-only.

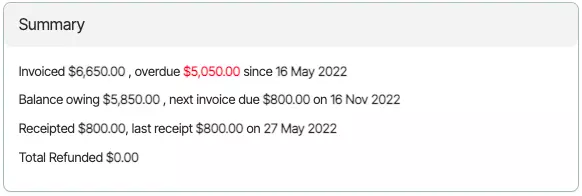
This tile will show you the enrolment financials summary as the total invoiced amount, overdue amount/since, balance owing, next invoice due, total receipted amount, last receipt amount/on a date, and total refund.

In the agent commission summary tile, you will see the agent financials as the total invoiced amount, paid commission amount, and last paid commission amount/on a date.

Icons under the actions column have been explained below:

IconsExplanation
This icon will allow you to edit the invoice details in the invoice section and receipt details in the receipt section.
Using the receipt icon, you will be able to create a new receipt against any invoice.
Using this cancel icon you will be able to cancel any invoice and receipt.
This is a negative invoice icon, using this icon you will be able to raise a negative invoice(credit note) against the invoices.
By using this icon you will be able to print the invoice or receipt.
By using this icon you will be able to send the invoice or receipt to the student via email.

Enrolment Financials Tile

Enrolment Dashboard > Financial Tile

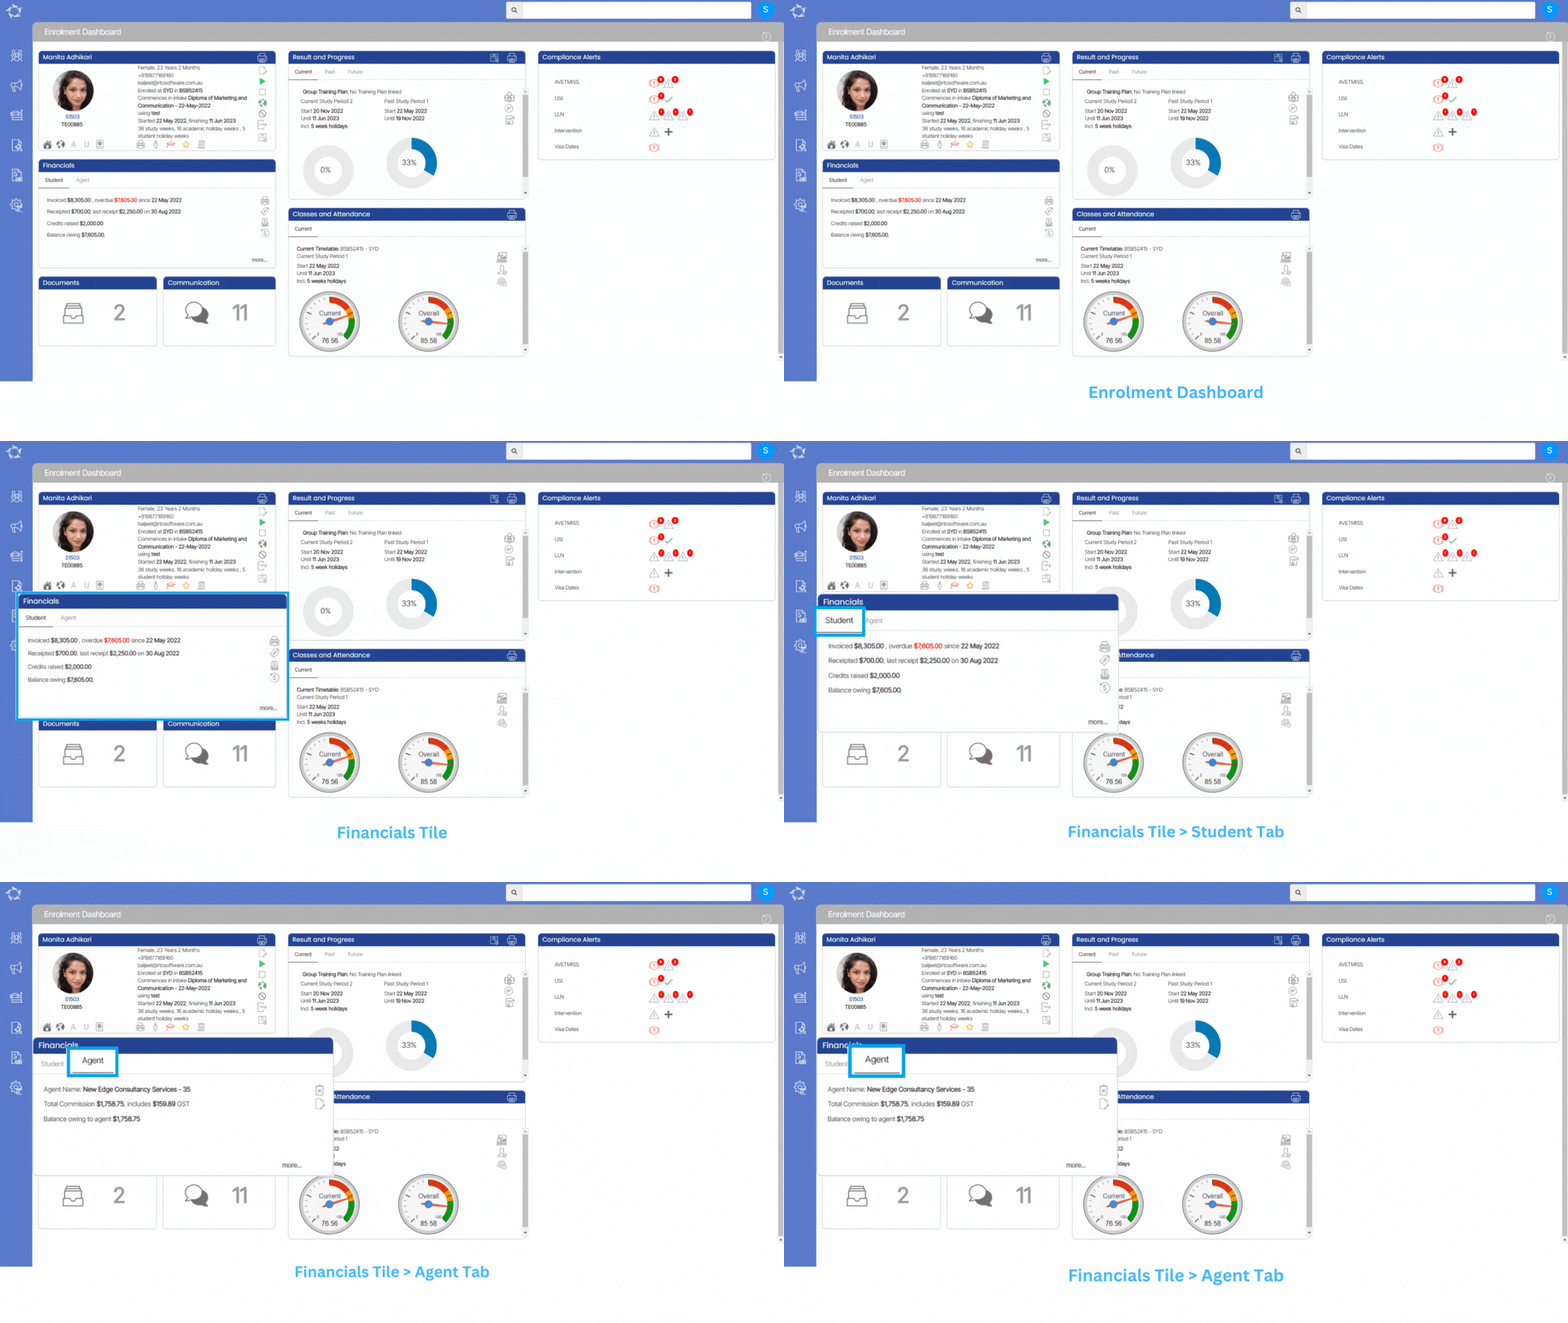
This tile will give you a summary of all the financial transactions of the student and Agent.

Tabs

Student

All the financials related to the student enrolment will be visible under the Student tab. You will be able to see the total invoiced amount, overdue amount, total receipted amount, total overpaid, and the balance owed.

Agent

Under the agent tab, you will be able to see the agent name that is linked to the enrolment, total commission, last paid, and the total balance owing.

Student Vertical Icons

Agent vertical Icons

Enrolment Dashboard – History

Here are some of the latest changes that we have made to the Enrolment Dashboard.

Date UpdatedWhat Screen / Report
12 Jan 2023Cancel Enrolment – UnAllocate Timetable
17 Nov 2022Visa Information – New column Expiry date
20 Oct 2022Changes – Transition Process
01 Sep 2022Intervention Screen
14 Jul 2022Transition of Enrolment
21 July 2022How to Re-Instate an Enrolment in TL?
02 May 2022Edit Enrolment – New Actual End Date Field

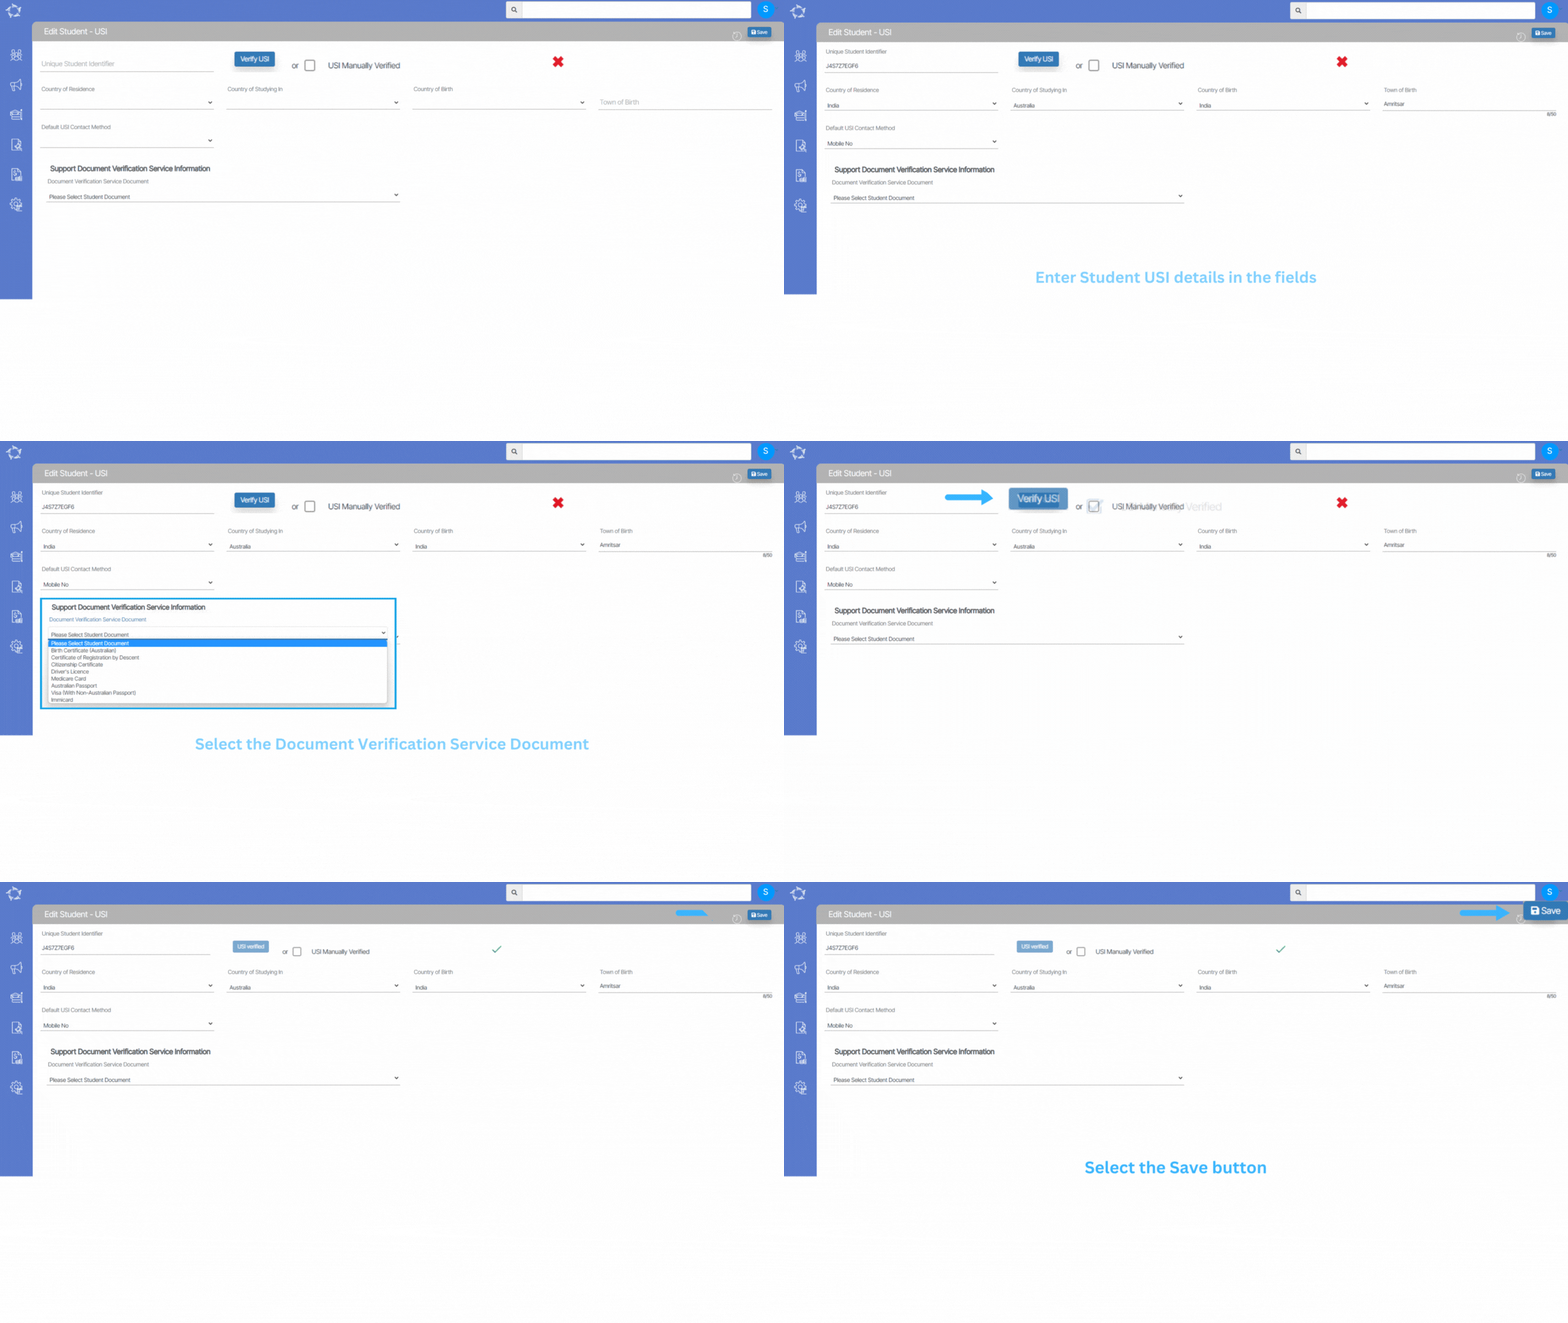
Edit USI

Student Dashboard > Student Profile Tile > USI Icon

A USI is your individual education number for life. It also gives you an online record of your vocational education and training (VET) undertaken in Australia.

This screen will allow you to log the request to create USI and then verify it.

Note – When you select the Create USI button, the request gets sent to https://www.usi.gov.au/ and you can check the status of the USI on the USI Request screen.

If you already have a USI number then update it in the Unique Student Identifier field, also you need to update all the USI-related fields and then hit the save button. Once you select the Save button, the screen will refresh and will show you Verify button and Use Manually Verified tick box.

Note: Verify USI – When you select this button, the request gets sent to the https://www.usi.gov.au/providers/verify-student-usi site and you can check the status of the USI from the USI request screen in the system.

Use Manually Verified – You can select this tick box if you already have verified the USI from the https://www.usi.gov.au/providers/verify-student-usi site.

Select here to know mandatory details to verify USI.

Once it is verified, the Verify USI button will change to USI verified button and the red cross icon will change into a green tick.

English Proficiency – Edit Applicant/Student

English Language Proficiency is the ability of Students to use the English language to make and communicate meaning in spoken and written contexts while completing their program of study.

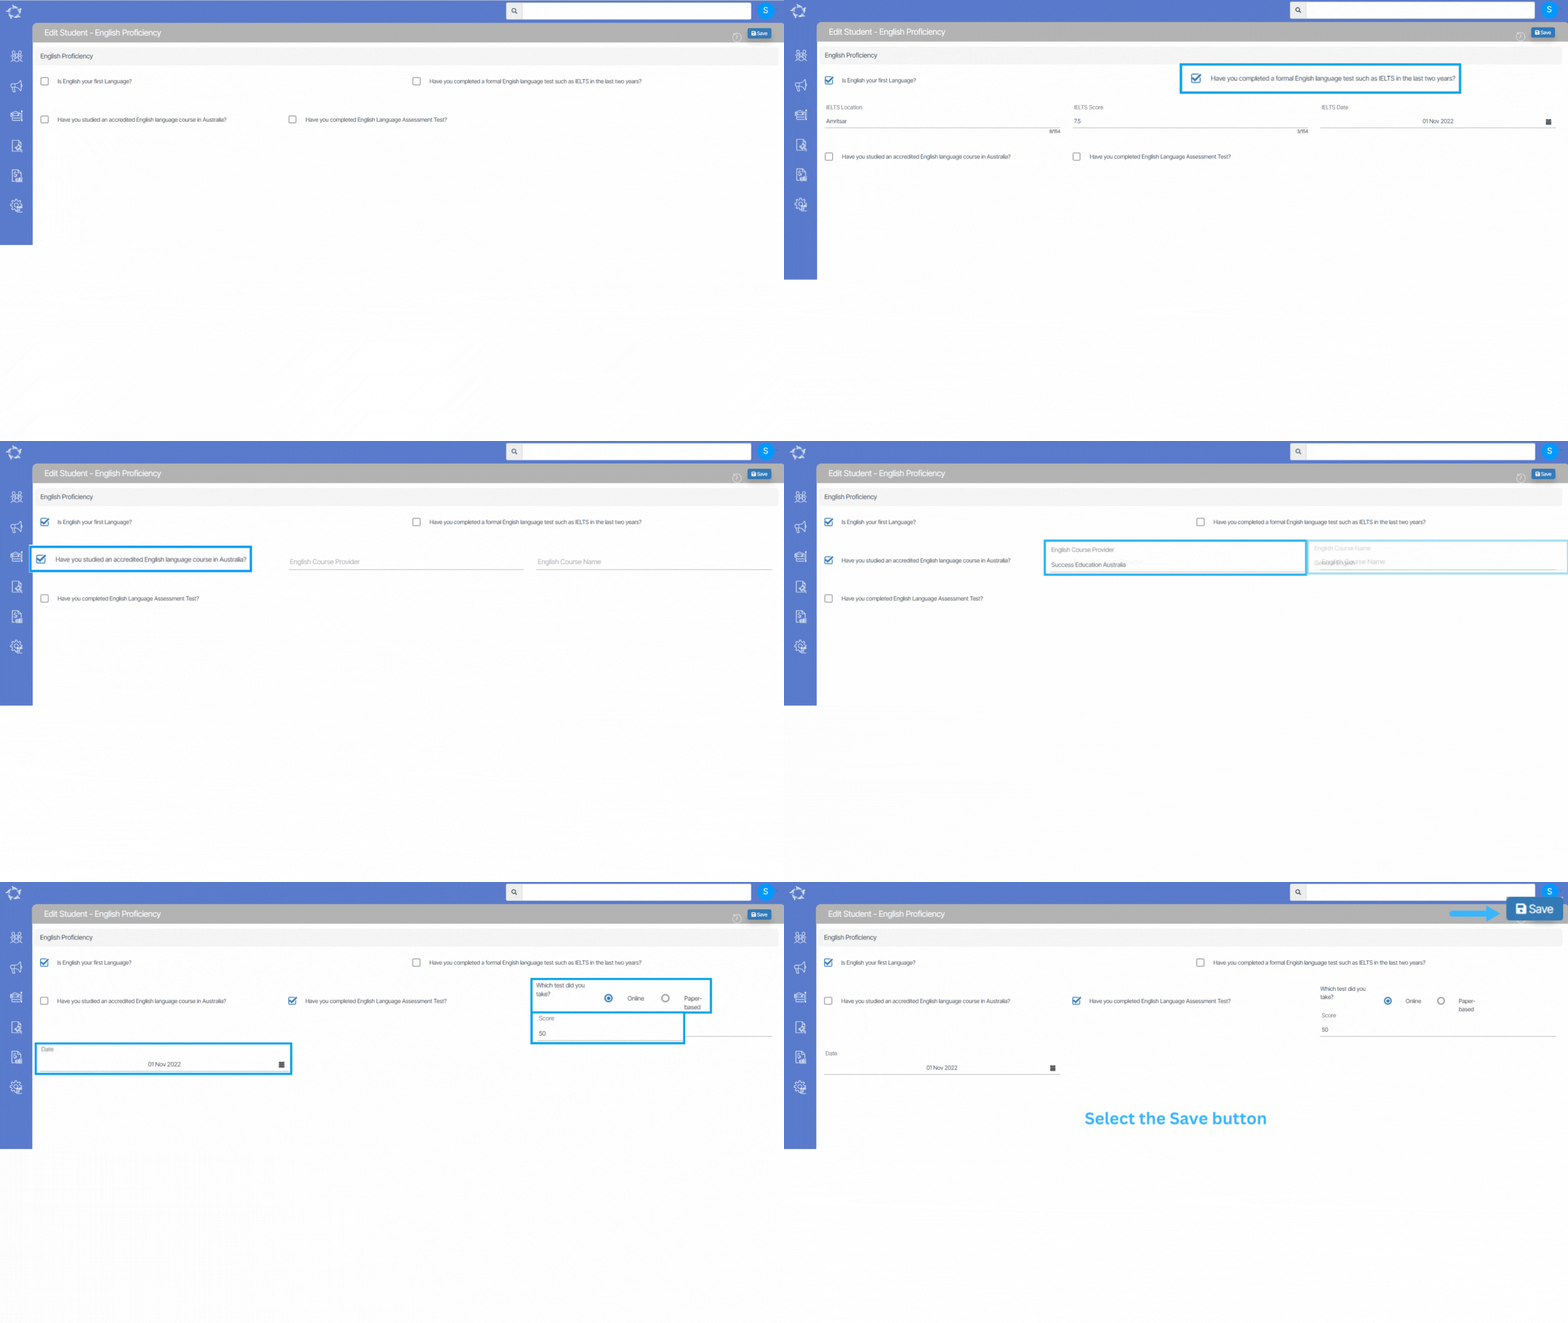
This screen will allow you to update the English Proficiency level of the Applicants/students. You can add English Proficiency from the Applicant Profile Tile and Student Profile Tile.

Note: You cannot edit the English proficiency at the applicant level once it is converted to a student. However, you can edit the English proficiency details at the student level.

FieldsExplanation of Fields
Is English your first LanguageIf the English language is the birth language of the student, then select this tick box
Have you completed a formal English language test such as IELTS in the last two yearsBy selecting this tick box the system will show 3 different fields related to the IELTS. You can enter the location where the IELTS test is conducted, enter the bands of the IELTS and enter the IELTS result date here.
Have you studied an accredited English language course in AustraliaIf the student has studied the English course in Australia, kindly select this tick box and the system will ask for the name of the provider and the course name.
Have you completed English Language Assessment TestIf the student has completed the English Language Assessment Test, then select this tick box and the system will ask for the type of the test. If the test was conducted online, select the online option otherwise select paper based. Also, the system will show two fields that ask for the score of the test and the date of the test conducted.

Edit Enrolment – New Actual End Date Field

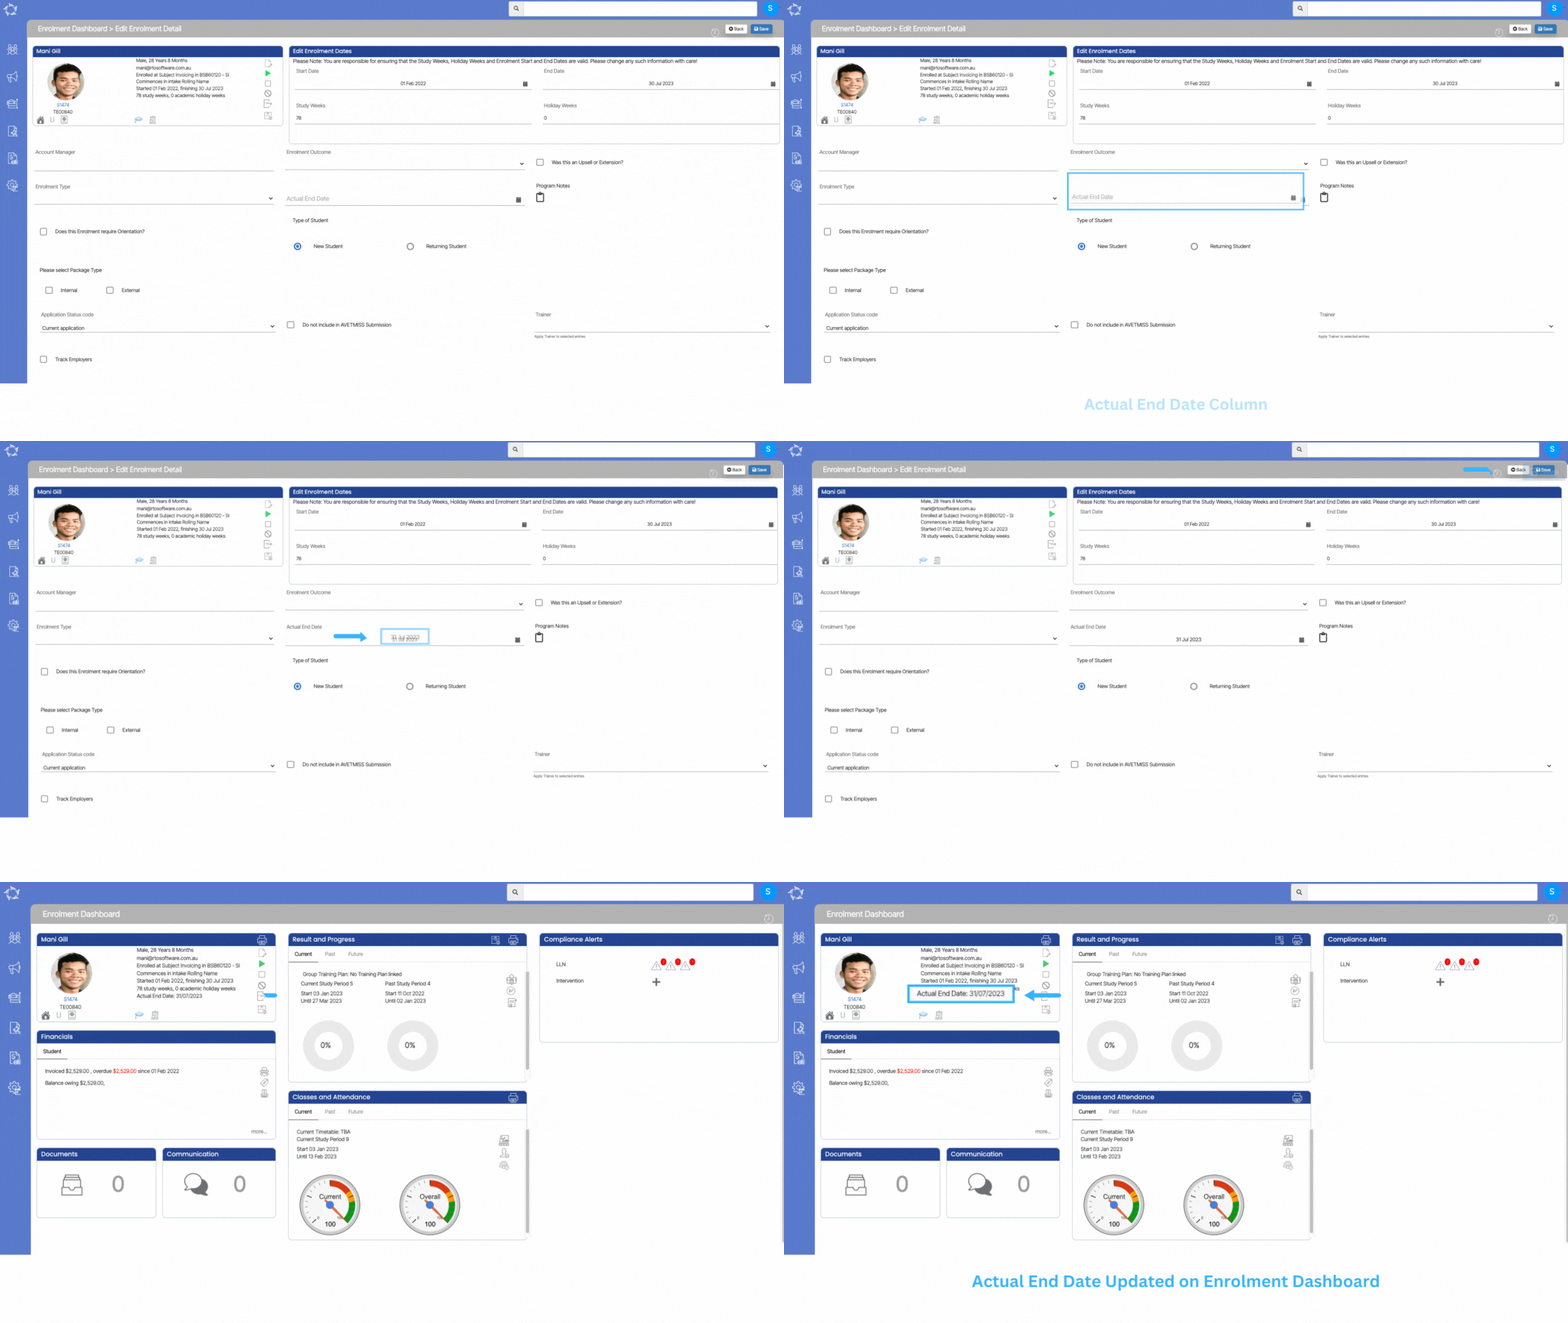
We have added a new field in the system called Actual End Date in the Edit Enrolment screen. The Actual End date is just the data entry field and it is not going to calculate the duration for you for the enrolment. This is just for the purpose to see the date when a student actually finished the study.

So, when you update and save the Actual End date in the edit enrolment screen, it will get populated on the profile section on the Enrolment Dashboard as you can see below:

IMPORTANT: It’s the Enrolment End Date that is being used in the AVETMISS reporting, not the Actual End Date. If you want the system to use the actual end date in AVETMISS reporting, please update the actual end date in the enrolment end date field.

Edit AVETMISS – Applicant

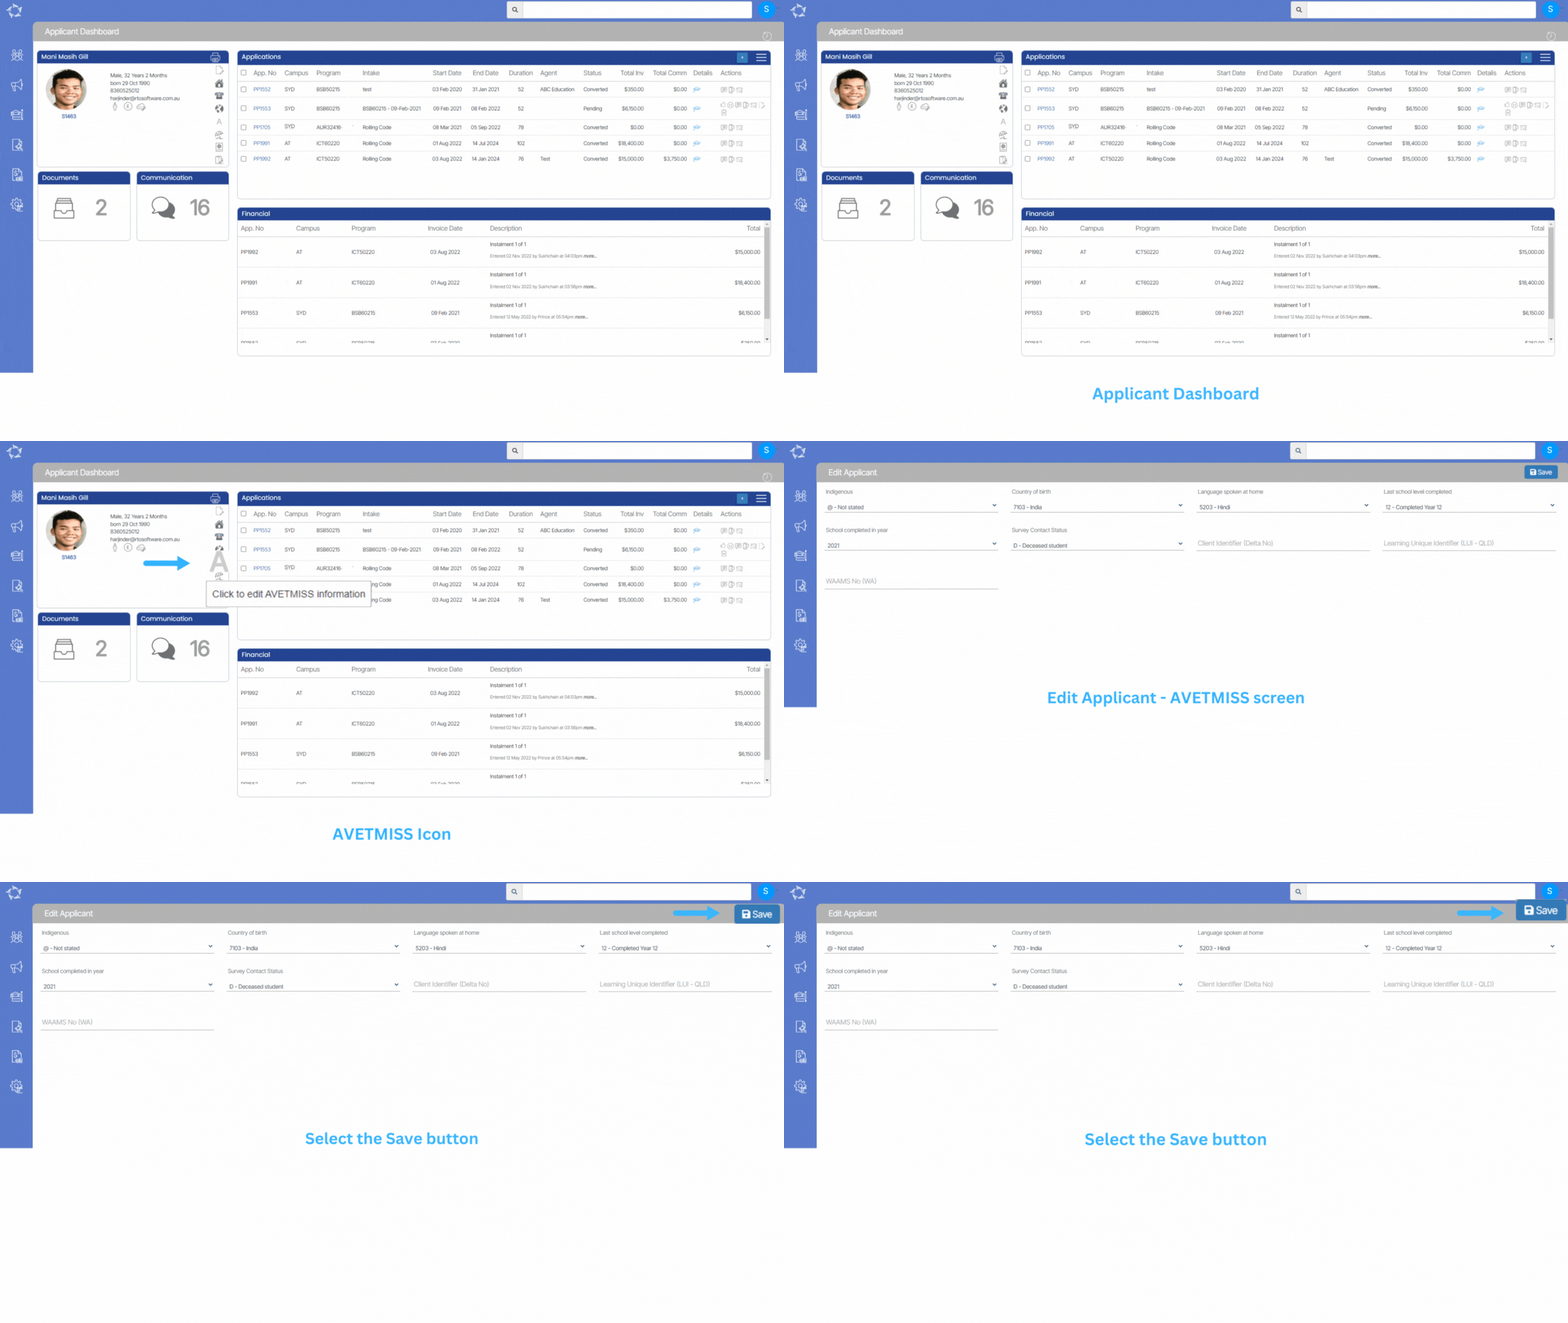
Applicant Dashboard > Applicant Profile Tile > AVETMISS Icon

The first thing to know is that AVETMISS stands for the Australian Vocational Education and Training Management Information Statistical Standard. It is the national data standard that ensures consistent and accurate capture and reporting of Vocational Education and Training (VET) information about students.

The below screen allows you to add/edit the AVETMISS information of a applicant. Some of the fields are very important in the AVETMISS submissions. For example, if you do not select the survey contact status, you will get errors in NCVER submissions. We will recommend you to enter all the AVETMISS fields to avoid compliance issues.

IMPORTANT – Once the application is converted from the applicant to a student then you won’t be able to add/edit any details at the applicant level. However, you can do the changes from the Student Profile Tile.

Note – On this screen, you will see dropdowns for the fields and these dropdowns are user codes in TEAMS. Please select here o know more about User Code.

Explanation of the Fields

ColumnExplanation
IndigenousIt is a UserCode dropdown field where you can select the indigenous status of the applicant.
Country of BirthSelect the country of an applicant.
Language spoken at homeSelect the language that the applicant speaks at home.
Last school level completedYou need to select the last school level completed year.
School completed in yearSelect the completed year of the school.
Survey Contact StatusIt is a UserCode dropdown field used to update the survey contact status of the applicant.
Client Identifier (Delta No)In this field, you can enter the Delta number of an applicant.
Learning Unique Identifier (LUI – QLD)It is a 10 digit learner unique identifier number used to log in learning account.
WAAMS No (WA)In this field, you can enter the WAAMS number of the applicant