This is the tag we use to approve any post (old and being edited etc) through revisions. Once the majority of all existing/old posts have gone through our edit process and have this tag, we will then bulk remove it from them.
We have added new tick boxes Requires Homestay and Requires Airport Pickup/Drop off on the Continuing listing screen > Advanced search section as below.
Once you select these tick boxes and selected the Apply button it will show you those students/enrolments who have the tick box’s for Requires Homestay and/or Requires Airport Pickup/Dropoff selected. From there you can download the list by selecting the CSV icon as shown below:
Main Dashboard > System Admin menu >Report Template
The Report Template screen in TEAMS offers users a valuable tool for generating various types of reports with ease. It serves as a comprehensive guide that enables the customisation of report formats, including essential documents such as offer letters, academic documents, invoices, receipts, and letters of warning. By providing a structured framework, the Report Template screen ensures that information is organised logically and presented in a clear and consistent manner across different reports.
This feature streamlines the report creation process, saving time and effort while maintaining professional standards. Whether it’s crafting official communication or documenting financial transactions, TEAMS’ Report Template screen empowers you to generate high-quality reports efficiently.
Select the below links, which will help you to understand the process of Report Template in TEAMS
Dashboard > Marketing > New Application > New applicant icon
In the system you will see dropdowns for fields and filters for reports, such as the one below:
Most of the dropdowns and what you see in the list will be automatically generated by the system. however, there are some that you can customise what you see in the list. For example, using the screenshot above below outlines the different types of dropdowns:
Gender – the options in the dropdown are standardised (hard coded) and you can’t add to them.
Marketing Source – the options in this dropdown you can customise using the User Codes screen.
Account Manager – when you setup Account Managers in the system then that is the list that will show in this dropdown.
If you want something added to a dropdown that you cannot customise in the User Codes screen, you are welcome to send an email to support@rtosoftware.com.au and we will see if it is possible to add the option for you. It will all depend on what dropdown it is and if it is a standardised option that the majority of our clients would/could use or unique to your college.
If you have any queries, please do not hesitate to contact us on 1300 85 05 85 or email us via support@rtosoftware.com.au
Many of the dropdown menus you see contain a selection of User Codes in the system. These User Codes are only visible within the dropdown if you have personally generated them. By creating user codes for specific objects or groups, you can find the available options in the dropdown to meet your specific needs.
The user Code Welcome screen offers a comprehensive overview of user codes in the system. It allows you to efficiently manage and track user codes, add new ones, search for specific codes using the code Type dropdown, and perform necessary actions like editing or deleting codes directly from the grid.
For example, below are some user codes that outline the type of dropdowns in TEAMS
Gender – the options in the dropdown are standardised (hard coded) and you can’t add to them.
Marketing Source – the options in this dropdown you can customise using this screen.
Account Manager – when you set up Account Managers in the system then that is the list that will show in this dropdown.
In the system, there are contact information merge fields for each object such as Applicant/Student, Agent, Employer and Schools. There is also contact information at the user and campus etc.
For each of these objects, there will be one or many types of contact information merge fields such as Phone number, Mobile number, Fax number, and Email Address for local and international contact information.
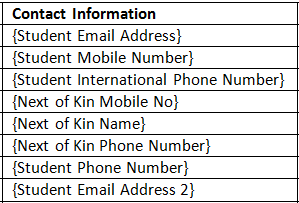
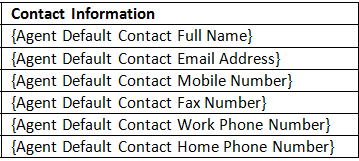
Each of the fields for contact information then becomes a merge field in our MS Word report templates. For example, the merge fields of each object’s contact information fields are as follows:
Applicant/Student Contact merge fields
Agent Contact Merge fields
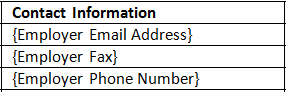
Employer contact merge fields
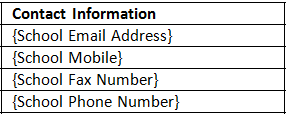
School Contact information merge fields
IMPORTANT – Always insert the merge field with the {} brackets, do NOT change them to any other style of bracket such as (), the system looks for the {} ones and will not work if you use any other style of brackets.
This is how the contact information merge fields will print the data in your customise templates
If you have any queries, please do not hesitate to contact us on 1300 85 05 85 or email us via support@rtosoftware.com.au
1. For employer role ” Legal“, you can not add multiple entries with overlapping dates. 2. If an employer with the role “GTO” is added then you can not add another employer with the role of GTO or legal. 3. If employer role ” GTO ” is selected then the system will check if its start date is greater than the last legal employer end date, only then it will allow adding the GTO employer to the grid
The Bank Account screen allows you to manage your linked bank accounts effortlessly. From this screen, you can view your existing bank accounts, add new ones, or make changes to the existing ones.
If you wish to add another bank to the campus then you can select the +Add button.
Once you select the +Add button, a floating window will open on the screen. Fill in the required information in the provided fields, Enter your account holder name, followed by the account number and the associated bank’s name. Ensure the accuracy of the details entered to avoid any transactional issues. Double-check the information before proceeding to the next step. Once all the necessary fields have been completed, click the “save” button to finalize the process.
You can also edit or remove existing bank accounts by clicking on the respective icons next to each account.
Below is the explanation of the fields
Fields
Explanation
Bank Name
Add Bank Name here.
BSB No/Swift Code
Add your bank BSB No/Swift Code.
Account Number
Add account number in this field.
Account Name
Add the Bank account holder’s name here.
Address
You can add your bank address in this field.
Active
Tick this box if you want to active this Bank Account.
 it will show you those students/enrolments who have the tick box’s for Requires Homestay and/or Requires Airport Pickup/Dropoff selected. From there you can download the list by selecting the CSV icon as shown below: